
How to generate a new page template in Shopify
Drive 20-40% of your revenue with Avada
Collections, also known as categories, are the feature to keep your products organized and help customers to find it easier. To make the collectections, you can group your products based on it name or characteristics to meet the demands of buyers. This feature is one of the most vital factors for all the online shopping store on Shopify platform. You can customize the way your store shows collections in many ways, such as create a new template or make a menu to control your collections. A page template gives you the ability to diverge from your website existing structure in addition to adding new features.
In this article, you will know how to generate a new page template in Shopify to optimize your business page.
How to generate a new page template in Shopify
Use of page template
Firstly, page templates are used to diversify the look and feel of a page. One page template can be used to variety of page, it can be applied to a single page, a page section, or a class of pages. Generally, page templates have a high level to target the right individual page or group of pages and make it more specific. You can also show the customers the dynamic content of your page through page template, such as collections, post, event updates, media or contact. You can decide the appearance of your page as you want and make it differs from your rival. With a page template, you are able to show a feature image that can links to another part on your page. All of these convenience and useful functions can be done by a new page template.
How to generate new page template
In order to assign to pages on which you will show collections, you will need to generate a new page template. Following are the steps for you to create a new page template
Step 1:
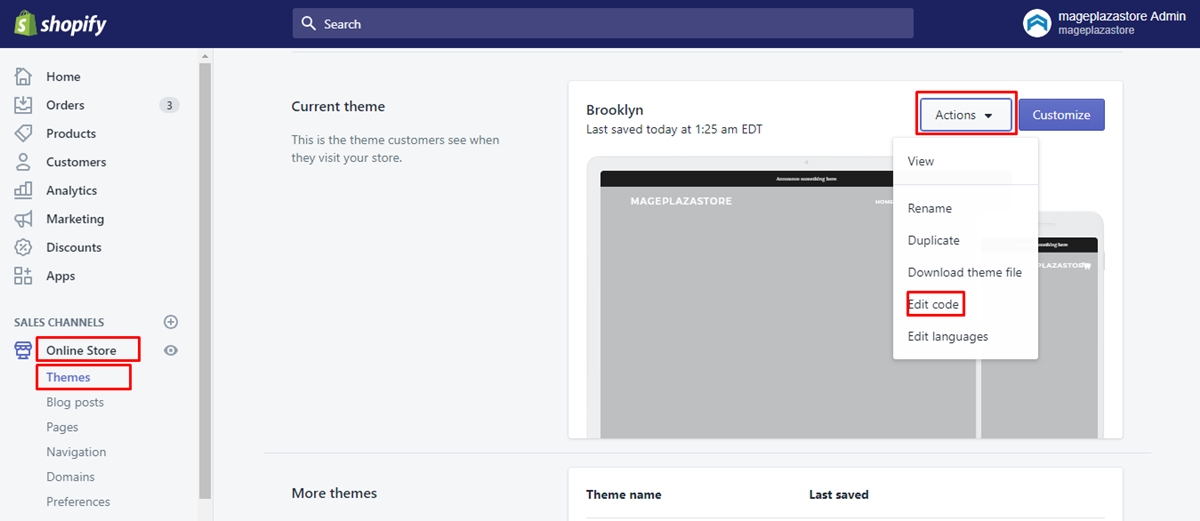
Go to your Shopify admin then click Online Store > Themes.
Step 2:
Click Actions > Edit code at the theme that you want to edit.
Step 3:
Choose Add a new template at the Template directory on the left side of the page.
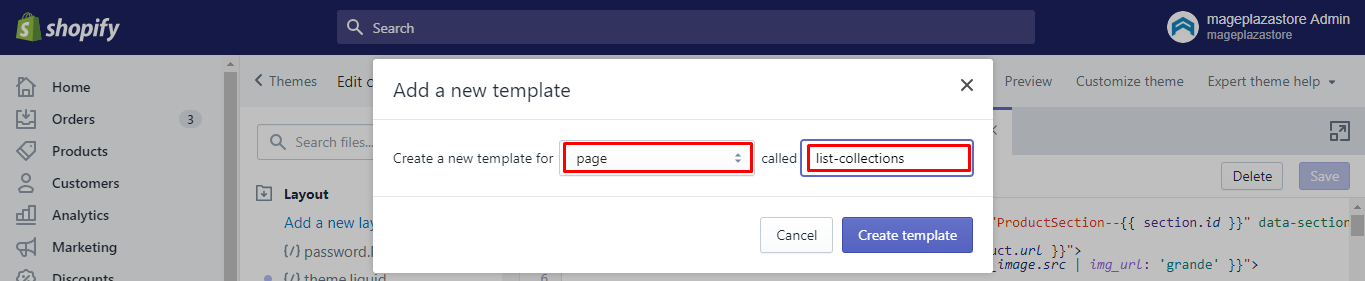
Step 4:
A box Add a new template shows up, Choose page at the Create a new template for section then name it list-collections on the other section.
Step 5:
After create template, your new page.list-collections file will show up, then all you need to do is copy and paste the following code at the end of your file:
{% comment %}
  Collections are listed here.
{% endcomment %}
{% capture uses_minimal_framework %}{% include 'product-loop' %}{% endcapture %}
{% if uses_minimal_framework contains 'Liquid error' %}
  {% assign uses_minimal_framework = false %}
  {% assign grid_item_width = 'large--one-quarter large-up--one-quarter medium--one-third medium-up--one-third small--one-half large--col-3 medium--col-4 small--col-6' %}
{% else %}
  {% assign uses_minimal_framework = true %}
  {% assign grid_item_width = 'span3' %}
{% endif %}
{% assign image_size = 'large' %}
{% if linklists[page.handle].links.size > 0 %}
  {% assign number_of_links = 0 %}
  <div class="grid-uniform{% if uses_minimal_framework %} row{% endif %} clearfix">
  {% for link in linklists[page.handle].links %}
  {% if link.type == 'collection_link' %}
{% comment %}
If we have a collection link.
{% endcomment %}
{% assign collection = link.object %}
        {% assign number_of_links = number_of_links | plus: 1 %}
<div class="grid__item grid-item product-grid-item {{ grid_item_width }} text-center">
          <div class="grid__image product-grid-image">
            <a href="{{ link.url }}" class="grid-image--centered">
            {% comment %}
              Bring in the featured image of the first product in the collection if no collection
              image has been uploaded for it.
            {% endcomment %}
            {% if collection.image %}
              <img src="{{ collection | img_url: image_size }}" alt="{{ link.title | escape }}">
            {% else %}
              {% assign product = collection.products.first %}
              <img src="{{ product | img_url: image_size }}" alt="{{ link.title | escape }}">
            {% endif %}
            </a>
          </div>
          <p class="collection-grid__item-title">
            <a href="{{ link.url }}" class="collection-item__title">{{ link.title }}</a>
          </p>
        </div>
        {% if uses_minimal_framework %}
          {% cycle 'clear-item': '', '', '', '<div style="clear:both"></div>' %}
        {% endif %}
{% elsif link.type == 'page_link' %}
{% comment %}
        If we have a page link.
        {% endcomment %}
{% assign number_of_links = number_of_links | plus: 1 %}
{% assign linked_page = link.object %}
        {% assign have_image = false %}
{% comment %}
          Does the page contain an image? If so, let's use it.
        {% endcomment %}
{% if linked_page.content contains '<img' %}
 {% assign have_image = true %}
          {% assign src = linked_page.content | split: 'src="' %}
          {% assign src = src[1] | split: '"' | first %}
          {% capture image_suffix %}_{{ image_size }}.{% endcapture %}
          {% assign src = src | replace: '_small.', image_suffix | replace: '_compact.', image_suffix | replace: '_medium.', image_suffix | replace: '_large.', image_suffix | replace: '_grande.', image_suffix %}
 {% comment %}
          If the page contains no image, and that page features collections, let's grab the image of the first
          collection on it.
        {% endcomment %}
{% elsif linklists[linked_page.handle].links.size > 0 and linklists[linked_page.handle].links.first.type == 'collection_link' %}
{% assign have_image = true %}
          {% assign collection = linklists[linked_page.handle].links.first.object %}
{% if collection.image %}
            {% assign src = collection | img_url: image_size %}
          {% else %}
            {% assign src = collection.products.first | img_url: image_size %}
          {% endif %}
{% endif %}
<div class="grid__item grid-item product-grid-item {{ grid_item_width }} text-center">
          <div class="grid-image product-grid-image">
            <a href="{{ link.url }}" class="grid-image--centered">
              {% if have_image %}
                <img src="{{ src }}" alt="{{ link.title | escape }}" />
              {% else %}
                <img src="{{ link.title | handle | append: '_' | append: image_size | append: '.png' | file_url }}" alt="{{ link.title | escape }}" />
              {% endif %}
            </a>
          </div>
          <p class="collection-grid__item-title">
            <a href="{{ link.url }}" class="collection-item__title">{{ link.title }}</a>
          </p>
        </div>

        {% if uses_minimal_framework %}
          {% cycle 'clear-item': '', '', '', '<div style="clear:both"></div>' %}
        {% endif %}
{% endif %}
{% endfor %}
</div>
{% if number_of_links == 0 %}
<div class="grid">
    <div class="grid__item grid-item rte text-center">
      <p>
        There are no links of type <i>Collection</i> in your <b>{{ page.title }}</b> link list.
        Go ahead and <a href="/admin/link_lists/{{ linklists[page.handle].id }}" target="_blank">edit your link list</a> to use links that point to collections.
      </p>
    </div>
  </div>
{% endif %}
{% else %}
<div class="grid">
  <div class="grid__item grid-item rte text-center">
    <p>
      You do not have a link list with a handle set to <kbd>{{ page.handle }}</kbd>, or you do and it's empty.
      Go ahead and create a link list called <b>{{ page.title }}</b> on your <a href="/admin/links" target="_blank">Navigation page</a> and populate that link list with links that point to collections, to see collections listed here.
      Make sure the link list also has a handle set to <kbd>{{ page.handle }}</kbd>.
    </p>
  </div>
</div>
{% endif %}
<style>
  kbd {
    background-color: #FBFBE4;
    padding: 1px 4px;
    border-radius: 3px;
  }
</style>
Step 6:
Finish this process by clicking Save.
Conclusion
We hope that by creating new page template, you can start to polish you business website and operate it at a profit. Noted that this is an advanced tutorial and fit for whom have a good command in program language, therefore if you have any trouble while doing this, we suggest you to hire a Shopify expert to make it easy.


