
How to generate a new template file in your theme in Shopify
Drive 20-40% of your revenue with Avada
In Shopify platform, a new template can allow you to customize the way website content can be displayed on your business page. However, this template only available for the products, collection, blogs, and other pages that you assign the new template..
To illustrate, this is applied for products that are out of stock, there for a new template for products will include no Add to cart button. For example, you can create an alternate product template that has no add to cart button, and apply it only to products that are not for sale. You can also create an alternate template that doesn’t include header or other section as you want.
Acknowledge the needs of creating a new template for your website, this article will show you how to generate a new template file in your theme in Shopify.
Noted that these steps might be dependent on your version of theme. You need to know which type of theme you are using now, sectioned or non-sectioned themes?
How to generate a new template file in your theme in Shopify
- Generate a new template file in sectioned themes
- Generate a new template file in non-sectioned themes
Before going into detail of the tutorial this article will also guide you how to control your theme sections. For definition, a theme is call sectioned when it is new and enable you to use drag and drop moves to arrange the layout of your store’s website. In order to know what type of theme you are using now, whether it is sectioned or not, you need to access theme’s Edit code page. In the Sections directory, if you see files, that means your theme is sectioned. For those which are non-section, it will not appear on the Section directory. Following is the tutorial for you to create an alternate template file for both sectioned and non-sectioned themes.
Generate a new template file in sectioned themes
Step 1:
Go to your Shopify admin, open Online Store > Themes.
Step 2:
Click Actions > Edit code at the theme you want to edit.
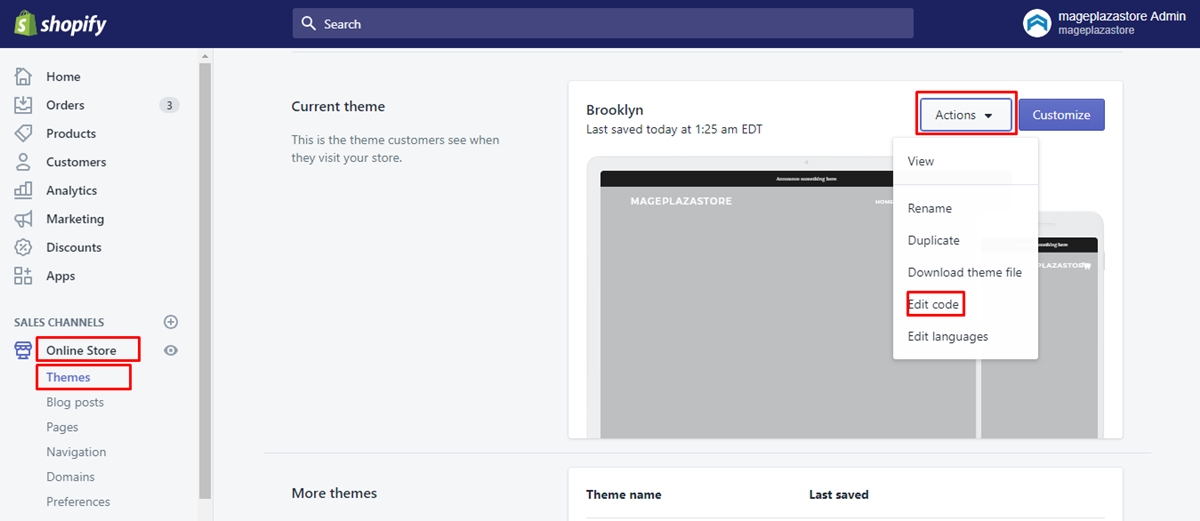
Step 3:
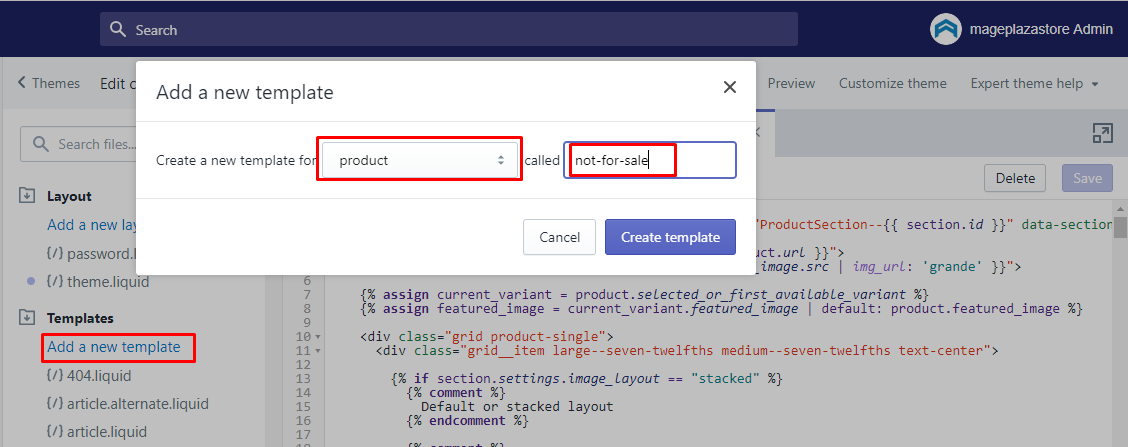
Click Add a new template in the Templates directory.
Step 4:
A box of Add a new template appear, now you can choose an option for your template. In this tutorial, we will show you how to create a template for products that are not for sale. You need to name your template with a specific name that can make it easy to find when you assign it in the admin. In this case, you can name it as not-for-sale so the template might not include price or Add to cart button.
Step 5:
Click Create template. In the code editor, your newly created template will show up and already filled with automated code.
Step 6:
You might need to generate a new section file as well depend on your theme and what kind of template that you have generated. It is unnecessary for you to create a new section if your new template already have the code that you want to modify. Therefore you just need to edit your new template as needed go to the next step in this case.
Opposite with the above when your template includes a Liquid tag for section that have the code you want to change, then you need to generate a new section. For instance, after creating a new product template, you must create a different section because most of the code that makes up the product page is contained in section file, not in the template file.
Following this case, you need to search for the Liquid tag of the section that you want to modify then replace it with the name you will give your new section. Continue with the example above, you need to find the following code:
{% section 'product-template' %}
Then replace it with your new name like this:
{% section 'product-not-for-sale-template' %}
Step 7:
To finish, click Save.
Generate a new template file in non-sectioned themes
In non-sectioned theme, the process is much simpler.
Step 1:
Go to your Shopify admin, open Online Store > Themes.
Step 2:
Click Actions > Edit code at the theme you want to edit.
Step 3:
Click Add a new template in the Templates directory.
Step 4:
A box of Add a new template appear, now you can choose an option for your template. In this tutorial, we will show you how to create a template for products that are not for sale. You need to name your template with a specific name that can make it easy to find when you assign it in the admin. In this case, you can name it as “not-for-sale” so the template might not include price or Add to cart button.
Step 5:
Click Create template. In the code editor, your newly created template will show up and already filled with automated code.
Step 6:
Then you can customize your template as much as you want.
Step 7:
Click Save to finish.
Conclusion
We hope that this tutorial will help you easily customize your own business website by creating new template file in your theme. If you need any help, feel free to ask our Shopify expert team.


