
How to Split Products in Shopify
By Sam Nguyen

If you are the new sellers or beginners in the Shopify marketplace, it is really challenging to create relationships for multiple products in their shops. The Products Variants is an effective solution that helps them to relate between them and increase sales as well. However, there are sometimes that online merchants want to add more variants into their stores. So the question can be raised like weather adding more variants into the shops which have a bulk of existing variants makes these shops unorganized or not.
When the store owners want to have more Product Variants without creating confusion, Splitting product variants will be the best choice for them. They can split each variant into an individual product. The color variant; for instance, if there are three color variants in a product, the store owners should consider converting each of them into an individual product.
This article How to Split Products in Shopify will help store owners to have the best answers.
Exclusive Offer: Get Shopify 33 days for just $1 + The Online Store Starter Kit
Start your 3-day free trial, and enjoy your first month of Shopify for $1 plus the premium package designed especially for new Shopify merchants!
What is Shopify product variants?

There are many choices for online sellers such as size, types, materials or color for each product. The combination of these options called a variant for that item.
To understand clearly, we give you an example of selling T-shirts. The options for that product should be size and color. Among the size option, there are three values such as small, medium, and large. While the color option will be blue and green. The variant for these options can be a big, red T-shirt. The store owners can know about the list of variants clearly on the product details page.
Adding variants to a product will change the way the product details will be set. If the store owners set the product without variants, it is necessary for them to adjust the settings of Pricing, Inventory, and Shipping on the product details page. So that online sellers also need to adjust those settings for each variant after adding variants from the variant details page.
Another choice for Shopify store owners is to manage each variant from the Inventory page.
How to split product variants

By the simple steps, it is easy for online sellers to split any Shopify product having more than one variant into separated products.
Step 1: Import products to a list
First of all, it is essential for online merchants to add the product that they want to split into an import list.
Step 2: Choose the products
After creating an import list, shop owners continue by finding the specific product which will be split. After that, they choose the button on the top right of the pageMore Actions. And then, click to one of the options appears is Split Product.
Step 3: Select splitting variants
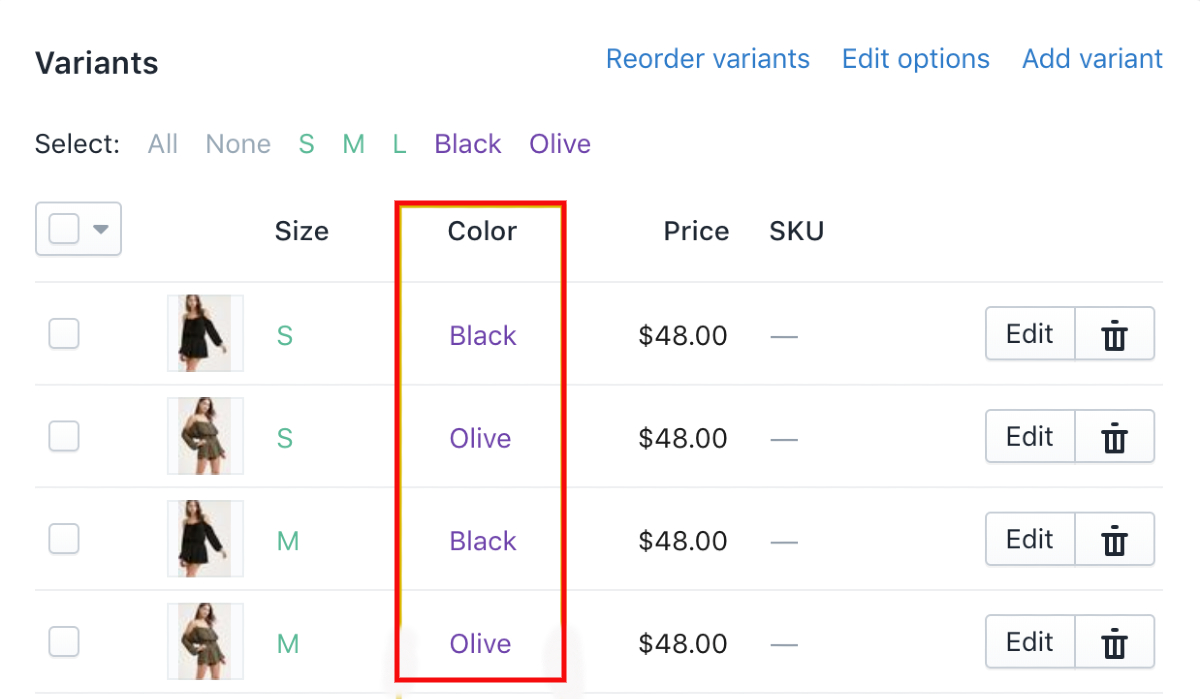
At this step, Shopify store owners will decide which ways they split their products. If their products have multiple variants such as color and size variants, they can choose one of them like Color to split it into individual products. Their products will be split based on their colors automatically.
However, when online merchants do not want to split all variants into separate products, there is a different way to split their products. For example, they just want to split based on two colors Black and Grey. They can choose to Split manually. Into new products, it allows them to select the variants and extract only these two variants.
Step 4: Click to Split
Finally, the store owners can click this button to Split to Products.
When creating a new product, unused variants will be disabled instead of deleted. After you have split the product, you can enable a specific variant any time .
Note: This enables you to easily enable a specific variant any time, even after you have split the product.
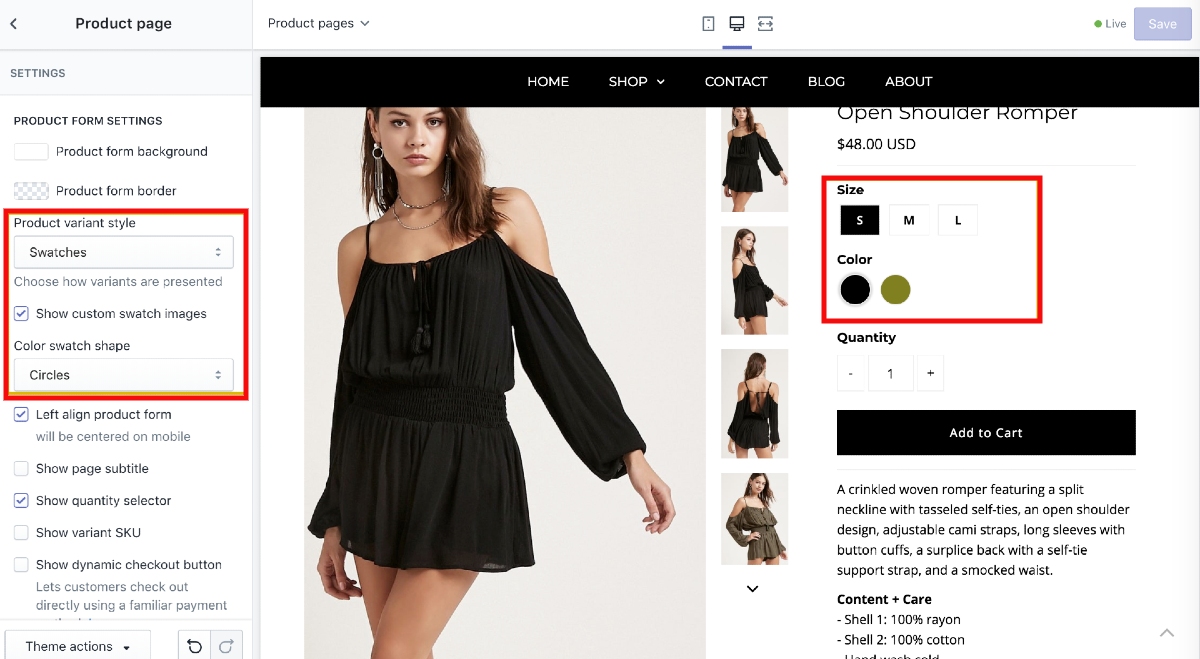
How to activate and customize color swatches on Shopify?
When hiring people paint your house? What should you do first? Of course, it’s selecting the paint. In the paint store, you will be shown a table including plenty of colors, patterns, gradients, and tints. This table is called swatch. Swatch is used as a tool to help you compare and contrast color and try mixing them to find out the suitable paint for you.
Therefore, it’s obvious that adding color swatches on Shopify will make it much easier to boost sales. By offering the color swatches, your customers have more choice in terms of color and directly change the color of items from the product page. Now, let’s go into more detail about the way to activate and customize color swatches on Shopify.
In fact, there are 4 main steps to activate and customize color swatch on Shopify, which are:
Step 1: Activate color swatches
- To make the swatches start working is access the Shopify admin then open the part named Online store.
- If you desire to change a theme, click on Customize located next to it.
- Select the product page from the top bar
- Click on Swatch on the left of the screen and then tick off the section named Show custom swatch images below.
Step 2: Name the product colors
- You are required to set a name for the product options between these two names Color and Colour to display the color swatches. Note: The HTML color spectrum is the default spectrum for color swatches on Shopify, so there are two cases that can occur when setting names for the color swatches: The color name is available in the list of HTML colors, It will show the color based on the name. For example, you set the name for your variant color option as Red; the HTML color Red will be shown on the screen. The color name is unavailable in the HTML color list. In this situation, it will be automatically changed to white. To deal with this situation, it is necessary to create a custom color swatches.
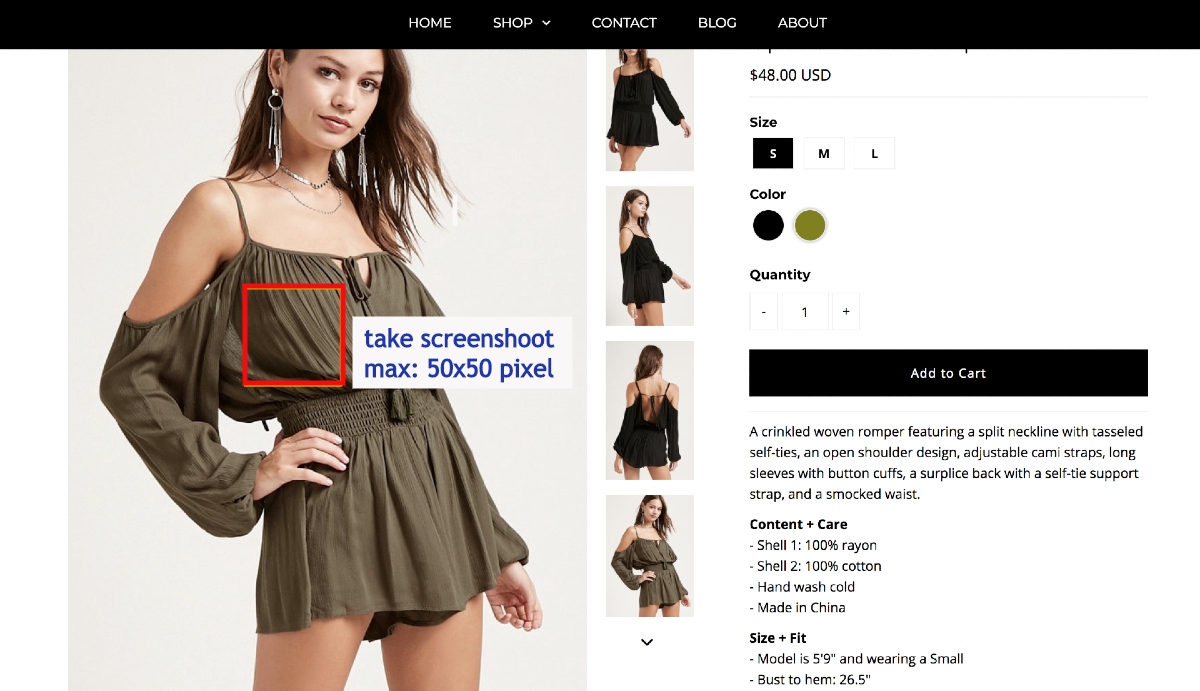
Step 3: Customize your color swatches
- Screenshot the item with the size of 50 x 50 pixel. Remember to the best place to screenshot is the one you can see the color proportion clearly
- Save the picture just taken according to this rule: all the letters in the name are lowercase with the hyphen “-” used as space, after the color name, add “.png” at the end. For instance:
- The color isLight Grey > save as light-grey.png
- The color is White/black > save as white-black.png
- The color is Gold > save as gold.png
Screenshoot to make color swatches
</figure>
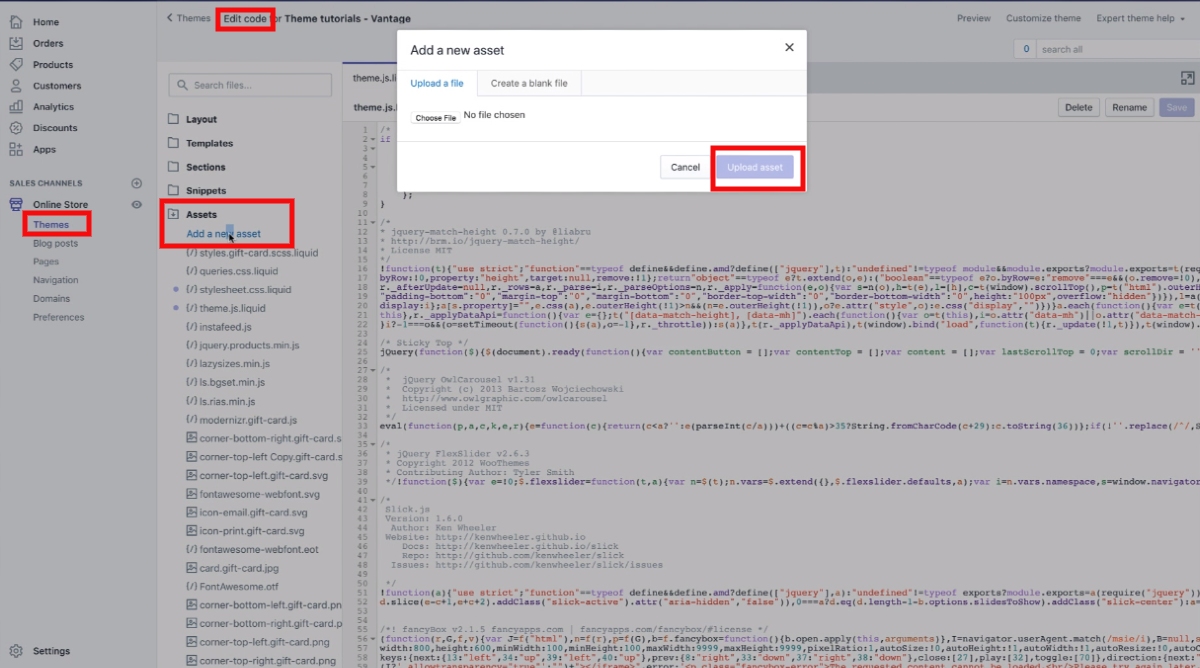
Step 4: Upload the swatches
- Come back to Online Store, open Themes
- Click on Edit Code
- Select the folder named Assets from the sidebar lying on the left of the screen. There, click Add a new asset, which is right under Assets
- Upload the color swatch in the form of png one at a time
Besides, if you are making use of these following themes: Mr. Parker V6.5+, Icon 7+ & Vantage 7+, you will be given another way to upload your color swatch. This way, especially, is regarded as not only easier but also faster, which is uploading the png swatch to the Shopify Admin Files:
- Open Shopify admin, choose Settings at the bottom
- Click Files and then upload all the images for color swatches (if you choose this option, there is no need to upload the png swatch one by one. Instead, you can upload all at a time)
- Refresh the product page, and you will see the png swatches you have just uploaded
How to display color swatches on the collection page on Shopify?
Step 1: Open Theme settings
- Open Themes from the Shopify Admin
- There, choose Theme Settings
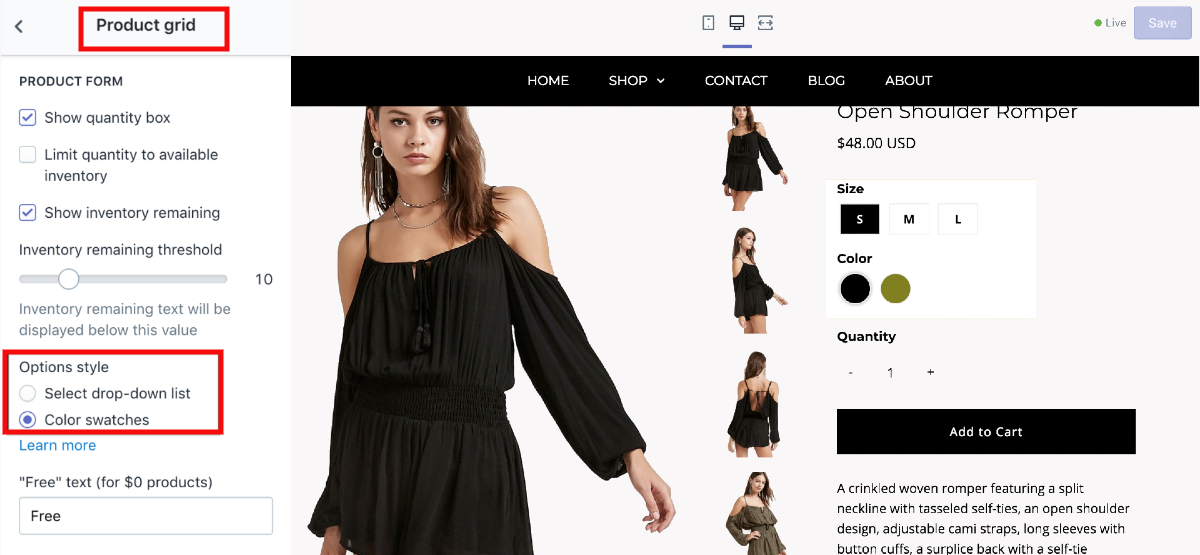
Step 2: Open Product Grid
- Click Product Grid on the left side of the screen
Step 3: Check off Show color swatches
- In the Collection and search result section of Product Grid, tick on the part named “Show color swatches.”
- Now, you will see the color swatches displayed under the item thumbnail images on the collection page.
What to do if the swatches are not appearing?
In cases, you have already completed all the steps above, but the color swatches are still invisible, please the list of seven crucial things following to handle the problem:
- Your color swatch names must be .png. If it is .jpg or other formats, change the image format.
- Your images must be uploaded in the Asset folder in Themes (not Files in the Settings)
- All the letters in the names must be lowercase, and each word is separated by a hyphen “-”. If there are any accented characters with letters or uppercase letters in the word, remove the accented characters, and replace them with the lowercase letters. Don’t forget that there is no space in the image name.
- The size of the swatch image cannot be smaller than 50px x 50px
- Make sure that you have already activated the swatch settings In case neither “Color” nor “Colour” in the title of your product option doesn’t make the color swatches displayed on the collection page, it means the language of your site is not English. Consequently, it is necessary to make some changes in the product-swatch.liquid to access this file, you need to open these folders respectively (Online store -> Themes -> Actions -> Edit codes -> Snippets)
- Find this code:
{% if downcased_option contains 'color' or downcased_option contains 'colour' %}
- And then change them into:
{% if downcased_option contains 'your-option-title' %}
- In the part “your-option-title”, you will change the option title by the equivalent words for “color” in the language of your Shopify store. For example, if the language is French, type “couleur” or if it is German, fill the word “farbe” in “your-option-title”.
Conclusion
These simple above steps are helpful for any online sellers to duplicate their products. Moreover, they can keep them by only those variants. That would be the best way to organize an online shop. Last but not least, online merchants should update their collection frequently to make their shops more catchy for customers.
We hope that Shopify store owners can have a better understanding of Shopify variants by reading this tutorial and do How to Split Products in Shopify indeed with a simple process. If you have any questions, let’s leave a comment below.
Related Posts:
- Change Sort Order for Products in a Collection on Shopify
- How to Choose Product Images From the Rich Text Editor on Shopify?
- How to Change Product Images Size on Shopify?
- How to Change Prices of Products on Shopify?
- How to Sell on Ebay using Shopify?


