
How to Edit Checkout Page in Shopify
By Sam Nguyen

Online customers who are coming to any online shops will come back by multiple factors. Checkout page is one of the most important roles to improve customer satisfaction and let them back to the online shops. In the Shopify marketplace, the Checkout page will be the end of the purchasing process. Therefore, it is necessary for any Shopify store owners to have a professional online process in Checkout page.
If the Shopify store owners want to boost the sales, they can use the theme editor to customize the style of checkout pages. It is easy for any online sellers to add a Logo to the Checkout Page in Shopify, make their shops more beautiful by changing the colors or choosing suitable fonts.
By reading this below article about How to Edit Checkout Page in Shopify, the online sellers enable adding designing their own Shopify checkout pages. Let’s make your Shopify Checkout Page impress any customers.
To make the checkout match your business, it is necessary for the Shopify store owners to edit the layout of the checkout page. In the Shopify store admin panel, there is a the theme editor section which includes checkout.liquid and checkout.scss.liquid files allows the users to customize their checkout panel.
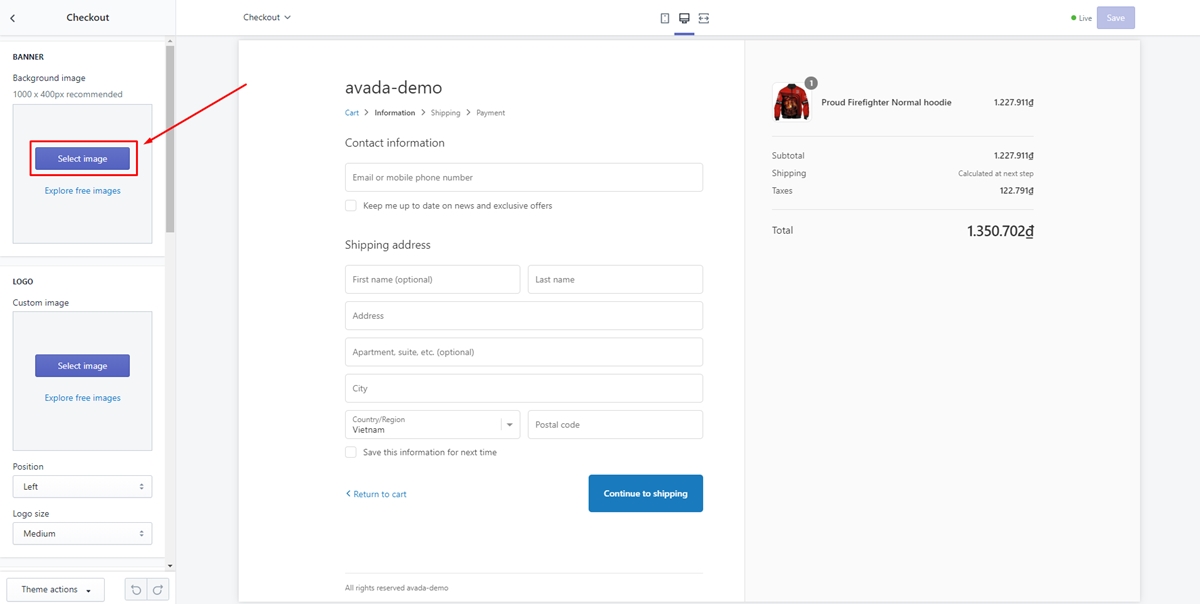
Upload a background image for the banner
The frontend with a clear and outstanding background image will impress any customers coming to an online shop. Especially, there is a banner displays your store name at the top of each checkout page, which will help them to remember and come back to your shops more and more. Therefore, it is essential for online sellers to optimize the appearance of that banner. Choose an image that matches your brand. For example, if you sell jewelry, then an image of colorful beads might be a good match.
Those steps below will support you to change the default image by custom one to catch the customer’s eyes.
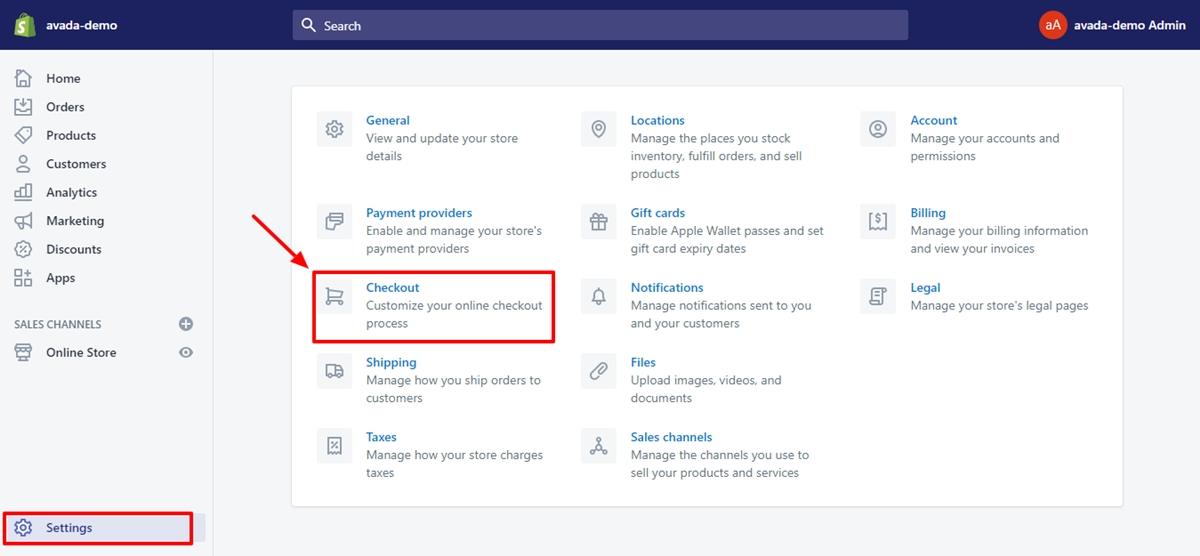
Step 1: Go to Checkout
First of all, Shopify store owners need to log in to the admin dashboard, click Settings and then Checkout.
Step 2: Open the theme editor sections
To open the theme editor sections, click to Style and then choose Customize checkout.

Step 3: Upload images
In the BANNER section, online sellers can upload their images by selecting the Select image button to upload the new images or select an uploaded image in their library. There is a note that Banner images will be the best with a resolution of 1000 x 400 pixels.
Step 4: Click Save
Click Save to confirm the changes.
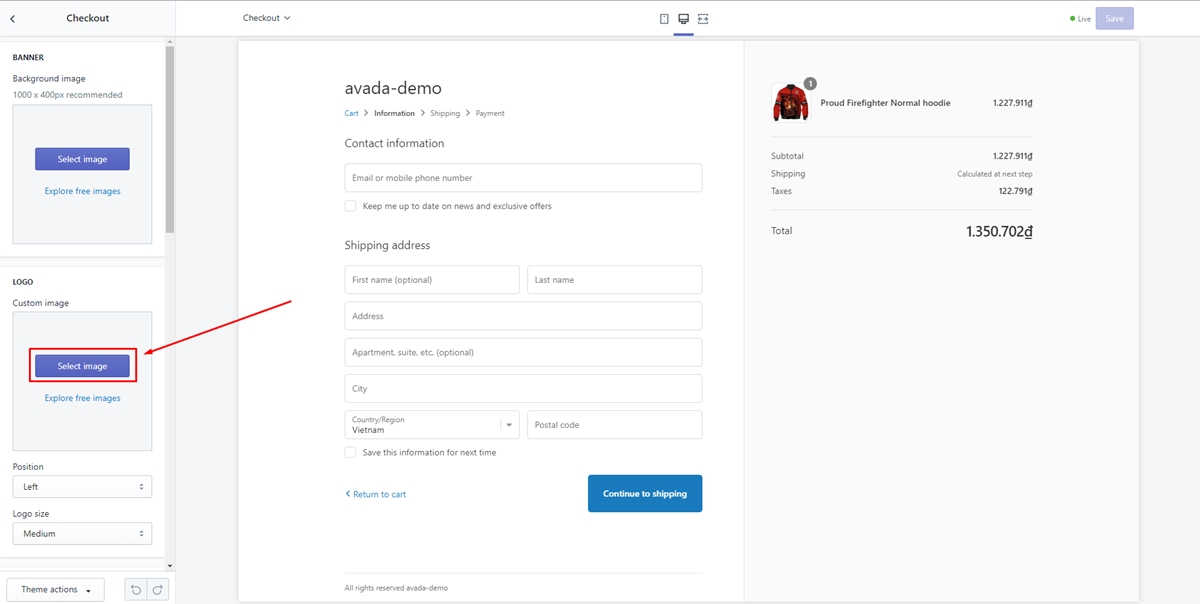
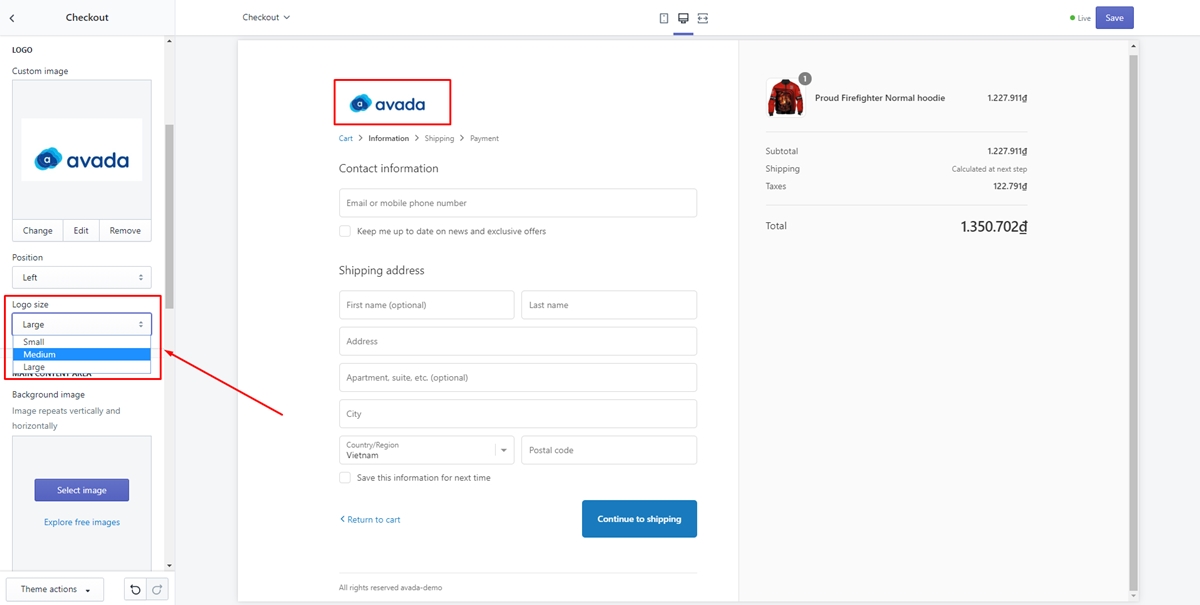
Add a logo to the checkout page
Logo plays as one of the most important role to make the uniqueness in the competitive market as Shopify. Adding logo will make your shops more trustful and professional.
In the checkout page, the Shopify store owners can add their store logo on the top of the banner if you’re using a banner image. Moreover, it is easy for online sellers to customize the position of your logo on the left, right, or center of the banner.
Step 1: Go to Checkout
First of all, Shopify store owners need to log in to the admin dashboard, click Settings and then Checkout.
Step 2: Open the theme editor sections
To open the theme editor sections, click to Style and then choose Customize checkout.
Step 3: Upload logo image
In the LOGO section, the Shopify store owners can click Select image to upload new logo or uploaded image in the library.
Step 4: Choose the position of LOGO
Select a position such as on the left, right, or center of the banner.
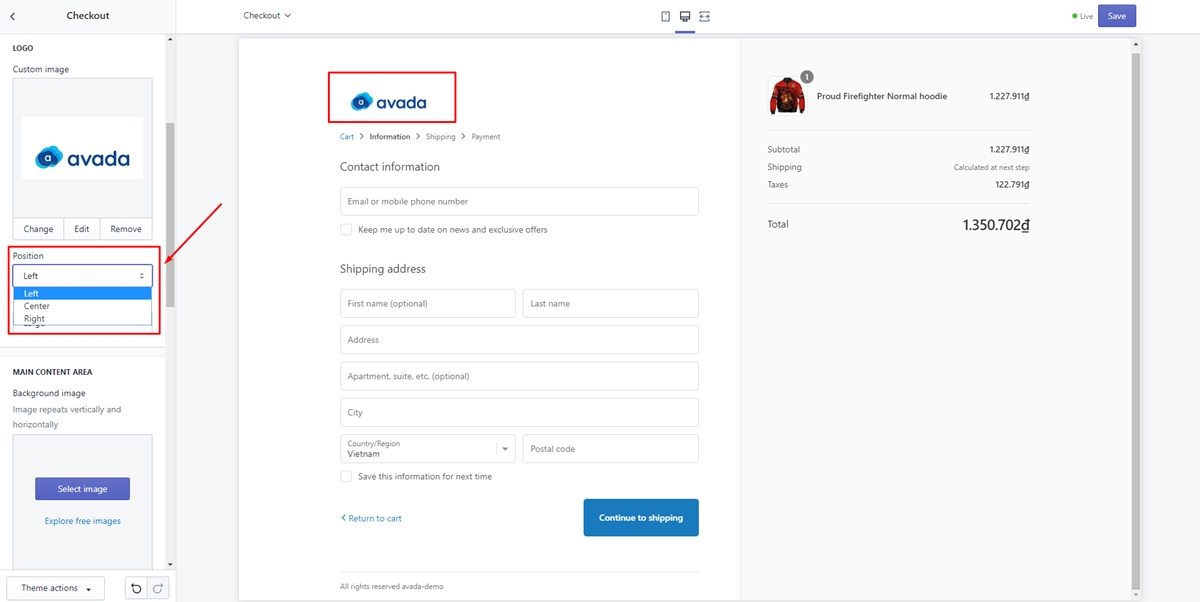
Step 5: Size the LOGO
At this step, online sellers can choose a suitable size for the logo.
Step 6: Click Save
Click Save to confirm the changes.
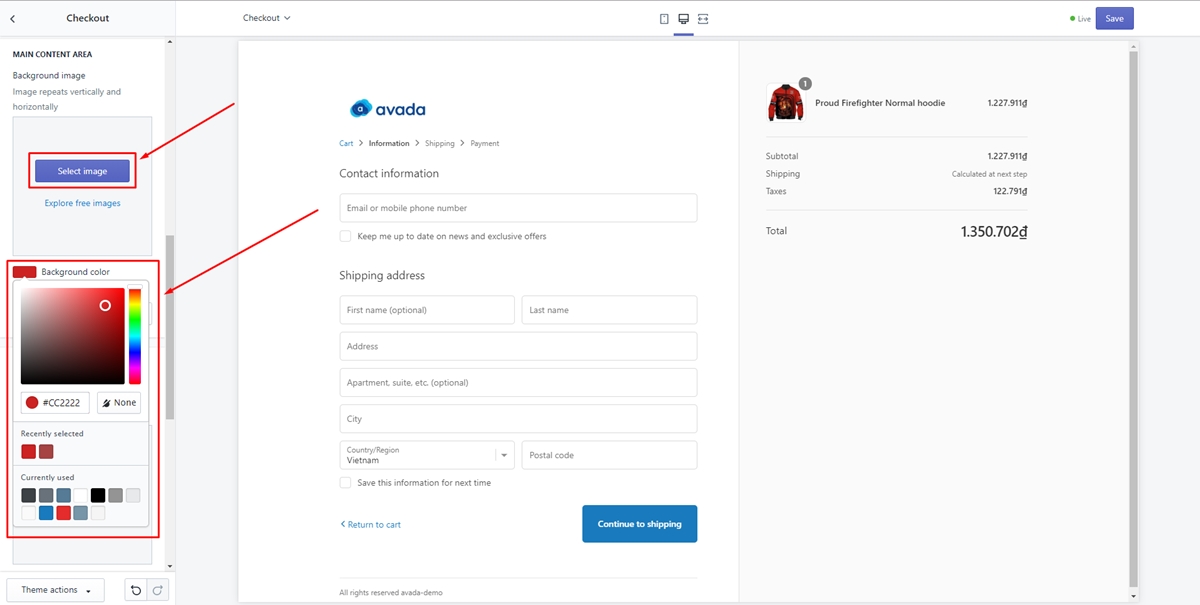
Add a background image or color to the main content area
You can add a background image or color to the main content area of the checkout pages. This is the area where your customers enter their shipping and payment information, so make sure that you can still clearly read the fields on the background. You can’t add both a background image and color.
Step 1: Go to Checkout
First of all, Shopify store owners need to log in to the admin dashboard, click Settings and then Checkout.
Step 2: Open the theme editor sections
To open the theme editor sections, click to Style and then choose Customize checkout.
Step 3: Add the background or image
In the MAIN CONTENT AREA section, there are many options for online sellers to add a background color or image.
- Adding colors: click the box beside Background color to choose the most suitable color and then enter a hexadecimal code.
- Adding an image: Select an image in the library or choose
Upload imageand resize to have best appearance.
Step 4: Click Save
Click Save to confirm the changes.
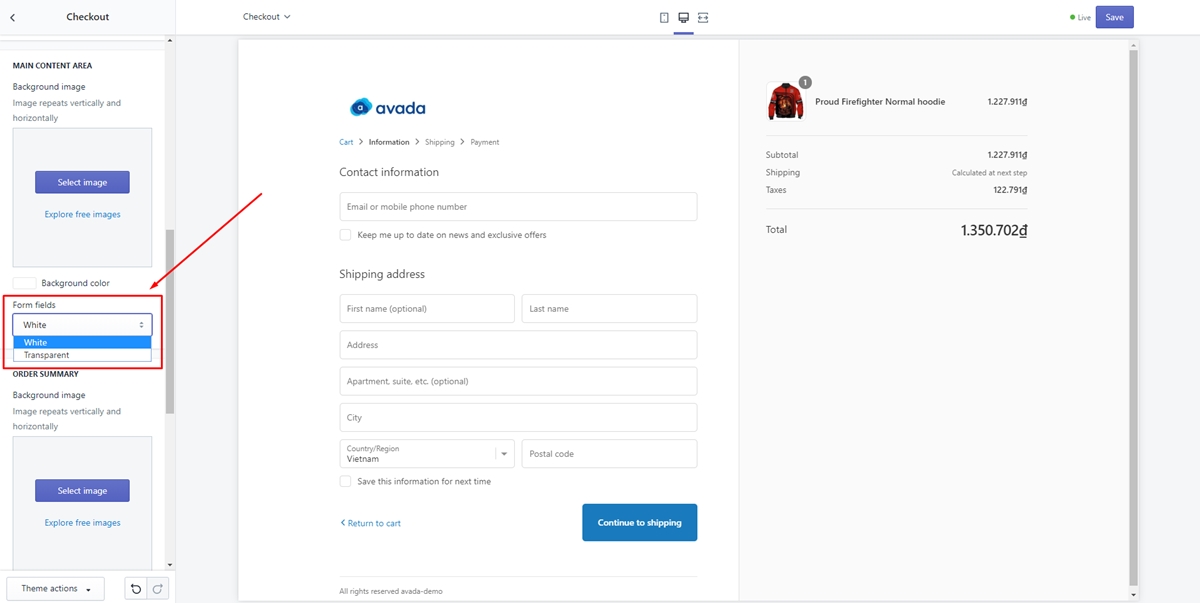
Change the color of the form fields
The colorful form fields will make any online shops outstanding and eye-catching compare to their competitors. That the reason why the designed color will be more successful to make the customers keep coming back and back.
If you want to change the white of the fields to transparent, you should read more detail with those steps below.
Step 1: Go to Checkout
First of all, Shopify store owners need to log in to the admin dashboard, click Settings and then Checkout.
Step 2: Open the theme editor sections
To open the theme editor sections, click to Style and then choose Customize checkout.
Step 3: Select the color of the form fields
In the MAIN CONTENT AREA section, online merchants choose Form fields, and there is a list of color drop-down. To finish this step, choose the color you want.
Step 4: Click Save
Click Save to confirm the changes.
Add a background image or color to the order summary
Before coming to the purchase process, the list of products they’re buying appears in the order summary. By showing the beautiful order summary with multiple custom functionalities, the shop owners can maximize a customer’s satisfaction. It is possible for online sellers to add a background image or color to the order summary.
Step 1: Go to Checkout
First of all, Shopify store owners need to log in to the admin dashboard, click Settings and then Checkout.
Step 2: Open the theme editor sections
To open the theme editor sections, click to Style and then choose Customize checkout.
Step 3: Add a background image or color to the order summary
In the ORDER SUMMARY section, choose to add a background color or image.
- Adding colors: click the box beside Background color to choose the most suitable color and then enter a hexadecimal code.
- Adding an image: Select an image in the library or choose
Upload imageand resize to have best appearance.

Step 4: Click Save
Click Save to confirm the changes.
There is a Show order summary which is on the preview in the theme editor allows the users to preview their choices in customizing the order summary looks.
Change or remove an image from the checkout page
In the above parts, you knew that it is easy for any Shopify sellers to add an image, a color or any background banner to their Shopify pages. In this part, you also can change or remove any of the added images in the checkout pages.
Step 1: Go to Checkout
First of all, Shopify store owners need to log in to the admin dashboard, click Settings and then Checkout.
Step 2: Open the theme editor sections
To open the theme editor sections, click to Style and then choose Customize checkout.
Step 3: Replace image
Click to the Update button under the image that you want to replace and then upload an image or select an updated image in your library.
Step 4: Click Save
Click Save to confirm the changes.
Before finishing to replacing these pictures, online merchants can maximize their SEO by adding image alt text. These texts can help customers easy to access your shops as well as boost your sales.
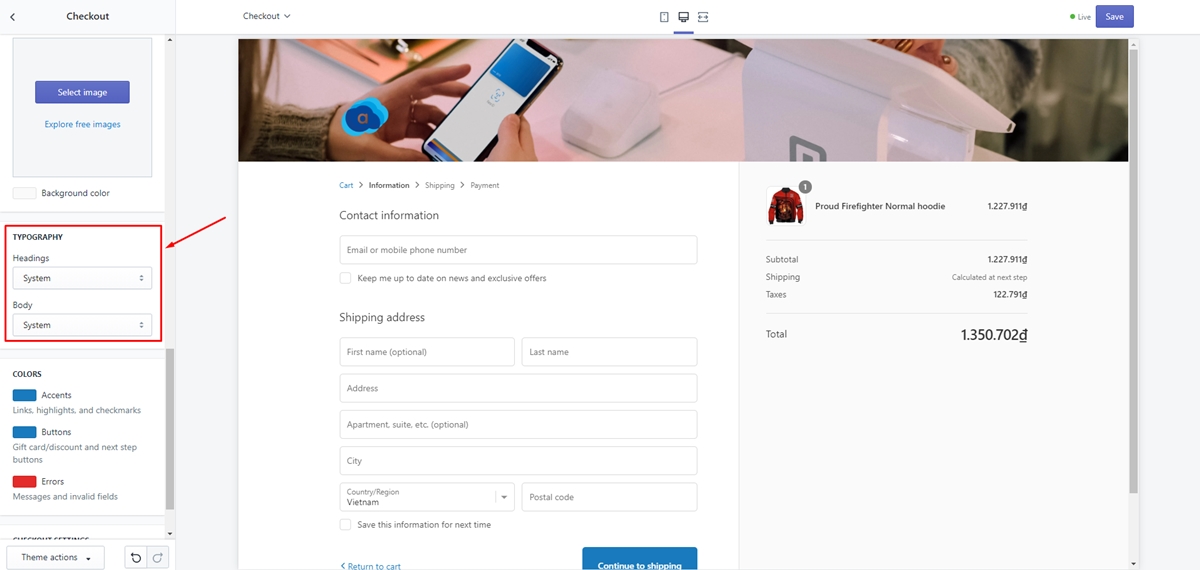
Change the font on the checkout page
The way that Shopify store owners display their text as using fonts will make their customers pay more attention to their shops. Fortunately, in the Shopify marketplace, there are multiple available fonts in a list that the Shopify store owners can choose to customize your checkout pages. However, it is possible for the online sellers to change the color of the text on the checkout page.
Step 1: Go to Checkout
First of all, Shopify store owners need to log in to the admin dashboard, click Settings and then Checkout.
Step 2: Open the theme editor sections
To open the theme editor sections, click to Style and then choose Customize checkout.
Step 3: Select a font
In the TYPOGRAPHY section, online merchants can choose their favourite fonts by dropping down the Headings or the Body.
Step 4: Click Save
Click Save to confirm the changes.
Change button and accent colors on the checkout page
On the checkout pages, the multiple buttons in black and white will make their shops boring. By changing the variety of buttons, error messages, and accents such as a link on the checkout pages, their Shopify shops will more and more outstanding on the competitive market such as Shopify.
It is easy for any online sellers to do it, just follow these steps:
Step 1: Go to Checkout
First of all, Shopify store owners need to log in to the admin dashboard, click Settings and then Checkout.
Step 2: Open the theme editor sections
To open the theme editor sections, click to Style and then choose Customize checkout.
Step 3: Change accent colors
In the COLORS section, it is easy to open the color picker by clicking the color box beside Accents, Buttons, or Errors. After that, the Shopify store owners to choose a color or enter a hexadecimal code.
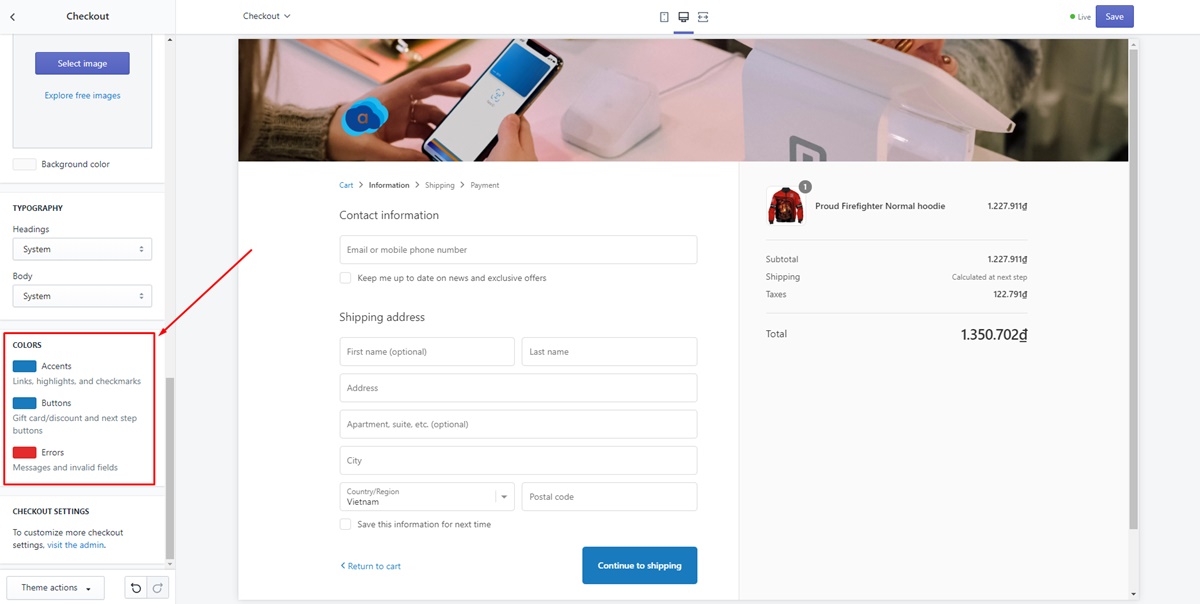
Step 4: Click Save
Click Save to confirm the changes.
Edit Checkout page in Shopify Plus store

If you are using the Shopify plus, there are the same basic with any Shopify stores. Besides, the online sellers can easily edit the layout of the checkout page with checkout.liquid and checkout.scss.liquid.
On Shopify Plus, the checkout.liquid file which is self-contained does not render any additional template files in the checkout process. This checkout process includes the following steps:
Step 1: Inventory issues
When the inventory level is under the amount that the customer ordered or there is any cart item is out of stock, there is a confirmation button will be shown for the online sellers to update their cart.
Step 2: Customer information
The second step will let the customers submit their email addresses and require they to log in when their accounts are informed to be enabled in the store. The information about customers will be presented in the shipping address form or in the billing address form.
Step 3: Shipping method
In the case that the customers want to change their information in shipping address or choose the most suitable shipping method. If there is no cart items require shipping, the customers can skip this step. When the customers choose to edit shipping information, the page will return to the Customer information step.
Step 4: Payment method
As soon as clients click to the suitable payment method, they can enter payment information. There are some required information that the customers need to complete on the payment gateway. Moreover, they also specify a different billing address during this step.
Step 5: Review order
This step is optional but if your Shopify stores has based in the European Union, it might be required. By clicking Complete order, the customer will need to confirm their order total, shipping and other payment details.
Step 6: Processing/forwarding
There is a temporary page shown to customers to show that their order is being processed. Another option that there is a message displayed during this step if the store owners set up in the checkout.
Step 7: Order status
Finally, the order status with multiple products will be recorded and displayed. On every step, there is an Order summary to inform about basic information such as the products, price, taxes, and shipping costs, etc is displayed in the right column and it will be collapsed on mobile).
Conclusion
The cutting-edge performance of the checkout pages will attract all customers who come to these pages to enter shipping and payment information for their orders. With these above details about How to Edit Checkout Page in Shopify, we hope that the Shopify store owners can customize their checkout page with the beautiful and attractive sites. In spite of the fact that online sellers can add a lot of colors and interesting images to their checkout pages, it’s best to keep a simple design because you may not want to distract them or make the information wrong with a lot of colors.
Related Posts:
- How to Hide Dynamic Checkout Buttons on Product Pages
- How to Hide Footer on Password Page
- How to Add a Logo to Shopify Store on all page


