6 Steps to Set the Social Sharing Image on Shopify
When you add a link from Facebook or Pinterest to your online store on Shopify, you can display a thumbnail image with your post. Just for you know, the displayed thumbnail pictures can be selected by setting the social sharing images.
Below is the writing on how to set the social sharing image on Shopify. Please read it carefully and follow my instruction.
How to set the social sharing image
Step 1: Go to the Online Store.
After logging in your Shopify account and get access to the homepage,you can see the SALES CHANNELS section, written in capital letters on your left screen. It is divided into three smaller part and for hiding dynamic sections, please go to the Online Store.

Step 2: Customize themes.
The system will take you to the themes page, scroll down to discover more themes and decide which want you would like to choose and click Customize.

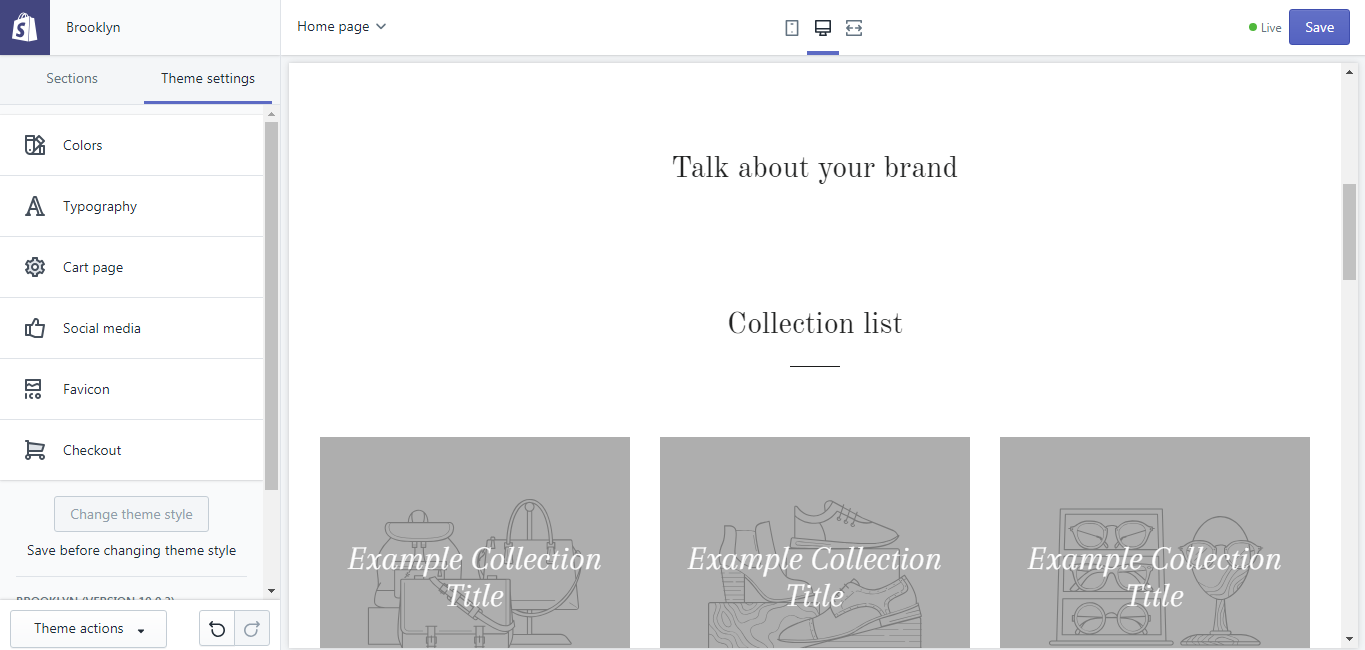
Step 3: Go to Theme settings.
The themes editor toolbar is divided into two parts, for our purpose, go to the theme settings tab.

Step 4: Go to Social media.
After finishing the previous step, click on the Social media button

Step 5: Select your image.
Choose the picture that you want to show by clicking on the Select image button in the Social sharing image area.

Step 6: Saving image.
The final step is easy, click the Save button to finish your job.

To set the social sharing image on iPhone (Click here)
-
Step 1: Go to Store. After logging into your account from the app on your phone, there is a
Storebutton at the homepage, go to it. -
Step 2: Go to the Online Store. In the middle of the screen, you can see the Sales Channels section, in it, you can see three smaller sections. However, for our purpose, tap manage
Online Store. -
Step 3: Customize themes. From the Themes screen, scroll down to see more themes, find the themes you want to make changes and click
Customize. -
Step 4: Select manage themes. Continue by tapping
Manage Themes. -
Step 5: Go to Theme settings. From the editor toolbar, choose the
Theme settingstab. -
Step 6: Tapping Social media. After finishing the previous step, click on the
Social mediabutton -
Step 7: Select your image. Choose the picture that you want to show by clicking on the
Select imagebutton in the Social sharing image area. -
Step 8: Saving. The final step is easy, click the
Savebutton to finish your job.
To set the social sharing image on Android (Click here)
-
Step 1: Go to Store. After logging into your account from the app on your phone, there is a
Storebutton at the homepage, go to it.
-
Step 2: Go to the Online Store. In the middle of the screen, you can see the Sales Channels section, in it, you can see three smaller sections. However, for our purpose, tap manage
Online Store.
-
Step 3: Customize themes. From the Themes screen, scroll down to see more themes, find the themes you want to make changes and click
Customize.
-
Step 4: Select manage themes. Continue by tapping
Manage Themes.
-
Step 5: Go to Theme settings. From the editor toolbar, choose the
Theme settingstab.
-
Step 6: Tapping Social media. After finishing the previous step, click on the
Social mediabutton
-
Step 7: Select your image. Choose the picture that you want to show by clicking on the
Select imagebutton in the Social sharing image area.
-
Step 8: Saving. The final step is easy, click the
Savebutton to finish your job.
Conclusion
In conclusion, above is the basic guideline for you on how to set the social sharing image on Shopify. I hope my writing would help you solve your problems and be sure to check out our Shopify tutorials for more helpful tips.
Related Posts:


