How to Start a Shopify Store in 7 Easy Steps & No Money (2024)
By Sam Nguyen

Starting a Shopify website can feel scary, especially if you don’t know much about tech.
The truth is many people struggle with setting up their store and choosing the right theme can be confusing. Additionally, configuring payment gateways can be tricky, and optimizing your site for SEO feels overwhelming.
But don’t worry, because this guide is here to help you.
We will simplify everything for you.
By following our clear, step-by-step instructions, you will launch a professional-looking Shopify store easily. You won’t need to know much about tech.
How to start a store on shopify
- Step 1: Sign Up for Shopify store & Get the Free Trial
- Step 2: Understand the Admin Panel
- Step 3: Choose a Theme
- Step 4: Add Products & Product-Related Information
- Step 5: To Set Up Checkout and Payments
- Step 6: To Set Up Shipping Rates and Zones/a></li>
- Step 7: Set Up Tax Rates on Shopify
- Step 8: Create a Page on Shopify
- Step 9: Connect a Domain
- Step 10: Test Your Shopify Store
- Step 11: Launch your shopify store
</ul> </div> </div>Before You Start
Before starting your Shopify store, here are 7 things you need to do:
- Conduct Market Research: Understand the market by analyzing trends and competitor strategies.
- Define Your Unique Selling Proposition: Identify what differentiates your product from others.
- Plan Your Budget: Allocate your financial resources carefully to cover all aspects of your business.
- Build Relationships with Suppliers: Forge strong connections with suppliers to ensure quality and reliability.
- Set Clear Goals: Establish measurable objectives to guide your business decisions.
- Leverage Social Media: Use social platforms to engage with customers and promote your store.
- Continue Learning and Growing: Stay updated with the latest in e-commerce to keep your business competitive.
For detailed guidance on each step, watch this comprehensive video.
Exclusive Offer: Get Shopify 33 days for just $1 + The Online Store Starter Kit
✅The Shopify free trial✅Enjoy your first month of Shopify for just $1✅Ecommerce CRO checklist: Set up a high-converting Shopify store – with over 300+ checkpoints to boost your conversion rate, AOV, and more✅Enjoy 2 months free on AVADA paid apps.✅Exclusive discounts on top-rated Shopify apps and themes + Additional perksClick the button below to claim your exclusive offer!
Step 1: Sign Up for Shopify store & Get the Free Trial
To start using Shopify for completely free, you can take a look at this tutorial:
Here’s the concise steps you need to take:
- Visit the custom landing page Shopify made for Avada’s audience where you can try it for free. You can check out Shopify for 3 days without paying anything. If you like it, you can keep using it for just $1 for the first month.
- Put in your email and click on “Start Free Trial.”
- Make a password, then click to make your Shopify account.
- Fill in the information to let Shopify design the dashboard for your unique business needs.
Step 2: Understand the Admin Panel
And then, you’ll be directed to the admin panel. As our latest update in 2024, the panel includes the following sections:

- Home: The dashboard for a quick overview of your store’s performance, latest updates, and important notifications.
- Orders: Manage customer orders, view order details, process refunds, and handle fulfillment.
- Products: Add, edit, and organize products, including managing inventory and product collections.
- Customers: View and manage customer information, segment customers, and track their purchase history.
- Content: Manage blog posts, pages, and other content for your store.
- Analytics: Access detailed reports and insights on sales, traffic, and other key performance metrics.
- Marketing: Plan, create, and manage marketing campaigns and promotions.
- Discounts: Create and manage discount codes and automatic discounts.
- Sales channels: Integrate and manage different sales channels like Online Store and Point of Sale.
- Apps: Install and manage apps to extend the functionality of your store.
That’s it! You now have your own store. But it’s still empty, so the next step is to get it ready to sell.
Step 3: Choose a Theme
If you’re unsure about the right theme for your own business, take some time to explore the Shopify Theme Store. There are thousands of themes, both free and paid, on the Shopify Theme Store or third-party theme markets like ThemeForest.
 💡 Further reading: Find The Perfect Domain Name with Shopify Domain Checker
Additionally, check out your competitors or the leading Shopify stores in your field using our theme detection tool to get a better understanding of the Shopify themes they are using.
To Customize the Theme
To better visualize how to customize your store using a theme, take a look at this tutorial:
Here is a simplified documentation for that:
Accessing the Customization Interface
- In your Shopify dashboard, locate the “Customize” option within the “Online Store” dropdown.
- Right-click on “Customize” and select “Open link in a new tab” to keep your Shopify dashboard accessible.
Understanding the Store Layout
- The live preview on the right reflects real-time changes.
- The store structure includes a consistent header and footer, with a customizable main content area.
Tailoring the Header
- Click on “Header” in the left sidebar.
- Add your logo by clicking “Select Image” under the “Logo” section and uploading your logo file.
- Adjust logo dimensions using sliders or input fields to ensure proper alignment with the header design.
*NOTE: You can add a logo now if you already have one. If not, you can always change it later. We’ll instruct you in detail on how to design your brand effectively in the later step (after you complete the basic setup).
To Customize Homepage Sections
- Navigate to the Homepage Sections in the left sidebar.
- Understand Section Types: Sections include featured products, banners, testimonials, blogs, etc.
- Customize Individual Sections: For instance, for Images, use high-quality images for banners, products, or backgrounds. For Buttons, use action-oriented text like “Shop Now” and ensure correct links.
- Rearrange and Add Sections: Drag and drop sections to reorder them, place critical content at the top, and add new sections by clicking “Add Section” and choosing from available options.
- Preview and Save.
Step 4: Add Products & Product-Related Information
To Add Product Details

- In the left-hand sidebar of the admin dashboard, click on “Products.”
- Click the “Add product” button at the top right of the screen.
- Enter Product Details:
- Product Title: Type a clear and descriptive name for your product.
- Product Description: Provide a detailed description of the product, highlighting its features and benefits. Use bullet points and headings to make it easily readable.
- Product Media: Select the images, videos, or 3D models you want to upload from your computer.
To Set Pricing

- Enter Product Price: Scroll down to the “Pricing” section. Then In the “Price” field, enter the regular selling price of the product (e.g., $49.99).
- Enter Compare at Price: If offering a discount, enter the original higher price in the “Compare at price” field (e.g., $69.99). This shows the discounted price visibly.
To Manage Inventory

1. Enter SKU:
- In the “Inventory” section, find the “SKU” field.
- Enter a unique Stock Keeping Unit (SKU) to help track and manage inventory (e.g., JD-001-BLU).
2. Enter Barcode:
- If applicable, enter the product’s barcode in the “Barcode (ISBN, UPC, GTIN, etc.)” field.
3. Enable Inventory Tracking:
- Check the “Track quantity” box to enable Shopify’s inventory tracking.
- Enter the quantity available in the “Quantity” field (e.g., 100).
- If you want to allow purchases when out of stock, check the “Continue selling when out of stock” box.
To Set Up Product Shipping Information
For physical products, add weight and customs info in this section. The weight data is essential for accurate shipping rate calculations.
- Enter Product Weight:
- Scroll down to the “Shipping” section.
- In the “Weight” field, enter the product’s weight (e.g., 1.5 lb or 0.68 kg).
- Enter Product Dimensions (Optional):
- If your product requires specific shipping dimensions, click “Show more” under the “Weight” field.
- Enter the length, width, and height in the respective fields.

To Set Product Variants
If your product has various options (sizes, colors, etc.), add them in this section. Shopify supports up to 3 options and 100 variants (combinations of these options). If these limits don’t suffice, consider purchasing an app like Infinite Options.

Enable Variants:
- In the left-hand sidebar of the admin dashboard, click on “Products.”
- Click the “Add product” button at the top right of the screen.
- Scroll down to the “Variants” section.
- Check the “Add options like size or color” button.
Add Option Names and Values:
- In the “Option name” field, type the first option (e.g., “Size”).
- In the “Option values” field, enter the different variants separated by commas (e.g., Small, Medium, Large).
- Click “Add another option” if you need more variants (e.g., “Color” with values “Blue, Black, Grey”).
To Set Prices and Inventory for Each Variant:
- For each variant, click the “Edit” button to enter specific prices, SKUs, barcodes, and inventory quantities.

To Set Up SEO Settings
- Edit Search Engine Listing:
- In the left-hand sidebar of the admin dashboard, click on “Products.”
- Select an existing product or click the “Add product” button to create a new one.
- Scroll down to the “Search engine listing preview” section at the bottom of the product page.
- Customize Page Title:
- In the “Page title” field, enter a title that includes relevant keywords for search engines (e.g., “Men’s Blue Denim Jacket – Stylish and Comfortable”).
- Write Meta Description:
- In the “Meta description” field, write a concise summary that includes important keywords and highlights the product’s main benefits.
- Edit URL and Handle:
- In the “URL and handle” field, ensure the URL is SEO-friendly. It should be short and descriptive (e.g., “mens-blue-denim-jacket”).

To Organize Products
On the right side of your product page:
- Product Category: Define your product’s main category.
- Product Type: Specify the exact type of product.
- Vendor: Identify the manufacturer or seller.
- Collections: These are catalogs of products that you can display in various ways.
- Tags: Keywords associated with your products, aiding in creating collections and improving store search functionality.

To Create Collections
- After adding your products, go back to the “Products” section in the sidebar.
- Below “All Products,” you will find the “Collections” option. Click on it.
- On the top right corner, click the “Create Collection” button.
- Provide a name for your collection.
- Under “Collection Type“, you can choose to manually select products for your collection or set up conditions to automatically add products based on criteria like product title, tag, price, etc.
- If you choose manual, you can pick products from your product list. If you choose automated, set up the necessary rules.
- Save your collection.

Pro Tip: Collections not only enhance user experience but also provide an opportunity for upselling and cross-selling. For instance, a ‘Summer Collection’ might motivate a customer to buy a complete set of summer essentials.
To Save Product
Once all information is correctly entered, click the “Save” button at the top right of the page to add the product to your store.
Step 5. To Set Up Checkout and Payments
- Go to Settings: In the bottom left corner, click on “Settings.”
- Select Payments: Click on the “Payments” option in the settings menu.
- Choose Payment Providers:
- Shopify Payments: Click “Activate Shopify Payments” and follow the prompts to set it up.
- Other Providers: For alternatives like PayPal or third-party gateways, click “Choose a provider” and follow the setup instructions.
- Add Manual Payment Methods (optional): Scroll to “Manual payment methods” and click “Add manual payment method” for options like cash on delivery or bank transfers.
- Set Up Checkout:
- Go back to “Settings” and click on “Checkout.”
- Configure customer accounts, checkout form options, and order processing settings according to your preferences.
- Save Settings: Click “Save” at the bottom of each page to apply your changes.

Pro Tip:
Regularly review and update your payment and checkout settings to ensure they align with your business’s evolving needs. Offering trending or region-specific payment methods can boost conversions and cater to a global audience.

Step 6. To Set Up Shipping Rates and Zones
- Go to Settings: In the bottom left corner, click on “Settings.”
- Select Shipping and Delivery: Click on “Shipping and delivery” in the settings menu.
- Manage Shipping Rates:
- In the “Shipping” section, click “Manage rates” next to the shipping profile you want to edit.
- Add Shipping Zones:
- Click “Create shipping zone” and enter a name for the zone (e.g., “Domestic” or “International”).
- Select the countries or regions you want to include in this zone.
- Set Up Shipping Rates:
- Within the shipping zone, click “Add rate.”
- Choose the type of rate (e.g., “Set up your own rates” or “Use carrier or app to calculate rates”).
- Enter the rate details, such as name, price, and conditions (e.g., weight-based or price-based rates).
- Repeat for additional rates as needed.
- Save Changes: Click “Save” to apply your new shipping rates and zones.

Step 7. Set Up Tax Rates on Shopify
- Select Taxes and Duties: Click on “Taxes and duties” in the settings menu.
- Set Up Tax Regions:
- In the “Tax regions” section, click “Set up” next to the regions where you need to collect taxes.
- Configure Tax Rates:
- For each region, enter the tax rate percentage you need to apply.
- If applicable, check options like “Charge tax on shipping rates.”
- Automatic Tax Calculations (optional):
- Enable automatic tax calculations by checking the “Automatically calculate tax” box if supported in your region.
- Include Taxes in Prices (optional):
- If you want taxes included in your product prices, check the “All prices include tax” box.
- Save Settings: Click “Save” to apply your tax rate configurations.
Step 8. Create a Page on Shopify
- Log In: Access your Shopify admin dashboard.
- Navigate to Pages: Go to the “Online Store” section and click on “Pages.”
- Add Page: Click the “Add page” button.
- Enter Page Details:
- Title: Add a clear and descriptive title.
- Content: Write the content for the page in the text editor.
- Set Visibility: Choose whether the page is visible or hidden.
- SEO Settings: Edit the SEO settings to optimize the page for search engines.
- Save: Click “Save” to publish the page.

Step 9. Connect a Domain

Through Shopify
- Navigate to “Online Store” and then select “Domains.”
- Click “Add domain.” Enter the desired domain name and see if it’s available.
- If it is, proceed to purchase. Shopify will automatically configure and connect this domain to your shopify store.
Using Third-Party Registrars
- Websites like GoDaddy, Namecheap, or Bluehost offer a vast array of domain names.
- Search for your preferred domain name and follow their purchasing process.
- Once purchased, keep the login details for your domain registrar account handy. You’ll need them for the connection process.
Pro Tips:
- Ensure you have an SSL certificate activated for your domain. This provides a secure shopping environment for your customers. Shopify automatically offers SSL for domains purchased through them. For third-party domains, SSL is typically activated within 48 hours of domain connection.
- Remember that domain settings, especially DNS changes, can take time to propagate. It might be a few hours to even 48 hours before your custom domain starts directing to your Shopify store.
💡 Further reading: Find The Perfect Domain Name with Shopify Domain Checker
Step 10. Test Your Shopify Store
- Place a Test Order:
- Activate Test Mode: Go to “Settings” > “Payments” and select your payment provider (e.g., Shopify Payments). Enable “Test mode” if available.
- Create an Order: Go to your store as a customer, add items to the cart, and proceed to checkout. Use test credit card details provided by Shopify.
- Complete Checkout: Verify the entire checkout process, including payment and order confirmation.
- Review Email Notifications:
- Check Order Emails: Ensure that order confirmation, shipping, and any other automated emails are correctly formatted and sent to the right addresses.
- Test Shipping Rates:
- Add Items to Cart: Add items to your cart and proceed to checkout.
- Enter Shipping Details: Enter different shipping addresses to test various shipping rates and options.
- Verify Tax Calculations:
- Enter Different Locations: During checkout, enter different billing and shipping addresses to verify that tax rates are applied correctly.
- Check Store Functionality:
- Navigation: Ensure all links and menus work correctly.
- Search Function: Test the search bar to verify that it returns accurate results.
- Product Pages: Check that product pages display correctly with accurate details, images, and pricing.
- Mobile Responsiveness:
- Use Different Devices: Access your store from various devices (e.g., smartphone, tablet, desktop) to ensure it is mobile-friendly and responsive.
- Test Payment Methods:
- Enable Real Payment Methods: Temporarily enable real payment methods in “Settings” > “Payments.”
- Place a Real Order: Use a real credit card to place a small order and ensure the payment gateway processes the transaction correctly.
- Refund the Order: After testing, refund the transaction to check that refunds work smoothly.
- Review Analytics:
- Verify Tracking: Ensure that Google Analytics, Facebook Pixel, and other tracking codes are correctly installed and recording data.
- Test Speed and Performance:
- Use Tools: Use online tools like Google PageSpeed Insights or GTmetrix to check your store’s loading speed and performance.
Step 11. Launch Your Shopify Store

- Remove Password Protection: Go to “Online Store” > “Preferences”
- Disable password protection to make your store publicly accessible.
- Review and Test: Double-check all settings and place a test order to ensure everything works correctly.
- Go Live: Click “Save” to finalize your changes and launch your store to the public.
How To Start Selling On Shopify With Very Little To No Money?
Speaking for real, eCommerce is not a walk in the park; both success and failure can come in the blink of an eye. But with small, careful steps that I will take you through now, your online store can have a good start at a little cost.

Build a business plan
A business plan is a document made by you to describe your business, products, or services, how to start making money on shopify, the leadership, and staffing, the operation model, the financing, and other essentials to success.
So why do you need a business plan? Well, for several benefits:
- If you are just trying things out: Your business plans can help you set clear goals and have an action plan to achieve them. This will also help you realistically estimate budget and cost.
- If you are looking for funding: The business plan is a standard way to tell potential investors why they should bet on your business.
- If you are considering going big: If you want to make your eCommerce business a full-time job, you need a business plan to see the options you have and what to do if things fail.
Since you are looking for the lowest cost possible way to start a Shopify store, this business plan will help you keep things organized nicely and reasonably for the long run.
These are the questions that you would want to answer with your business plan:
- Overview: Who are you and the business you are owning?
- The Opportunity: What is the current customer’s problem? And what is your solution to it?
- Target Market: Gender, Age, Characteristics of your prospect? How are your products better than competitors? How much funding is needed? and for what?
- Sales and Marketing: What channels should you use to reach your prospects? With what marketing activities? Current and expected Sales, Expenses, and Profit? What are the milestones?
- Team & Key Roles: Who are they? What do they do?
- Partnership & Resources: Who can help you? and which services to go to when you need something.
Through time, your business plan can always expand and change, but the key thing is it helps you see what you do, keeps you on track, and makes clear goals to achieve.
Decide on your niche
The choice of products has a crucial role in determining the success of your online business. You can focus on a single product line and then expand to multiple lines depending on your budget and resources.
In case you want to have a more detailed guide on how to find products to sell online, read our resource on What To Sell Online.
On another hand, dropshipping allows you to switch between ideas quickly, so you can easily try other things later. And it costs very little too, let’s see what it is!

Dropshipping – the perfect choice to start selling on Shopify with no money
In a way, dropshipping is like an eCommerce hack for entrepreneurs without money. You don’t hold inventory, you order the product from the supplier to ship directly to the customer under your name. Which means:
- No warehouse cost
- More items on your eCommerce store
- No money needed to purchase the items in the first place
- No picking and packing all the orders
With a system like that, anyone can get into an eCommerce business with little to zero cost, and of course, you can too!
Cost so far: 0$.
Also, you’ll learn some tips and tactics on how to get more sales from Corey Ferreira – a Shopify educator and dropshipping expert who built a 6-figure dropshipping business.
What to Do After Setup: How to Level Up Your Shopify Store
Create Your Brand
Building a robust brand is not merely about aesthetics; it’s about creating a perception, a feeling, and an emotional connection with your customers.
Designing Your Logo
- Reflect Your Identity: Ensure it captures the essence of what you’re selling and the ethos of your business. For instance, if you’re selling eco-friendly products, consider incorporating nature-inspired elements or colors.
- Free Online Tools: Platforms like Canva, Looka, and Hatchful by Shopify offer user-friendly design interfaces to create professional-looking logos without any design experience.
- Color Matters: Different colors evoke different emotions. Research color psychology to understand which colors align best with your brand’s message.
- Versatility: Ensure your logo looks good in various sizes and on different platforms, from social media icons to large banners.

Beyond the Logo
- Brand Story: Every brand has a story. Whether it’s how you started or why you’re passionate about what you sell, sharing your journey can create a deeper connection with your audience.
- Tagline: Think of a catchy, concise phrase that encapsulates your brand. It should be memorable and give insight into what you offer or stand for.
- Typography: Choose a consistent font style for your website, marketing materials, and products. Typography plays a subtle yet crucial role in conveying brand personality.
- Visual Elements: Beyond the logo, consider other design elements like patterns, icons, or illustrations that can be consistently used across your Shopify store and marketing materials.
Seek Feedback
As you develop your brand, seek feedback from potential customers, friends, or mentors. A fresh perspective can offer invaluable insights and highlight aspects you might have overlooked.
Product Imagery
Ensuring that your product images are high-quality, clear, and varied can significantly enhance user experience and boost conversions.

The Two Essential Types of Product Images
Product Shots
- Purpose: These images offer a clear and unobstructed view of your product, showcasing its features, design, and quality.
- Background: Typically, these shots are taken against a white or neutral background to avoid any distractions and to ensure the focus remains solely on the product.
- Angles and Zoom: Offer multiple angles of the product. Include close-ups to showcase intricate details or features.
- Consistency: Ensure consistency in lighting, size, and orientation for all products. This uniformity provides a professional look to your store and eases the browsing experience for customers.
Lifestyle Images
- Purpose: These images portray the product in real-life scenarios, helping customers visualize its use and benefits.
- Setting: Choose a setting that resonates with your target audience and aligns with your brand’s ethos. For instance, a camping gear product can be depicted in a forest or mountain setting.
- Models: If relevant, using models can offer scale and context to the product. Ensure the models reflect the diversity of your potential customer base.
- Storytelling: Lifestyle images can narrate a story, evoke emotions, or depict a desired lifestyle, thereby enticing customers not just to buy a product but to buy into an experience.
Continual Improvement
Regularly update product images based on feedback, product changes, or emerging trends. A/B testing, where you try different images to see which one resonates better with your audience, can also offer insights for improvement.
The dashboard will also feature a setup checklist, guiding you through essential steps to get your store up and running. Whether it’s adding products, setting up a payment gateway, or choosing a theme, the checklist ensures you don’t miss out on any crucial aspect of store setup.
Adopt Organic Growth Strategies
While paid advertising is an effective way to quickly attract customers to your store, organic growth strategies are essential for long-term, sustainable growth.
Organic growth refers to attracting customers without direct advertising costs, relying instead on high-quality content, authentic engagement, and word-of-mouth.
Here’s a closer look at the organic growth strategies you can implement when you start a shopify website:
Content Marketing: Crafting Value-Driven Content
It involves creating and sharing relevant and valuable content to attract and engage a specific target audience. The goal is not always direct sales but building trust and authority in your niche.

Social Media Marketing: Building Communities and Engagement
It revolves around creating content and engaging with your audience on social media platforms to build brand loyalty, awareness, and direct traffic to your website.
Email Marketing: Direct Line to Your Audience
A strategy where you send emails to customers and prospects to inform, engage, and promote.

Market your store
Configure Facebook Ads
Importantly, promoting your online store is just as crucial as setting it up. Facebook offers an unparalleled platform for reaching a vast audience. By harnessing the power of Facebook Ads, you can drive traffic, boost sales, and enhance brand awareness. Here’s a detailed guide on configuring Facebook Ads for your Shopify store.
Run Google Ads
Expanding your online store’s reach through Google Ads is a strategic move for those looking to tap into the vast potential of search engine marketing. Google Ads allows businesses to appear at the top of search results, making it easier for potential customers to find you.
Outsource Tasks
Expanding your Shopify store can be thrilling, but as orders pile up and responsibilities increase, it may become overwhelming to manage every aspect on your own.
To ensure smooth operations and maintain the quality of your brand, outsourcing certain tasks can be a game-changer.

Tasks Ideal For Outsourcing
- Content Creation: Engaging content can drive traffic and boost sales. Hiring professional writers or videographers ensures your brand message is communicated effectively.
- Customer Service: As your customer base grows, so will inquiries and complaints. Consider hiring dedicated customer service personnel or a virtual assistant to ensure prompt responses and high customer satisfaction.
- Advertising: Digital advertising can be complex. Outsourcing to specialists ensures that your ad budget is utilized effectively and optimally.
- Accounting and Finances: Bookkeeping, tax preparation, and financial forecasting are critical tasks that require precision. An experienced accountant can keep your business financially healthy and compliant.
Influencer Marketing

Finding the right influencers
- Relevance: Ensure the influencer’s audience aligns with your target demographic. It’s not just about large follower counts; it’s about the right followers.
- Engagement: An influencer with high engagement (likes, comments, shares) usually has a more active and invested audience. This can translate to better visibility for your product.
- Authenticity: Choose influencers who are genuine in their endorsements and aren’t flooded with too many promotional posts, which can dilute their impact.
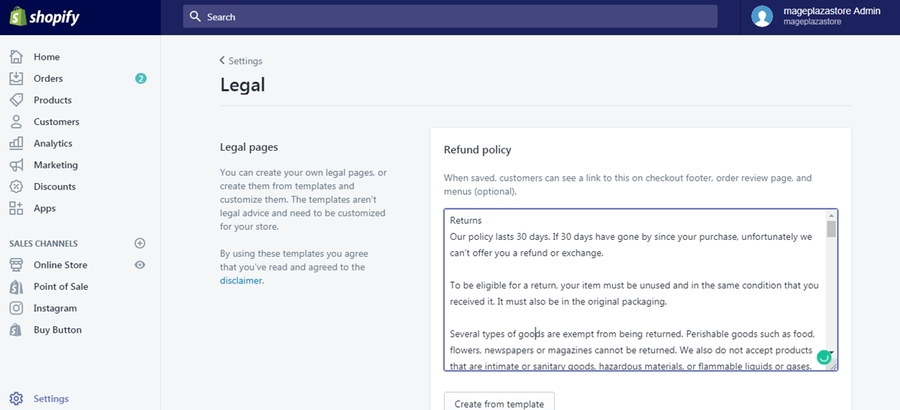
Set Up Legal Pages
Having clear and accessible legal pages is not just a good practice for transparency; it’s also essential for compliance, trust-building, and ensuring smooth operations of your online store. Shopify simplifies this process by offering templates for key legal documents.
- Privacy Policy: This essential document outlines how you will handle and protect your customers’ personal information. Given the emphasis on digital privacy in today’s world, having a clear privacy policy can help build trust with your customers and ensure you’re compliant with data protection laws.
- Terms of Service: This document provides the rules and guidelines that customers must agree to start a shopify website. It covers areas like payment methods, delivery terms, returns, and other vital aspects of the purchasing process.
- Refund Policy: Clearly articulating your return and refund procedures ensures transparency and can prevent potential conflicts with customers in the future.
Saving the Legal Pages
- Once you’ve customized each policy to your satisfaction, click the “Save” button at the bottom.
Pro Tip: Legal pages play a critical role in building trust. Ensure that your language is clear, concise, and free from excessive legal jargon. Your aim should be for customers to understand their rights, responsibilities, and how their data is used without feeling overwhelmed or confused.
Scale and Optimize
Analyze customer feedback, website analytics, and sales data to pinpoint areas that require attention. Maybe it’s tweaking your marketing strategies for better ROI, introducing new, trending products, or even revamping the store’s design based on user behavior.
Moreover, growth doesn’t just mean scaling upwards; it’s also about evolving with the market. The digital landscape, especially e-commerce, witnesses swift shifts in consumer behavior, technology, and trends.

As you progress through 2024 and beyond, it’s essential to remain vigilant and adaptable. This adaptability can mean exploring untapped markets, adopting emerging technologies, or simply refining your brand messaging.
FAQs: How To Start With Shopify
Starting on Shopify involves a few costs, including the monthly subscription fee, the cost of a custom domain, and any additional apps or plugins you may want to integrate. Shopify’s basic plan starts at $39 per month.Absolutely! Shopify is designed for users of all technical levels. With its intuitive drag-and-drop interface, pre-designed themes, and comprehensive support resources, you can create and customize your online store without any coding knowledge.Shopify offers a 3-day free trial, allowing you to set up and test your store without any charges. However, to make your store live and accept orders, you’ll need to select a paid plan.There are several ways to create an online store without holding inventory:- Dropshipping: You partner with a supplier who ships products directly to your customers.
- Print-on-demand: Products are created and shipped only after a customer places an order.
- Digital products: Sell items like ebooks, courses, or software that don’t require physical inventory.
- Affiliate marketing: Promote other people’s products and earn a commission on each sale. </ul> </div> </div> </div>
Yes, Shopify is user-friendly and offers a variety of tools and features that make it suitable for beginners.Yes, Shopify’s ease of use makes it a good option for novices. The platform provides resources and support to help you get started, even if you have no prior experience.No, you will eventually need to pay for a Shopify subscription to start selling.</div>Most beginners make $0-$1,000 per month on Shopify.How To Start With Shopify: Conclusion
In conclusion, mastering how to start a Shopify website can pave the way for your e-commerce success, empowering you to tap into a world of digital opportunities and growth.