
How does Shopify work: A step-by-step guideline
By Sam Nguyen

This guide will break down how does Shopify work process into more straightforward steps that empowers businesses to thrive in the online marketplace.
Key Takeaways
- Shopify is a fully-hosted, cloud-based ecommerce platform suitable for businesses of all sizes, offering a comprehensive suite of tools to establish, manage, and sell products online.
- Understanding how to set up a Shopify store, add products, manage payments, and leverage marketing tools is crucial for successful ecommerce operations.
What is Shopify?
Shopify is a leading name in e-commerce, defined as a fully-hosted, cloud-based ecommerce platform. This robust solution caters to businesses of all sizes, providing a versatile framework for creating your online store without complex coding.
Shopify’s standout attributes lie in its website features and comprehensive ecommerce tools. From creating captivating online storefronts to managing sales and inventory, Shopify offers a robust suite of functionalities.
For any online store’s success, Shopify has everything you need—no software installation or hosting services required.
How does Shopify Work
Shopify simplifies your business by combining your product details, customer information, and tasks in one place that smoothly links to all your sales platforms. After setting the basics, Shopify makes it a breeze to venture into new products and sales channels.
Now, let’s take a step-by-step journey through how Shopify operates, starting with the initial setup and moving on to effective sales management.
A. Setting Up a Shopify Store:
Creating a Shopify Account
Step 1: To begin your Shopify journey, take advantage of a free three-day trial.
Here’s the unique – no upfront credit card details required. Shopify just needs your basic information and email address.

After that, Shopify will ask you a few questions about yourself to know you better. You can smoothly transition to the next question with a click on the “Next” button, or if you prefer, skip ahead with the “Skip” button.
Now, let’s pinpoint your business’s home turf. A simple click on the “Next” button after selecting your business’s location will propel you forward.

Before you dive into your trial, there’s one last step – creating your Shopify ID by completing with your email address and a password. This swift process ensures seamless future logins.
But here’s a golden rule: Verify the email Shopify sends you. This added step enhances the safety net for your business.

Customize your store with themes

In the panel admin, you click on “Store online -> Themes” to shape your website’s appearance.
Next, just pick a theme from Shopify’s options, click “Add Theme,” and then select “Customize” in the Theme Manager to change your webpage.
With over 140 store themes available, Shopify offers convenient drag-and-drop functionality for personalizing colors, images, and fonts.
B. Adding Products:
Set up your collection
Shopify offers two distinct collection types: Automated and Manual collections, each serving unique methods to create your collection.
- A manual collection in Shopify is a customized selection of specific products that you choose. The collection will contain the same products unless you add or remove items.
- An automatic collection uses conditions to include products that match specified criteria, you can streamline your product organization with up to 60 conditions.
Please note that converting an automatic collection to a manual collection is not feasible.

To create a manual collection or automatic collection in Shopify, you can start by accessing your Shopify admin panel and navigating to Products > Collections. Then, click on the “Create collection” button.

Here, you’ll input a title and description for your collection. In the Collection type section, select “Manual” to create a manual collection. If you want to create an automatic collection, choose “Automated.”
After making your choice, don’t forget to click “Save” to finalize the creation of your manual collection.
Finding the products you want to sell
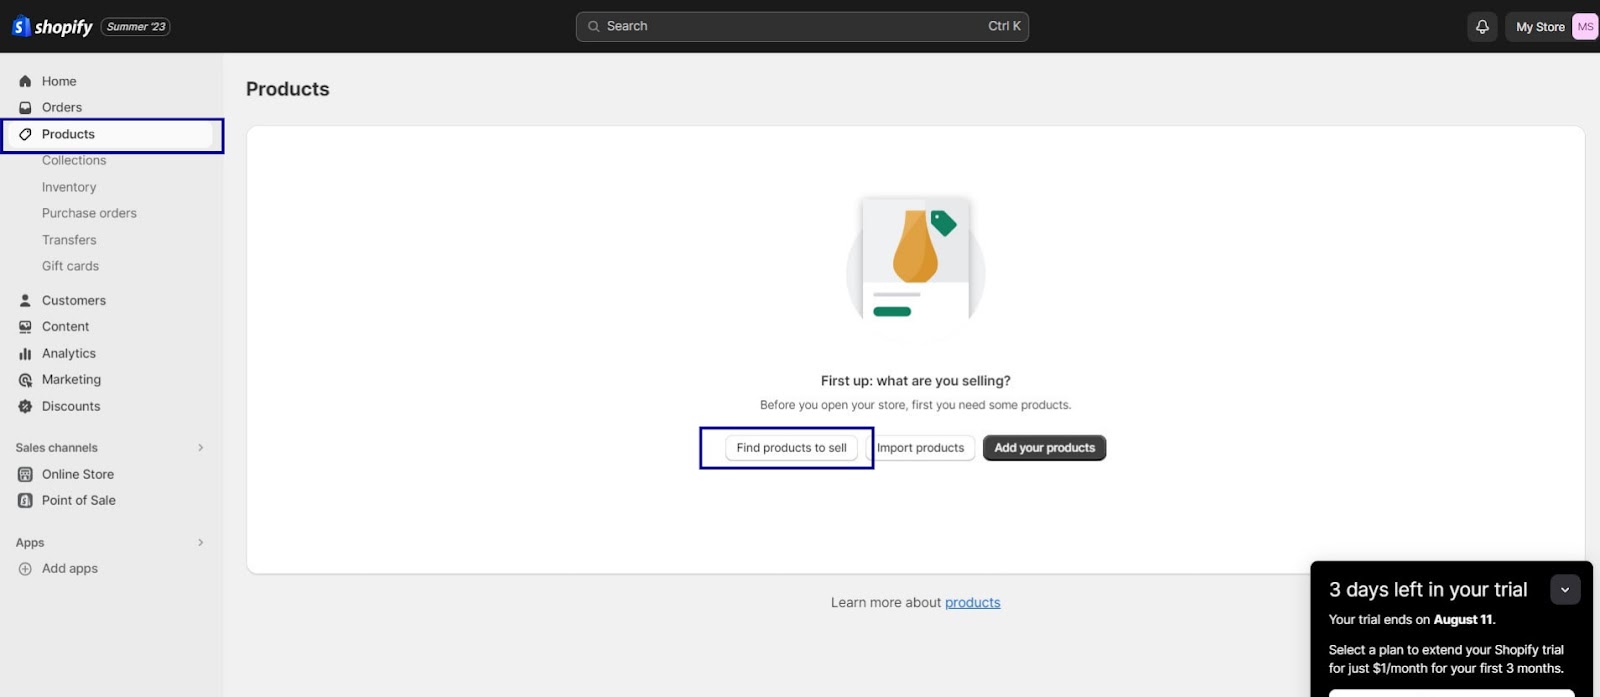
To start your journey, it’s wise to explore products and a market niche that resonate with your strengths, promising substantial profits. All you need to do in this step is choose “Products” -> “Find product to sell” to be redirected to Shopify’s app store page.
Adding Product
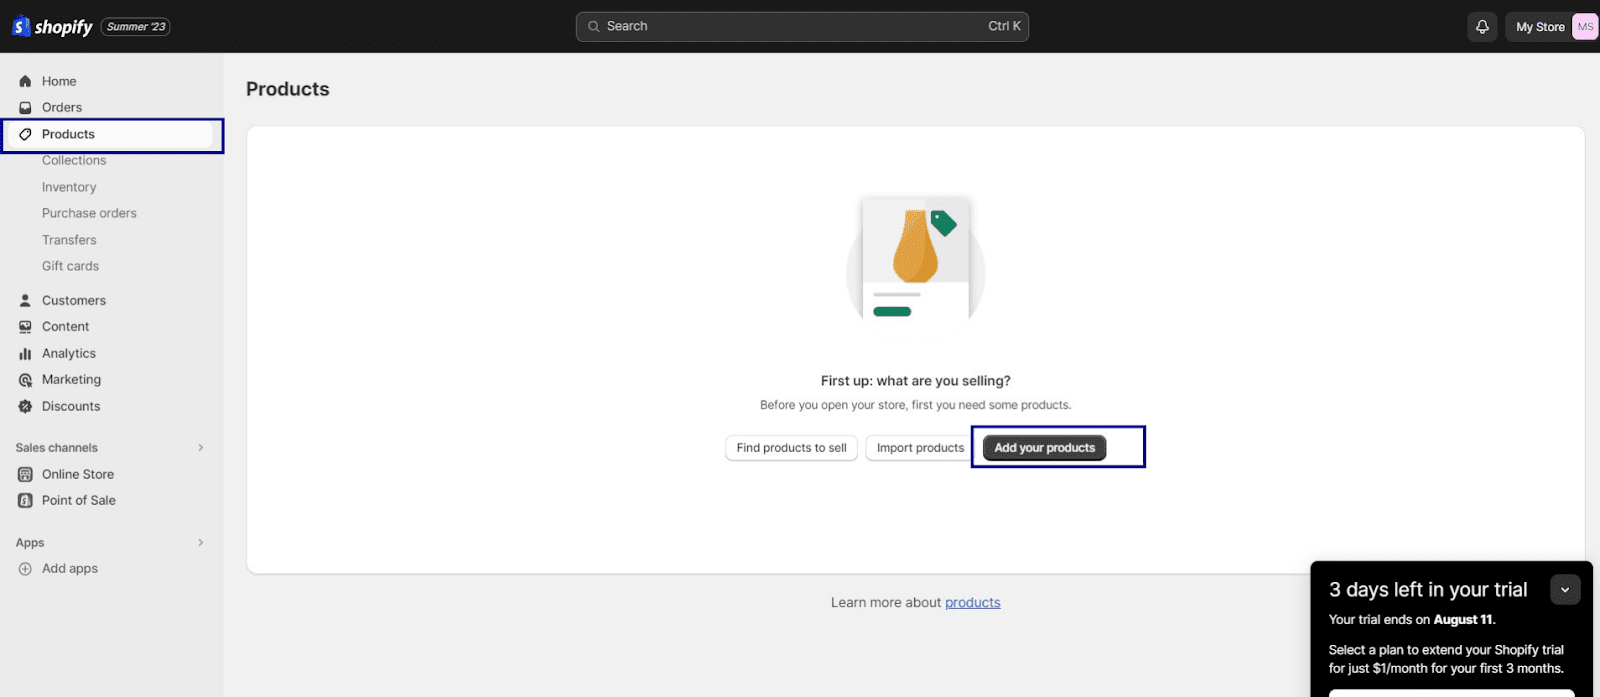
In case you already have your product list, to add a product on Shopify, navigate to the “Products” section and select “Add Products.”
It’s crucial to provide comprehensive product details during this step, as this is where potential customers gather information to make purchasing decisions. Ensure you include as much relevant information as possible.

Don’t overlook the significance of product images – upload visuals that effectively showcase your product’s unique features and benefits. Once you’ve completed the product information and images, click the “Save product” button to finalize and save your product listing.
An important step you need to take is to assign your products to a collection, which will display and manage the product catalog on your storefront.
To add a product to a collection, you go to the “Products” section, click on the product you want to add.

In the “Collections” section, choose the existing collections you want to add the product to. Click “Save” to add the product to the selected collections. This way, you can easily organize your products within specific collections.
Manage Inventory
Managing your inventory yields multiple benefits. It prevents overselling by accurately tracking stock levels and determining the right time for restocking or producing more items.
For direct alerts on low stock levels, you may consider installing an inventory alert app available on the Shopify App Store.

The Inventory page of Shopify allows you to oversee inventory, make count adjustments, and initiate transfers. You can track inventory changes’ history for products and variants under Shopify’s inventory tracking.
To enable inventory tracking, you access a product’s details page in your admin panel.
You type an SKU (stock-keeping unit) showing a number to clarify each item. Especially, before specifying the available quantity, you had better change the “Inventory policy” to “Shopify tracks this product’s inventory.”

By doing this, Shopify can help you track how many items were already sold and how many left in your store.
C. Payment and Shipping:
How Shopify handles payment processing and shipping settings
Shipping stands out as a notably intricate aspect in E-commerce operations. Rates hinge on factors like product weight, packaging, locations, carriers, expected profit per order, and more.

To manage this, visit Settings -> Shipping and Delivery for access to Shopify’s Shipping page. Here, you can define your preferred shipping rules encompassing label printing and order fulfillment while Shopify handles the remaining logistics.
Shopify Shipping simplifies fulfillment with leading carriers like UPS and DHL, granting access to competitive rates. This minimizes delays and enhances reliability by collaborating with third-party providers. You can enjoy streamlined operations and dependable deliveries through Shopify Shipping.
Shopify’s payment gateways enable you to collect customer payments on your website. The ideal gateway involves considering factors like prices, commissions, and features. Shopify offers two integration options: Shopify Payments or third-party providers like PayPal and Amazon Pay.
The advantage of third-party options is their global availability, with over 100 payment gateways. However, fees and transaction percentages can vary among providers. You should choose wisely to optimize your payment processing.
The other choice is Shopify Payments, which serves as Shopify’s internal payment processor, facilitating payments via diverse methods like debit/credit cards, Amazon Pay, Apple Pay, and cryptocurrency.
How to set up Shopify Payment
Set up your Shopify Payments account, including business info and banking details, within 21 days of your first sale. Otherwise, payments could be refunded. If you are a store owner in the EU and Hong Kong, this setup is a prerequisite for accepting customer payments.
When preparing for the Shopify Payments setup, prioritize selecting your store currency first. You can contact Shopify Support for assistance if you need to adjust currency after the post-initial sale.
Setting up Shopify Payments is a breeze. Just follow these steps:
Step 1: Access your Shopify admin and navigate to Settings > Payments.
Step 2: Activate Shopify Payments by choosing one of the following methods:
- If you haven’t set up a credit card payment provider yet, click Complete account setup in the Shopify Payments section.
- If you already have another credit card payment provider enabled, click Activate Shopify Payments in the Shopify Payments box, and then confirm the activation in the dialog. This action will replace any existing credit card payment provider on your account.
D. Managing Orders and Customers:
Managing Orders
When customers buy from your sales channels, their orders appear in Shopify’s Orders section. You can also create draft orders manually in your admin for outside sales or invoicing. Shopify helps you manage all your store’s orders easily from the Orders page in your Shopify admin panel.
In addition to processing orders and receiving payments, you can tag, add notes, check the order’s Timeline, and communicate with customers for open orders.

You can manage the orders by selecting “Order” in the admin page, a screen with a list of orders will be displayed.
By clicking on an order in the list, you can view the details of that order. If you want to create a new order, click the “Create an Order” button on the right corner of the screen.
Managing Customers Relationship

Every time a new customer places an order with your store, their name, and other details are added to your customer list. You can review all of your customers and manage your customer information from the Customers page of your Shopify admin and the Shopify app.
A customer profile is generated when:
- Signing up for mailing list or customer account
- Placing an order
- Initiating an order but abandoning checkout
- Manual addition to your store
Otherwise, you can also create customers manually by following these steps below:
Step 1: Go to “Customers” in your Shopify admin.
Step 2: Click “Add customer”.

Step 3: Enter the customer’s details.
Step 4: Optionally, if they agreed to receive marketing emails and provided an email address, check Customer agreed to receive them in the Customer overview.
Step 5: In the Tax exemptions section, choose one of the following:

- If you charge sales tax, check “Collect tax”
- If the customer is tax-exempt in Canada, select the applicable exemptions from the list.
Step 6: Click “Save”.
E. Marketing and SEO
You can maximize your Shopify store’s marketing using diverse tools available. Shopify allows you to access vital data like marketing KPIs and top channels, while setting up activities within the Shopify Marketing section.

Shopify offers email marketing features if you choose email marketing as one of your primary channels for marketing. You can start doing this as soon as potential customers that visit your website opt in to receive communications from your brand via emails.
Enhancing SEO on Shopify offers significant benefits for Shopify online store owners. By optimizing your store’s visibility on search engines and social media platforms, you can increase the chances of potential customers discovering your products.
Moreover, Shopiy helps you to run enticing promotions like seasonal and flash sales to drive higher traffic and boost sales for your store.
Detail information on Shopify’s SEO & Marketing Tools in this article: Shopify SEO: A Guide to Generating Store Traffic (2023)
F. Analytics and Reports
Shopify offers robust tools to help users monitor and comprehend their store’s performance comprehensively. Through detailed analytics, users can gain insights into their sales, customer behaviors, and website traffic.
Tracking the sale volume

You can utilize Shopify’s sales reports to access valuable insights into your customers’ orders, offering data based on various criteria such as sales trends over time, specific products, or sales channels. But the access to sales reports is exclusive to stores on the Shopify plan or higher.
When you access a sales report, the data is current, with a variance of about 1 minute. You can refresh the report to display more recent data. However, it may take 12-72 hours for sales to appear in the Sales by discount report.
To view sales reports on Shopify, follow these steps:
- Step 1: Access your Shopify admin.
- Step 2: Navigate to “Analytics” > “Reports”
- Step 3: Click on “Categories”. Select “Sales” to filter the reports and display only sales-related information.
Understand your customers
Begin by envisioning the type of customers interested in your products. Consider their characteristics, such as gender, age, roles, location, and economic status. Identify specific traits or challenges they may have.
Understanding your customers better enhances your marketing strategy, focusing on those likely to purchase.
Here’s how to access your customer reports:
- Step 1: From your Shopify admin, navigate to “Analytics” > “Reports”.
- Step 2: Click on “Categories”
- Step 3: Select “Customers” to filter the reports, displaying only customer-related reports.
How to effectively sell on Shopify: An Ultimate Guide
After you know how Shopify works, including how to add products, handle payments, and so on. So now let’s come to how to sell products with Shopify.
Products that are sold/not sold on Shopify Store
Shopify is renowned for being a comprehensive platform designed to facilitate the sale of a wide range of products. However, to foster a sense of community and uphold their brand image, Shopify maintains a well-defined categorization of products permissible for sale on their platform.
So, what types of products are sold on Shopify? Here is the list:
- Physical products: Shopify facilitates the sale of tangible items that can be shipped or picked up in person.
- Digital products: You can distribute digital goods like eBooks or software, granting instant access to customers upon purchase.
- Dropship items: Collaborate with suppliers to directly fulfill orders to customers, making dropshipping a seamless process.
- Products & services: Shopify supports a wide range of offerings, from physical goods to intangible services, providing versatility for businesses.
- Online courses: Entrepreneurs can leverage Shopify to sell and manage online courses, sharing knowledge with their audience.
- Tickets and passes: Sell tickets and passes for events or experiences, facilitating customer access.
- Rentals sports equipment, formal wear, and cameras: Offer rental services for items such as sports equipment, formal wear, or cameras, providing customers with temporary access.
- Donations and fundraisers: Utilize Shopify to raise funds for various causes and initiatives.
So, what types of products cannot be sold on Shopify?
Shopify maintains an extensive catalog of prohibited and restricted items, encompassing diverse categories like financial services and regulated products.
- Alcohol: Craft breweries are included in the list of prohibited items, preventing alcohol sales on Shopify due to age restrictions.
- Tobacco and E-Cigarettes: Smoking-related products like tobacco, e-cigarettes, and accessories are prohibited on Shopify.
- CBD Products: While CBD is legal in some areas, Shopify imposes restrictions on selling CBD items, requiring specific forms for US-based sellers.
- Fireworks: Even legal fireworks can’t be sold on Shopify, restricting the use of its Payments Services.
- Firearms and Weapons: Firearms, weapons, and related items are prohibited, irrespective of location or state laws.
- Solvents: Stores dealing with solvents, including lighter fluids, are prohibited businesses.
- Pharmaceuticals: Online pharmacies, nutraceuticals, peptides, and health-related products claiming benefits are prohibited.
- Gaming Restrictions: Shopify restricts the sale of gaming-related items like internet gaming, video game currency, and age-restricted games.
- Certain High-Demand Items: Recent updates led to the prohibition of specific items like masks, sanitizers, and disinfectants, affecting even legitimate merchants.
Start selling on Shopify
Ready to begin your journey selling on Shopify? It’s more straightforward than you imagine!
Kickstart your Shopify experience with a 3-day free trial. You’ll be able to set up your store and see how everything works before committing. Plus, you only need to pay once you’re ready to publish your store.
Next, to start selling products on this platform, you have to pay a monthly fee. Shopify offers five monthly pricing plans tailored to different business needs from $5 to $2000 per month. (Includes: Shopify starter, Shopify basic plan, Shopify, Shopify advanced plan and Shopify plus )
After completing registration, you should select the right products for your Shopify store. This involves determining what items you intend to sell within your store’s inventory.
Here are a couple of ways to generate product ideas:
- Combine Existing Products or Concepts
- Develop Solutions to Customer Problems
These approaches can aid you in formulating a well-informed product selection for your Shopify store.
Five tips to selling on Shopify – tips for first sales
As you set out on your Shopify journey and strive for those crucial first sales, consider these five valuable tips for a successful start.
Create Ads
Running online advertising is a powerful way to promote your products, including platforms like Facebook Ads, Google Ads, and Pinterest Promoted Pins. However, it’s important to remember that these advertising methods typically involve costs.
Utilizing platforms such as Facebook Ads, Google Ads, and Pinterest Promoted Pins for online advertising can be a robust method to promote products. However, these approaches generally come with associated expenses.
Leverage SEO
Leveraging search engine optimization (SEO) strategies, you can enhance your store’s ranking on search engine results pages. This facilitates potential buyers easily find your products.
Below are key recommendations:
- Integrate strategically chosen SEO keywords into your Shopify store content.
- Streamline your website’s structure to enhance its visibility on search engines.
- Identify and submit your sitemap to ensure efficient indexing by search engines.
- Leverage the option to prevent specific pages from being indexed if necessary.
Use High-quality Photos
Mastering the art of image optimization can lead to significant benefits, including faster website loading speeds, improved brand presentation, and increased visibility among shoppers browsing through Google images.
Here are some tips to optimize images for the web
- Select the right image dimensions and angles for product shots.
- Resize images to reduce page load times, aiming for file sizes below 70 KB.
- Choose the appropriate image format (JPEG for quality and small size, GIF for simple images, PNG for detailed images).
- Optimize thumbnails for faster page loading, varying alt attributes and maintaining smaller file sizes.
- Utilize image sitemaps to help Google index images on your site.
- Use content delivery networks (CDNs) cautiously, considering backlink implications.
Use Upselling and Cross-Selling Techniques
Upselling and cross-selling differ in their approach: upselling suggests a higher-priced product upgrade, while cross-selling focuses on selling related items.
How to upsell to customers
How can you effectively implement upsells that align with customer preferences and business goals?
- Choose Complementary Products: Consider displaying related products or bundles for a cohesive shopping journey, enhancing their experience, and encouraging additional purchases
- Offer Discounts: Provide discount coupons for future purchases through pop-ups or email sequences, fostering repeat business and enticing customers with savings opportunities.
- Showcase Upgrades: Present upgrade options alongside desired products or during checkout, enticing customers to elevate their purchase for improved value and satisfaction.
- Create Subscriptions: Introduce subscription plans to transform one-time purchases into recurring transactions, fostering customer loyalty and predictable revenue streams.
- Provide Free Shipping: Incentivize larger orders by offering free shipping for minimum purchase thresholds, encouraging customers to increase their cart value to avoid shipping fees.
Sell with Shopify Sales Channels
Shopify’s Sales Channels is a robust tool that lets you link your store to various marketplaces, all while managing orders, inventory, and reports from the Shopify Dashboard.
Here’s how to do it in steps:
- Step 1: Access your Shopify Admin and navigate to “Sales Channels”
- Step 2: Click the “Add” button.
- Step 3: Choose from the available sales channels listed on the Shopify App Store.
- Step 4: For specific products, go to their “Product Pages”
- Step 5: Scroll down to “Product Availability”
- Step 6: Select the desired sales channels for each product.
Shopify offers a range of outstanding sales channels, each equipped with unique features to enhance the experience for Shopify store owners:
- Social Media Integration: Effortlessly integrate your Shopify store with social media platforms like Facebook’s Shop tab, Messenger for direct interactions, Instagram’s product tagging, and Pinterest’s “buyable pins.”
- Marketplace Expansion: Extend your sales reach by connecting your Shopify store to prominent marketplaces like Amazon and eBay. This integration lets you tap into a larger customer base and gain visibility in well-established online marketplaces.
- Embeddable Buy Button: Enhance your online presence by embedding your products onto external web pages using the Shopify Buy Button, letting you showcase your products on partner websites or blogs.
- Shopify POS (Point of Sale): Offer a versatile solution for selling products and accepting payments on any device, providing a cohesive omnichannel experience for both in-store and online customers.
How Much to Sell on Shopify?
Shopify offers five monthly pricing plans to suit different business needs. The plans start from $5 to $2,000 per month.
Shopify POS – Selling in person with Shopify
Apart from online sales, Shopify facilitates offline transactions through its POS system. The Shopify POS Lite package offers essential features, while the PRO add-on provides access to advanced POS functionalities.
Shopify POS Pro costs $89 per month per location, with a 3-day free trial period for testing. Opting for an annual subscription yields a 10% discount, reducing the monthly cost to $79 per location.
For details on how to sell in person with Shopify, check out this article: Shopify POS Pro: Selling In-Person Effectively with Shopify
Dropshipping on Shopify
Dropshipping is a business model where entrepreneurs sell third-party products from their online store.
How does Shopify dropshipping work?
While dropshipping may appear as an effortless path to quick wealth, it’s not. Similar to any e-commerce venture, it demands a commitment to set up.
Dropshipping enterprises can evolve into dependable and efficient collaborators for burgeoning e-commerce ventures, streamlining order and fulfillment procedures when executed effectively.
Dropshipping on Shopify operates through these streamlined steps:
- Step 1: Customer places an order on your online store.
- Step 2: Your store automatically forwards the order to your chosen dropshipping supplier.
- Step 3: Dropshipping supplier prepares the customer’s order.
- Step 4: The supplier ships the order directly to your customer.
This approach simplifies the process, enabling you to focus on business management while ensuring smooth order fulfillment and delivery for your customers.
How to start a Shopify dropshipping business
Here, we’ll guide you through the steps to build your own functional Shopify dropshipping store for profitable operations.
- Step 1: Product Idea Exploration
- Step 2: Choose a Memorable Store Name
- Step 3: Set Up Your Shopify Account
- Step 4: Fine-Tune Your Shopify Store Settings
- Step 5: Adding your products
- Step 6: Design Your Store’s Look
- Step 7: Launch Your Shopify Dropshipping Store
To more detailed, you can follow: How to Start a DropShipping Business with Shopify?
Shopify Ecommerce platform: Pros & Cons
Shopify comes with its pros and cons, although undeniably one of the largest ecommerce platforms on the internet.
Pros
- User-friendly Interface
- Omnichannel selling
- Responsive templates
- Abandoned cart recovery
- Flexible pricing plans
- A wide range of apps & integrations
- Email marketing and SEO tools
- Multiple payment gateways
- Advanced reporting & analytics
Cons
- Limited free themes
- Transaction fees
FAQs
Final Thoughts
In conclusion, “How does Shopify work” is a question met with a straightforward answer: effortlessly. By following this step-by-step guideline, you’ll navigate the world of e-commerce confidently, tapping into Shopify’s versatile toolkit to build a successful online presence.
Related Posts


