
How to Set up a Test Mode in WooCommerce Easily

Payment is a critical element for online merchants and you should make sure to offer customers the best payment service. However, how can you tell if the checkout procedure is operating properly or your potential consumers have trouble completing their purchase?
Therefore, setting up a test mode is of great importance. In today’s article, we’ll show you how to set up a test mode in WooCommerce easily.
Why Should You Set up a Test Mode In WooCommerce?
-
When it comes to running an online business, the efficiency of accepting payments via online transactions is crucial, and you should make sure that this procedure is safe and convenient for both the seller and the customers.
-
Setting up a test mode helps with the smooth operation of online transactions. After you’ve completed the test mode, you’ll be able to ensure that any purchases made on your WooCommerce store are processed without errors and bugs before your website goes live.
-
As a result, testing your WooCommerce orders also reduces the risk of losing your consumers’ confidence and facing legal proceedings.
How to Set up a Test Mode in WooCommerce?
In this part, we’ll show you two different methods to set up a test mode for WooCommerce orders: from the WooCommerce dashboard, using plugins.
Method 1. From WooCommerce Dashboard
Enabling cheques from the WooCommerce dashboard is the simplest way to test WooCommerce orders.
It’s worth noting that there will be no online transactions in this approach because cheques are typically used for physical transactions as a convenient alternative to cash.
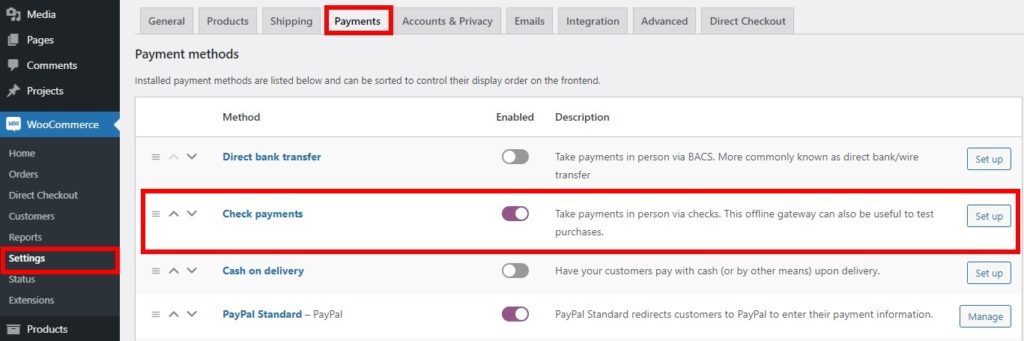
Step 1: Go to the Payments tab
First of all, you need to go to WooCommerce > Settings from your WordPress dashboard. Then navigate to the Payments tab.
Step 2: Enable the Check payments method
Under the Payments tab, you need to turn on the method Check payments in the Enabled column.
After that, click on the button Set up. If you’ve used cheques before on your store, you need to select Manage.
Now you’ll see a new page called Check payments.
In the Enable/Disable field, you need to check the box to enable check payments.
You must also fill in the needed information for the title, description, and instructions since they are all required. When you’re finished, click Save changes.
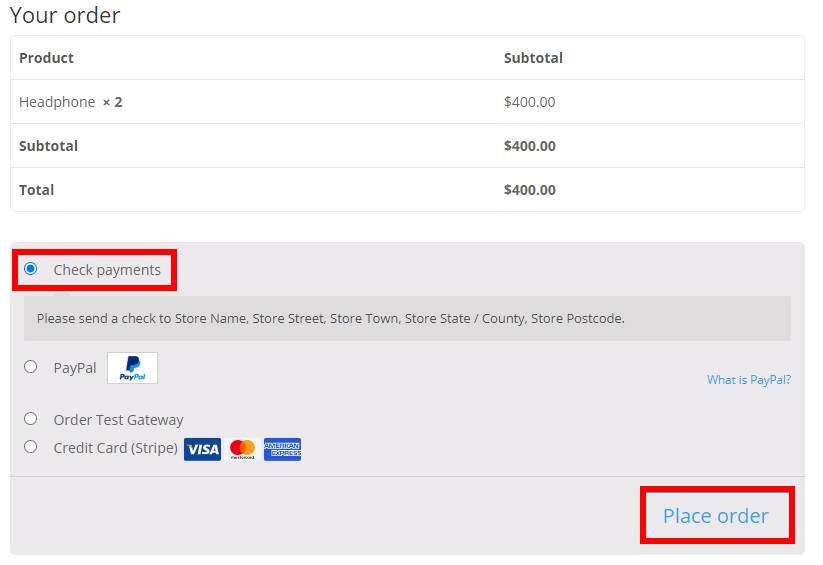
Step 3: Add a product to the cart
Now you head to your store’s front store and add a product to the cart. Then just go to the checkout page.
Step 4: Complete placing the order
Now you need to submit the required billing information, after which you need to choose Check payments as the payment option.
After that, click Place order to confirm your order.
After that, you’ll be directed to your previously placed order. As previously stated, this process does not include any online transactions; therefore, if you can see that your order was successfully processed with accurate details, your orders and transactions will operate correctly on your website.
And that’s how you test WooCommerce orders from the WooCommerce dashboard.
Method 2. Using Plugins
The next method we’d like to show you is using a plugin. All you need to do is download, install, and activate one of the following tools, depending on which payment gateways you use.
We’ll guide you how to do it with three plugins: WooCommerce Stripe Payment Gateway, WC Order Test, and PayPal in this section.
1. WooCommerce Stripe Payment Gateway
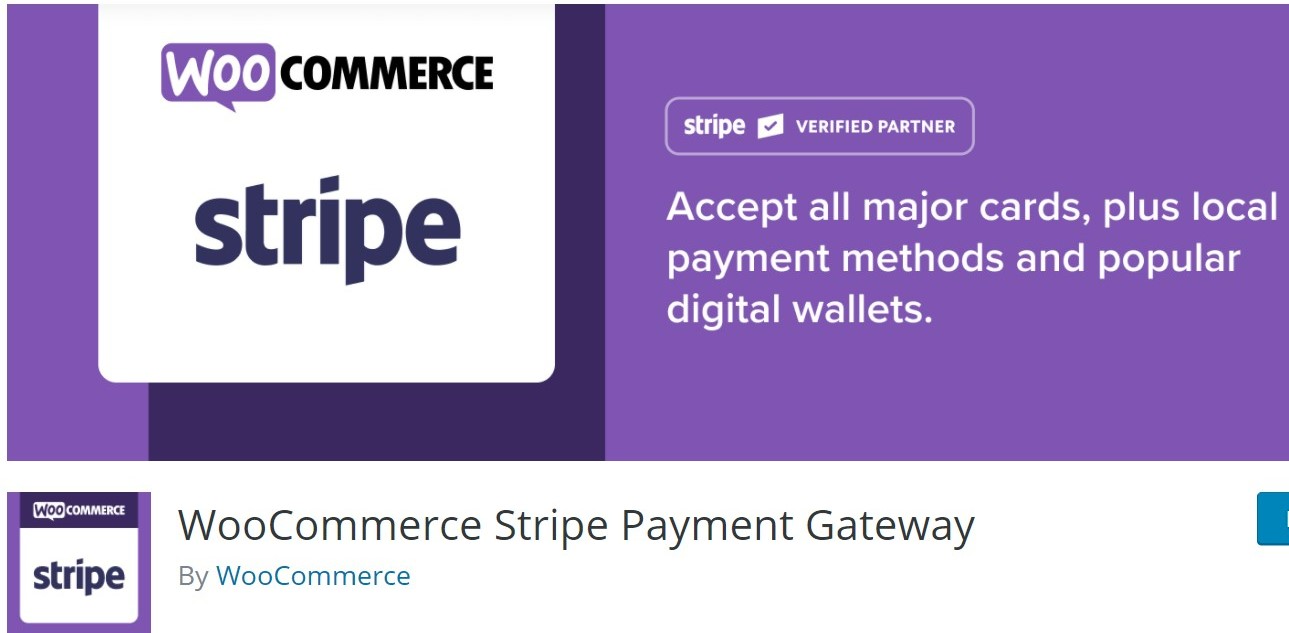
WooCommerce Stripe Payment Gateway is a WordPress plugin that connects Stripe and WooCommerce. Stripe is one of the most widely used payment gateways, so it is useful for online stores with international customers.
Step 1: Install and activate the plugin
Because this is a WordPress plugin, it must first be installed and activated. Go to Plugins > Add New and then search for “WooCommerce Stripe Payment Gateway” in the search box. After that, install the plugin by clicking Install Now and activate it by clicking Activate.

Step 2: Integrate WooCommerce with Stripe for test mode
-
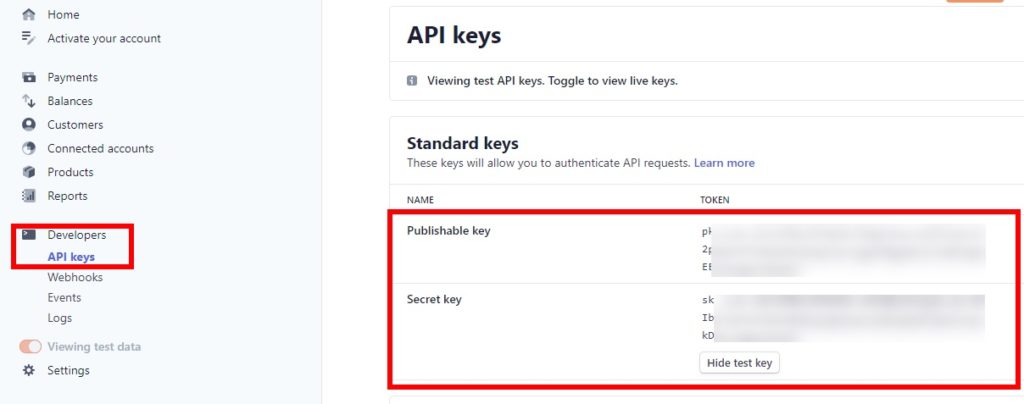
Once you’ve installed and enabled the plugin, you’ll need to configure it for test mode and obtain your API keys. To do so, log into your Stripe account and open the Developers > API keys section.
-
Here you will see the Publishable and Secret keys of your Stripe account. You have to copy both keys.
-
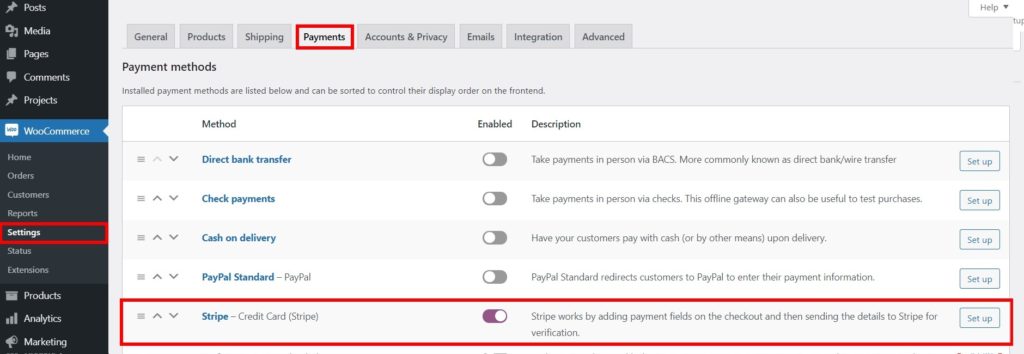
From your WordPress dashboard, go to WooCommerce > Settings and select the Payments option. You’ll get a list of all the payment options for your website.
-
Select the Stripe - Credit Card payment option by turning on the button in the Enabled/ Disabled column and then click Set up.
However, click the Manage button if you’ve already set up Stripe.
- Now you will see a new page with Stripe options for WooCommerce. Check the box for Enable Test Mode and paste the publishable and secret keys from the Stripe dashboard that you’ve just copied previously into the Test Publishable Key and Test Secret Key fields, respectively.
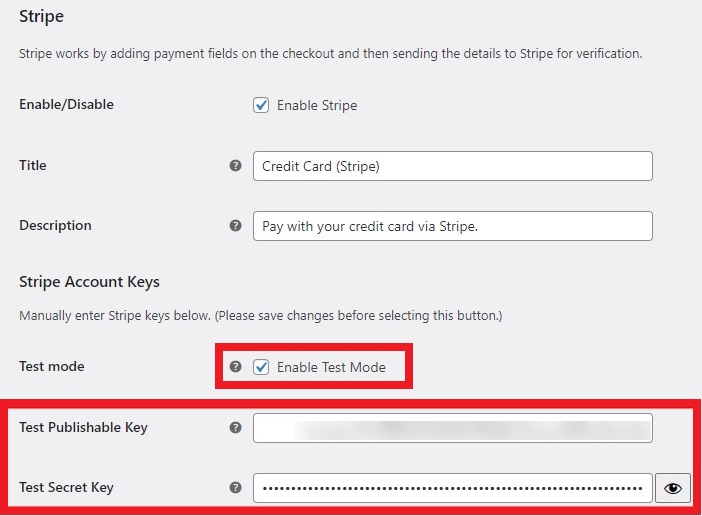
- Click Save Changes.
Step 3: Use Stripe to test the WooCommerce orders
It’s time to test your WooCommerce orders now that you’ve set up Stripe in test mode.
-
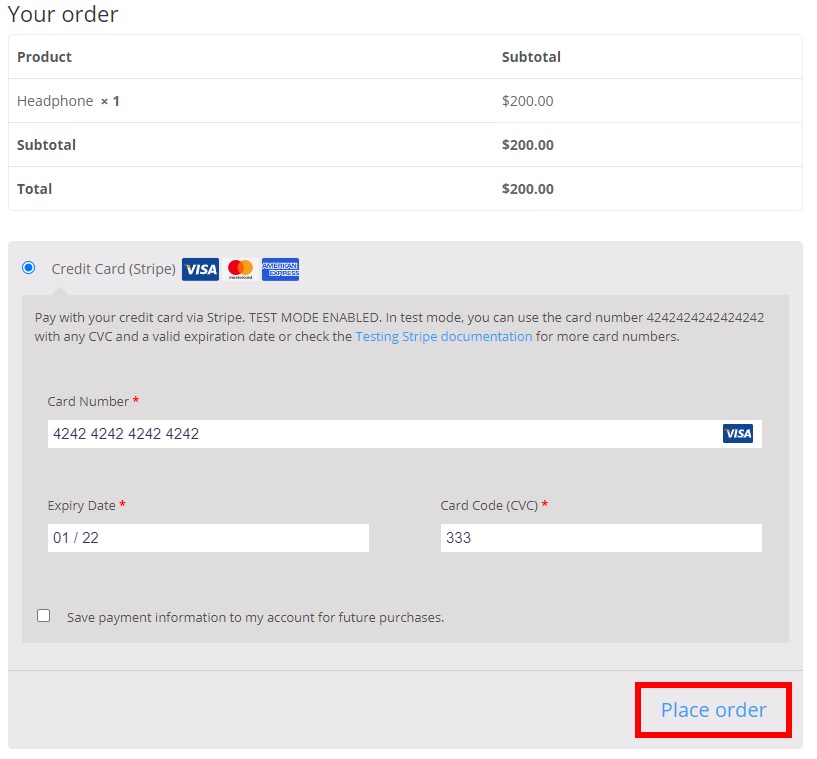
Go to the front end of your website and make a purchase. Add any item to your cart and go to the checkout page.
-
Fill in all of the relevant billing information, as well as Stripe’s payment card information.
You may enter any valid information for this test because it is only a test. For instance, you can enter “1313131313131313”. In the same way, you can enter any valid date and CVC code.
- When you’ve finished entering all of the fields, click Place Order to proceed.
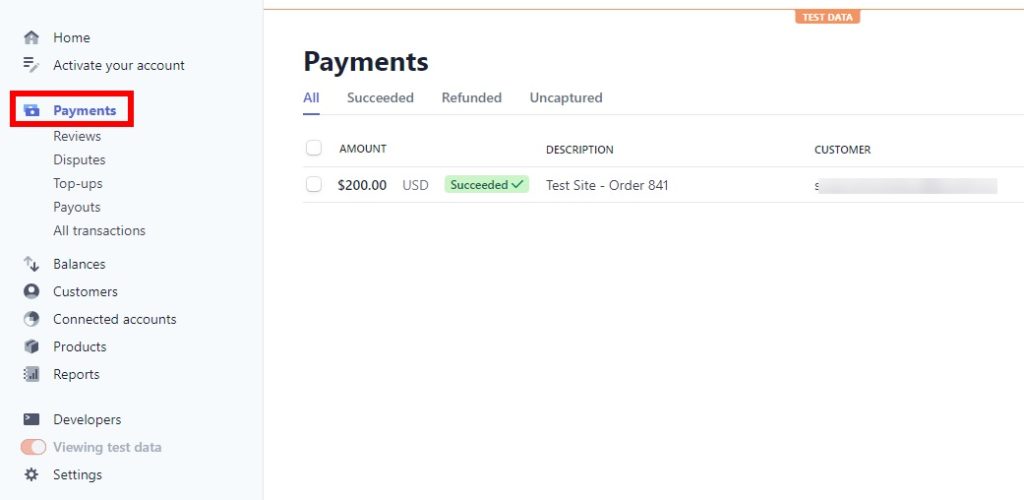
- Open the Payments tab on your Stripe dashboard. You can see the order you just placed.
If this is the case, Stripe-paid orders will operate fine, and you may begin selling your products using Stripe as your payment gateway.
-
From your WordPress dashboard, go to WooCommerce > Settings and open the Payments tab to help your website go live.
-
Go to the Stripe - Credit Card gateway and uncheck the “Enable Test Mode” option before filling in the required information. Remember to save your modifications once you’ve finished.
That’s how you set up a test mode in WooCommerce with the Stripe payment gateway.
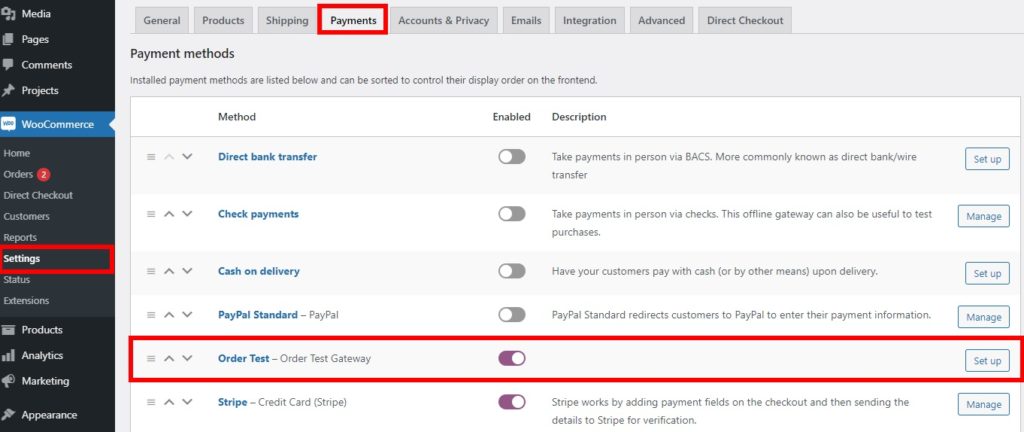
2. WC Order Test
WC Order Test is a straightforward and simple tool that does not demand the setup of any API keys or payment gateways.
Step 1: Install and activate the plugin
Go to Plugins > Add New and search for “WC Order Test”. Then click Install Now”” and once the installation is done, click **Activate to finish the installation process.
Step 2: Configure the Payments tab
Select the Payments tab in WooCommerce > Settings.
You’ll see a new payment gateway option called Order Test - Order Test Gateway on this page. Enable it and click Set up.
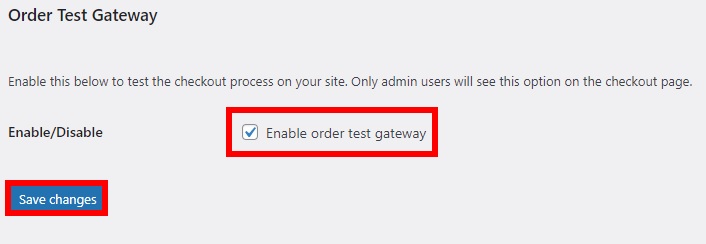
Step 3: Enable order test gateway
With this test gateway, there is only one option: Enable order test gateway. Check this option and then click Save changes.
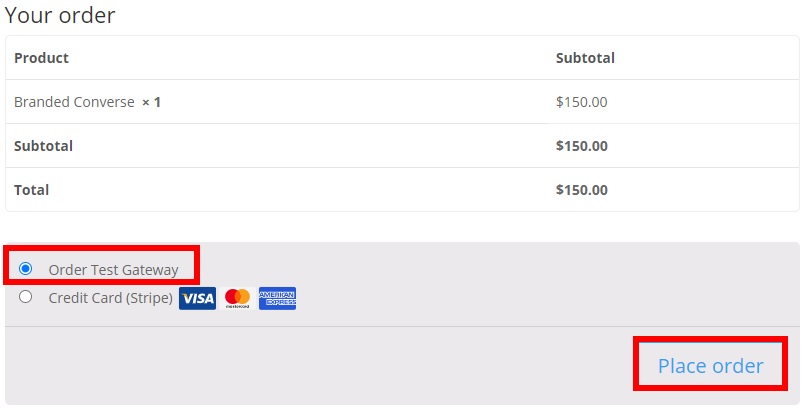
Step 4: Test WooCommerce orders
Go to the front end of your store, add any of your products to the cart, and head to the checkout. Enter all of the essential billing information, then scroll down to the bottom of the page to see the Order Test Gateway option.
This option will only be available if you are logged in as an administrator. To proceed, select it and click Place order.
It will then show that your order has been received, along with all of the relevant order information. Check the information to make sure it’s correct; if it is, your WooCommerce orders are working properly.
You may also look it up by navigating to WooCommerce > Orders. You should write down the order number correctly to make it easy to locate.
3. PayPal Sandbox
Being among leading payment gateways, PayPal can be integrated with a WordPress website and used to test WooCommerce orders.
While PayPal is by default in WooCommerce with PayPal Standard, you need to have a PayPal Sandbox account from the PayPal developer website to test orders.
A sandbox, offered at no cost by any system, is a testing environment. You can build and test numerous features of a system to make sure that there are no issues on your website when it goes live.
Step 1: Create a PayPal Sandbox account
-
Go to the official PayPal developer website and sign in with your PayPal account. After that, you’ll be taken to the PayPal Developer dashboard.
-
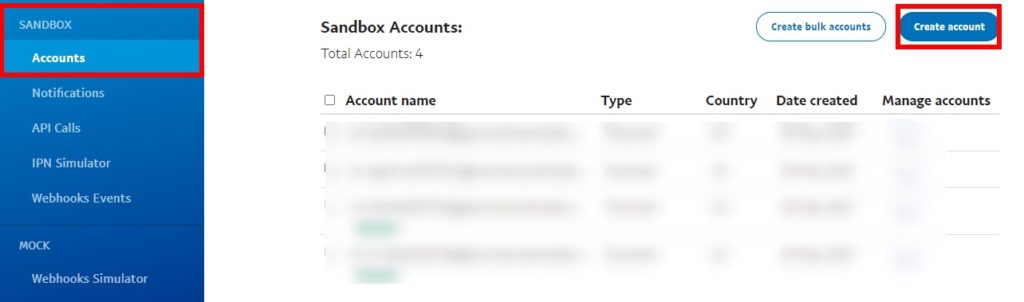
Go to Sandbox > Accounts and click on the button Create account.
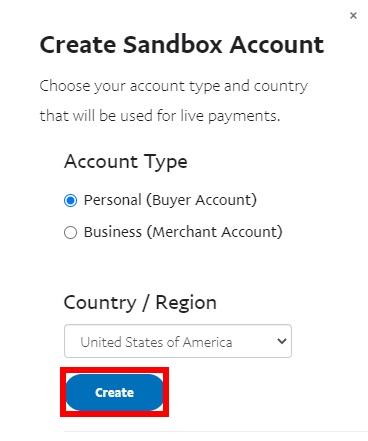
- A popup will show up to ask if you want to create a business (merchant) or a personal (buyer) account as well as the country/region.
Since we’re doing this to test orders, we will need both the merchant and the customer’s email. Therefore, if you choose the business account first, choose your country/region and click Create.
Next, just do this process again to create a personal sandbox account.
It’s worth noting that you must match the country/ region with the default currency of your online business to prevent orders from being pended.
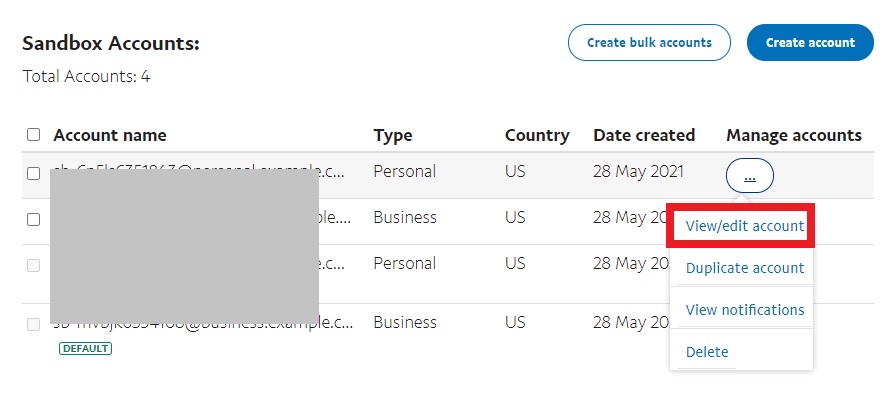
- Click the Options button on the Manage Accounts section for the sandbox account which you’ve just created.
Then click View/edit account.
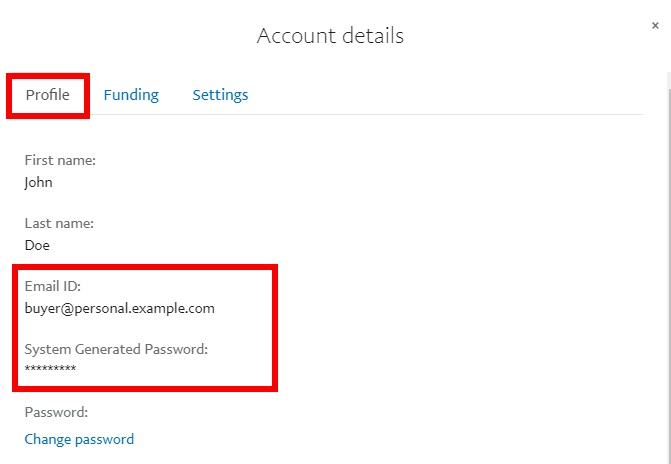
- Here you can see all the account details of the sandbox account. Under the Profile tab, you can see the email address and password of both the Buyer and Merchant accounts.
You need to copy both the email IDs and passwords of these accounts. Then save them for later use.
Step 2: Enable PayPal Sandbox
-
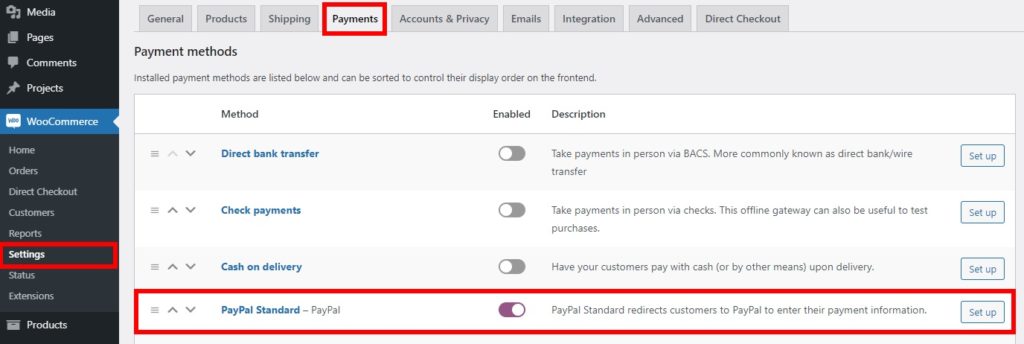
Go to WooCommerce > Settings and open the Payments tab.
-
Enable the PayPal Standard gateway. If you haven’t set up PayPal on your WooCommerce website, click Set up. But if you have already set up PayPal, click on Manage.
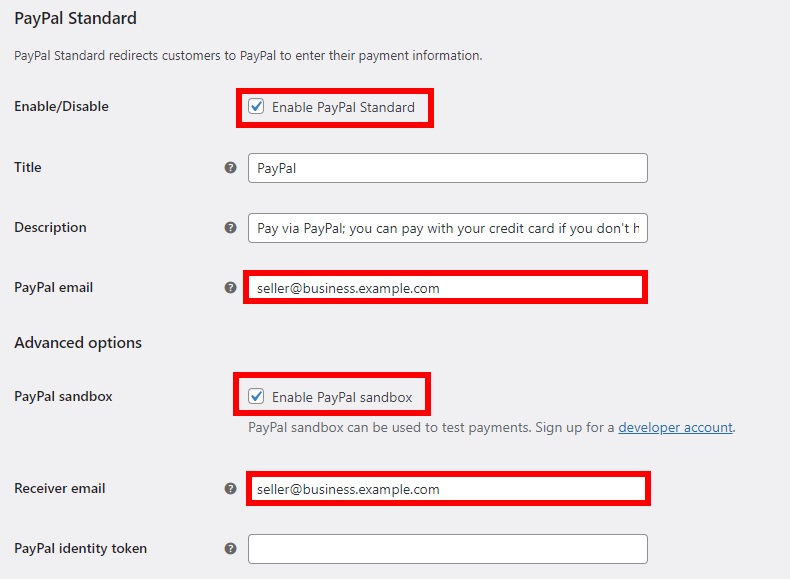
- Now that you’re on the page PayPal Standard, check the option Enable PayPal Standard and enter the PayPal business (merchant) email on both the PayPal email and Receiver email.
Then check the option Enable PayPal sandbox. Remember to click Save.
Step 3: Test WooCommerce orders with PayPal
-
Open your WooCommerce online store on a different tab.
-
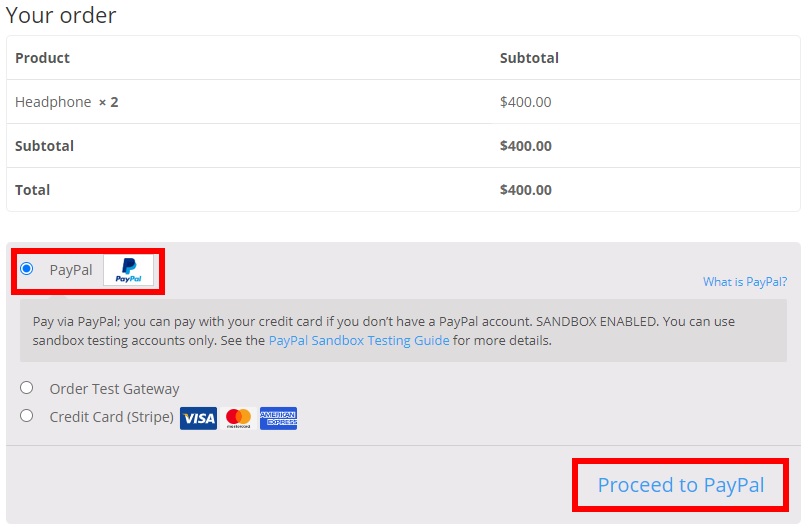
Add any product to the cart and go straight to the checkout.
-
Fill in all the required billing details and choose PayPal as the payment method. After that, click Proceed to PayPal.
- You’ll be sent to the PayPal sandbox website to confirm the order because you’re running sandbox mode.
Just type in the email address of the buyer sandbox account and log in to PayPal.
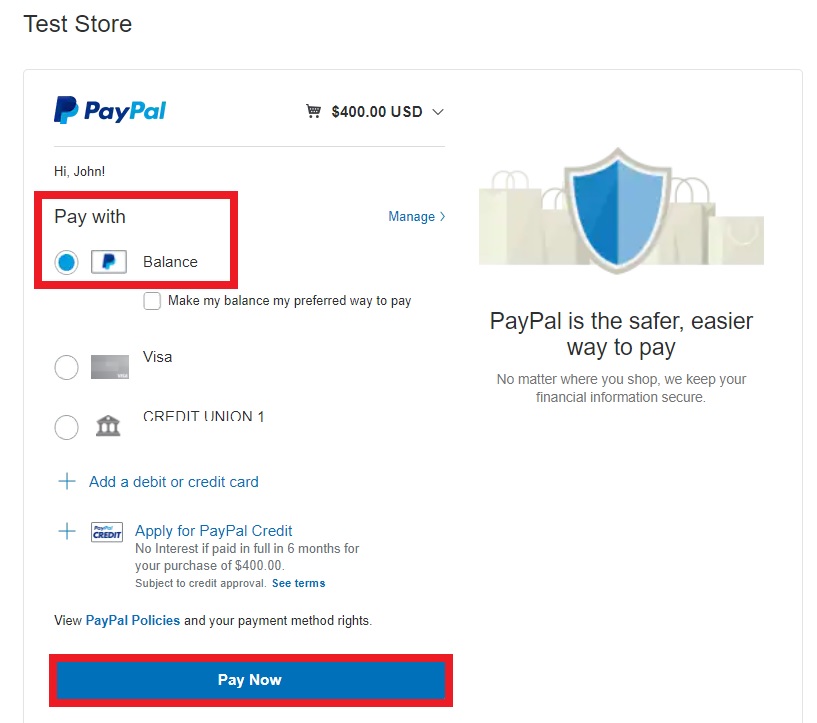
- Choose Pay with a PayPal balance and click on Pay Now to pay with the sandbox buyer account.
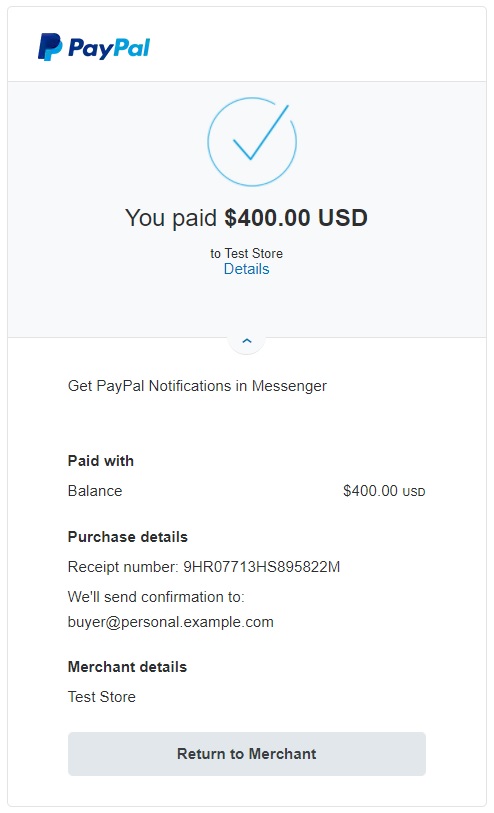
After that, you’ll see a screen that verifies your payment.
- To ensure that everything works accurately, you can also log into the PayPal sandbox with the sandbox merchant record and check the Recent Activity section on your dashboard.
If you can see a new transaction being made recently, then the order has been processed properly and error-free.
To do so, from your WordPress dashboard, go to WooCommerce > Settings > Payments. Click on Manage for PayPal Standard. Then, uncheck the Enable PayPal Sandbox, fill in the essential information for your PayPal account, and save changes.
And that’s how you set up a test mode for your WooCommerce orders with PayPal.
Final Words
It is a good idea to test orders before your WooCommerce store goes live to ensure that the checkout process operates smoothly and without problems. Order testing guarantees that every transaction is accurately processed, thus, your customers will have faith in your service, and you will prevent complaints and refunds.
We hope that our two methods to set up a test mode in WooCommerce are of great help to you and help you test orders successfully.
If you have any questions, feel free to reach out to us via the comments section below. Thank you for reading and we’ll see you in the next article.


