
How to Integrate Salesforce with WooCommerce

Sometimes, we often question the significance of implementing CRM solutions in streamlining the process of online businesses, coupled with automatic routine tasks. However, it can be seen that the use of this solution has become more and more demanding due to the increasing remote working culture. It means that you could still manage your store wherever you are.
If you own a WooCommerce business, you should look for a smart solution to help your store serve customers, generate revenue as well as improve the overall performance of your business. While there are multiple CRMs out there that could make you confused in selecting which would fit best for your WooCommerce store, go with us on this guide. Then we will help you make the best use of Salesforce and WooCommerce with its integration. Do not worry if you have not known how to do it exactly. Keep scrolling down to see how to integrate Salesforce with WooCommerce, and you can enjoy various benefits.
Why should we integrate Salesforce with WooCommerce?
You should first know the importance of this integration before having an in-depth into how to do it. By integrating Salesforce with WooCommerce, your store can get tons of benefits that could be beyond your expectation. And below are some of the most obvious advantages of this activity.
-
Enhance lead generation: The AI-enabled features and augmented analytics will help track leads and nurture them.
-
Understand your customers: Customers play a vital role in the success of any business. So, this integration will rest assured that the data related to your customers can be synchronized. Hence, information will be kept and remain recorded.
-
Automate daily processes and tasks: This activity helps you avoid looking into your menial tasks, thereby focusing on important decisions.
-
Manage your team better: The integration lets you construct custom interfaces for managing your teams.
How to integrate Salesforce with WooCommerce
Now it is time to pay attention to detailed steps in integrating Salesforce with WooCommerce. Follow us with three simple steps to accomplish this task. To make this activity successful, we are going to guide you with assistance from a great plugin named Salesforce Integration for WooCommerce. Then, everything will become easier and quicker.
Step 1: Install and activate the plugin
The first and foremost step is to purchase this plugin and get it installed and activated. This process will begin with downloading the .zip file that you receive the notification in your email after finishing the buying procedure. In other words, you could download the file .zip by navigating to the WooCommerce account.
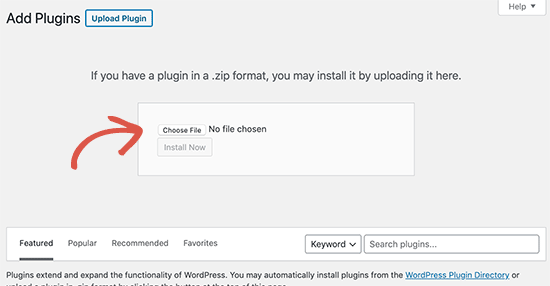
Proceed to log into the dashboard of your WooCommerce and select the section “Plugins” before picking up “Add New”. The next thing to do is hit on the button “Upload Plugin” to upload the downloaded zip file. After you are done uploading it, you click on the button “Install”, then hit on “Activate” for getting started.
Step 2: Connect and authorize
As soon as the installation and activation are done, it is time to connect and authorize this integration. There exist two methods that you can use to get it connected as well as authorized.
- Use the default way
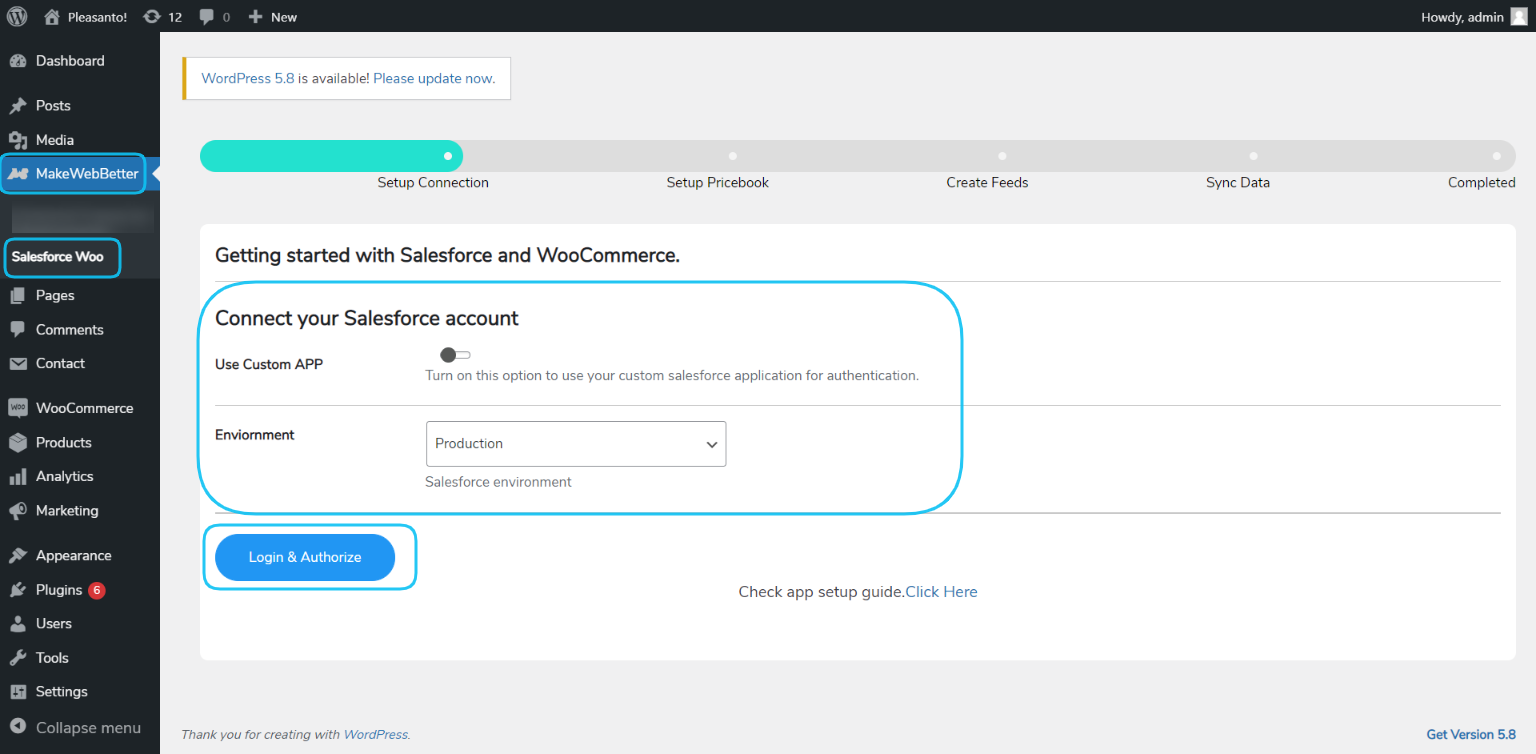
In this method, you need to implement the direct login between your WooCommerce and Salesforce Account. In case you are not keen on logging in with your custom apps, this option is perfect to go. All you need to do is to navigate to your admin dashboard in WordPress, then click on “Salesforce Woo” before opting for “Setup Connection”. The next minor step is to disable your “Use Custom Apps” as well as choose “Environment”. Here you will notice the button “Login and Authorize”, do not hesitate to click on it. In this situation, the login will use your account Salesforce, then you need to select “Grand permissions” for processing.

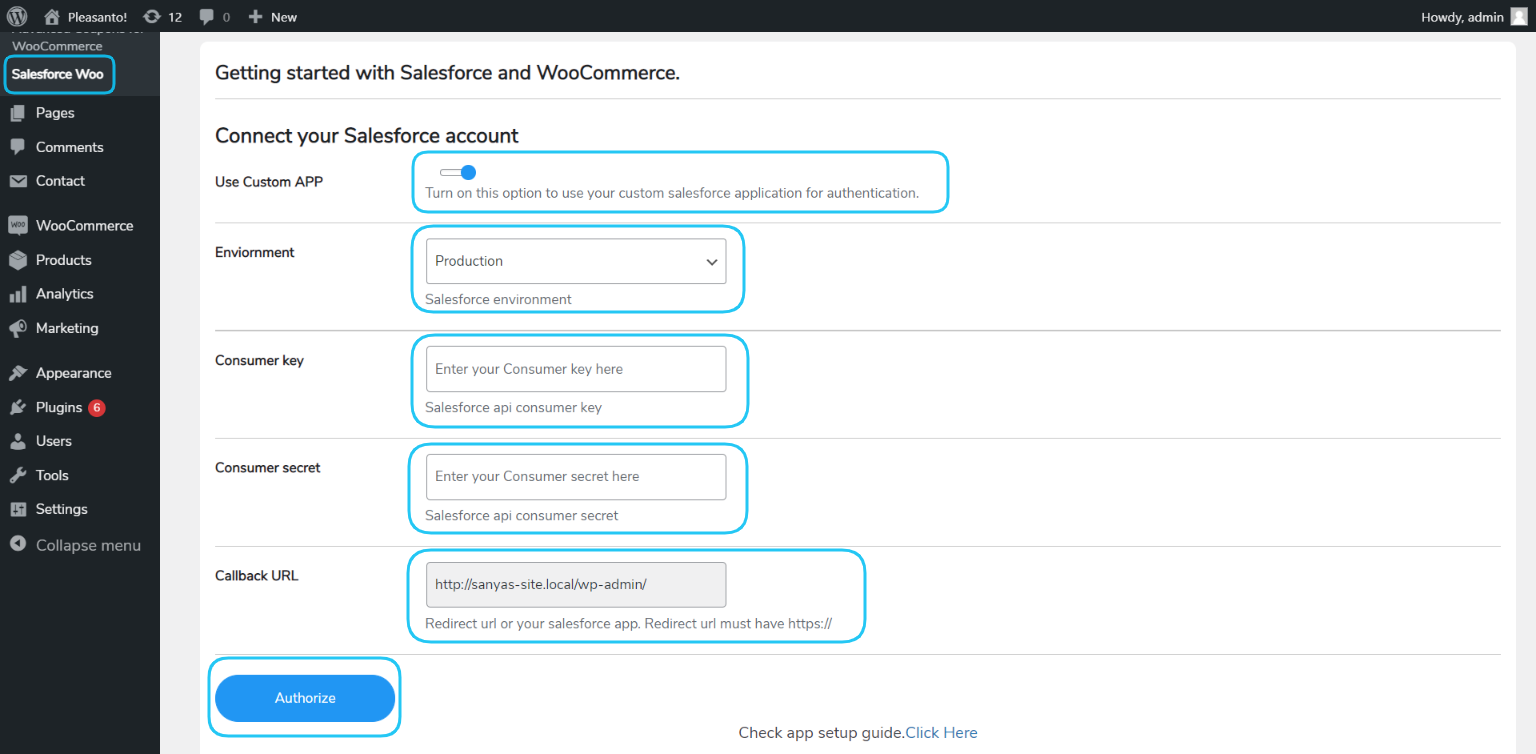
- Use Custom App
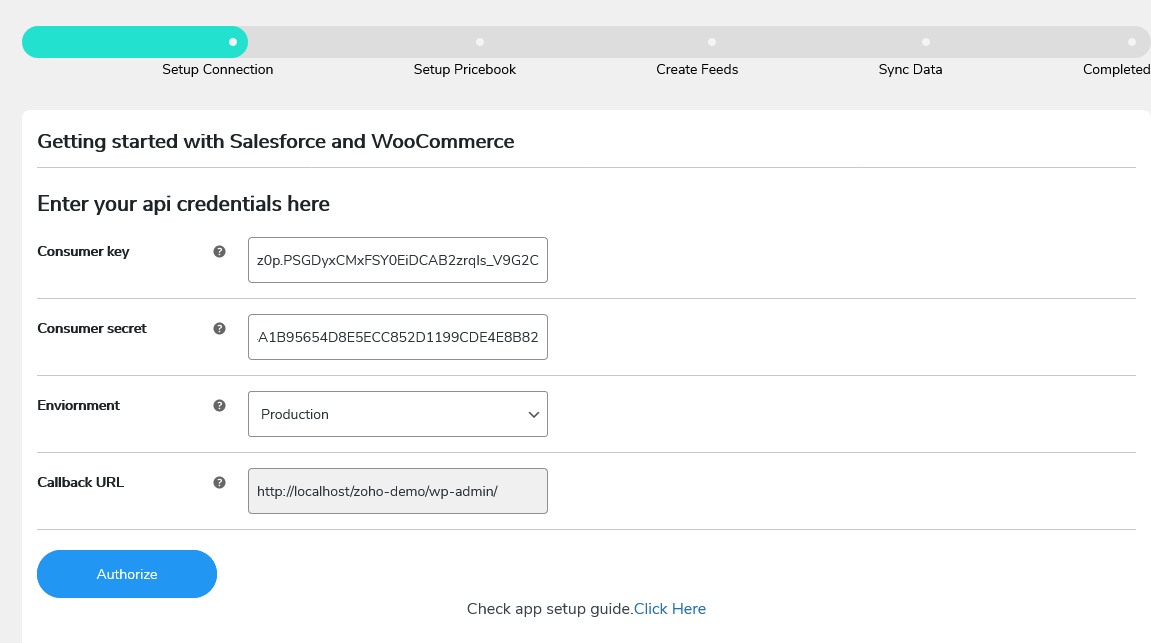
The previous method aims at using the default option. But, if you are not fond of it, it is possible to proceed differently. So, in order to log in with the use of the custom app, you are supposed to enter some details involving the consumer key, custom app, consumer secret, environment, and callback URL.
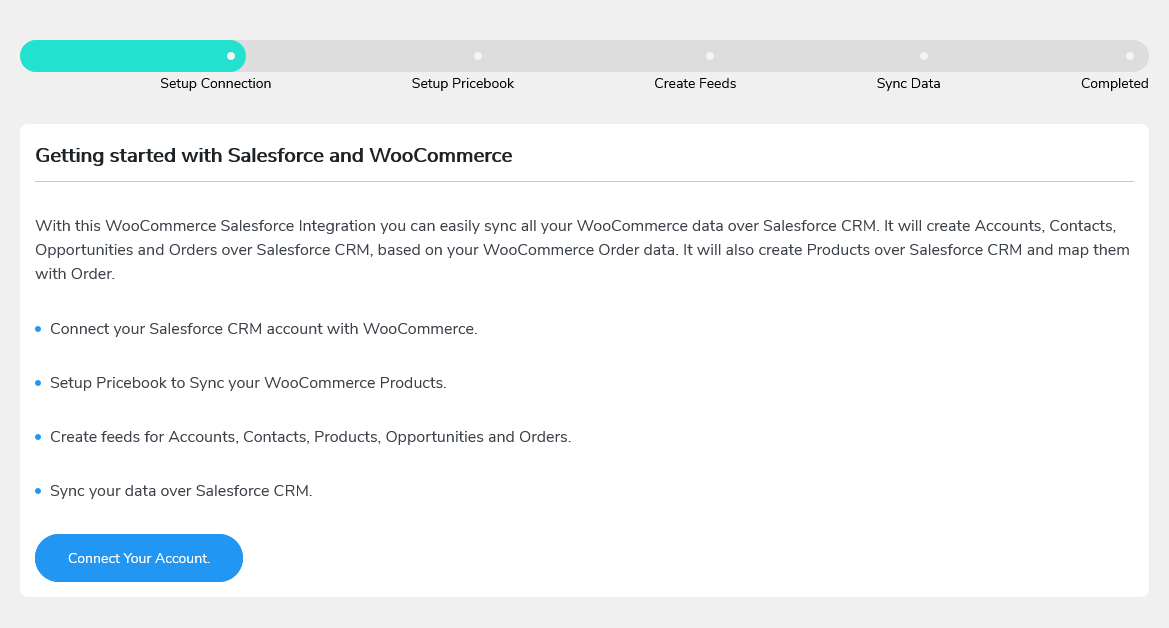
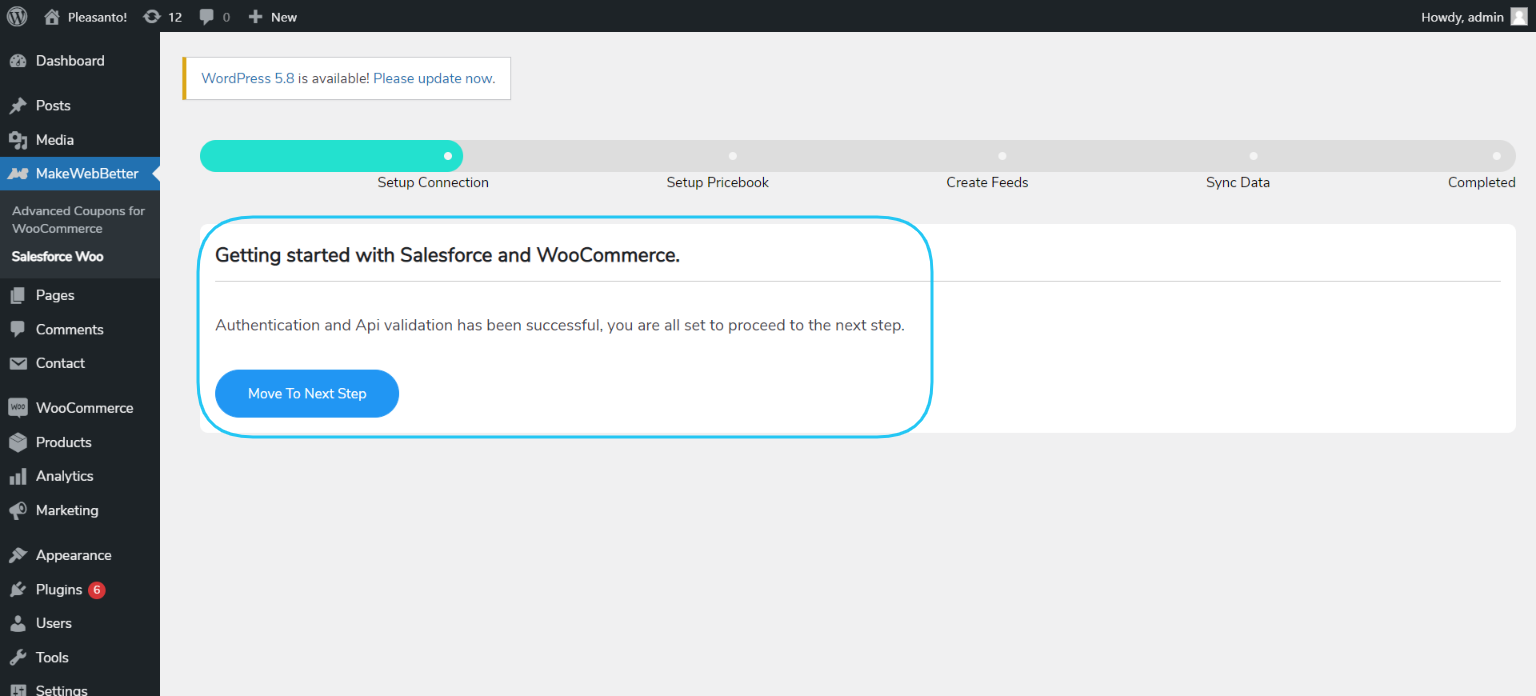
You could make up your mind on one of the above two methods to accomplish your task. In doing so, you need to choose “MakeWebBetter”, then click on “Salesforce” on the admin dashboard of your WordPress. Check out the below screen to see what it looks like. Then, take no hesitation to hit on “Connect Your Account”. Then, keep going with connecting WooCommerce with the Salesforce account.
As we said above, you could establish this connection by using the custom app or direct login. With logging indirectly, you should rest assured that your button toggle against the setting “Use Custom App” will be disabled. Next, choose “Environment” and hit “Login & Authorize”button.
Afterward, you will be taken to the login page of your Salesforce account. Then, login will use your Salesforce account in which you want to connect as well as sync the WooCommerce data. As soon as you are done entering your login credentials and clicking on “Login”, you will be back to your setup screen of this plugin.
The next step entails hitting on the button “Move to the next step” for further steps.
In case, you decide to use the custom app, you need to enter the necessary information about using the custom app, consumer secret, consumer key, callback URL, coupled with environment.

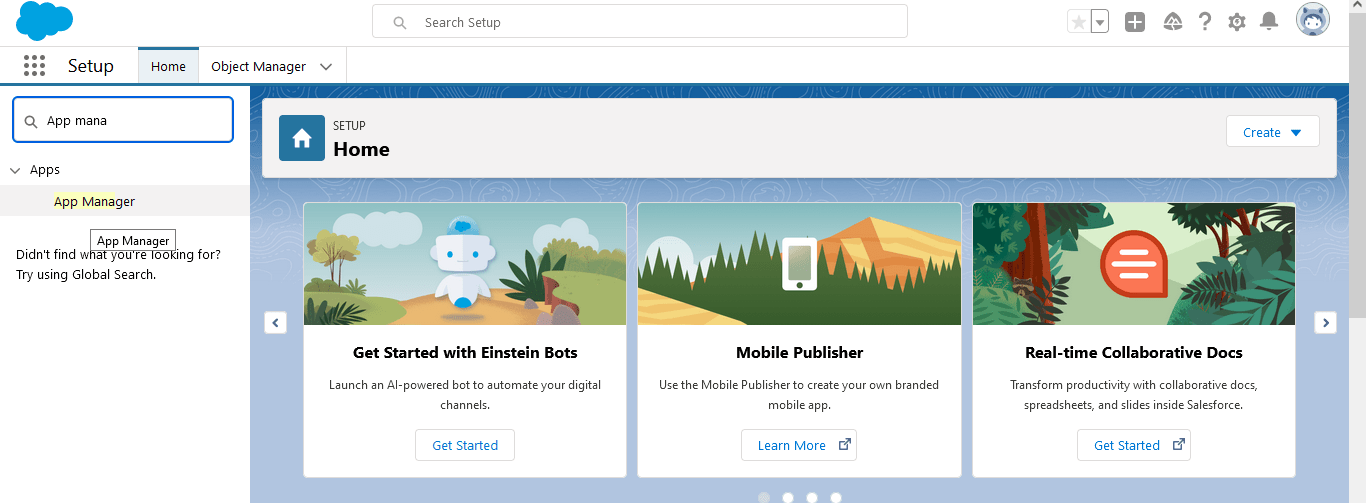
Now you are also required to get some details that are required for being filled in the form. Do not forget to log into your account of Salesforce, then head to the section “Settings”. Here, you can be able to choose “Setup” and “Setup Home”.

At this step, you can look at the section “App Manager” by searching it from your search menu.
After that, you will see the screen “App Manager” opening up, your next task is to pick up the button “New Connected App”.

After that, the form “Basic Information” will appear on the following screen. Here, there is a form that you need to fill in some required information, including “Contact Email”, “API Name”, and “Connect App Name”.

After filling in the above details, you navigate down to another section for enabling the settings OAuth. Next, remember to add the callback URL.
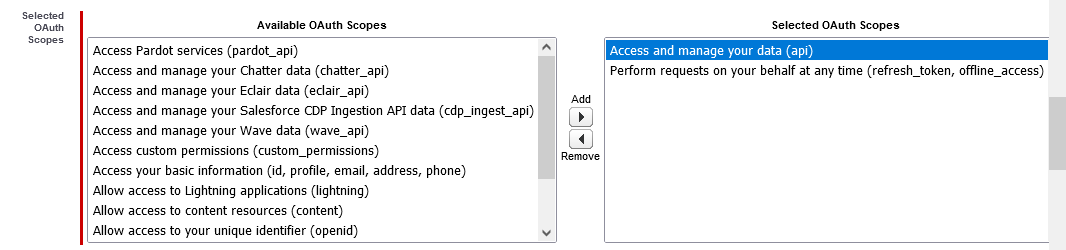
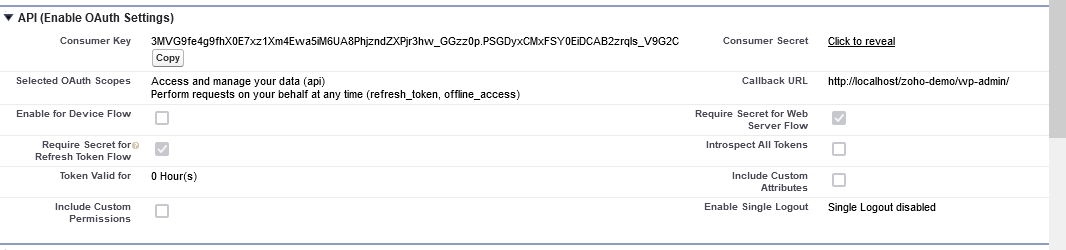
Now another not-to-be-missed thing is to choose the scopes OAuth from the existing scopes as indicated in the below screen. When you are done, you will need to save what you have made recent changes. Then, another screen will appear together with one message “Change can take up to ten minutes to take effect”. Afterward, do not forget to hit on “Continue” button.

Now it is high time for you to get the IDs of Consumer Secret and Consumer Key. Your job now is to copy your IDs and paste them into the authorization form of this integration plugin.
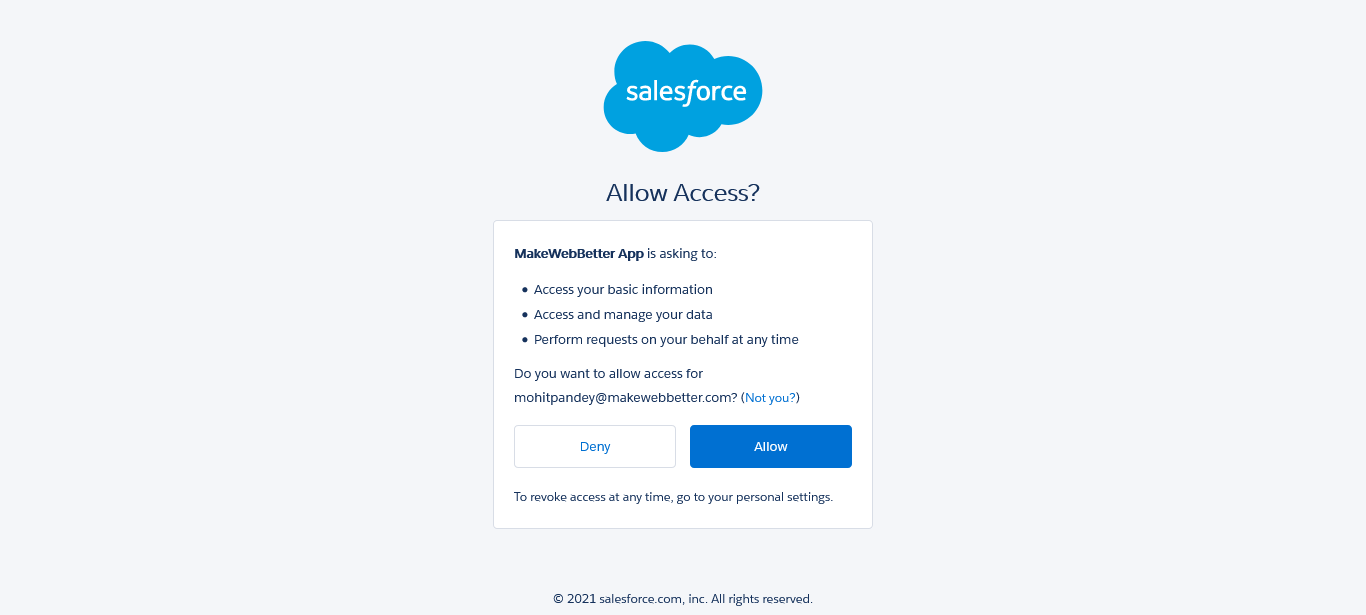
When you finish adding the required information, you need to choose the button “Authorize”.
Clicking “Authorize” will result in the appearance of one dialogue box where you could seek your permissions to approach the data. Then, hit on “Allow”.
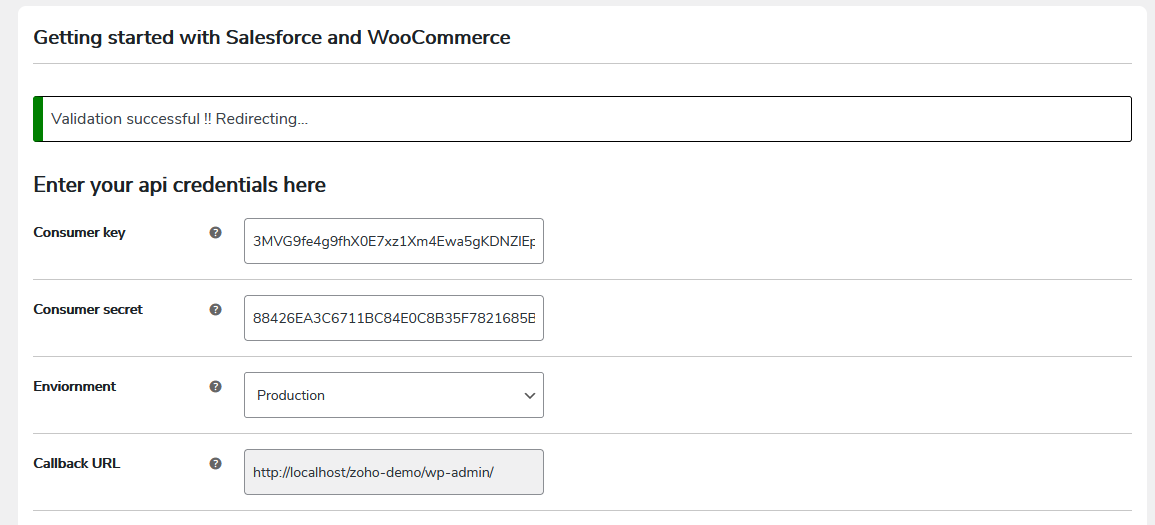
Congratulation! You have enabled the request of connection authorization validated.
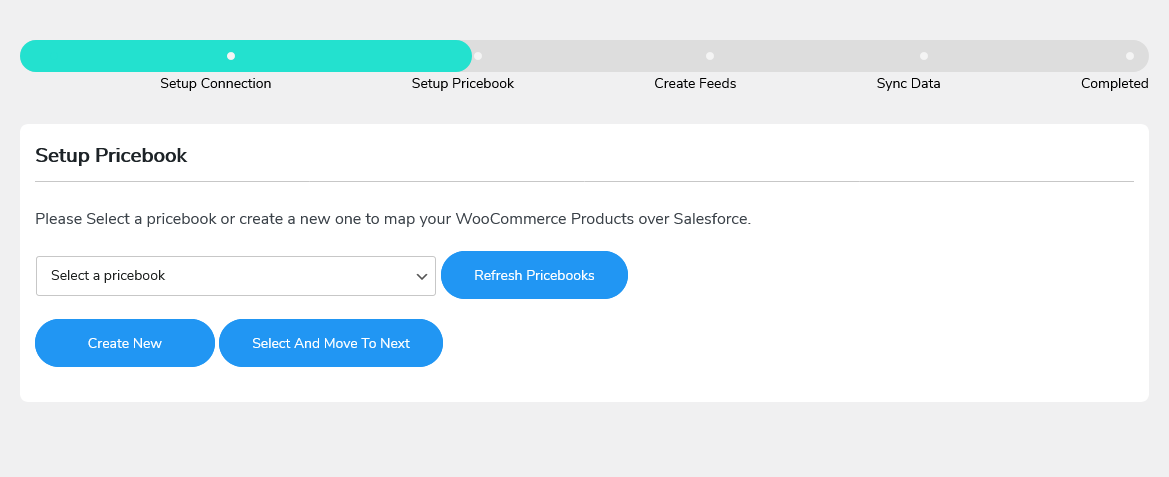
Another must-do step involves setting up your PriceBook. When the permissions have been given, you would be taken to a different screen as shown in the following screen. Your task here is to hit on the button “Refresh PriceBooks”. Then, it is a must to choose your PriceBook from your dropdown menu before clicking on the section “Select & Move to Next”. To build your PriceBook, you need to choose “Create New”.
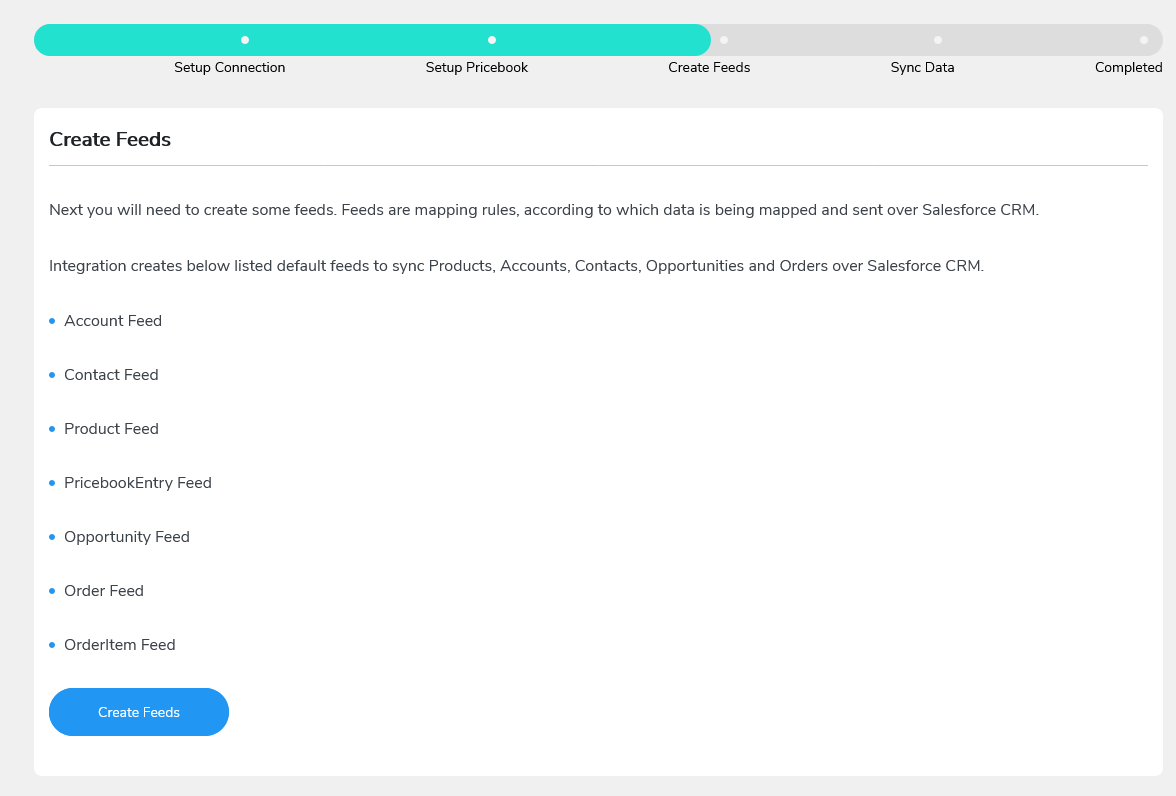
Afterward, you move on to create your feeds for mapping objects in WooCommerce with object fields of Salesforce. In this situation, if you fancy creating fields, you need to choose “Create Feeds”.
Step 3: Perform the data synchronization
The last step is to perform the data synchronization. This step ensures that your integration becomes successful or not. But don’t worry as it is easy to do so. There are also two methods to sync the data between WooCommerce and Salesforce. They are using One-click or Bulk.
-
Bulk data synchronization: This lets you implement the data synchronization of specific objects in bulk at once.
-
One-click data synchronization: If you make up your mind to choose this method, you could be able to sync data only when the data is newly added or the data that is under the failure of sync earlier. This method is better than the manual approach for syncing data.
Now you are ready to accomplish this synchronization, right? To do it, you just simply hit on the button “Start Sync” to begin the process.

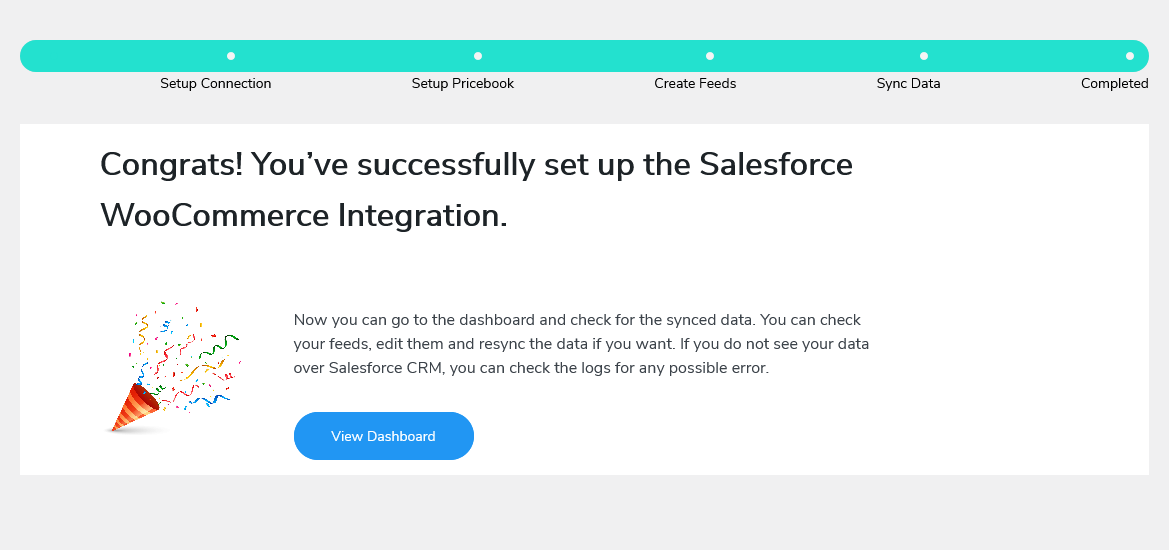
After the setup process finishes, you will see a screen as below. And congratulation, you have successfully integrated Salesforce with WooCommerce.
Top 3 plugins to integrate Salesforce with WooCommerce
There is no denying that plugins are powerful solutions to facilitate any integrations. So, let plugins help you execute any of your integration between two platforms to improve your online business. While there are tons of plugins out there, it is a bit difficult to figure out which one is the best or fits your store best. Hence, we have come up with a list of the top 3 plugins to help you integrate Salesforce with WooCommerce.
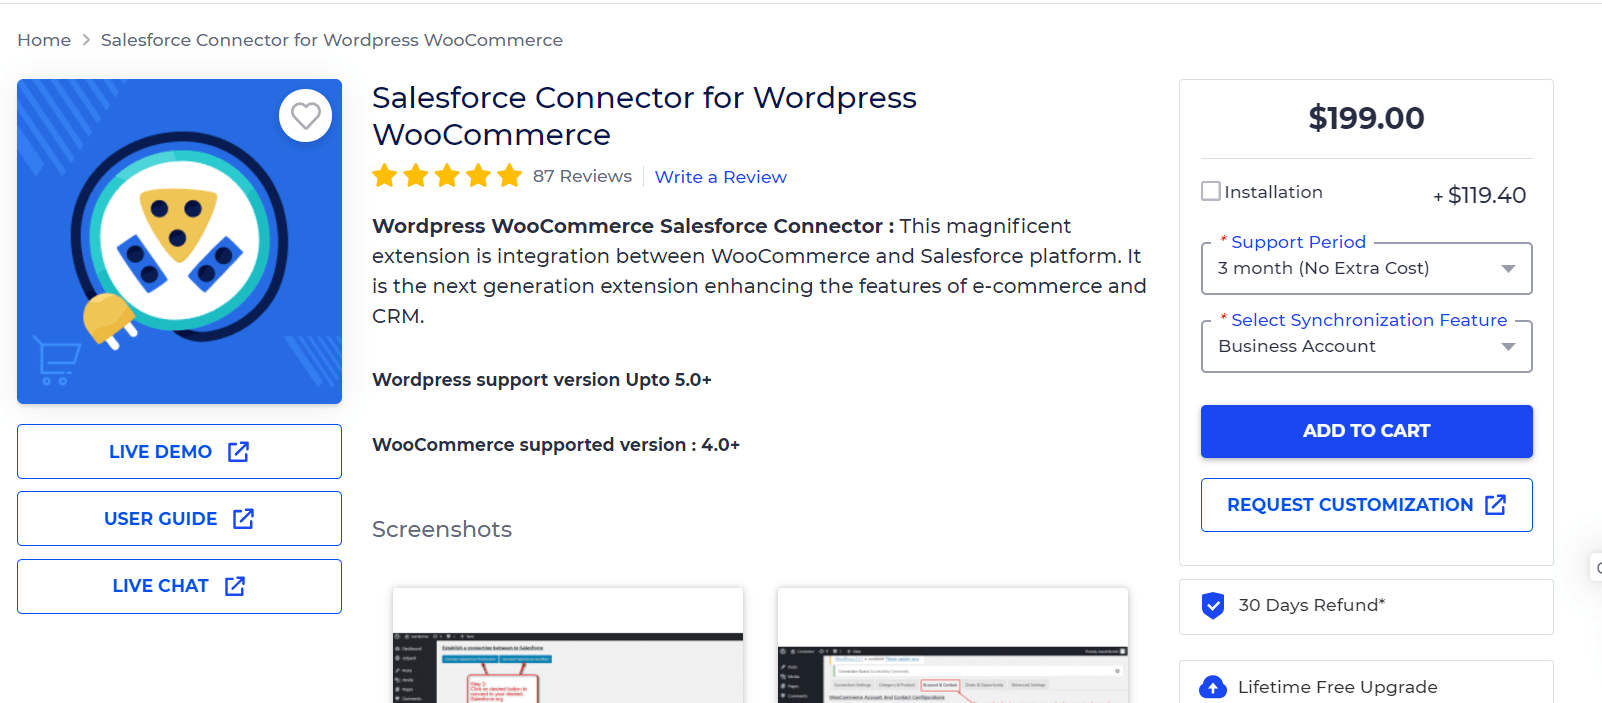
1. Salesforce Connector for WordPress WooCommerce
Salesforce Connector for WordPress WooCommerce , as its name states, is famous for improving the eCommerce’s features. Thanks to this plugin, your content from WooCommerce will be synchronized with the Salesforce account with the approach “service-first”. Now, there is no need to worry about how to connect these two platforms as it will work great as the bridge between Salesforce and WooCommerce. Therefore, it gives you the interactive design that comes with a wonderful user interface.
Main features
-
Help users implement data synchronization in bulk
-
Provide the options for disabling or enabling the real-time order sync
-
Be able to sync the price of products based on chosen price book
-
Be able to sync category or product image as the attachment to your Salesforce
-
Come with manual mapping elements for Orders, Users, and Products
Pricing: $199.00
2. WooCommerce Salesforce Plugin
The second not-to-be-missed plugin to assist you in integrating Salesforce with WooCommerce is the WooCommerce Salesforce Plugin. With the use of this, you could be able to send the data from WooCommerce to Salesforce effortlessly. The data can be sent to the expected object in accordance with the rules that you have established. So, do not hesitate to buy a license and you are capable of controlling how you will use the data in your WooCommerce.

Main features
-
Map the order fields in WooCommerce to object fields in Salesforce easily
-
Be able to determine the way to send WooCommerce data to the Salesforce
-
Come with the error reporting features when there appears an error while sending data
-
Help store owners view the detailed log about the data to be sent
-
Help to export Salesforce logs for accounting, bookkeeping, or forecasting purposes
Pricing: Start from $119.00
3. Contact Form 7 Salesforce
The last plugin to appear in this list is Contact Form 7 Salesforce . With such features as being user-friendly and compatible with various themes and plugins, this tool is perfect to go if you are finding a way to map form fields in WooCommerce to object fields in Salesforce. What is more, it is useful in setting filtering rules, viewing form submission logs, or sending data. It allows you to construct forms from scratch as well as connect your site to Salesforce easily.
Main features
-
Be compatible with myriad themes and plugins
-
Help store owners lookup email addresses, coupled with phone numbers
-
Come with the ability to access Google Analytics for the form submissions, geolocation, or expand objects and fields
-
Be able to access myriad additional addons
Pricing: Start at $89
Conclusion
To sum up, Salesforce has become a modern and strong platform with such modern technologies as artificial intelligence and cloud computing. In the meantime, WooCommerce is a convenient platform that costs you no penny at all for entrepreneurs to grow their businesses. This is to say, you could get unlimited benefits only by integrating Salesforce with WooCommerce. Hope you could find this guide helpful for you to combine the pros and advantages of these two platforms, thus giving you a great environment for flourishing online businesses as well as achieving targets.


