
How to Create & Use WooCommerce Points and Rewards

Launching an online store based on a builder platform is a piece of cake, but managing it to generate profit is very hard. It requires you to implement many features in order to bring a better user experience. The grower your store is getting, the more difficult you need to keep your business qualified.
One of the ways to attract more visitors to your store and buy your products is by using points and rewards besides a discount in a special season. This technique can be simple but very effective to gain customer loyalty, that’s why we want to introduce this method in our article.
We are going to give you a step-by-step guide of How to create and use WooCommerce points and rewards. Furthermore, which parts you should enable while setting up your points and rewards. The last section is a performance for the best-recommended plugins in WooCommerce to configure this function.
Without further ado, let’s start right now!
Benefits of using points and rewards in WooCommerce stores
As said earlier, having points and rewards installed in your WooCommerce store is an amazing way to connect with customers quickly. Offering them this award is a motivation to make customers come back and order more products.
As for your store, you can gain some benefits after implementing this reward system:
-
Build brand loyalty
-
Increase lifetime customer value
-
Helps in increasing your customer conversion rate
-
Get the word of mouth marketing free
How to create and use WooCommerce points and rewards
In order to create and use WooCommerce points and rewards, you need to integrate a plugin with your store. It gives you the ability to set this process easily and quickly. Since after installing, all you need to do is build up your reward system based on the plugin theme.
There are a few steps you have to follow to set this all up and let it run probably. We will go over them together, starting from step 1, which is installing a plugin. Once you are done, you have a solid point and reward system included on your website.
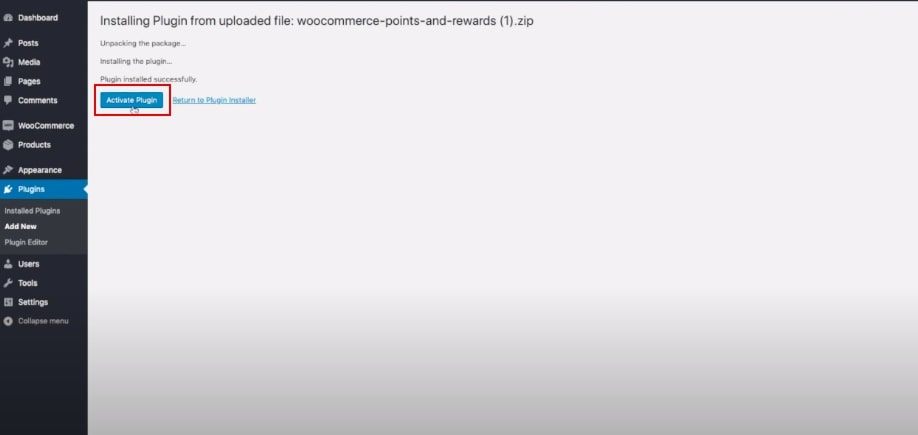
Step 1: Install the plugin
In the first stage of the process, of course, you have to get the plugin installed and activated. By doing this, please hook over to the Plugins in the WooCommerce dashboard. Then, choose Add new in that Plugins section and search for the plugin you want to add to the searching tab.
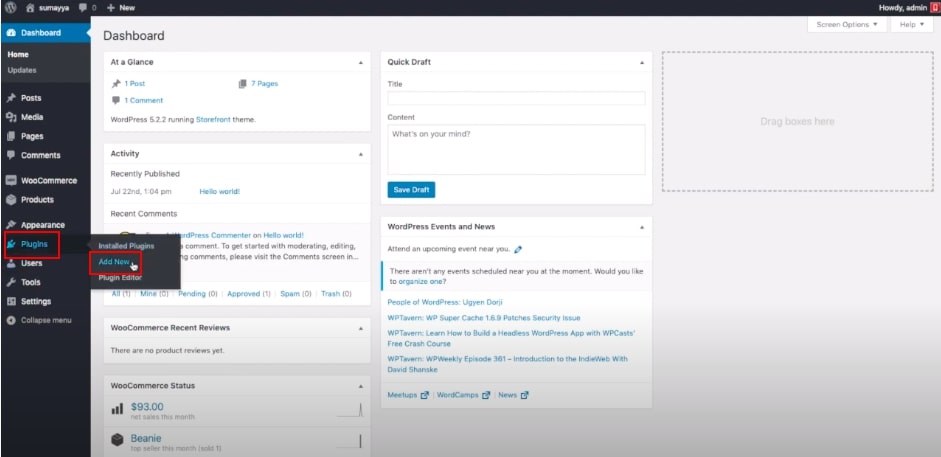
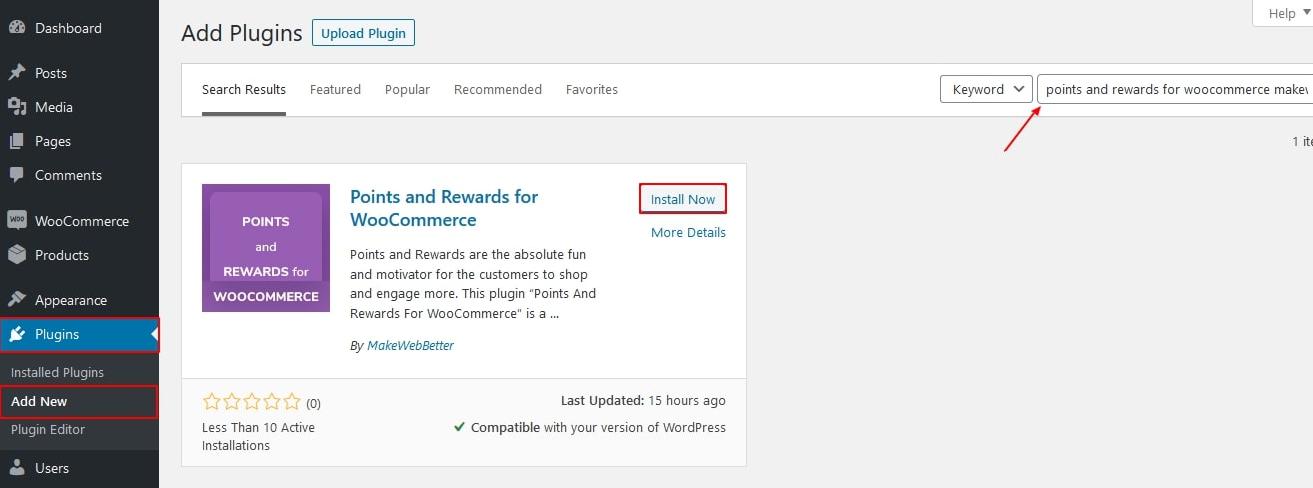
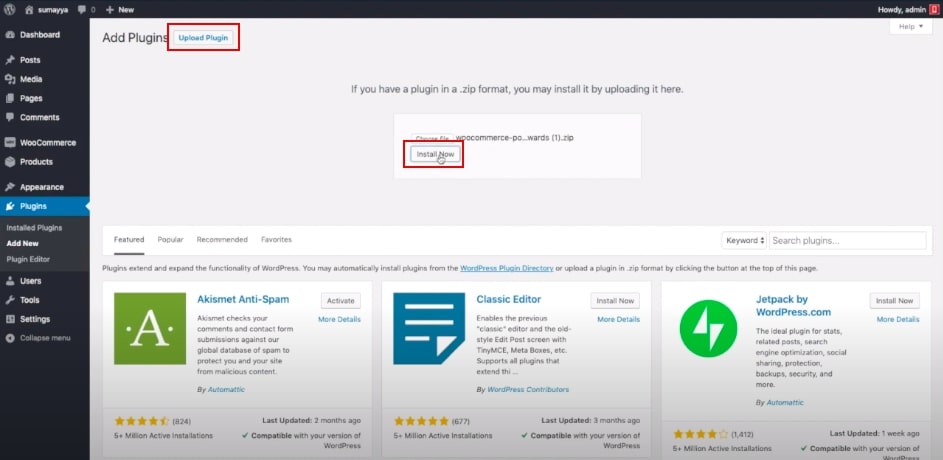
After finding it, click on the Install now button, waiting for it to be set in your WooCommerce settings by selecting the Activate it button. Like our example, you can download the plugin file zip from its website into the computer as an alternative way. Then, you just upload the downloaded file on your Plugins section to start integrating.
Although you can install a free plugin, however, a paid plugin still has further advanced functionalities over the free one. Thus, we will discuss a premium version of the plugin.
Step 2: Enable the plugin settings
When the plugin has been installed and activated, you can come to the second process to enable the plugin settings. To do this, please head to WooCommerce > Points and Rewards.
You will see on the screen that there are some options needed to activate after you activate the plugin. This will take you to the main general page, where you can set everything up available.
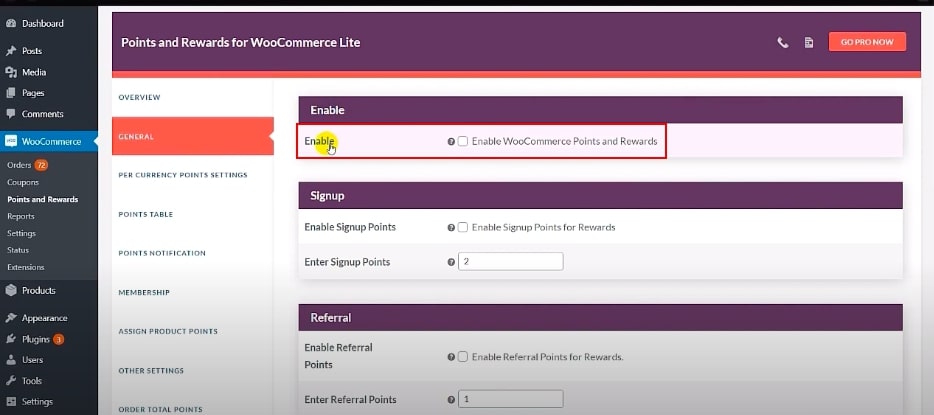
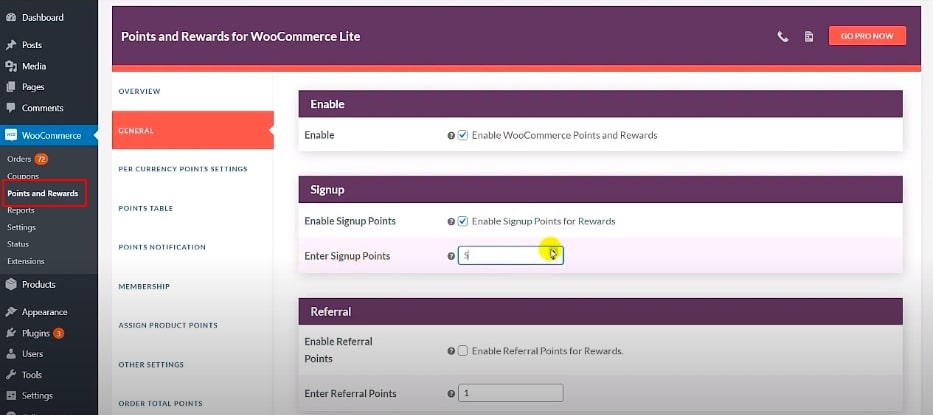
In the General section, it’s time for setting the signup points, referral points, social sharing rewards, point redemption. This is the session where you find all the general settings for the plugin, so just follow us and set some of these up for your reward system.
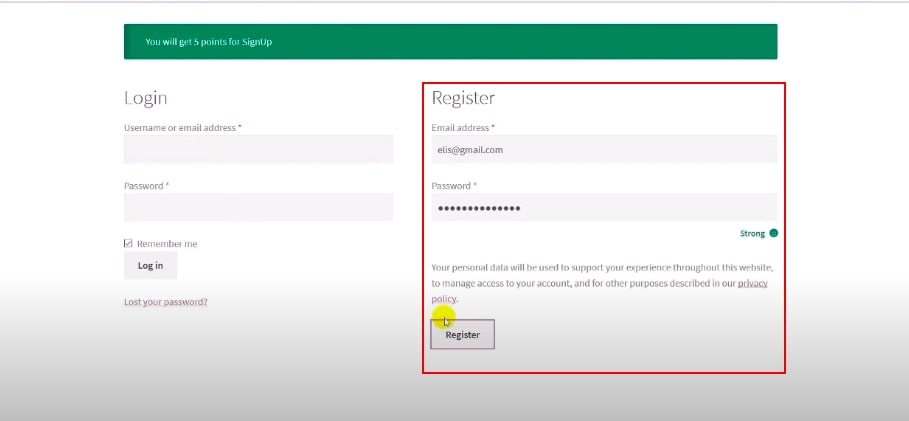
Signup points
This option is for intriguing visitors to become your prospects. Once turning into your prospects, it is straightforward to nurture your shoppers to increase conversion rates. You should enable the sign-up point settings as well as enter the signup points for new signup to customers.
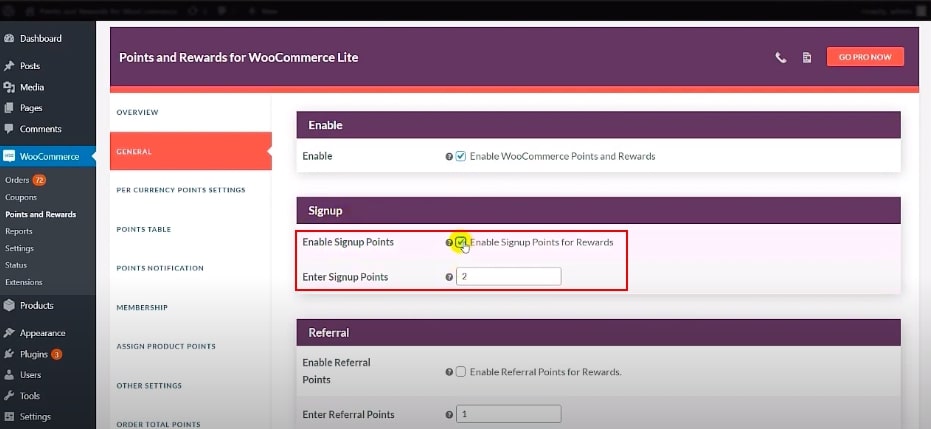
Don’t forget to hit the “Save changes” button to update.
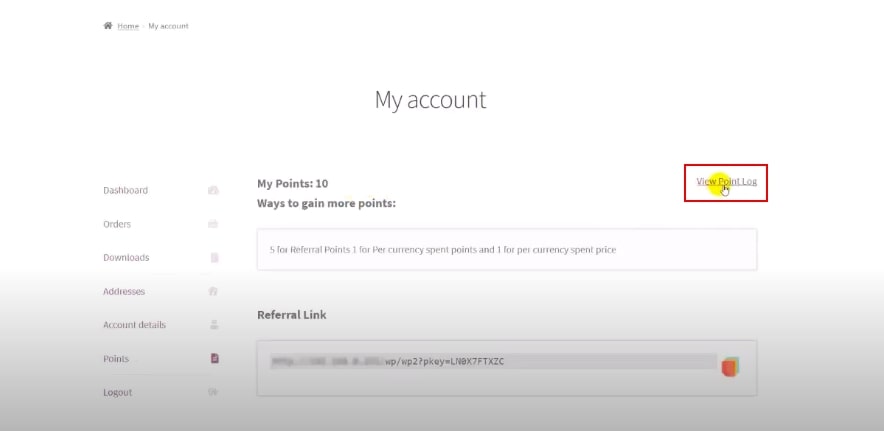
Referral setting
You have been aware of the fact that giving rewards to your current customers can increase your profits by a significant percentage - from 25% to 95%. Just by concentrating on customer retention rates, you also bring new customers.
As enabling this function, it is like a free cost of word-of-mouth marketing. You need to fill out the desired referral points for this setting on your own and then save your changes in the last step.
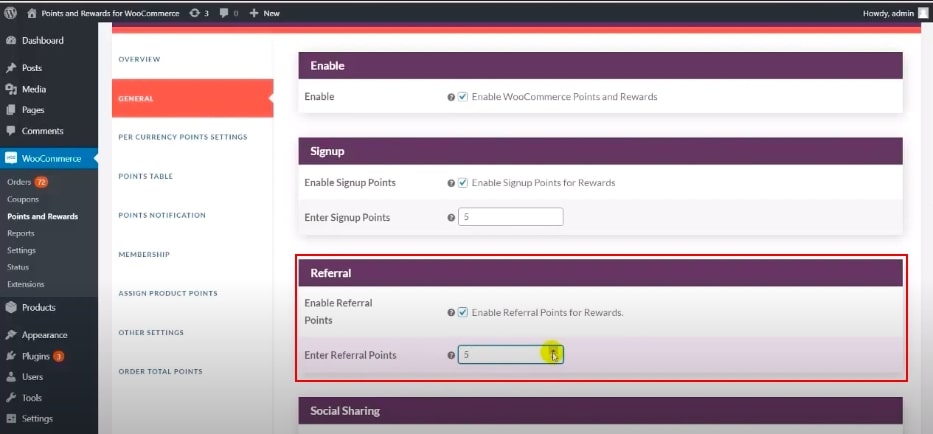
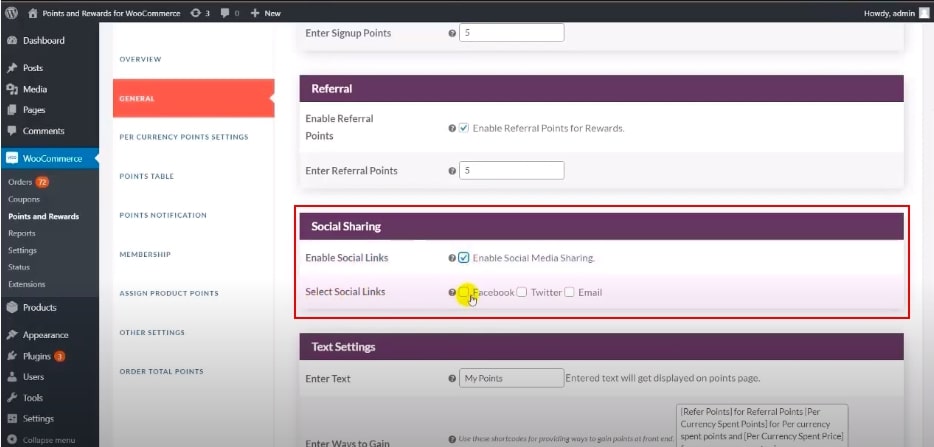
Once activated at this point, it will work that when your customers share a referral link, they can get a small point for their efforts. For much more detail, the customers have to visit their own account page in your store and share the link with others via copying it. In addition, if you want to extend your store’s reputation through more Internet vehicles, tick the checkbox of the “Enable social media sharing” term.
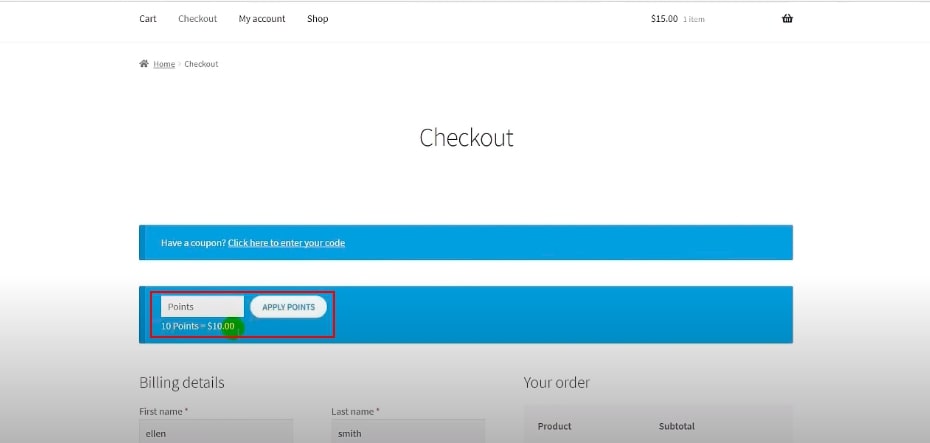
Redemption settings
In terms of this section, this part lets the buyers redeem at the checkout stage and they are able to earn a discount on their orders. Your customers can earn their points on the Cart page or Checkout page.
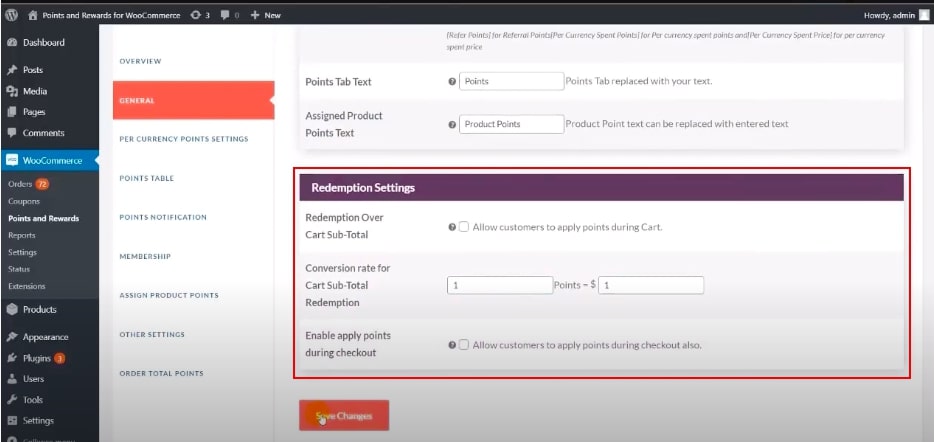
Actually, on the screen, you can view several parts that you need to enable and set it out based on your store. Apparently, you can activate some of them, so it is not compulsory at all!
-
Redemption on cart subtotal: earn rewards over the Cart subtotal
-
Conversion rate: set the conversion rate of point redemption, which means that you can set a discount for your shoppers over the points or rewards
-
Points redemption on checkout: redeem points on the Checkout page
Step 3: Create and use the points and rewards
In step 2, we did enable the features in the points and rewards plugin, which will activate this reward system. However, to be displayed on your product page, the system has to be created by your own decision. So, in the third stage - the crucial part of the tutorial, we will guide you through setting up and use the points and rewards function by going over each section below.
Per Currency settings
This section allows you to install the point conversions. It is up to you that you set the conversion depending on a certain amount of points given for each dollar or a ratio. The customers earn redeemable points for every single spent currency through each purchase on your site.
You are able to start rewarding your shoppers with only 2 steps in this section:
-
Enabling per currency point conversion: firstly, you must enable the Earn points per currency setting by hitting the checkout of the Per currency points & coupon settings
-
Setting Points for unit currency spent: next, you enable Earn points per currency settings and enter the reward points for unit currency

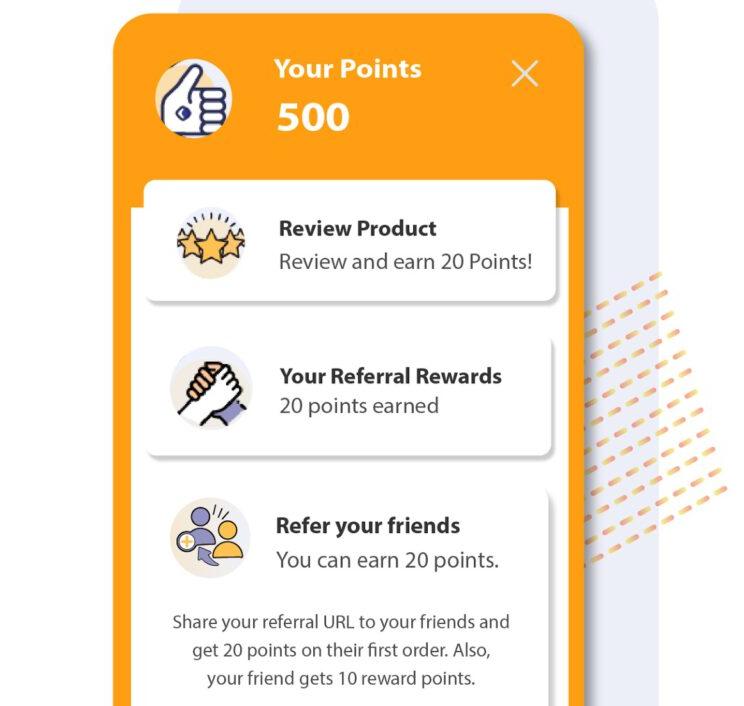
After doing that, your customers will see the notification on the website like the image below on the product page.
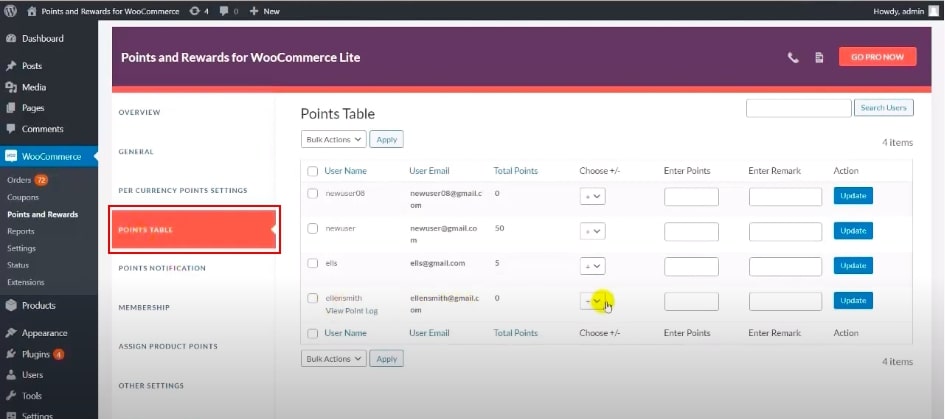
Points table
Coming to this part, it lets you keep track of the customer’s history on your site, containing their points, membership, delivered orders, and others.
Points notification
As you set this function up, you will get an email notification announcing that your users get more points added to their accounts after ordering successfully.
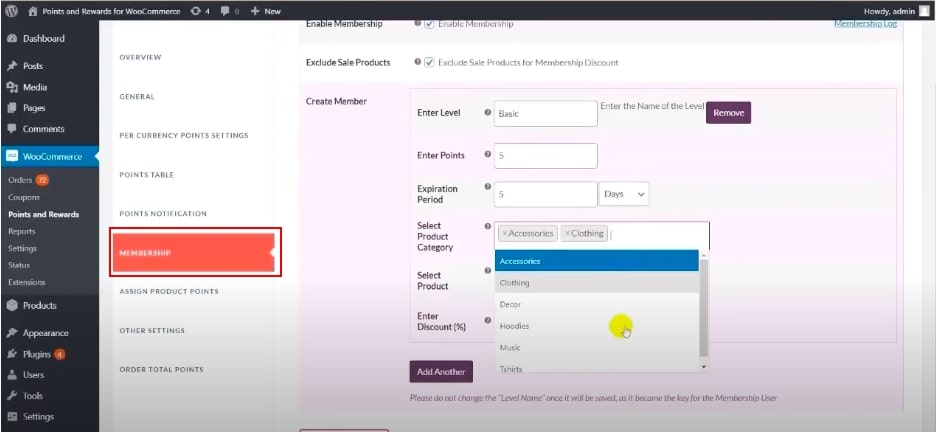
Memberships
Furthermore, you may activate the “Enable membership” in the “Membership” section. You are ready to have your first member using this points and rewards system when enabling this function.
There are different levels of membership which we will explain in detail:
-
Enter level: typing down the names of membership levels. For example, they could be basic, bronze, gold, diamond, etc.
-
Enter points: enter the number of points needed to achieve a level
-
Expiration period: enter the number of days that membership will be expired
-
Select product category: choose the specific categories of your WooCommerce store
-
Select products: choose the specific product for membership rewards
-
Set Discount value: set the value of the discount for particular membership levels
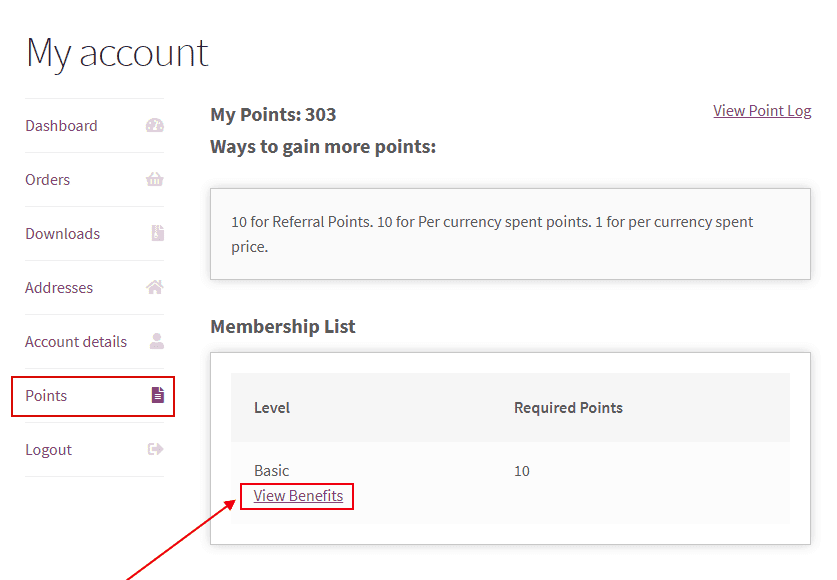
When you create your membership levels, your customers can see the benefits of joining the membership system in your store by pressing the View benefits section in their account page. If they want to gain more advantages of being a membership such as discount per order, shoppers can upgrade their levels meeting your requirement.
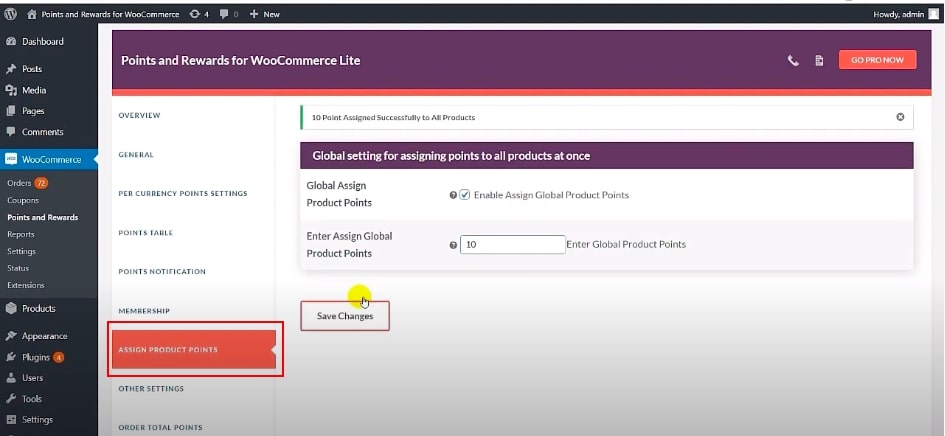
Assigning product points
This function is only available for the premium version of the plugin that you can assign rewarding points wider, in a scope of the international region applying to all products.
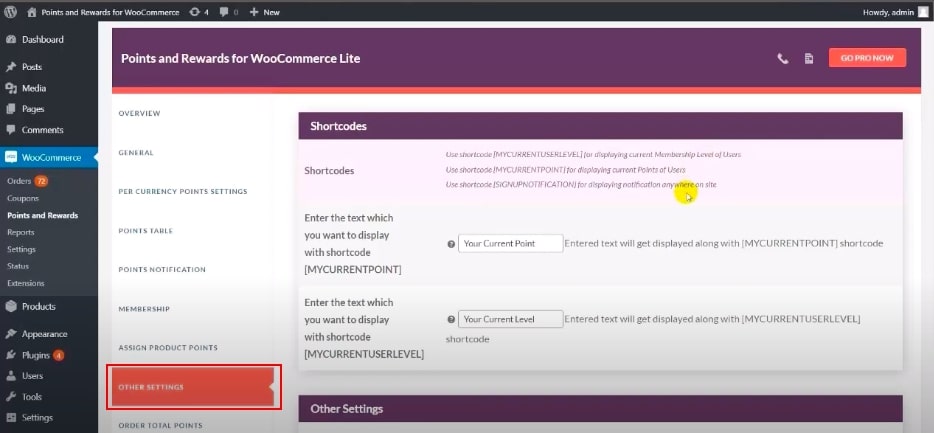
Other settings
You can see that some other available settings for the reward system are available, allowing you to enable or disable based on your willingness to build your ideal system.
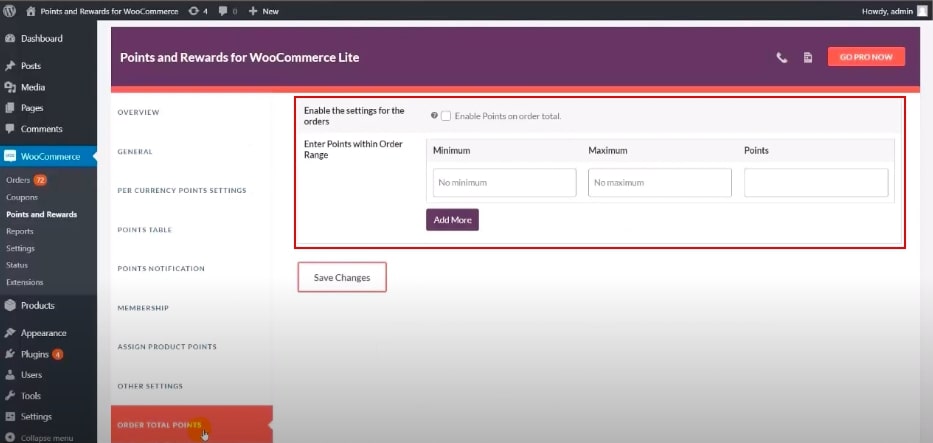
Order Total points
In this section, you enter the point range of the orders in total. By doing that, based on the range you have set before, customers can earn the points following your rule.
Step 4: Display on the product page
When you have done all the settings, selecting Save changes and you can log into your page as a customer. On behalf of a customer, you can test it to see the points and rewards after purchasing.
In case you want to test how it would like to be, you can view the login page in your WooCommerce dashboard. Go to the My account page and see if it works probably or not.
Remember that our tutorial is just a reference that you follow, our theme and your theme as well as the options in the plugin, are different. Therefore, your practice needs to be flexible with what you have learned from our share.
Top 4 Points and Rewards plugins for WooCommerce stores
WooCommerce points and rewards
Indeed, Points and Rewards for WooCommerce is highly recommended to be a potential plugin for your WooCommerce store. It allows you to offer customers easily a variety of functions such as signup, purchase, and referrals.
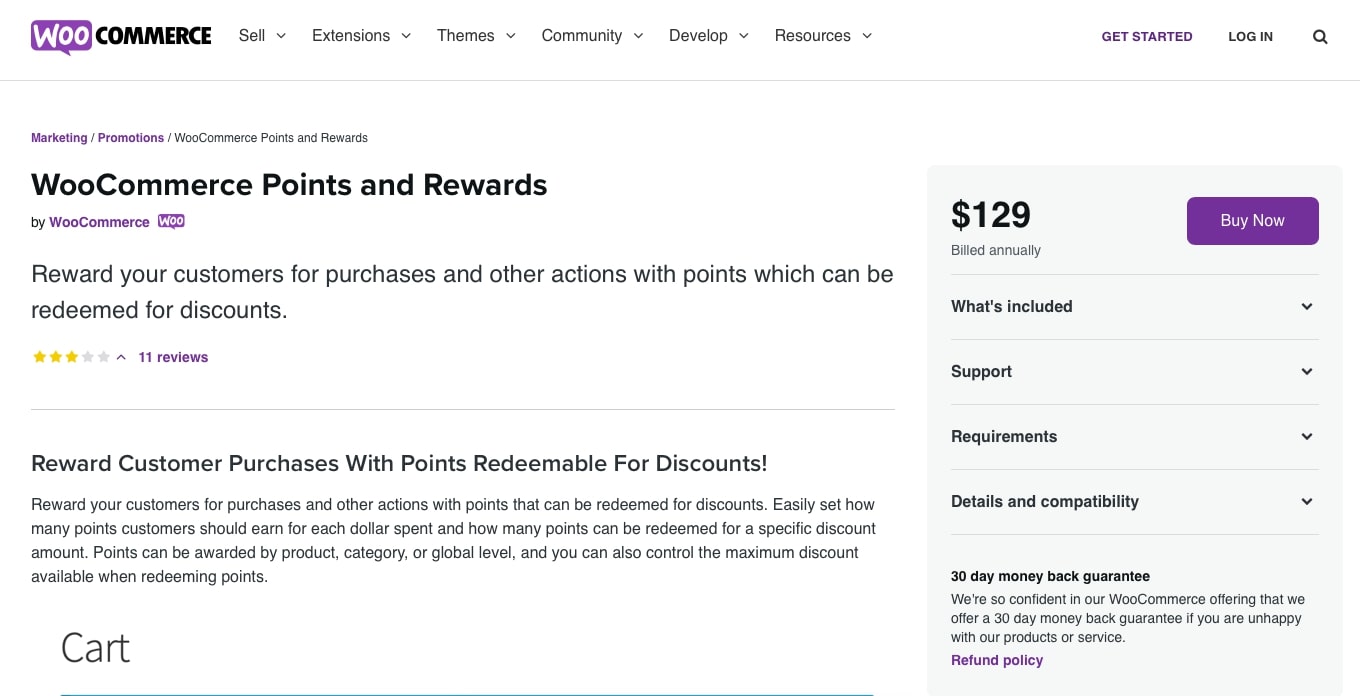
In addition, the plugin is designed to help you improve sales - a bigger ROI (return on investment) and conversion rates. As a result, the points and rewards system boosts up a long-term customer lifetime value. This paid version provides you with tons of features and functionalities, listing below:
-
A fully functioning membership program
-
Track customer point transactions
-
Adjust and update reward system manually
-
Offer the rewards and points in different languages
-
Notify customers via email
In all, this plugin gives you everything you need. If you want to have extra features, you can purchase a Pro version as a consideration.
Price: $129 for a single site subscription
Loyalty points and rewards for WooCommerce
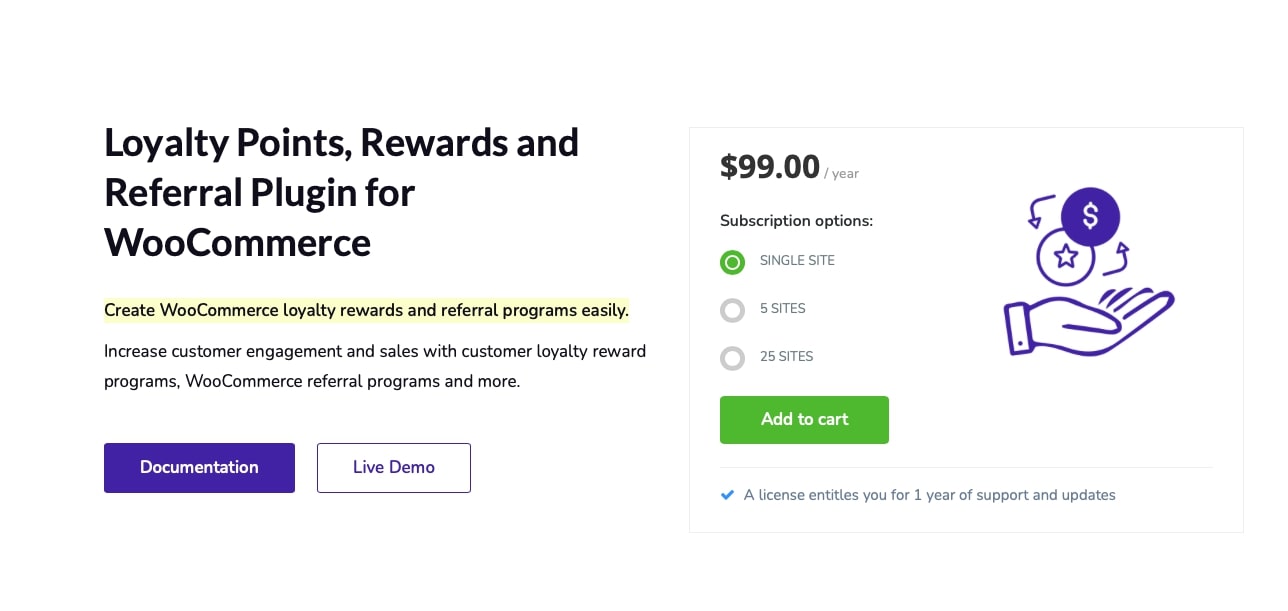
Another good plugin is Loyalty points and rewards for WooCommerce. It is well known for its ease of use and friendly interface. By using this plugin, you can gain some benefits:
-
Create a loyalty program
-
Use multiple methods of setting up a reward points system
-
Built-in shortcodes to display relevant information to customers
Price: $99
Host Plugin
The last plugin we want to suggest you is Host Plugin. The cheapest pricing plan still benefits a loyalty customer program by giving rewards when they purchase their order. Besides the similar characteristics compared with mentioned plugins, it also includes some unique features:
-
Set minimum purchase value to gain rewarding points
-
Increase customer’s points manually
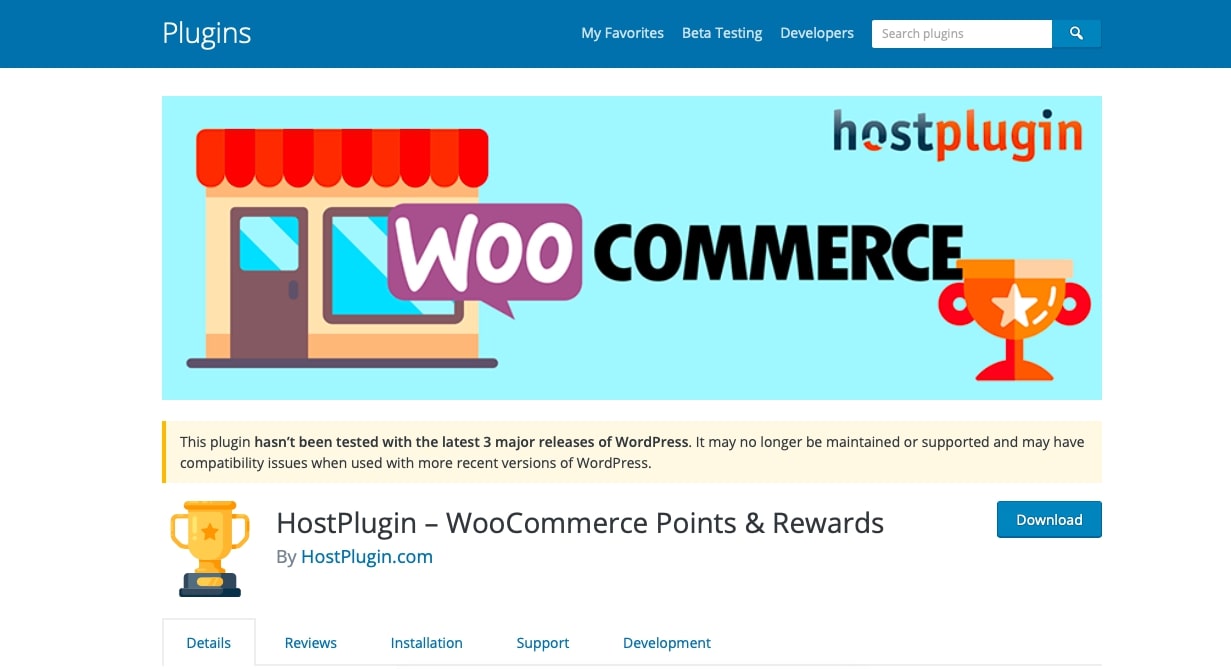
You can download the free version of HostPlugin from the WordPress marketplace, while for a premium version, you should download its file from their website.
Price: $29.99
Final thought
That’s it! You now can learn How to create and use WooCommerce points and rewards by following our tutorial step by step. If you encounter any problems during practice, please feel free to contact us by commenting down below in a chat box. We will support you as much as possible at the nearest time when we approach your problem.


