
How to Organize Products in WooCommerce

WooCommerce is one of the greatest solutions for creating and managing an online store, with over 5 million active users. By default, it includes a variety of tools that make it simple to organize and manage your shop, including the ability to organize products for your shop.
As the WooCommerce store owner, you’re likely to be interested in various conversion optimization tactics. The order in which products are displayed on your WooCommerce store may have a significant impact on conversions. Manually sorting products in WooCommerce is actually rather straightforward. Even, you may custom sort each one of your products.
In this article, we will show you How to Organize Products in WooCommerce by default and how to sort your products by brand to increase your sales even more.
Why you might need to Organize Products in WooCommerce
There are a variety of reasons why you might want to organize products in a shop or on other archive pages. For instance:
- You may choose to alter the order of your WooCommerce products. As a result, items with a higher profit margin appear higher on the page.
- You have some things that you need to move quickly.
- You’re having a promotion on specific products. Additionally, you want to ensure that customers see those products first, rather than later on the website.
How to Organize Products in WooCommerce manually
WooCommerce includes a number of sorting options. By default, your products are sorted in the order Custom Ordering + Name.
A few plugins allow you to manually sort your products, but did you realize that this feature is already incorporated into WooCommerce?
Step 1: Navigate to Product > Sorting
From the WordPress dashboard, select Products and then Sorting.
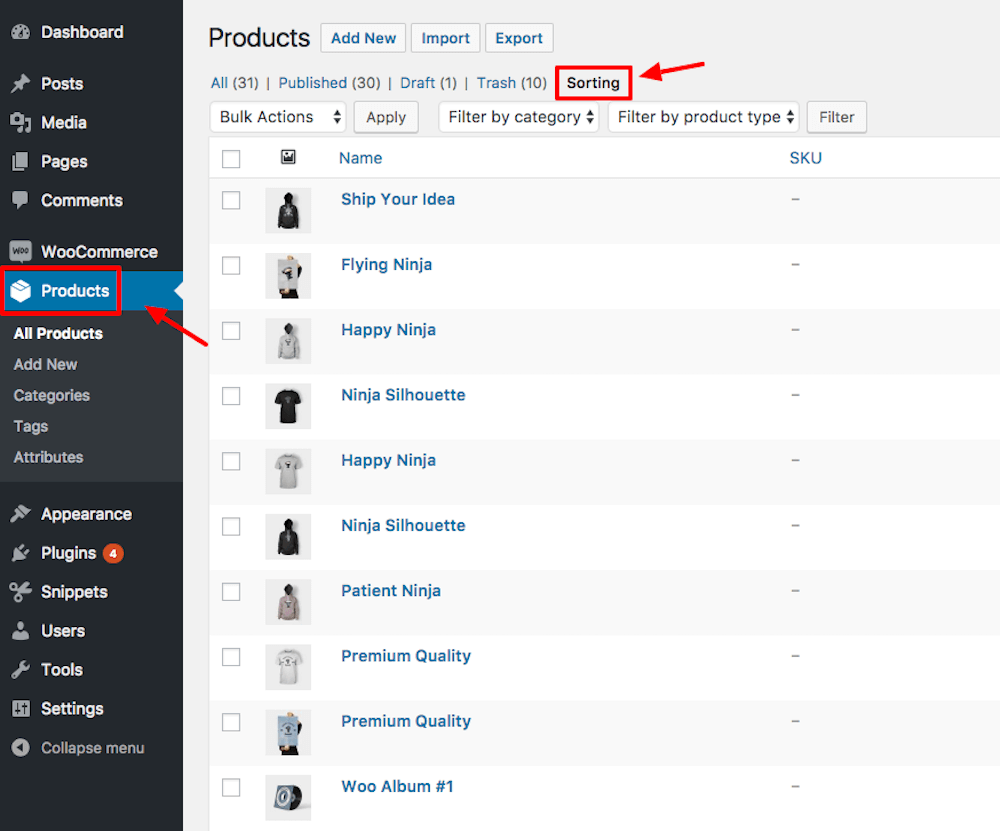
You may easily reorder the product rows from this page by dragging and dropping them. Additionally, you can filter by category and rearrange the order of the categories.
It’s worth noting that this is not the most versatile sorting option available, but it should be enough for most purposes.
When you add new products to the list, they will appear first.
Step 2: Change the Default product sorting option
To alter the default sort order, navigate to WooCommerce > Settings > Products > Display > Default product sorting, then choose the option Default sorting (custom sorting + name).
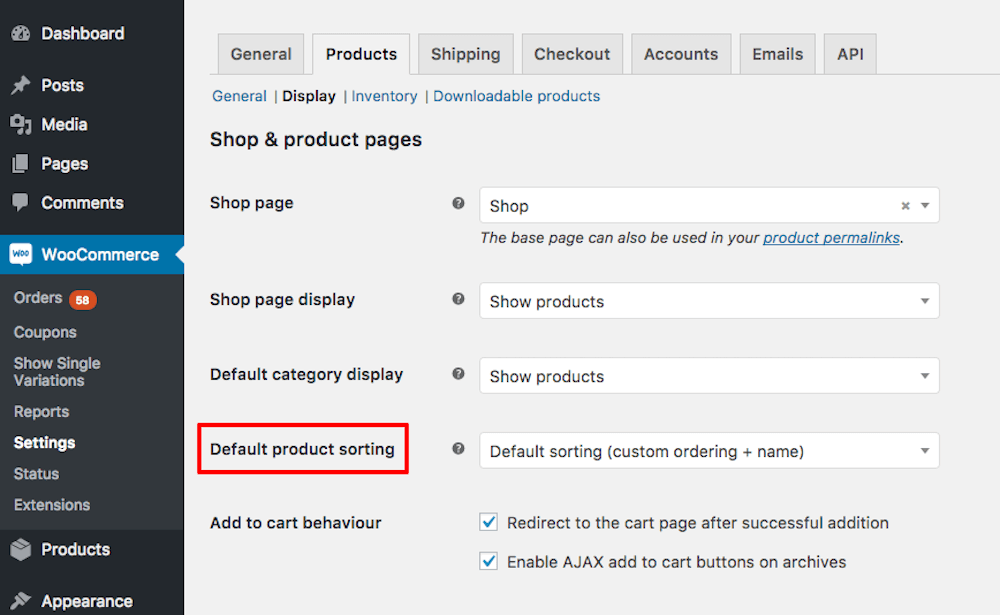
WooCommerce includes six distinct sorting options, from which you may choose your default sorting method. Among these alternatives are the following:
- Default sorting (custom sorting + name): Sorts products by name by default, but allows for user custom sorting. This is advantageous when you want to draw attention to multiple products that do not meet a single requirement.
- Popularity (sales): Sorts the goods in ascending order by the number of sales. This will move the most popular things to the top of the page.
- Average Rating: Sorts the products from top to bottom based on their average rating. This is advantageous if you like to emphasize your highest-rated products.
- Sort by Most Recent: This option prioritizes the most recent products. This option allows you to introduce new collections to your customers.
- Sort by Price (asc, desc): Sorts things in ascending or descending order of their price. You can rank them either ascending (from lowest to highest) or descending (from highest to lowest).
Now that you’re familiar with all of WooCommerce’s sorting choices, let’s look at how to select and apply them.
How to Organize Products in WooCommerce by brand with plugin
Whether we are aware of it or not, brands have an impact on our purchasing decisions. They are a symbol of the quality and trust built up over time. Certain brands have even developed a cult following. Their clients are emotionally invested in that particular brand and will never switch to a rival brand – particularly a rival brand.
Collaboration with brands is critical for eCommerce businesses since it enables you to enhance the consumer experience and grow your sales. From the customer’s perspective, it’s a wonderful experience to land on an online store that allows for product organization by brand.
Regrettably, WooCommerce does not provide such a feature by default. Fortunately, everything is possible with WordPress! We’ll introduce you how to sort products by brand with the Perfect Brands for WooCommerce plugin in this post.
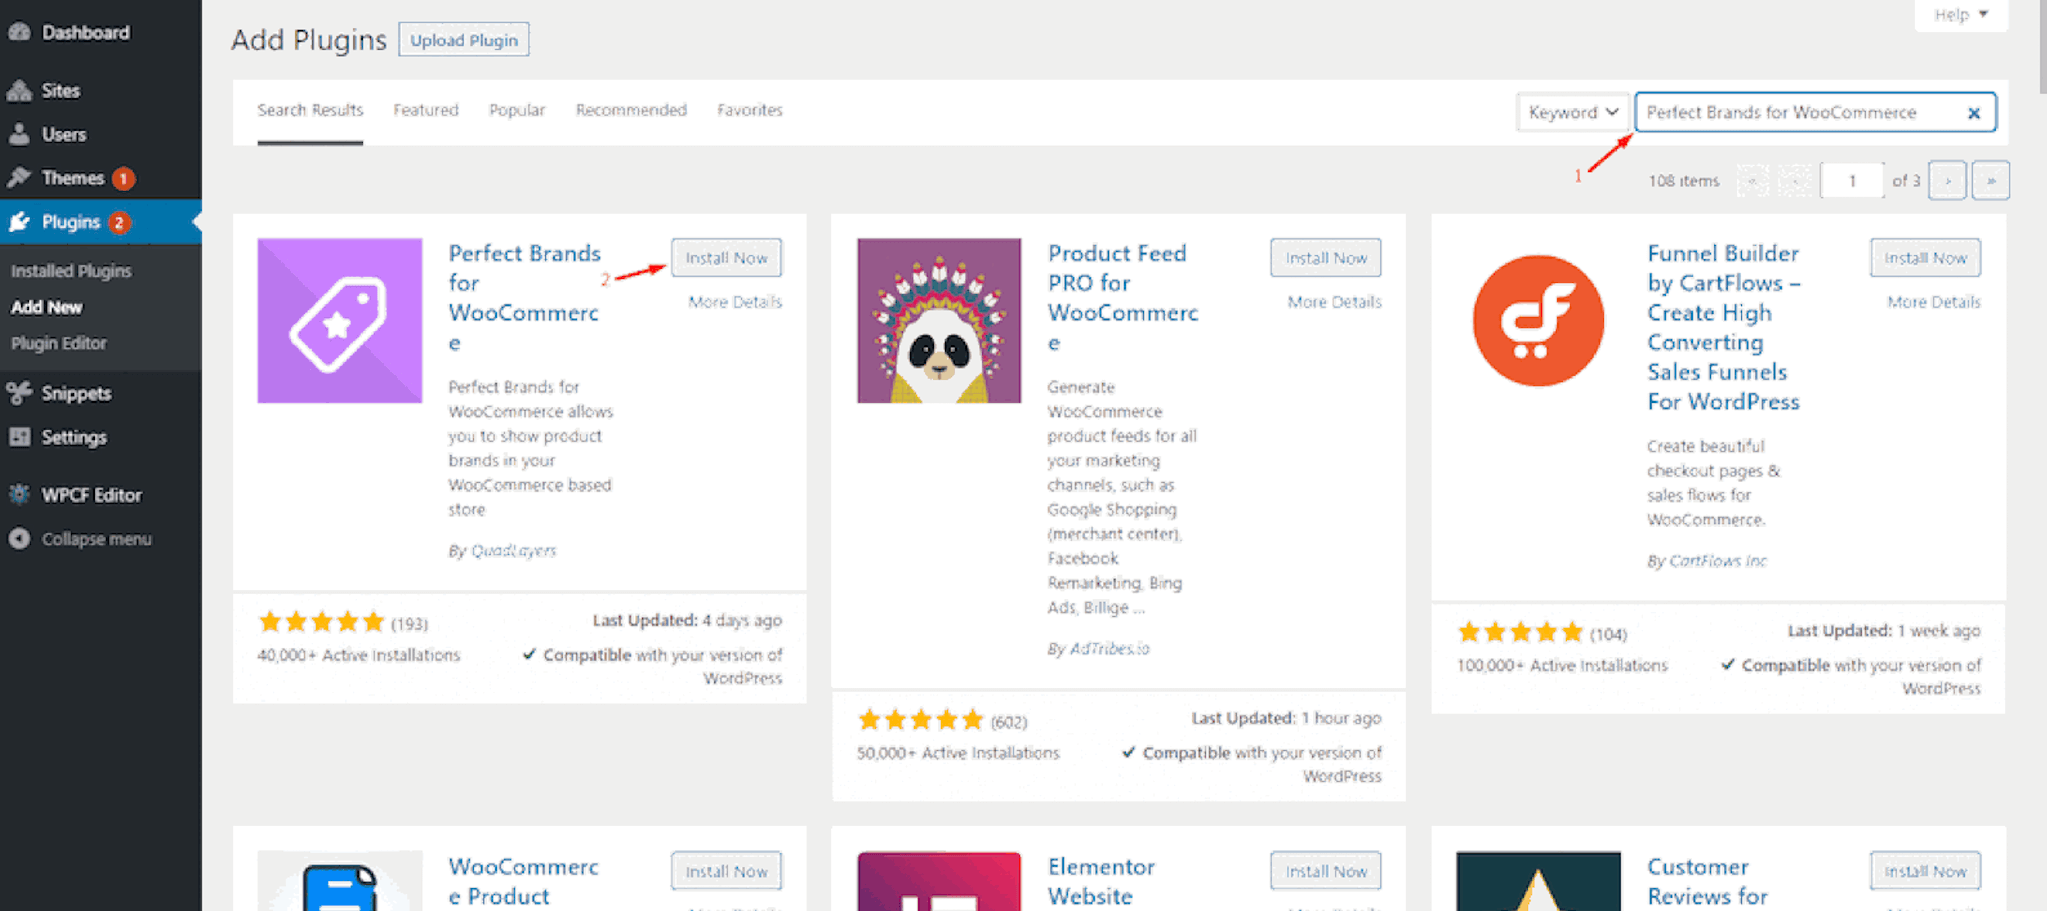
Step 1: Download and install the plugin
To begin, let’s download and activate the plugin. Navigate to the WordPress Admin Dashboard, choose Plugins > Add New, and type Perfect Brands for WooCommerce into the search bar. Install Now and then activate the plugin once the installation is complete.

Install Now and then activate the plugin once the installation is complete.
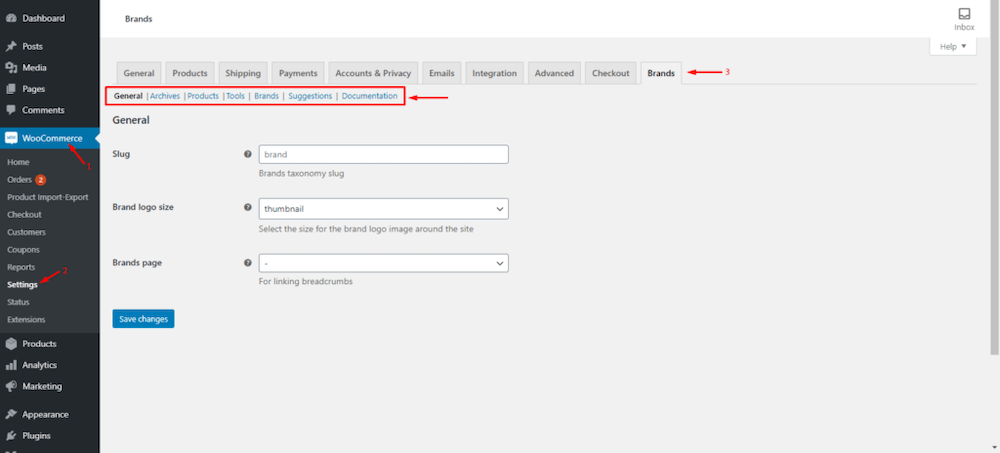
Once that is complete, navigate to WooCommerce > Settings > Brands. There, you may adjust the settings for all of your brands at any time.It’s now time to develop the brands.
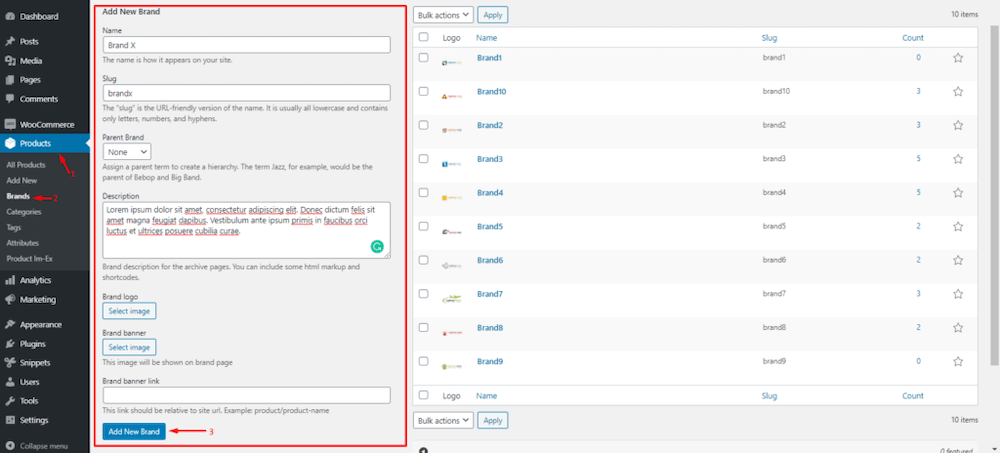
Step 2: Establish a New Brand
Navigate to Products > Brands on your WordPress Admin Dashboard. The Add New Brand area is located on the left-hand side of the page.
Complete all needed fields and click the Save Changes button to apply the changes. Your brand will now display in the right-hand sidebar’s brands list.
After creating your brands, you must allocate them to your items.
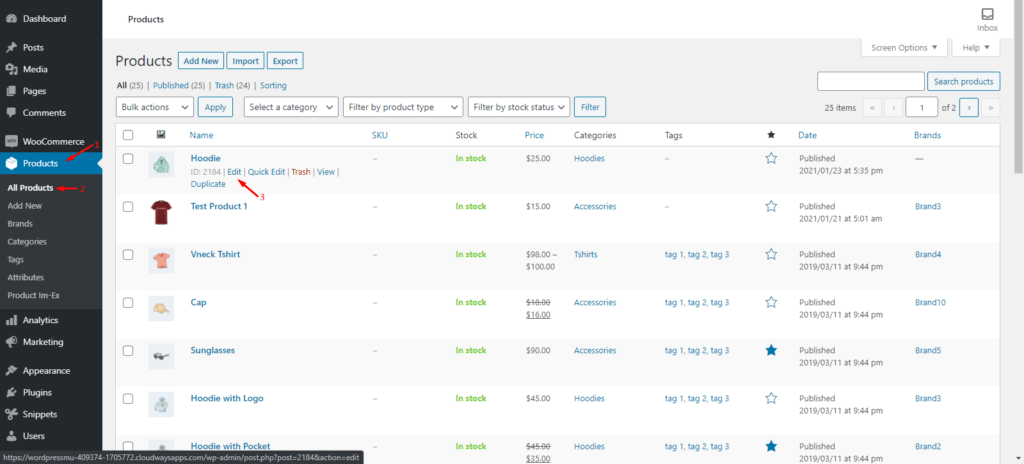
Step 3: Assign a Product to a Brand
Navigate to Products > All Products on your Admin Dashboard. Then, click Edit on a product to which you wish to attach a brand.
On the Edit Product Page, locate the Brands area on the far right and select one or more brands to associate with this product. Alternatively, you can create a new brand. Once finished, click the Update button to apply the changes.
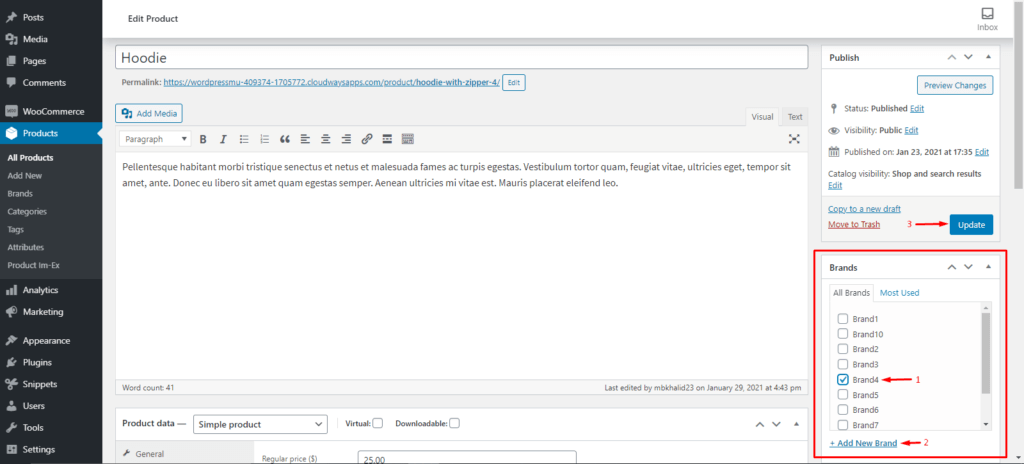
That is all! You have successfully added assigned brands to your items and generated new brands. Bear in mind that you must repeat the process for each item you sell.
3 plugins to Organize Products in WooCommerce
1. WooCommerce Extra Product Sorting Options
WooCommerce Extra Product Sorting Options adds choices to the store page that enhance the usual WooCommerce order by options. You can optionally change the default sorting order’s name (useful if you’ve used this to construct a custom sorting order) and enable up to five new sorting options: alphabetical, reverse alphabetical, on sale, review count, and availability product sorting. Additionally, you can disable basic sorting options or altogether disable the sorting dropdown.
Key Features:
- Rename the default product sorting system (i.e., “Our Sorting”).
- Allow for alphabetical product sorting Allow for reverse alphabetical product sorting.
- Allow for on-sale product sorting (note: works only for simple products).
- Enable inventory/availability-based sorting.
- Enable sorting by the number of reviews (most reviews to least).
- Delete all default sorting choices.
Price:
This plugin is free of charge.
2. More Sorting Options for WooCommerce
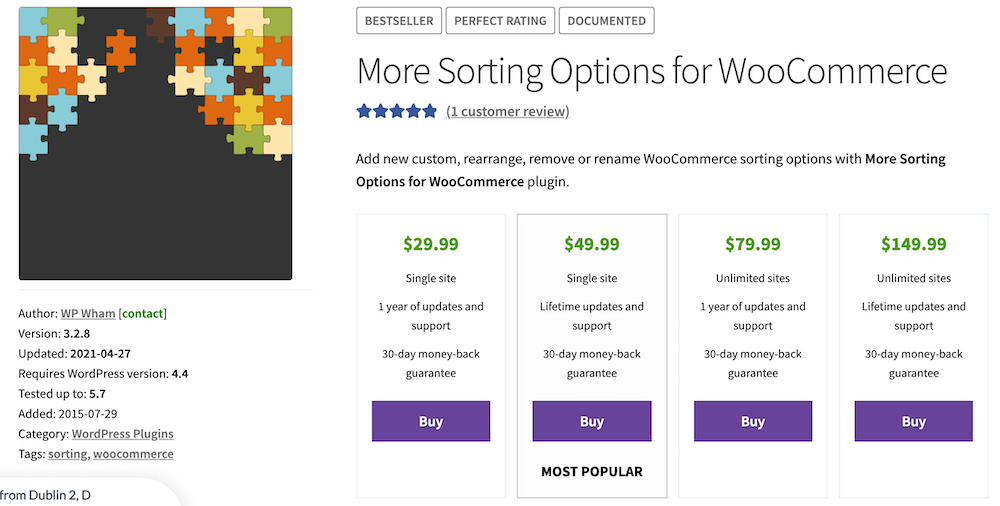 The WPFactory More Sorting Options for WooCommerce plugin includes a slew of features that will assist you in optimizing product sorting. It enables you to reorganize, rename, and delete existing sorting choices, as well as add new ones. The plugin expands the product display options, and you can quickly rename any of the existing sorting options. The plugin has a huge number of custom sorting options, allowing you to extend the default sorting options. Another advanced feature of this plugin is the ability to completely eliminate the sorting choices from the front end of your site.
Key Features:
- Numerous custom sorting possibilities, including SKU, stock, and meta information.
- Sorting options can be rearranged.
- Rename WooCommerce’s default sorting options.
- Remove all sorting options from the frontend of your site.
Price:
There are 4 price plans for you to choose:
- Single site - 1 year update and support: $29.99.
- Single site - Lifetime update and support: $49.99.
- Unlimited sites - 1 year update and support: $79.99.
- Unlimited sites - Lifetime update and support: $149.99.
3. Rearrange Woocommerce Products

Rearrange Woocommerce Products is a plugin that enables you to rearrange/reorder the products on the Woocommerce Shop Page’s default sort order. Additionally, it enables the rearrangement of products according to a given category. This is a very simple-to-use plugin that features drag-and-drop capabilities for the rearrangement of products.
Key features:
- Rearrange/reorder products.
- Rearrange products according to a given category.
- Possibility of sorting products according to any product category.
- Capability to choose and sort many products with a single click.
- Drag-and-drop capabilities
Price:
This plugin is free to download and use.
Final thoughts
The process of organizing WooCommerce products is quite simple and straightforward. With this instruction, we believe that you can now sort your shop’s items in just a few minutes without difficulty.
Do you find this article helpful? If yes, please share our work with your friends and coworkers and stay tuned for more useful posts from AVADA.


