
How To Manage Orders In WooCommerce

It is essential for an eCommerce business owner to manage every ordered system to provide the most significant experience for customers. You must guarantee that every stage of the fulfillment process is addressed from the moment you receive an order. This won’t be easy if you have a high quantity of orders. It’s a good idea to invest in particular solutions that will help you ensure effective order administration.
Today’s tutorial will show you how to manage orders in WooCommerce. We will go through all the basic steps and introduce some helpful plugins to increase your managing process. So, let’s dive in!
How To Manage Orders In WooCommerce
Add a new order
The first and foremost step you need to know is to add a new order. To access the page where you can manage all of your Orders, you must first log into the admin area of your WordPress website. You’ll need to go to WooCommerce > Orders from there.
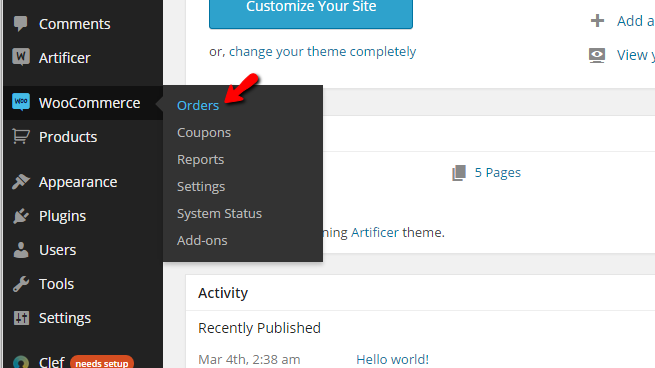
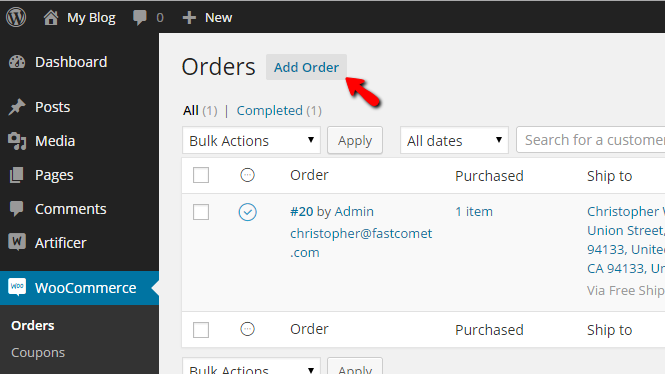
Once there, you’ll see a table view with all of the orders that have been submitted on your website. To manually add a new order to your website, go to the top of the page and click the Add Order button.
By clicking on that button, you will be taken to a page with a few sections containing settings that you must specify for the new order to be added. Let’s go over them one by one. The first part is called Order Details, and it allows you to select the essential details about the purchase you’re adding, such as the Order Date, Order Status, and, of course, the Customer to whom you’re adding this order.
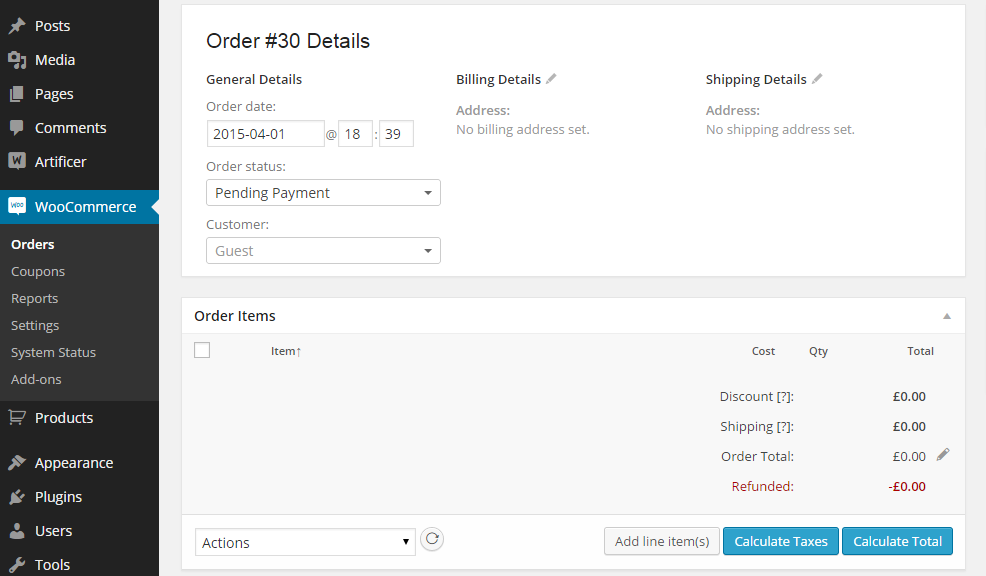
The second area is called Order Items, and it is here that you may add goods to your order. The third area is called Custom Fields, and as the name implies, you will be able to add various custom fields to the order there.
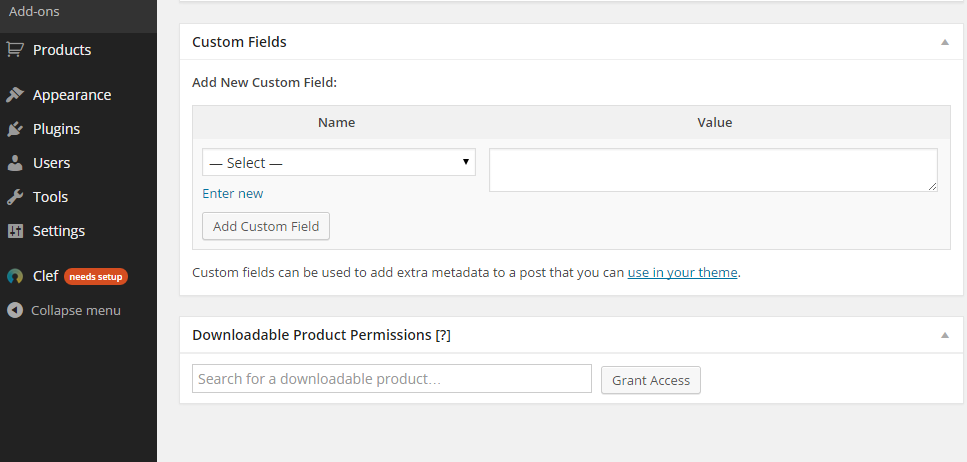
Downloadable Product Permissions is the fourth part. There, you will be able to add certain downloaded items to the order, and after the order’s status is updated, the client will be able to download them. Additional sections named Order Actions and Order Notes may be found in the page’s sidebar. There, you can add and set various actions for the order, such as sending emails and adding any comments if necessary.
Manage existing orders
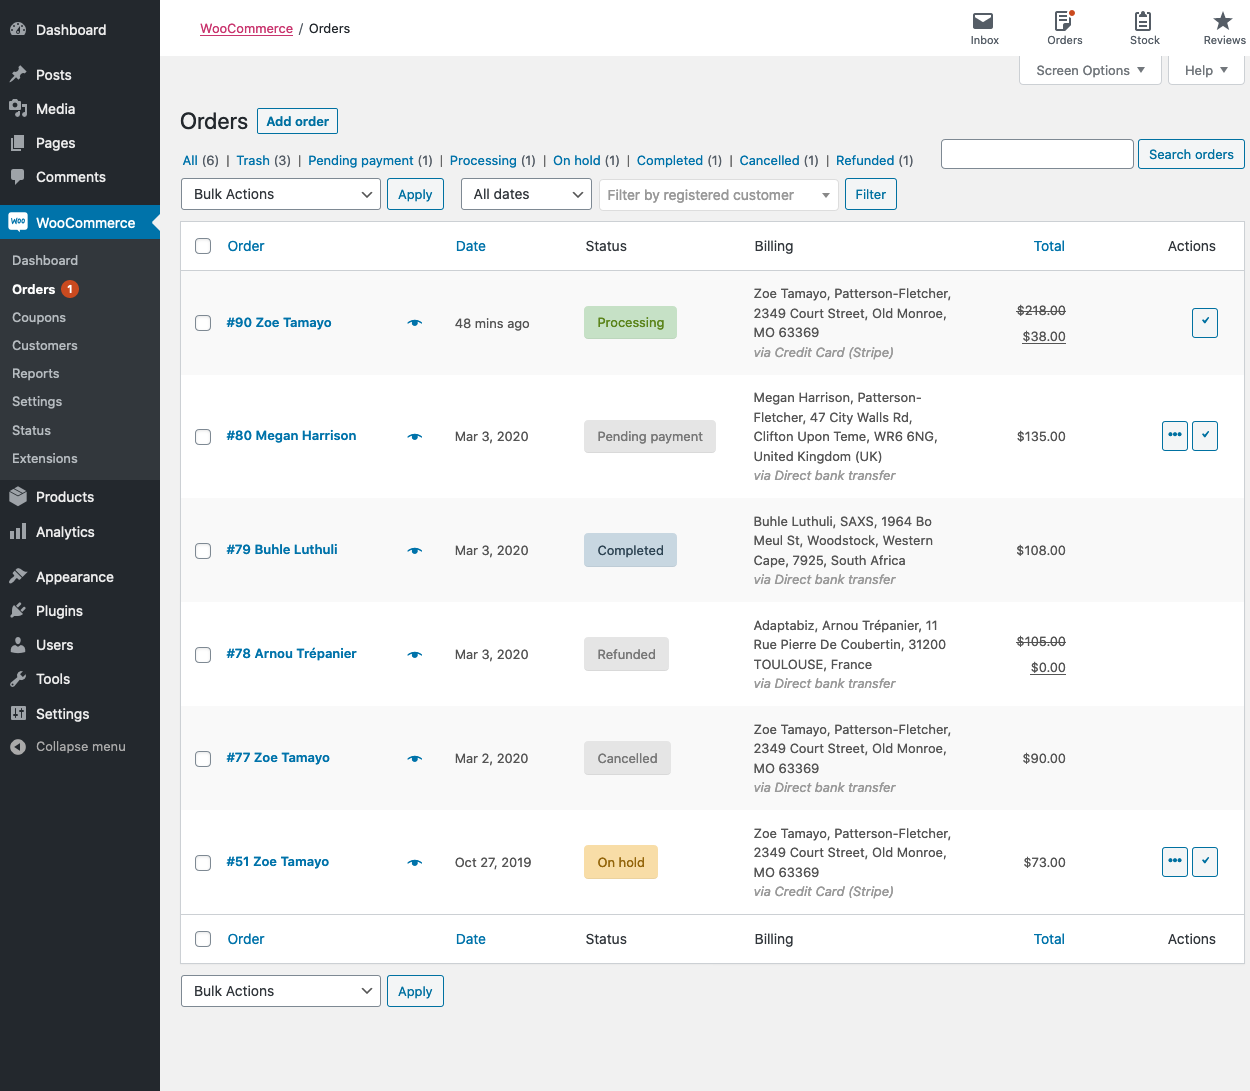
Once an order is entered on your WooCommerce Online Store, it must be processed and may be completed after successful payment. You can only update orders that have not yet been paid and are in the Pending Payment stage. Please browse to WooCommerce > Orders once you have signed into the admin area of your WordPress application. You can see all of the orders placed on your website once you get there.
Order overview
When a business begins to accept orders, the Orders management page fills up. Each row provides specific information. Some are there by default; others can be added. The following are the options:
- Order number and customer name,
- Date of purchase.
- Order status.
- Billing address.
- Shipping address.
- Purchase total.
- Actions.
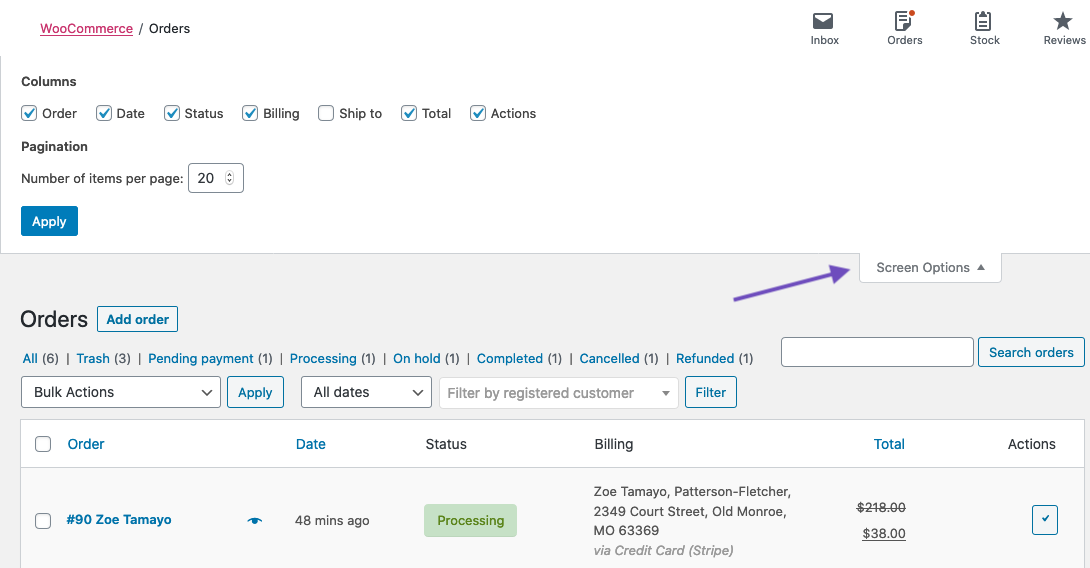
To modify these columns, follow these steps:
- Step 1: Navigate to WooCommerce > Orders.
- Step 2: In the upper right corner, click Screen Options.
- Step 3: Choose which columns to display.
- Step 4: Choose how many items you want to see on each page.
- Step 5: Then submit your application.
Filter and arrange orders
In this section, you can manage and control your orders with different Filters. Orders can be filtered by date (month/year) or by the registered client.
- Choose a month or search for a customer.
- Choose Filter.

Select the heading to arrange orders in ascending or descending order by an Order Number, Date, or Total. It should be noted that the refunded value is not included in the “Total” column.
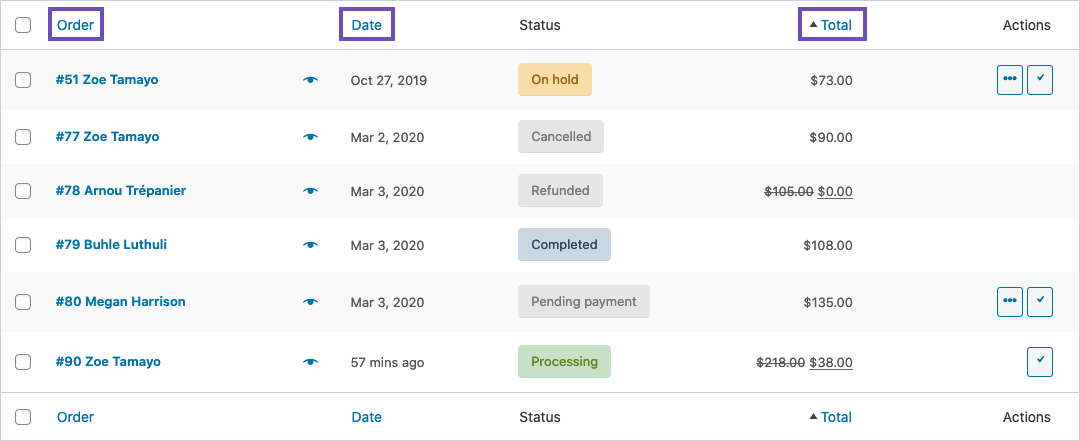
Clicking the order number and client name will take you to the Single Order page, where you can also Edit order information, Update Status, and Add Notes.
Searching and finding orders
Orders may be located by utilizing the search box located at the top right of the order list. Enter an order number, a client name, or any other information from the order list, such as an address. Click Search orders or press the return key on your keyboard to get a list of matched orders.
Preview orders
It should be noted that if you want to see more information about your order without entering inside it, there is a Preview option that will display a pop-up window with further details.
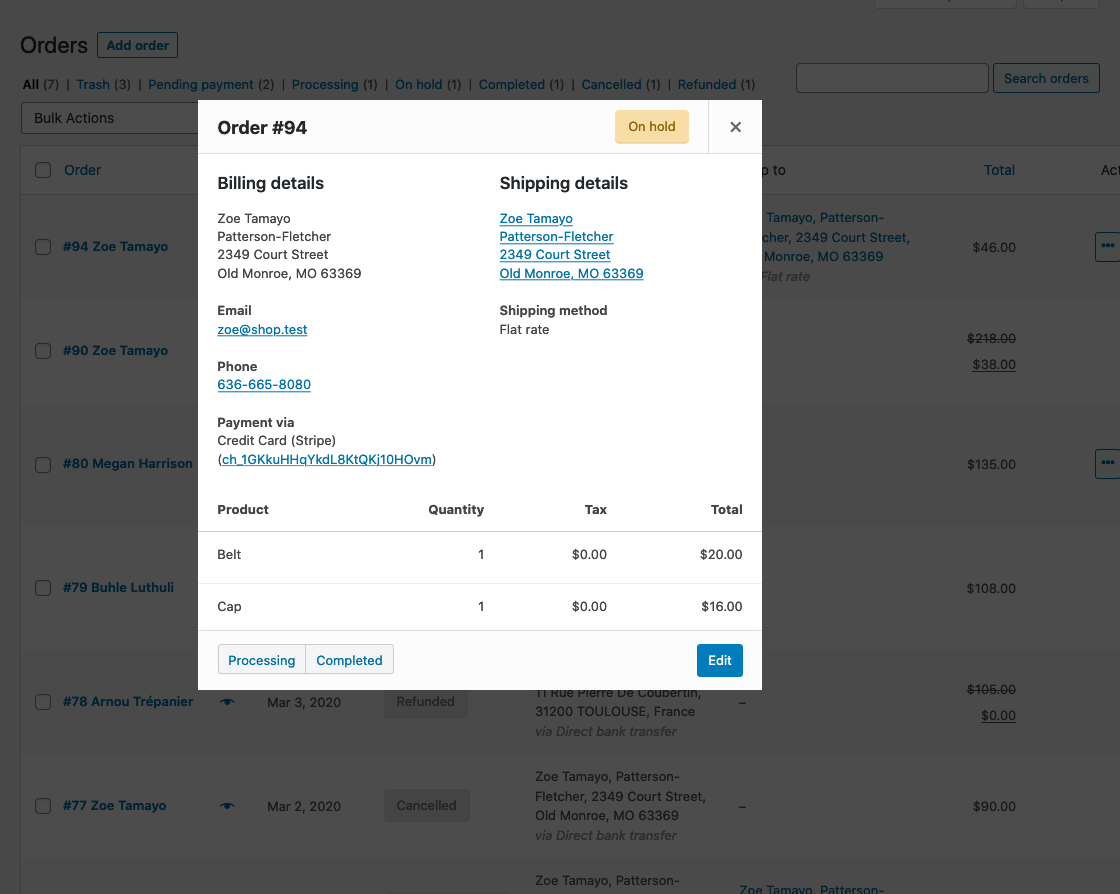
When you click Preview, a Modal appears with the order number, order status, billing information, payment method, shipping information, payment method, products ordered, and the ability to alter the order status.
Control order status
The statuses are denoted by the colors grey, green, or red. An order’s status, on the other hand, can be:
- Canceled – Grey
- Completed – Blue
- Failed – Red
- On Hold – Orange
- Pending Payment – Grey
- Processing – Green
- Refunded – Grey
Edit orders
Now we will show you how to view and edit orders in WooCommerce. Not only can you view all order data from the Single Order page, but you can also modify and change it. Here are some changes you can make in this section:
- Modify the order status.
- Order items can be edited by changing the goods, pricing, and taxes.
- Supply - Reduce and replenish an order’s stock.
- Order Actions – Email order data to the client (applicable if you’re manually making orders for customers), or Download permissions should be regenerated.
- The product should be modified. Meta may be used to alter product variants by deleting and adding meta.
- Use coupons: To apply the coupon code to the order, you will need to know it. Coupon usage statistics are kept, and coupons can be withdrawn from orders. It should be noted that for coupons to be effective, the order must be unpaid.
- Add fee: To add a charge to an order, enter a figure or a percentage. Negative costs will distribute taxes across all other products and not cause the cart total to fall below zero.
Order details
You may see the following information in the Order Details panel:
- Order number
- Payment details
- Order date and time
- Order status
- Customer details:
- Username and email, together with a link to view their profile and other purchases that customers may have had in the past.
- Billing details
- Shipping details
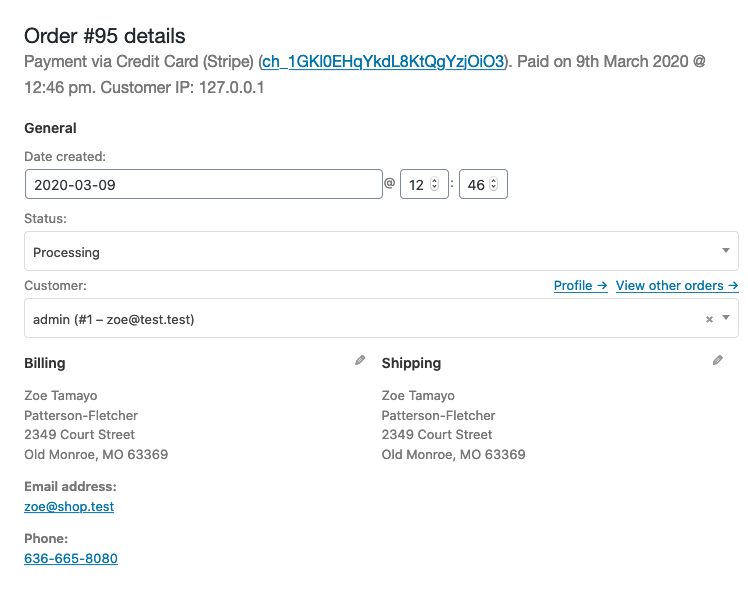
The majority of the information in this section can be updated or changed:
- Use the dropdown date selector and the quantity selectors for the time to change the date and time.
- To alter the status, select the appropriate option from the dropdown menu.
- To switch customers, first, pick the current customer and then search for the new customer.
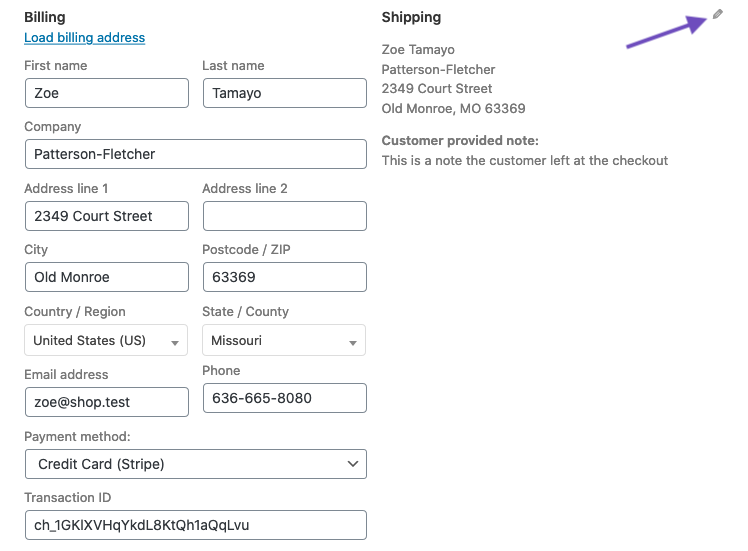
- Several more parameters can be modified under “Billing” and “Shipping.” To do so, click the pencil symbol next to each of them.
- Under “Billing,” you can change these details:
- Billing address - This information may also be retrieved from the customer’s profile by selecting “Load billing address.”
- Phone number
- Payment method and details
- Under “Shipping,” you can modify these sections:
- Shipping address - This information can also be retrieved from the customer’s profile or copied from the billing address.
- Customer provided note
- Once you’ve made the required adjustments, click Update to bring the order up to date.
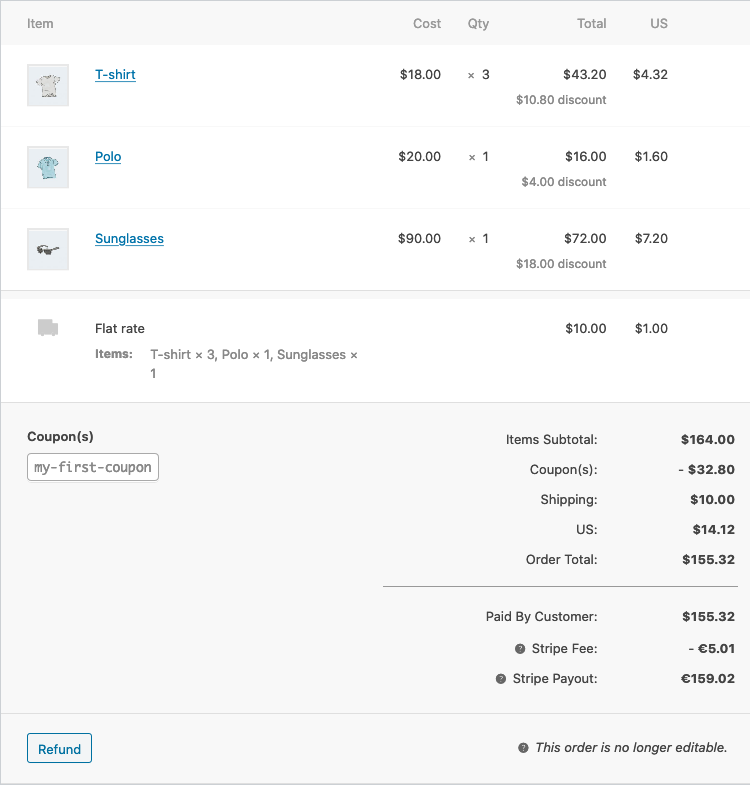
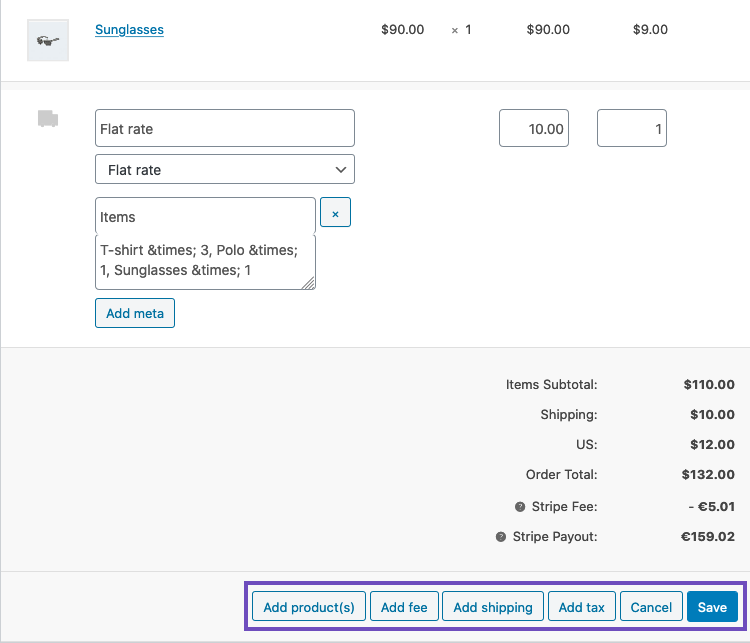
Order items and totals
The Order Items panel is the next panel on the order page. This section includes the product items, shipping information, and an order summary.
Each product item contains all the information below:
- Product image
- Product name
- Single product Cost
- Quantity
- Total (Cost x Quantity, with discounts taken into consideration)
- Taxes
Below that, you will see all shipping information which will include:
- Shipping method
- Boxed items
- Total cost
- Taxes
The last section is the overview of the order costs. You will see some changes in this section if any customers refund the order. By default, it will contain:
- Subtotal of items — cost excluding tax
- Coupon(s) — the amount removed due to the usage of coupons; the coupons used are listed on the left side of this section.
- Shipping – the cost of shipping the order.
- Taxes — the total amount of taxes applied to the order; this will be replaced by the tax code applied to the order.
- The order total is the sum of the expenses listed above.
- Finally, a summary of what is paid and the fees charged by payment gateways is provided below the line.
Order items cannot be changed except for refunds until the order status is “Pending payment” or “On hold.” To modify a product line, click the pencil symbol next to it.
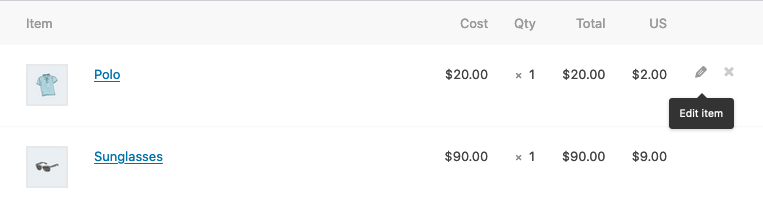
The following product elements are editable:
- Add Meta — You can alter the product variable choices by adding and removing meta.
- Quantity — The number of goods purchased by the client.
- Total — The sum of the line price and the line tax, less any pre-tax reductions.
- Tax – The cost of paying taxes. If a consumer is tax-exempt, for example, you may wish to eliminate the taxes.
Then, at the bottom of this window, you have four options:

- Add item(s) – this brings up six additional options:
- Add product(s) — Add more items to the order.
- Fee — Include an extra charge, such as gift wrapping.
- Add a shipping fee — Include a shipping cost. Click the pencil symbol to edit the name, method, price, and tax when you’re finished.
- Add tax — Add a tax code to each component of the order.
- Cancel — Use this option if you do not want to make any changes.
- Save – Once the modifications have been made, save them.
- After that, you may choose the Recalculate option to do additional calculations depending on shop settings automatically. This is useful for adding or deleting items, discounts, delivery options, and so on. Please keep in mind that any tax adjustments you’ve manually entered will be deleted since the tax settings in your shop will apply based on the customer’s address.
- Apply coupon – If your customer forgot to enter the coupon code or you want to reward them before they pay, clicking this option will bring up a modal that allows you to enter a coupon code.
- Refund – the act of returning money to a consumer.
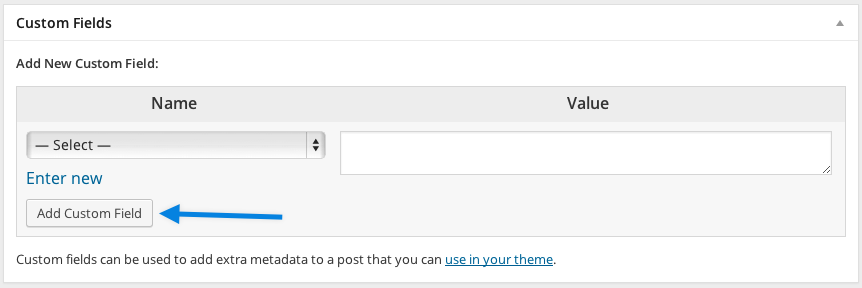
Custom Fields
Use the Custom Fields meta box to create custom meta fields:
Order Notes
The Order Notes panel displays comments linked to the order and may store event data such as payment outcomes or stock level reductions or add notes to the order for consumers to read. Some payment gateways additionally include debugging notes. Several note formats can be used:
- Purple: System status notifications, such as payment gateway information.
- Grey: Status updates in general, such as status modifications or private remarks. Customers do not see these remarks, but they may be notified of them; for example, an email may be sent if the status changes from processing to done (depending on your settings).
- Blue: Notes represent customers. Customers are emailed notes, but they may also read them by visiting orders in their My Account area.
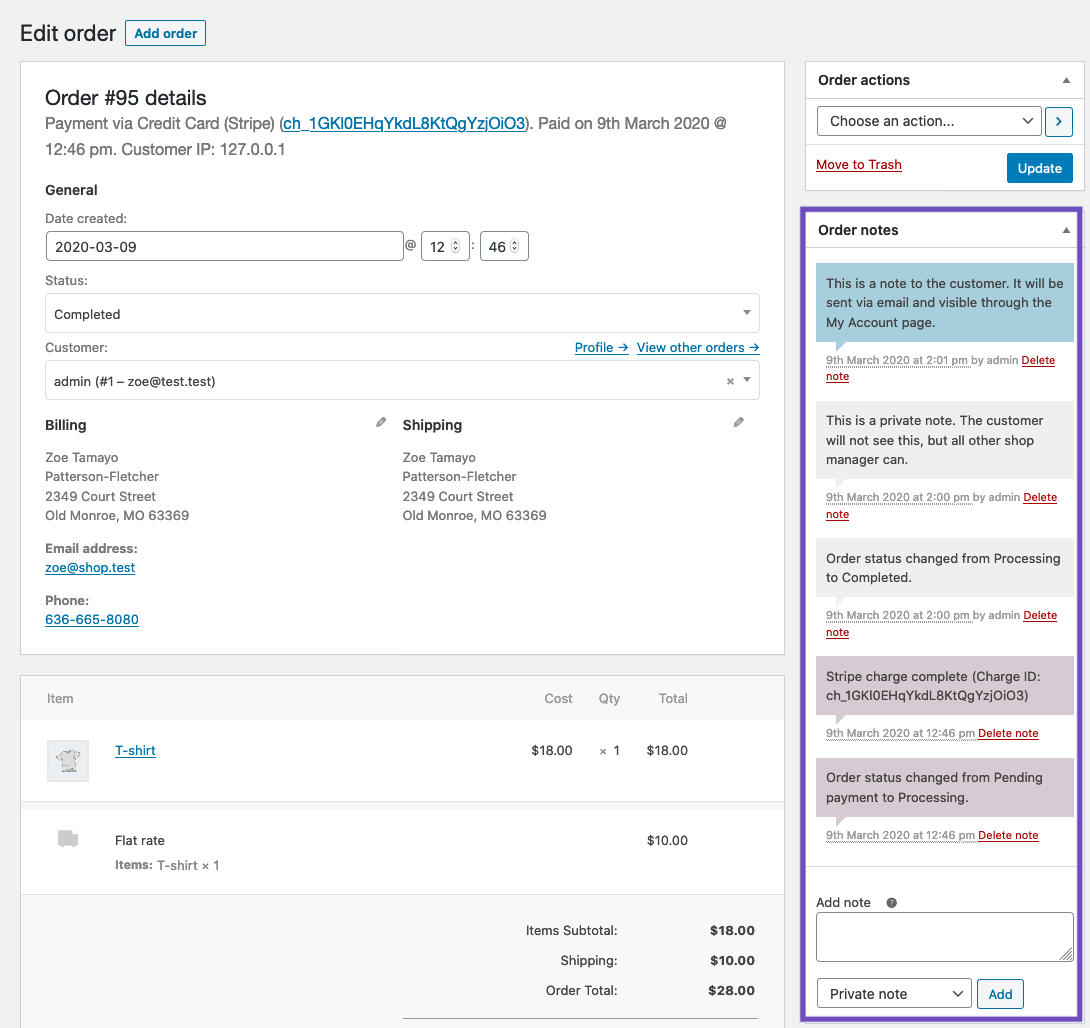
Notes can be an effective way to communicate with consumers or other shop managers. Do you need to include a tracking number for shipping? Is there a stock delay? When you add a customer note, they are automatically alerted. To add a note:
- Step 1: Fill in the note’s content in the text area.
- Step 2: In the dropdown menu, choose Private note or Note to customer.
- Step 3: Select the Add option to finish the process.
4 best plugins to manage orders in WooCommerce
Order Coupon Subscription Export Import for WooCommerce
You might wish to export order information from your WooCommerce store so that third-party apps and services can handle it. Order Coupon Subscription Export Import for WooCommerce allows you to export order information in CSV and XML formats. For simple integration, it supports the formats of many shipping companies. Furthermore, the plugin will enable you to use cron jobs to schedule exports at certain time intervals. The plugin may also be used to handle order imports into your WooCommerce store. You may also use it to update current order data in bulk. Furthermore, the plugin is compatible with several other plugins, including WooCommerce Subscriptions and Bookings.
Outstanding features:
- Order, discount, and subscription information may be exported and imported from and into your WooCommerce store.
- CSV and XML files are supported.
- Cron jobs may be used to schedule import and export.
- Smooth and friendly Ajax-enabled user interface.
- Filtering possibilities abound for customizing the import and export of data.
Price: This plugin costs $69.00 for a single site license.
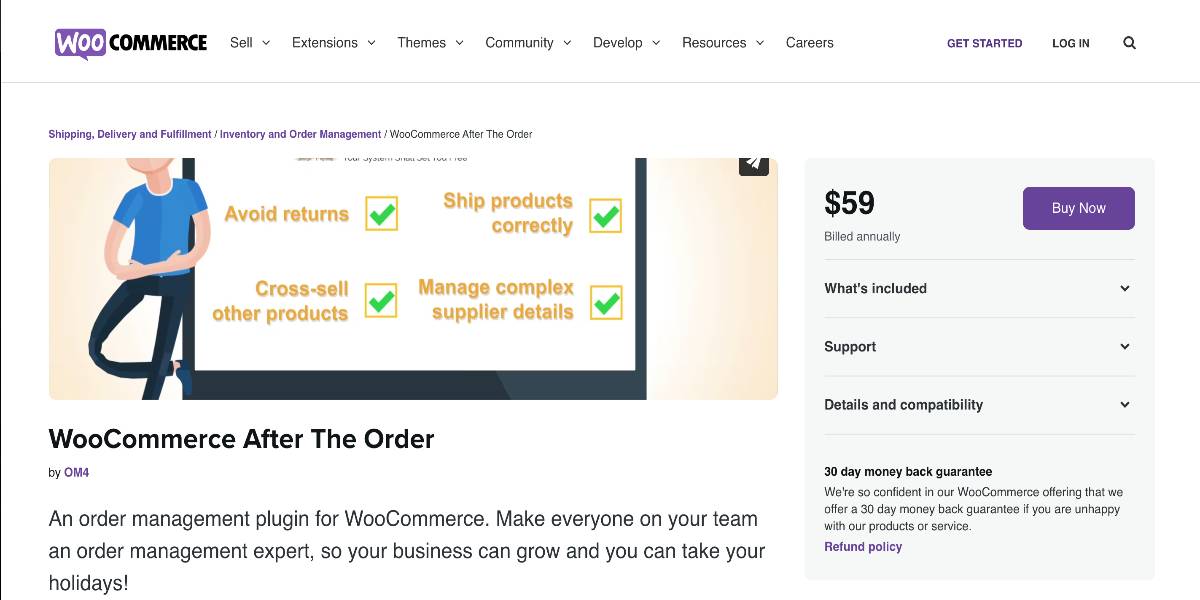
WooCommerce After The Order
WooCommerce After The Order is a fantastic plugin that will benefit you with order processing. It will assist you in taking notes that are necessary for the seamless processing of an order. You will add order notes at various levels, which will be forwarded to the store manager. This might include store-wide announcements or notifications when a specific product is included in order. These order remarks will be included in both the order notification emails and the dashboard view. Overall, the plugin can be quite beneficial in minimizing mistakes and, as a result, enhancing customer experience and sales numbers.
Outstanding features:
- Keep track of order processing notes for individual goods or all orders.
- Order processing remarks should be included in the order notification email.
- When the order is evaluated on the dashboard, show the shop notes and product notes.
- Reduce mistakes and increase order fulfillment accuracy by avoiding overlooking critical details.
Price: You can get the plugin with a fee of $49.
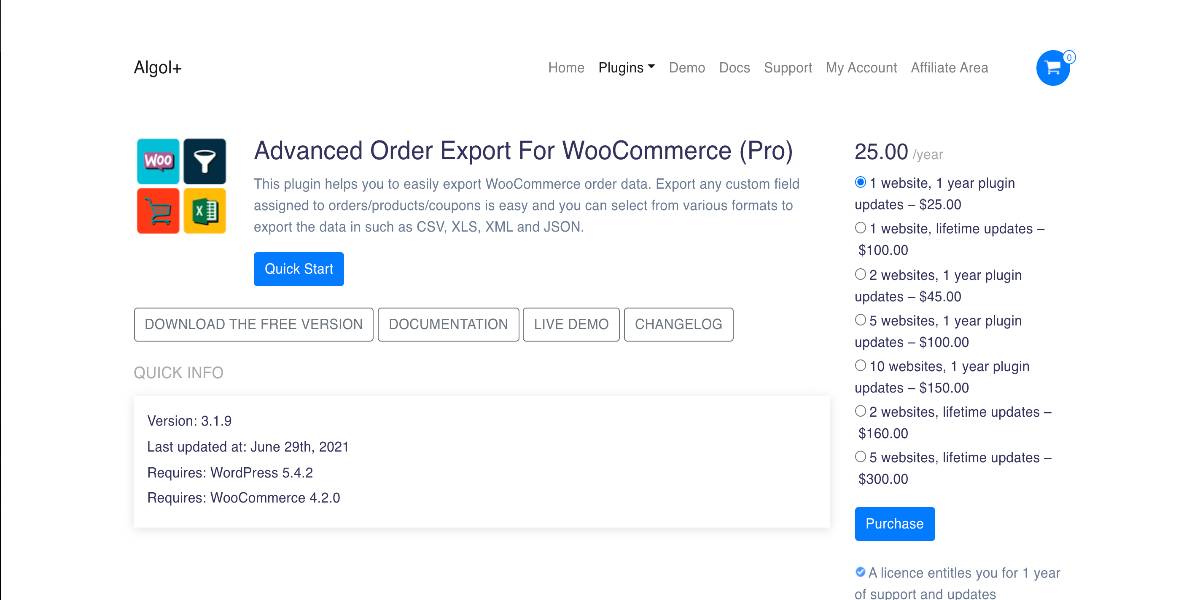
Advanced Orders Export For WooCommerce
Advanced Orders Export For WooCommerce is another plugin that will allow you to export order information from your WooCommerce store selectively. You may also configure rules to ship specific orders depending on a specified status change. The plugin also allows you to plan imports in both basic intervals and more sophisticated daily routines. Furthermore, the plugin will enable you to send the export data to different destinations such as email, FTP, sFTP, URL, etc.
Outstanding features:
- Orders from your WooCommerce store can be exported.
- Schedule exports at predetermined intervals or at a particular time each day.
- Schedule individual order data exports based on order status changes.
- Send the export file by email, FTP, SFTP, or URL.
Price: The plugin’s basic version is $25.
YITH WooCommerce Custom Order Status
The YITH WooCommerce Custom Order Status plugin provides sophisticated functionality for managing order statuses and labels on your site. In your online store, you may establish complex order statuses based on your needs. Furthermore, you may modify statuses with color, text, and symbols to make them more visible to consumers. You will also be able to overwrite the current order statuses on your WooCommerce shop. You will also be able to add orders with all classes in the reports.

Outstanding features:
- WooCommerce allows you to create custom order statuses.
- To make it easier to distinguish states, utilize icons and labels.
- Send emails when the status of a custom order changes.
- Customers should be able to cancel or pay for orders, as well as download products.
- WPML is supported.
Price: A single site subscription to this plugin will cost $69.99.
Conclusion
Following the automation methods outlined above in this post will undoubtedly give you greater control over your orders. However, if you decide to go without adding a WooCommerce order management plugin, you will discover that maximizing your business’s performance will be a difficult task.
We hope this tutorial will clear your mind on how to manage orders in WooCommerce. Take deep research to find the proper methods and plugins suitable for your online business and peak your sales!


