
How to Integrate Payeezy with WooCommerce?

As an online merchant, you must have heard of the Payeezy payment gateway. With the Payeezy payment gateway, your customers can complete transaction payments directly on your online store website and have a wonderful shopping experience on your website.
In this article, we’ll talk about how to integrate Payeezy with WooCommerce. Let’s get started!
Benefits of Integrating Payeezy with WooCommerce
Customers can complete transaction payments directly on your WooCommerce store after integrating Payeezy with WooCommerce, resulting in a seamless customer experience.
Payeezy is a direct processor, which means you can communicate directly with the firm in every area of managing and monitoring your merchant account with the highest level of security, which is advantageous for launching your online store and starting to sell products online.
Payeezy’s comprehensive reporting tools also allow you to follow, analyze and comprehend payment operations. As a result, you will be able to understand your consumers’ behaviors and demands in order to maintain their loyalty.
How to Integrate Payeezy with WooCommerce?
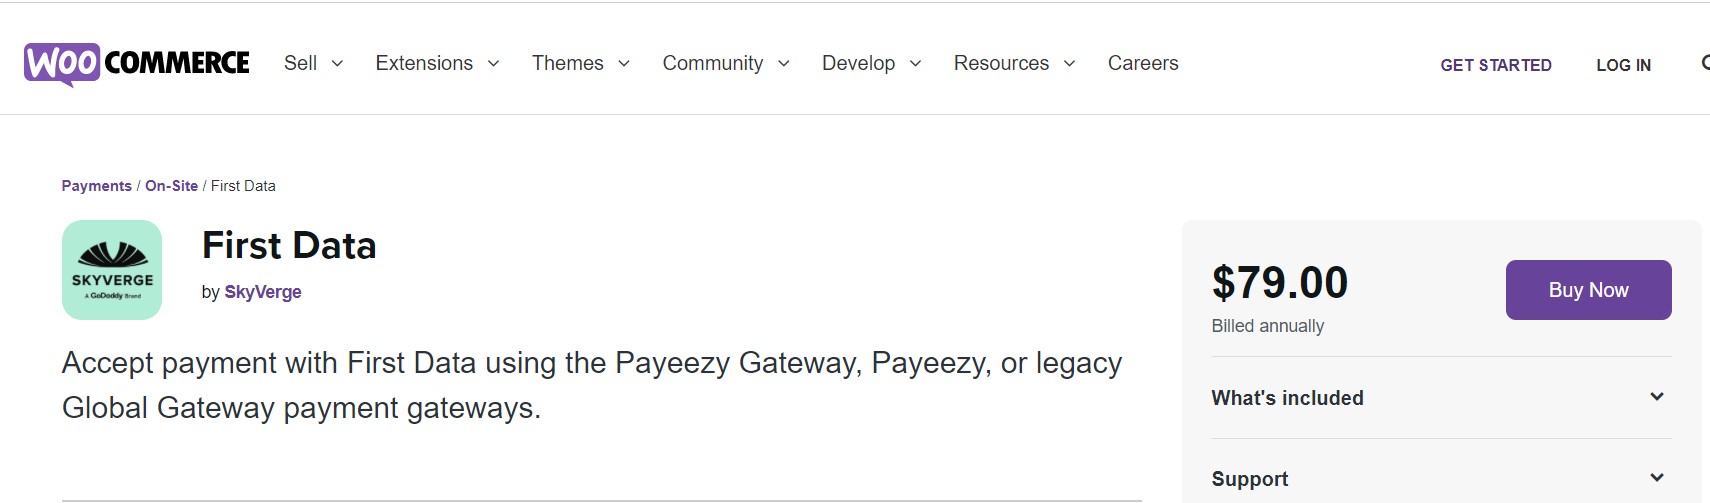
In this part, we’ll show you how to integrate Payeezy with WooCommerce using the plugin First Data by SkyVerge.
Step 1: Create your Payeezy Gateway account
First of all, you need to create a Payeezy (formerly GGe4) account or get a free demo account.
To sign up, please click on this link: https://provisioning.demo.globalgatewaye4.firstdata.com/signup. Then just fill in all the required information to create your Payeezy account.
If you already have a Demo account, you can start logging in by entering details in this link: https://demo.globalgatewaye4.firstdata.com/

Your demo account will give you access to almost all of the live system’s features, and you may use it to create Payeezy Gateway-compatible solutions. However, it’s worth mentioning that just the USD currency is available for demo accounts.
Step 2: Install the plugin “First Data”
Now you need to purchase and download the First Data extension. You can do that by clicking on this link: https://woocommerce.com/products/firstdata/.
After that, you need to go to Plugins > Add New > Upload from your WP admin dashboard. Then choose the ZIP file that you just downloaded.
Press Install Now and then Activate to finish the installation.
Step 3: Setup and configure the plugin “First Data”
To set up the module, you’ll need credentials from First Data for your payment gateway account. Therefore, first off, you have to choose which payment gateway account you’ll use to see how to obtain your payment gateway credentials for use in the module.
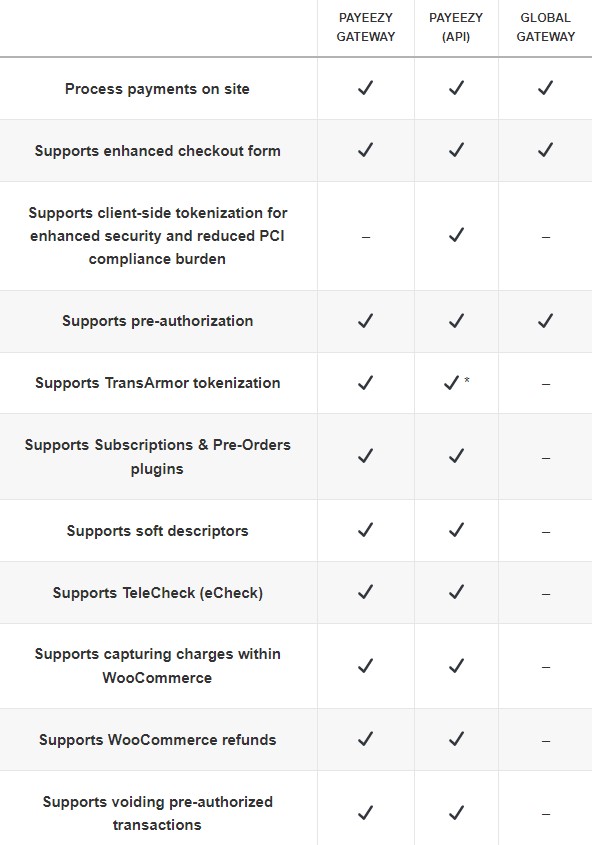
There are three gateway modes to choose from: Payeezy gateway; Paywwzy API; and Global gateway.
The three gateway modes provide different features, and you can switch between them based on which First Data account you’re using to connect to WooCommerce. For example, to connect to Payeezy API, you must have a Payeezy API account with First Data (you can also request an upgrade to this account from First Data).
Before you begin configuring the plugin, make sure the gateway is in the correct mode. You can also change the gateway mode under the Plugins list by clicking Use {Gateway name}.

After that, you must get credentials and configure the gateway mode you’re using: Payeezy Gateway (GGe4), Payeezy API, or Global Gateway.
Mode 1. Payeezy Gateway (GGe4)
To get your Payeezy Gateway (GGe4) account credentials, follow the steps below:
-
Log into your Payeezy account by accessing this link: https://globalgatewaye4.firstdata.com/login and then select Administration.
-
Go to Terminals and select the “TERM ECOMM” terminal type for your account.
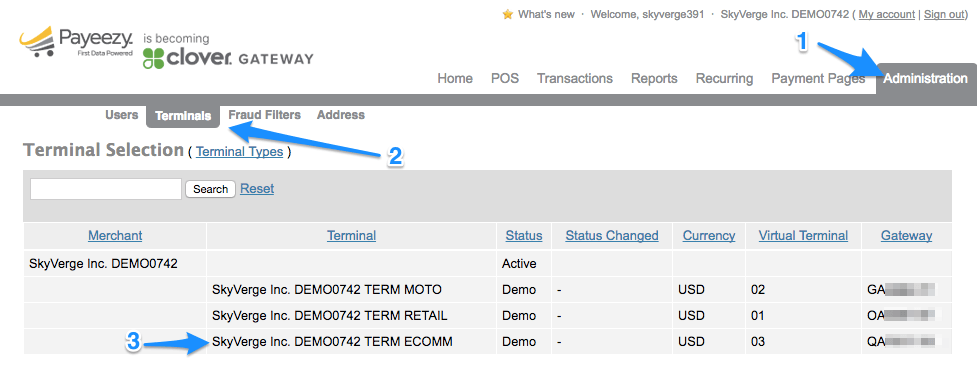
- Under Details, copy your Gateway ID and create a Gateway Password. After that, you need to save these values in the plugin’s Connection Settings.
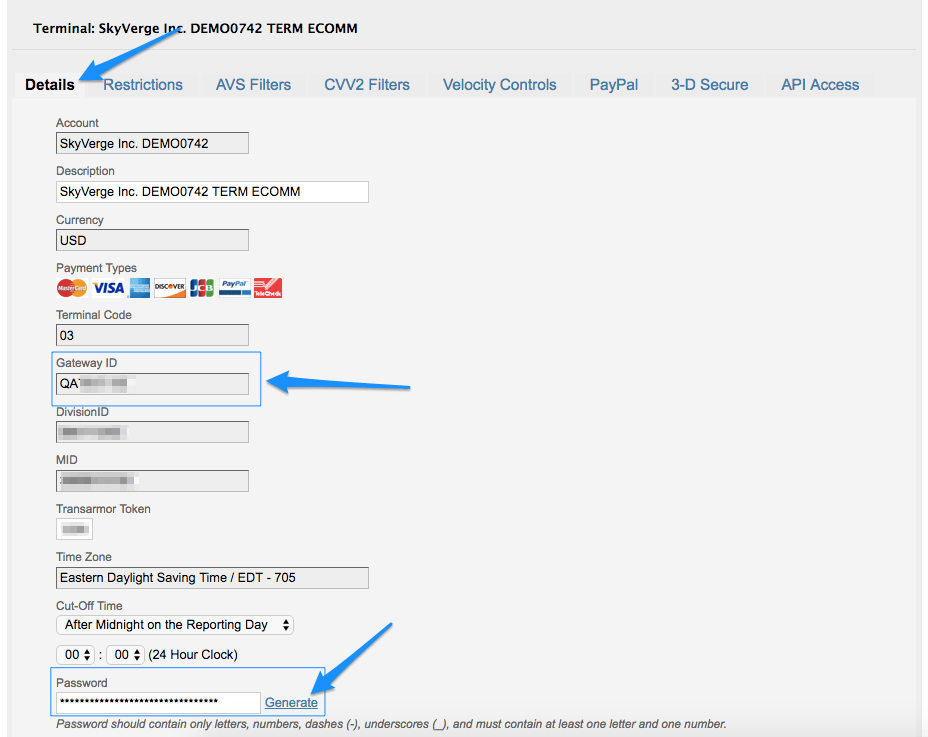
- Under API Access, copy your API Key ID and create an HMAC Key. After that, please save these values in the plugin’s Connection Settings.

Now, it’s time to configure the gateway. From your WP admin dashboard, go to WooCommerce > Settings > Payments > Payeezy Gateway Credit Card.
1. General Settings
- Enable / Disable: Enable to allow customers to check out using this gateway.
- Title: The name of the payment method that consumers will see when they go through the checkout process.
- Description: The payment method’s description that customers will view at checkout.
- Card Verification (CSC): Enable this to require consumers to provide their CVV / CV2 (Card Security Code) before checking out. If you have CV2 verification requirements in your First Data account, this might be handy.
- Transaction Type: This determines how First Data receives transactions. You have the option of selecting “Charge” or “Authorization.” If you choose “Authorization,” you’ll have to manually collect and settle payments once the transaction has been processed in your First Data control panel or on the WooCommerce orders screen. This is set to “Charge” by default.
- Charge Virtual-Only Orders: (Displayed if Transaction Type is “Authorization”) Enable this to force charges on orders containing solely virtual products, causing them to be captured rather than permitted (for example, to grant download access right away).
- Partial Redemption: This option allows you to redeem only a portion of the entire amount. For example, if a consumer tries to checkout for a $100 item but only has $80 in credit, the transaction would only capture $80 rather than the entire $100.
- Accepted Card Types: This determines which card logos are shown throughout the checkout process. This has no effect on the cards that your merchant account actually accepts.
- Tokenization: Enable this to allow your customers to securely keep their credit card information to their account for future checkouts, or to enable full WooCommerce Subscriptions or Pre-Orders support. Before you can use this option, you must first set up TransArmor Multi-Pay Tokenization.
- Detailed Decline Messages: Allow customers to see detailed messages that explain why they were declined rather than a generic error message.
- Debug Mode: Use this if you have trouble processing transactions correctly. You may either log API requests/responses on the checkout/thank you page, then save them to the WooCommerce Error Log (under WooCommerce > System Status > Logs), or do both. All debugging messages are stripped of sensitive information before being displayed, however, as a best practice, only activate this if you’re having problems with the plugin, and then disable it once the problems are fixed.
- Environment: Depending on the type of account you have, you may set your site to process transactions in the production or demo environment. If you’re not sure, it’s likely that your account is a production account. Make sure your Gateway credentials match the environment you’ve set up.
2. Connection Settings
- Share connection settings: Enabling this allows you to utilize the credit card and eCheck gateways’ connection/authentication settings. To execute transactions if this option is selected, you’ll need to provide your First Data gateway credentials under the eCheck settings.
- Gateway ID: This is the gateway ID for the environment you’ve chosen. Your login name is not the same as your gateway ID. To find your Gateway ID, follow the steps above.
- Gateway Password: This is the current environment’s gateway password. Your account password is not the same as your gateway password. To generate your Gateway Password, follow the steps outlined above. Key ID: This is the Key used for the enhanced security v12 API authentication for the currently selected environment. To locate your Key ID, follow the steps indicated above. HMAC Key: For the currently selected environment, the HMAC Key is used for enhanced security v12 API authentication. To generate your HMAC Key, follow the steps mentioned above.
3. Soft Descriptor Settings
- Soft Descriptors: If you check this box, you can utilize soft descriptors. A single merchant account from First Data can be used on up to 150 different websites. This is accomplished by using “Soft Descriptors.” The soft descriptor enables the customer’s credit card transactions to provide a secondary business name, address, and phone number. It’s worth noting that First Data must enable soft descriptors for your merchant account.
Mode 2. Payeezy API (Payeezy JS)
Please follow these steps to get your Payeezy JS account credentials and set up the plugin:
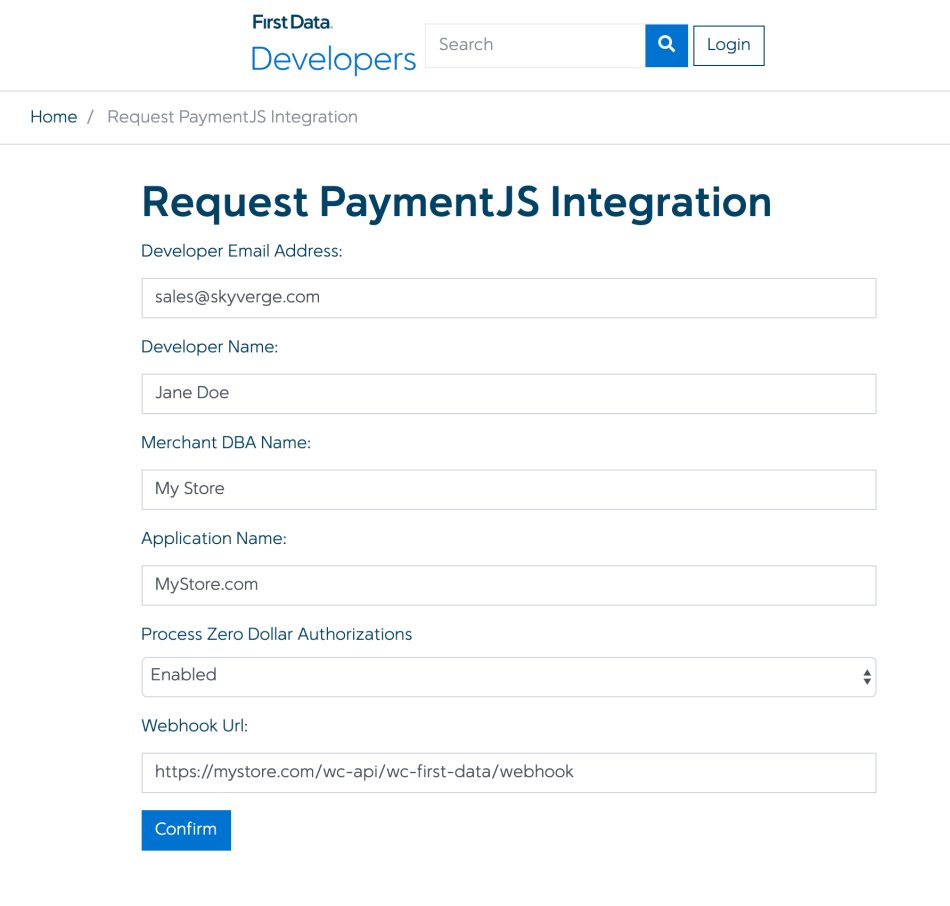
- Create a Payeezy webhook URL. In order to register your site’s webhook URL with Payeezy, fill out this form at this link: https://docs.firstdata.com/req/paymentjs.
You can copy the webhook URL straight from the gateway’s settings page, which will look like https://mystore.test/wc-api/wc-first-data/webhook.
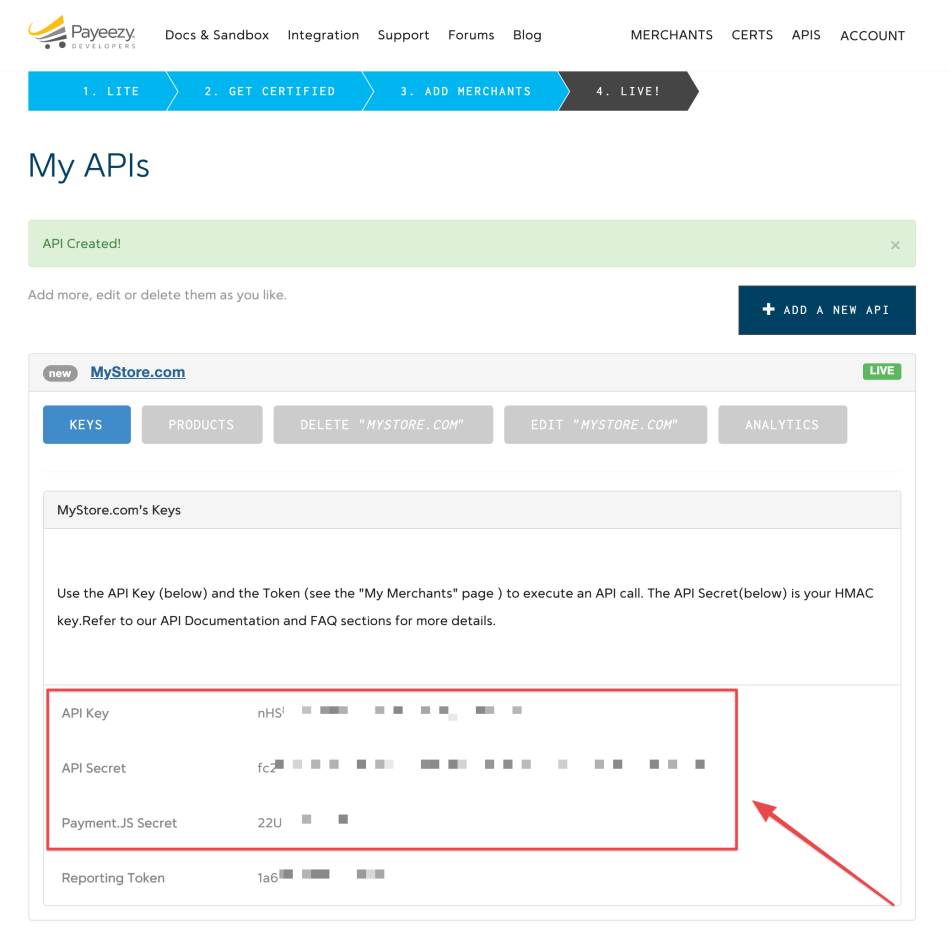
- Log into your Payeezy account by accessing this link: https://developer.payeezy.com/user. After that, go to APIs, and choose Add a New API.
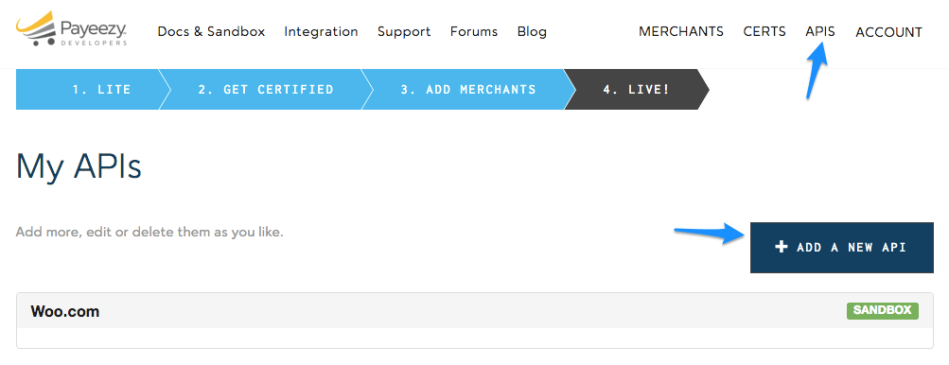
- Give your application a name and select an environment. To process live payments with Payment.JS, choose Live and PaymentJS-PROD.
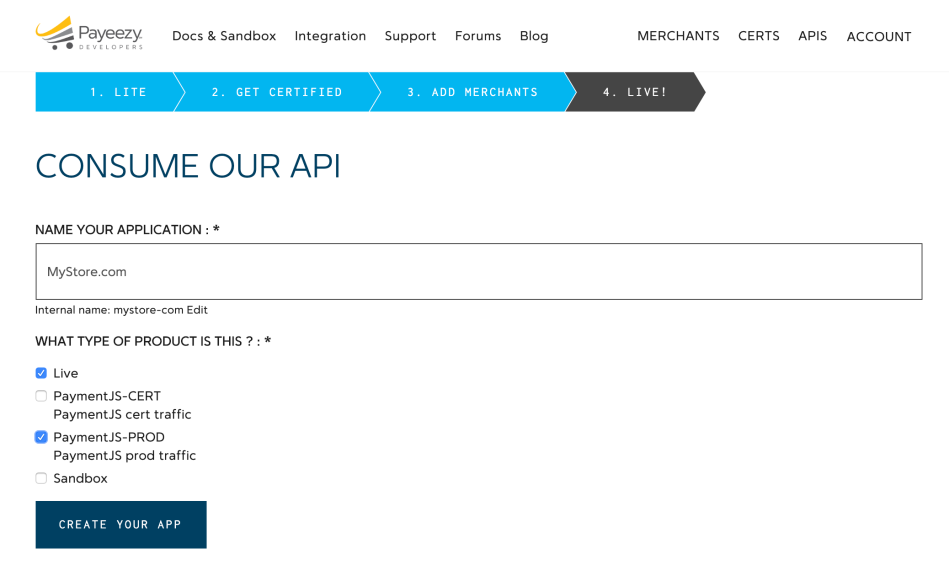
- Copy your API Key, API Secret, and Payment.JS Secret when you’ve finished creating your application. Save these in the Connection Settings of the plugin.
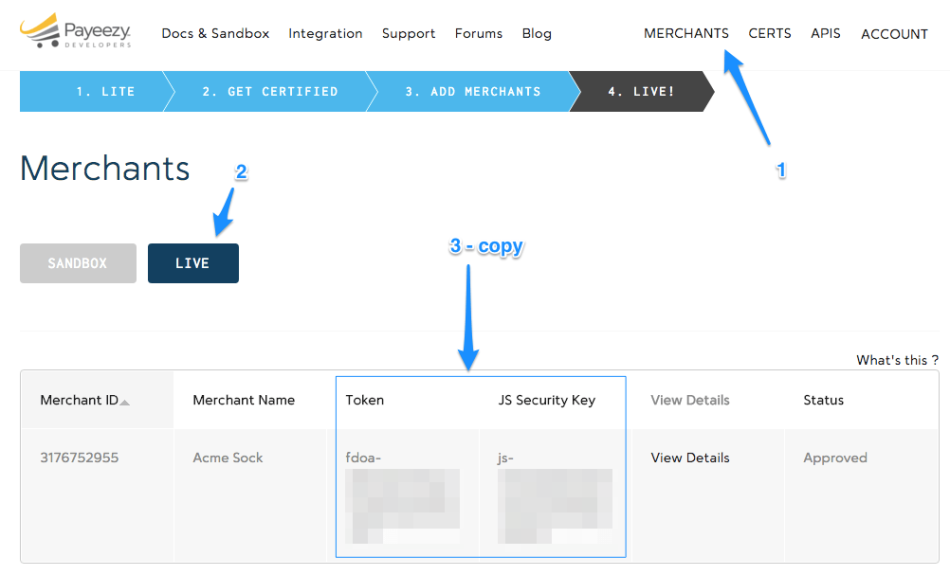
- Select the Live tab under Merchants to obtain your account-specific live credentials. Select the Sandbox tab if you want test credentials. Copy the JS Security Key and the Merchant Token. These will be saved in the Connection Settings section of the plugin.
Next, you need to configure the gateway. Go to WooCommerce > Settings > Payments > Payeezy Credit Card from your WP admin dashboard.
1. General Settings
- Enable / Disable: Enable to allow consumers to check out using this gateway. Title: This is the payment method’s name that consumers will see throughout the checkout process.
- Description: This is the description that customers will see during checkout for the payment method. Limited HTML is allowed.
- Transaction Type: This option determines how transactions are sent to First Data. “Charge” or “Authorization” are the two options. If you choose “Authorization,” you’ll need to manually record and settle payments once the transaction has been processed in your First Data control panel or on the WooCommerce orders screen. “Charge” is the default.
- Charge Virtual-Only Orders (Displayed if Transaction Type is “Authorization”) Allow this to be enabled to require charges on orders containing just virtual items, causing them to be captured instead of authorized instantly.
- Accepted Card Types: This is where you can decide which card logos appear after checkout. This is entirely aesthetic, and it has no effect on the cards that your merchant account actually accepts.
- Required Transarmor Entitlement: Verify that your Payeezy account has Transarmor enabled by checking this box. To utilize this gateway mode, you must configure TransArmor Multi-Pay Tokenization on your First Data account. This will also enable full support for WooCommerce Subscriptions or Pre-Orders by securely saving your customers’ card information to their account for future checkout.
- Detailed Decline Messages: Allow clients to see detailed messages that explain why they were declined rather than a generic error message.
- Debug Mode: If you have trouble processing transactions correctly, enable this. You may log API requests and responses directly to the checkout / thank you page, save them to the WooCommerce Error Log (available under WooCommerce > System Status > Logs), or do both. All debugging messages are stripped of sensitive information before being displayed, however as a best practice, only activate this if you’re having problems with the plugin and then disable it after the problems are fixed.
- Environment: Depending on the type of account you have, you can have your site execute transactions in either the production or demo environment. Your account is most likely a production account if you’re not sure. Check that the credentials for your Gateway match the environment you’ve set up.
2. Connection Settings
- Share connection settings: Enabling this will allow you to utilize the credit card and eCheck gateways’ connection/authentication settings. To execute transactions if this option is selected, you’ll need to input First Data gateway credentials in the eCheck settings.
- API Key: This is the API Key for the environment you’ve chosen. Your API Key is different from your login name. To locate your API Key, follow the steps outlined above. API Secret: This is the API Secret for the presently selected environment. The API Secret is not the same as the password for your account. To find your API Secret, follow the methods outlined above.
- Merchant Token: This is the Merchant Token that your merchant uses for improved security. To locate your Merchant Token, follow the steps outlined above.
- Payment.JS Secret: This is the Payment.JS Secret that the Payment.JS script uses to authenticate itself.
- Transarmor Token: This is your merchant account’s TransArmor Token. When activating TransArmor Tokenization, you must obtain this information from your First Data representative.
- JS Security Key: This is the JS Security Key that your merchant uses for better security.
3. Soft Descriptor Settings
- Soft Descriptors: Enable this to allow soft descriptors to be used. A single merchant account from First Data may be utilized on 150 different websites. “Soft Descriptors” are used to accomplish this. Thanks to the soft descriptor, customers’ credit card transactions can now include a secondary business name, address, and phone number. Soft descriptors must be enabled for your merchant account with First Data.
Mode 3. Global Gateway
To get your Global Gateway account credentials, please follow these steps:
- Log into your Global Gateway (formerly Linkpoint) account via this link: https://www.staging.linkpointcentral.com/lpc/servlet/LPCLogin.
- Copy your Store ID from the information bar at the top of your screen and save this in the gateway settings.
- To get your PEM file, go to Support, select Download Center, and then click Download Now (certificate).
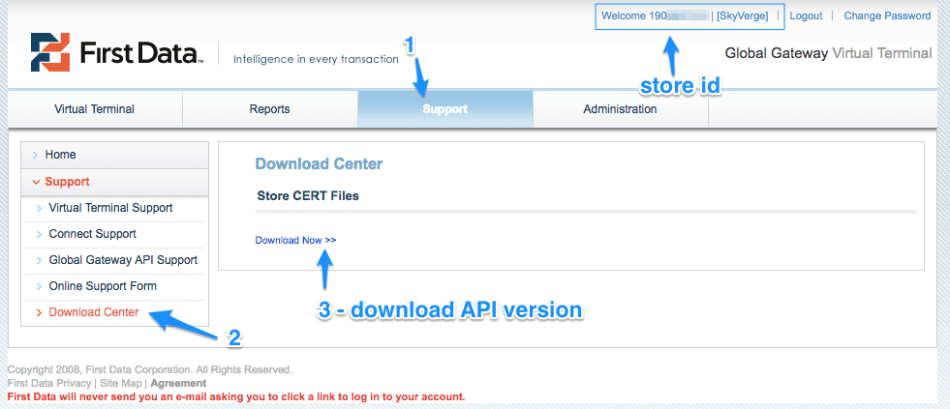
-
Save the API version of your PEM file in a readable directory above your web root on your site (i.e. outside your WordPress installation).
-
In the gateway settings, enter the absolute / full path of the PEM file.
Next, you need to configure the gateway. Just go to WooCommerce > Settings > Payments > Global Gateway Credit Card then start configuring the fields below:
- Enable / Disable: Enable to allow customers to use this gateway to checkout.
- Title: The name of the payment method customers will see during checkout.
- Description: The description of the payment method customers will see during checkout. Limited HTML is allowed.
- Card Verification (CSC): Enable this to require customers to enter their CVV / CV2 (Card Security Code) when checking out.
- Transaction Type: This controls how transactions are submitted to First Data. You may choose either “Charge” or “Authorization”.
- Charge Virtual-Only Orders: Enable this to force charges on order containing only virtual items so they’re captured immediately instead of authorized.
- Accepted Card Types: This determines which card logos appear during the checkout process.
- Debug Mode: Use this if you’re having trouble processing transactions correctly. You may either log API requests / replies on the checkout / thank you page, save them to the WooCommerce Error Log (located under WooCommerce > System Status > Logs), or do both. All debugging messages are stripped of sensitive information before being displayed, however as a best practice, only activate this if you’re having problems with the plugin, and then disable it once the problems are fixed.
- Environment: Depending on the type of account you have, you may set your site to execute transactions in the production or demo environments. Your account is most likely a production account if you are unsure. Check that your Gateway credentials match the environment you’ve set up.
- Store Number: This is your First Data account’s store number.
- PEM File Path: The absolute path of the PEM file for your merchant account on your server.
And that’s all you need to do to integrate Payeezy with WooCommerce.
Final Words
Integrating Payeezy with WooCommerce can bring out significant benefits to your consumers and your business, and you should take advantage of this fantastic payment gateway. We hope you will be able to integrate Payeezy with WooCommerce after reading this guide successfully.
Please feel free to contact us in the comments section below if you have any questions. We’d be delighted to hear from you. Thank you for reading this post and we’ll see you soon in the next article.


