
How To Import Etsy Listings To WooCommerce

Etsy is a thriving, fast-growing marketplace that brings together millions of artists, designers, and craftspeople from all over the world. However, as your online retail increases, so will the expectations of your business growth. That is why, after acquiring invaluable experience selling on this well-known marketplace, many entrepreneurs are seeking a WooCommerce Etsy importer.
Today’s tutorial will show you how to import Etsy listings to WooCommerce. Trading on a stand-alone, feature-rich shopping cart like WooCommerce allows many store owners complete control over their businesses. It enables them to benefit from its robust functionality, exceptional flexibility, and high-level management. So, let’s dive in!
Why should you import Etsy listings to WooCommerce?
Etsy is a global marketplace where you can buy and sell one-of-a-kind and creative things. This is a well-known sales channel that sells art, jewelry, health and beauty products, clothing, photography, and a range of other stuff. As a result, it’s simple to set up a shop and start selling to a large audience. Additionally, the readership of Etsy is more specialized than even Amazon or eBay. Unfortunately, the most significant downside of selling on Etsy is that it might be difficult to distinguish oneself as a business. Many people prefer to say “from Etsy” instead of “from NovelTea Tins.” Furthermore, it increased the pressure on merchants to offer free shipping to rank higher on Etsy’s search page. The marketplace also requires merchants to promote offsite, which has caused many Etsy sellers to evaluate the channel’s cost-effectiveness.

So, why is WooCommerce? WooCommerce is an open-source solution that is free to download and use. It enables you to list an infinite number of items with no fees or limitations. With WooCommerce, you have complete control over everything, from maintenance to new audience engagement, website conversion, funnel creation, and so forth. We can’t help but believe that with opportunity comes responsibility. No worries if you’re tech-savvy or plan to recruit a dedicated staff of IT specialists. A significant advantage is that it provides hundreds of free store additions such as new plugins and modules. When it comes to paid extensions, you may anticipate paying anything from 29$ to 130$ or more. Furthermore, because WooCommerce is compatible with WordPress, you can access hundreds of thousands of themes, plugins, and extensions that will give your shop a professional appearance as well as feature-rich capabilities.
How to import Etsy listings to WooCommerce
You may obtain a CSV file containing your shop’s product information from Etsy. Another way is using a third-party plugin. Etsy Importer is a bit appropriate. It does not rely on Etsy’s CSV output, instead of connecting directly to Etsy through its API service. However, it does not import items into Woocommerce; instead, it produces them as a custom post type that you cannot sell on your WordPress + Woocommerce site. It’s essentially a more complex version of Etsy’s own Mini Store, and as such, it falls short as a viable means to transfer Etsy listings into Woocommerce. So, let’s see how different the two methods are.
Method 1: Using the CSV file
Before we get into a detailed guide of using the CSV file to import Etsy listings to WooCommerce, here are some important notes you should need to know:
- This will only be a one-time import. After the import, any changes to your Etsy shop will not be instantly synced to WooCommerce.
- Etsy does not export variation pricing or quantities. If you have variations, their pricing will be the same after importing, and the quantities will be set to zero.
- Imported digital items from Etsy will be listed as physical products. However, this is not a significant issue because WooCommerce is designed to handle digital things as readily as physical ones.
- Manually created.csv files will not import correctly. To effectively import products from Etsy, you must use a CSV file exported from Etsy and follow the instructions outlined below.
- This is not a fully-featured import. However, it’s still the easiest way to solve your transformation problems. Let’s see how you can do it:
Step 1: Export your Etsy products
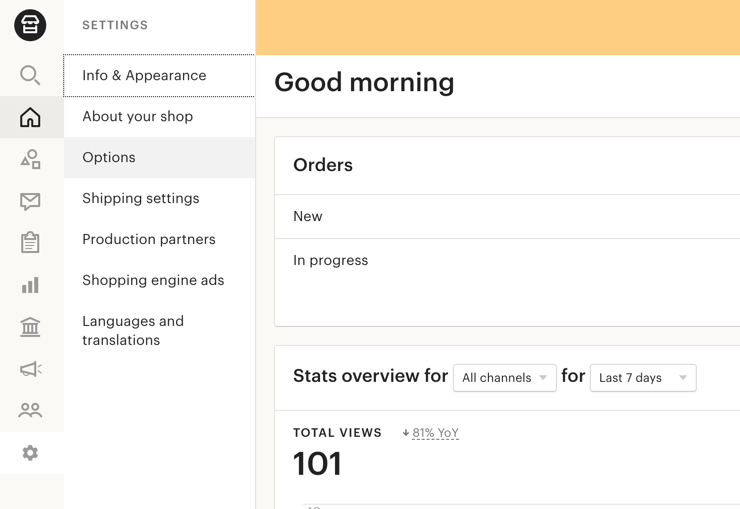
To begin, go to Etsy.com and sign in to your account. In the top-right corner, select Shop Manager. Choose Settings and then Options from the menu on the left of the screen once you’re in the Shop Manager dashboard.
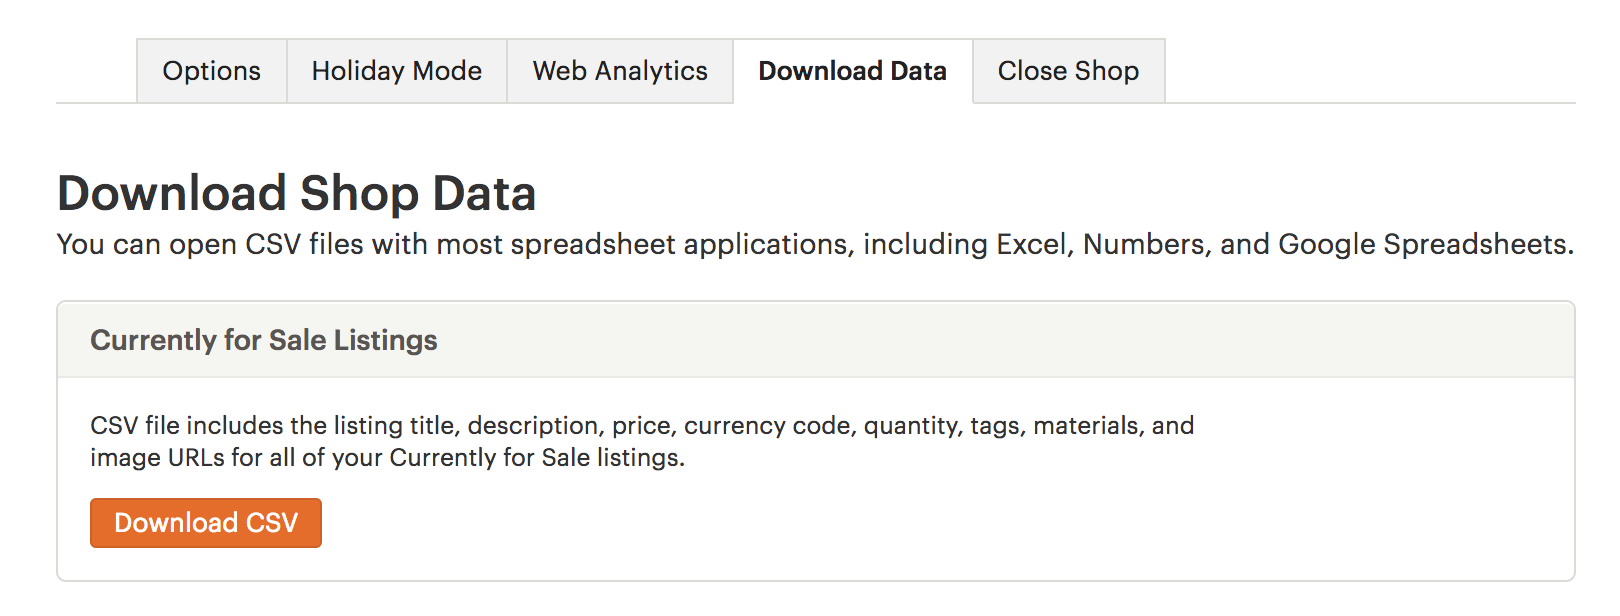
Click the Download Data tab, then the Download CSV button.
Step 2: Create and set up a new WooCommerce store
To set up WooCommerce, follow these steps:
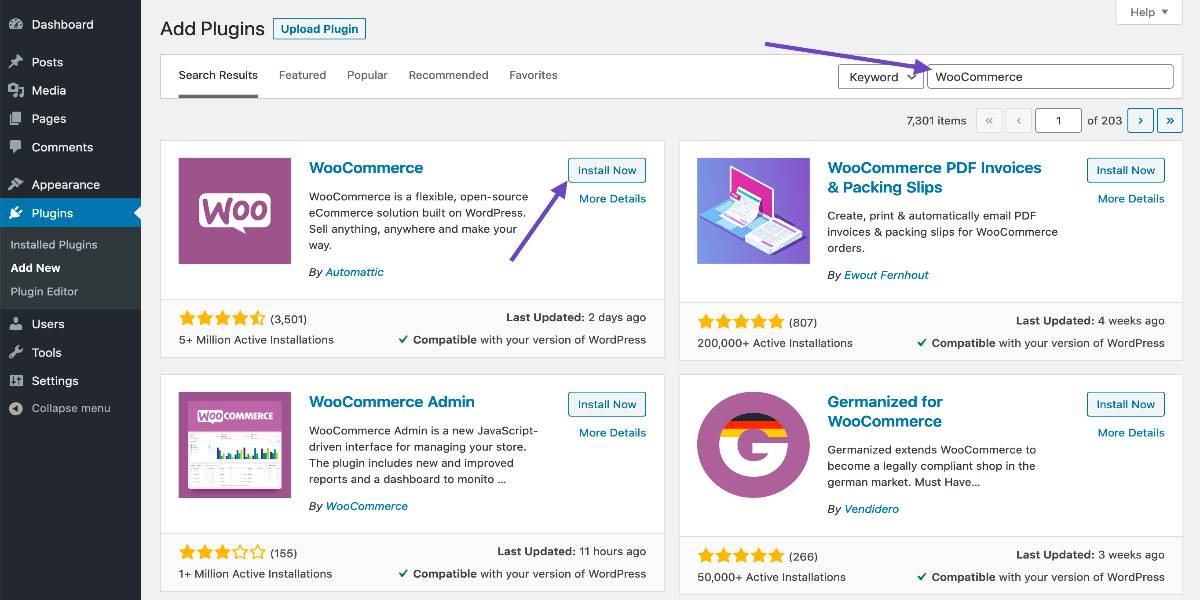
- Navigate to Plugins > Add New.
- Look up “WooCommerce.”
- Install Now should be selected.
- When you click Activate Now, you’ll be sent to the WooCommerce Wizard.
When you first activate WooCommerce, the next screen you view after clicking “Activate” is the WooCommerce Setup Wizard. This assists you in setting up and configuring your site for WooCommerce functionality.
Step 3: Import your Etsy CSV file to WooCommerce
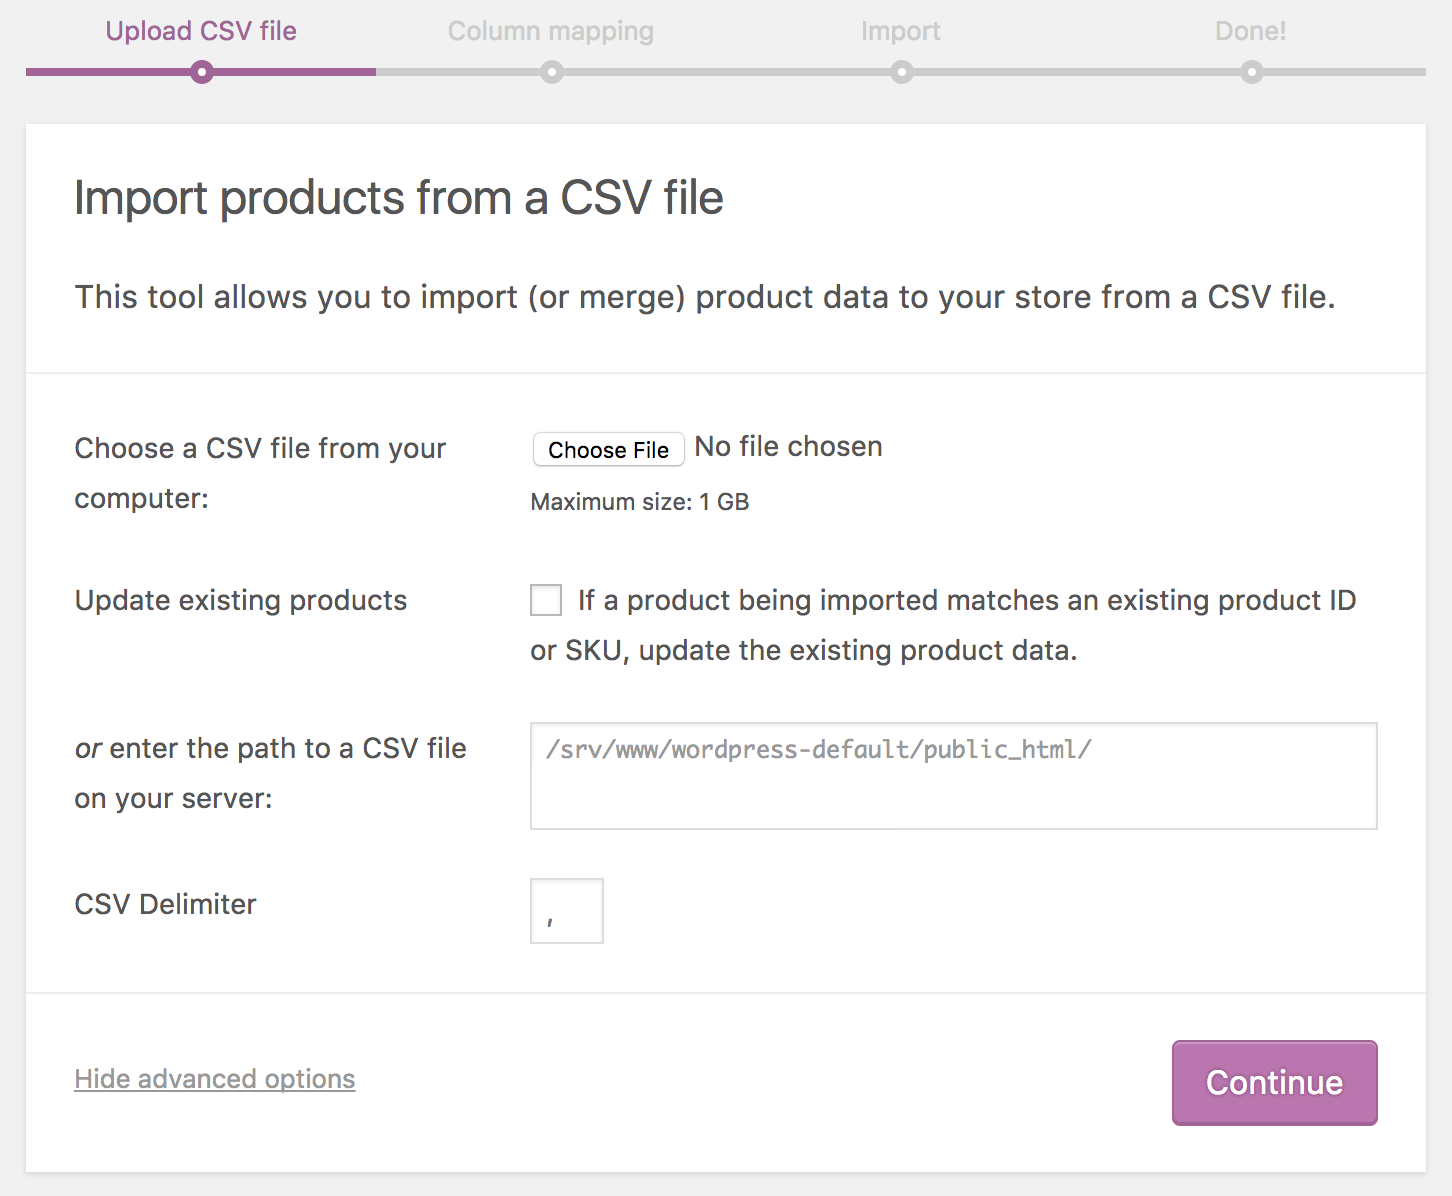
If you follow the onboarding procedure when installing WooCommerce, you will see an opportunity to create a new product or import goods on the final screen.
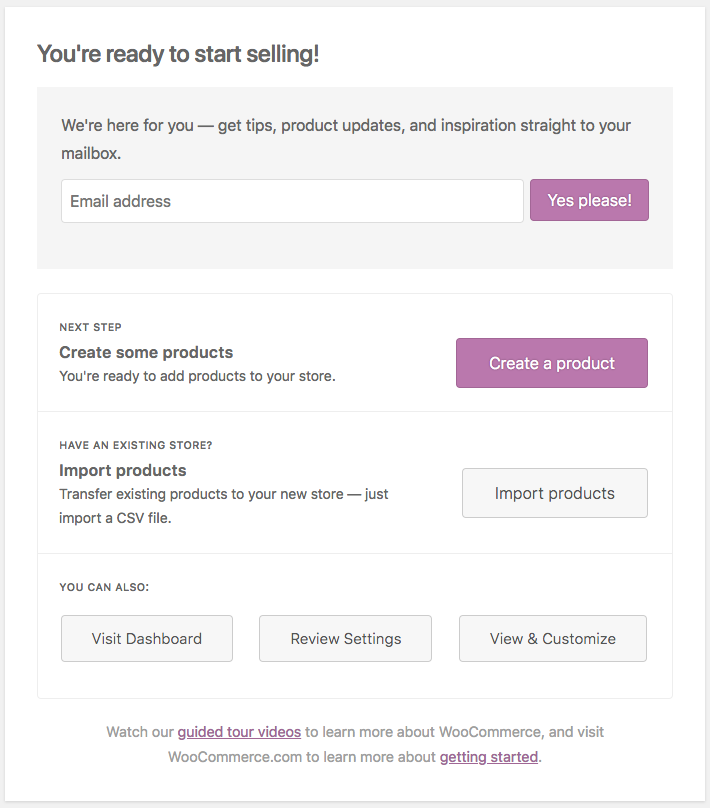
Select the Import products option. Then, base on Step 1, click Choose File and then upload the CSV file you obtained from Etsy.
Then press the Continue button. The Column Mapping page will appear, and WooCommerce will strive to match or “map” the Column Name from your CSV to Fields immediately.
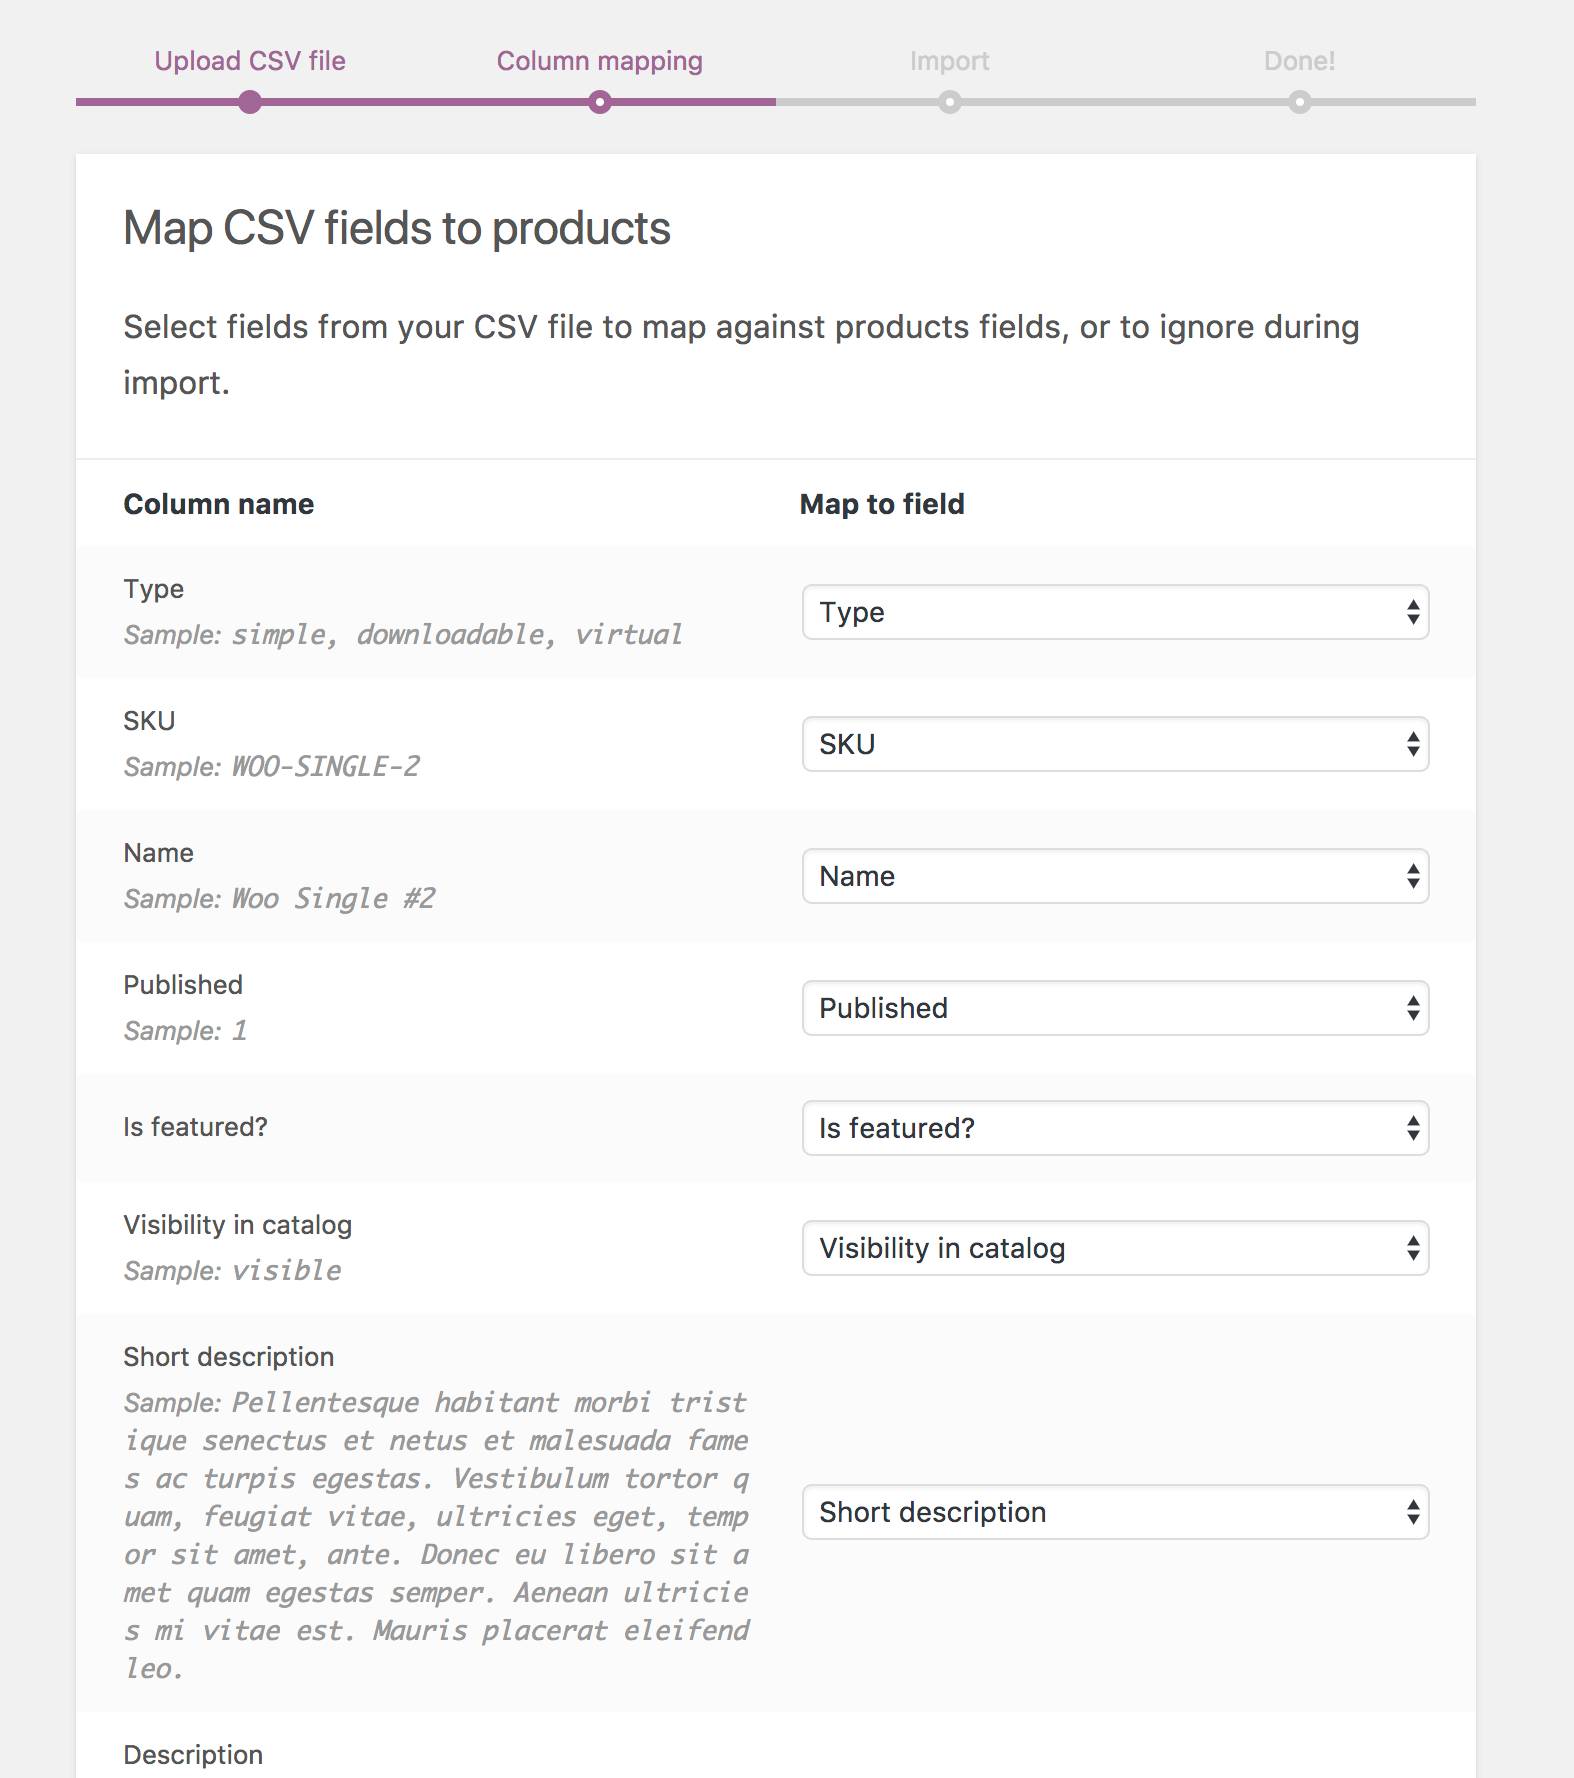
To change fields or signal ‘Do not import,’ use the dropdown options on the right side. By default, unknown columns will not be imported.
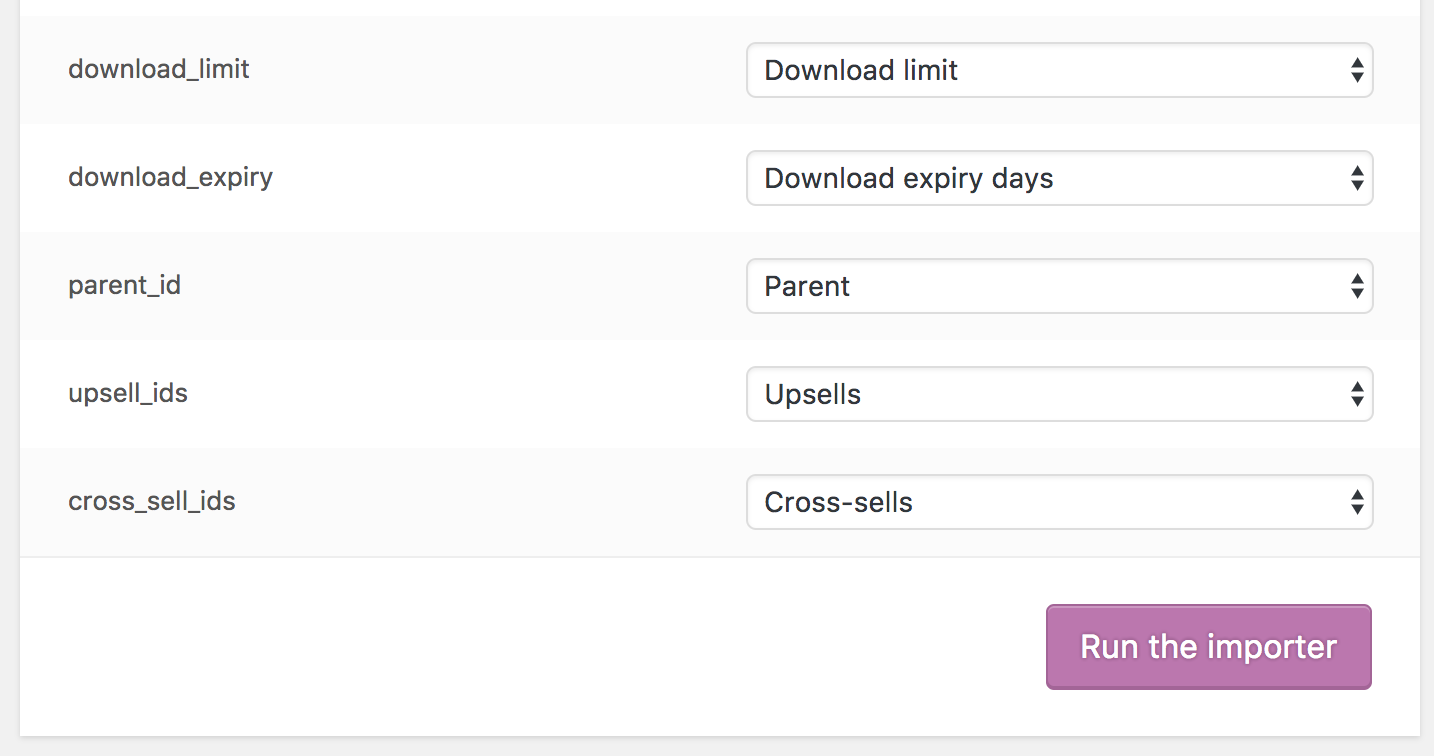
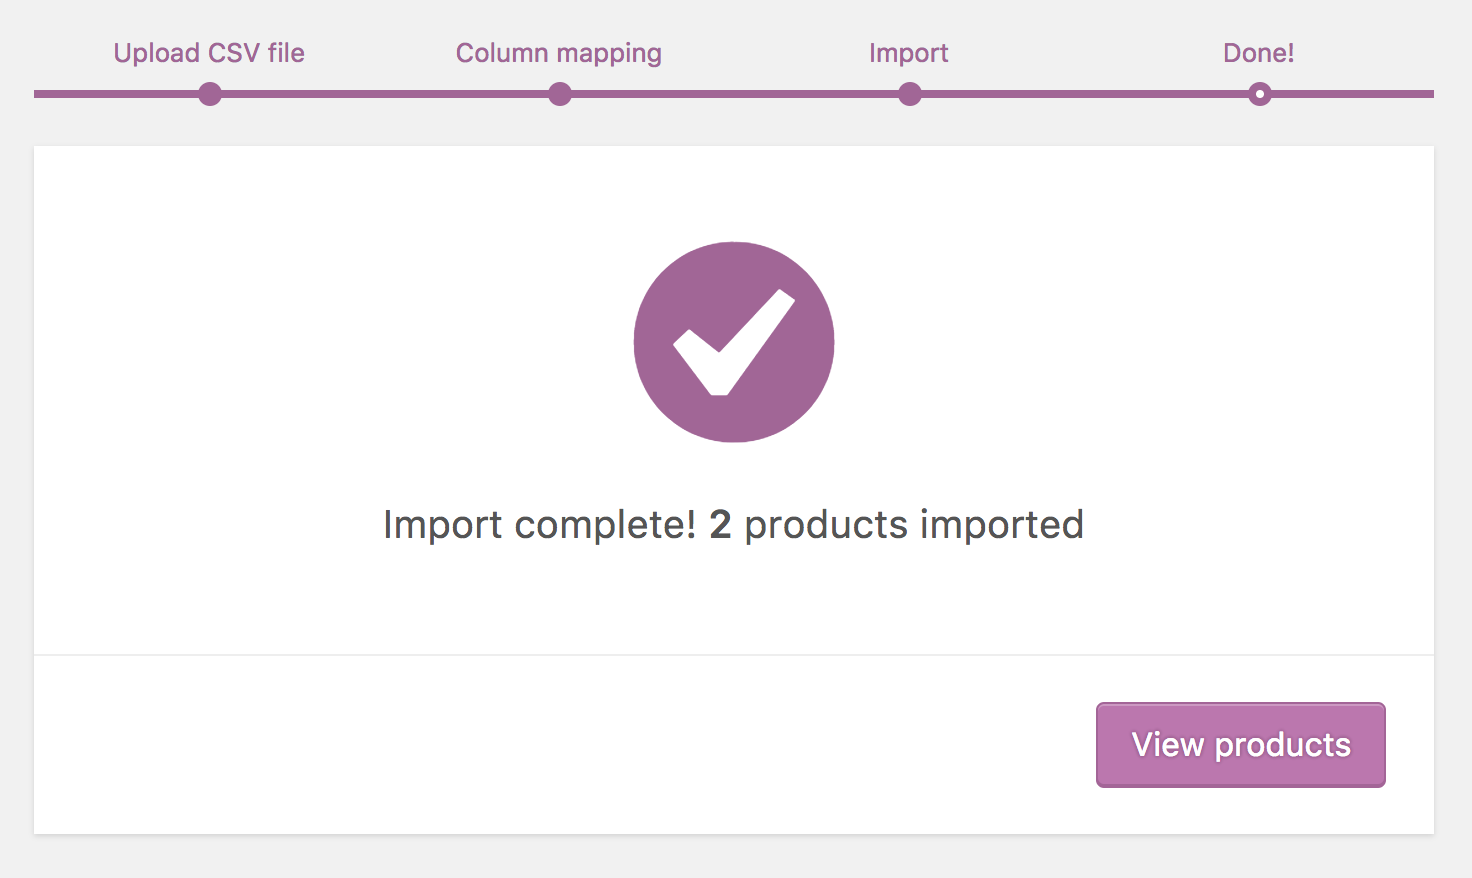
Choose Run the Importer.
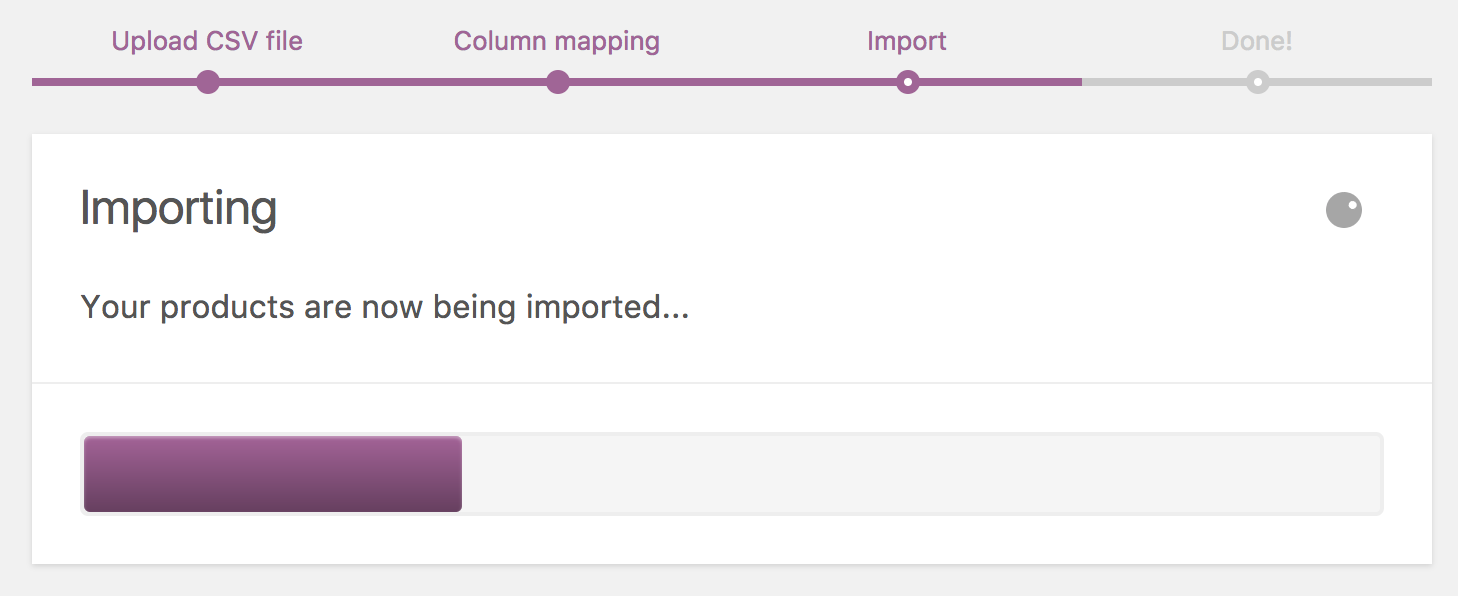
Finally, please wait till the Importer has completed its work. While the process is running, do not refresh or touch the browser.
Method 2: Using a third-party plugin
The other way to import Etsy listings to WooCommerce is by taking advantage of the third-party plugin. And the Woocommerce Etsy Importer plugin seems to be a great option. It won’t break the bank at $79 for a single site. It makes use of Etsy’s API. Thus it’s more robust and powerful than CSV-based alternatives. It will replace your picture files with SEO-friendly file names and add alt tags to them instantly. You can even automate it to re-import your Etsy listings and update your Woocommerce items. Remember to read Etsy’s API Terms of Service and understand how they relate to you.

Nothing in this tutorial should be taken as legal advice or guidance, and we cannot be held liable if you come into trouble with Etsy for misusing their API. That being said, if you’re using the Woocommerce Etsy Importer plugin to do a one-time export of your Etsy store before closing it, or if you’ll be selling one set of products on Etsy and another on Woocommerce with no overlap, you may charge ahead. On the other hand, if you want to sell the same items on Etsy and your Woocommerce site, there are stipulations in Etsy’s API Terms of Use and Terms of Service that outline how and under what conditions this is permitted.
Step 1: Copy the Etsy API key
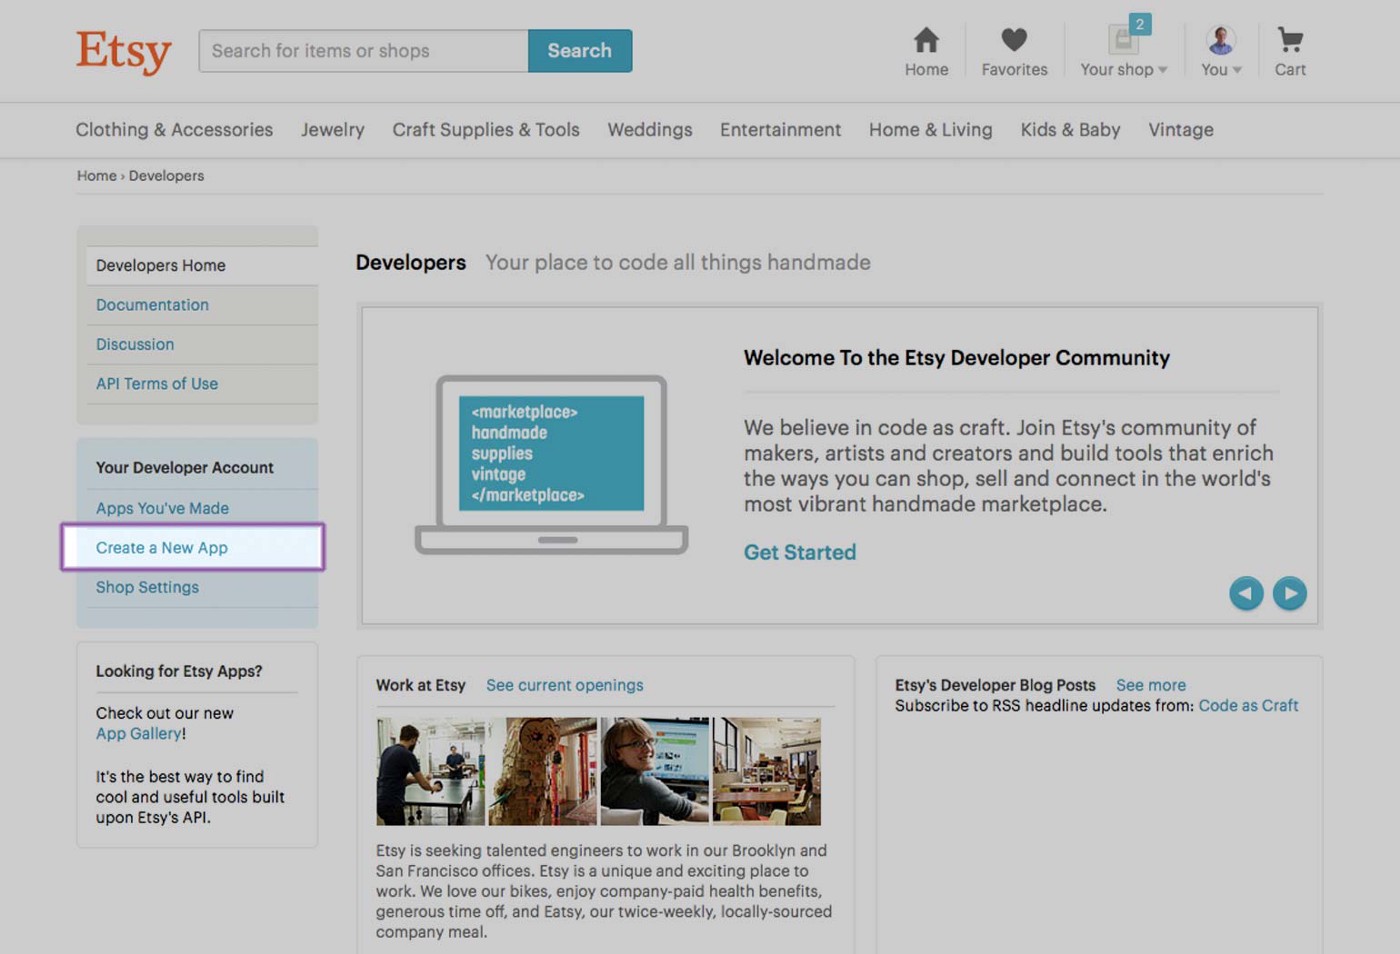
If all of that legal terminology hasn’t frightened you out, the first step is to log in to your Etsy account at etsy.com/developers. You’ll be sent to the Etsy Developers home page; on the left, select “Create a New App”:
This will lead you to a form, which you must complete as indicated above. Change the URL with your own:
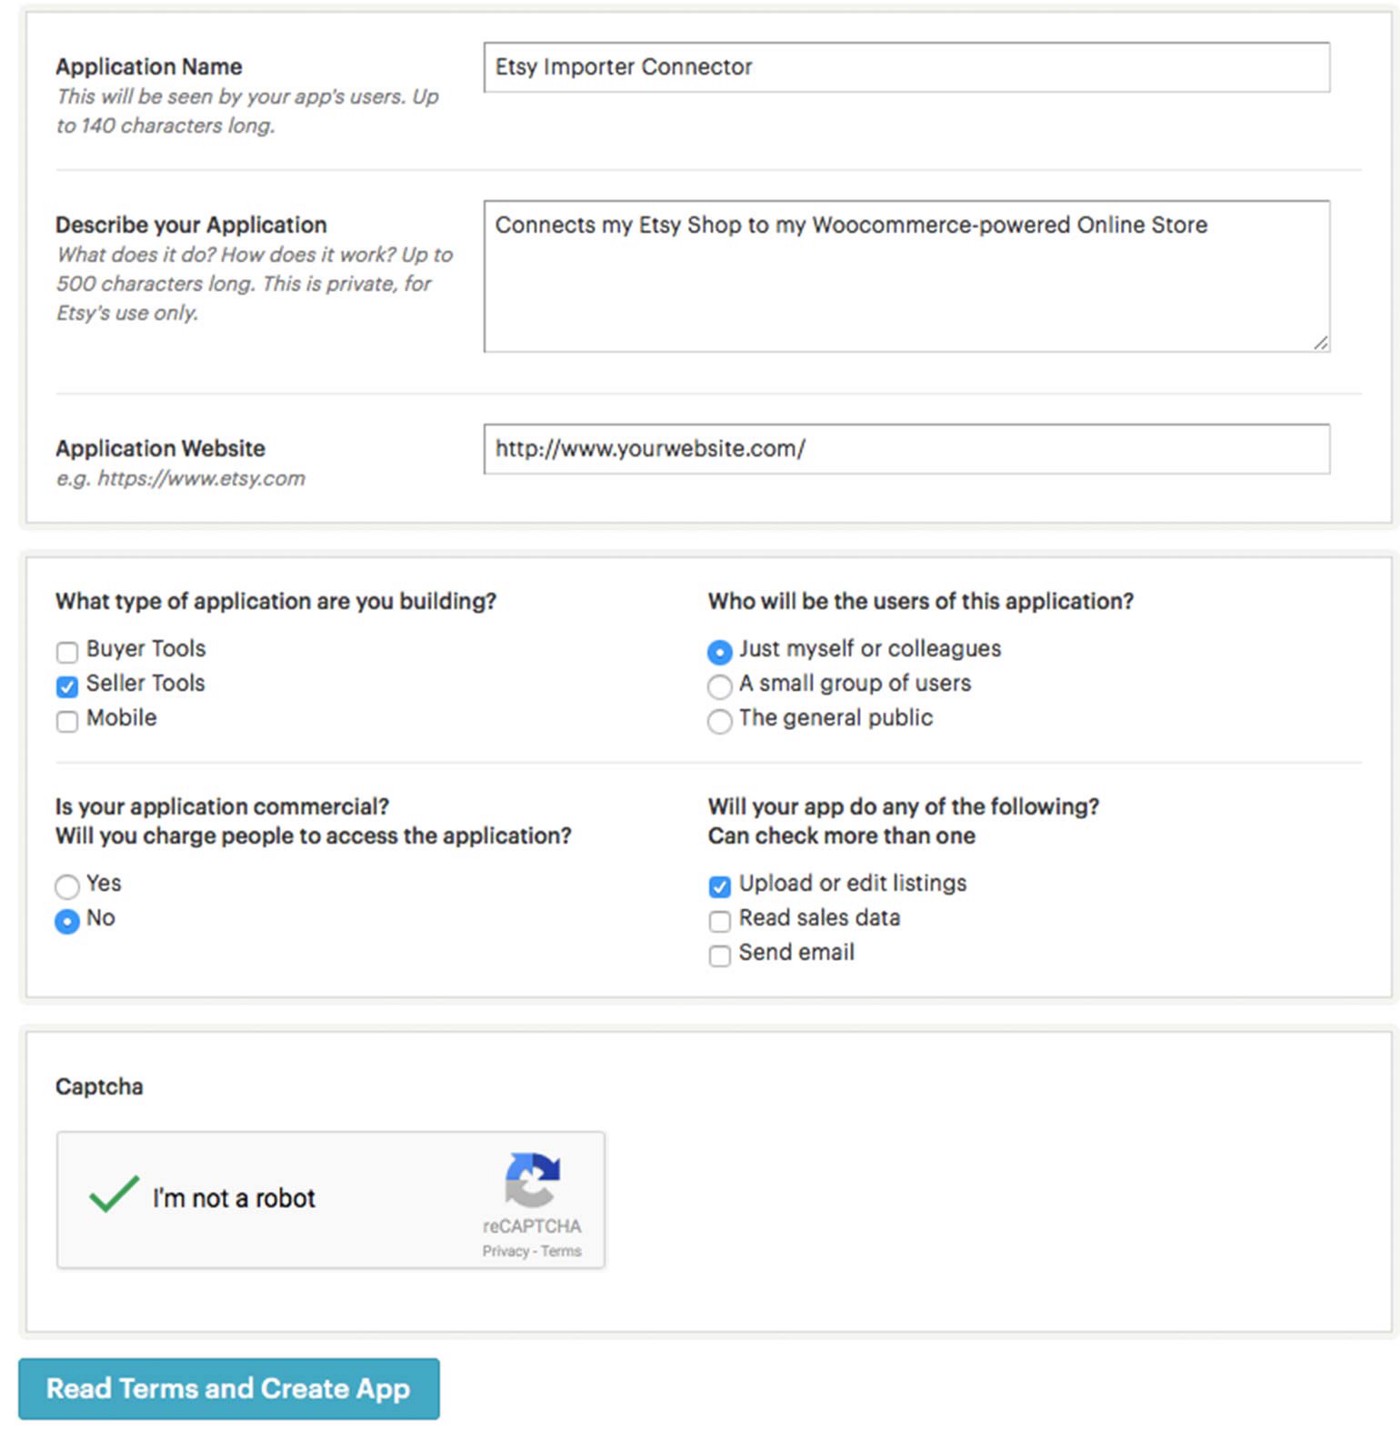
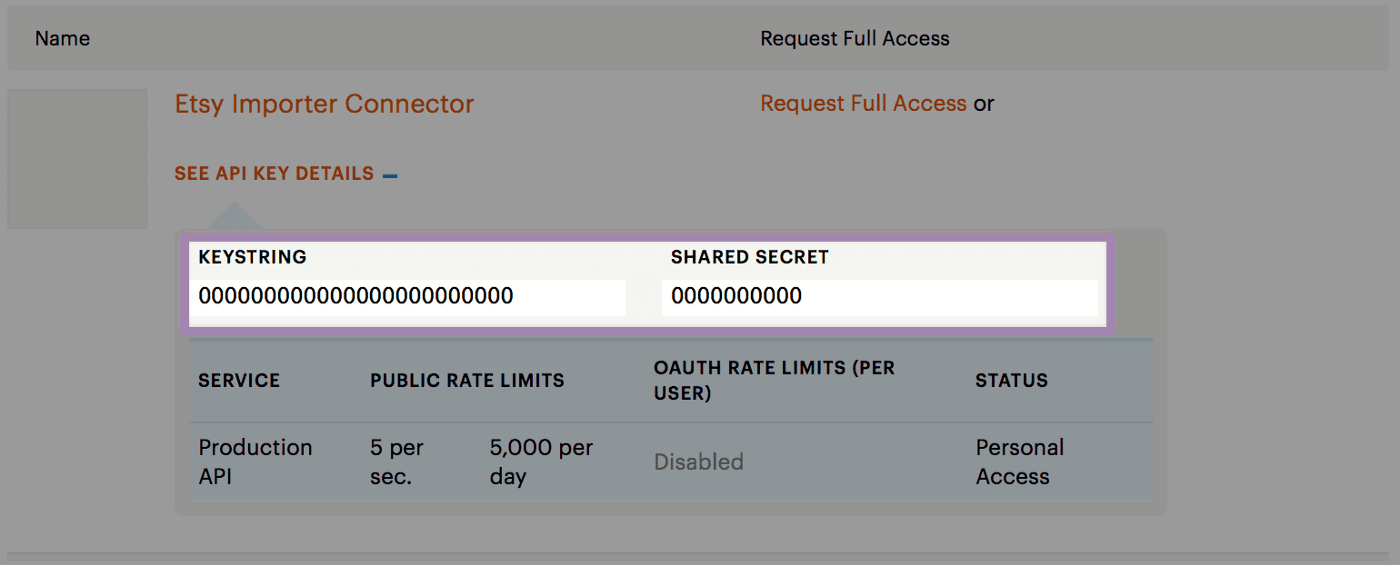
Click “Read Terms and Create App,” and you’re done! On the following screen, select “See API Key Details.” Take note of the Keystring and Shared Secret - you’ll need these when installing the WooCommerce Etsy Importer plugin:
Step 2: Install the plugin
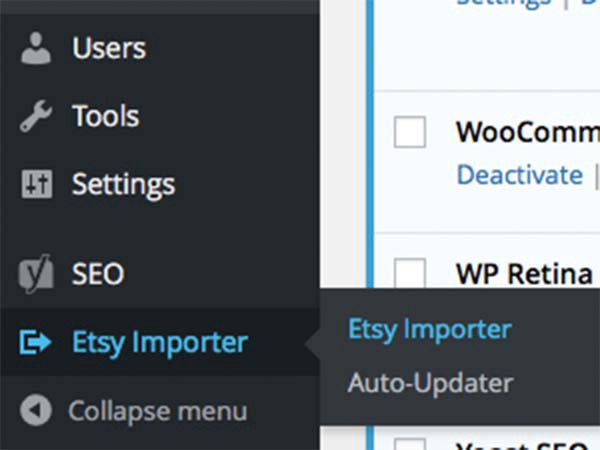
Now that you’ve obtained your Etsy API Key go to your Woocommerce store and activate the plugin. As of this writing, the plugin is available for US$79 through the developer’s website. Once you’ve installed and enabled it, you’ll notice a new “Etsy Importer” option in your site’s Admin sidebar:
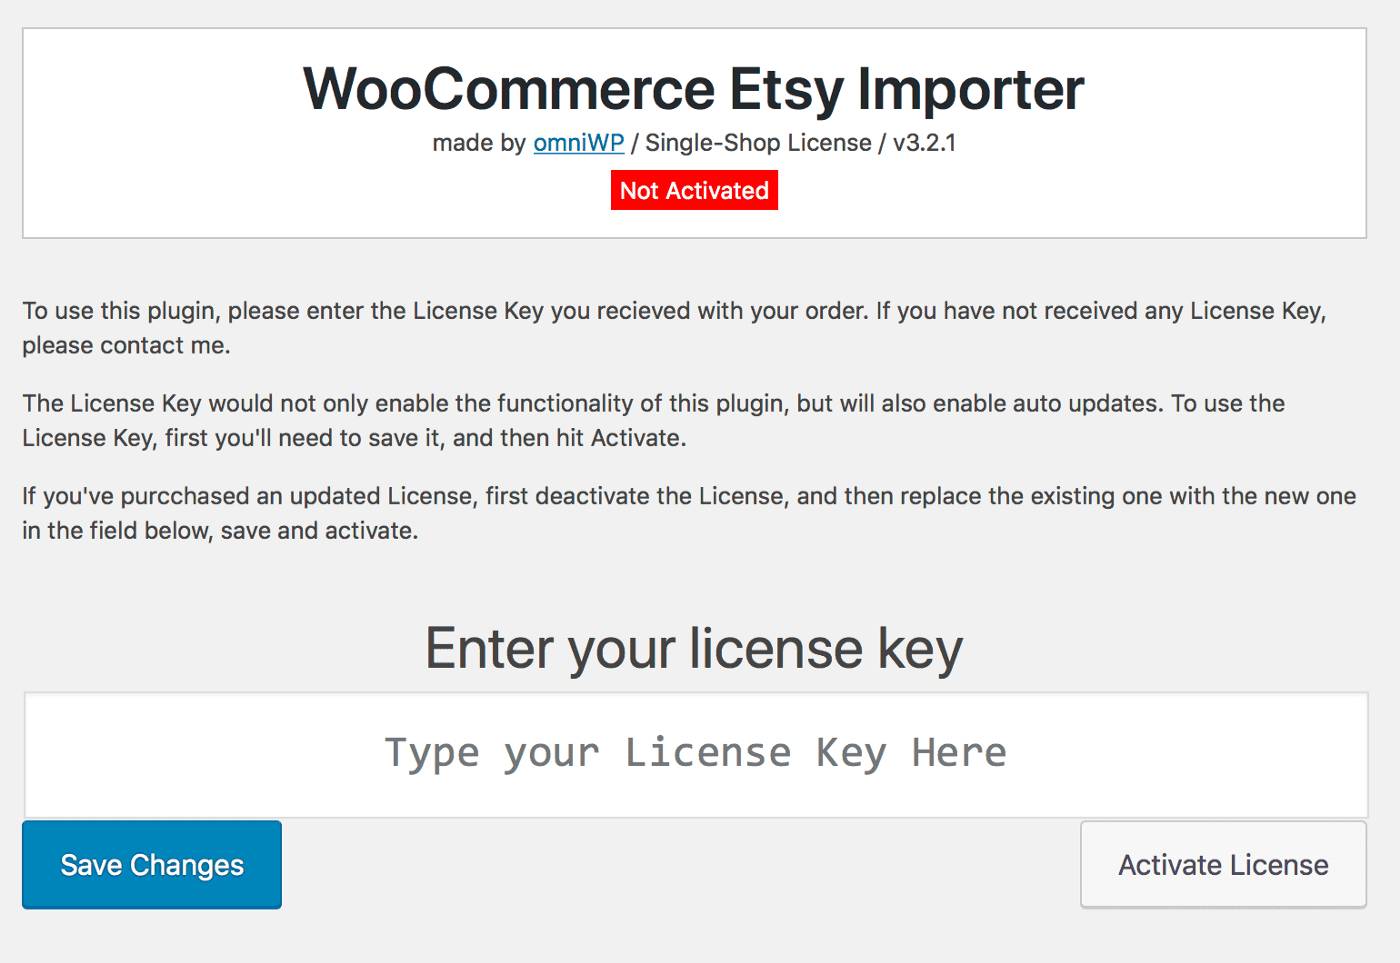
When you click the “Etsy Importer” option, you will be transported to the License Activation page. Enter your license key, then click “Save Changes” and “Activate License”:
You’re now ready to install the plugin and begin importing your first Etsy listings into Woocommerce!
Step 3: Set up the plugin with Etsy
It’s time to put the Etsy API Keystring you received in Step 1 to use. On the plugin’s “Connect” section, set the Keystring into the “Etsy API Key” area and the Shared Secret into the “Etsy Secret” field. In the “Your Shop ID” area, enter the name of your shop as it displays in your Etsy store’s URL, either http://myshopname.etsy.com or https://www.etsy.com/shop/myshopname. The plugin will then validate your API connection when you click “Save & Verify.”
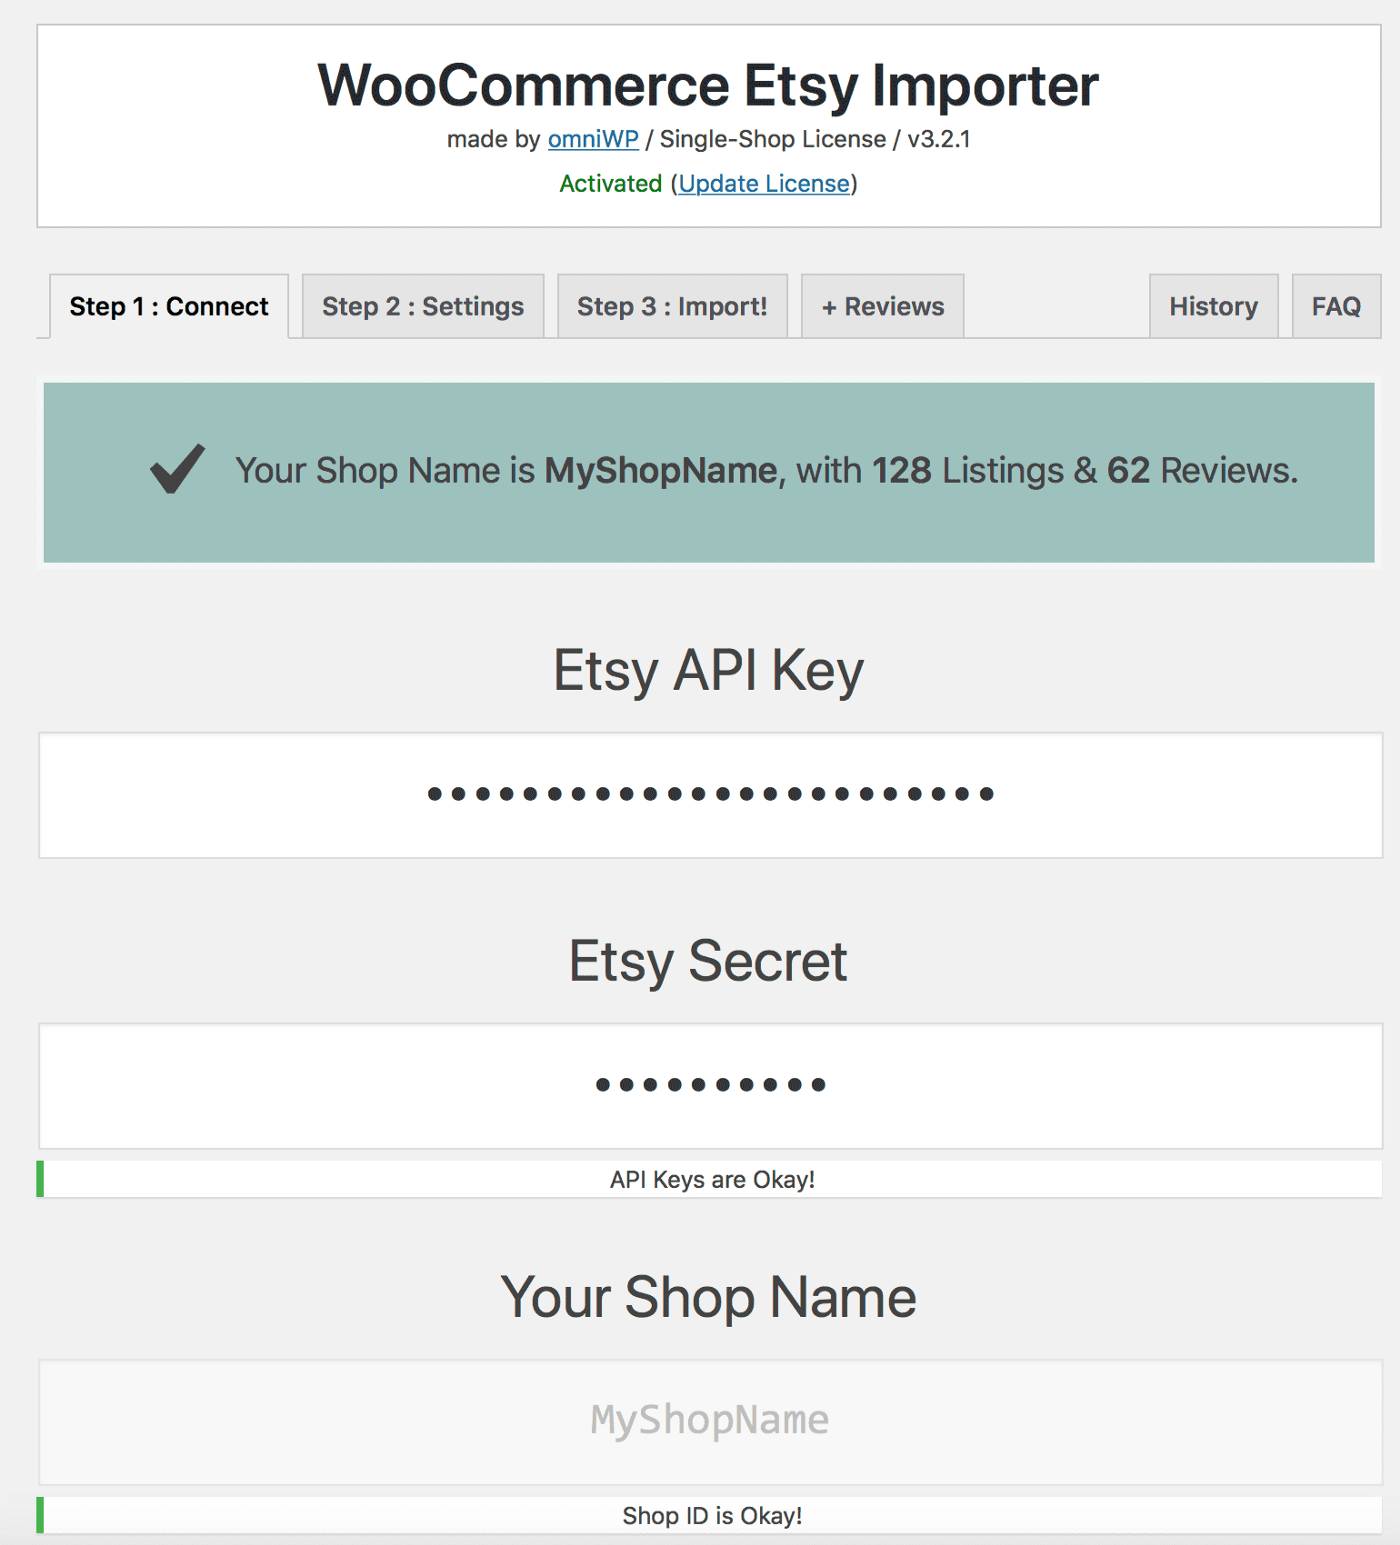
You should get the notifications “API Keys are OK!” and “Shop ID is OK!” If you don’t, double-check that you’ve entered the correct API Key and Shop ID and that you’re connected to the internet.
Step 4: Configure the setting
Proceed to the “Settings” page, and take a minute to gather your thoughts after seeing the massive amount of setup possibilities. But don’t worry: We’ve tried them all, and here’s how you should set them up:
- External / Affiliate / Standard Product: You should pick the “Standard Listing (Includes Variations)” Product Type unless you are an Etsy Affiliate.
- SKU (Unique ID Settings): These are entirely up to you. The importer may either assign the SKUs from Etsy (the “Use Etsy Listings” option) or produce new ones (the “Auto Generate Unique IDs” option). Which you select is determined by the requirements of your store. It’s important to note that if you want to use the automatic updating function, you must use Etsy’s SKUs without any prefixes, as that’s how the plugin determines which Woocommerce listing matches which Etsy listing.
- Language: Choose the language in which your Etsy shop and website are available.
- Product Title: Once again, these possibilities are dependent on how your shops are configured. Suppose you have excessively long Etsy listing names that incorporate keywords. In that case, they will harm your SEO and not convert effectively into Woocommerce (Woocommerce has a dedicated Tag field that handles this). These options allow you to truncate your Etsy listing titles based on a rule.
- Product Description: When you import your listings to WooCommerce, this area is crucial for making changes to all of your listing descriptions. “Batch Remove Content’’ will remove specific text from all of the listings you’re importing, and “Add Content to Top” and “Add Content to Bottom” will accomplish just that. Finally, you may instruct the importer to import only a specific amount of paragraphs. For example, suppose all of your descriptions have two sections of item-specific information followed by shop laws and directions. In that case, you may ask the importer to import the first two paragraphs and ignore the rest.
- Images: Unless there is a compelling reason not to, choose “Include Images,” set “Method” to “Import Full Quality Images,” and allow “Change Image Names.” If you want to import the Featured Image from all of your listings, choose “First Image Only.” Don’t check the “Remove Duplicates” box unless you’re conducting an update rather than a fresh import, and even then, I’d recommend leaving it unchecked to avoid accidentally deleting photographs.
- Categories: Check the box next to “Assign ALL Etsy’s Listing Categories.” You’ll have to do some category cleanup following import, but there’s no way around it. If you select “Assign Only the Lowest Category Level,” you will end up with Child categories in Woocommerce that have no Parent, which is a nightmare to fix.
- Sections: Unless you have a compelling reason to do otherwise, select “Add Product Section as Category.” Again, following your import, plan on performing some Category and Tag cleanup.
- Post Status: Draft or Auto-Publish, depending on your preferences.
- Stock Management and Tax Status: Once again, how you manage them depends on your situation.
- Excerpt for Product: I recommend following the WordPress/Woocommerce standard of 55 words. Depending on how your theme presents the excerpts, you may need to go back and adjust them to avoid uncomfortable cutoffs. Still, there is no way around this because Etsy has no idea of an Excerpt as a separate item from the Description.
- External Link: Uncheck “Add Etsy’s Product URL” unless you are not selling anything on your site and wish to redirect clients to Etsy to complete their purchase, or you have some other special conditions.
- Reviews: Once again, this is dependent on your business and theme.
- Product Variations: You can import Product Variations or assign those Variations their own SKU; however, if this is your first import, DO NOT SELECT “Assign a Default Variation on Import.” It will result in broken variants with incorrectly assigned properties.
- Sale Notes: This is entirely up to you; however, I recommend not including Sales Notes with each Woocommerce product. Unless they provide particular instructions related to a product or product category, it’s typically best to put such sorts of terms and conditions on their page.
When you’ve got everything just the way you want it, click the “Save Settings” button, and you won’t have to touch these configurations again. Now comes the exciting part: it’s time to transfer your Etsy items into Woocommerce!
Step 5: Import your Etsy listings to WooCommerce
It’s the moment you’ve been waiting for, and we’re sure you’re eager to get started. But try to keep your excitement in check for a minute and conduct a test import with only a few things. The plugin downloads all of your listing data and photos from Etsy to your PC and then uploads them to your Woocommerce web server during the import process. This can take some time, especially if you have many listings, high-resolution photographs, or a sluggish internet service where you work. As a result, it’s a good idea to import a few test items to ensure that everything is operating correctly.
The plugin allows you to pick specific items to import in two ways: by ID and by item order. Item Order is the order in which each listing was produced, but determining that might be difficult, especially if you wish to import an item in the middle of your inventory - you must manually count backward from the beginning to determine its number. We now use the item ID (its SKU), which is unique to the listing and more reliable. Look at the URL of a listing’s page to determine its ID. It will resemble the following: https://www.etsy.com/listing/000000000/product-title. The ID is the figure between “listing” and the item title (without the slashes). On the plugin’s “Import” page, select the “Specific Listings” Mode and enter the IDs of the listings you wish to import, separated by commas:
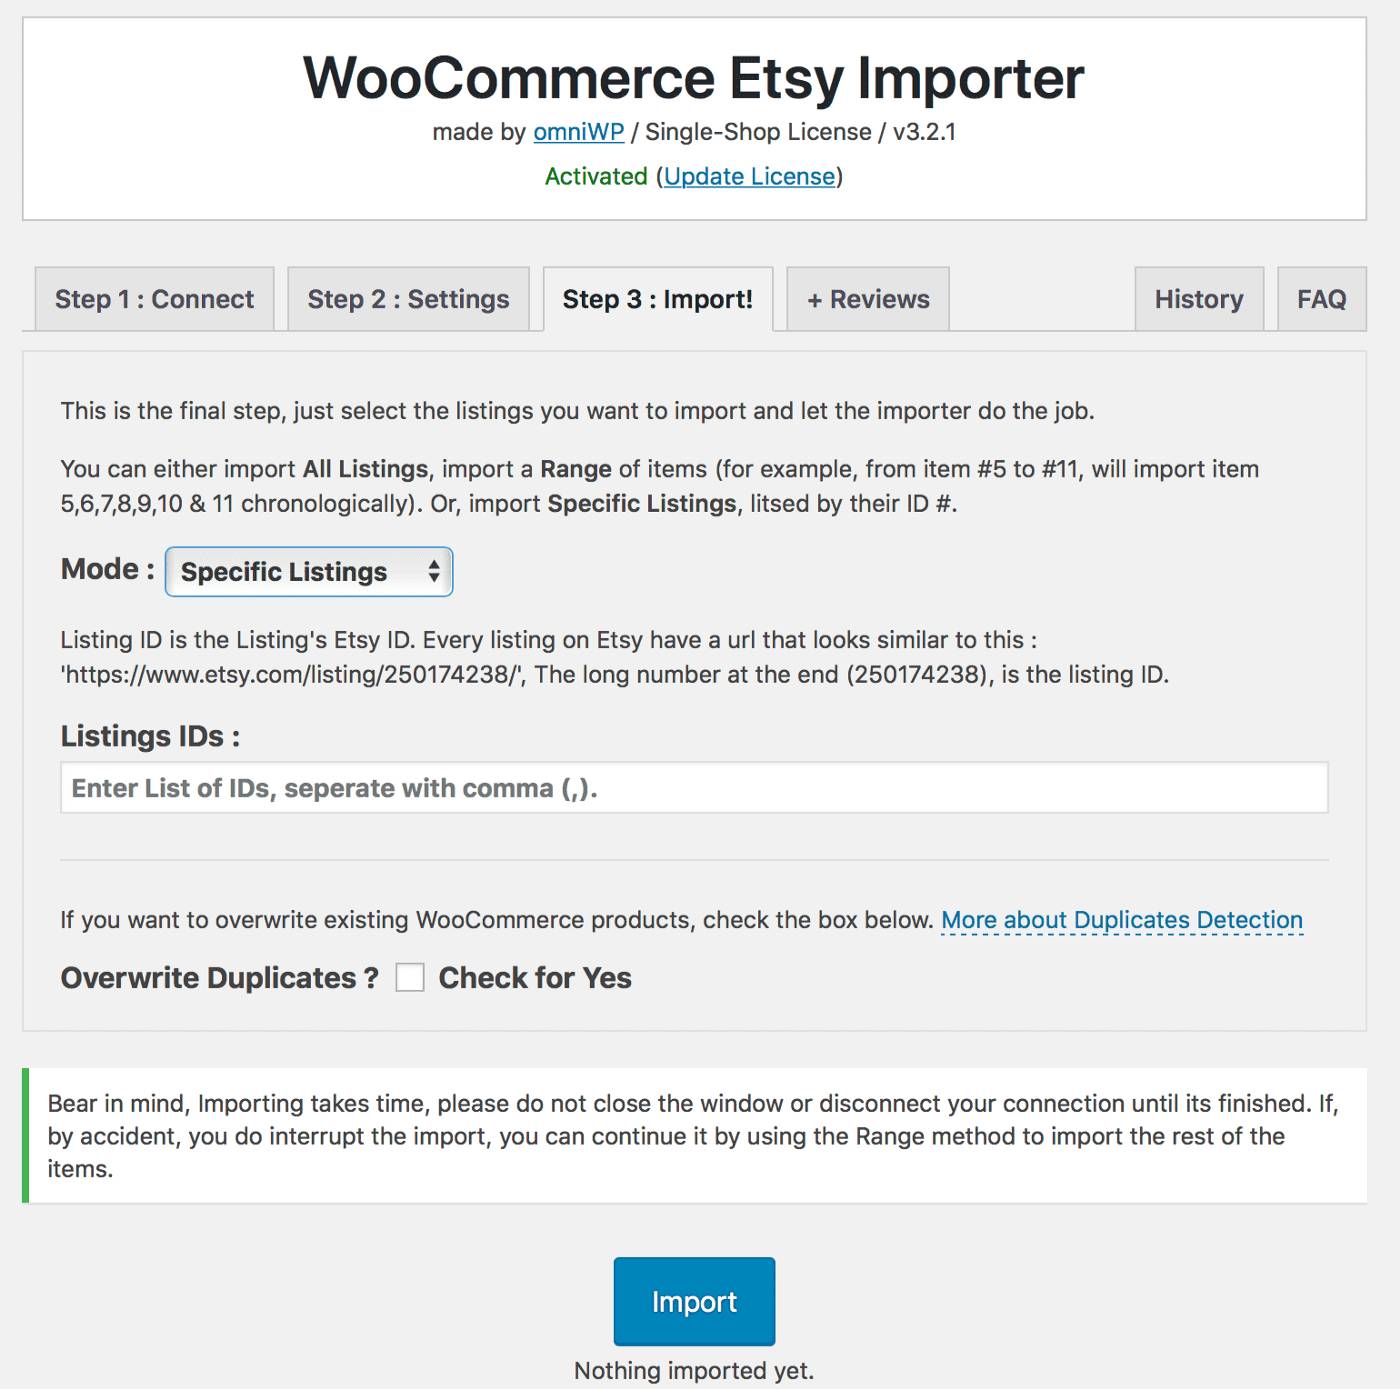
If this is your first import, do not choose “Overwrite Duplicates.” It’s now time to press the “Import” button and let the plugin do its work! The Import status page appears, displaying a running record of what the plugin is doing during the import process. This might be beneficial for troubleshooting or confirming that things are still operating correctly. Close the import window, exit your web browser, switch off or sleep your computer, or unplug from the internet until the import is finished. If you do any of these things, the import process will be halted.
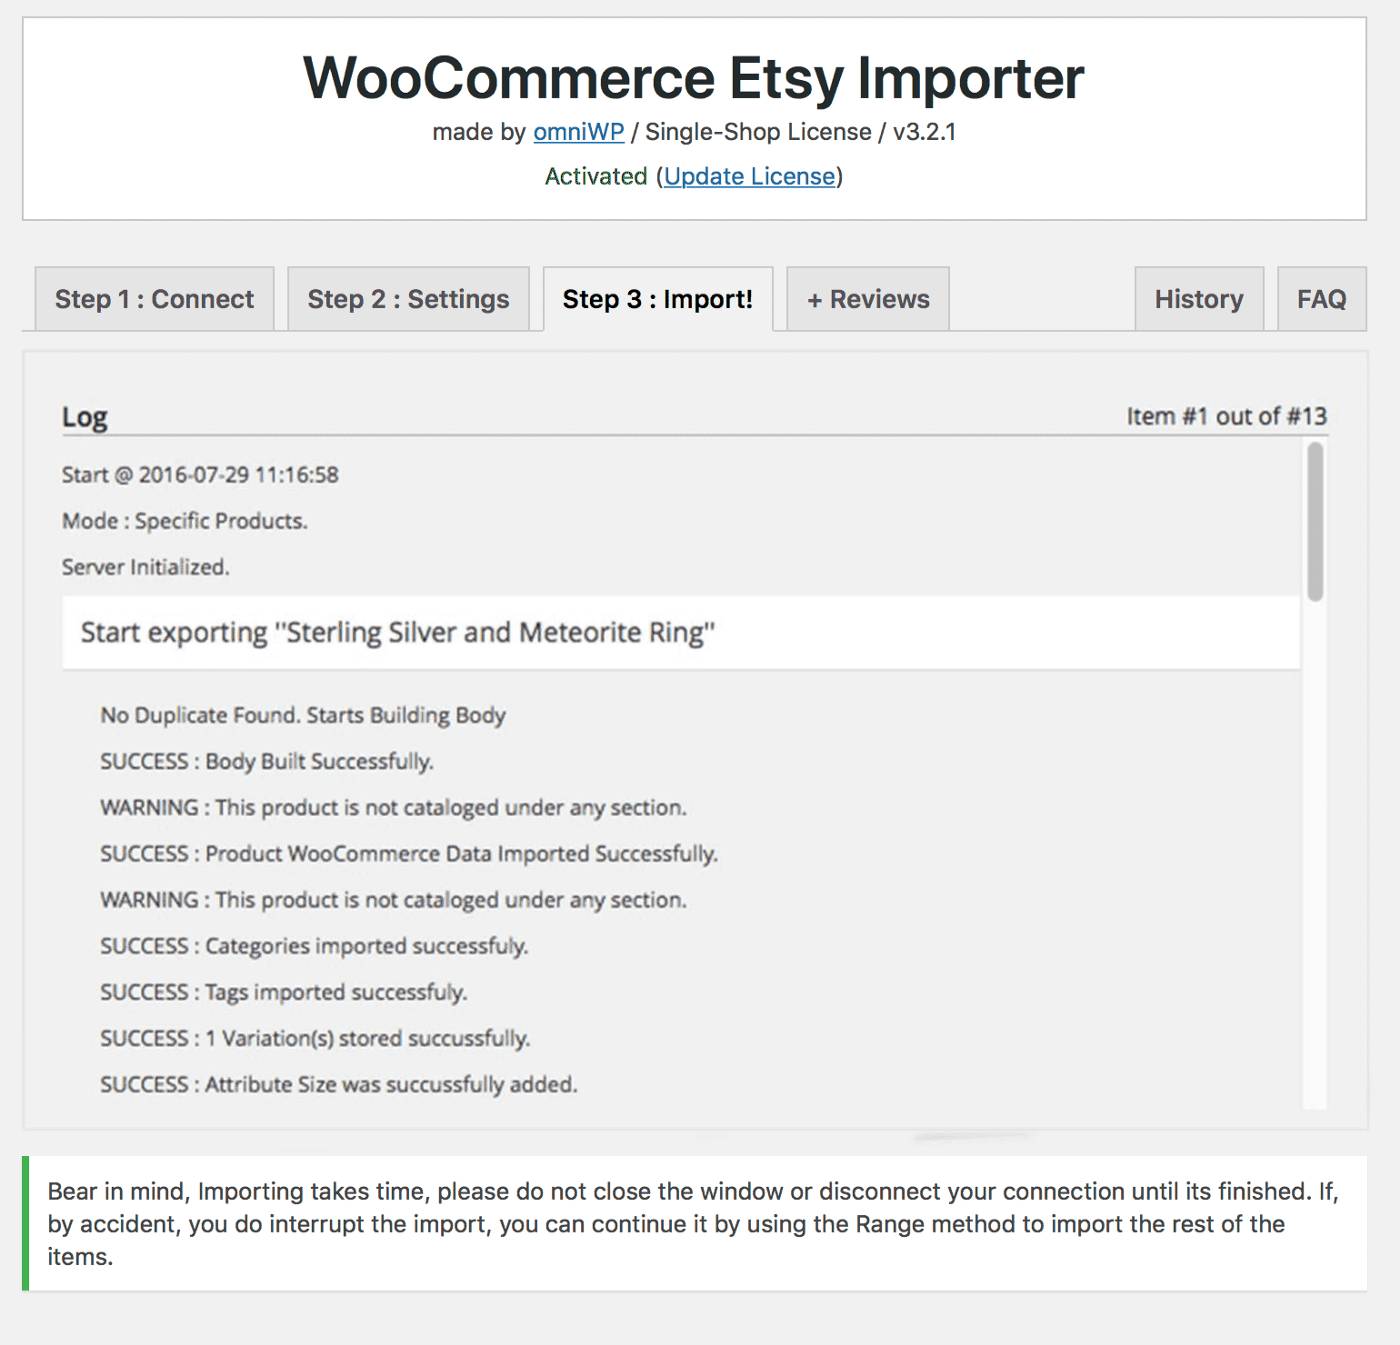
It’s time to test out your products after seeing “Import Complete” in the upper right corner of the log!
Step 6: Check and review your listings
After the import is complete, all of your imported goods will appear in the Woocommerce Products listing:
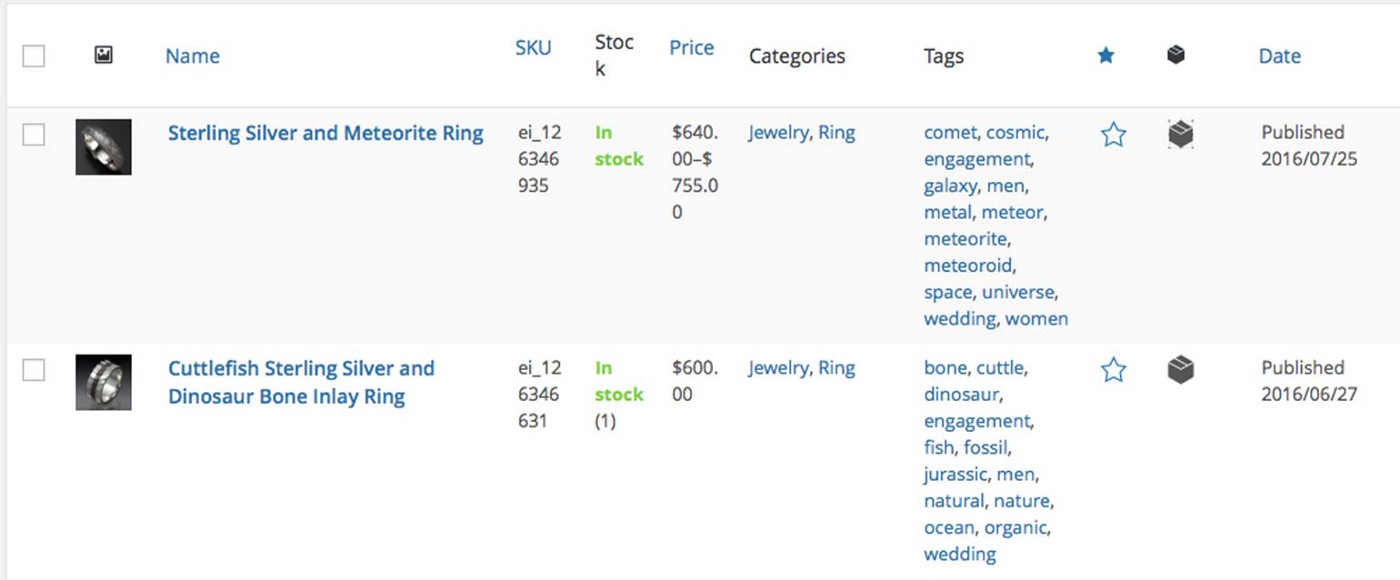
If everything appears to be in order, remove your test products and import everything. If you have a large number of listings, this may take some time, so plan appropriately. You’ll most likely need to utilize Woocommerce’s Bulk Edit tool to tidy up the Categories and Tags, but the listings will be ready to go. Here are some screenshots of genuine imported postings for comparison.
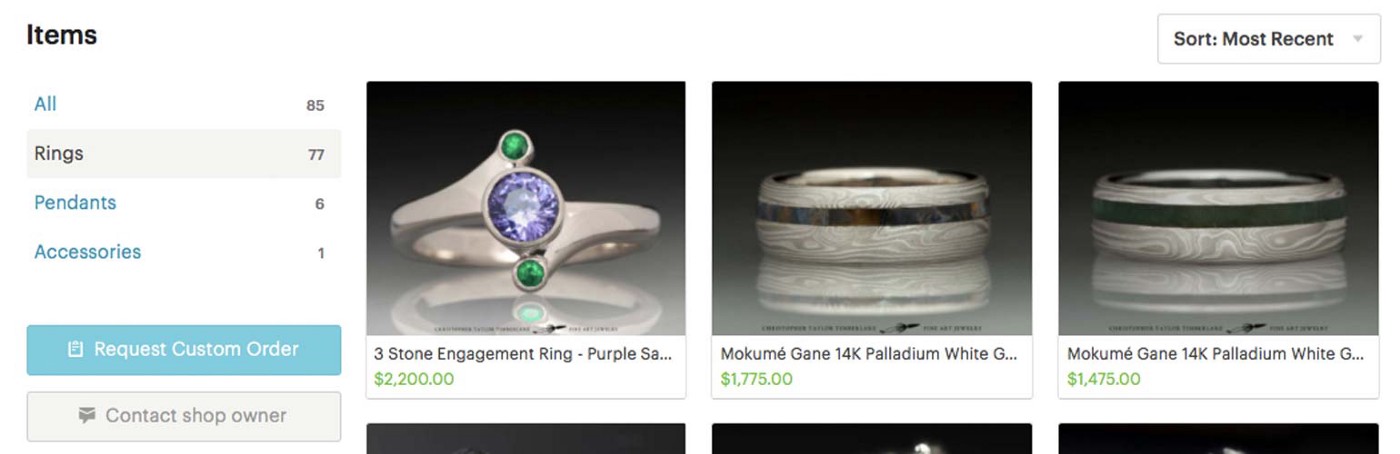
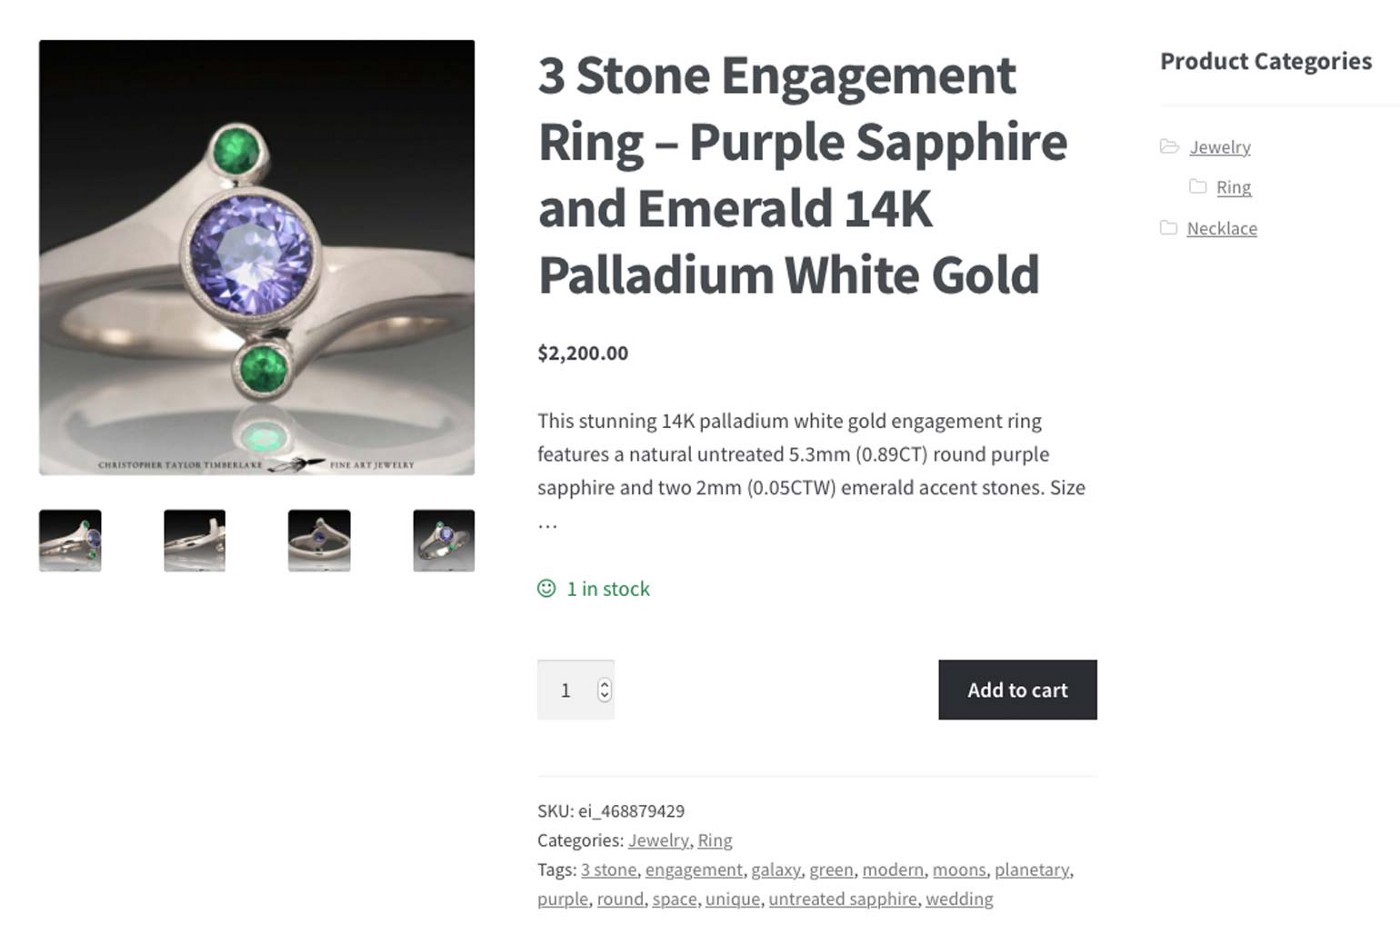
First, the original Etsy listings, followed by the matching listings after being imported into Woocommerce:
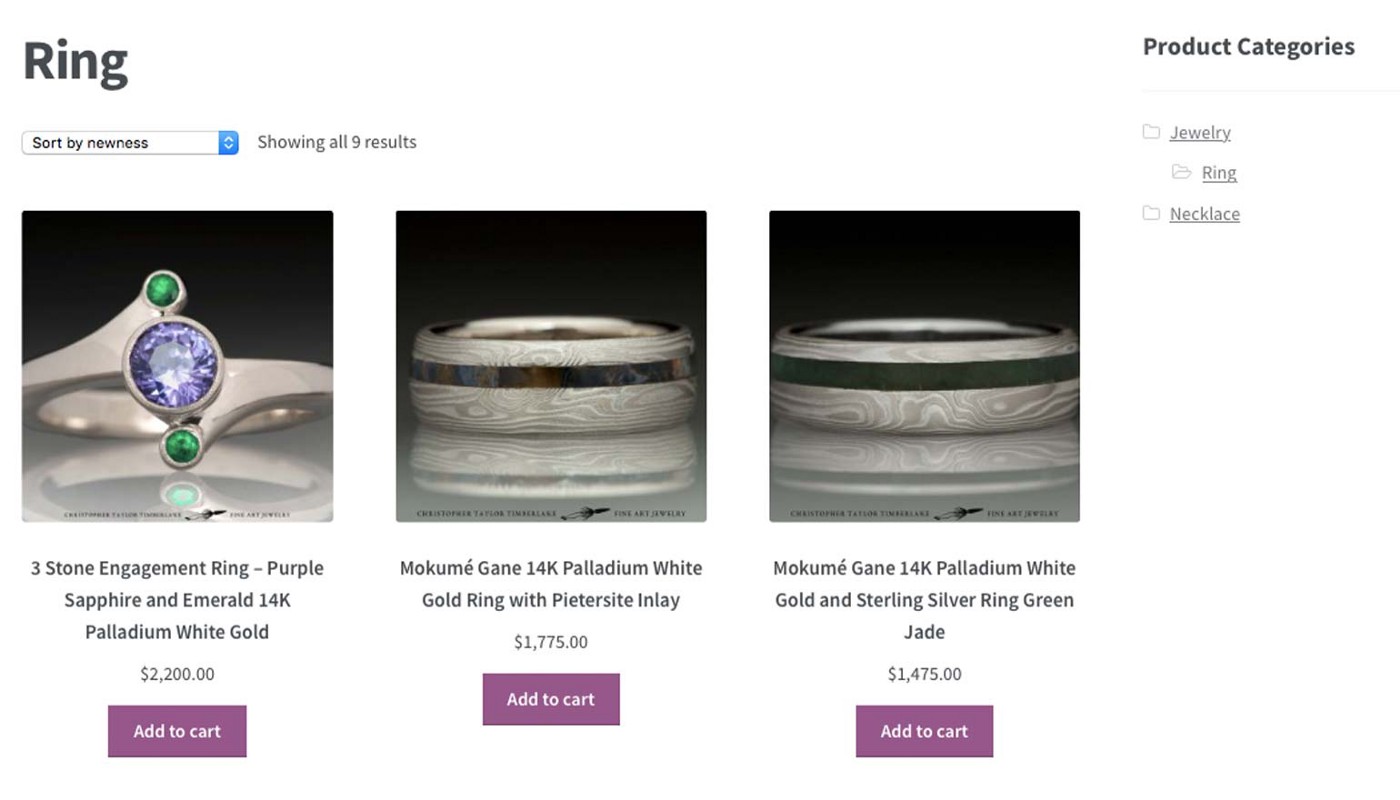
Here’s what we see when we click on an individual listing on Etsy, and here’s what we get after importing the duplicate listing into Woocommerce:
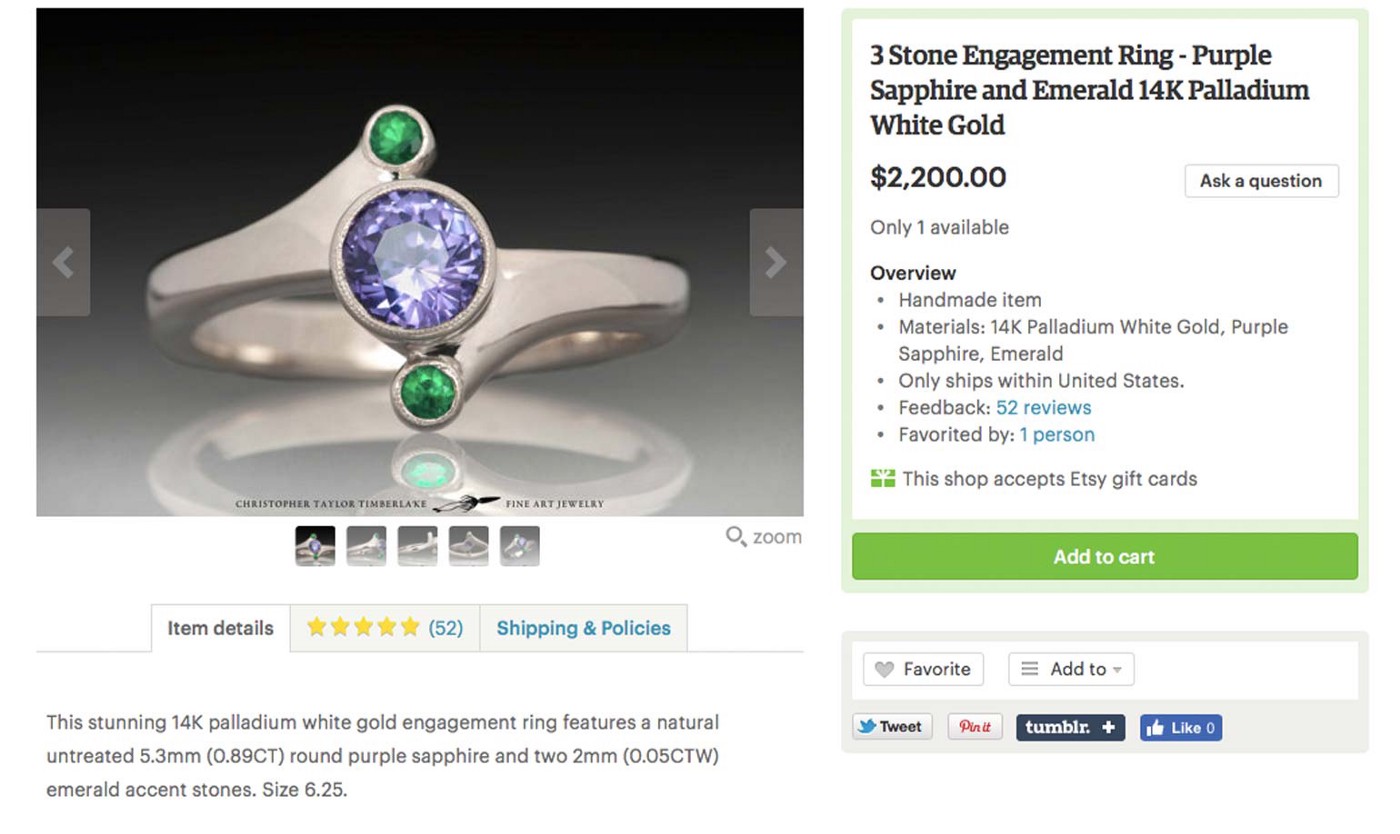
This Woocommerce instance uses the default, unstyled Storefront theme to benefit from some UI and UX modifications, but all of the information from the Etsy listing has adequately been imported into the Woocommerce shop and is ready to sell.
Conclusion
The Woocommerce Etsy Importer plugin has made something that was before virtually complicated, absurdly simple. Its price also significantly undercuts the competition, and anytime we had queries for the developer throughout our testing, we received rapid and easy-to-understand replies. If you’ve decided it’s time to take charge of your online store and grow your business beyond Etsy, you now have one more minor obstacle to overcome.
We hope this tutorial will help you understand how to import Etsy listings to WooCommerce. The first method seems simple and easy for newcomers, but it still contains some drawbacks mentioned above. The second choice could be perfect for any WooCommerce owner due to its feature-rich functionality and straightforward importing process. Just take a look at both approaches and find the most appropriate one for your business.


