
WooCommerce Hooks: The Ultimate Guide & Examples

Let’s get started with our below guides on How to use WooCommerce hooks? Guides & Examples for your reference so that you could have a deeper understanding of what they are, how to use them, and what you are about to do with them.
By designing your store with good use of hooks, you are facilitating the true possibilities as well as the potential of your ideal store. With WooCommerce hooks, you can now increase the level of customization, edit the tiniest features, or utilize its open-source ads.
What are WooCommerce hooks?
Like WordPress kooks, WooCommerce hooks are specifically used to customize your stores on the WooCommerce platform. To be more specific, it functions by adding extra contents and features to the default file of WooCommerce with no change of the principle code. It is highly effective in the improvement or extension of core programs’ features without manipulating them.
The amazing thing is that WooCommerce hooks boost the customization level for your store. They let you filter and add even the tiniest details to the store processes and pages.
How to use WooCommerce hooks?
Here, we mention three ways that you can use your WooCommerce hooks. Firstly, we provide you instructions with adding function code or using action and filter hooks to put in new content or filter any existing feature. In a second way, we recommend using Code Snippets. And the third way is to use HookMeUp.
1. Write codes for action hooks and filter hooks
As previously mentioned, it is very easy to use these hooks with a code. Those codes aim at adding corresponding functions where defined hooks are located. If you want to use those codes, you could do them in the “functions.php” of the active theme or the disparate “plugin’s file”.
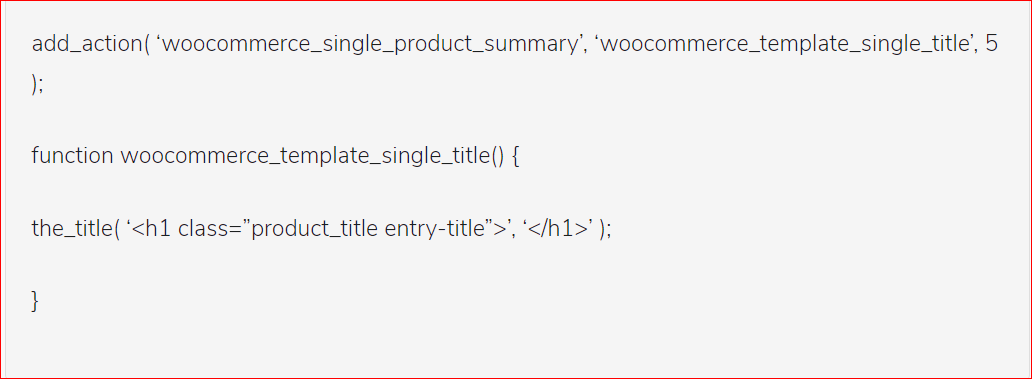
Step 1: Construct the code for action hooks
Follow the below code for your action hooks.
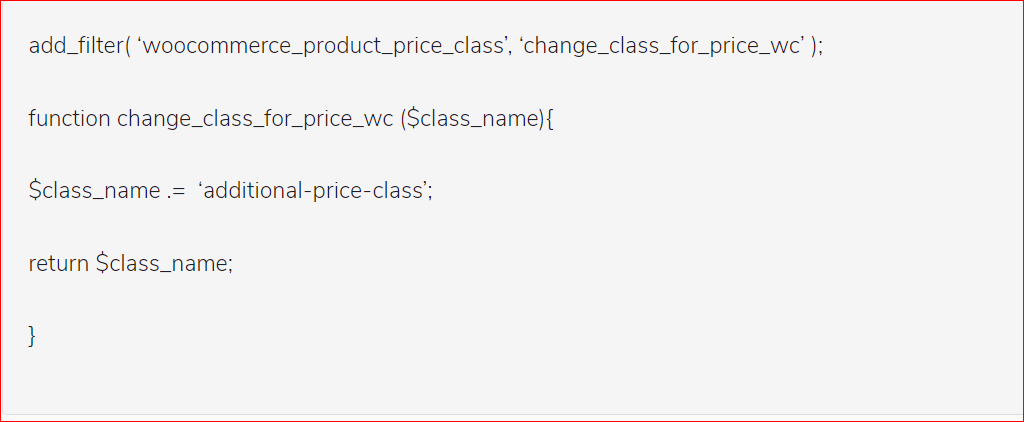
Step 2: Construct the code for filter hooks
Follow the below code for your filter hooks.
2. Add content by applying HookMeUp
In the above section, we have suggested how to use WooCommerce hooks using code for your action hooks and filter hooks. So, if you follow this way, you do not need to rely on any developer to write code for your hooks. However, there is a simpler method to put in content by applying HookMeUp.
Let’s thrive with HookMeUp to know a pro-level in customizing your WooStore without coding. Now, using hooks seems far easier. Nevertheless, not all hooks are accessible using HookMeUp. Hence, do not be hesitant to have a try; hopefully, these hooks could make sense.
Step 1: Access particular WooCommerce hooks
To use hooks, navigate to the section “Customize”. Once you have clicked it, one page will appear and you can notice the menu named “WooCommerce Hooks”.
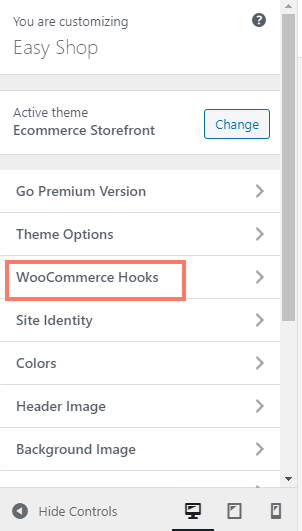
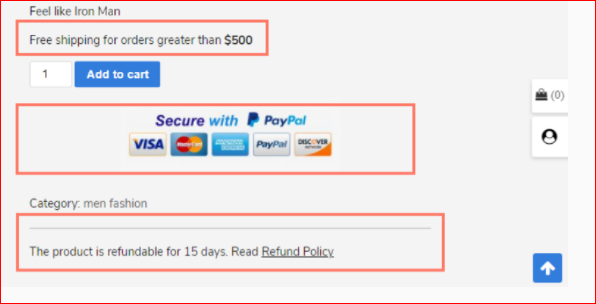
Proceed to choosing this menu. Then, a page list opens up on the above picture’s right side. This plugin functions to let you get into particular WooCommerce hooks, which are shown from these listed pages.
Step 2: Customize an attractive look
After you are done with the first step in this method, you can see how to present products. And it is time to reward it with a more appealing and worthy look. Therefore, you could enable products on your WooCommerce store to be more promising for sales.
Start with checking your available hooks. You can use these four hooks:
There are four necessary things to add when we use those hooks correspondingly. The first and foremost thing is to return to the link of product categories, the second thing involves the value of the free-shipping threshold. The third is to consider the logo of payment gateways. And the last one is to link to the store’s refund policy.
To add these things, go to your left panel, you will see a down arrow. Choose it and the editor panel would open up. Then, you will employ the editor for adding tables, media, links, text and modifying in the way you want by utilizing available options. As soon as you finished editing, the product page looks like below:
3. Use WooCommerce hooks by relying on Code Snippets
Step 1: Add Code Snippets
In order to use your WooCommerce hooks, it is a requirement to add codes to the website. You could add this kind of code to a similar spot. But there is no need to modify template files.
In particular, two places that you could add the code are the “functions.php” file of the child theme and the management plugin like Code Snippets. While it is a good idea to apply the “functions.php” file of the child theme, it is recommended to use the plugin Code Snippets.
There are several reasons that you should go with Code Snippets. This plugin is extremely useful in controlling many various hook Snippets as you could allow these snippets their entry. Furthermore, you might enable or disable particular hooks easily. Especially even when you edit themes, these code snippets still come along automatically.
Approach the section “Snippets”, then choose “Add New”.
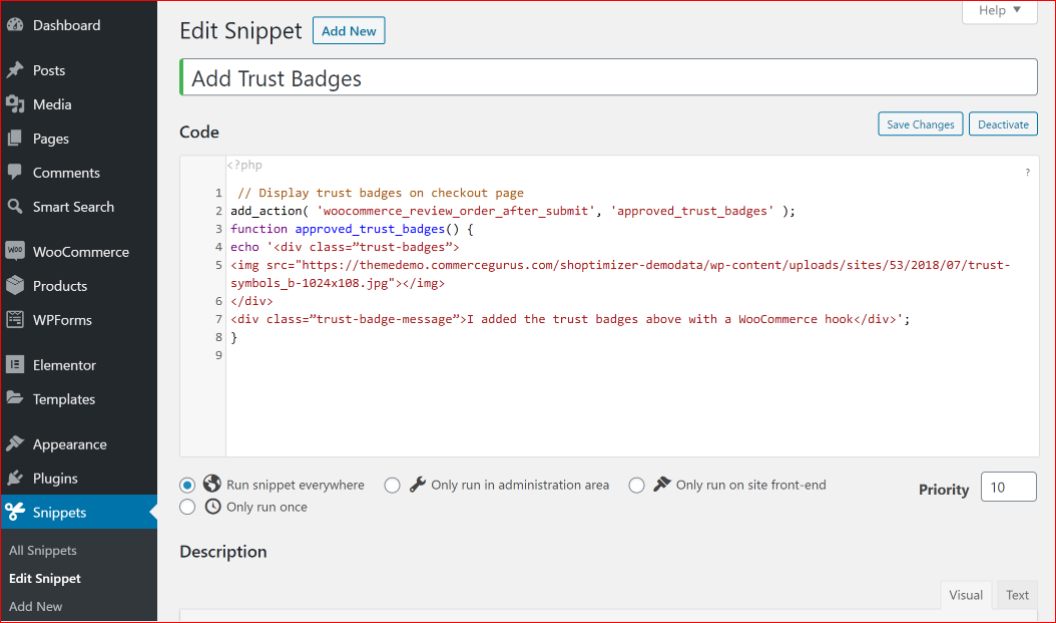
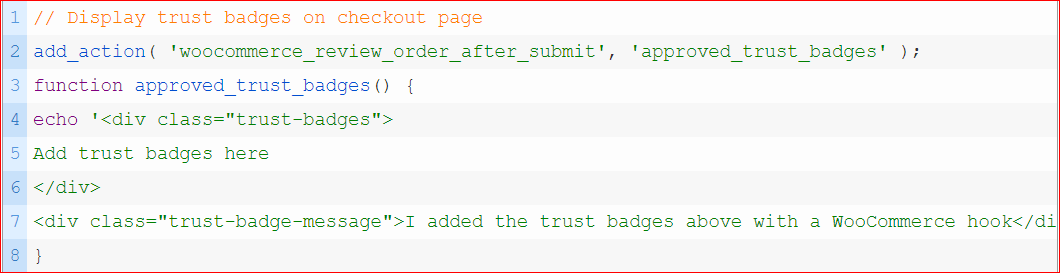
After that, it is time for you to give a name to your hook so that you can remember it easily and help it to be found later. Go to your code editor and add this code to the hook.
Step 2: Select where you are about to run snippets
Right after adding code to your hook, you will select where you will run your snippets. If you are in doubt, your task is just to choose “Run snippets everywhere”.
Step 3: Save what you have made, then Activate
Now, it is time to save some changes that you have made, click “Activate” to enable it.
You could add myriad hooks within the similar entry of Code Snippets. However, it seems to be more convenient if you build a separate entry for every hook.
Type of WooCommerce hooks
The classification of WooCommerce hooks is determined by how they work. Therefore, they come with two types: Filter Hooks and Action Hooks. Let’s keep scrolling down to explore all details of these two types.
1. Filter Hooks
Filter hooks are known for modifying one existing content of your WooStore. They work by selecting a set among other possibilities. Moreover, you can also get an opportunity to change the content’s existing behavior. As the name indicates, filter hooks do not have the function to add new features or content. Instead, they let you filter your data one out of several possibilities. This is the way to show how they get their name.
2. Action Hooks
While Filter hooks are useful in modifying existing contents or features, Action hooks are utilized to put a new thing to the principle file. It is your choice to add what you want from numbers, paragraphs, icons, images to text. This type of hook provides you a chance to implement one action on core codes.
List of WooCommerce hooks
In WooCommerce, there are various hooks that may confuse you when looking at first, so we categorize them into different types so that you can understand them more rapidly.
Global hooks
- woocommerce_breadcrumb
- woocommerce_no_products_found
- pre_get_product_search_form
Cart hooks
Before product list:
- woocommerce_before_cart
- woocommerce_cart_contents
- woocommerce_before_cart_table
- woocommerce_before_cart_contents
- woocommerce_after_cart_contents
After product list:
- woocommerce_before_cart_totals
- woocommerce_cart_actions
- woocommerce_cart_coupon
- woocommerce_cart_collaterals
- woocommerce_after_cart_table
At the end of an order:
- woocommerce_cart_coupon
- woocommerce_cart_actions
- woocommerce_cart_collaterals
- woocommerce_after_cart_table
- woocommerce_before_cart_totals
In an empty cart:
- woocommerce_cart_is_empty
Checkout hooks
Before contact form:
- woocommerce_checkout_billing
- woocommerce_before_checkout_form
- woocommerce_before_checkout_billing_form
- woocommerce_checkout_before_customer_details
To set markup for billing details:
- woocommerce_before_order_notes
- woocommerce_after_order_notes
- woocommerce_checkout_shipping
- woocommerce_after_checkout_billing_form
- woocommerce_checkout_after_order_review
Before the product summary in the order:
- woocommerce_review_order_before_shipping
- woocommerce_review_order_after_shipping
- woocommerce_checkout_before_order_review
- woocommerce_review_order_before_order_total
- woocommerce_review_order_after_order_total
- woocommerce_review_order_before_cart_contents
- woocommerce_review_order_after_cart_contents
- woocommerce_checkout_after_customer_details
Below the order form:
- woocommerce_after_checkout_form
- woocommerce_checkout_order_review
- woocommerce_review_order_before_submit
- woocommerce_review_order_after_submit
- woocommerce_review_order_before_payment
- woocommerce_review_order_after_payment
In the product list of an order:
- woocommerce_thankyou
- woocommerce_order_items_table
- woocommerce_order_item_meta_end
- woocommerce_order_item_meta_start
- woocommerce_order_details_after_order_table
Product hooks
At the top and bottom of the product page:
- woocommerce_before_main_content
- woocommerce_after_main_content
- woocommerce_before_single_product
- woocommerce_after_single_product
Above and below the product description:
- woocommerce_before_single_product_summary
- woocommerce_after_single_product_summary
In short product description:
- woocommerce_share
- woocommerce_product_meta_end
- woocommerce_product_meta_start
- woocommerce_single_product_summary
In the comments:
- woocommerce_review_meta
- woocommerce_review_before
- woocommerce_review_comment_text
- woocommerce_review_before_comment_text
- woocommerce_review_after_comment_text
- woocommerce_review_before_comment_meta
Category hooks
- woocommerce_shop_loop
- woocommerce_before_shop_loop
- woocommerce_after_shop_loop
- woocommerce_after_shop_loop_item
- woocommerce_shop_loop_item_title
- woocommerce_before_shop_loop_item_title
- woocommerce_after_shop_loop_item_title
- woocommerce_archive_description
My account hooks
- woocommerce_account_content
- woocommerce_account_navigation
- woocommerce_before_account_navigation
- woocommerce_after_account_navigation
- woocommerce_before_edit_account_address_form
- woocommerce_after_edit_account_address_form
- woocommerce_before_my_account
- woocommerce_after_my_account
- woocommerce_account_dashboard
Mini cart hooks
- woocommerce_before_mini_cart
- woocommerce_after_mini_cart
- woocommerce_mini_cart_contents
- woocommerce_before_mini_cart_contents
- woocommerce_widget_shopping_cart_buttons
- woocommerce_widget_shopping_cart_before_buttons
Email hooks
- woocommerce_email_footer
- woocommerce_email_header
- woocommerce_email_order_meta
- woocommerce_email_order_details
- woocommerce_email_customer_details
- woocommerce_email_before_order_table
- woocommerce_email_after_order_table
Others
- woocommerce_auth_page_header
- woocommerce_auth_page_footer
- woocommerce_available_download_start
- woocommerce_available_download_end
- woocommerce_before_available_downloads
- woocommerce_after_available_downloads
- woocommerce_before_account_downloads
- woocommerce_after_account_downloads
- woocommerce_before_account_orders
- woocommerce_after_account_orders
- woocommerce_before_account_orders_pagination
- woocommerce_cart_has_errors
- woocommerce_edit_account_form
- woocommerce_edit_account_form_start
- woocommerce_edit_account_form_end
- woocommerce_before_edit_account_form
- woocommerce_after_edit_account_form
- woocommerce_before_account_payment_methods
- woocommerce_after_account_payment_methods
- woocommerce_before_checkout_shipping_form
- woocommerce_after_checkout_shipping_form
- woocommerce_before_checkout_registration_form
- woocommerce_after_checkout_registration_form
- woocommerce_checkout_before_terms_and_conditions
- woocommerce_checkout_after_terms_and_conditions
- woocommerce_lostpassword_form
- woocommerce_order_details_after_customer_details
- woocommerce_pay_order_before_submit
- woocommerce_pay_order_after_submit
- woocommerce_product_thumbnails
- woocommerce_resetpassword_form
- woocommerce_shop_loop_subcategory_title
- woocommerce_before_subcategory
- woocommerce_after_subcategory
- woocommerce_before_subcategory_title
- woocommerce_after_subcategory_title
- woocommerce_view_order
5 Examples of WooCommerce Hooks
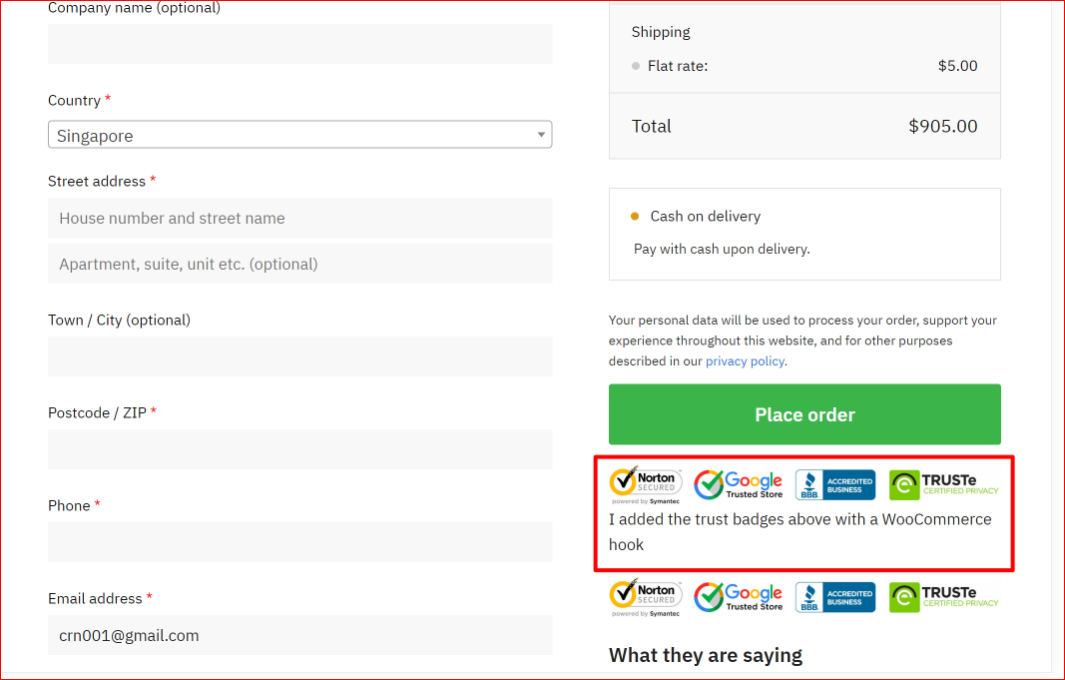
1. Put in logos right at your Checkout pages
Putting logos right at your Checkout pages is a perfect way to increase conversion rates for your WooCommerce store. The reason is that Checkout pages are where a consumer goes through his/her order. Hence, it is a great place to displace trust logos.
Not every WooCommerce themes provide testimonials and trust badges below the button “Place order”, the theme from Shoptimizer does. In case your theme does not offer conversion-boosting features, you could apply the hook “woocommerce_review_order_after_submit” to add on your own. Let’s have a glance at the below example.
You can notice in the trust badges’ first row. It originates from the WooCommerce hook, whereas the second one is shown in the theme of Shoptimizer.
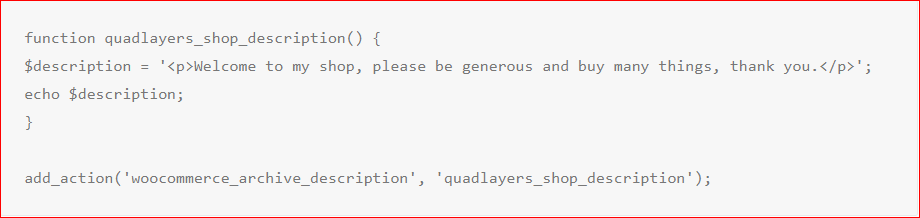
2. Showcase Shop page’s description
Your Shop page will not display the description by default. Conversely, you can use WooCommerce hooks to enable it. And the hook is used: “woocommerce_archive_description”. See below to understand how you will use this hook.
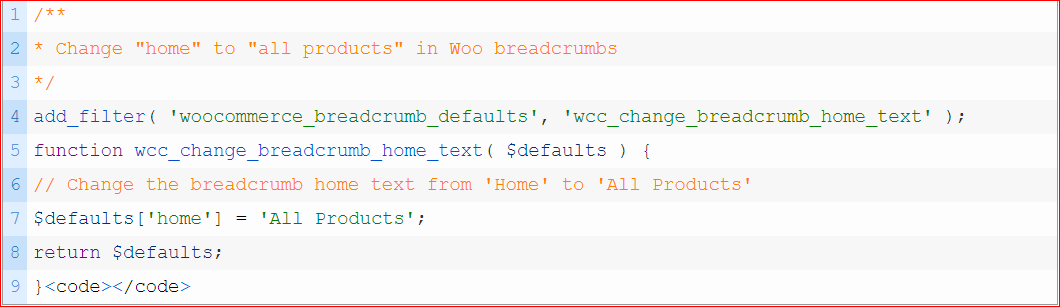
3. Modify the breadcrumb text
In the first example of WooCommerce hooks, putting in logos right at your Checkout pages means using action hooks to add a new feature. And, in this example, we introduce a real-world instance using filter hooks.
So, what you could do with filter hooks is to modify the text of your WooCommerce store. To be more specific, this kind of text is breadcrumbs to show up on your store’s product page. For example, you wish to modify the page default “Home” and change it to “All Products”.
You can rely on the below filter to change the text:
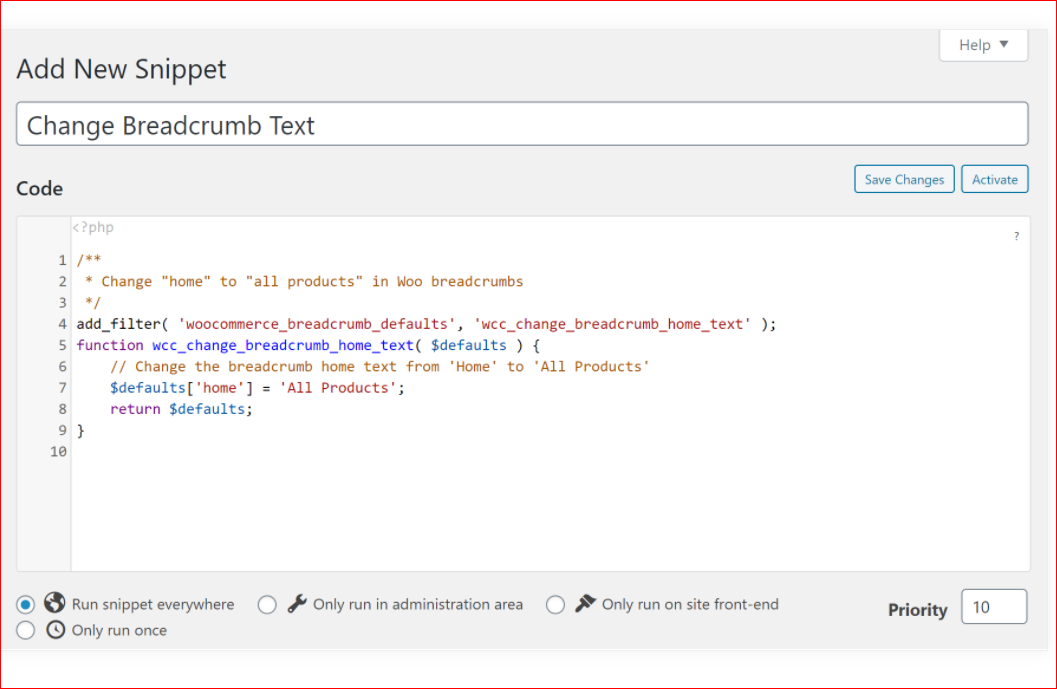
And there you are, congratulation, you have successfully changed your breadcrumb text:

4. Insert information text after the button “Add-to-cart”
One more useful example of WooCommerce hooks is to insert information text right after your button “Add-to-cart”. Hooks of WooCommerce let you add custom scripts to myriad sections of your cart page. Follow the below image to know how you will be adding a text right after the button “Add-to-cart”.
This kind of script aims at printing one custom text that comes after the button “Add-to-cart”. The purpose of this script is for discounts promotion, requiring free delivery or minimum spending. Let us explain a bit about these codes:
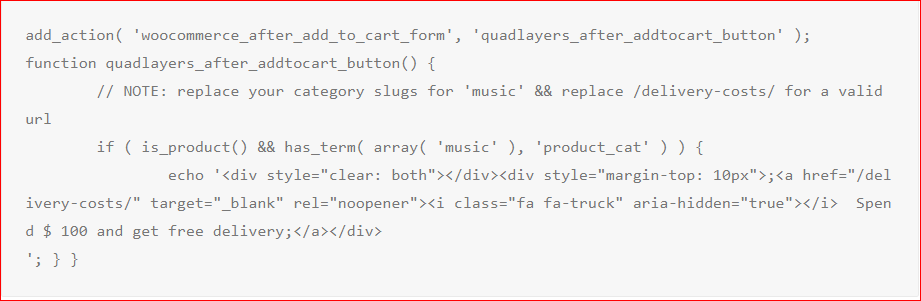
- The “woocommerce_after_add_to_cart_form” hook will print the code HTMN following the button.
- Echoed content lets variables, HTML tags, and so on within the PHP scope.
- The category slug is used within one array. Then, you could check some categories
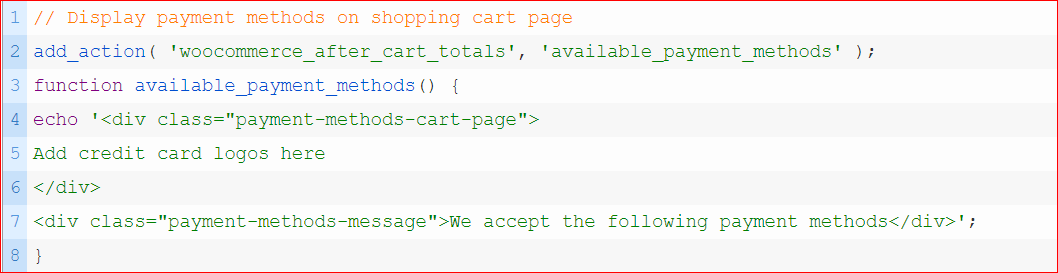
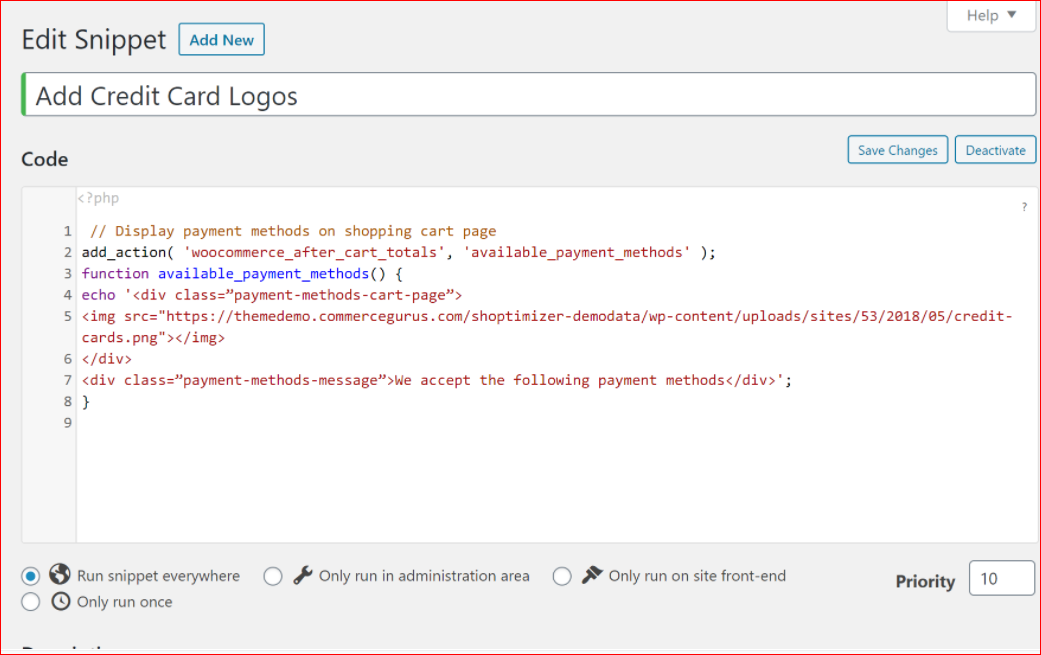
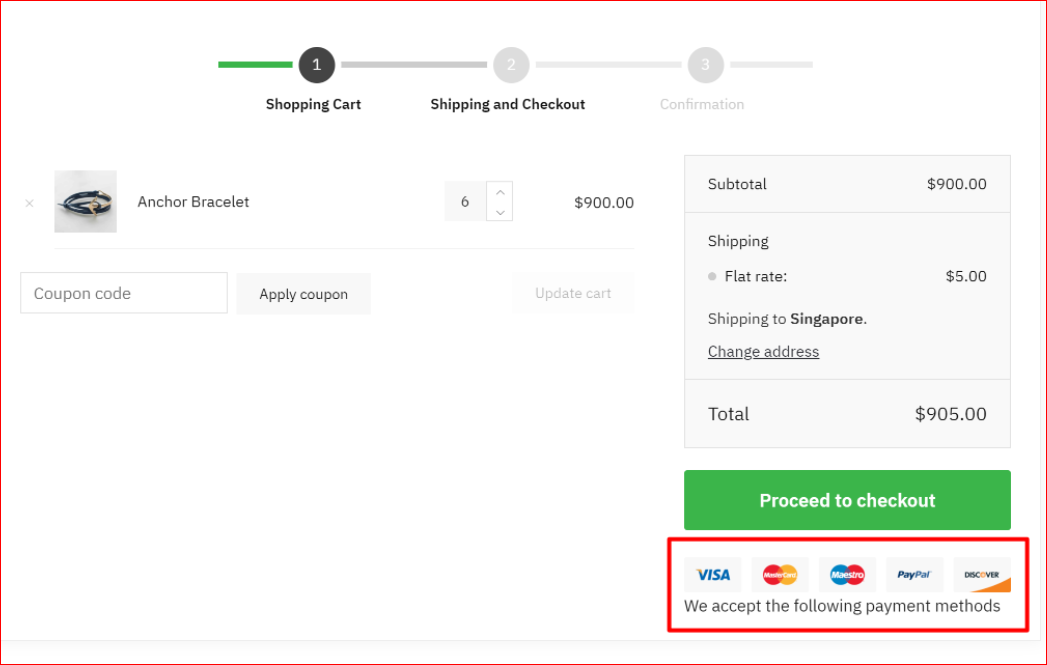
5. Display logos of credit cards on the Cart page
Suppose you are questioning whether current payment methods cause the abandonment of shopping carts. As a result, you could insert PayPal badges or credit cards on the shopping cart page to specify what type of payment method they can use. Hence, there is a much easier way to help shoppers perceive which payment methods your WooCommerce store supports.
Apply hook “woocommerce_after_cart_totals” below the button “Proceed to checkout”:
You could notice the logos of the credit card under the button “Proceed to Checkout”:
Conclusion
There is no denying that WooCommerce Hooks make your store better with their ability to add content or modify behavior at the store’s specific parts. What wonderful hooks! Because they allow you to do those things without editing underlying template files. So, let’s customize your WooStore functions and looks with WooCommerce hooks and share these tips with others who need them.


