
How to Set up EasyPost to Woocommerce

Customers anticipate same-day or next-day shipment, and eCommerce is approaching this era. As consumer expectations alter, it begs the question of how eCommerce businesses or even small eCommerce businesses can stay competitive in an already crowded industry. Versatile supply chain management is the best answer.
Any eCommerce company’s supply chain is its foundation or even it is the factor that has the ability to make or break your online businesses. You should not take for granted your capacity to keep the product on hand as consumers demand it and provide lightning-fast shipping. Every eCommerce business should aspire for speedy commodity delivery to order fulfillment centers, correct online order assembly, and expedited client shipment. Integrating a technology shipping solution that addresses your supply chain’s shipping complications is a straightforward approach to sustain a competitive advantage.
Therefore, we have put the article How to Set Up EasyPost to WooCommerce to help you figure it out. In this article, you will have an in-depth understanding of the importance of WooCommerce EasyPost, and we will share necessary steps about the setup of EasyPost for WooCommerce that you can apply when establishing your online store.
Why Should You Use EasyPost for WooCommerce?
EasyPost is a tech-forward transport and logistics approach that enables supply chains to exert more control and insight over their shipping workflows.
Through simplified API interfaces designed to automate the exchanges of data transactions between parcel shipping service suppliers (UPS, USPS, FedEx) and your users, EasyPost gives you end-to-end management over your shipping and logistics operations. EasyPost’s API shipping connections come with a variety of customizable capabilities, as listed below:
-
Rating: Shipping charges might make up a significant portion to 10% of an eCommerce company’s total expenses. By comparing carrier prices through our Rating API, EasyPost enables businesses to mitigate this possible loss. Simply compare and choose shipping prices from 100+ integrated carriers, providing you and your consumers with a suitable pricing point and the proper degree of service.
-
Shipping Labels: In minutes, you may begin shipping. E-retailers may now effortlessly link with over 100 carriers across the world, enabling your company to swiftly buy and produce shipping labels from favored carriers.
-
Tracking: Parcel delivery on time might be as lesser as 83 percent, meaning one out of every five items arrives late. With real-time updates given to both online retailers and customers, you can keep your finger on the pulse of your deliveries and enhance your business intelligence. EasyPost’s Tracking API also allows for more control over the user experience with functionalities like branded tracking pages that reinforce your brand’s appearance, experience, and messaging. With smart delivery predictions based on state-of-the-art historical data and real-time carrier input, you will never leave your consumers in the dark about their projected date of delivery.
-
Address Verification: Faulty deliveries impact about 5% of all items transported, according to estimates. With CASS certified Address Verification API, we assist employers to avoid this issue and enhance shipment accuracy by 62 percent by leveraging a wide international network of information from best-in-class vendors. This technology collects data in real-time and learns as it goes, boosting delivery accuracy and ensuring that your products arrive on time. What does this imply in terms of supply chains? Less time spent dealing with consumers who ask, “Where’s my stuff?” and less money spent on resolving the issue.
-
Insurance: In transportation to customers, one out of every ten packages is destroyed. We understand how annoying the insurance claim procedure may be when your consumers report these accidents. Allow EasyPost to take care of this bothersome situation and secure your delivery from loss or damage. By paying a 1% premium, you can quickly add insurance coverage to all of your orders, and your deliveries will be protected. If you need to recuperate a loss, we will give you your money back in 30 days or less.
How to Set Up EasyPost to WooCommerce
You now have an overall understanding of the EasyPost in WooCommerce and its significance in eCommerce. It’s time to delve into the way to set up EasyPost to WooCommerce.
Here are some steps for generating EasyPost that can benefit both your online business and your customers’ purchase experience. Let’s get started!
Step 1: Install the Plugin
-
Make sure that you have purchased one of the ELEX WordPress WooCommerce plugins
-
Sign in to your WordPress / WooCommerce website
-
If you have the plugin’s Basic version installed, make sure to disable and uninstall it before installing the Premium version you have bought and downloaded. All of your data, including plugin settings, will be secured
-
Then, navigate Plugins > Add New in the WordPress sidebar menu on the Your website admin page, as seen in the screenshot below
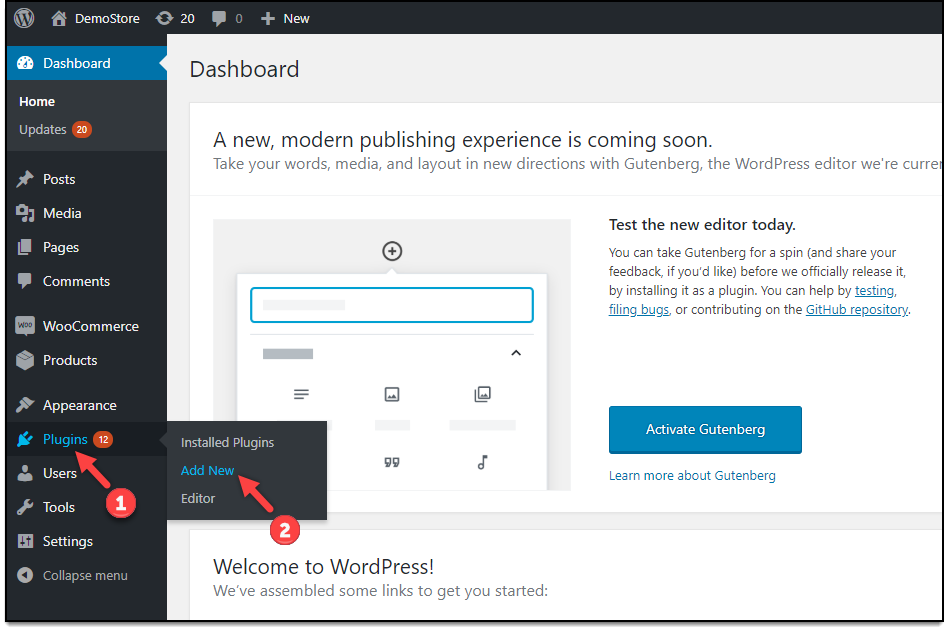
-
Tap on Upload Plugin > Install Now
-
Click on Activate to finish installing the Plugin
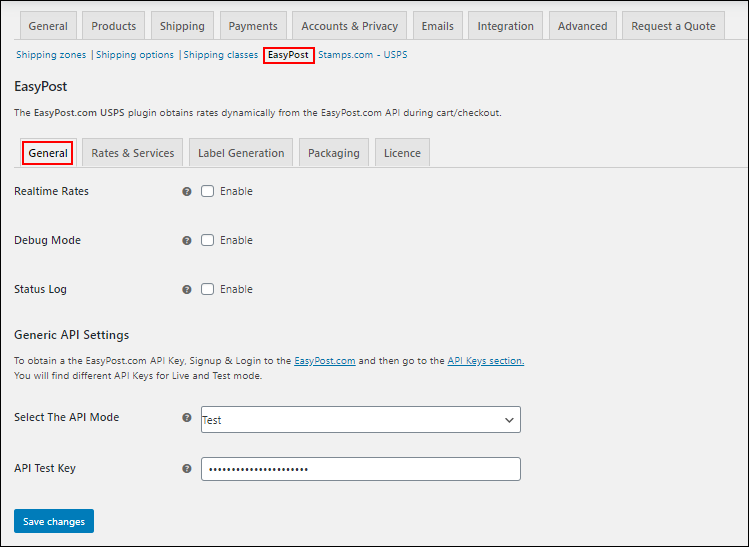
Step 2: General Settings
The general settings are demonstrated as follows
-
Real-time Rates: Select this checkbox to display real-time shipping costs from shipping services on the cart/checkout page
-
Debug Mode: If you are not obtaining appropriate rates (less or more than intended), all possible shipping options, or even no rates at all, you can use this Debug mode checkbox to figure out what’s wrong. The WooCommerce EasyPost plugin additionally displays the warning. You can use a log to track down issues if you enable debug mode. Troubleshooting information is available at the top of the cart and checkout pages. Add an item to the cart after activating debug mode. To access the debugging data, go to the cart or checkout page.
-
Status Log: Check the data about the orders for developers to investigate by enabling this option. On a live website with traffic, you can turn it off
If you have enabled it, you may examine the status log of orders by heading to WooCommerce > Status > Logs after creating the delivery of an order

You can select an order from the drop-down menu and then tap on View to examine the order’s status log
Step 3: Settings for a generic API
The below are the generic API settings:
API-KEY: You must first register with EasyPost in order to use the EasyPost APIs. You’ll get a test key and a live key after completing the registration process. In this area, type the received API key
Please follow the below instruction to register for EasyPost.com:
-
Head to EasyPost Signup Page
-
Sign up by filling out the registration form with all of the relevant information
-
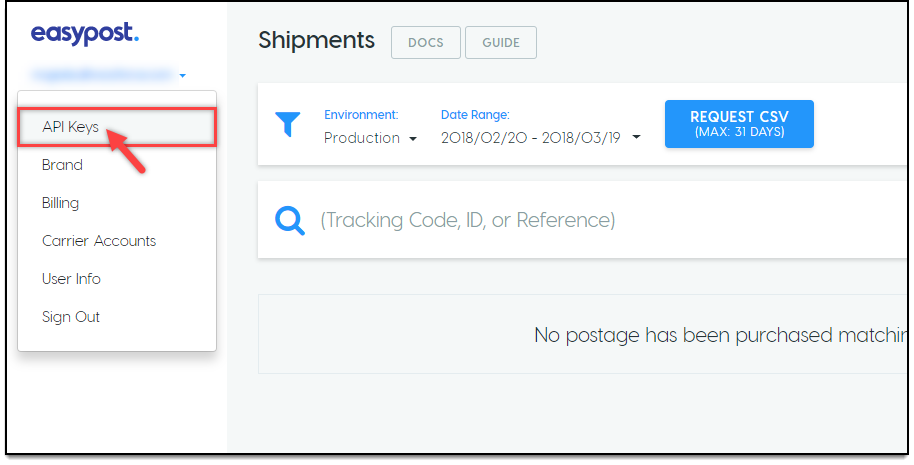
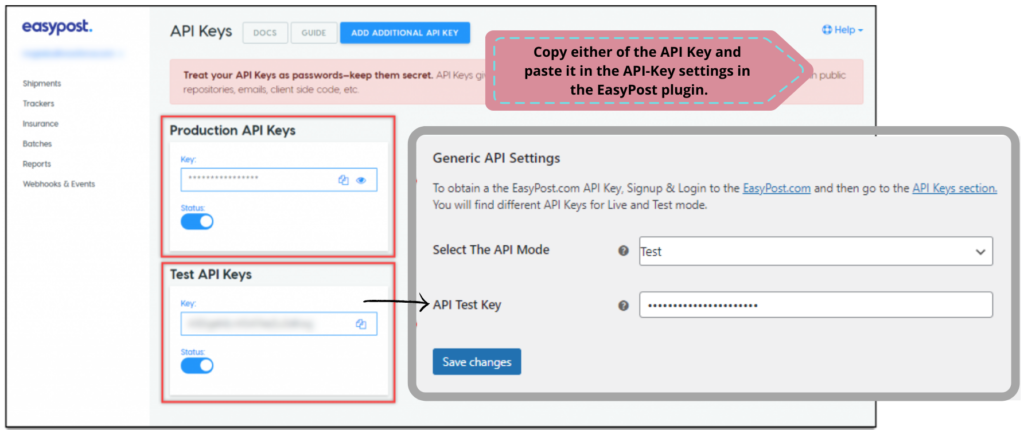
Just go to Account > API Keys after you have signed up, as indicated in the image as follows
- Copy the required API keys (Production or Test) and put them into our EasyPost plugin’s API-Key text area.
Here is an example of a picture of the credentials
API Mode: You could use TEST mode to examine your plugin settings (such as real-time rates, label printing, and so on), and then change to LIVE mode to handle real-world orders
Step 4: Setup of Rates and Services
This area provides options that will define which services your WooCommerce store’s customers will have access to. The options are seen below:
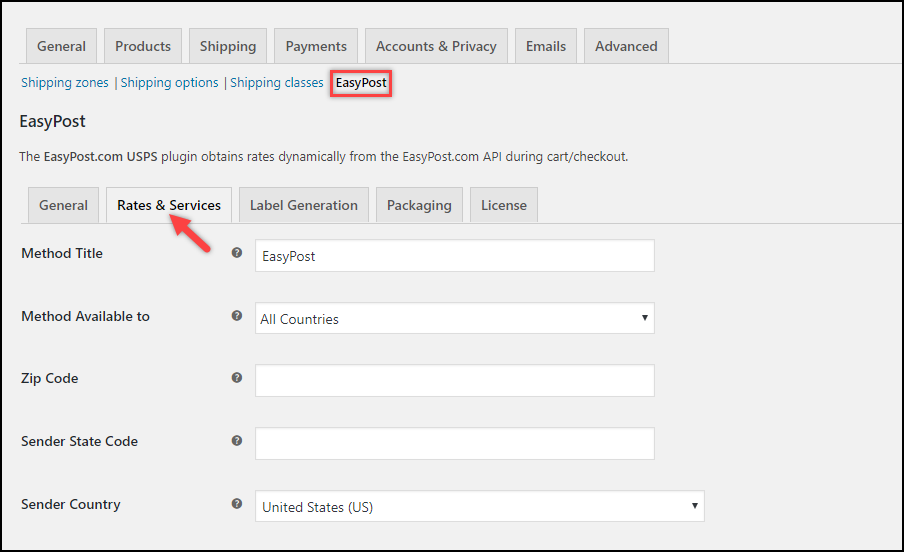
Method Title: Enable you to give the EasyPost shipping method a unique moniker. This title will appear in the Shipping options section of the cart and checkout page
Method Available to: This area allows you to choose which countries you want to provide EasyPost as a delivery option
There are two possibilities:
-
All Countries: If you want to provide the EasyPost shipping service to customers all over the world, select this option. By default, this option is chosen
-
Specific Countries: This allows you to choose the nations you want to visit. Only a few countries can use the EasyPost shipping service
Zip Code: Insert the sender’s zip code here. The delivery prices will be calculated using this zip code
Sender Country: Choose your preferred sender nation
Step 5: Settings for the Estimated Delivery Date
Estimated Delivery Date: Provide an anticipated delivery date for the shipment to the specified delivery address.
If you enable this option, the following options will appear
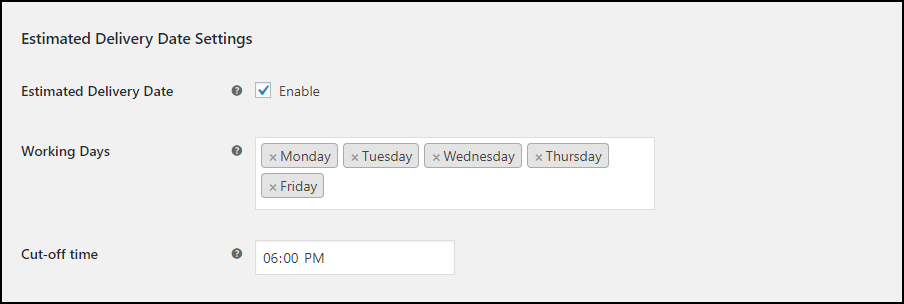
Working Days: Choose the days for delivery that you want. Based on the days indicated in this setting, the customer will be given an approximate delivery date.
Cut-off Time: Select a particular time for the cut-off. If an order is made after the cut-off time, the shipment date will be set to the next working day in the EasyPost API call. Please keep in mind that the time style will be determined by your system’s date and time format.
Step 6: Setup for the USPS Flat Rate
Flat Rate Boxes will be included in the Box Packing technique if they are available for products. Flat Rate Boxes include the box’s dimensions. In addition, if a flat rate box was used to pack a shipment during the order process, that will be the default setting on the order page for such packages.
Flat Rate boxes are designed differently for internal and overseas services by the plugin.
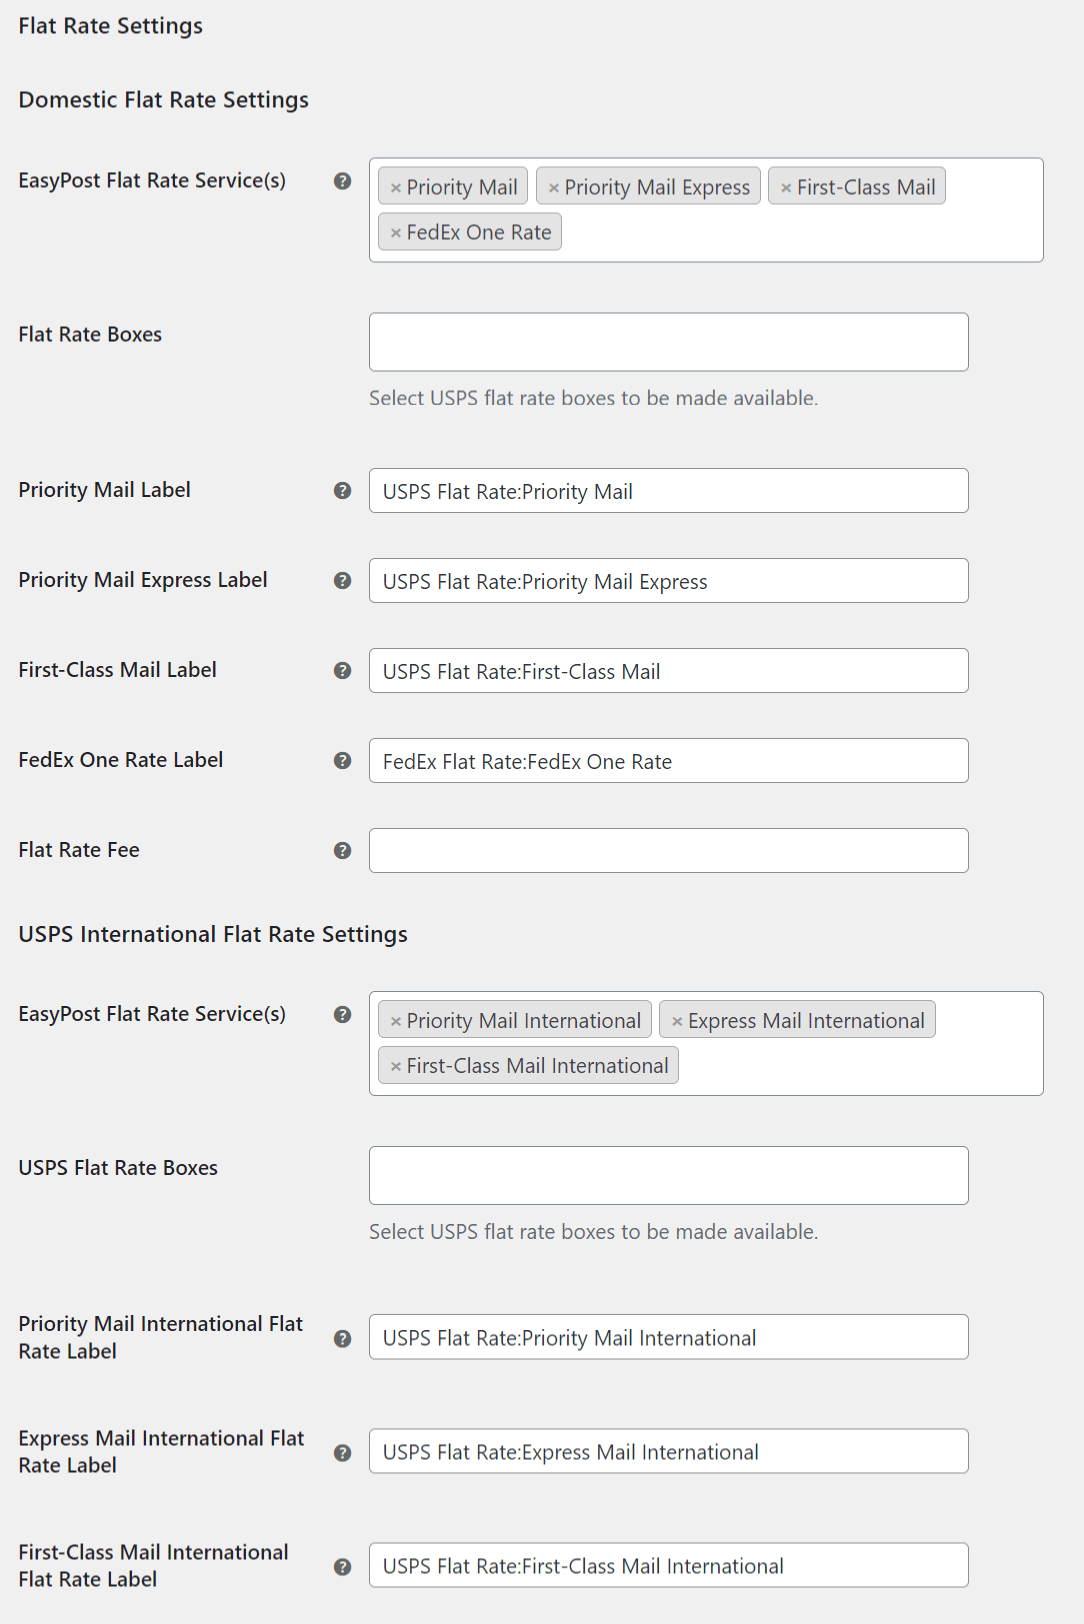
Domestic Flat Rate Settings
EasyPost Flat Rate Service(s): From here, you can choose USPS’s EasyPost flat-rate options. From the drop-down menu, select Priority Mail or Priority Mail Express.
Flat Rate Boxes: This enables you to choose between USPS Domestic Flat Rate and USPS International Flat Rate boxes. The WooCommerce EasyPost plugin’s flat charges are hardcoded. To obtain Flat rates, no USPS API claims are made.
Priority Mail Label: Here on cart and checkout pages for local deliveries, submit a custom text to be presented for the flat fee of USPS Priority Mail.
Priority Mail Express Label: Here on cart and checkout pages for national deliveries, create a custom text to be exhibited for the flat fee of USPS Priority Mail Express.
First-Class Mail Label: For domestic deliveries, insert the custom text for the First-Class Mail Flat Rate label that will appear in the cart and checkout pages.
FedEx One Rate Label: For internal shipments, input the custom wording for the FedEx One Rate label that will appear upon that cart and checkout pages.
Each rate is FedEx’s flat-rate shipping option. You can mail packages weighing 50 pounds or less for a fixed price anywhere in the United States at one rate. FedEx One Rate gives you a choice of twelve free packaging options, including envelopes, flat-rate packaging, tubes, and more. Your merchandise could be sent for a set amount anywhere in the United States if it fits inside a flat rate box and does not exceed the weight restriction. FedEx One Rate is currently only available for local shipments within the United States.
The cost of FedEx One Rate is influenced by three factors:
- The delivery location
- Packaging options
- The speed of delivery
Flat Rate Fee: This is an additional charge on top of the flat shipping rate. If you submit a negative sum, the amount you specified will be deducted from the flat delivery fee. This is the price per package, excluding taxes. To deactivate the Flat Rate Fee, leave this option blank.
USPS International Flat Rate Configurations
You can identify suitable USPS International Flat rate options and specify custom labels to be shown on the cart and checkout pages, just like you can with domestic flat rate configurations.
USPS Flat Rate Boxes: This enables you to choose from a variety of USPS International Flat Rate boxes.
Priority Mail International Flat Rate Label: For overseas shipments, submit a custom text to be shown for the flat fee of USPS Priority Mail on the cart and checkout pages.
Express Mail International Flat Rate Label: Just on cart and checkout pages for international shipments, add a custom text to be shown for the flat fee of USPS Express Mail International.
First-Class Mail International Flat Rate Label: Customize the text that appears on the cart and checkout pages for overseas shipments with the Flat Rate label of First-Class Mail International.
Step 7: Duty Settings
This selection is mostly used to designate the individual who will be liable for paying the duty in global shipping.
Duty: Duty is a type of tax imposed on some imported and exported products, services, as well as other transactions.
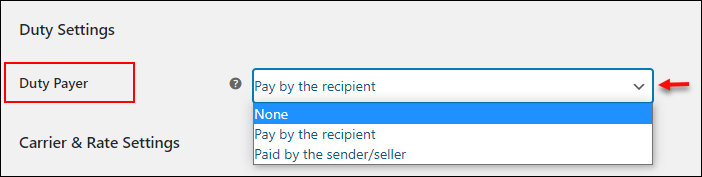
Duty Payer: If you select Pay by the receiver, the recipient is responsible for paying the duty. The levy will be paid by the sender/seller if you opt for Paid by the sender/seller. If you don’t need to pay the duty, you can even select ‘None.’
Step 8: Settings for the Carrier and Rates
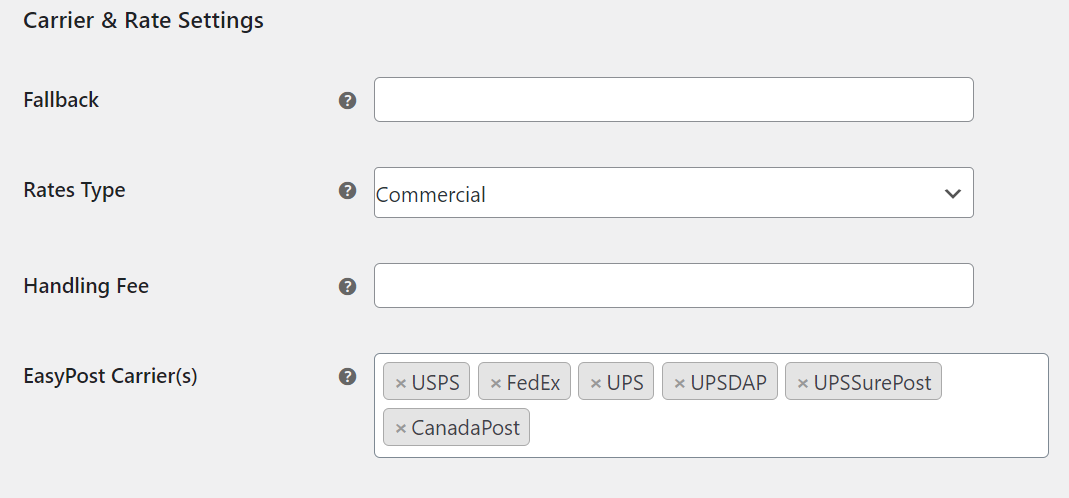
Fallback: If EasyPost fails to fulfill any shipping rates, consumers will be presented fallback pricing for delivery so that they can Checkout. To turn it off, leave it empty.
Rates Type: Choose whether to give residential or commercial prices to your customers. Typically, residential rates are greater than commercial rates.
Handling Fee: Suppose you want to charge your customers a handling fee, put it here and it will be included in the order total. If you don’t want to pay the fee, you can leave it blank.
EasyPost Carrier(s): Choose your preferred shipping carrier(s). USPS(default), FedEx, UPS, UPS DAP, UPS SurePost, and Canada Post are among the shipping carriers supported by the plugin. Depending on your needs, you get to choose one or more shipping carriers.
Services: USPS, FedEx, UPS, UPS DAP, UPS SurePost, and Canada Post all offer a variety of shipping options to meet the demands of its customers.
Step 9: Settings for Label Generation
The options for the Label Printing API Setting are demonstrated as follows:
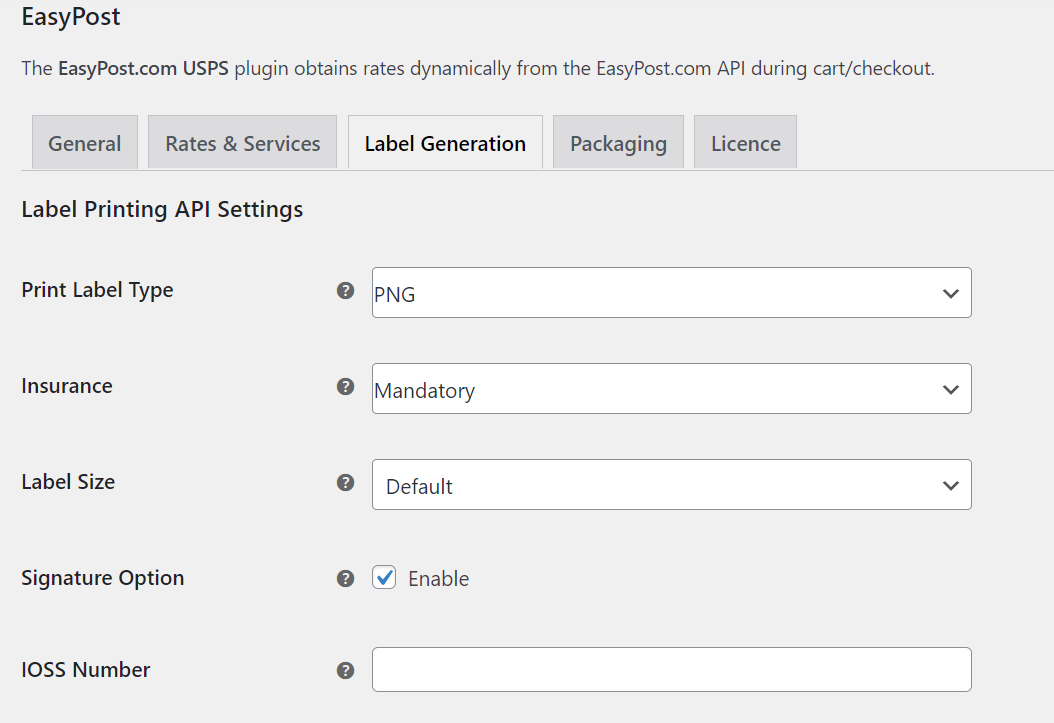
Label Printing API Settings
Print Label Type: This section enables you to choose the file type for printing the shipping labels. The following are the alternatives that are available:
Insurance: The insurance charges are calculated for in your EasyPost account, but the API does not provide the insurance charges with the shipping rate when asking for Rates and services. Remember that EasyPost costs 1% of the whole amount, with a $1 minimum. EasyPost is in charge of any claims. The insurance feature will be available under the label generation portion of the WooCommerce order page once this feature is activated. The insurance option is deactivated by default. Customers must choose the insurance option during the checkout procedure if they want their delivery to be insured.
Label Size: Label sizes are available in two sizes
-
Default - Uses the same label size as the one returned by the shipping service
-
Custom - For each shipping carrier, you can select a custom label size
Signature Option: When this is enabled, it enables a safe and informed distribution. A signature option notifies the supplier and certifies that the order has been sent to the intended recipient. It’s great for sending crucial documents or any other fragile or non-perishable items.
Bulk Shipment
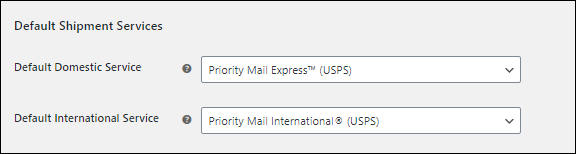
For a mass generation of domestic and international shipment labels, select the standard domestic and international services. The WooCommerce Orders page is where this label generation takes place. If no shipping services have been specified for an order, the default services indicated in these parameters will be used.
Origin Address & Return Address
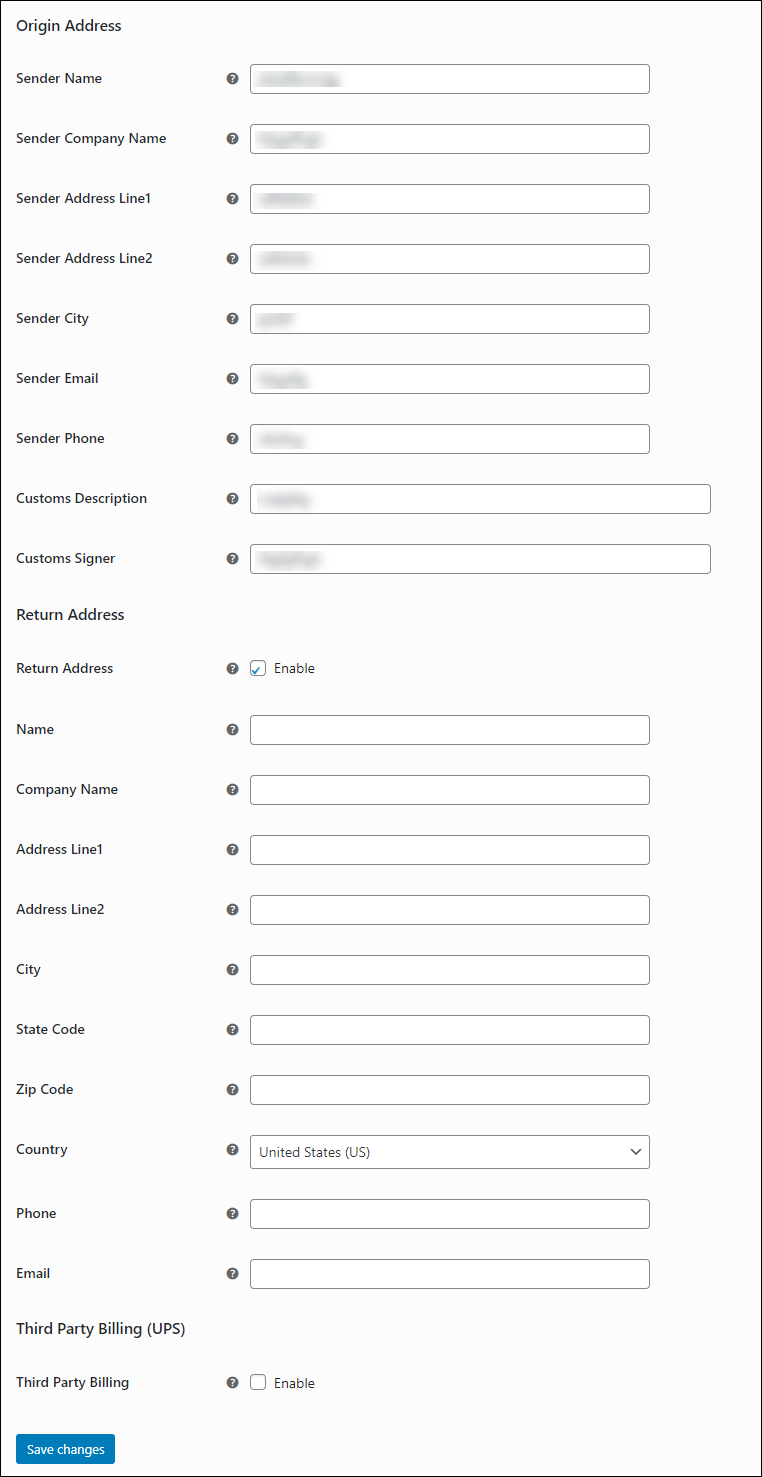
Origin Address
-
Sender Details: Insert the sender’s name, company name, address, email address, and phone number.
-
Customs Description: Input the description of the product for overseas shipping in the Customs Description field. This description will come in handy when it comes to customs.
-
Customs Signer: Fill in the name of the person who is validating the customs form’s details. Utilize the name of the person in your organization who is in charge of this. This will come in handy when it comes to customs
Return Address
Return Address: If you want to specify a different address for the return distribution, choose this checked. The original address will be used as the return address if this item is uncontrolled. Once you have ticked the box, fill in the blanks with your name, company name, address, contact number, and email address.
Third-Party Billing (UPS)
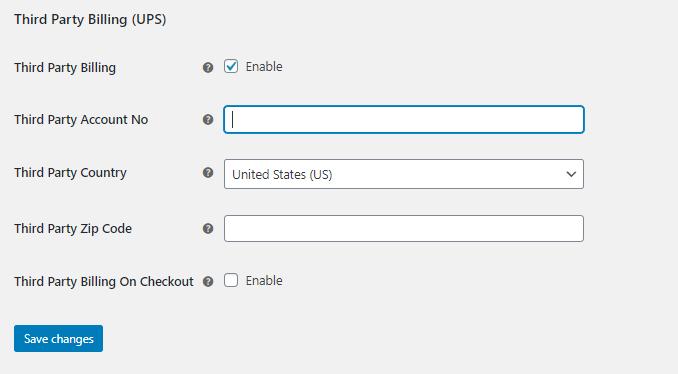
You can enable this option here if you want to send your UPS shipment bills to a third-party. Then enter the third party’s exact UPS account information, as well as the nation and zip code. When the receiver’s or origin’s nation and the third party’s country are the same, this is usually done. At Checkout, you can also activate Third-Party Billing.
To save the changes, press Save Changes.
Step 10: Arrangements for packaging
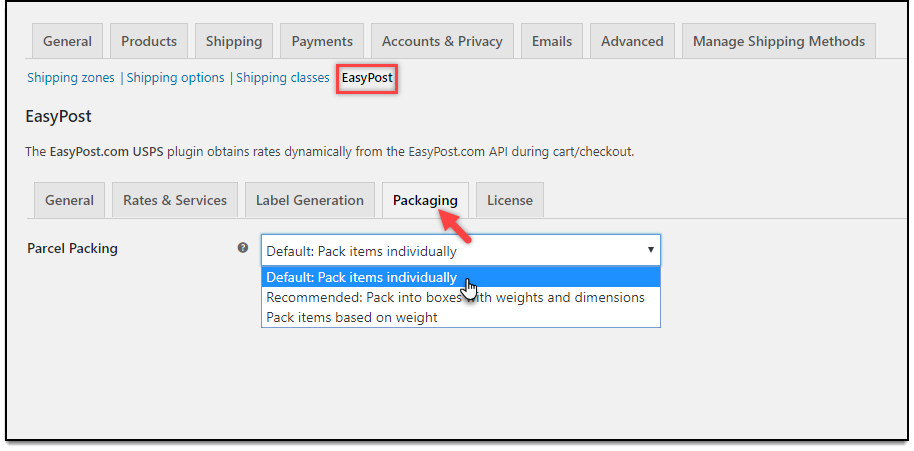
There are three methods of parcel packing:
Pack Items Individually: Every item in the basket is packaged individually under this option. By adding the shipping costs for each item, the total shipping price is estimated. By default, this option is chosen.
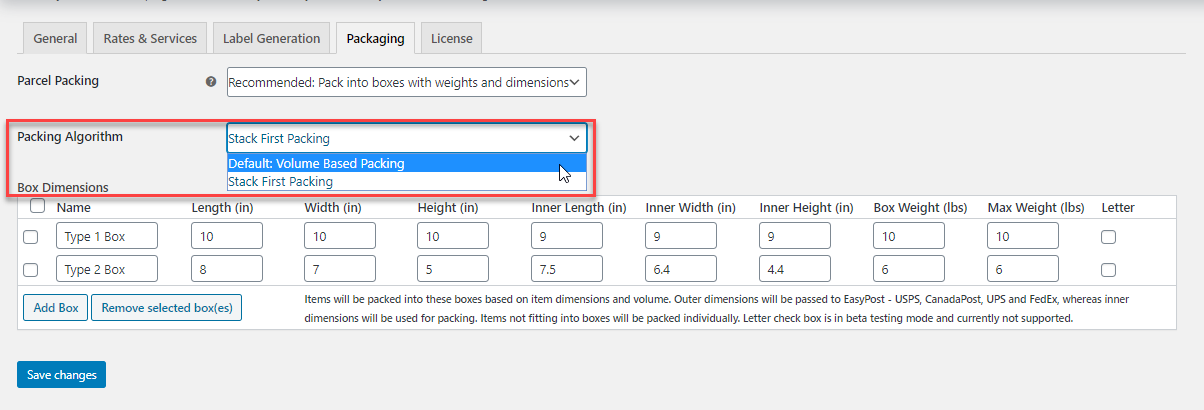
Pack into boxes with weight and dimensions: If packing things separately isn’t feasible for your company, you can create bespoke box sizes in the Box Dimensions area. All of the products in the cart are packed into custom boxes that have been established in the Box Dimensions settings. From the defined boxes, the best fit box is selected automatically. This is the preferred choice. Establishing box measurements is a good place to start if you want to learn more about box packing.
Pack items based on weight: Set the package’s maximum weight restriction. The weight of all the cart goods is added together, and the products are packed in the box(es) with the maximum weight limitation and provided to the API to retrieve rates.

You can also choose to pack heavier items, lightweight items first, or pack solely by weight.
Finally, press the Save Changes button.
Step 11: Presentation
Now let’s have a look at our WooCommerce cart page to see how the modifications have been implemented.
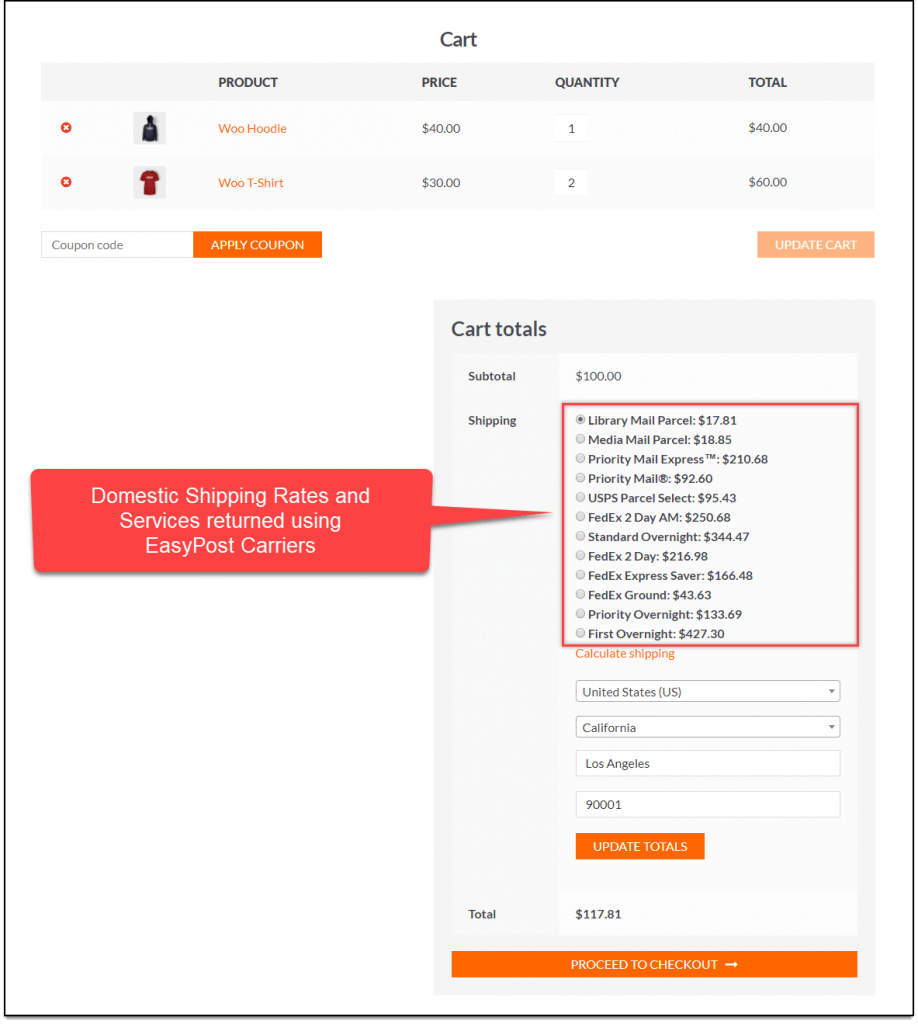
EasyPost shipping companies have returned domestic rates and services in the image below.
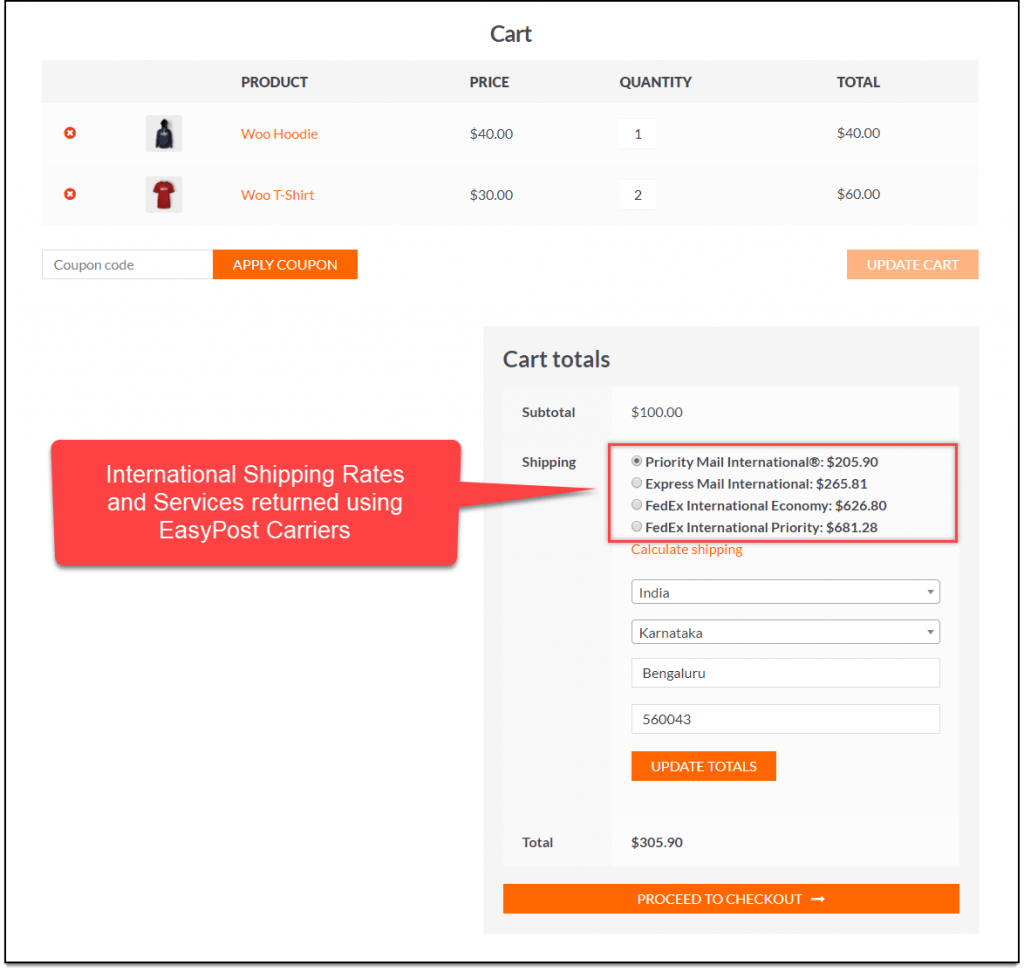
As indicated in the screenshot beneath, the overseas rates and services returned by EasyPost shipping providers will be presented.
Label Generation
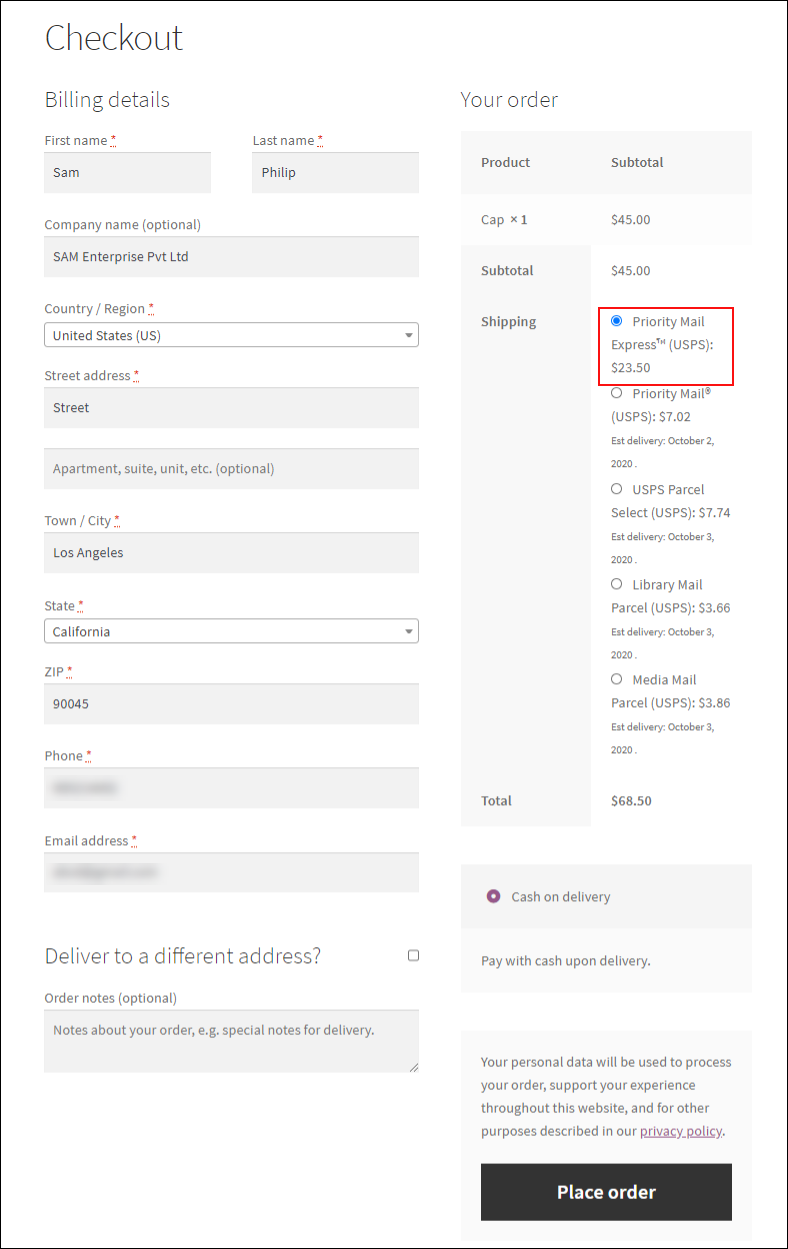
Navigate to your WooCommerce admin order page to create shipping labels once your buyers have placed a purchase.
With the assistance of an example, learn how to create shipping labels.
The buyer has chosen USPS Priority Mail Express as the shipping method for this order.
Head to WooCommerce > Orders > Choose the order to be processed for shipment and label generation.
Check the image as follows:
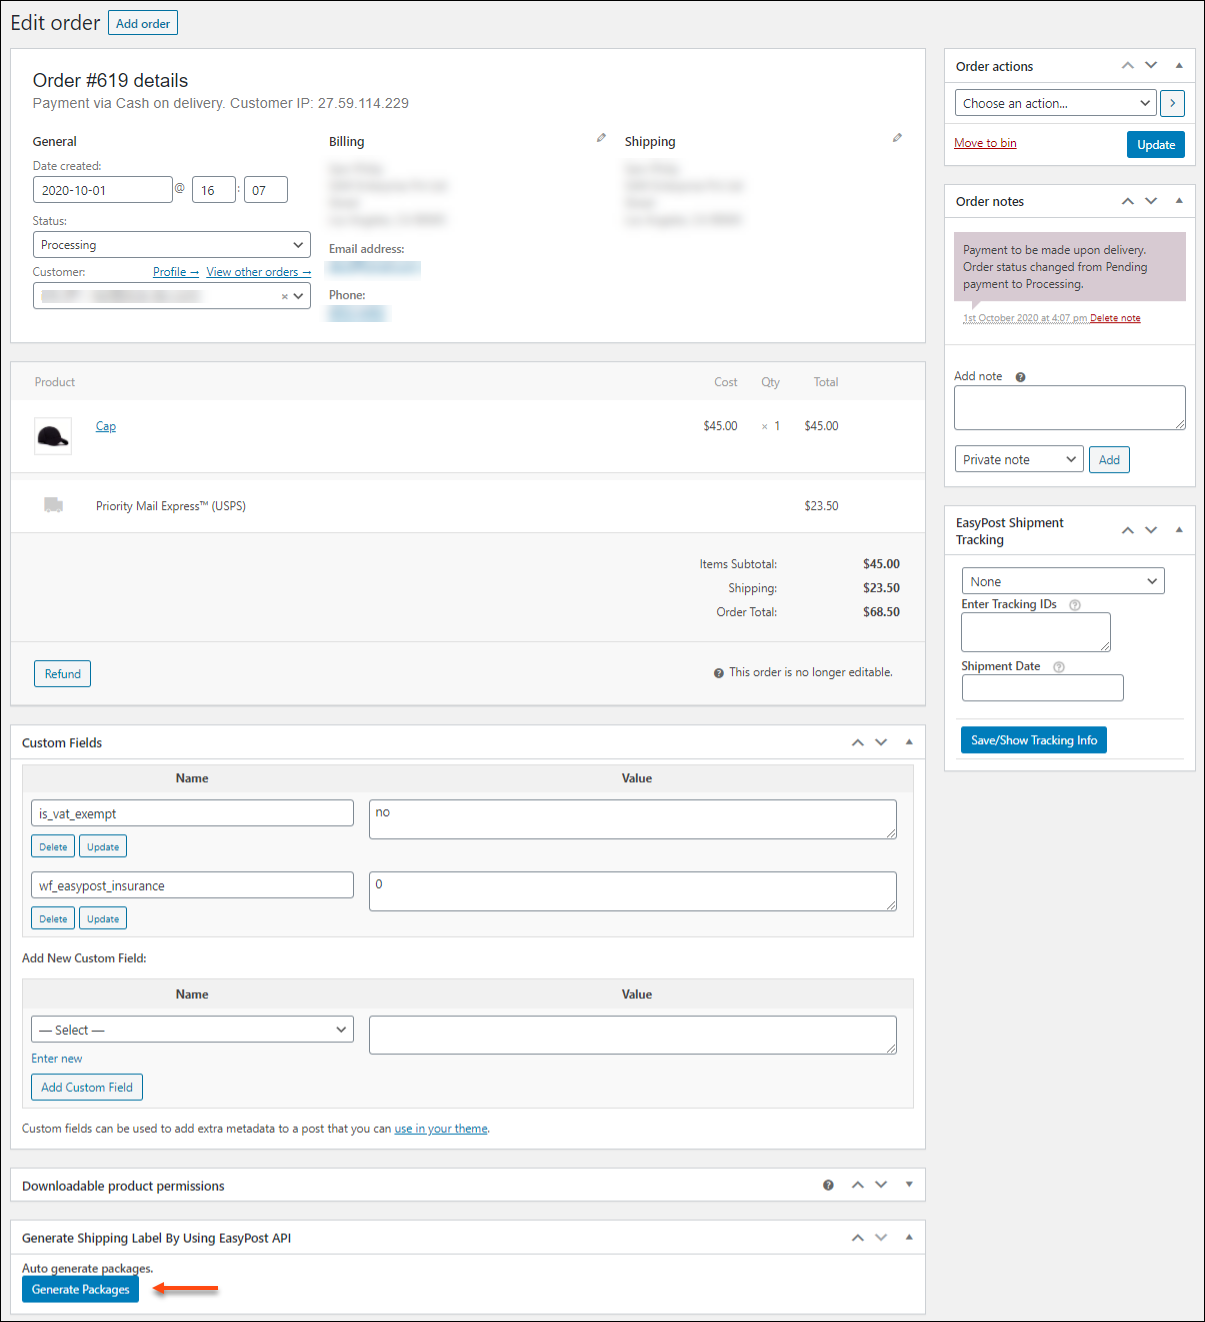
Select Generate Packages from the drop-down menu.
You can create customized services for each package using the plugin. You can also add more packages to your cart. If your clients choose a USPS or Canada Post Flat Rate Box service at checkout, the plugin will automatically load the same service. You also can’t add FedEx and UPS because they don’t offer Flat Rate Box services.
Following the click of the button, you will be given the option to select a suitable service from your side to replace the service selected by the consumer.
To create a shipping label, navigate the Generate Shipping Label page. Using the EasyPost API > Select the blue-lined button. Take a look at this image:
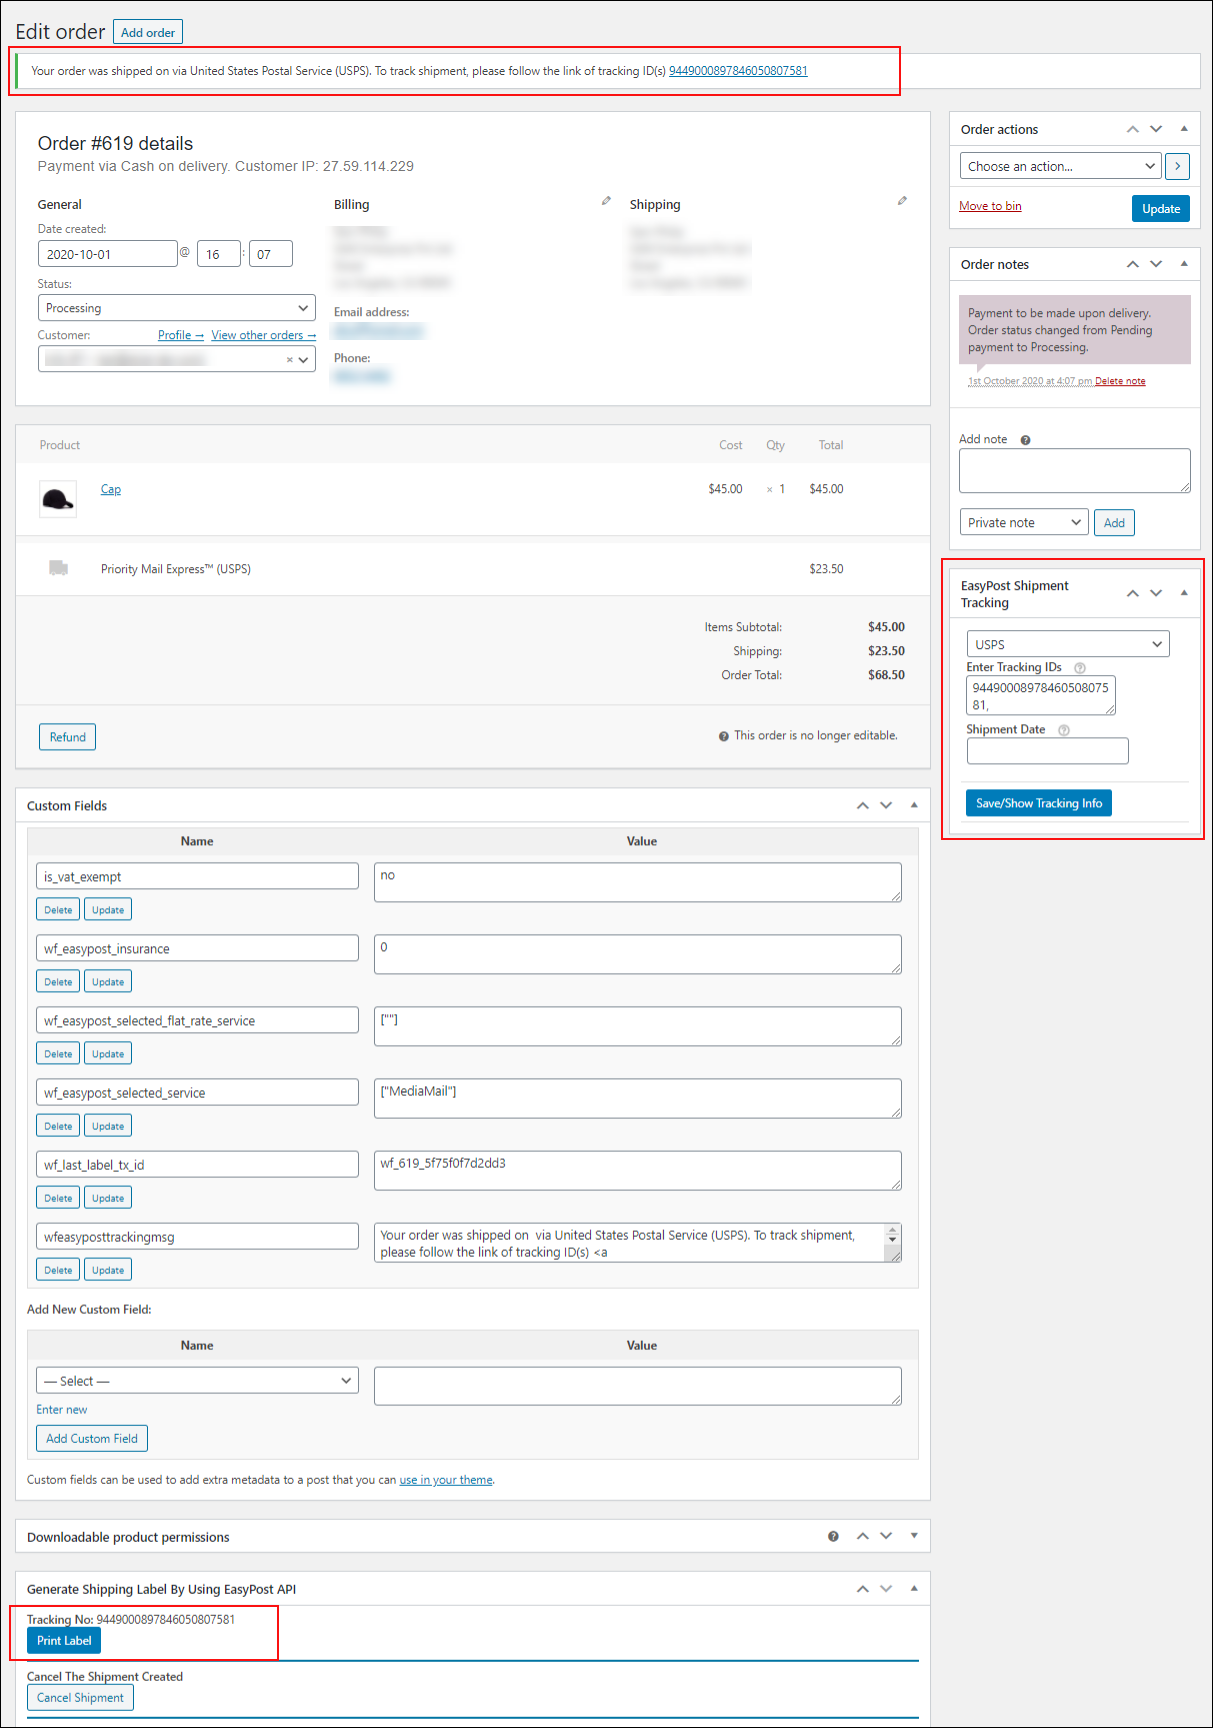
Generate a shipment by clicking the Create Shipment button.
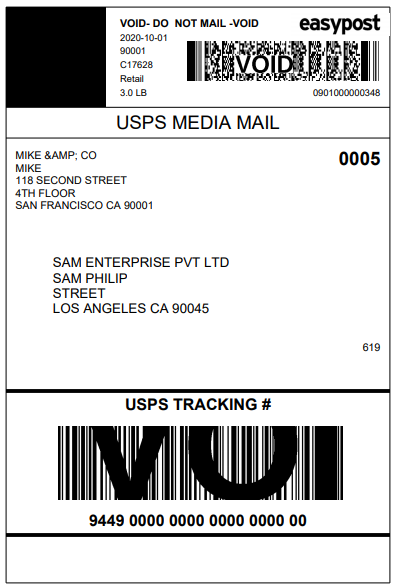
You will also receive the delivery tracking ID after the label has been generated. Then, to print the shipping label, click the Print Label option.
4 EasyPost Plugins for WooCommerce
You now have an overall understanding of the EasyPost in WooCommerce and its significance in eCommerce. It’s time to delve into the best plugins we highly recommend below. We hope that all of the plugins that we highly recommend below can help eCommerce owners find the best direction for their own business. Let’s dive in!
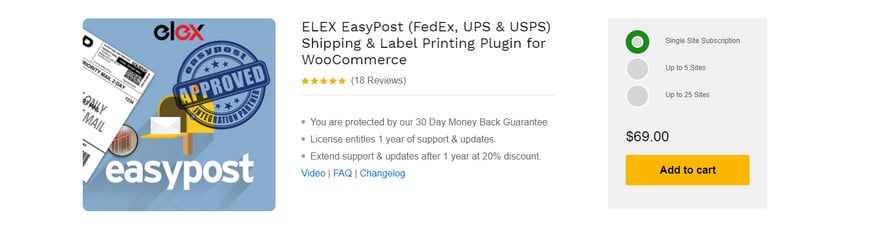
1. ELEX EasyPost
ELEX EasyPost plugin is the simplest and most effective way to integrate FedEx, USPS, and UPS shipping prices into your WooCommerce store. Utilizing EasyPost APIs, this plugin could automate WooCommerce UPS, USPS, and FedEx mailing.
Highlight features:
- Real-time Shipping Rate from USPS, FedEx, UPS, UPS DAP, UPS SurePost & Canada Post
- UPS enables you to charge your bill to a third-party
- Display Estimated Delivery Days to Customers
- Enable Shipment Tracking for customers as well as shop admins
- Set up handling costs for each shipping service
Price: The EasyPost Plugin offers $69 for a single site
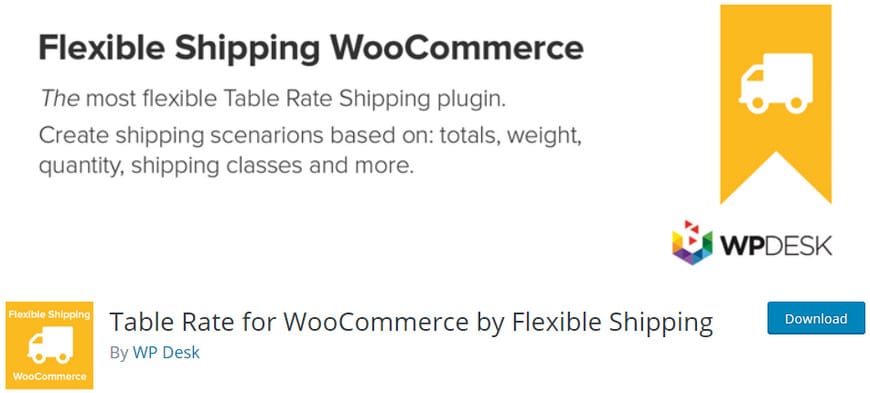
2. Table Rate for WooCommerce by Flexible Shipping
Table Rate for WooCommerce by Flexible Shipping could be the most advanced free WooCommerce Shipping plugin in our list. It has over 40,000 active installations and is completely compliant with WordPress’s most recent version. This plugin lets you compute shipping rates depending on a client’s weight or cart. This plugin, however, is also accessible in a premium edition, and upgrading to the premium version will make it the only plugin you’ll ever need.
Highlight features:
- Shipping techniques are limitless, as are the procedures for calculating expenses
- Putting titles and descriptions to your delivery methods is a possibility
- The cost of shipping is determined by the total amount in your cart and/or the weight of your package
- Minimum and maximum cart total and/or weight values
- Override for free shipping
Price: With this plugin, the premium package starts from $89 and goes up to $249
3. WooCommerce FedEx Shipping Plugin
WooCommerce FedEx Shipping Plugin is a WordPress plugin that aids in the management of WooCommerce shipping prices. You may access straight and real-time shipping rates from your FedEx account using the plugin. Yes, in order to use this plugin, you must have a FedEx account. The plugin works with your FedEx account’s specified product weight and dimensions, shipper’s address, customer’s address, and shipping rates.

Highlight features:
- Integrate easily with WooCommerce
- Show live FedEx Shipping Rates on your website for accurate shipping quotations
- By automating the shipping process, you may save time and effort.
- Track your shipments using FedEx Tracking services
- supports both domestic and international shipping services
Price: The premium version starts at $69 for a single website license, and you will need to buy multiple licenses if you use this plugin for many websites
4. Advanced Flat Rate Shipping Method WooCommerce
Advanced Flat Rate Shipping Method WooCommerce is the next shipping plugin on our list. You can use this plugin to establish your own website-based shipping criteria. You can build an unlimited number of shipping ways governed by the rules you specify with this plugin. This plugin enables you to establish custom shipping methods for certain countries, as well as shipping methods related to user roles.

Highlight features:
- A table rate shipping method can be enabled and disabled.
- Free shipping can be obtained in a variety of ways.
- Set a shipping method that is based on a fixed cost.
- Create various flat-rate delivery methods that are unique to you.
- Flat-rate shipping dependent on the country
Price: This plugin costs $99, including 1-year extension updates, 1-year support, and a 30-day money-back guarantee
Final words
We hope that the article How to Set Up EasyPost to WooCommerce has given you a better understanding of the relevance of EasyPost in the e-commerce industry. In addition, we also provide detailed instructions on how to set up EasyPost to your own WooCommerce store shipping as well as delving deeper into that EasyPost ensures and boosts your online business more effectively as quickly as possible.
We also hope that what we share above will be the foundation for you to get the best results in your business career now and in the future.


