
How to Customize Product Pages in WooCommerce

Suppose you are running an online business on WooCommerce just like millions of others. In that case, there is a higher chance that you might be visually identical to all of them - assuming you’re using the standard WooCommerce layouts. That’s why designing your own website with a unique vibe is more important than ever.
In today’s topic, we will be explaining to you three ways to customize your WooCommerce product page, both manually and using plugins. Feel free to pick out the best method for your store!
The importance of customizing your WooCommerce product pages
Product pages are critical to the success of an online retailer. They give store owners the possibility to showcase all the advantages and characteristics of their items. Plus, this is where you attempt to persuade your consumers that your product or service is worth their time and money.
If you’re running an online company that caters to a certain niche market or product, WooCommerce’s preset product selections may not be enough for you. You can substantially enhance the consumer experience and stand out from your competition by personalizing your WooCommerce product pages and adding more information. As a result, your shop can generate more money without the need for extra customers.
As you can see, customizing the WooCommerce product pages seem to contribute more than we thought. Online merchants need to ensure that the items are shown in the best possible manner, but they also carry the mission to guarantee that their customers have access to all the vital information.
What to add to your WooCommerce product page template?
Now that you have a grasp on how modifying the WooCommerce product page can positively affect your business in the long run, it’s time to take a look at the main factors creating an effective template for your WooCommerce product pages. Here are our conclusion after working for a while:
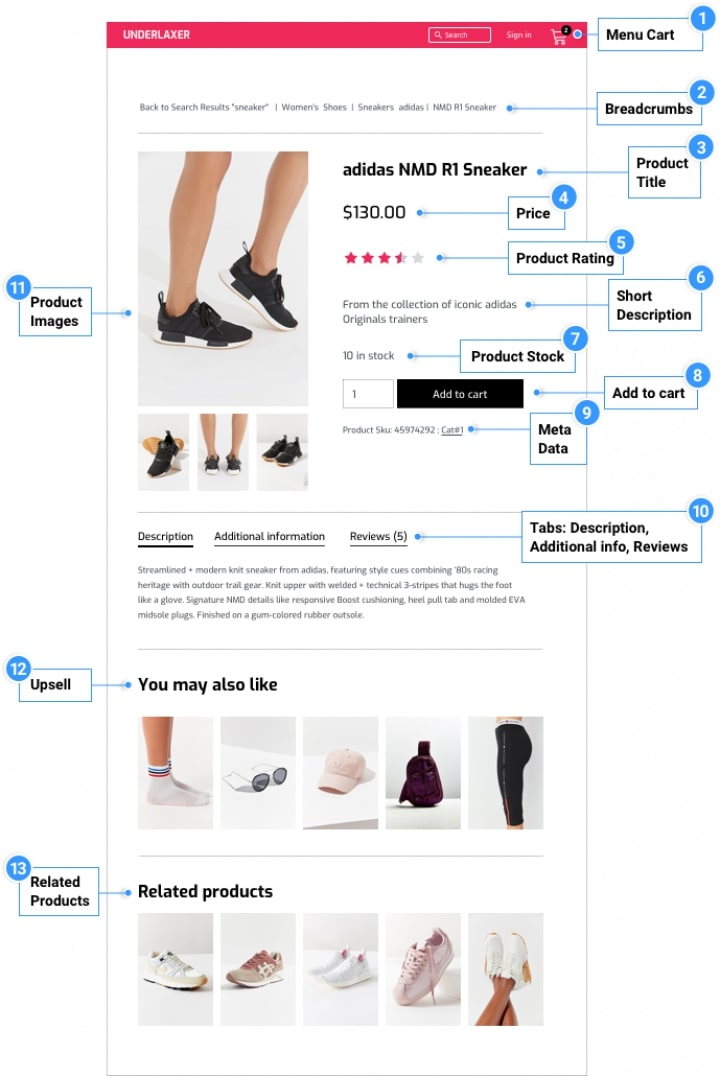
- High-quality images: Your product may be excellent, but if your thumbnail images don’t display it at its best, your sales are likely to stagnate. Product-focused, high-quality photos with a clean backdrop are what customers want when they visit your business. The items may also be shown in context by including photographs of them in their surroundings.
- Product Description: A lengthy and short product description should be included on your product page. Customers will benefit from the concise description’s inclusion of essential and useful information while in the lengthy explanation that follows, specifics regarding the product’s manufacturing process are provided. Customers may feel more at ease while making a purchase as a result of this.
- Product filters: You may improve your WooCommerce store’s page experience by adding a product-filtering tool. In addition, buyers will be able to get their hands on the goods they want more quickly.
- Placement for prices: Before making a purchase, customers always want to know the pricing. Your price placement has to be tested. Using a large font size with bold text on the product page can help buyers rapidly grasp the pricing. To make the pricing stand out, you can also choose a contrasting color.
- Organizing the information flow: Your clients will be able to learn more about your product and the services you provide if you organize your product information in a hierarchical manner. Including product information helps buyers learn more about the product. They are also encouraged to take action on your WooCommerce product page.
How to customize your product pages in WooCommerce using hooks?
Increased conversion rates may be achieved by using a well-thought-out design that offers the greatest possible customer experience. And customizing WooCommerce product pages can be done in three distinct ways, which we will cover in more detail as the article goes on. For this section, we will guide you through the customization process using WooCommerce hooks.
It might be difficult to locate a plugin that meets all of your needs, even if several are available. So if you’ve got a little bit of programming experience, this will be a better option.
Step 1: Remove and rearrange the elements
You may utilize a variety of WooCommerce hooks to delete any element from a single product page. Depending on what you want to do, you’ll need to utilize the appropriate hook, callback function, and priority value. You may use the following script in your child theme’s functions.php file if you want to remove the title of all product pages:
remove_action(/* hook -> */'woocommerce_single_product_summary',
                /* callback function ->*/ 'woocommerce_template_single_title',
                /* position ->*/5 );
Using the same method allows users to remove any element on the WooCommerce product pages of their choice. Besides deleting them, you can also reorder the elements, which is simpler than removing hooks. All you have to do is re-add the element you have previously deleted with a new order number. This is how we modified the product description order:
// change order of description
remove_action( 'woocommerce_single_product_summary', 'woocommerce_template_single_excerpt', 20 );
add_action( 'woocommerce_single_product_summary', 'woocommerce_template_single_excerpt', 6 );
Step 2: Add new features to your product pages
Adding new material to the WooCommerce product page may need altering the template files, but another way to do so is using the following hook:
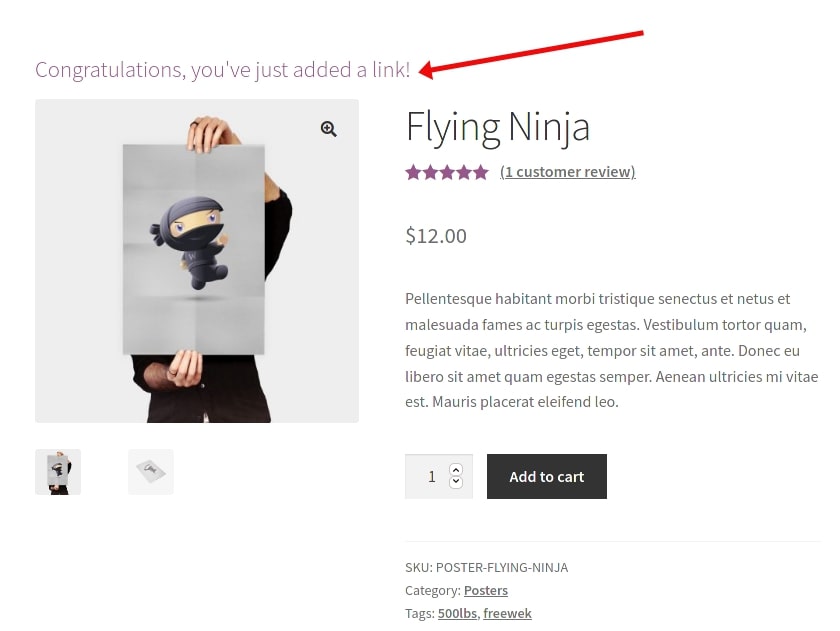
add_action('woocommerce_before_single_product_summary',function(){
  printf('<h4><a href="?added-content">Congratulations, you\'ve just added a link!</a></h4>');
}
);
As you can see, the result is available. We have successfully added a link into our WooCommerce product pages:
Step 3: Adding conditional field
The user_is_logged_in() function is a standard WooCommerce method for verifying if a user is logged in. wp_get_current_user() may also be used to obtain all of the logged-in user’s information. If the user is signed in and has the appropriate role, the following script will simply add some material to the page. However, you may add your own custom functions for more complicated functionality:
add_action('woocommerce_before_single_product','QuadLayers_get_user');
function QuadLayers_get_user() {
    if( is_user_logged_in() ) {
    $user = wp_get_current_user();
    printf ('<h1>Howdy ' .$user->user_nicename.'!</h1>');
    $roles = ( array ) $user->roles;
        if($roles[0]=='administrator'){
            echo "<h4><b>You are $roles[0]</h4></b>";
        }
    }
    else {
    return array();
    }
}
The product ID and/or categories may also be retrieved in the same way. To acquire the product ID, we’re going to utilize the global WP $post object, while we’ll use the get_the_terms() method to get the product category:
add_action('woocommerce_before_single_product','QuadLayers_get_product_taxonomies');
function QuadLayers_get_product_taxonomies(){
    global $post;
    $term_obj_list = get_the_terms( $post->ID, 'product_cat' );
    $terms_string = join(', ', wp_list_pluck($term_obj_list, 'name'));
    if($terms_string=='Posters'){
        echo "
<h1>This is one of our best $terms_string</h1>"; echo "<h2>Product ID: $post->ID"; } }
Step 4: Modifying the product tabs
Add, delete, or reorganize tabs in the Additional Information area using this WooCommerce hook: woocommerce_product_tabs . Remove the Description tab and its content, rename the Reviews tab, and add Additional information to the top of the list with the help of the following script:
add_filter( 'woocommerce_product_tabs', 'woo_remove_product_tabs', 98 );
function woo_remove_product_tabs( $tabs ) {
    unset( $tabs['description'] );    	// Remove the Description tab
    $tabs['reviews']['title'] = __( 'Ratings' );	// Rename the Reviews tab
    $tabs['additional_information']['priority'] = 5;	// Additional information at first
    return $tabs;
}
And here is how your consumers are going to view the final results:

We also tried out by creating a new tab called “New Product Tab” just like in the screenshot below:
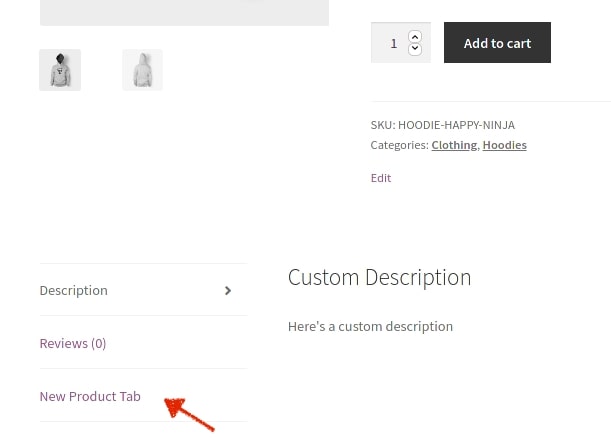
By writing the following WooCommerce hook into the file:
add_filter( 'woocommerce_product_tabs', 'woo_new_product_tab' );
function woo_new_product_tab( $tabs ) {
	// Adds the new tab
	$tabs['test_tab'] = array(
		'title' 	=> __( 'New Product Tab', 'woocommerce' ),
		'priority' 	=> 50,
		'callback' 	=> 'woo_new_product_tab_content'
	);
	return $tabs;
}
function woo_new_product_tab_content() {
	echo '<h2>New Product Tab</h2><p>Here\'s your new product tab content</p>.';
}
Step 5: Variable items setting
The WooCommerce default functionality of product variants allows you to build and utilize variable products without any change. A bespoke solution that works with product variants must adhere to WooCommerce requirements. Another thing you have to remember is that every new custom solution must be incorporated into the whole website, not just a single page.
You can use these WooCommerce hooks designed specifically for their variable products, however, they will only work for the variable product page instead of single ones:
woocommerce_before_variations_formwoocommerce_before_single_variationwoocommerce_single_variationwoocommerce_after_single_variation
How to make changes to the WooCommerce product pages using template files?
WooCommerce product pages may also be edited programmatically by overriding their template files. Make a comprehensive backup of your site before proceeding with this procedure, since it is riskier than the prior one. The tutorial has been divided into small basic steps so that you can easily catch up with the process.
Step 1: Edit the meta key
First of all, we will be navigating to the meta.php file by following the path: woocommerce/templates/single-product. Create a WooCommerce folder in your child theme’s files directory now. Once you’ve done that, create a new folder named single-product in your child theme’s woocommerce directory, and then copy and paste the meta.php file into it:
global $product;
?>
<div class="product_meta">

	<?php do_action( 'woocommerce_product_meta_start' ); ?>

	<?php if ( wc_product_sku_enabled() && ( $product->get_sku() || $product->is_type( 'variable' ) ) ) : ?>

		<span class="sku_wrapper"><?php esc_html_e( 'ID:', 'woocommerce' ); ?>
			<span class="sku"><?php echo ( $sku = $product->get_sku() ) ? $sku : esc_html__( 'N/A', 'woocommerce' ); ?>
			</span>
		</span>
	<?php endif; ?>
	<?php echo wc_get_product_category_list( $product->get_id(), ', ', '<span class="posted_in">' . _n( '', '', count( $product->get_category_ids() ), 'woocommerce' ) . ' ', '</span>' ); ?>
	<?php echo wc_get_product_tag_list( $product->get_id(), ', ', '<span class="tagged_as">' . _n( 'Published under:', 'Published under:', count( $product->get_tag_ids() ), 'woocommerce' ) . ' ', '</span>' ); ?>
	<?php do_action( 'woocommerce_product_meta_end' ); ?>
</div>
Step 2: Making changes to the single-product.php file
For this step, we will be starting with copying all of your single-product.php files into your child theme’s directory:
Child_theme/woocommerce/single-product.php. Scroll down to line number 37 and you will see it saying: wc_get_template_part('content','single-product');
Replace line 37 of this code, which reads wc_get_template_part( 'content', 'single-product' ); with the following script:
$terms      = wp_get_post_terms( $post->ID, 'product_cat' );
				$categories = wp_list_pluck( $terms, 'slug' );

				if ( in_array( 'posters', $categories ) ) {
					wc_get_template_part( 'content', 'single-product-posters' );
				} else {
					wc_get_template_part( 'content', 'single-product' );
				}
Step 3: Create new .php file
After creating a new content-single-product.php file, we need to overwrite the default one. The category slug will be included in the file’s name. You can simply copy and paste the content-single-product.php file into your child theme’s WooCommerce folder, rename it and run some tests.
Step 4: Design your own template
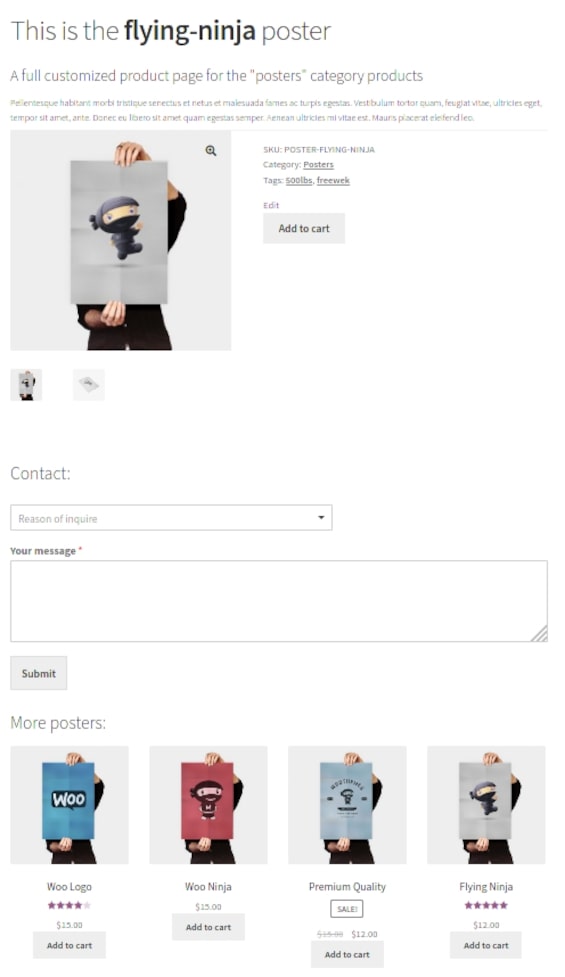
As a combination of the three previous steps, we have come up with a full source code to design our own signature template for the WooCommerce product pages. All of the actions from removing, reorganizing to adding new elements have been included in our snippet:
// remove product summary elements
remove_action( 'woocommerce_single_product_summary', 'woocommerce_template_single_title', 5 );
remove_action( 'woocommerce_single_product_summary', 'woocommerce_template_single_rating', 10 );
remove_action( 'woocommerce_single_product_summary', 'woocommerce_template_single_excerpt', 20 );
remove_action( 'woocommerce_single_product_summary', 'woocommerce_template_single_add_to_cart', 30 );
remove_action( 'woocommerce_single_product_summary', 'woocommerce_template_single_price', 10 );

		// Custom content
		printf('<h1>This is the <b>'.$post->post_name.' </b>poster</h1>');
		printf('<h4>A full customized product page for the "posters" category products</h4>');
		// Description
		printf('<h5>'.$post->post_excerpt.'</h5>');
		//thumbnail
		do_action( 'woocommerce_before_single_product_summary' );

		//add meta
		do_action( 'woocommerce_single_product_summary');
		// shortcodes
		echo do_shortcode('[add_to_cart id="'.$post->ID.'" show_price="false" style="border:none;" class="my-addtocart"]'); echo "<h3>Contact:</h3>".do_shortcode('[wpforms id="1082"]'); echo "<h3>More posters:</h3>".do_shortcode('[product_category category="posters" orderby="desc" limit="4"]');
Step 5: Check out the results
Don’t forget to save your changes and this is what your customers will see if they go to your website:
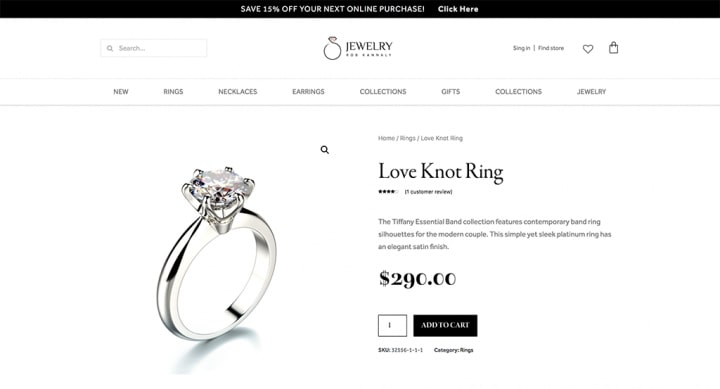
Before leaving, make sure that the global post object var_dump($post); is used to display all of the accessible product information. In the sample script, we used the product’s description as an example of how to utilize its data: $post->post excerpt.
How to customize your WooCommerce product page template with a plugin?
Suppose you are new to the eCommerce business and have little experience running codes. In that case, using a plugin to set up your WooCommerce product page is the most recommended method out of the three tutorials in our article today. For the visual design features, you can have the Elementor and Elementor Pro extension installed on your device and follow our instructions below:
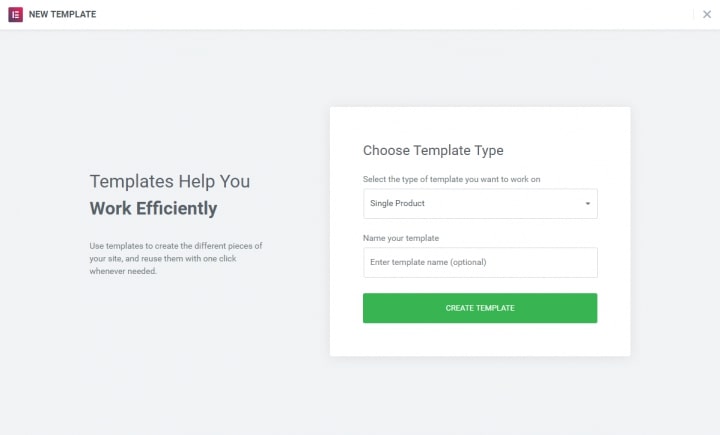
Step 1: Create a new template
For the single product template, we will follow the same process as developing a typical single template in Elementor:
Step 2: Adding the widgets
Use one of the pre-designed product page templates and adjust it to match your site’s needs for the best results. It’s possible to choose from a variety of page layouts for your product offerings. You may ensure that you’re working on a full-width product page before you begin adding widgets by switching to a full-width template:
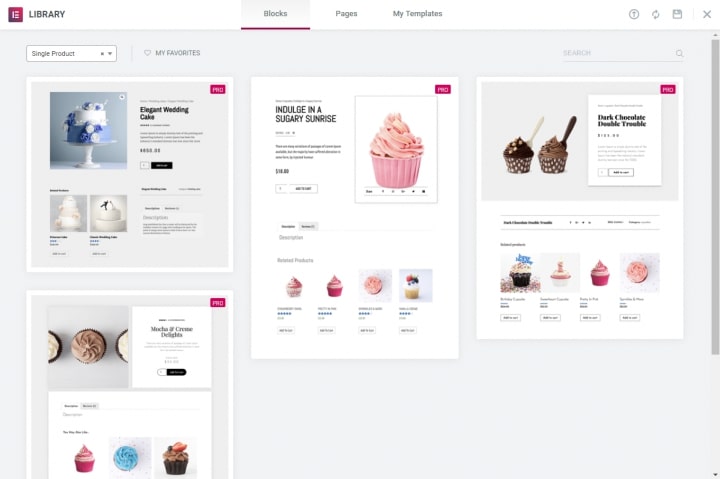
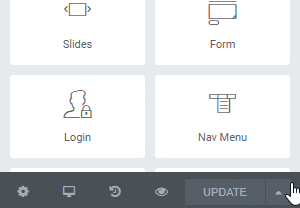
It’s now time to start putting together the components of your WooCommerce product page. We have inserted in all of the possible widgets which you will be able to add to your website. Just click on “Single Product Block” and “Insert”, then pick out any widget that you want to:
It is recommended that you evaluate your product template with a variety of items to ensure that the design is correct. Select the product you wish to show from the drop-down menu under Preview Settings. On the bottom left of the screen, click the eye symbol, then settings. Now that you’ve applied, have a look at it to see how it will look like before publishing the final result:
Step 3: Setting up the conditions
This is the step in which you choose where your product template will be displayed. All product pages on your site will be affected by the template by default. You may also choose a particular product category.
To exemplify, we have created a condition called “Entire site” for the “Header” template in the screenshot below. On our site, we’ll now have two headers: cross the whole site, and on the homepage solely:
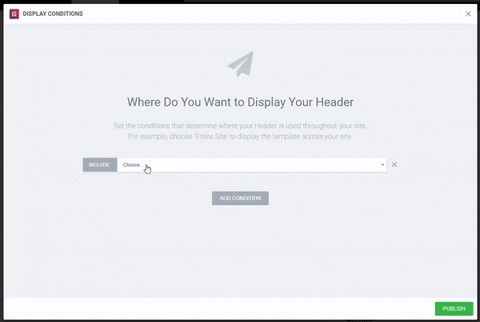
To alter, add, or delete conditions, just click on “Display conditions” button:
Step 4: Save your changes
After you have finished all of the setup required in a WooCommerce product page, hover your mouse over the “Publish” selection to enable the customers to view your newly-created design!
Top 4 best plugins for customizing your WooCommerce product page template
Besides the Elementor plugin that we used in the tutorial’s today, there are multiple alternatives you can choose from to customize your own WooCommerce product page. Fortunately, you can quickly check out our list of Top 4 plugins for personalizing the WooCommerce product page. These plugins have been tested to guarantee that they bring back the best experience for online store owners.
WooCommerce Store Customizer
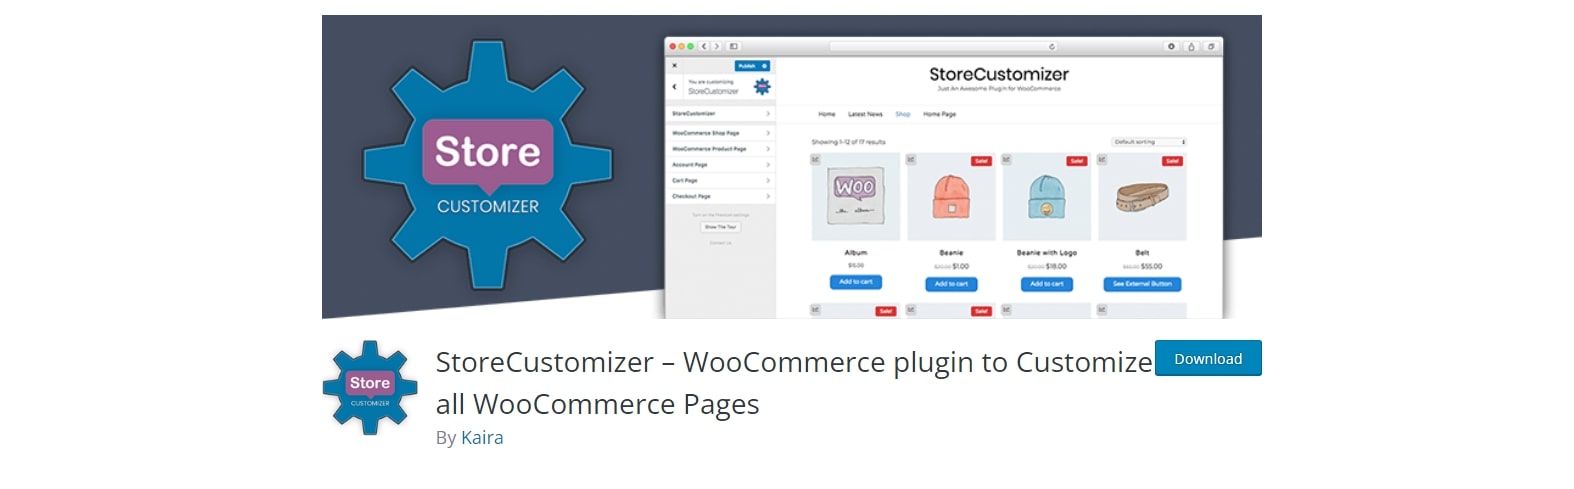
With WooCommerce Store Customizer, you can adjust practically everything appearing on your WooCommerce product page. In addition to WooCommerce’s built-in customisation options, this is a wonderful tool for adding additional functionality. Everything from adding product sales stats on the front end to changing the style of your shop buttons is included in this category. Customize your product, My Account, and Shop pages using the Store Customizer.
Outstanding features:
- Product page, Shop page, Checkout and more have the ability to be customized in terms of typography, font size, and font color.
- You may add or remove various items and modules from the WooCommerce Product page.
- Enable Add to Cart buttons for increments and decreases, as well as min/max increment values
Divi Builder

Divi Builder is a premium page builder plugin specifically designed for building your WooCommerce product page. It has a WooCommerce builder built-in, so you can develop your own layouts to replace WooCommerce’s defaults. It’s possible to construct a single product page using Divi Builder. When using Divi Builder to create a custom single product page, you may attach it to certain products, categories, and tags. For example, breadcrumbs, product prices, and so on may be added to the chart.
Outstanding features:
- Customizable theme templates.
- Allows you to design parts that can be reused throughout your site.
- Custom page designs may be created using a WYSIWYG visual editor.
- It is possible to see the page structure in a wireframe mode.
WooCommerce Single Product Page Customizer
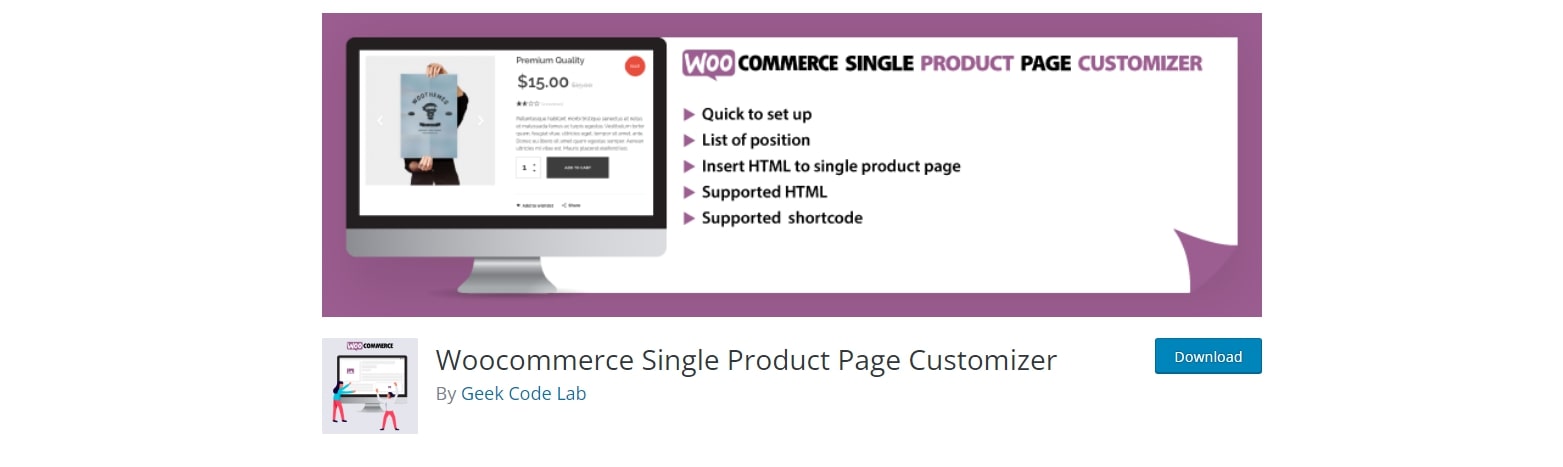
With the free WooCommerce Single Product Page Customizer plugin, you can customize the look and feel of your Product pages by adding custom text, images, and HTML. Custom HTML elements and hooks may be added to your product page using a dedicated visual HTML editor. To further customize your product page, you may place your own components where you want them.
Outstanding features:
- There are over 17 distinct locations in which HTML components may be added.
- An easy-to-use graphic editor for entering text and HTML
- Custom texts, HTML codes, links, media and embeds are also supported
JetWooBuilder
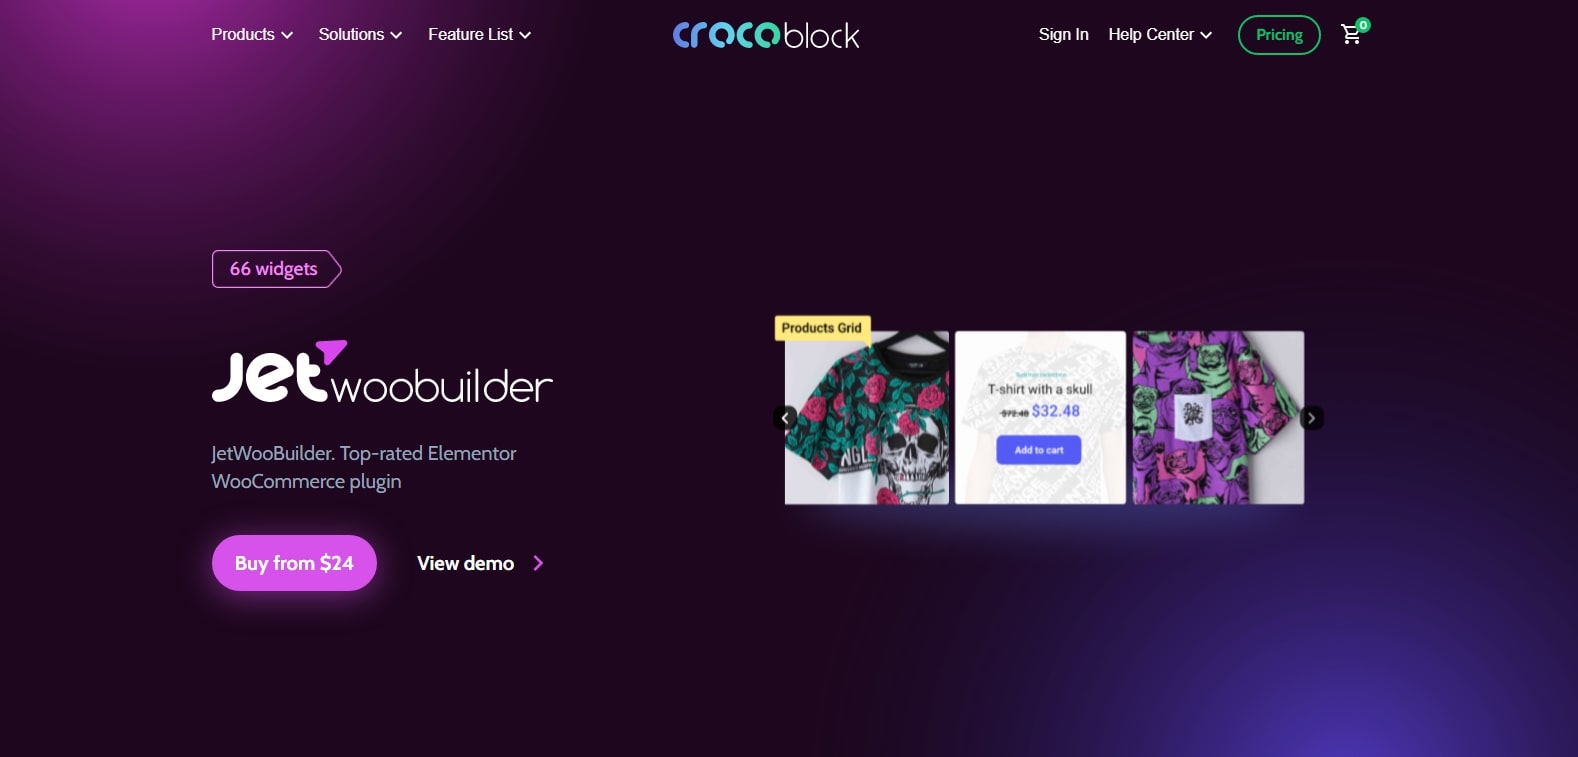
Custom templates for WooCommerce product pages may be created using JetWooBuilder. The default WooCommerce templates will be replaced with the ones you generated using JetWooBuilder. Over 60 Elementors may be used to make each template in JetWooBuilder.
Outstanding features:
- 66 WooCommerce-specific widgets have been added to your Elementor backend, allowing you to quickly and simply create complicated product pages, individual listings, and other types of listings.
- Easy-to-use interface, so there is no need to know any coding skills
- You have custom behavior conditions and role-based criteria that you may control.
Final thoughts
We hope that throughout the article today, you should now be able to easily modify the WooCommerce product page in the quickest time possible. In this way, increasing conversion rate and total profits will no longer become a problem!


