
How to Customize Checkout Page in WooCommerce

Checking out is the very last step in a shopping experience. Your consumers can either pass on this step or finish the process. It will be perfect if all of them fall into the second situation. However, what can online merchants do for ones that exit your website at the checkout steps? Don’t worry, you have come to the right place!
The article today is introducing you to How to customize your WooCommerce checkout page. Keep reading if you are interested in the same topic!
Why should you edit your WooCommerce checkout page?
A website’s checkout page is where customers are going to finish their payment process and close the deal. Another way of putting it more simply is that a checkout page resembles your ability to encourage the consumers to make their final purchases. However, the current marketplace is crowded with numerous competitors; therefore, you should use checkout optimization to get as many purchases as feasible. It has become more important for online merchants to edit their WooCommerce checkout page to improve the conversion rate in the long run.
Several tips you can try out to maximize your WooCommerce checkout experience are:
- Using one-page checkout
- Focus on the design and layout using CSS
- Additional charge for delivery, packing section
- Determine whether or not a field is needed.
- Comprehensive and persuasive content
How to customize your WooCommerce checkout page by coding?
There are two main ways for e-tailers to modify their WooCommerce checkout page: using plugins or manually changing the CSS coding files. If you have already learned to code and want to save money for other matters of the website, then the latter might be a better option. Yet customizing the original source codes is pretty complicated so please make sure that you keep a close eye on each of the steps:
Step 1: Adding the source code for fields
First of all, we will be adding the following code lines to your functions.php file to create a custom checkbox field appearing on your WooCommerce checkout page. For this reason, it is recommended that you are using a child theme:
// checkbox field
add_action( 'woocommerce_after_order_notes', 'quadlayers_subscribe_checkout' );

function quadlayers_subscribe_checkout( $checkout ) {
woocommerce_form_field( 'subscriber', array(
'type' => 'checkbox',
//'required' => true,
'class' => array('custom-field form-row-wide'),
'label' => ' Subscribe to our newsletter.'
), $checkout->get_value( 'subscriber' ) );
}
For instance, these source codes for a radio input field has been added:
// Radio input field
add_action('woocommerce_before_order_notes', 'quadlayers_radio_checkout');
function quadlayers_radio_checkout($checkout3){
woocommerce_form_field( 'feed', array(
'type' => 'radio',
//'required' => true,
'class' => array('custom-field form-row-wide'),
'label' => ' How did you find us?.',
'options' => array(
'Google' => 'Google',
'Friend' => 'Friend',
'Facebook' => 'Facebook',
'Youtube' => 'YoutTube',
'Other' => 'Other'
)
));
}
And here is the result of the previous action:
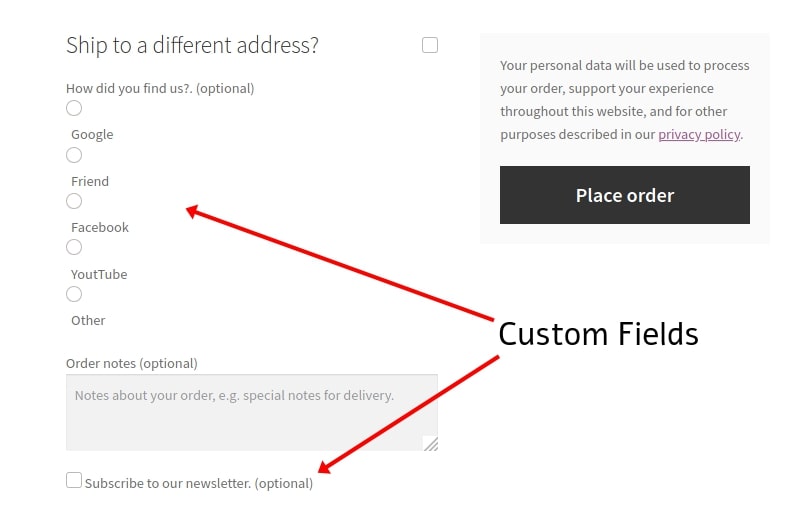
On the basis of these, you can customize the fields in any way you wish to as long as it is functional and works for your site in the future!
Step 2: Storing the information
This is where you are going to automatically save a customer’s information when they finish filling in the form and seal the deal. Also, at your functions.php file, copy and paste the following script into:
add_action( 'woocommerce_checkout_update_order_meta','quadlayers_save_function' );
function quadlayers_save_function( $order_id ){
if ( ! empty( $_POST['subscriber'] ) ) {
update_post_meta( $order_id, 'subscriber', sanitize_text_field( $_POST['subscriber'] ) );
}
if ( ! empty( $_POST['feed'] ) ) {
update_post_meta( $order_id, 'feed',sanitize_text_field( $_POST['feed'] ) );
}
}
The if() statement is placed to make sure that the visitor has not left any empty field before charging their orders. As a matter of fact, it is advisable to change our original code to fit your requirements for the checkout process instead of applying it right away.
Step 3: Changing the required elements
Using the basic but efficient approach of making necessary or obligatory data optional may be used to modify the checkout page in WooCommerce easily. You may do this by having customers fill in just the fields required for the transaction, resulting in a better shopping experience. All you have to do is to add these source codes in the file and change the name of the custom fields in the brackets of the first line:
add_filter( 'woocommerce_billing_fields', 'wc_address_field_optional');
function wc_address_field_optional( $fields ) {
$fields['billing']['billing_address_1']['required'] = false;
return $fields;
}
Step 4: Additional content
Adding useful content is also an effective strategy to increase the number of conversions for your online business. But this step might require a deeper understanding of WooCommerce checkout hooks, which will be clearly introduced in the next section of the article. In other words, you will insert a specific source code into the file depending on the type of content you want to add to your WooCommerce Checkout Page, such as images, titles or just plain text.
Here is an example of adding a short header text for your checkout:
add_action(woocommerce_checkout_before_customer_details
,'quadlayers_checkout_header');
function quadlayers_checkout_header(){
echo "<h2>This is a custom Header<h2>
";
}
Or a reminder about the length of the delivery process:
add_action( 'woocommerce_after_order_notes', 'wc_add_message' );
function wc_add_message () {
echo 'Please remember that delivery may take up to 5 business days.';
}
Step 5: Adding the price to WooCommerce checkout page
You must decide between fixed fee or percentage-based pricing before adding the source code to your file. If you have chosen the first one, then this is a sample source code for a $10 fixed fee named “Extra Charge”. You can easily make changes to the amount of money as well as s specified name for it:
add_action('woocommerce_cart_calculate_fees', function() {
if (is_admin() && !defined('DOING_AJAX')) {
return;
}
WC()->cart->add_fee(__('Extra Charge', 'txtdomain'), 10);
});
And with the percentage-based fee, here is what you are going to paste into your file:
add_action('woocommerce_cart_calculate_fees', function() {
if (is_admin() && !defined('DOING_AJAX')) {
return;
}
$percentage = 0.03;
$percentage_fee = (WC()->cart->get_cart_contents_total() + WC()->cart->get_shipping_total()) * $percentage;
WC()->cart->add_fee(__('Tax', 'txtdomain'), $percentage_fee);
});
Don’t forget to modify the percentage rate of 3% that we have included before saving your changes!
How to edit the checkout page using WooCommerce Checkout Hooks?
Most of the customization for the WooCommerce checkout page makes use of WooCommerce checkout hooks. For this reason, we have provided a clearer review of these helpful functions so that when applying those into your checkout file, you can know exactly what you are doing.
There are two types of WooCommerce Checkout Hooks that you can use to adjust the file: Action Hooks and Filter Hooks. Both of these give users the ability to add or update source codes without changing the core ones, but the first type will add a custom code into a program dealing with specific events and the latter will alter the behavior of an existing variable or function.
Step 1: Before getting started
As you can see in the following example, the woocommerce_after_checkout_billing hook has been added:
add_action(‘woocommerce_after_checkout_billing_form’,’QuadLayers_callback_function’);
function QuadLayers_callback_function(){
echo ‘here goes the content text or html’;
}
This is one of the most well-known WooCommerce hooks for the checkout page of a website, you can check out for the full list and how they can benefit your online business here.
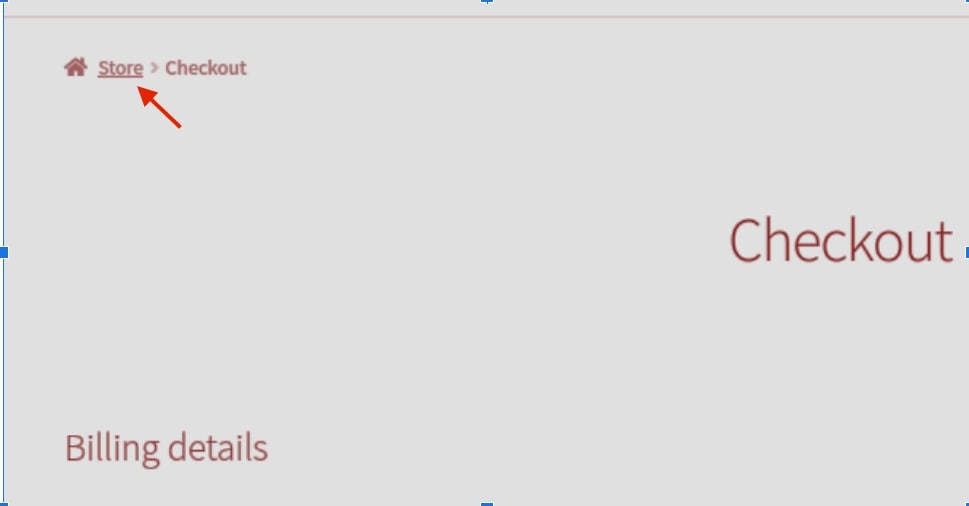
Step 2: Customizing the breadcrumbs
Modify the breadcrumbs to block visitors from returning to the home page. In this image, we have changed the breadcrumbs from “Home” to “Store” by applying these source codes:
add_filter( 'woocommerce_breadcrumb_defaults', 'quadlayers_change_breadcrumb' );
function 'quadlayers_change_breadcrumb'( $default ) {
    $default['home'] = 'Store';
    return $default;
}
Step 3: Adding images to the reviewing order page
Adding a picture to the order review page is also made possible by adding the following WooCommerce checkout hook to your file. You can either incorporate additional images, GIFs or even backdrops in this scenario. All you have to do is change the link of the image in the example as well as adjusting the width and height:
add_action('woocommerce_review_order_before_payment','example_callback');
function example_callback( ) {
    echo '<img src="https://quadlayers.com/wp-content/uploads/2020/06/frame.png" width="200px" height="200px" style="margin:auto">';
}
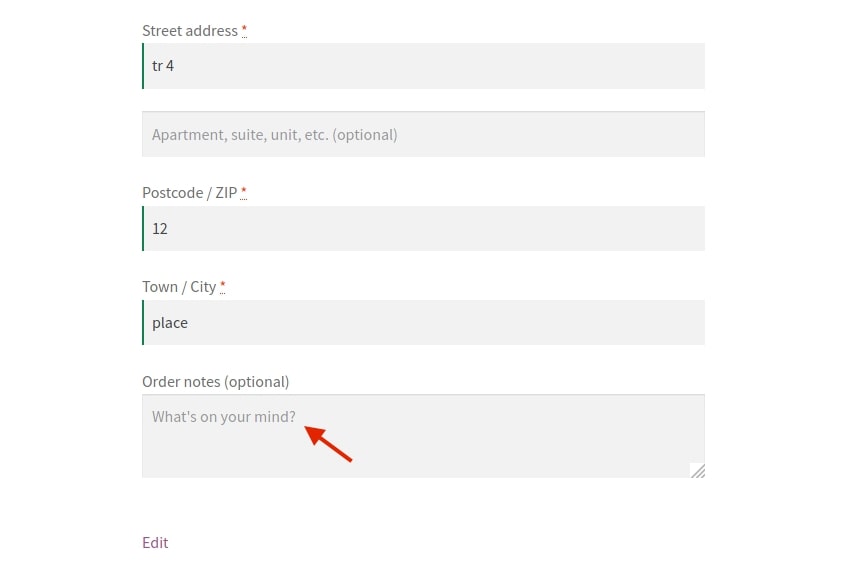
Step 4: Making changes to available checkout fields
Adding labels and placeholders for your checkout fields is another way of attracting customers. The tricks are easy for this step, too. Here is how we added the two elements using woocommerce_checkout_fields hook and look at the results:
add_filter( 'woocommerce_checkout_fields' , 'quadlayers_labels_placeholders', 9999 );
function quadlayers_labels_placeholders( $f ) {
	$f['billing']['billing_first_name']['label'] = 'What\'s your name?';
	$f['order']['order_comments']['placeholder'] = 'What\'s on your mind?';
	return $f;
}
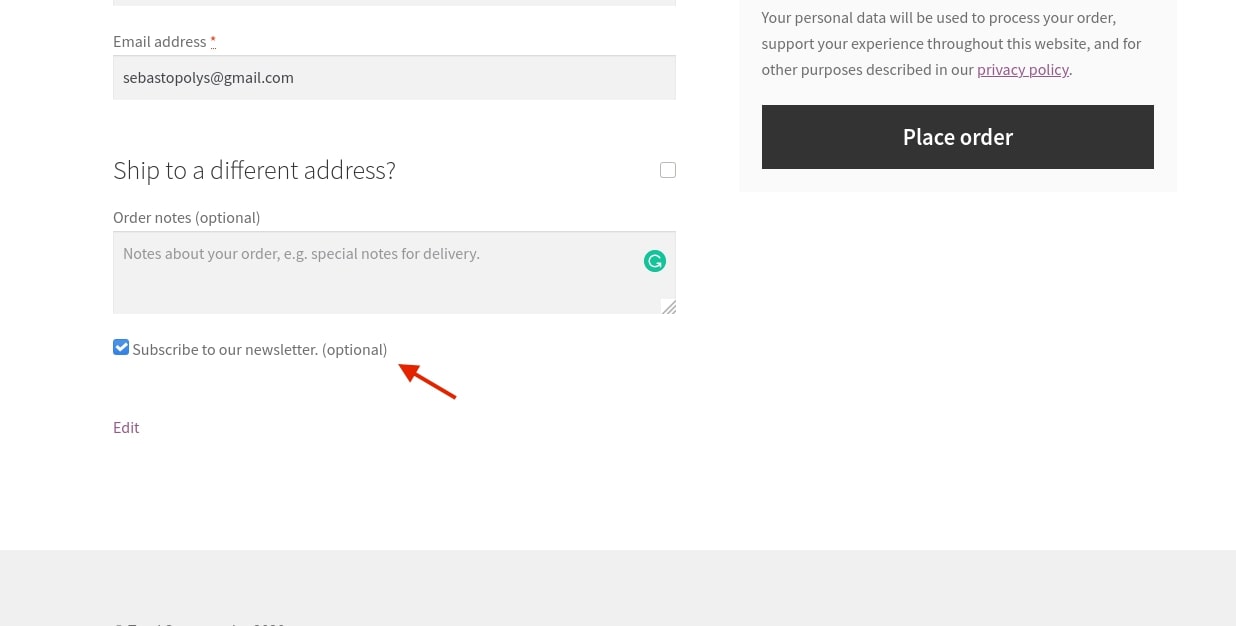
Step 5: Adding a new checkout field
This one is a little bit more complicated compared to the previous steps. We will be setting up a new custom field for consumers to register for newsletter checkout by using two hooks: one to show the field and another to save the state of the button:
add_action( 'woocommerce_after_order_notes', 'quadlayers_subscribe_checkout' );
add_action( 'woocommerce_checkout_update_order_meta', 'quadlayers_save_function' );

// insert checkbox in woocommerce checkout
function quadlayers_subscribe_checkout( $checkout ) {
	woocommerce_form_field( 'subscribed', array(
		'type'	=> 'checkbox',
		'class'	=> array('misha-field form-row-wide'),
		'label'	=> ' Subscribe to our newsletter.',
		), $checkout->get_value( 'subscribed' ) );
}
// save field value
function quadlayers_save_function( $order_id ){
	if( !empty( $_POST['contactmethod'] ) )
		update_post_meta( $order_id, 'contactmethod', sanitize_text_field( $_POST['contactmethod'] ) );
	if( !empty( $_POST['subscribed'] ) && $_POST['subscribed'] == 1 )
		update_post_meta( $order_id, 'subscribed', 1 );
}
Step 6: Putting the Trust Badges
Trust Badges are a great way to increase your credibility in the consumers’ eyes. If you do just like what we did below, your WooCommerce Trust Badges will be placed under the “Place Order” button:
add_action( 'woocommerce_review_order_after_submit', 'quadlayers_trust_badges' );
function quadlayers_trust_badges() {
    echo '<div class="trust-badges">
    <img src="https://www.pngitem.com/pimgs/m/19-197703_transparent-secure-checkout-png-best-trust-badges-for.png">
    </div><div class="trust-badge-message"><i>I added the trust badges above with a WooCommerce hook</i></div>';
}

Top 3 best plugins for customizing WooCommerce checkout page
If you have no time or knowledge about coding, hiring a third-party to edit the WooCommerce checkout page would be a better option. Fortunately, we have it all covered. Here is the list of the top 3 best plugins for you to try out:
Checkout Field Editor and Manager by Acowebs
Top of the list is Checkout Field Editor and Manager by Acowebs. This easy-to-use plugin helps with the checkout process by making it easier to modify, add, hide, rearrange, and deactivate certain fields. When you upload pages, they will appear on both the checkout pages and order details pages, as well as in the purchase confirmation email sent to the client. If you want, you may use your own custom CSS and alter the checkout page widths to match your brand.
If you update to their Pro version, you even gain access to more than 16 types of custom fields, create new sections, incorporate fees for additional features and so on. Thanks to these useful tools, your online store may yield higher profits in the long run.
Checkout Field Editor by ThemeHigh

With Checkout Field Editor by ThemeHigh, you now have full control over your checkout fields. You may add and modify custom fields to your checkout form using the tool. You may also use the following field kinds in your forms: text, password, email, phone, select, textarea, and radio. Furthermore, you can define any additional fields such as placeholders, labels, classes and rules.
Conclusion
To sum up, customizing the WooCommerce checkout page for your website can be done in multiple ways. We hope that this article on How to customize WooCommerce Checkout page will help you to make further improvements for your online store and earn higher profits in the future.


