
How to Create a Custom Taxonomy in WooCommerce

WooCommerce includes a variety of fields for recording product information. There is a product name, a lengthy and concise description, a price, photos, stock, weight, size information, etc. However, what if you wish to save and show additional product data, such as custom taxonomies for WooCommerce?
We will show you How to create a custom taxonomy in WooCommerce. We’ll compare WooCommerce custom fields and taxonomies and determine which to utilize for various types of product data. Additionally, we demonstrate how to create custom taxonomies to hold additional information about WooCommerce products. You can display the additional fields on a standard WordPress page, on your shop or product category pages, or on the detail page for a specific product.
What are the differences between WooCommerce taxonomy and product field?
Custom fields and custom taxonomies are frequently used in conjunction with WooCommerce product data. However, many people are unaware of what they are or how they differ. Custom fields in WooCommerce are used to record random, one-time information about a product. A custom taxonomy is used to categorize objects.
This is reflected in the way custom fields and taxonomies are added to items in the WordPress administration:
- Custom fields are displayed in the Add/Edit Product screen’s main column. This is where you can add additional unique product information such as a title, a description, and a price.
- Custom taxonomies, on the other hand, are displayed in the right-hand column beneath the product categories and tags. As with categories and tags, each WooCommerce taxonomy word should be unique to a specific product.
Here are some samples to assist you in making your selection:
- Clothing store powered by WooCommerce that displays the color of each item. If you’re selling clothing through WooCommerce, you’re probably going to want customers to be able to search for things based on their color. You’ll have a variety of items in each hue. By building a new taxonomy called ‘Color’ in WooCommerce, buyers may filter the product list to find the color they want. With a custom field, this would not be possible.
- WooCommerce resale site that stores information about the ‘condition’ of their used merchandise. If you’re selling used products on a site like eBay, you’ll need a field to record any damage or defects. Because the condition description for each item will be unique, you should build a WooCommerce custom field for it.
- Product directory for WooCommerce with a vast product database. WooCommerce directory-style websites with many products frequently include additional product information in the directory listings view. For instance, a book directory may contain information about the author, publisher, and publication year.
How to create a custom taxonomy in WooCommerce with code
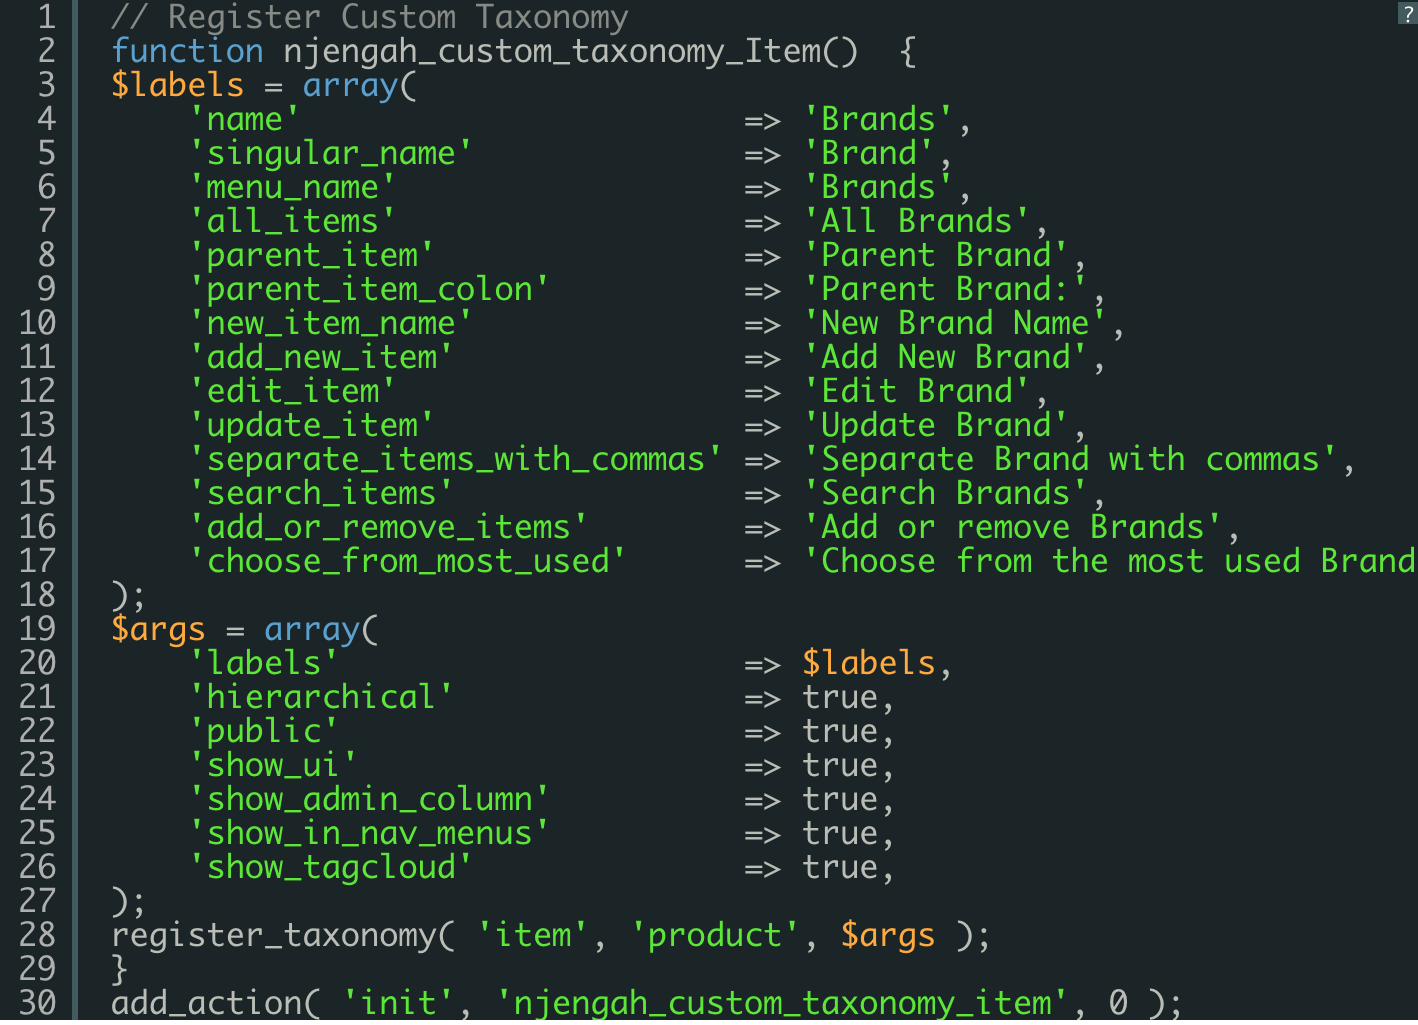
Log in and go to your WordPress Dashboard. Navigate to Appearance Menu > Theme Editor Menu, then find the theme functions file to insert the function.
Adding this code to the php file.
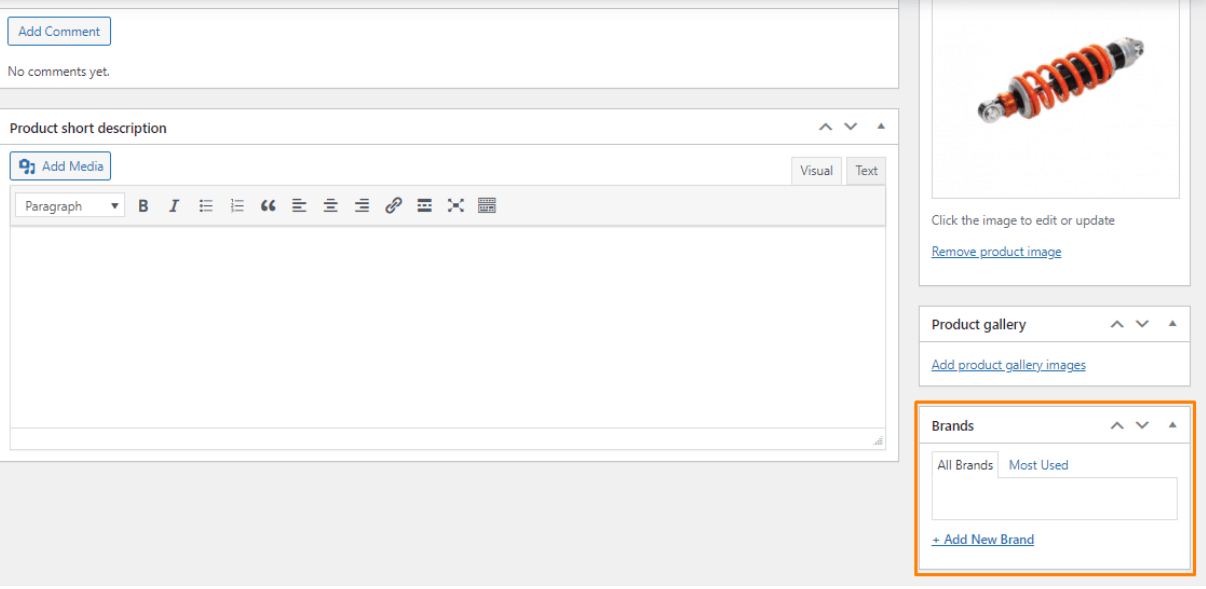
Here is the result:
How to create a custom taxonomy in WooCommerce with a plugin
Custom Post Type UI is the finest plugin for creating a custom taxonomy for WooCommerce items. With over 400,000 active users, it’s a massively popular plugin that’s also completely free!
Along with developing custom post types (which is optional), Custom Post Type UI enables you to add taxonomies to pre-existing custom post types. This is necessary, as WooCommerce items are a form of custom post in WordPress.
Here’s how to use Custom Post Type UI as a custom taxonomy plugin for WooCommerce:
Step 1: Install and activate the plugin
In the WordPress admin, navigate to Plugins > Add New and search for Custom Post Type UI. The plugin must be installed and activated.
Step 2: Add and Edit Taxonomies
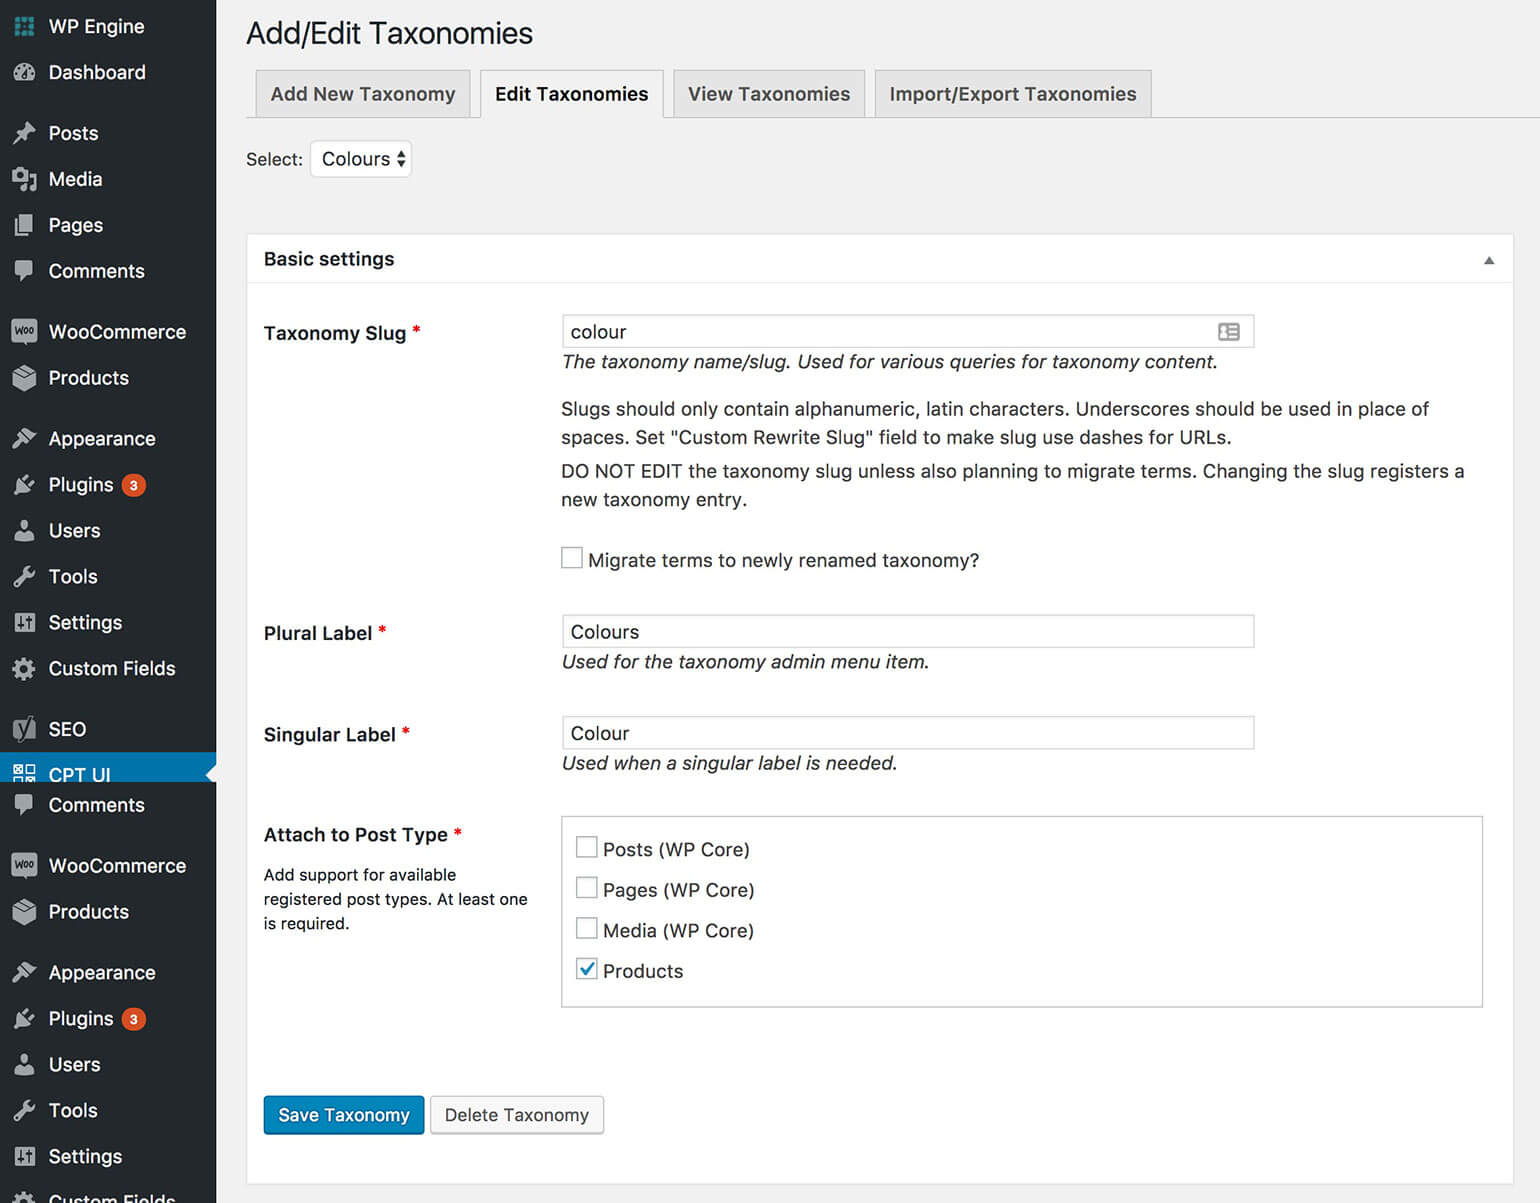
- Navigate to the CPT UI area of the WordPress admin panel on the left and click on the Add/Edit Taxonomies section.
- Incorporate the Taxonomy Slug (ideally 1 word, lowercase).
- Give your WooCommerce custom taxonomy a plural and single name (label). This will appear exclusively in the WordPress administration area.
- Then, it should be attached to the Products post type.
- To add a taxonomy, click on Add Taxonomy.
Now navigate to the Edit Product page, where you’ll see the custom taxonomy on the right, among the categories and tags. As with conventional product tags, add one or more taxonomy words to each product.
3 best plugins to create a custom taxonomy in WooCommerce
1. Custom Post Type UI
Custom Post Type UI is one of the most popular plugins for custom posts and taxonomies in the official WordPress plugin directory, bringing a slew of fantastic options and features for free. This plugin is quite simple to use. After installation, you’re presented with a lovely dashboard from which you can access all of the plugin’s options and capabilities.
The plugin enables you to create new post kinds and associated taxonomies and update existing post types on your site. Additionally, it lets you import a custom post that already exists on another site. Additionally, exporting yours is a possibility. Its only disadvantage is that it will not display registered post types or taxonomies within your current theme. It will simply register them on your behalf.
Key Features:
- Allows you to build and customize custom post types and taxonomies.
- Allows you to associate post types with built-in and custom taxonomies.
- Comes with extensive post-type labeling.
- Does not display your newly created post types and taxonomies. This is something you must accomplish on your own.
Price: This plugin is available completely free.
2. Pods – Custom Content Types and Fields

**Pods is another simple-to-use free plugin that allows you to create new post kinds, taxonomies, and fields. It stands out for its unique user interface and the entire process of installing and utilizing the plugin. The experience is more akin to a wizard than a dashboard.
Additionally, the plugin enables you to create custom settings pages and sophisticated content kinds (which do not utilize the regular WordPress database tables but instead create their own). Additionally, you can extend the already available content kinds, taxonomies, media, users, and even comments.
Key Features:
- Allows you to build and customize custom post types and taxonomies.
- Allows for the creation of custom configuration pages and complex content types.
- Extends the functionality of pre-existing content kinds.
- Able to utilize a variety of field types, as well as design your own.
- Modern and user-friendly UI.
- Integrates with various other plugins, including Polylang, WPML, Tabify Edit Screen, Codepress Admin Columns, and Gravity Forms.
Price: This plugin is free of charge.
3. Toolset Types

This is the premium version of the preceding selections. Apart from prompt support, you’ll also receive front-end posting — a feature that enables you to show bespoke material on the front end easily. You may create templates, lists, and archives to ensure that your custom post types look pleasant to your visitors.
Additionally, Toolset includes built-in input validation. When someone fills out a field, they will see a warning if the wording is wrong or incomplete. Individuals will be unable to proceed without filling out the response. Moreover, you can create repeating field groups and connect any number of post kinds.
Key features:
- It features a modern and user-friendly UI.
- Provides a front-end post-type display, allowing for the creation of custom templates and forms.
- Includes built-in validation of user input.
- Can create groups of repeating fields.
- Allows you to connect several post kinds (parent-child-like structures).
Price: There are 3 different price plans for you to choose from:
- 1 site - $69/year.
- 3 sites - $149/year.
- Unlimited sites - $299/year.
Final thoughts
After reading through this article of How to create a custom taxonomy in WooCommerce, we hope that you are now able to create your WooCommerce taxonomy seamlessly.
Do you find this article helpful? If you do, don’t forget to share our work with anyone who needs it, and stay tuned for more useful posts from AVADA.


