
How to Create Pages in WooCommerce Store?

WooCommerce allows you to modify your online store by adding pages. You may either construct all of WooCommerce’s preset pages or create custom pages. In this article, we will provide you with the best ways to create pages in the WooCommerce Store.
Benefits of customizing the Shop Page in WooCommerce
The majority of the default pages are produced automatically when you install WooCommerce. If you neglect any stages, WooCommerce may not be able to create all of the pages your online store requires. If that’s the case, the good news is that adding such pages is simple.
The style and language of your WooCommerce store say volumes about your business when people shop for the first time. As a result, you may expect a number of advantages from customizing each page.
-
Show Clients You’re Serious: Customizing your pages gives your site more credibility and demonstrates to potential customers that you didn’t open this store on the spur of the moment.
-
Set Yourself Apart from the Competition: By customizing your store pages, you’ll stand out from rivals who are content with WooCommerce’s default look.
-
Increase Sales: Your store pages will be more enticing to your target audience as a consequence of your efforts. As a result, your WooCommerce store will generate more sales.
How to Create WooCommerce Shop Pages?
You can create WooCommerce pages in a few different ways:
- From the WordPress control panel
- Shortcodes are a great way to save time
- Using Elementor (or other page builders)
All the ways make it simple to add pages. We’ll look at both in this tutorial so you can pick the best solution for you.
From the WordPress dashboard
Step 1: Create all the default WooCommerce Pages
The basic WooCommerce pages may be easily created and installed from the WordPress dashboard with just a few clicks.
Go to WooCommerce > Status first. The option to build preset WooCommerce pages is then found under the Tools tab. To add the missing pages to your store, simply click the Create Pages option.
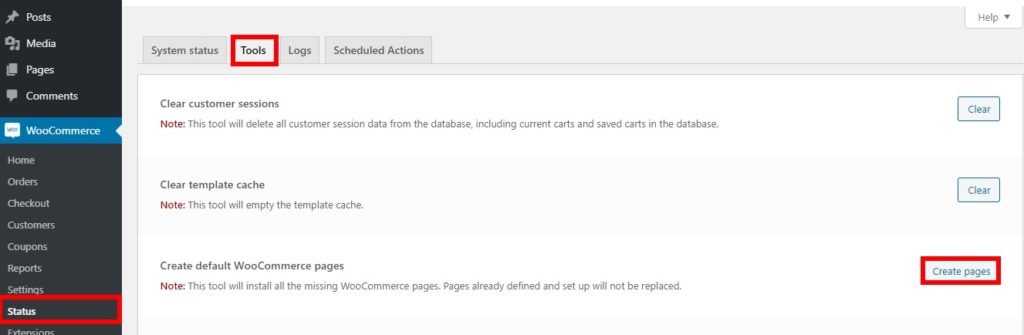
As an example, suppose you have an online store with the Shop, Cart, and Checkout pages but no My Account page. When you click Create Pages, it will only create the My Account page, leaving the rest of the pages blank. That concludes our discussion. You’ve just finished adding the missing WooCommerce pages to your store.
NOTE: You will only construct the missing pages in your shop; you will not alter the default pages that already exist.
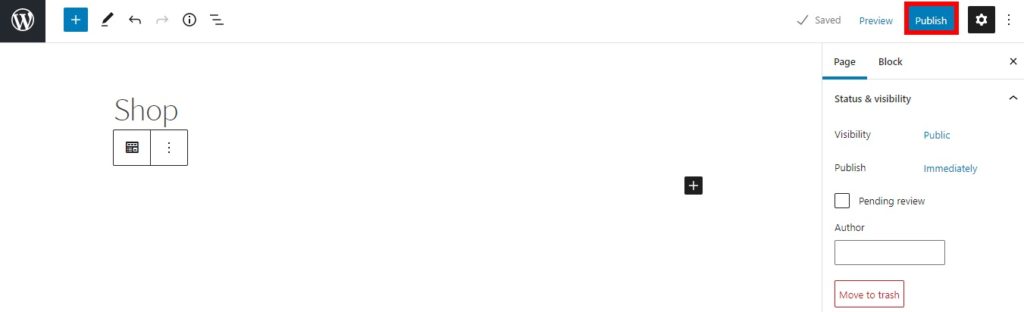
Step 2: Create Shop Page from the WordPress Dashboard
Simply navigate to Pages > Add New on your dashboard. Then, on the page, put the Shop title and hit Publish.
Then, under WooCommerce > Settings, select the Products tab. Select the Shop page you just established from the dropdown menu and save your changes by clicking the Shop page option.
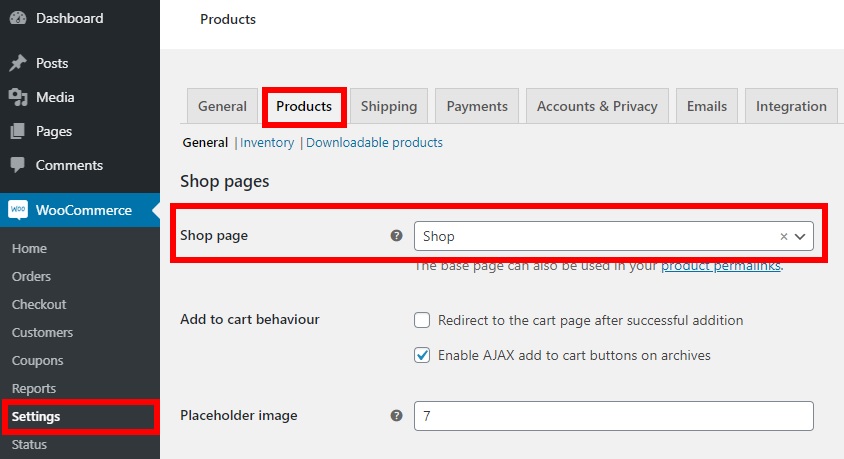
That concludes our discussion. When you preview the page, you’ll see the default Shop page. All of the goods you’ve listed for your online store will appear on this page immediately.
With Shortcodes
It’s simple to create WooCommerce pages from the WordPress dashboard, but there’s another option for adding pages to your store. Shortcodes are used in this procedure. Shortcodes are code snippets that allow you to show text or add functionality without having to write lengthy scripts. If you’re not familiar with shortcodes, we recommend reading this complete beginner’s guide.
In comparison to the previous way, WooCommerce contains default shortcodes that give you greater freedom when adding pages to your store.
To utilize shortcodes to build WooCommerce pages, go to Pages > Add New, enter the title of the page you want to create, and use the correct shortcode. Let’s look at a couple of instances.
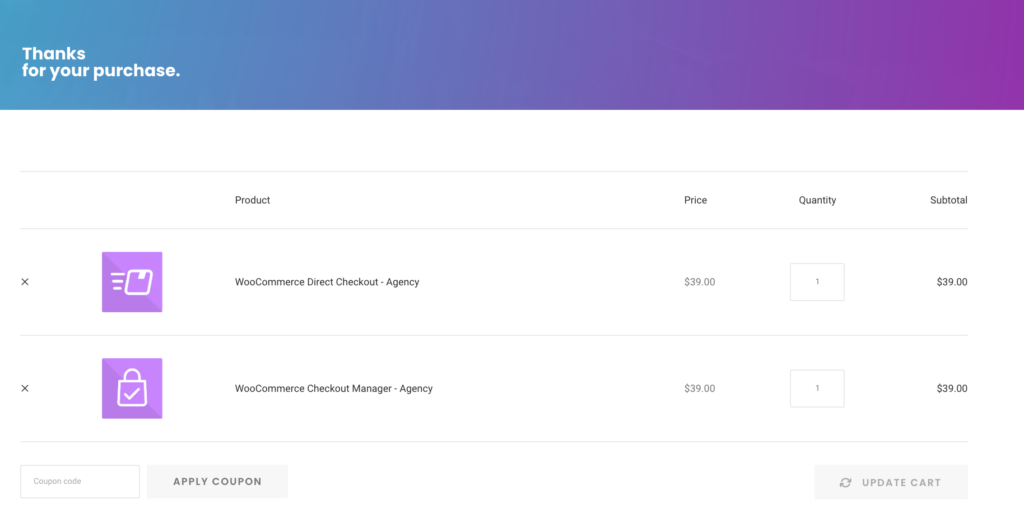
1. Cart Page
Create a new page called “Cart,” add the following shortcode, and publish it to add a cart page.
<img src="https://cdn4.avada.io/media/shopify/890q5D7.jpg" alt="Create a new page called "Cart," add the following shortcode, and publish it to add a cart page.">
After that, navigate to WooCommerce > Settings and select Advanced from the drop-down menu. Then, under the Cart page option, choose the Cart page that you just built and save it.
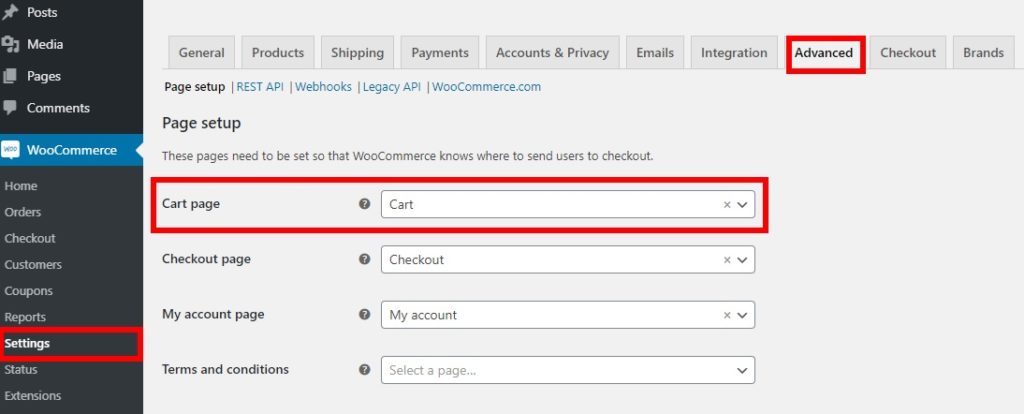
That’s all; the goods your customers have in their carts will now be shown in the Cart page you just established.
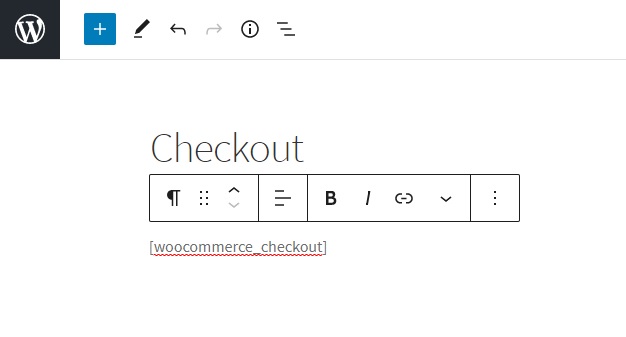
2. Checkout Page
Similarly, to build the WooCommerce default checkout page, simply create a new page and name it “Checkout.” Then, add the following shortcode to the page and publish it.
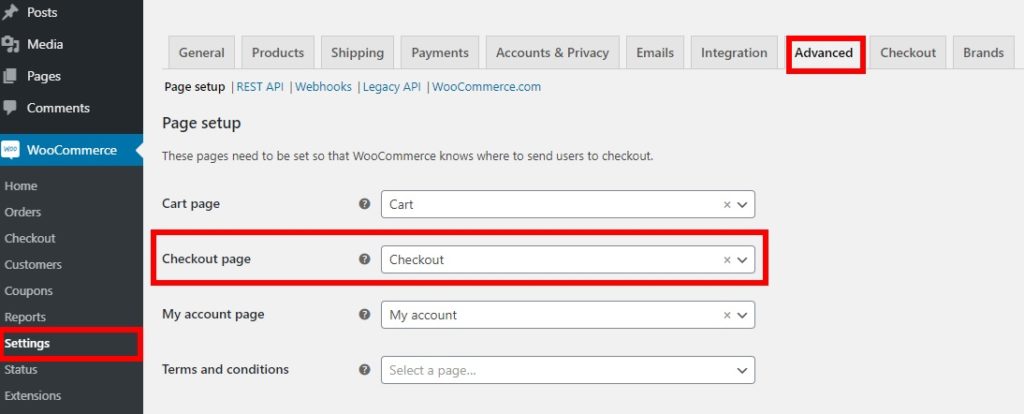
Return to WooCommerce > Settings and choose the Advanced tab once again. Then, as an option for the Checkout page, choose the checkout page that you just generated and save the modifications.
The default checkout page is adequate, but you should alter it if you want to stand out and increase conversion rates.
3. My Account Page
To make a WooCommerce My Account page, just build a new page, name it “My Account,” and add the following shortcode to it.
<img src="https://cdn4.avada.io/media/shopify/EEz7iXm.jpg" alt="To make a WooCommerce My Account page, just build a new page, name it "My Account," and add the following shortcode to it.">
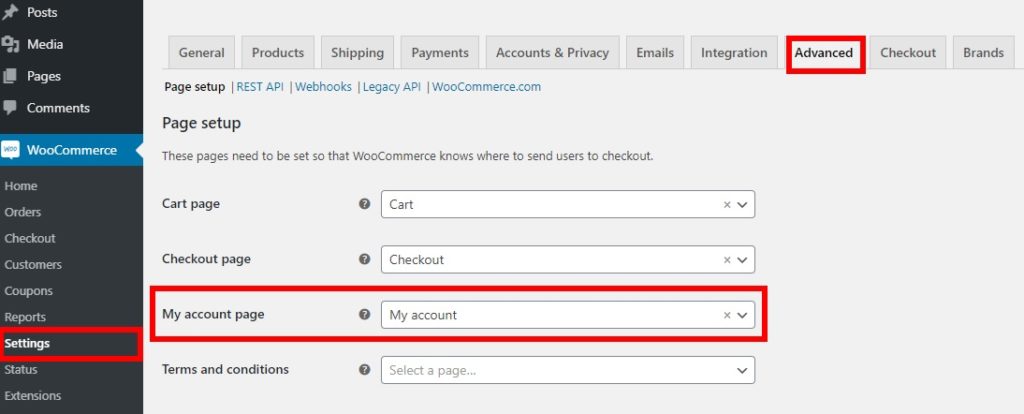
After that, navigate to WooCommerce > Settings and select Advanced from the drop-down menu. Finally, save the modifications by selecting the newly created My Account page as an option for the My Account page.
Check out our step-by-step tutorial on how to modify your My Account page if you want to make it more interesting.
That’s how shortcodes may be used to generate WooCommerce pages.
Using Elementor (or other page builders)
Instead of altering the default WooCommerce store page, you can use a website builder like Elementor to create a completely new shop page.
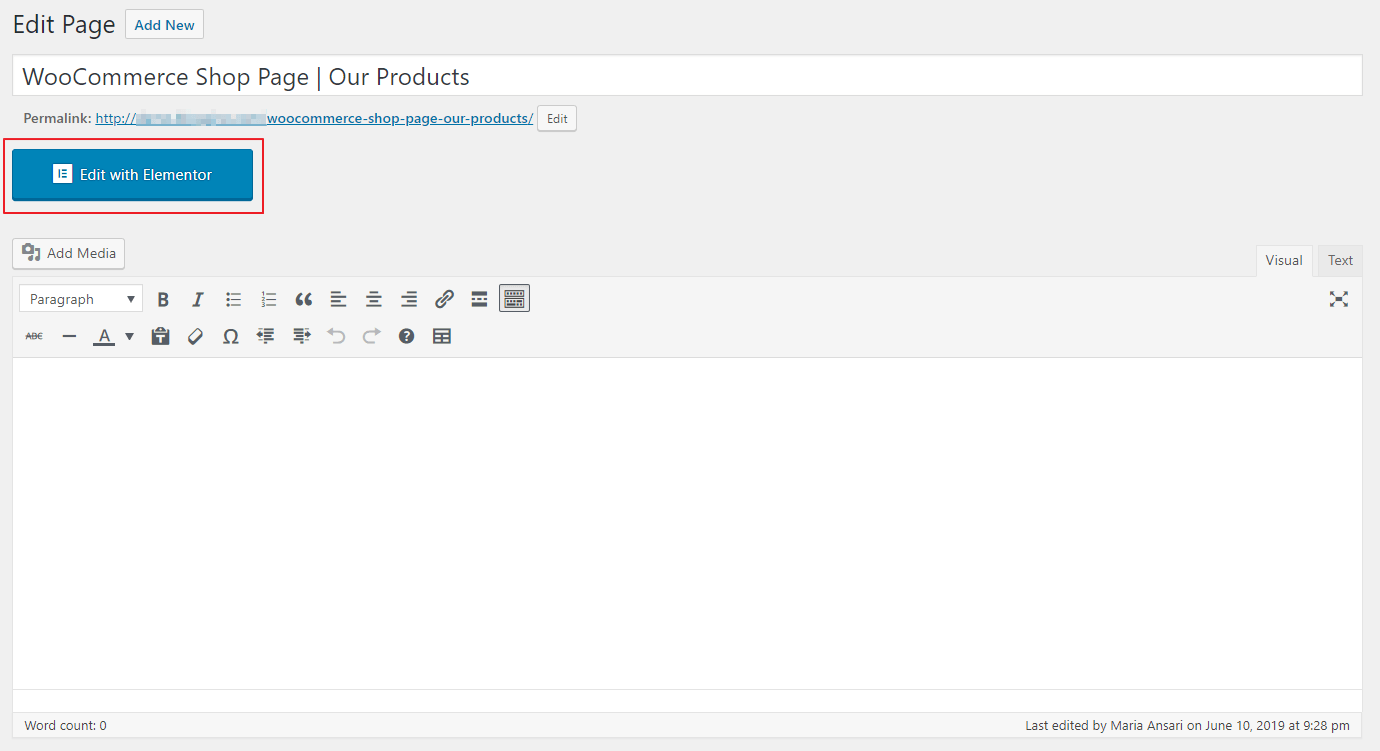
Step 1: Create a new page in Elementor and modify it
Make a new post or page (or update an existing one) and use the Elementor editor to make changes. You may accomplish this by selecting Edit with Elementor from the drop-down menu.
Step 2: In a text editor or a shortcode widget, paste the WooCommerce Product Table shortcode
A product table may also be added to many Elementor widgets. In this section, we’ll teach you how to add a widget to a text editor and a shortcode widget.
Widget for text editing:
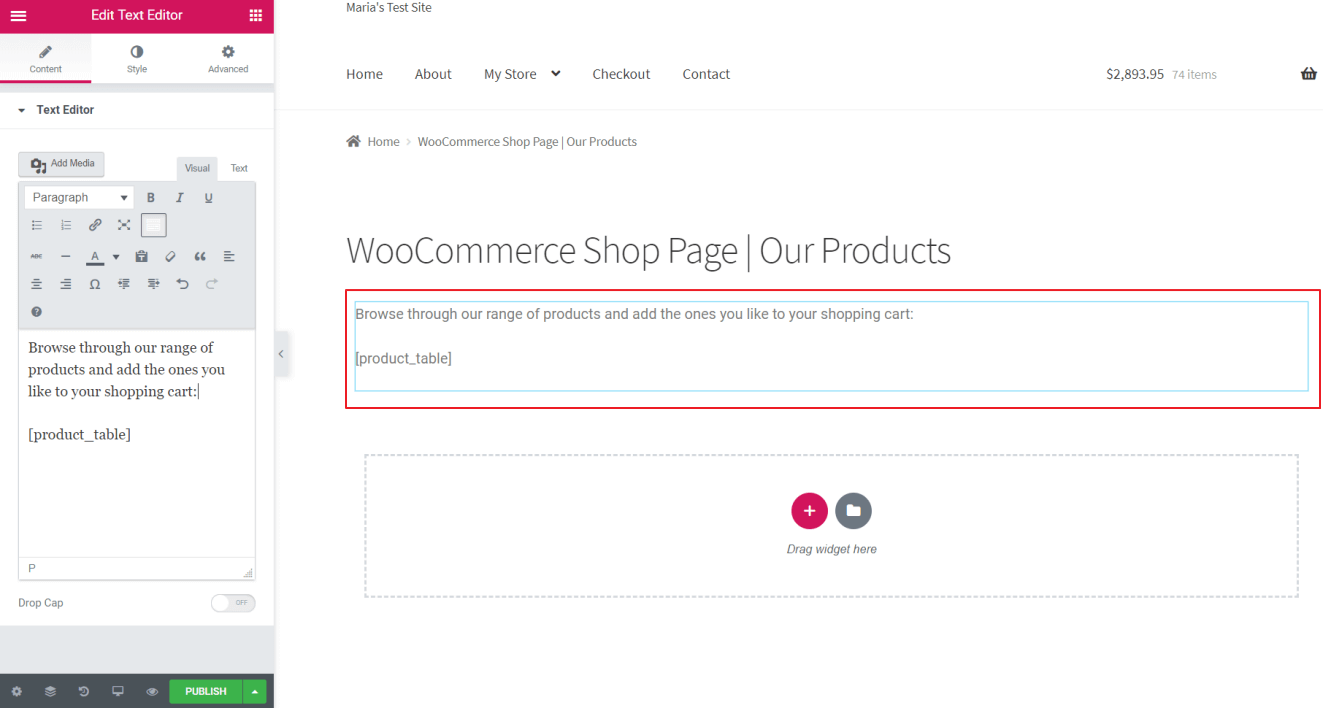
Drag the Text Editor widget to where it says Drag widget here by clicking and dragging it there. Next, add the product table’s shortcode [product table] to any location within the widget.
This is useful for adding text (such as instructions) or images (for aesthetic purposes) above or below the product table. On the front end, this is what it may look like:
Widget with a shortcode:
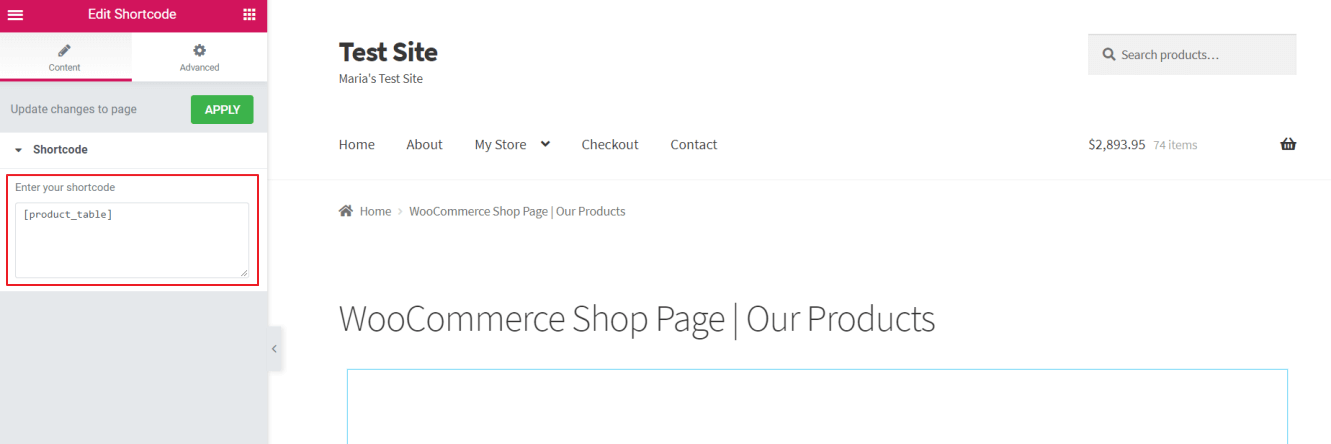
You may use the shortcode widget if you just want to show the product table on the front end.
Step 3: Set the WooCommerce Product Table options
Navigate to WooCommerce Settings Products Product tables from the WordPress dashboard to adjust the WooCommerce Product Table plugin’s settings.
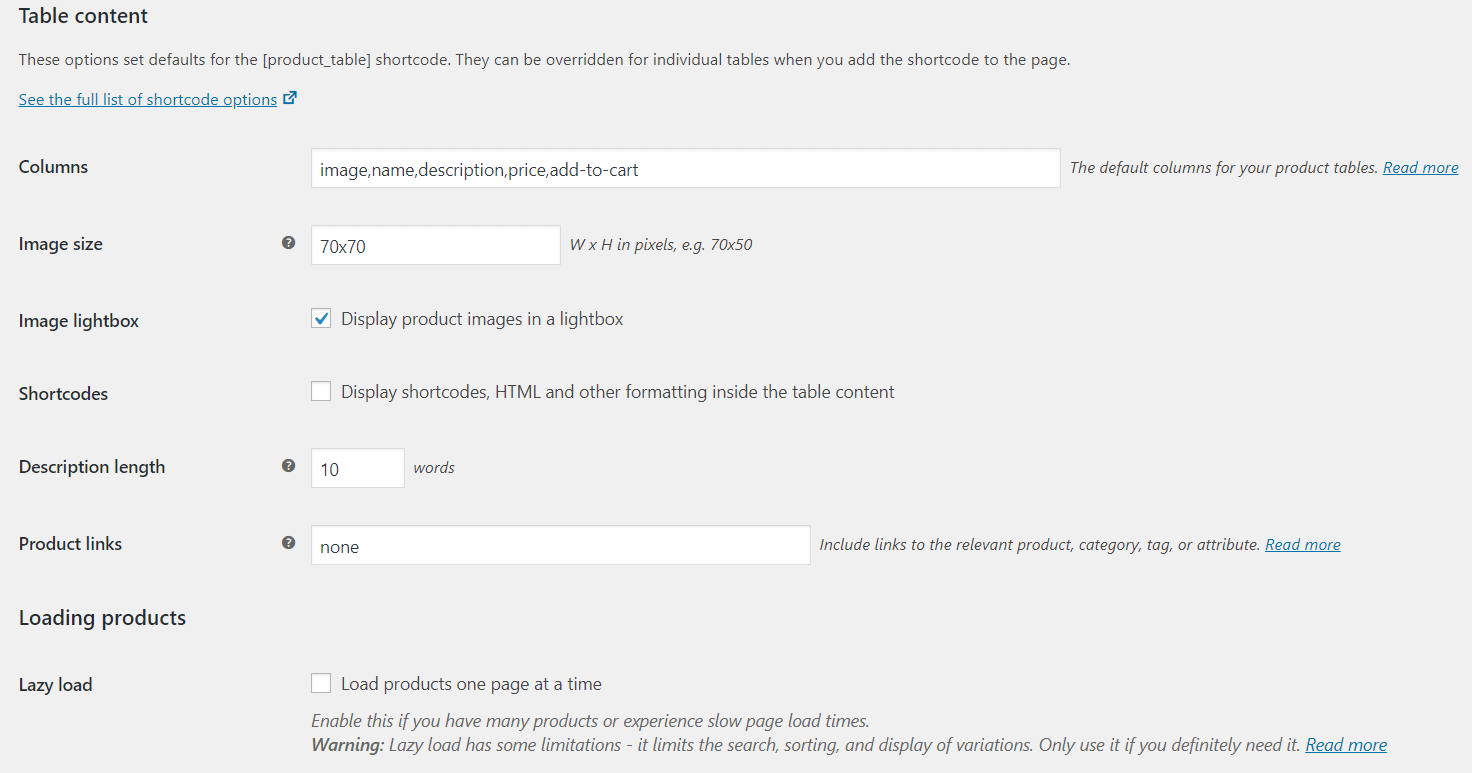
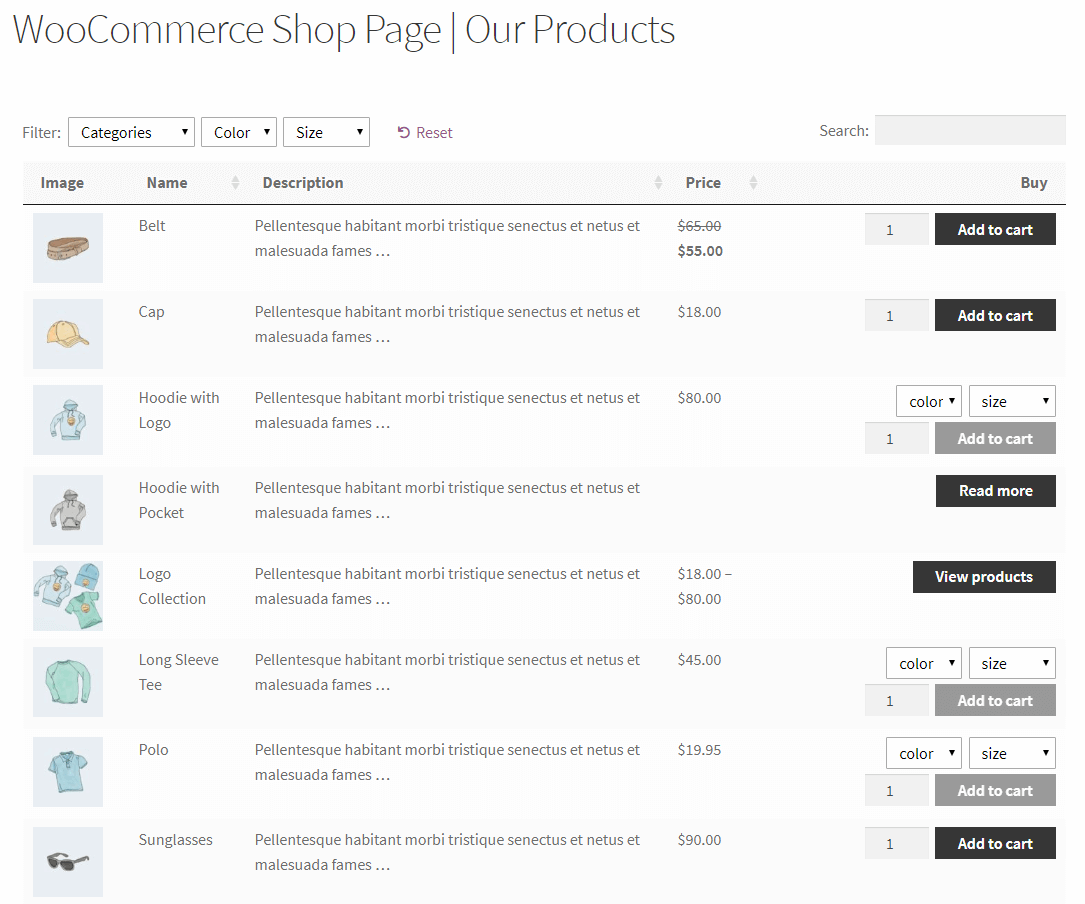
You’ll find a long number of options for configuring your WooCommerce product table here. You may choose the data to display in the table, add variables and filters, and do a lot more. Simply save the settings when you’ve finished making changes, and you’re done!
How to customize WooCommerce Pages
Method 1: Customize WooCommerce shop page using page builder
The style, design, amount of items displayed, product types, and other characteristics of a shop page may all be changed using page builders. The best part about using a page builder is that you won’t have to mess with any theme files or coding.
You may alter the WooCommerce shop page using Beaver Builder (see Beaver Builder free vs paid comparison), Divi, Elementor, Visual Composer (differences between Visual Composer free vs premium), or any other popular page builder without touching a single line of code.
Method 2: Customize default WooCommerce shop page using the plugin
Here are some other plugins which are not page builders you can use to customize and edit WooCommerce pages:
The StoreCustomizer
The StoreCustomizer plugin is available in two versions: free and paid. To make live updates to your WooCommerce shop, the plugin leverages the WordPress Customizer settings. You can see your changes as you make them.
If you like, you may remove the “Purchase” and “Add to Cart” capabilities from your online store or conceal the price (how to hide pricing in WooCommerce). You’ll be able to create your own WooCommerce catalog this way.
Settings for Catalogue Mode may be applied to specific goods or to all of your WooCommerce products. These changes can also be applied just to non-logged-in users. Users will be asked to establish an account and log in before they can make purchases on your site.
Storefront Blocks
Storefront Blocks may be used to customize the look and feel of your WooCommerce store page, category page, and home page. These blocks can be combined without the need of any code.
There are eight premium WooCommerce Storefront Blocks to choose from. Some of the accessible blocks include Product Category Blocks, Product Carousel Blocks, Product Slider Blocks, Product Table Blocks, Masonry Product Blocks, and Square Grid Blocks.
WooCommerce usually produces your category pages for you dynamically. Those aren’t particularly distinct pages. They usually have the same style and appearance as the rest of your store’s pages. You can’t even adjust their look.
You may construct customized category pages with Storefront Blocks. There’s a larger probability of increasing sales if you could modify the design of each category page.
Because you may add more enticing material that’s relevant to the specific things you’re attempting to sell, Storefront Blocks can help you enhance your search engine optimization.
You can even use Storefront Blocks to redesign your home page. The elements on your site’s main page are frequently generated automatically by themes. You may control the content with Storefront Blocks. Existing sections may be rearranged, and new sections, categories, and goods can be added.
Reusable, transformable, and expandable blocks are available. They let you change things like product grid columns and rows, label alignment and placement, grid gaps, colors, fonts, and more.
WooCoomerce Blocks
WooCommerce Blocks may be used to display the goods in your store that you wish to highlight. Products may be sorted by tag and category. You can also display featured, hand-picked, best-selling, or currently on-sale items.
Pagination is now included in the current version of WooCommerce Blocks. This is a useful tool for business owners who have a large selection of items to offer their clients.
Conclusion
Overall, we’ve demonstrated many methods for creating and reinstalling WooCommerce pages. You can add or restore any of your pages that are missing. The three techniques for installing WooCommerce Shop pages outlined above are quite effective and user-friendly for beginners. The easiest approach is to create pages from the dashboard, but you can also utilize shortcodes if you want more flexibility.


