
How to Create a Multi-Vendor Marketplace on WooCommerce

Online businesses have become more and more popular nowadays on account of changing behavior of customers, along with technological advancements. Customers are now shopping right at their homes as it will save a lot of time and expand their choices. This has helped to boost all online store scenarios, including a multi-vendor marketplace.
In case you are seeking how to create a multi-vendor marketplace on WooCommerce and have not where to start, how to start, and what to do, this instruction is for you. Let’s thrive in and we will help your design your dream multi-vendor marketplace.
Benefits of creating a multi-vendor marketplace on WooCommerce
eCommerce has become increasingly trending. And creating a multi-vendor marketplace on WooCommerce is a perfect way for not only small businesses but also large ones to be on the crest of a wave. There is no denying that this is a community for both customers and sellers. And it brings about tons of benefits for all.

For owners
In case you are the owner of this multi-vendor operation, what you could get are:
-
An extra income stream
-
A new group of expanded customers
-
Full management of members
-
Shared responsibility
For sellers
If you are a merchant who is finding a place to sell your products. Do not hesitate to join this kind of platform as you can make the most use of it with the following benefits:
-
Sell everything
-
Have separate sales reports
-
Create customer notes
-
Create and control products and inventory fully
How to create a multi-vendor marketplace on WooCommerce
Step 1: Pick up a platform (if you haven’t set it up)
In case you have not set up your WooCommerce platform. Follow our following simple steps.
1. Choose a platform
Initially, WordPress started as a platform for blogging only. Therefore, most people misunderstand that it works for personal and blogging websites. But that is not the truth. WordPress, in fact, powers over 30% of the fastest websites in the world.
WordPress is so great that it also improves its plugins for eCommerce like WooCommerce. This is a renowned one with the conversion of up to 22% of websites into eCommerce platforms of high revenue. By choosing this platform, you could have more opportunities to penetrate a multi-vendor eCommerce marketplace with the potentials to develop more.
2. Select Hosting and Register a Domain Name
What you need to do now is to design your profile, then get one domain name as well as one hosting service. A domain name, in this case, is your store’s virtual address. It will be in charge of your WooStore. For instance, a site’s domain name will have a format like www.exampledomain.com.
Bear in mind that the domain name should be short and as easy to remember as possible. Take advantage of keywords when creating it and keep away from hyphens or numbers when you target your location.
3. Set up WordPress and Enable WooCommerce
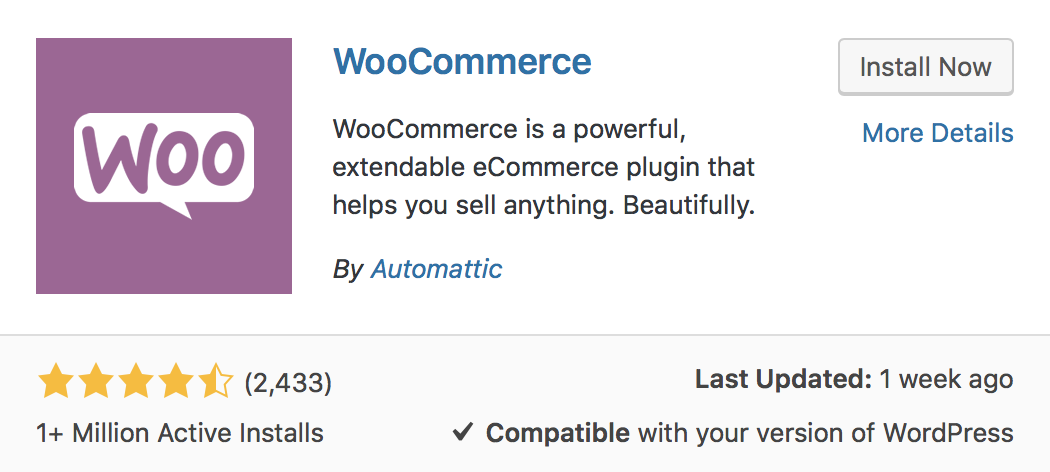
You go to the address www.wordpress.org to download WordPress for installation. After you finish installing it, you then move the section “Plugins” and seek “WooCommerce”. With WooCommerce, there is no need to pay any fee for its installation.
When you are done with this step, you proceed with the next one with setting up a WooCommerce store. Next, just add the products you are going to sell and enable any customization of such specifics as payments and shipping by navigating the menu “WooCommerce Settings”.
5. Set up WooStore
Once you have created your online store, you will need to set it up by creating an appropriate one for your WooCommerce multi-vendor marketplace. Remember to make your site more attractive and engaging so that it could draw attention from more customers and visitors.
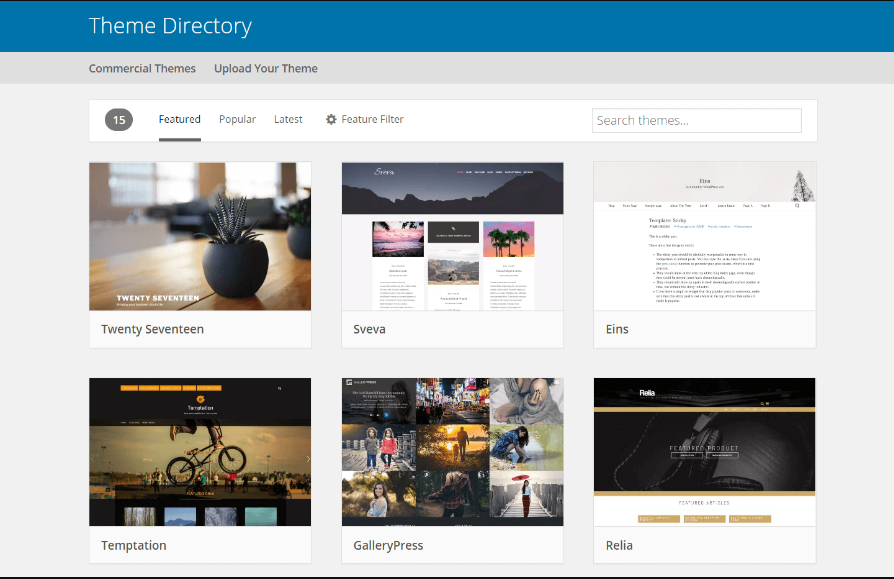
Our advice is to pick up a theme optimized for one multi-vendor store. Thus, it could attain a similar result. You could choose not only physical but also digital themes as WooCommerce offers both of them.
6. Build an MVP
Building an MVP is a very critical aspect that you could do. As you are not merely selling on a platform, you are establishing a high-brand business. So, you need to create your MVP. What is MVP? Why do you need to create that?
“A Minimum Variable Product”, or MVP for short, is a term to stress that learning in the developments of new products is of great significance. An MVP brings about an opportunity for you to deeply know about your customers’ interest in products with no need to create them completely.
If you could know whether your product appeals to your customers and clients or not, then you could save a lot of time, coupled with the effort spent on any product that you will not be selling. This is to say, you should construct a site that displays enough features. As a result, your early users will feel satisfied with your service and you then introduce upgrades based on the responses. Keep going with the next steps after setting up your Wooster.
In the other hand, you can consider to use a MVP devlopment services.
Step 2: Pre-creation process
Before starting your creation of a multi-vendor marketplace on WooCommerce, you are suggested to follow the below necessary steps to facilitate a smooth process.
1. Create a good business plan
The first and foremost thing to do before you implement to create your multi-vendor marketplace is to build a good business plan. This plan helps your concentrate on key steps to make your business ideas take off. Moreover, it assists you in achieving short-term as well as long-term objectives. This kind of plan will ensure that you are going on the right way.

There are many cases in which sellers jump into choosing a platform but do not care about how or what they will grow their business. This is a complete disaster. So, if you do not take those things into careful consideration, it would be a disaster for your business, and you will become perplexed.
Right now, outline your business’s multiple perspectives and follow included ideas. Therefore, make clear and keep track of the below things:
-
You should denote your objective when joining a multi-vendor marketplace.
-
You are supposed to clarify how the competition will be maintained.
-
It is a must to make a forecast of your finance for the upcoming 1,5-2 years. This will include the forecast for loss, profit, and funding.
-
At this step, be sure of who your target customers are.
-
You will also need to have plans for advertisements and marketing strategies.
Some aspects of your competitors’ business should be taken into accounts, such as partner arrangement, commission structure, and price ranges. Invest them carefully to understand your competitors as well.
- You should know the commissions clearly.
In case anything gets worse, this business plan is your life saver to enable you to be focused. Therefore, you could know what is working and what is not working properly. You can rely on myriad online tools that provide you with a detailed outline in developing your business plan. As your store tends to expand, you will understand what works or what does not. Then, your strategy will evolve.
2. Strategize the revenue models well
The revenue model plays a key role in all businesses. It comes with markup, subscription, and licensing. If you don’t strategize the revenue models well, you will not be clear about which source of revenue should be prioritized, who your target customers are, and how you will price products.
Currently, various revenue models are available for WooCommerce multi-vendor marketplaces. A not-to-be-missed thing is that you should not forget to scrutinize the rates of your competition, along with what they will be like or what fits you brilliantly.
3. Understand legal requirements
Like running a business or a company, operating a multi-vendor marketplace on WooCommerce is not easy as a pie. It will involve your understanding of some legal requirements. Consequently, you need to be good at setting up some of the agreements, documents, and regulations. Those criteria are the principal component of running any business.
As regards the introduction of one multi-vendor marketplace, those legal requirements are also applicable. You can consult a professional accountant or lawyer to know each legal aspect deeply.
4. Customer support
Customer support contributes to the success of any online store in any eCommerce platform. To be more specific, immediate customer service will make your business more successful. When you are here, think twice to see how you will provide timely service for your customers. Keep in mind that you should not allow the situation of customer’s emails going to your spam to happen. If this goes on, you will lose potential customers in just a minute.
5. Select effective payment gateways
Selecting payment gateways that work best for your multi-vendor marketplace is not always easy. Do not forget to pick up the payment gateway with the following recognized aspects:
-
Refund procedures
-
Charges
-
Payment schedules
-
Recurring billing fees
6. Consider several possible extensions for creating a multi-vendor marketplace on WooCommerce
For your multi-vendor marketplace to work, it is a suggestion to consider several possible extensions. Among the most popular approved plugins, the one with functionality enhancements is WooCommerce RMA for WCFM. This kind of solution will help your marketplace a lot with advanced features.
Vendors who join this platform could make use of it to tackle with a refund or exchange their requests for products or services that they have sold. This plugin is specifically designed to make good use of the most popular multi-vendor marketplace features. What is more, it even lets store owners exert a limitation on vendors’ activities for requests of refunding or exchanging.
Step 3: Set up a multi-vendor marketplace on WooCommerce
In this instruction, we will guide you on how to create a multi-vendor marketplace on WooCommerce with the assistance of a common plugin. There are millions of plugins available on the worldwide market, including WCFM Marketplace Rest API, WC Vendors, WC Multi-vendor marketplace, Dokan Marketplace, and so on.
Those plugins will help you transform your WooCommerce store into one marketplace. With the help of it, vendors could have full control over this website. Furthermore, they also can sell or promote their products effectively. In particular, choosing your favored business model, payment methods, fees, product formats, and business model is now up to you. Keep scrolling down to see what you will do next.
1. Choose a plugin
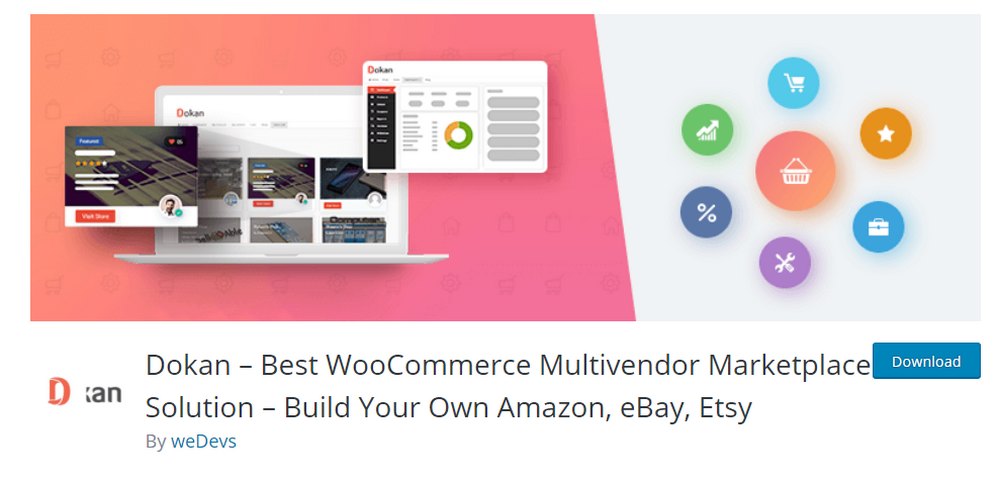
We will opt for Dokan to create a multi-vendor marketplace in this case. The reason is that it has a reputation for gaining traction as well as exceptional features. The simple frontend graphical user interface and other features make it one of the best user-friendly multi-vendor plugins ever.
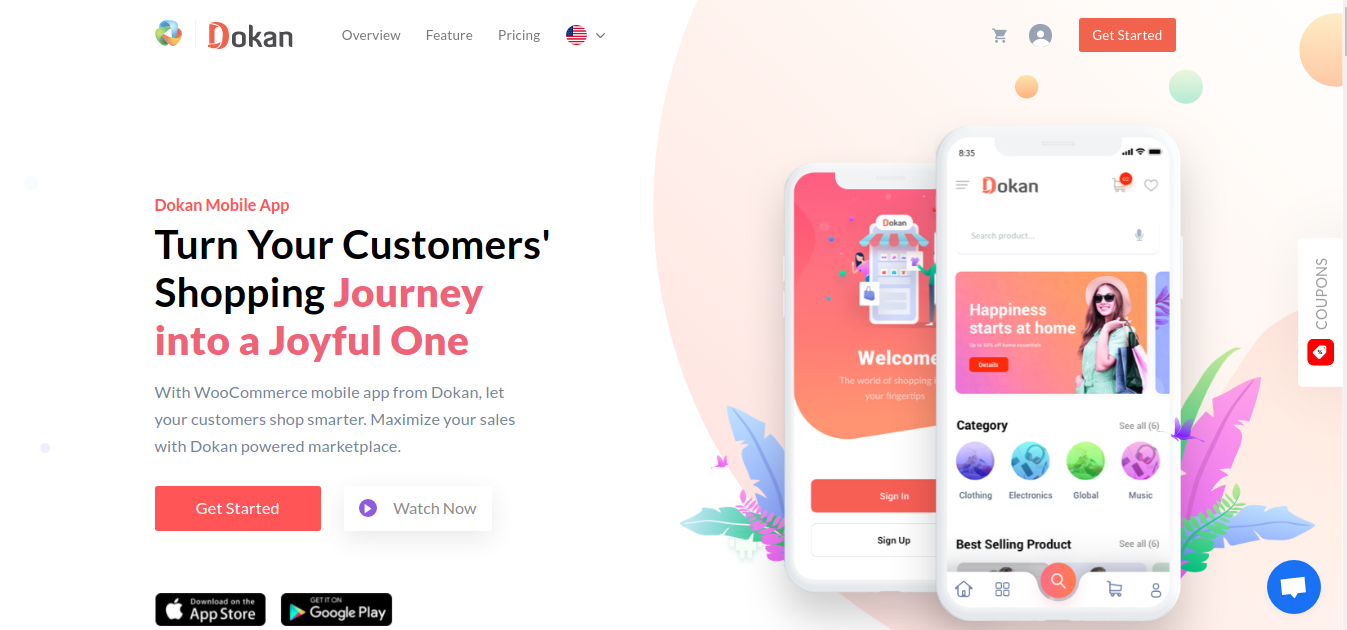
One more thing is Dokan will reinforce multi-vendor marketplaces’ strength by a provision of outstanding features to allow vendors to collaborate easily.
2. Set up the plugin
Once you have chosen your preferred plugin to create this multi-vendor marketplace, it is time to set it up. Firstly, go to the WordPress site’s admin panel to log in. After that, select “Plugins”, then choose “Add New” before clicking “Dokan” from your drop-down menu. Proceed to press the “Install” button as well as the icon “Activate” to set it up and enable the plugin’s activation.

If this is the first time you set up this plugin on the WordPress website, you will have a chance to use the setup wizard. This wizard comes with detailed instructions to install Dokan quickly and easily. In installing it, you can encounter an overview of this setup.
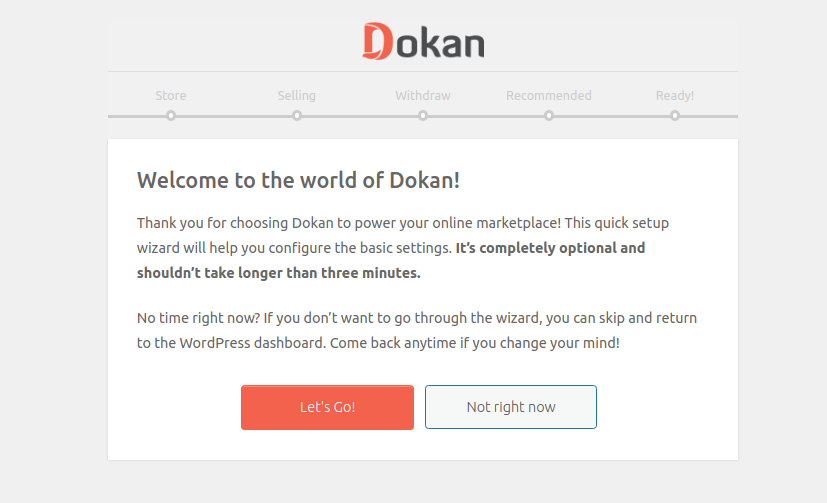
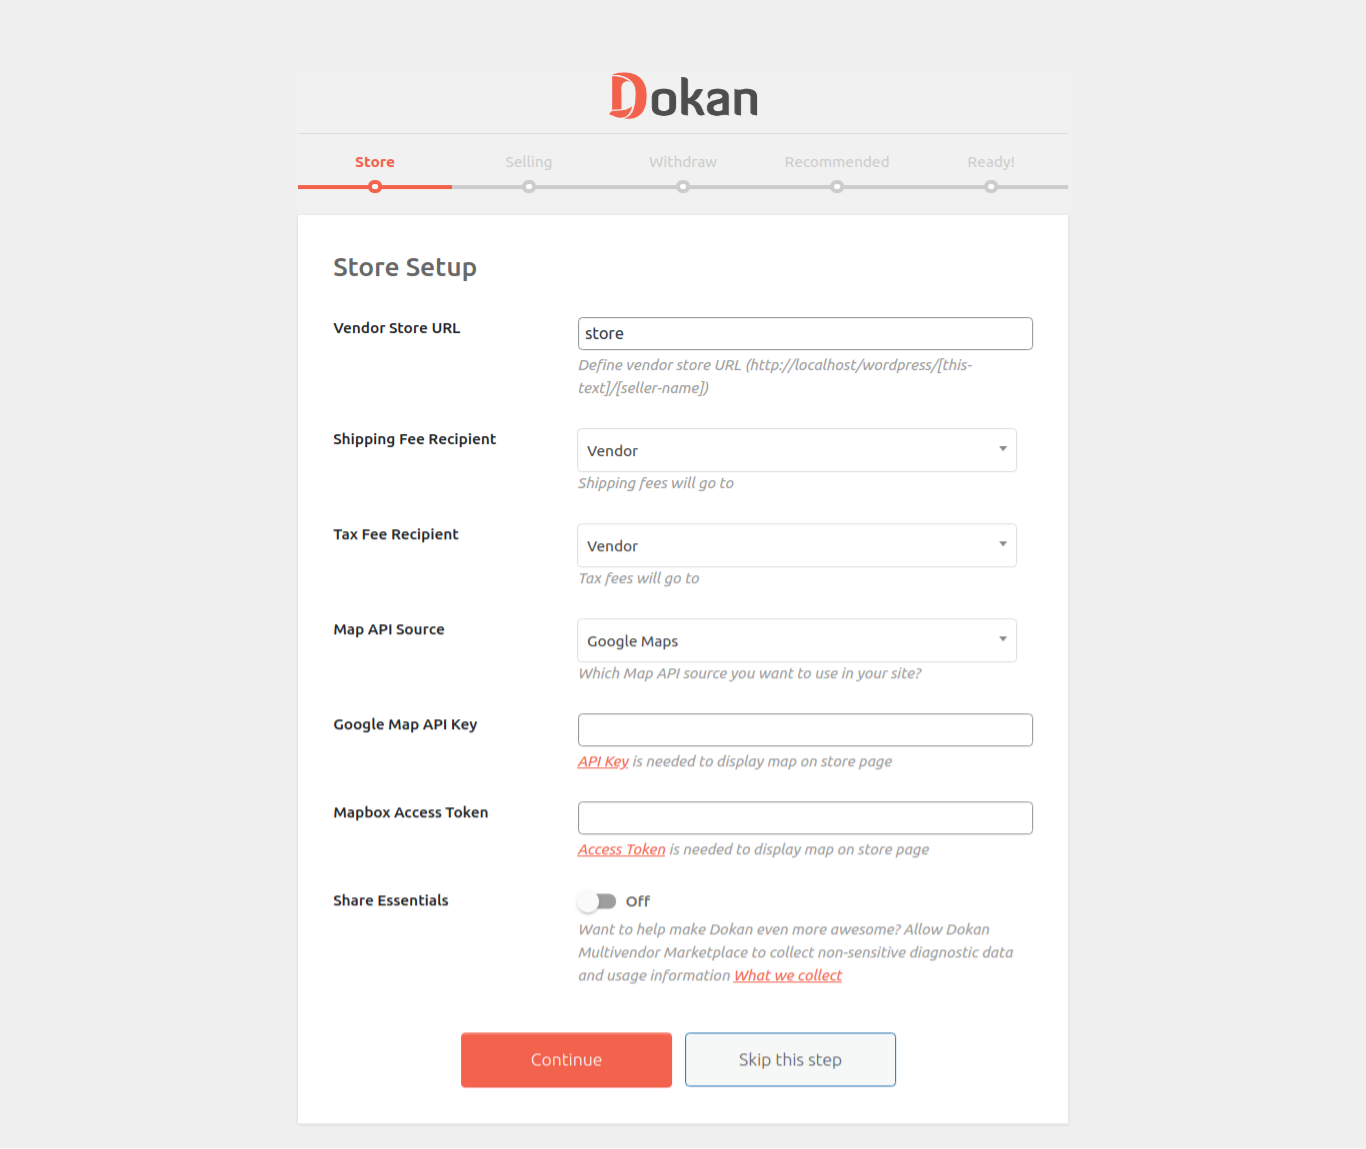
After that, you will press the button “Let’s Go!” to go to the setup page of the store. Here you need to include some information related to the store of sellers. To be more specific, sellers’ store URL is a prerequisite; hence, you need to have it and select the additional fee receiver. As soon as you finish, click the button “Continue”.
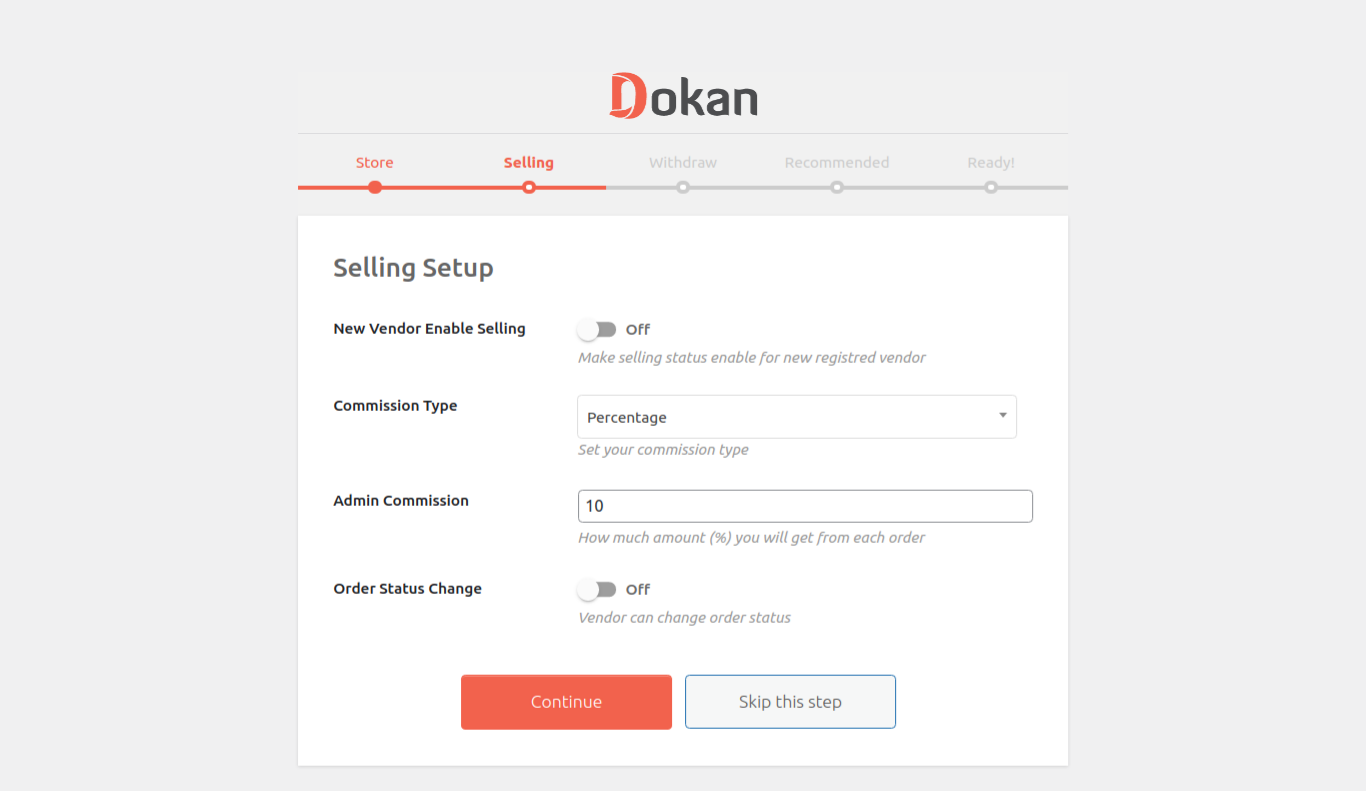
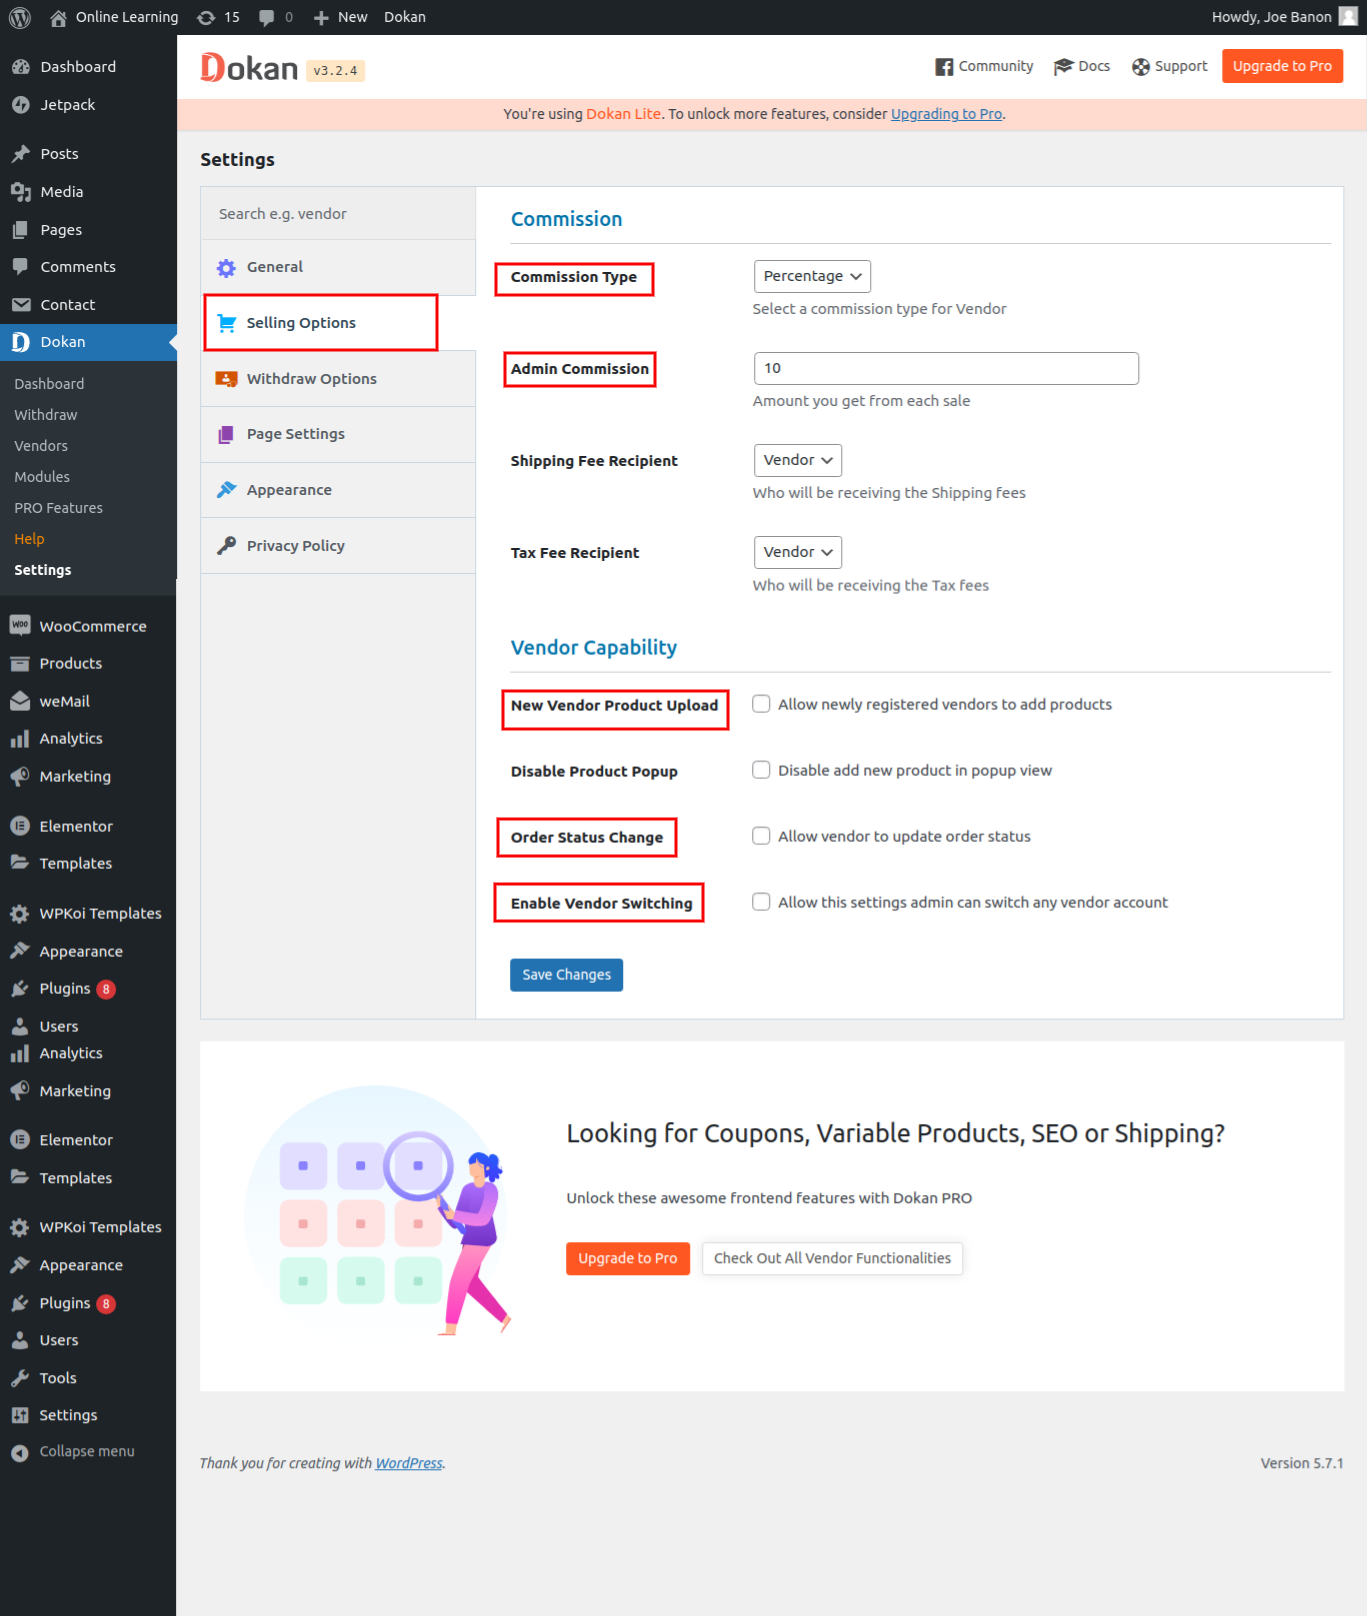
- Configure the selling options
A must-have step is to configure the selling options. Now, you need to enable the selling status for sellers who have just registered. This will let you have the sellers’ selling function activated. At this step, you should also specify the percentage of commission for your seller.
You can let your sellers modify the order status. What is more, as regards the page “Product Edit”, you could select between “Tab” & “Flat” views.
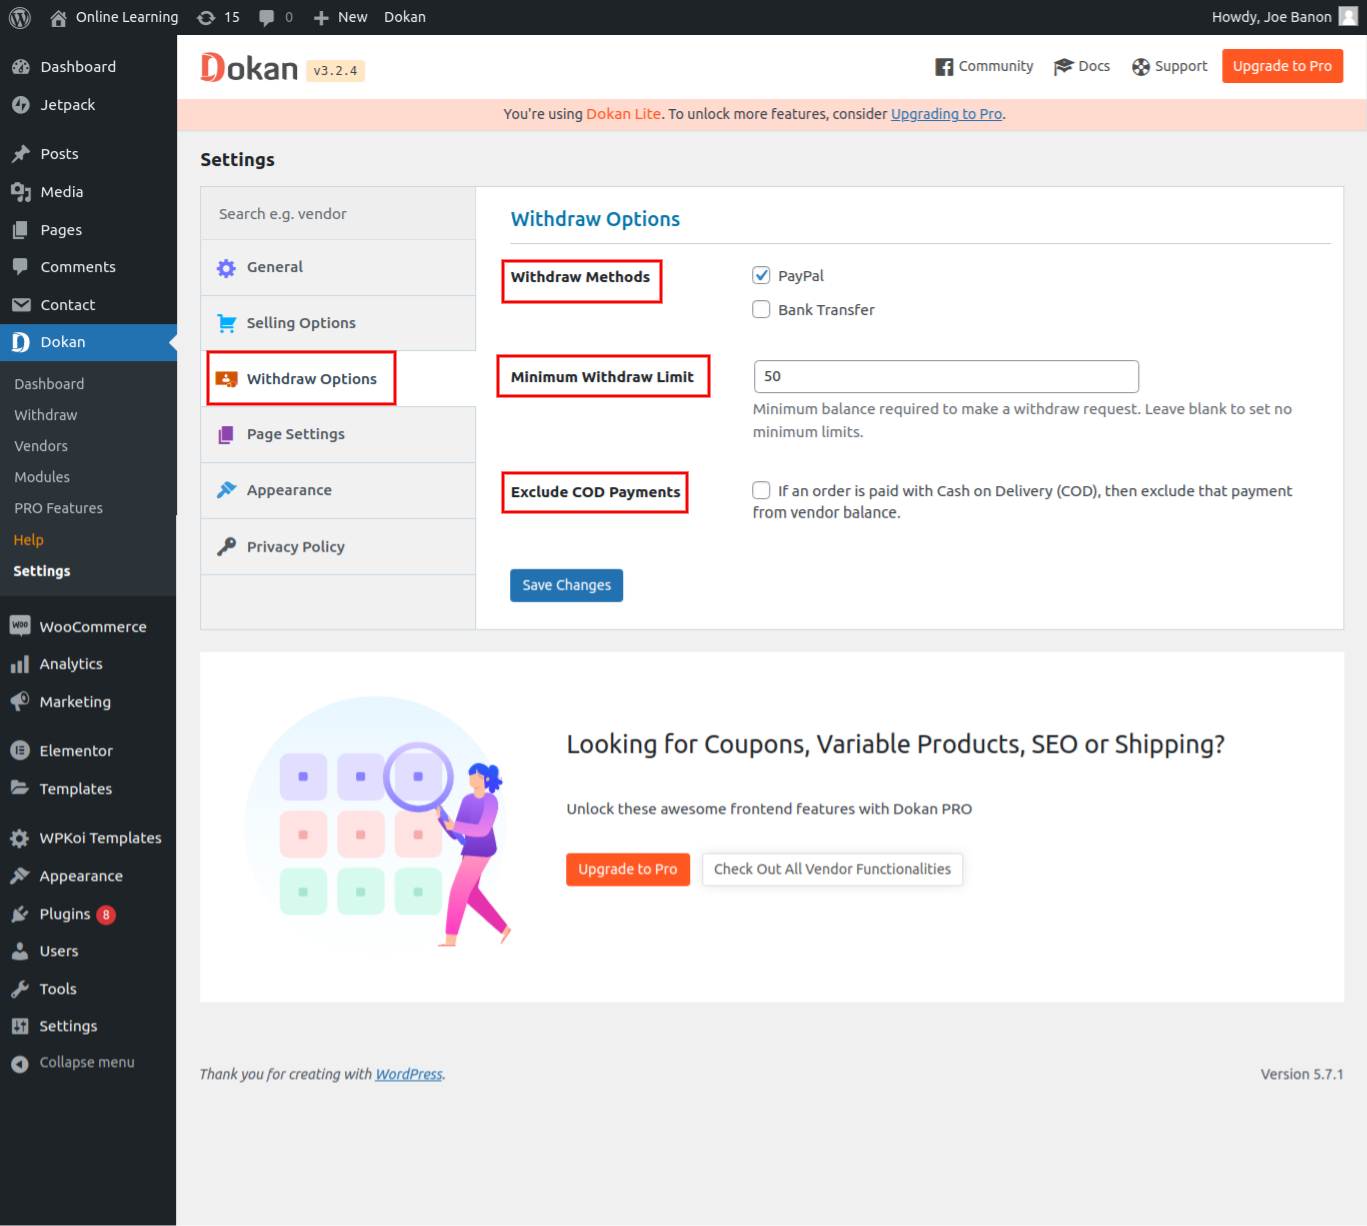
- Install withdrawal options
Another step in setting up is to install the withdrawal methods for sellers. Currently, three withdrawal options are available including Skrill, Bank Transfer, and Paypal. Among these three methods, you can opt for the one that fits your withdrawal option. Moreover, setting the minimum amount of withdrawal as well as withdrawing order status.
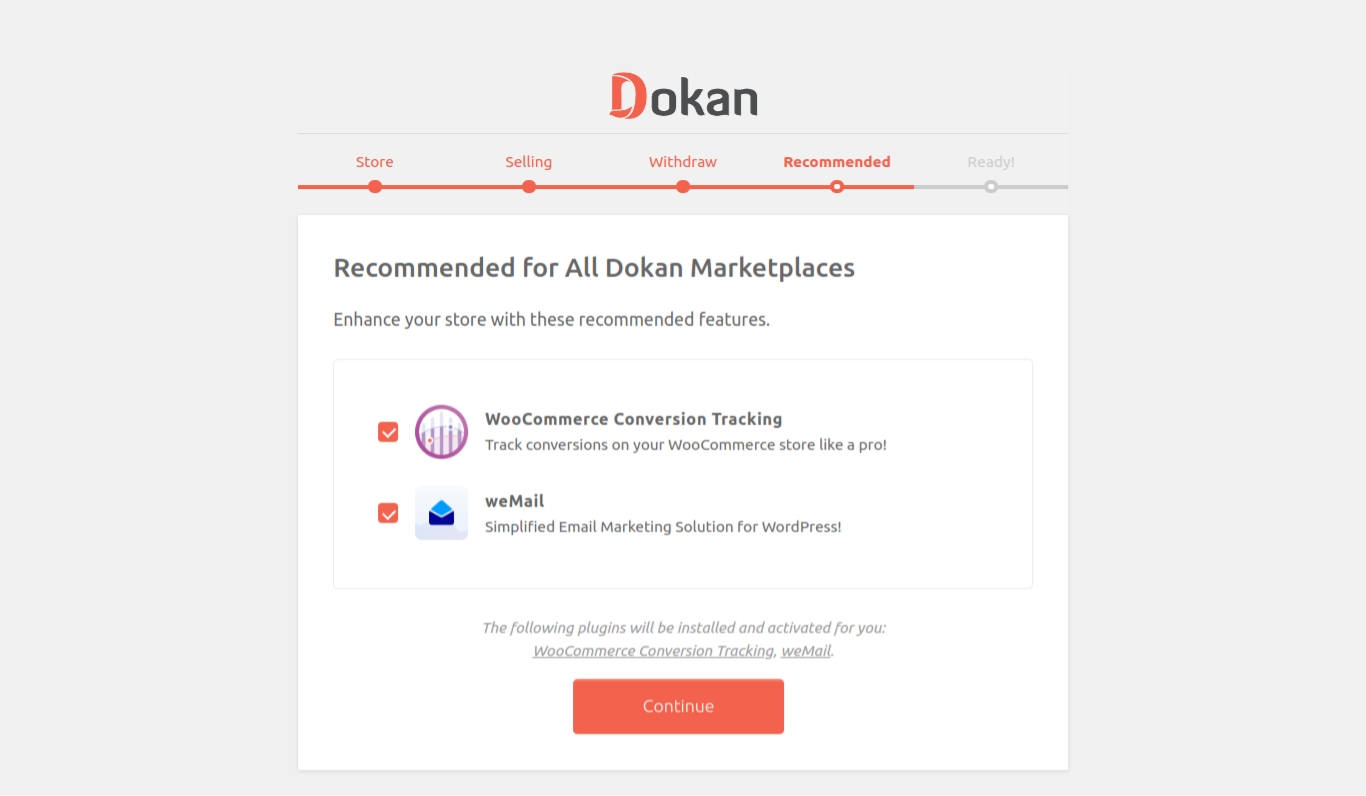
- Install “weMail” and “WooCommerce Conversion Tracking”
If you need to install “weMail” and “WooCommerce Conversion Tracking”, just go ahead.
When you are done filling in every field, you proceed to another step by pressing the button “Continue”. Then, you will go to the settings page of Dokan after showing one confirmation message. As you click the connection that is at the wizard bottom, you could be back to your “WordPress Dashboard”.
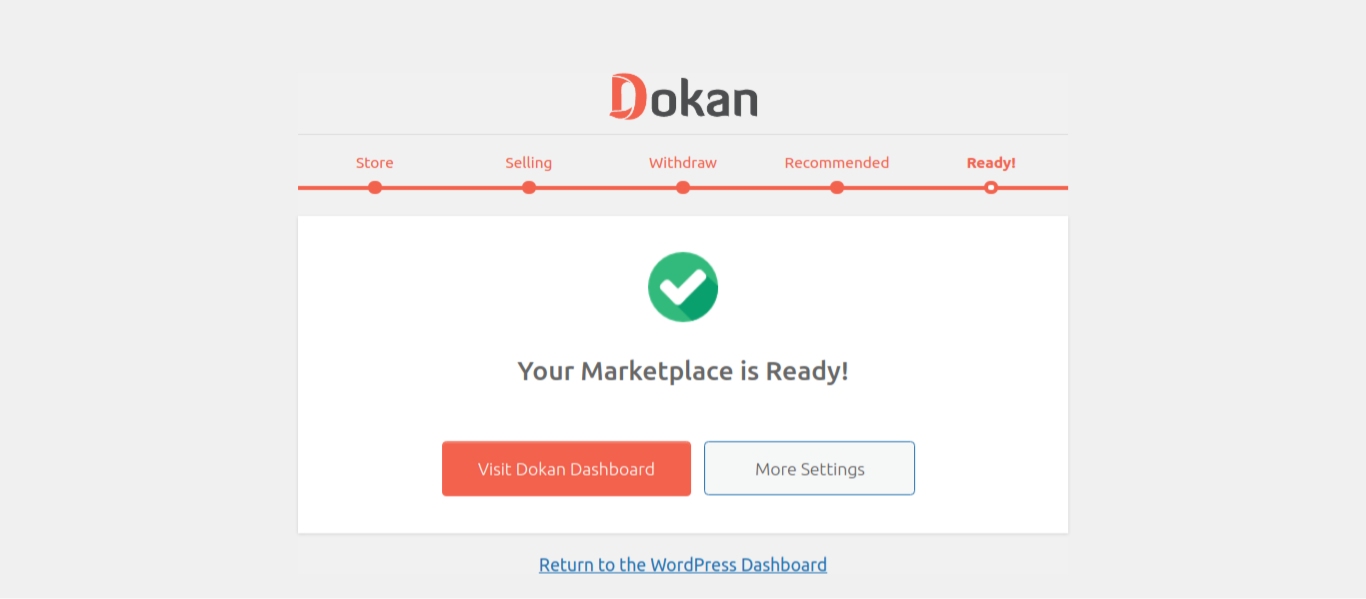
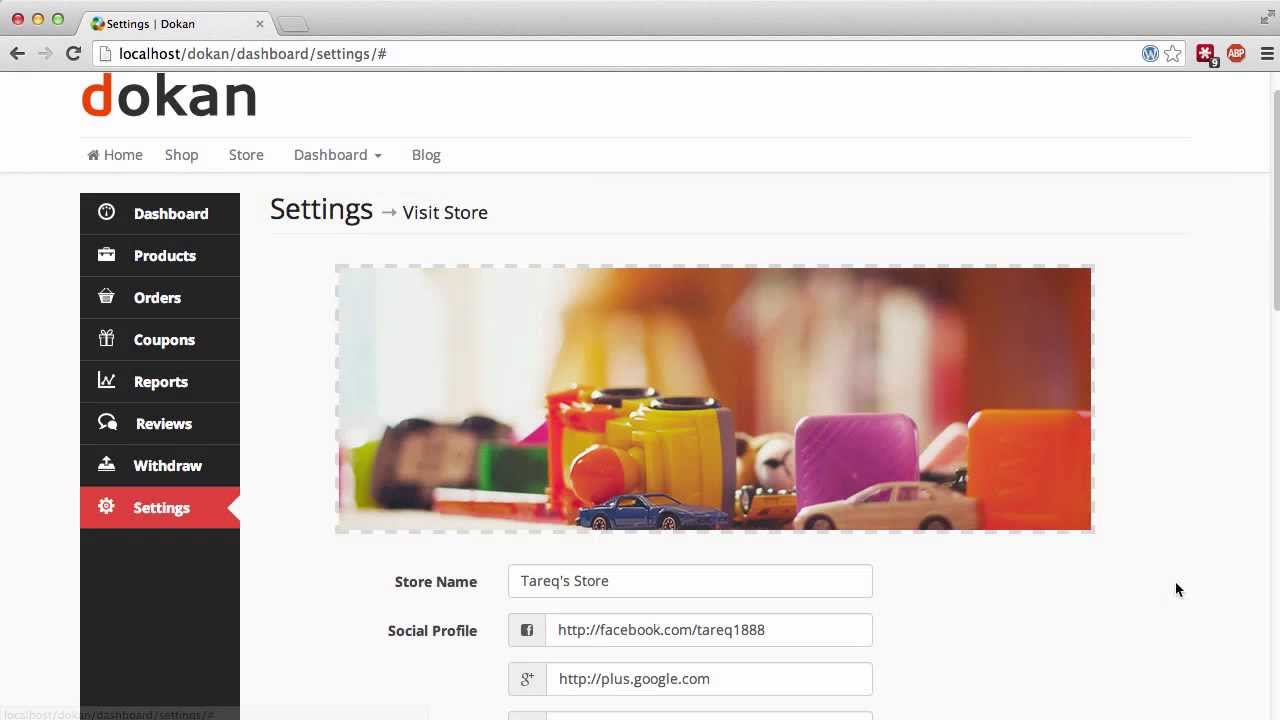
When you are here, it means that you have to install Dokan successfully on your WooShop. The settings of Dokan are vital information that you need to make in place so that the store could be in full operation. You could also perform that throughout the setup procedure or execute later in your Dashboard by approaching “Dokan”, then “Settings”. Right on this “Settings” tab, you could encounter all of the basic settings of Dokan. To discover the tab, go to WordPress Admin Dashboard, select “Dokan” and choose “Settings”.

3. Allow vendor registration, forms, and commission settings
The template of vendor registration in Dokan will let the admin of a site put in extra fields to the registration form of the plugin Dokan Multivendor with the help of WP User Frontend.
Vendors now can register by using one template that could be customized.
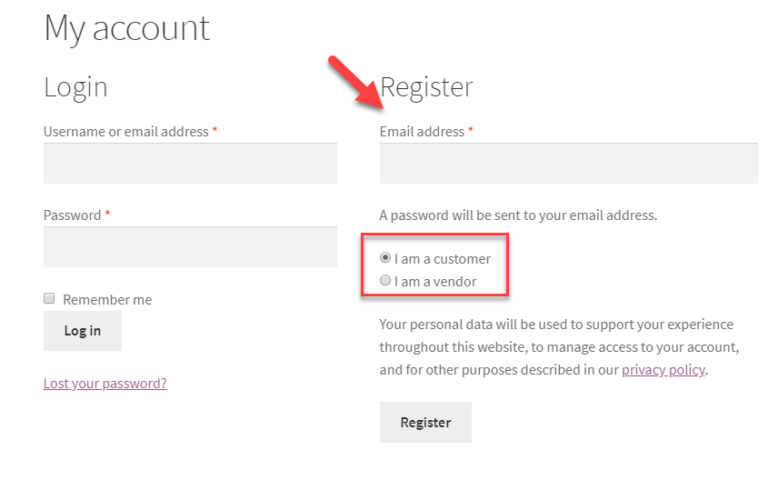
To register a vendor via WP User Frontend, do the following quick steps. Firstly, it is a must to create one form template of “Dokan Vendor Registration”. Next, vendors, who register for Dokan Multivendor with the use of this form would be assigned as vendors. Admins have the right to add myriad additional fields if they want.
Another no less vital section is the segment “Selling Options”. Here, you could tweak a lot of settings for vendors as well as their stores. To set up selling options, go to “WP Admin”, select “Dokan”, then click “Settings” before choosing “Selling Options”.
4. Install the settings of payment
As you are the owner of a marketplace, you will sometimes need to withdraw money until you have approached the proper threshold. Therefore, Dokan is here to assist you in providing the similar feature as in your** “Withdrawal Options”**.
Using various payment gateways within your WooCommerce store helps you maintain accurate withdrawal.
Dokan comes with five options such as Stripe, Wirecard, Skrill, Bank Transfer, and PayPal in terms of payment withdrawal methods. Therefore, if you wish to install those payment gateways, start by going to the menu “WP Admin”, click “Dokan”, and choose “Settings” before selecting “Withdraw Options” and the “Withdrawal Methods”.
5. Add vendors manually
There is no denying that vendors play a key to all online marketplaces’ success. When vendors sell their goods, the marketplace administrator also receives a fee or commission for every sale. With the help of Dokan, there is no need to worry about whether you could build, customize, or add vendor profiles or not. Now, this Dokan backend will make your wish come true.
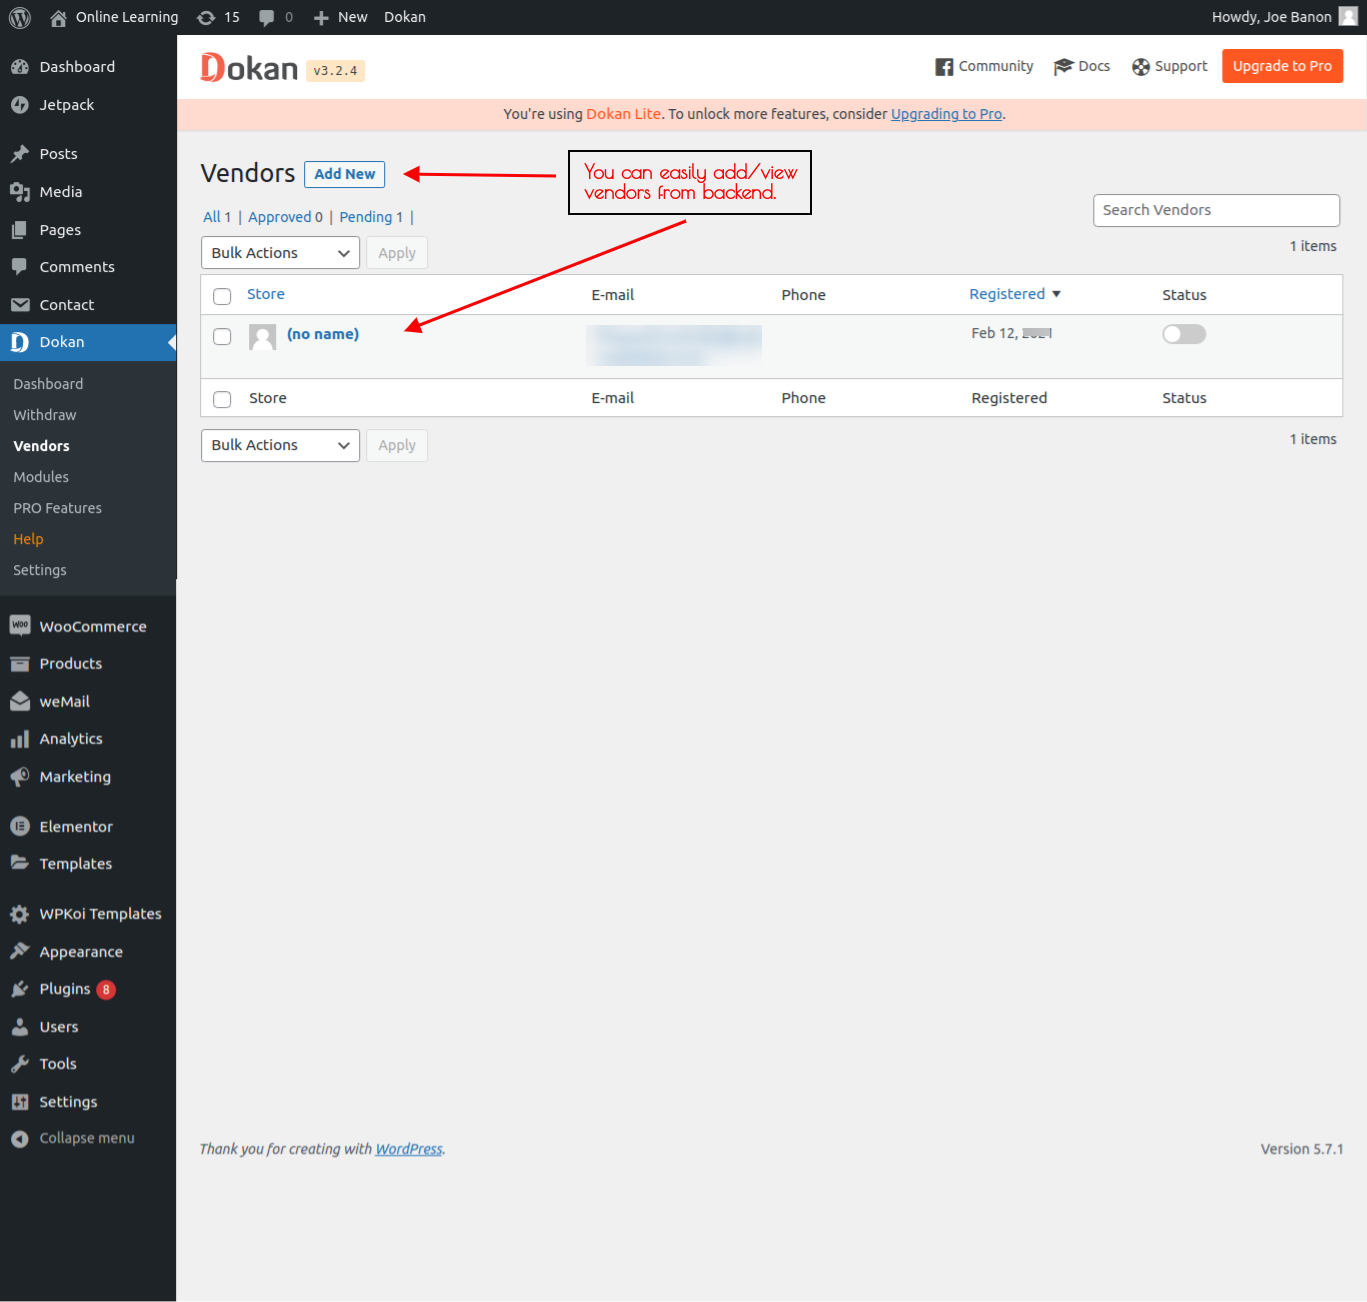
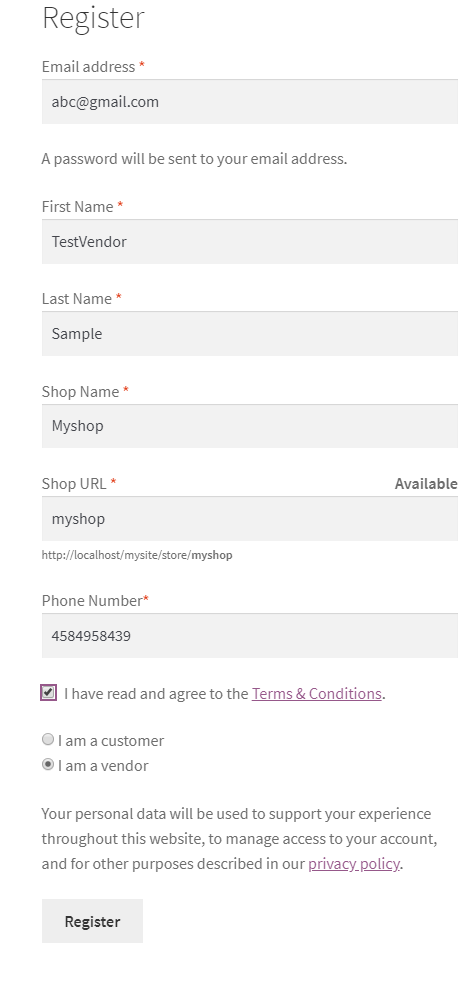
If you are about to create profiles for a vendor, just simply go to your “Admin Dashboard”, then select “Dokan”, choose “Vendors” and click “Add New”.
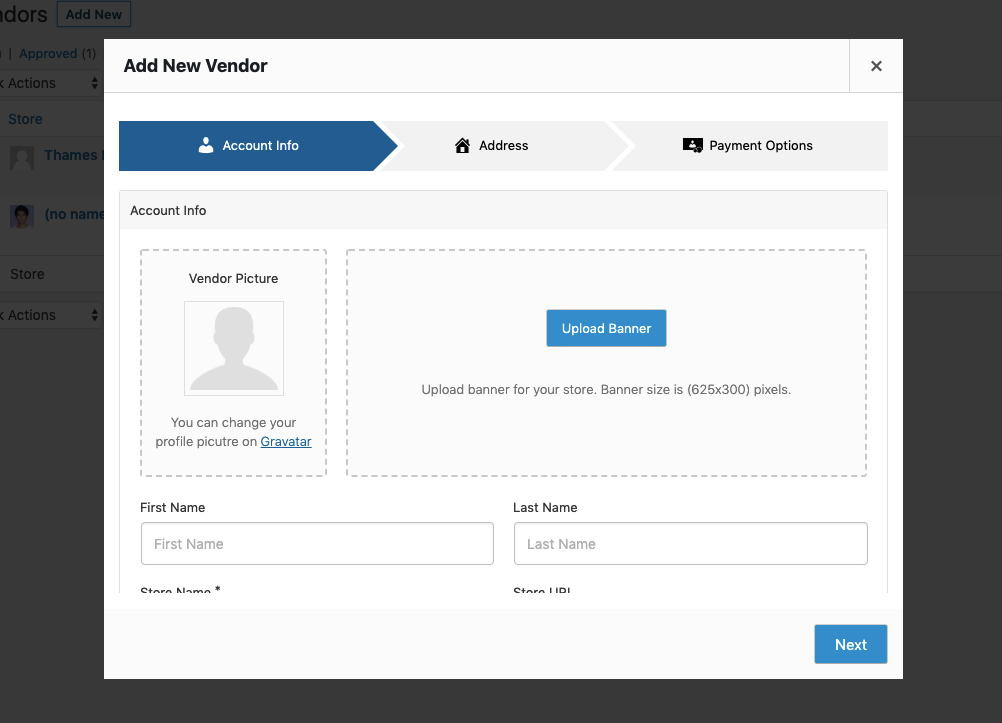
As soon as the administrator selects the button “Add New”, a form will appear, and it comes with all needed fields where you could add vendors.
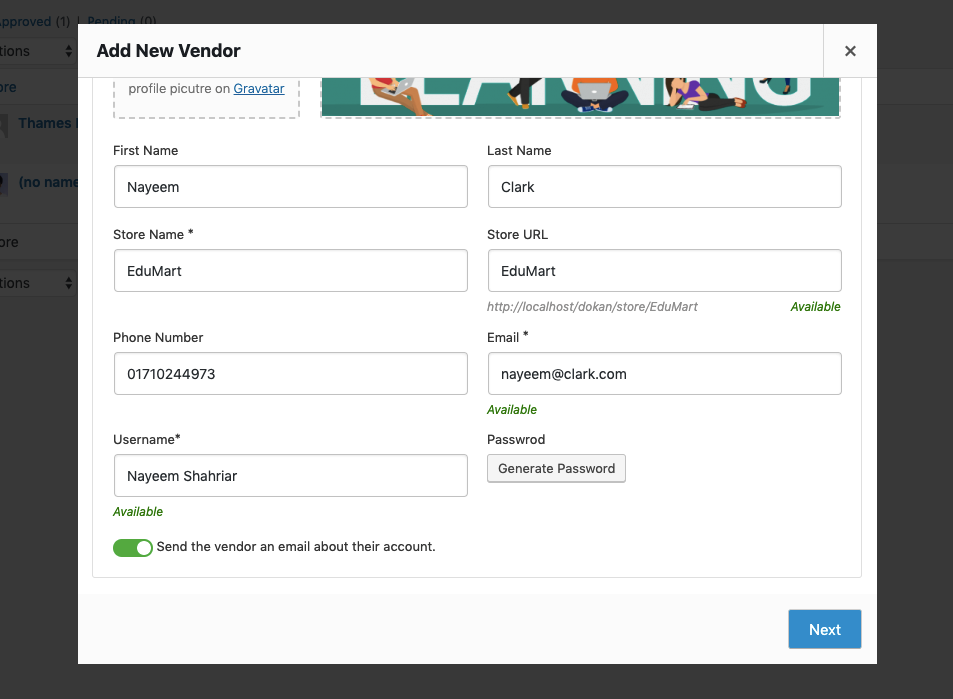
Uploading images, filling out the name, phone number, name, creating one banner image, and creating a vendor password is what the admin does. When you are done, select the button “Next”.
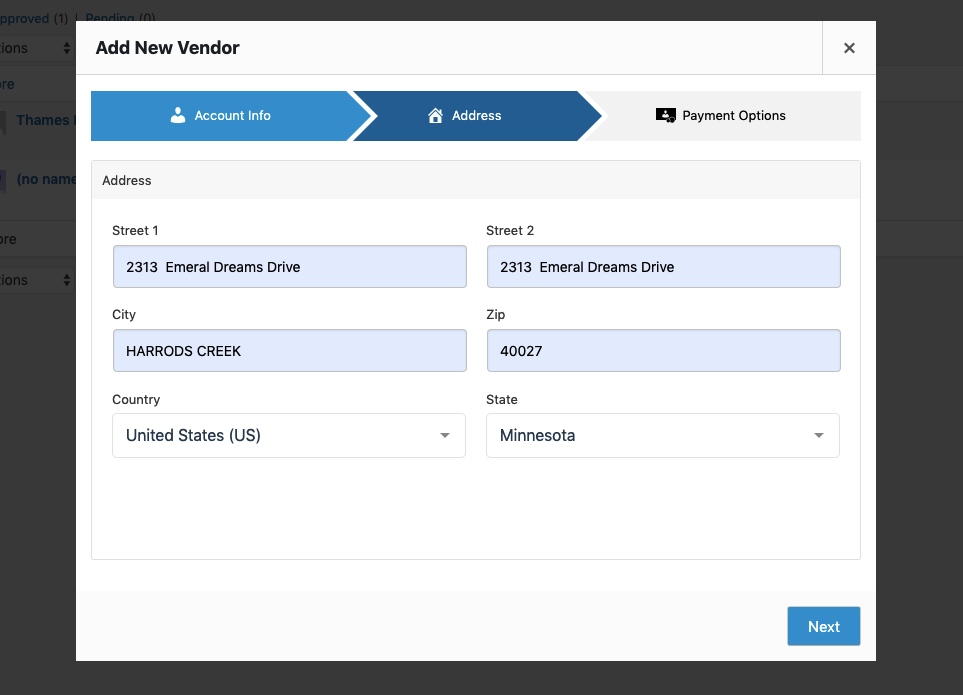
At this step, the administrator must fill in the vendor’s address, then click the button “Next” to keep going.
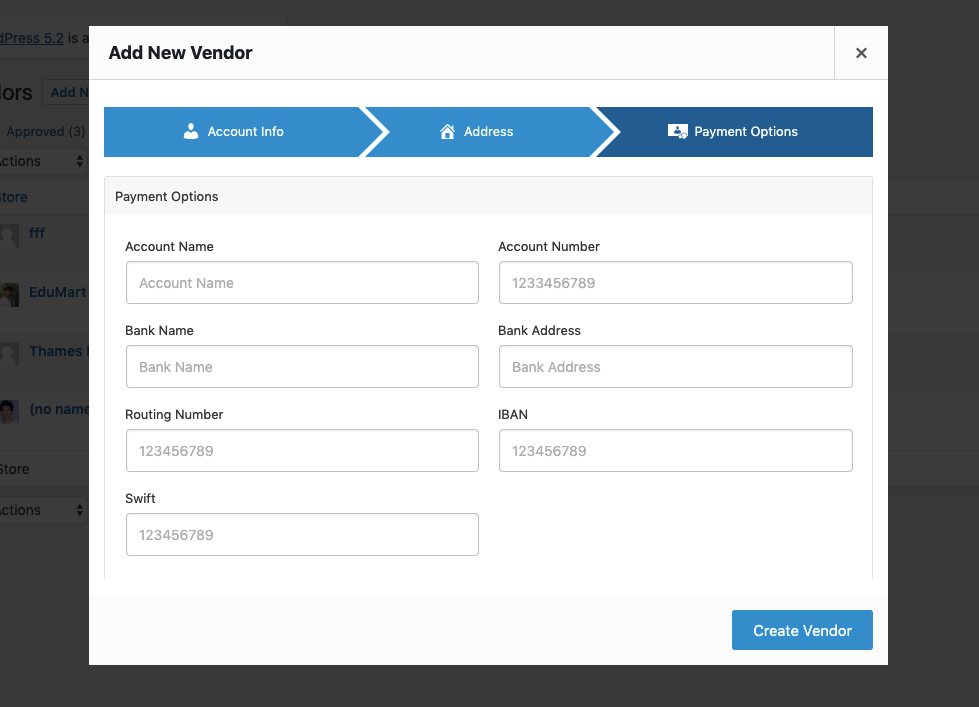
Go ahead with entering the information related to the vendor’s bank account as well as the PayPal account email address. Then admin could let vendors sell their goods, publish products, or display a vendor.
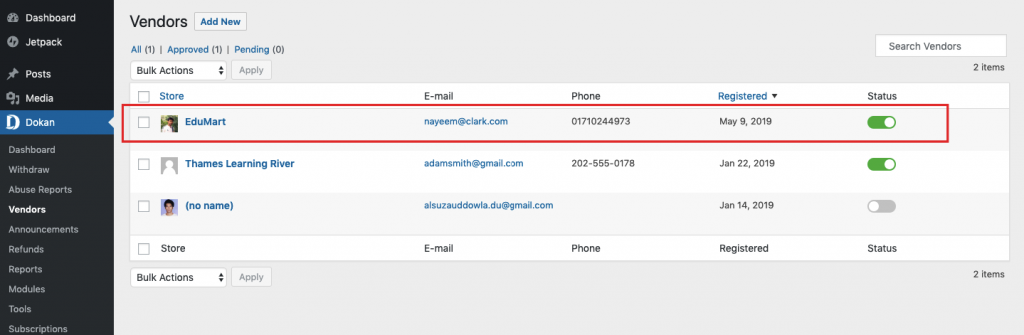
One more step is to click the button “Build Vendor” to facilitate the procedure of building a vendor. See the below screen to see how a vendor will appear in the vendor list on the WooCommerce marketplace.
6. Track performance
Dokan is so helpful that it even allows vendors to measure as well as track the results of their stores. Thus, they could know things are getting words or going well. From this activity, they could make significant changes to improve their online store in general and their products in particular. To make this happen, a module named “Vendor Analytics” has been a part of the modules’ extensive library in Dokan.
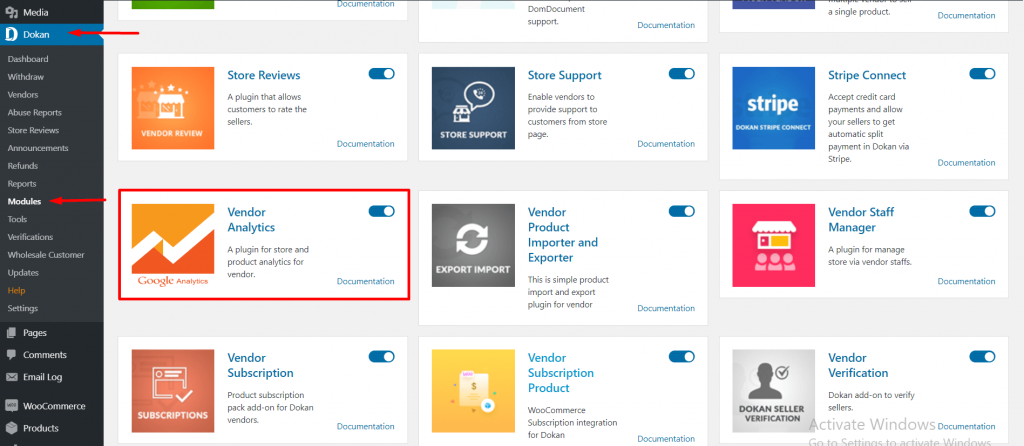
To unlock this module, just penetrate the “WP Dashboard”, choose “Dokan”, and select “Modules”. You then will enable the module “Vendor Analytics” right in this step.

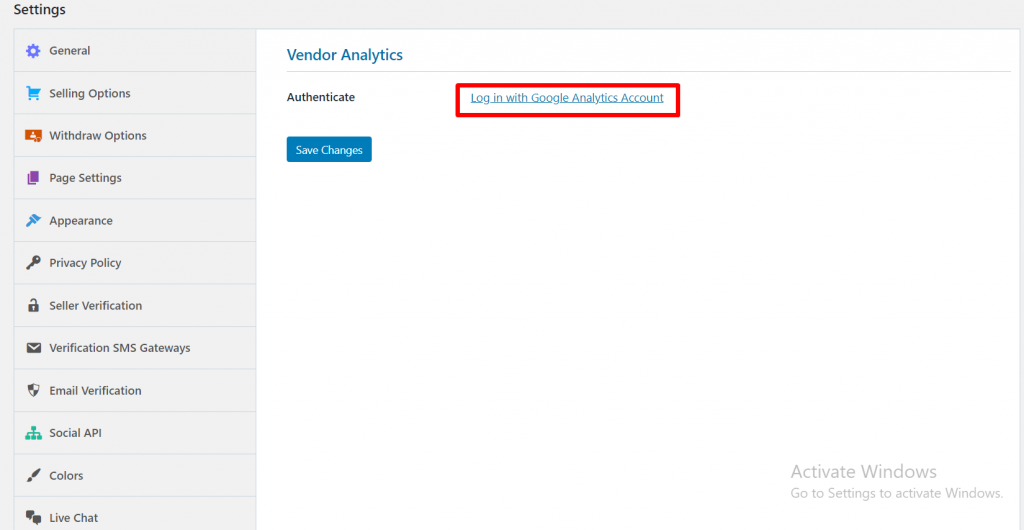
If you are fond of tracking several store results and metrics, you have to add the account of “Google Analytics” to perform that activity. Go to “Dokan Dashboard”, then “Dokan” to choose “Settings” and “Vendor Analytics”.
Now, you will need to select “Login” to penetrate your account of “Google Analytics” from your dropdown menu. There, you will go to the tab “Google Accounts”. The Gmail account used for creating your account “Google Analytics” will be enabled now.
Proceed to the next step by letting the app Dokan access the information of your account GooGle Analytics.
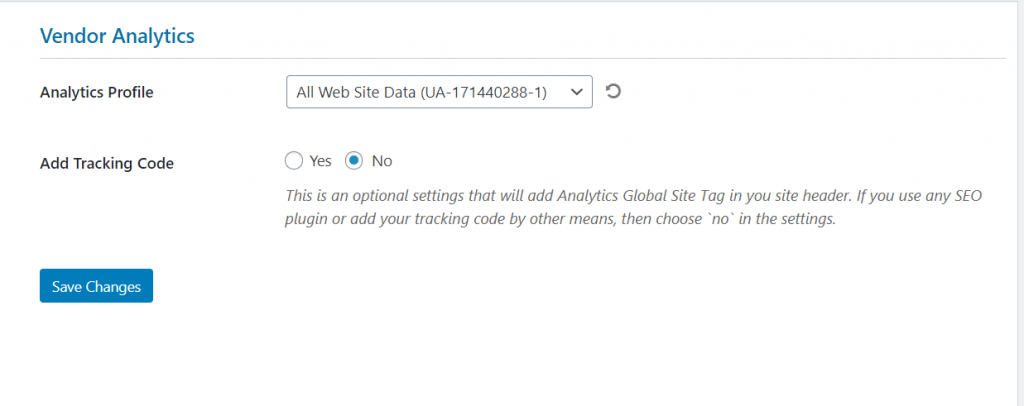
After you finish the above steps, you will be taken to the area of “Dokan Dashboard”. Here, it is time for you to enter the tracking ID of Google Analytics. You could choose to add myriad IDs.
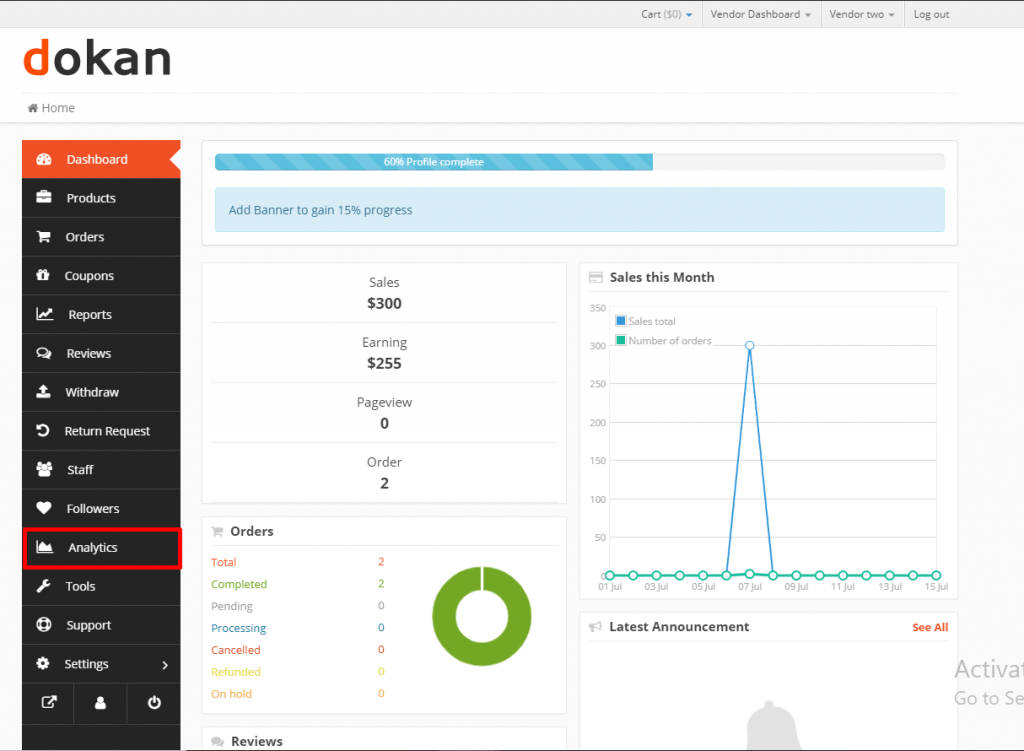
Choose “Save Changes” to complete your setup. This vendor dashboard is where vendors can view and observe their analytics. From the sidebar of the dashboard, choose the option “Analytics” to view.
Step 4: Sell at your WooCommerce Marketplace
Congratulation! You have successfully created a multi-vendor marketplace on WooCommerce. Now, start selling at your WooCommerce marketplace, then earn from that.
Here, you could easily navigate to the section “Dashboard” after you download Dokan successfully on your account of WordPress. From that page, you can have an overview of every detail of your WooStore. To see such information as withdrawal made, monthly sales, the fee paid, as well as suppliers, just simply go to “WordPress”, click “Dokan” and choose “Dashboard”.
Top 3 plugins to create a multi-vendor marketplace on WooCommerce
1. Dokan
If you choose to go with Dokan, it will offer you tons of benefits in creating a multi-vendor marketplace. This plugin helps to save myriad working hours. And it has become one top open-source solutions to create the online marketplace. You can easily transform your WooStore into one multi-vendor marketplace within a minute because Dokan offers a great collection of WP themes as well as a large user community.
Main features
-
Be compatible with multiple WooCommerce themes
-
Be capable of supportive engineers who will offer prompt support
-
No requirement of coding as well as easy customization
-
Offer a variety of functionalities from its frontend dashboard
Pricing: Free
2. WC Marketplace
The second not-to-be-missed plugin that assists you in creating a successful multi-vendor marketplace is WC Marketplace. It comes with the world’s best software to kickstart an eCommerce community for multiple vendors. There is nothing to worry because you can follow an easy process to set up.

To be more specific, you could be equipped with premium add-ons that are useful for adding extra features to your online WooCommerce marketplace.
Main features
-
Easy to use, set up, as well as manage commissions, memberships, and so on.
-
Have a deeper insight into commission details, coupled with vendor reports
-
Customize vendor registration templates and dashboard easily
-
Be available in myriad coupons and commission types
-
Configure your tax and shipping rates on your own
Pricing: Free
3. WooCommerce Product Vendors
Besides Dokan and WC Marketplace, WooCommerce Product Vendors is another renowned plugin. Necessary tools to manage a multi-vendor marketplace or tools for frontend management are available for the user to apply. Get it and let’s get started installing one multi-vendor system quickly.
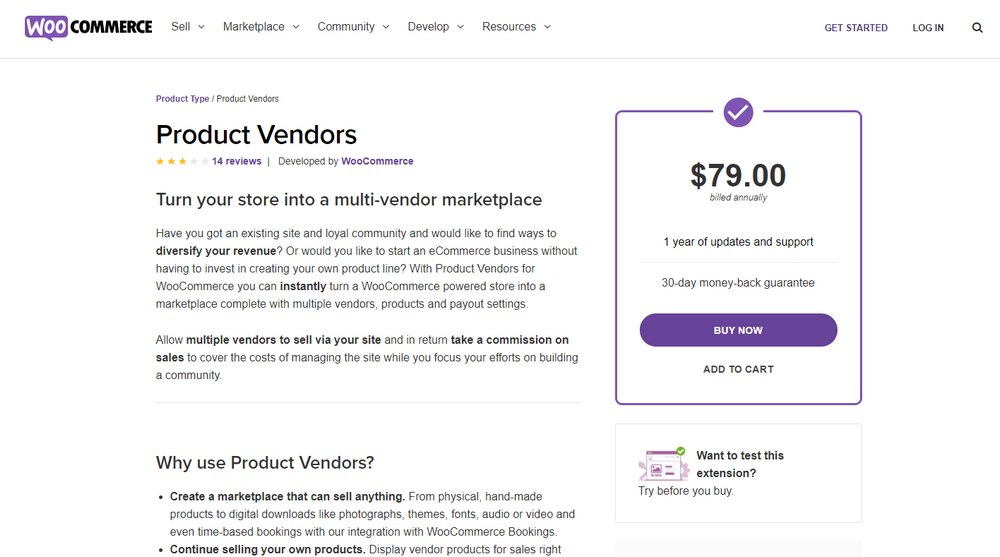
Main features
-
Build a marketplace where vendors can sell all kinds of products and services
-
Set the commission rate for every specific vendor
-
Allow vendors to create profiles, have sales reports, as well as manage products
-
Be able to become a vendor selling your goods and services, besides other vendors
Pricing: $79
Conclusion
Building your WooCommerce multi-vendor marketplace is quite adventurous but also yields a lot of benefits after a period of time. You could not only earn a lot from a successful multi-vendor marketplace. Do not hesitate to draw a plan with this online community to expose products and services to a giant audience of tons of people. Thanks to it, you could earn from vendor commission or even sell your own things. Hope you find this instruction useful as your wish and expectation. Keep following us for further interesting guides.


