
How to connect Zoho to WooCommerce?

Connecting Zoho to WooCommerce is an advanced integration for your business. You are able to sync all of your wooCommerce orders to ZOHO CRM (Customers, Products, Sales Order) in a couple of minutes after authenticating your site with ZOHO CRM. This plugin allows you to create custom values to add data. Step-by-step following the instructions, you can integrate Zoho with WooCommerce by yourself easily.
How does the integration work?
The integration’s mechanics are straightforward. When users make an order, their information, including User Information, Order Information, Invoice Information, and Shipment Information, will be available in WooCommerce and synchronized with Zoho. Depending on which system is your inventory master, the items can sync back to WooCommerce as products or the other way around..
- Saves Your Developers Time: The Zoho WooCommerce Integration plugin lets you save any error logs that occur when synchronizing data. However, it also provides a detailed logging report containing answers, requests, object information, and many other facts. This makes it easy for your developers to figure out the problem and fix it, saving them time that they would have otherwise spent on it.
- Simple to Set Up and Use: The plugin comes with a super easy and user-friendly interface, making it simple to use. You need to install, set up the plugin, and use it at your WooCommerce store.
- Synchronizes Data In No Time: This Zoho WooCommerce Integration uses Zoho API that permits you to send multiple records of any module in one go.
- Gives You Full Control to Your Data Sync: You have total flexibility over how you wish to integrate your data with the CRM Integration for Zoho plugin. This plugin provides a feed that you may use and alter to sync data in your own method.
How to integrate Zoho with WooCommerce?
Step 1: Connect to Zoho Account
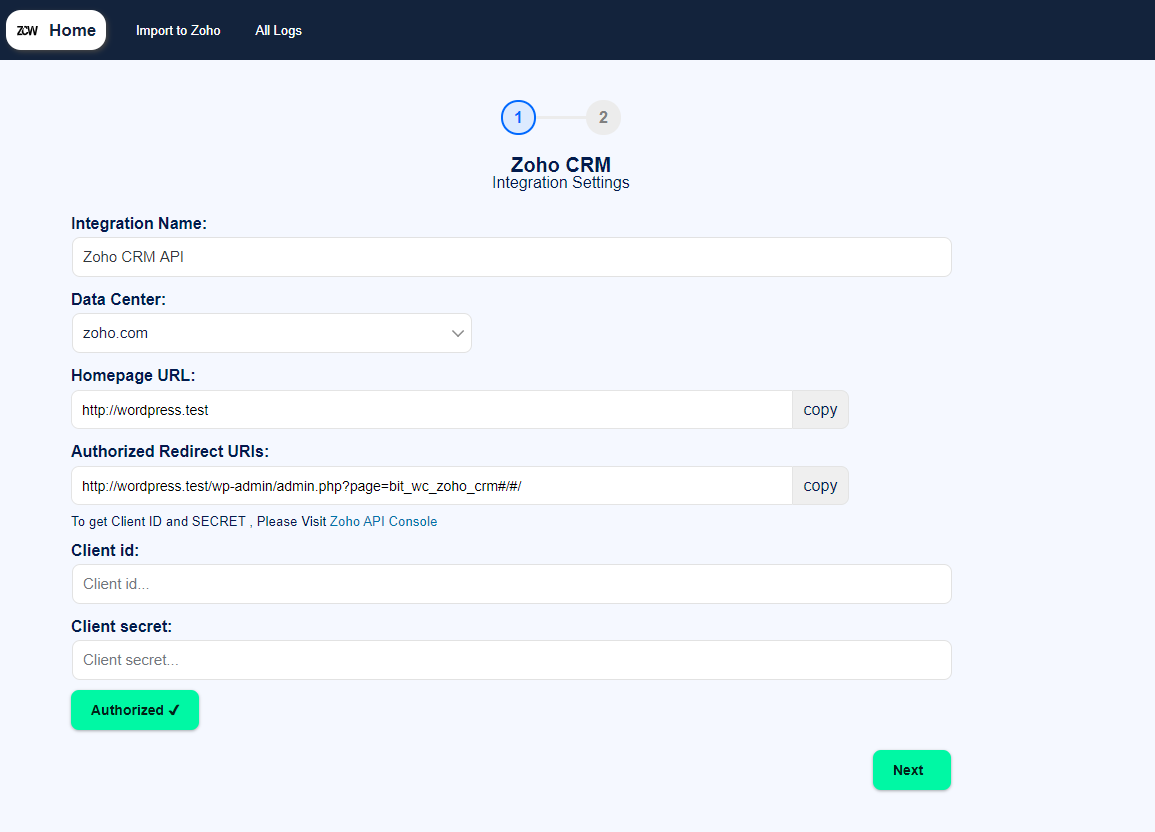
- Install and activate WooCommerce’s integration with ZOHO CRM.
- Press the Home key.
- Select Integration Name, Data Center, Homepage URL, and Authorized Redirect URL from the Zoho CRM settings.
- Go to ZOHO API CONSOLE => Add Client=> Server-based application => Get Client Id and Secret. Make a new client. Get your client ID and secret information by registering all of your details.
- Authenticate your website.
Step 2: Mapping setting
To map the fields, start by entering the name of the organization to which your Zoho account belongs. By mapping the fields related to your decision, you can now sync order details from your site with Zoho inventory. You simply need to map those fields once, and the plugin will take care of everything else.
Customer Mapping
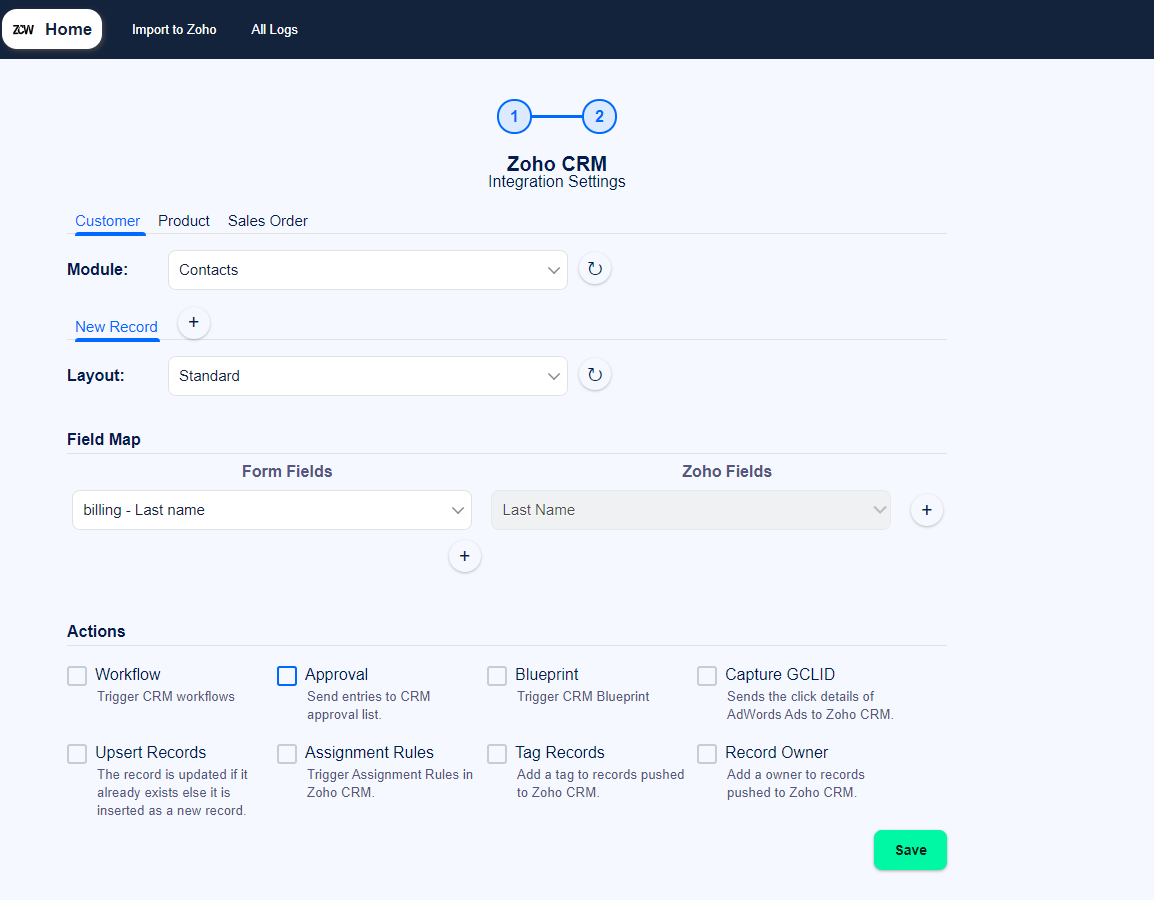
- Module: Following CRM connection, users must choose modules in which all customer data will be kept. Accounts, Contacts, Leads, and Custom modules are available to users.
- New Record: The user may use this option to build several linked lists relating to the customer’s information.
- Field Map: Users must link their wooCommerce checkout field to their CRM field in the Field Map. Assume you wish to use your customer’s first name as a Zoho inventory contact name. Then, in the wooCommerce checkout box, pick ‘First Name .’ In the Zoho inventory area, select ‘Contact Name.’ To manage your client information, you may map multiple fields to inventory fields. You can set ‘Custom value‘ from where you can send order notes according to the placed order.
Product mapping
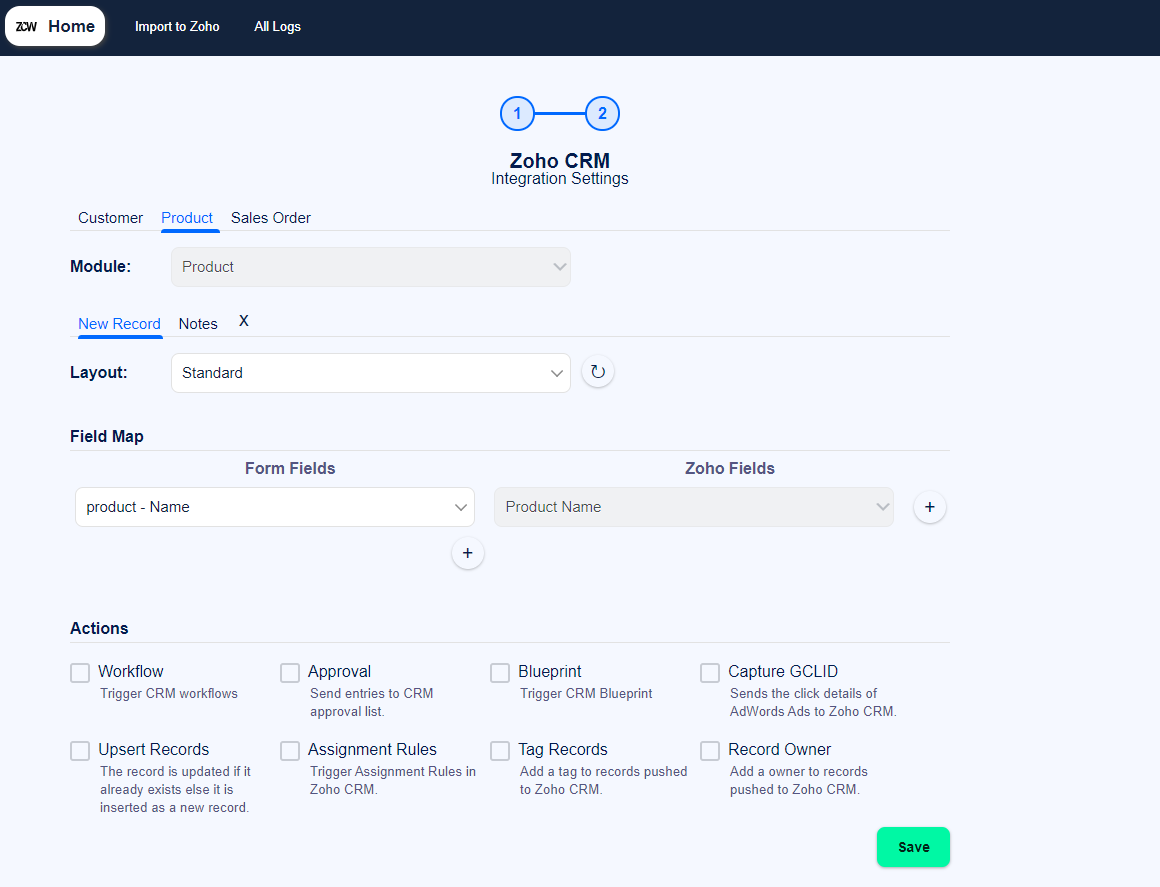
The user must place the product in the module area from the product settings, which will keep all of the product data for each client from the user’s wooCommerce site. If any item on your wooCommerce site isn’t included in your CRM account, you’ll need to add that item or product. Then, similar to the Customer and Sales Order options, you may construct a connected list. You must map which wooCommerce site field will sync with the CRM field. One thing to keep in mind is that duplicate data will not be an issue. When a product is published and numerous customers order it, all of the customers’ information is sorted for that product.
(Only Pro Version) Sale order Mapping:
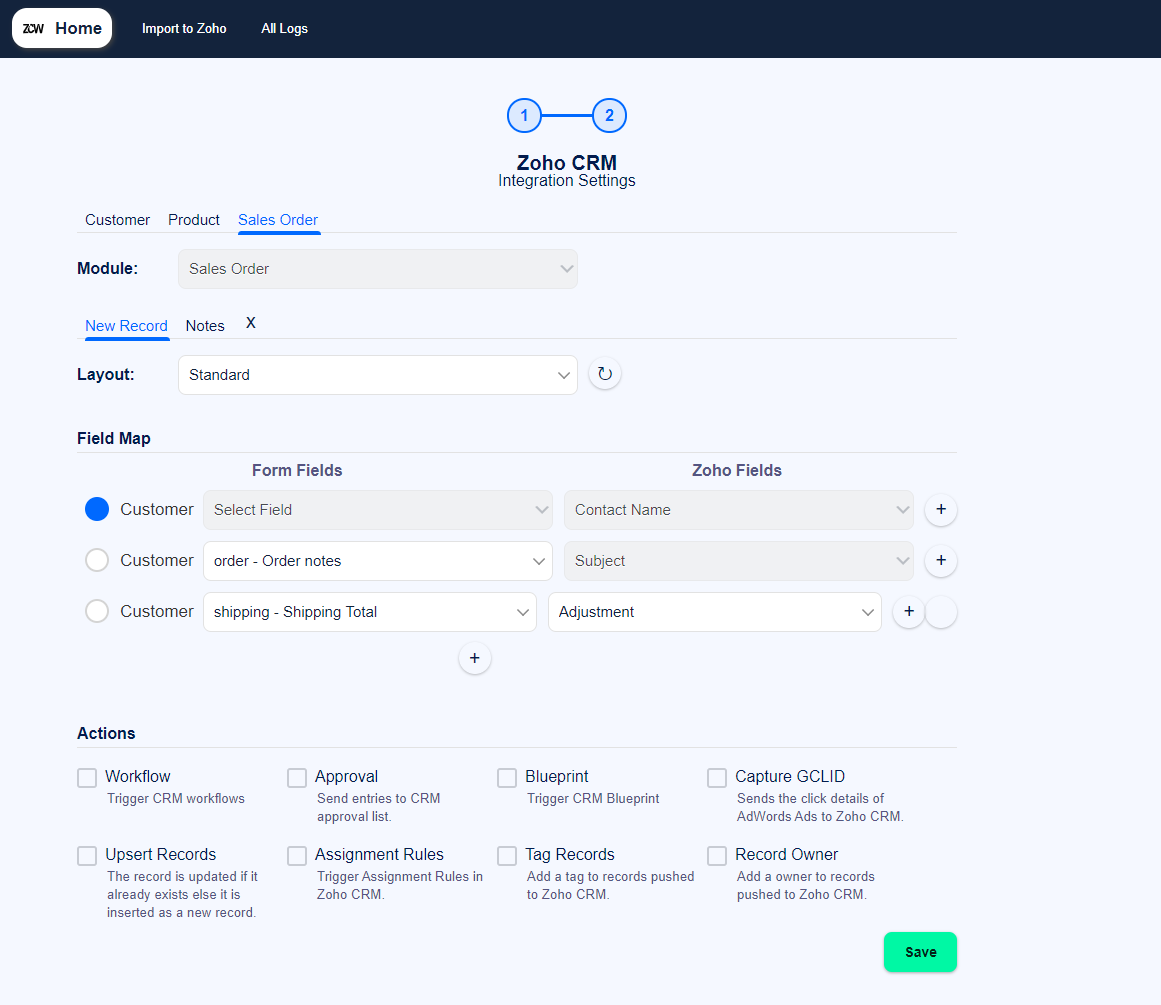
If you want to use this feature, you have to upgrade Zoho to the pro version. When utilizing the pro version, you must first choose the lookup field you want to use. The Customer Module may then be configured based on the lookup field. As with the Customer option, you must choose the sales order module and build a connected list in the New Record box. When a customer purchases on your wooCommerce site, a matching sales order will be produced immediately after you’ve mapped all of your preferred wooCommerce fields to CRM fields. You may personalize your sales order section to present your customer’s sales order on your Zoho CRM account according to your needs.
Step 3: Actions

Zoho owns 8 additional actions which help users to control the data submission as well as to track their leads/Contacts on a CRM account, including:
- Process: Select this option to start the Zoho CRM workflow for the module you’ve chosen. If you don’t pick this option, Zoho CRM workflow will not operate with the specified module.
- Approval list: You may send file upload field data to Zoho CRM associated list Attachments if you choose this option. You may also use regular field mapping to communicate file upload field data to Zoho CRM. From the drop-down menu, choose the CRM file upload field to which you wish to send data.
- BluePrint: Select this option to have the Zoho CRM blueprint apply to the module you’ve chosen. If you do not pick this option, the specified module will not operate in Zoho CRM.
- GCLID: Sends the Google ad click id to Zoho CRM.
- Upsert Record: If the option YES is selected, any records in Zoho CRM that have the same value will be updated with the new values. If you choose NO, a new record in Zoho CRM will be generated. You can arrange fields in the order that they should be upserted.
- Assignment Rules: If you select this option, Zoho CRM Assignment Rules can be activated when form items are uploaded to a CRM module. Please choose the assignment rule you wish to activate from the drop-down menu.-
- Tag records: You may add a tag to the records that are pushed to Zoho CRM when you select this option. It allows you to use tags to search for records in CRM. In the dropdown, there is a list of tag records. You may use Zoho CRM’s default tag, and you can also add a custom tag to form fields.
- Record owner: If you choose this option, you can specify who owns the transmitted record.
Step 4: Import to Zoho Setting
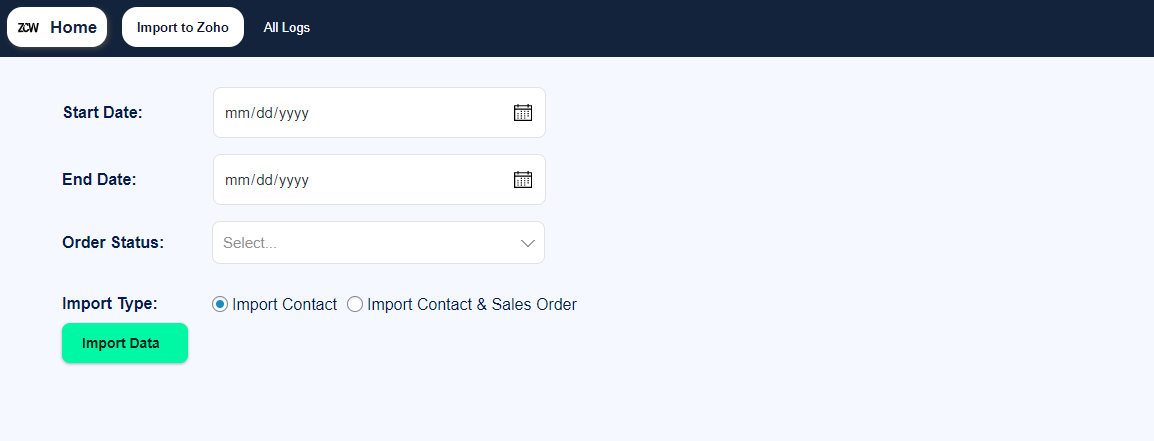
In this section, you may define a time limit for importing all data into CRM. For instance, you’ve had a wooCommerce site since 2020, but you’ve just been utilizing this plugin since 2020. When you set Start Date – 1/1/2020, End Date – 1/1/2021, Order Status – Confirmed, and Import Type, just the data you choose will be transferred to Zoho CRM when you click “Import Data” Simply click the ‘Import Data’ button to import all of the confirmed data from 2020 to 2021.
Step 5: All logs
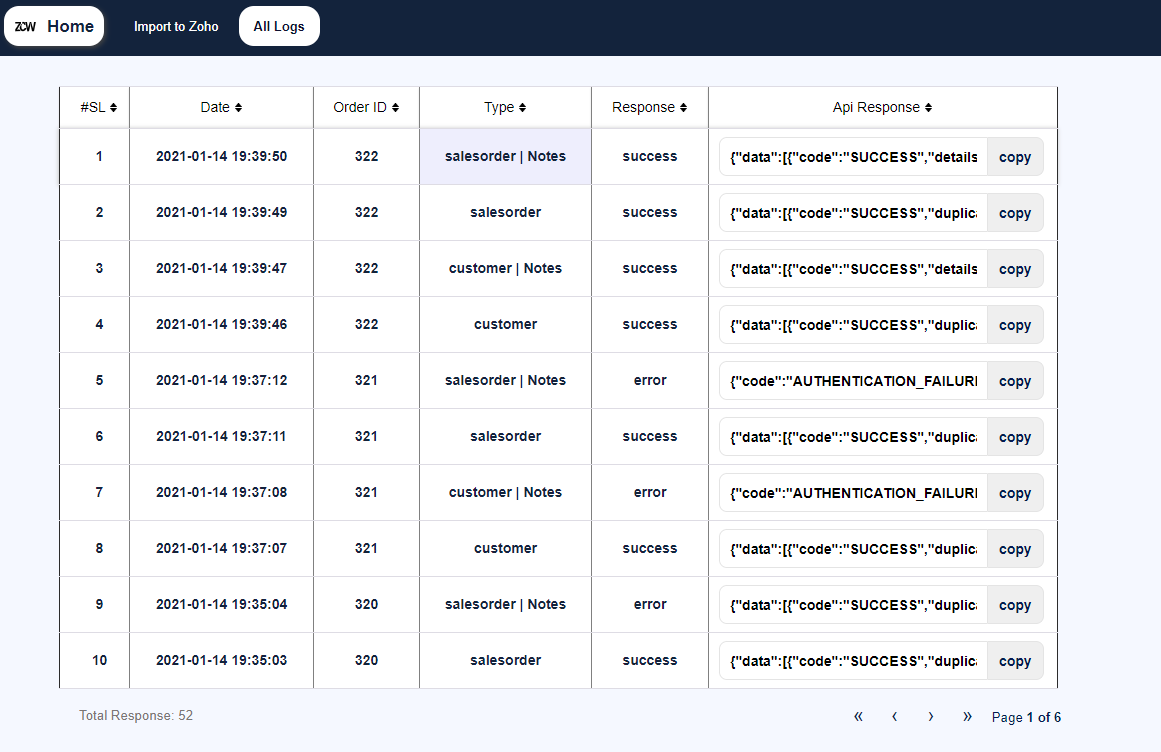
- All logs allow administrators to view freshly produced data on the website.
- If a user imports outdated data from your site, it will be presented here as well.
- Users can arrange the columns in whatever order they like.
- Users can copy the whole sales order API response to their clipboard.
- The associated list of the linked module will be displayed in the log.
Final thoughts
Connecting WooCommerce to Zoho provides several advantages, including time savings and the avoidance of mistakes associated with manual data entry. You can accomplish it on your own even if you have no prior expertise. This post should make it easier for you to link Zoho to WooCommerce and optimize your online business.


