
How to Connect Amazon S3 to WooCommerce

If you manage a WooCommerce-based online business, you should consider connecting to Amazon S3. Using Amazon S3 storage to deliver your digital items allows for higher scalability, reliability, and download speeds for your customers, especially when providing large files. These features will help you control your business system better.
You’ve come to the correct place if you’re seeking for a way to integrate this valuable storage service with your WooCommerce store. We’ll explain why Amazon S3 (Amazon Simple Storage Service) is a must-have feature for your store in this article, and then show you how to connect Amazon S3 to WooCommerce.
What is Amazon S3?
Amazon S3 is scalability, data availability, security, and performance-leading object storage service. Amazon S3 allows customers of all sizes and sectors to store and safeguard any amount of data for various use cases, including data lakes, websites, mobile applications, backup and restore, archive, business applications, IoT devices, and big data analytics. You may use Amazon S3’s administration tools to optimize, organize, and configure data access to meet your specific business, organizational, and compliance needs.
Key features
-
Offer a range of storage classes designed for different use cases
-
Allow storing data with changing or unknown access patterns in S3 Intelligent-Tiering
-
Have storage management features to manage costs, meet regulatory requirements, reduce latency, and save multiple distinct copies of your data for compliance requirements
-
Provide features for auditing and managing access to your buckets and objects
-
Provide features to transform data and trigger workflows to automate a variety of other processing activities at scale
-
Offers features to help you gain visibility into your storage usage
How it works
Amazon S3 is a bucket-based object storage service that stores data as objects. A bucket is a type of container that holds stuff. A file and any metadata that describes it are considered objects.
To store data on Amazon S3, you must first establish a bucket and name it, as well as designate an AWS Region. Then you upload your data as Amazon S3 objects to that bucket. Each item has a key (or key name), which serves as the object’s unique identifier within the bucket.
Why you should connect Amazon S3 to WooCommerce?
Amazon S3 is the most important thing that an online business owner must-have. Especially for folks who are always on the go, automation is a great way to save time. It allows you to automatically migrate data between your online apps, allowing you to focus on your most important tasks.
Furthermore, the Amazon S3 Storage plugin for WooCommerce enables you to use your Amazon AWS S3 service to serve digital products, making your store more flexible and maximizing functionality to help your website run more smoothly.
Using Amazon S3 storage to deliver your digital items also allows for higher scalability, reliability, and download speeds for your clients, especially when providing large files.
That’s an excellent choice for any WooCommerce store. So, let’s take a look at how to connect Amazon S3 to your WooCommerce store!
How to connect Amazon s3 to WooCommerce?
Step 1: Install and configure
Installation:
-
Upload the woocommerce-amazon-s3-storage folder to your Plugins directory.
-
Activate WooCommerce Amazon S3 Storage through the Plugins menu in your WordPress admin area.
-
Configure the plugin settings.
Configuration:
-
Go to aws.amazon.com and create a user account there.
-
Go to console.aws.amazon.com then Select Your Name at the top right corner and then click My Security Credentials.
-
Click Create New Access Key under Access keys (access key ID and secret access key).
-
Keep a copy of the Access Key ID and Secret Access Key; you’ll need them later.
-
In your WordPress admin area, go to the WooCommerce > Amazon S3 Storage option.
-
In the fields, paste the Access Key ID and Secret Access Key.
In these options, you’ll also discover the URL Valid Period. If you want to keep your files hidden from other people and utilize the Redirect only approach for downloaded products, please provide a value in this area. This item will set a time limit (minutes) on how long the download links will be active.

Note: When a consumer clicks the WooCommerce download link, the plugin intercepts the download process and generates a unique Amazon URL that is only valid for the amount of time given in the URL Valid Period parameter. Please keep in mind that this time period must be defined in minutes. Your customers will be unaware of this entire procedure because it is hidden.
These actions WooCommerce > Settings > Products > Downloadable products will tell you which approach you’re utilizing. Although we do not encourage employing the redirect approach, it is a requirement if you do.
Step 2: Uploading Files to Amazon Web Services
You must upload your files to the Amazon S3 service before you can use it to serve your files.
-
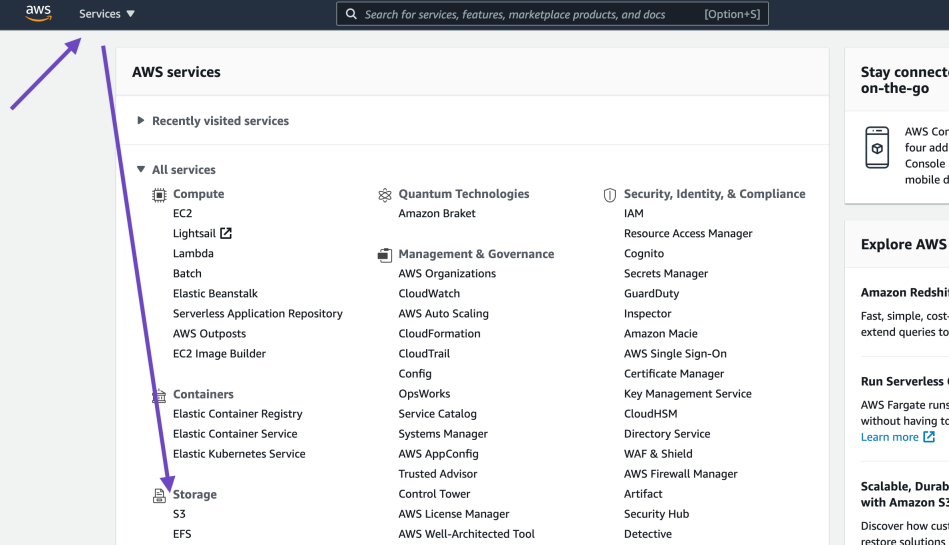
Go to console.aws.amazon.com
-
Choose S3 under Services > Storage.
Step 3: Create an S3 bucket for file storage
You’ll need to create a bucket whether this is your first time using Amazon S3. A bucket is a one-of-a-kind identifier that can be assigned to a specific location. This reduces costs, improves latencies, and even satisfies regulatory standards. To make a bucket, you should:
-
Go to the top left and click the + Create Bucket” button
-
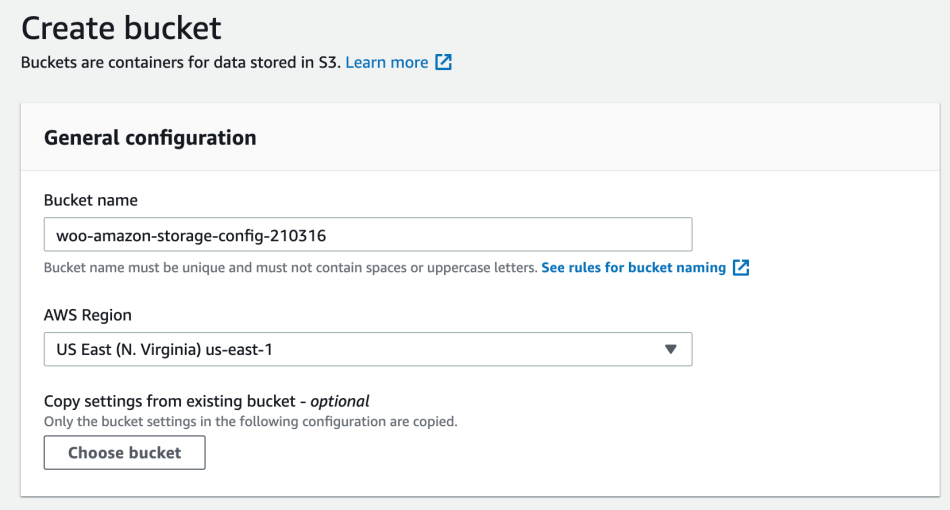
Give your bucket a name and choose the location where you want it to be hosted
Note: Please consult the Rules for Bucket Naming in the Amazon Simple Storage Service Developer Guide for naming recommendations.

- Configure your bucket in the first section of the Create Bucket page.
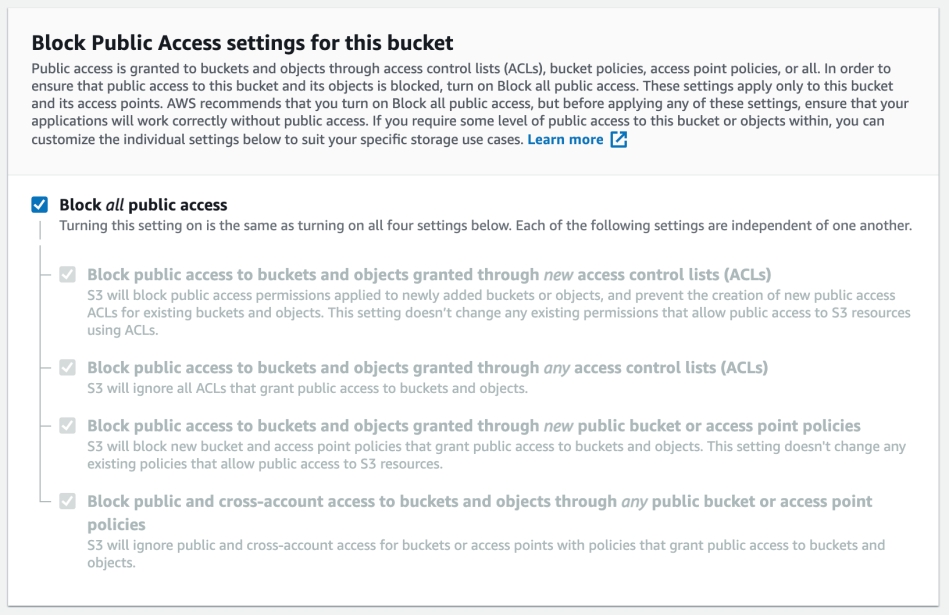
- You can leave the default values in the next section, Block Public Access settings for this bucket, because you can alter the permissions later.
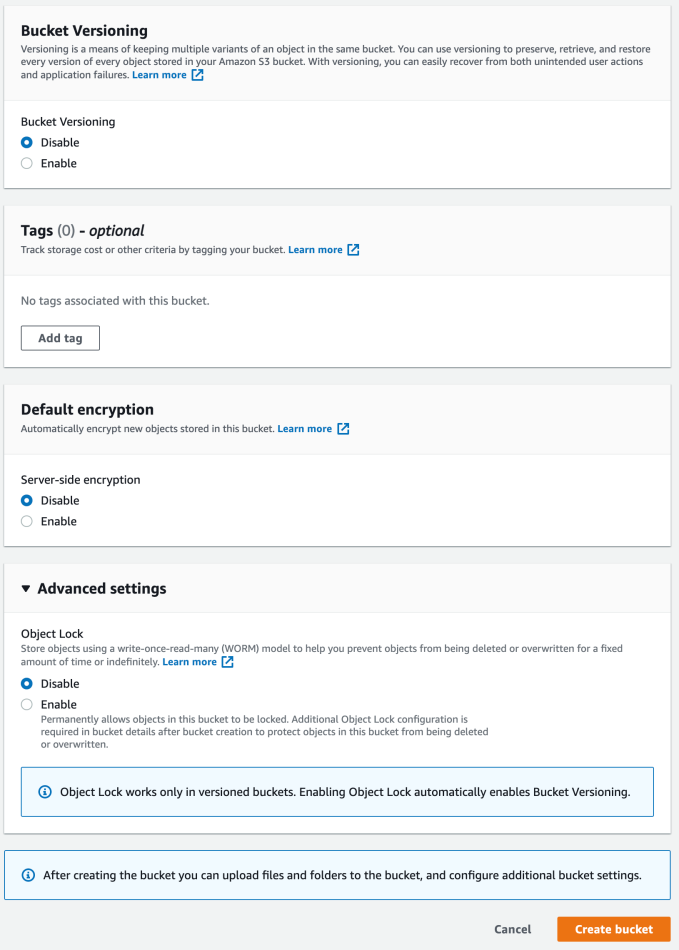
- In most circumstances, the default parameters in the following sections will suffice. When you’re finished, click the Create Bucket button in the bottom right corner. When you’re finished, you’ll be directed back to your bucket list.
- To upload files, go to the left-hand menu and select Buckets, then your bucket’s name.
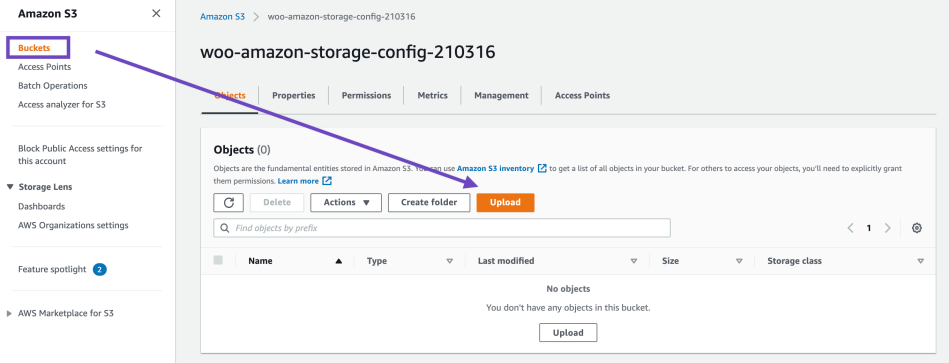
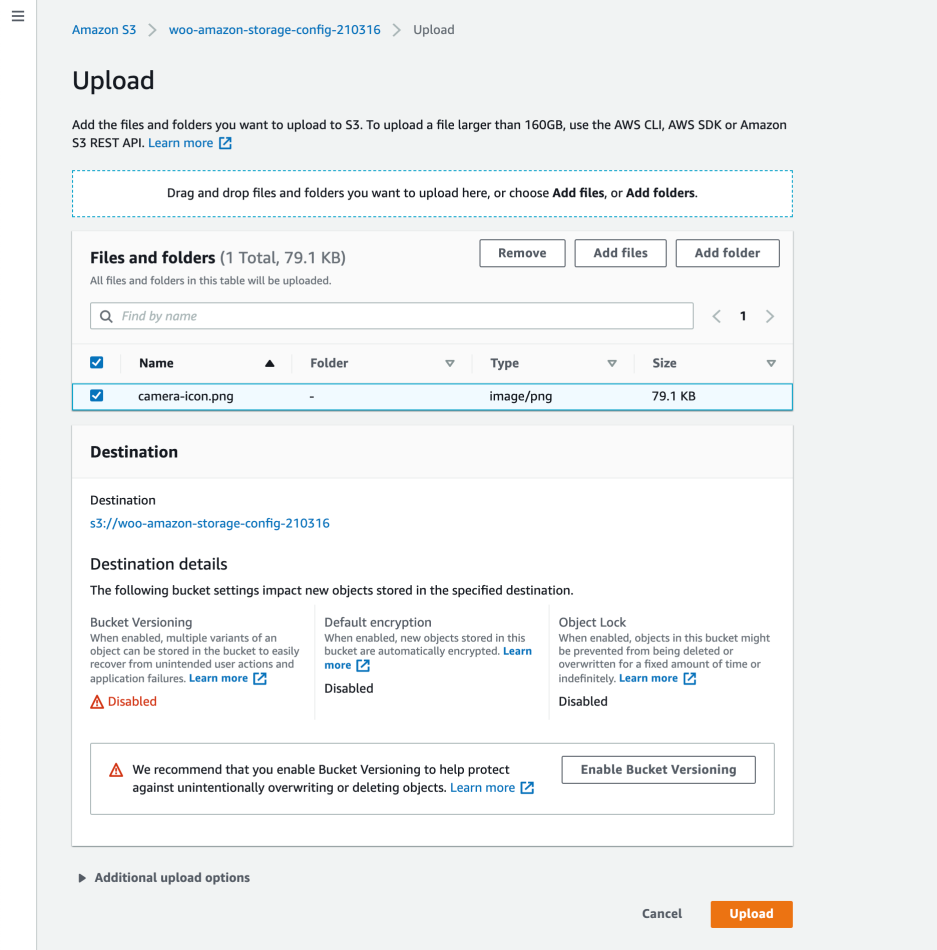
- To queue your files, simply drag & drop them. File-specific settings can be changed under Additional upload options. Click Upload when you’re finished.
Step 4: Set file permissions
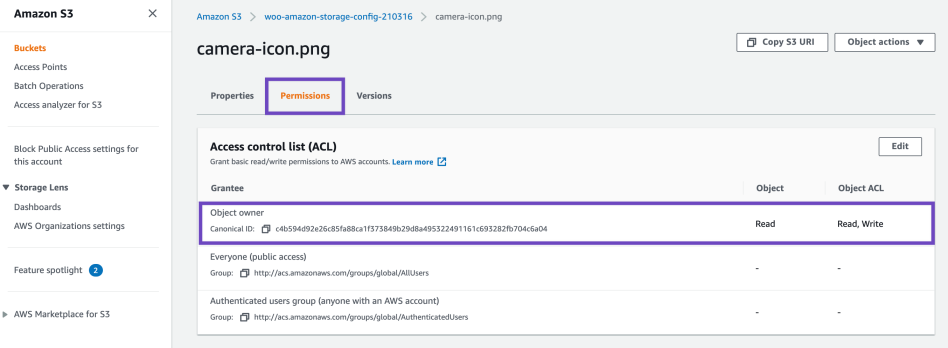
The default file permissions are set to private, but they can be altered by clicking on the file name and altering the privacy settings under the Permissions tab by adding or deleting privileges.
Please double-check that the object permissions are set to Read. Otherwise, your files will not be accessible or downloadable, and an Access Denied` error will be displayed.
Additional instructions for utilizing Amazon S3
Amazon S3 Shortcode
For file download URLs that are unique
- To offer unique download URLs to files on your Amazon S3 service, use the shortcode to generate them anywhere on your WordPress site. The shortcode is as follows:
[amazon_s3 bucket=MyBucketName object=MyFileName.ext]
- To add a download link to a page or post, type in the following:
<a href="[amazon_s3 bucket=MyBucket object=MyFile.jpg]">Download File From Amazon</a>
For different region parameters
The shortcode also accepts the parameter region required if your buckets are divided into separate areas. It is defined as follows:
[amazon_s3 bucket=MyBucketName object=MyFileName.ext region=eu-central-1]
Files Download With Funny Names
When your store is set to use Force Download and the Amazon S3 plugin’s private URL functionality, your files will be the filename of the URL that is generated. To avoid this, set your store to use Redirect for downloads and optionally add some metadata to the file on Amazon S3 to give it a different name than the one you published it with. Your file will be downloaded by default with the name you gave it when you uploaded it.
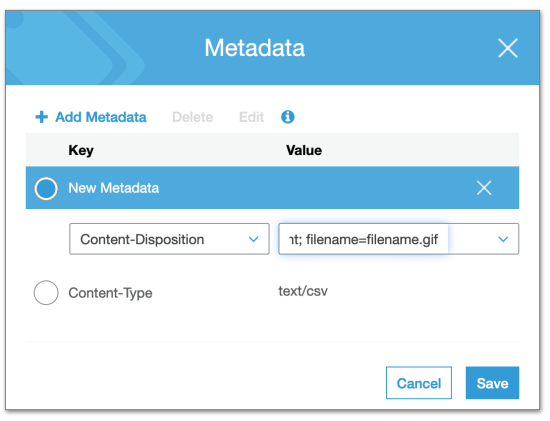
Go to your AWS interface, identify the file, and click on it to modify the metadata. Select Properties from the drop-down menu. Choose Meta Data > + Add Metadata on the next tab, then pick Content-Disposition from the drop-down and type the following in the value drop-down: attachment; filename=filename.gif to surely modify filename.gif to the name of the file that needs to be saved.
Audio files playing and not downloading
This can be resolved in the same manner as the issue with downloads with unusual names.
-
Open the S3 console and choose an object.
-
If the properties window at the bottom isn’t already displayed, select the Properties button.
-
Go to the Metadata tab and click it.
-
Click the icon that says Add additional Metadata.
-
From the drop-down menu, choose Content-Disposition.
-
Type attachment as the value.
-
Save your work.
Conclusion
We have shown you the way to connect Amazon S3 with the WooCommerce store. Hope that you can get your business better, increase sales, and satisfy your visitors coming to your online store with its useful features.
If you want to learn more about WooCommerce, you can discover more valuable articles on AVADA.


