
How to Add Handling Fee to WooCommerce Checkout

In the case of eCommerce, a handling fee is the additional cost imposed on a customer in addition to the shipping fee and cart subtotal. A conditional fee is another term for it.
Shop owners are typically required to charge such a fee for the fulfillment, transportation, packaging, gift wrapping, and storage of customized requests. Handling fees are sometimes paid per order or on numerous orders. If you also need to charge such fees from buyers, your WooCommerce store should be capable of doing so.
Today’s article will show you How to Add Handling Fee to WooCommerce Checkout to upgrade your online store.
Situations to add Handling Fee to WooCommerce Checkout
For more sophisticated enterprises, you may need to charge a processing fee for specific regions, cart subtotals, or other factors. So, while choosing a remedy, make sure you’re choosing a long-term answer rather than a quick cure. Here are some scenarios in which you need to charge a handling fee at checkout:
- When customers pay via a method that requires you to pay a commission
Let’s imagine your consumer paid using a credit card, for which your payment processor charges a 1.5 percent fee. How will you pay for this if your online store is unable to pass this cost on to the customer? Obviously, you’ll need a way to charge this handling fee, which must be included to the subtotal of the cart and the shipping amount.
- When you have tailored an Order to the buyer’s specifications
If you sell mugs, pillows, photo frames, and other customized products in addition to customisation services, you should surely charge this fee to the customer who is receiving the extra services. Your store’s conditional or handling fee capabilities will aid you in this.
- When a consumer need an add-on service to their order
If you provide storage services for keeping a product in inventory for a long time, or anything similar, you should charge a handling fee on products so that you can recover the cost of the services you provide.
- For Orders That Must Be Shipped Right Away
Sellers of cakes, gifts, and other similar items frequently receive hurried orders. Some customers may request that you deliver the product late at night, while others may request that you deliver the order as soon as possible. Customers are willing to pay a premium for such services. Adding a handling fee to Checkout in WooCommerce is your saving grace if you’re willing to charge a premium for such orders.
How to Add Handling Fee to WooCommerce Checkout
1. From WooCommerce
Make sure WooCommerce is set up correctly if you want to add additional charges straight through WooCommerce.
After that, go to WooCommerce > Settings in your WordPress dashboard and select the Shipping option. Then select Add Shipping Zone from the drop-down menu.
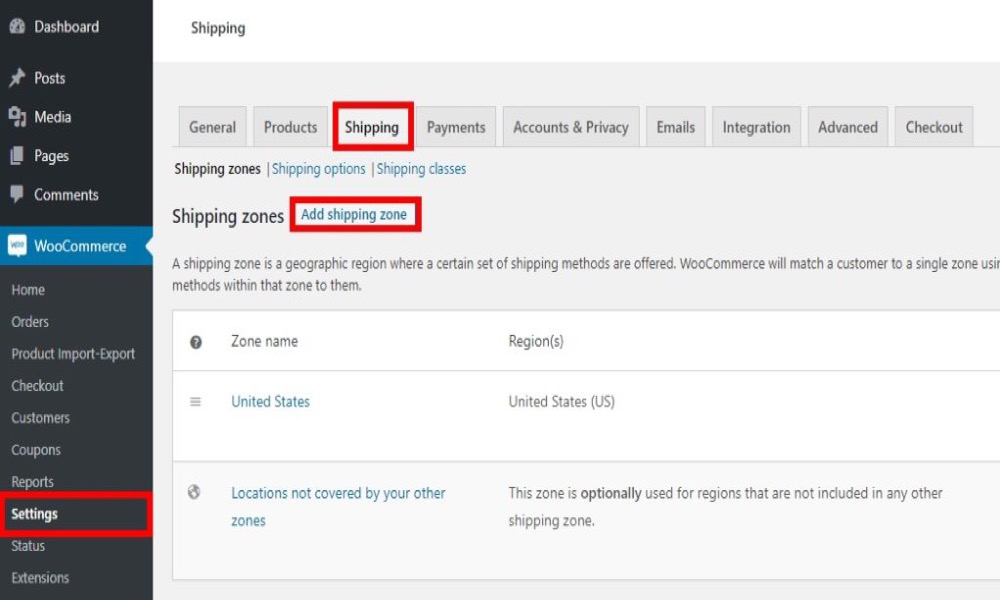
You can add shipping zones by entering their names, territories, and shipping methods in this section. After that, hit Add shipping method and enter the zone name and areas you want to create.
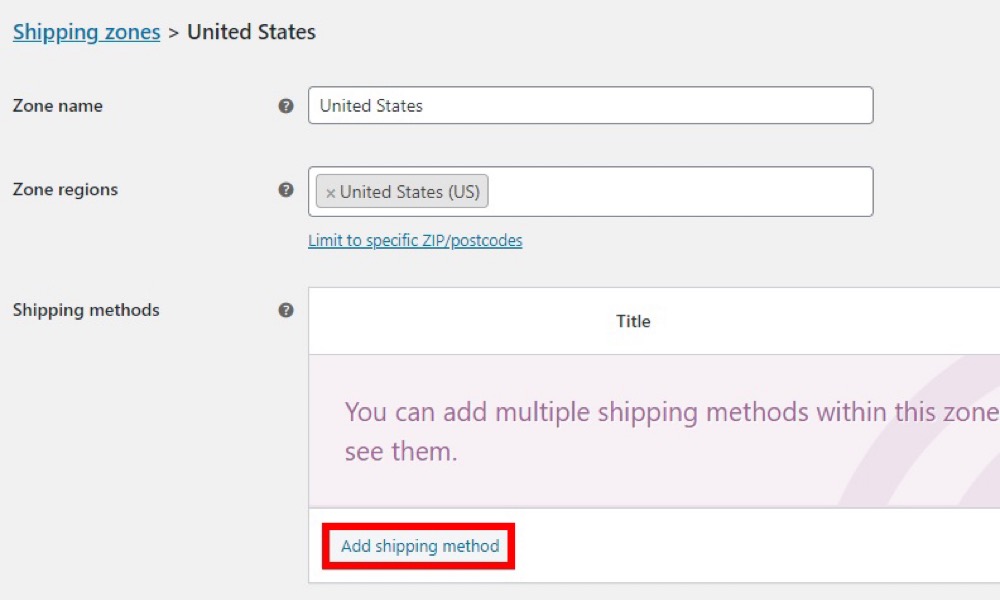
You can add three different shipping methods here:
- Flat rate
- Free shipping
- Local pickup
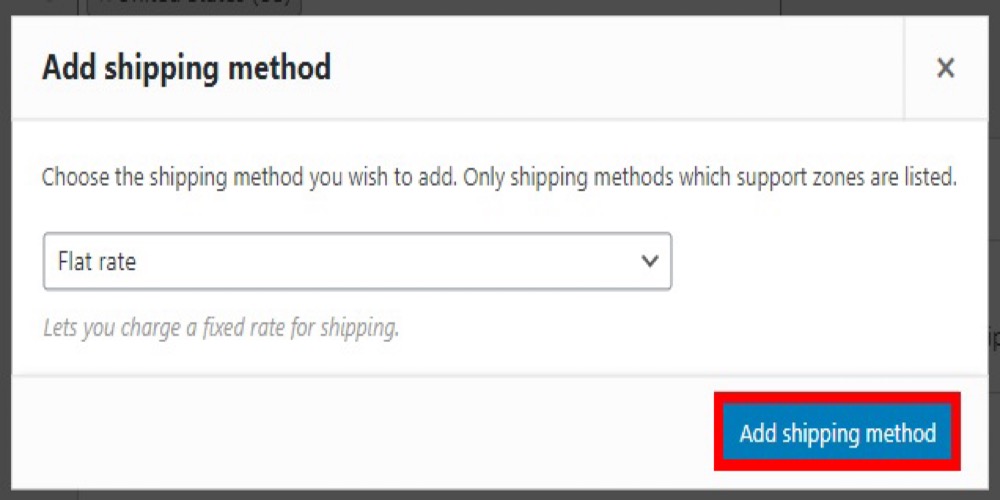
We will go with a flat pricing because we will be adding extra fees. After you have made your selection, click Add shipping method.
It is now time to add the shipping costs. Under the shipping method you just created, click Edit.
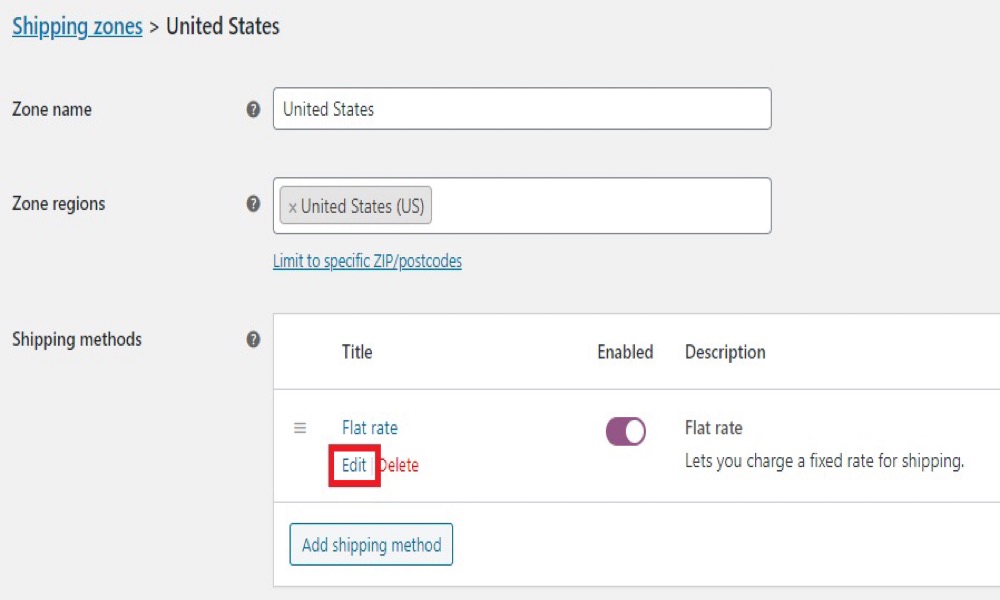
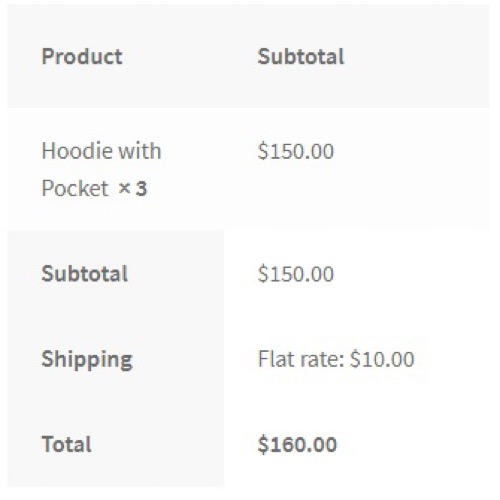
You will be taken to a new screen where you can modify the method title, tax status, and shipment cost. Simply enter your selected shipping fee and remember to save your changes.
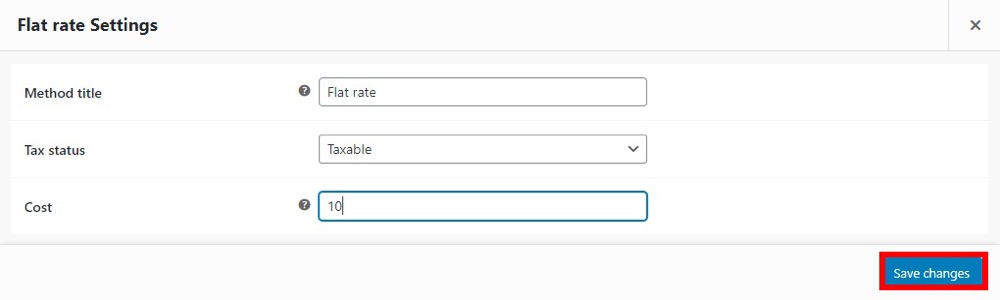
Now let’s have a look at the user interface. When a consumer purchases a product and has it shipped within the United States, you will charge them a $10 shipping fee, as illustrated below.
You may also add alternative shipping rates and procedures for a certain shipping zone from the Shipping page, as well as enable or disable shipping methods based on the situation. To better control your online store’s shipping prices and processes, you can add more delivery zones and charge various rates for each of them.
The default WooCommerce settings make adding fees simple, but they do not offer many options or features. You can utilize a plugin to provide you greater freedom when adding fees to your WooCommerce checkout.
2. Using a plugin
One of the greatest plugins for customizing and adding extra fees to the checkout is Checkout Manager for WooCommerce. It allows you more flexibility and control over which fields to include than the WooCommerce default settings. It also features conditional logic, which can be extremely useful for creating more sophisticated scenarios. We will teach you how to add extra fees both with and without conditional logic in this procedure.
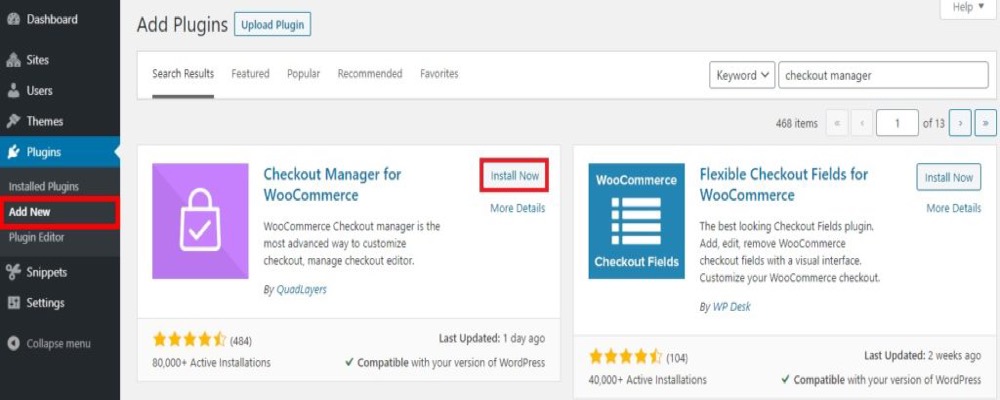
You need to install this plugin before you using it. Go to Plugins > Add new in your WordPress dashboard and search for Checkout Manager for WooCommerce. To finish the installation, click Install Now and then Activate.
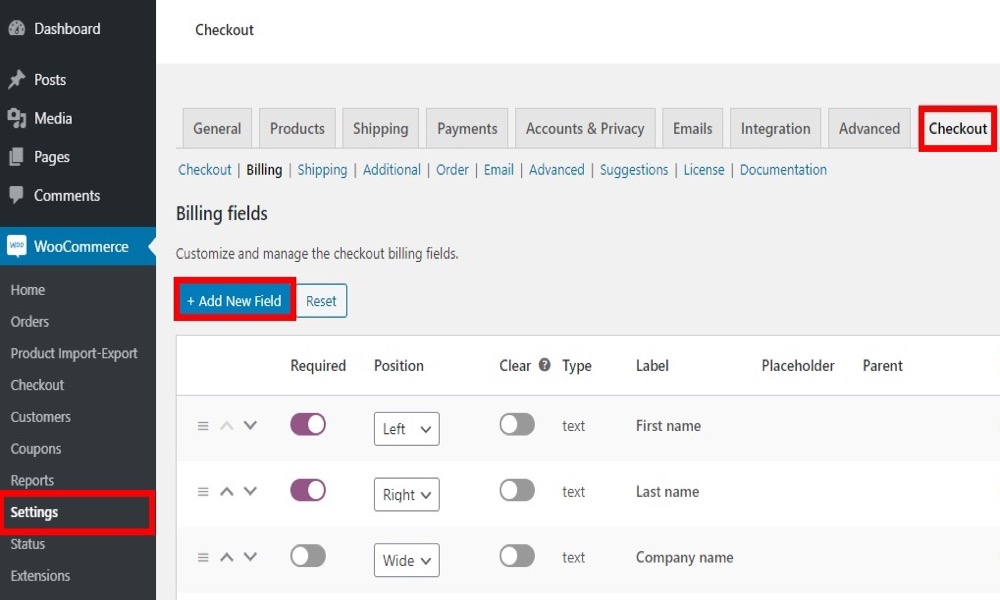
Go to WooCommerce > Checkout and select the Billing tab from the drop-down menu. For the checkout, you will see different charging fields that you can enable or disable. For the time being, let’s click Add New Field.
You may now choose the field options you want to include in your new field. Here you can make any type of field you like. Let’s look at how to add the extra fees using conditional logic and without it.
-Add Fees Without Using Conditional Logic
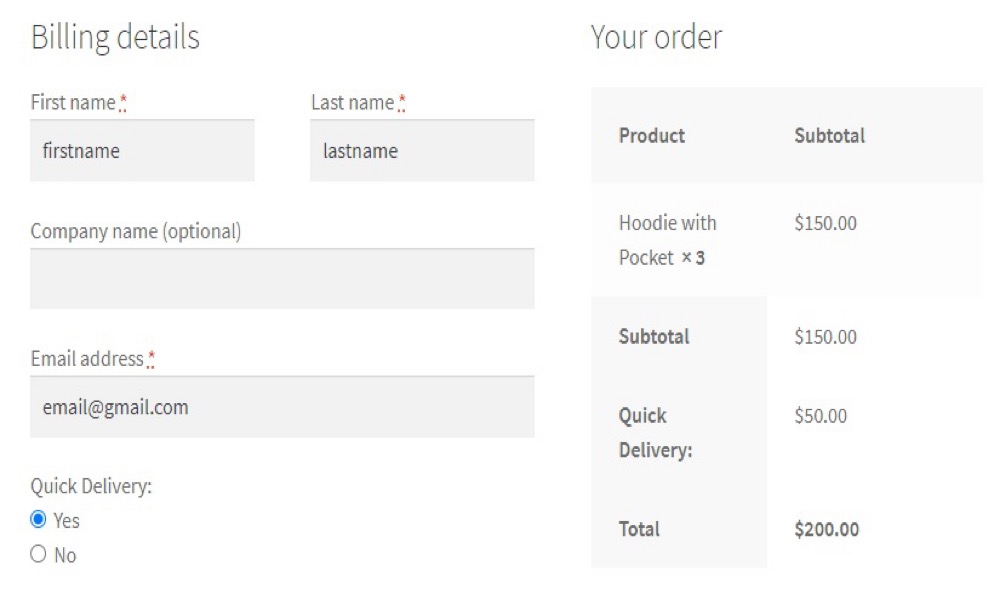
It is simple to add fields for extra costs without using conditional logic. Create a field for clients to pick speedy delivery during checkout, for example. We will utilize simple radio buttons, but based on your needs, you can use various field possibilities. To add a rapid delivery option, we selected these choices in the Checkout Manager.
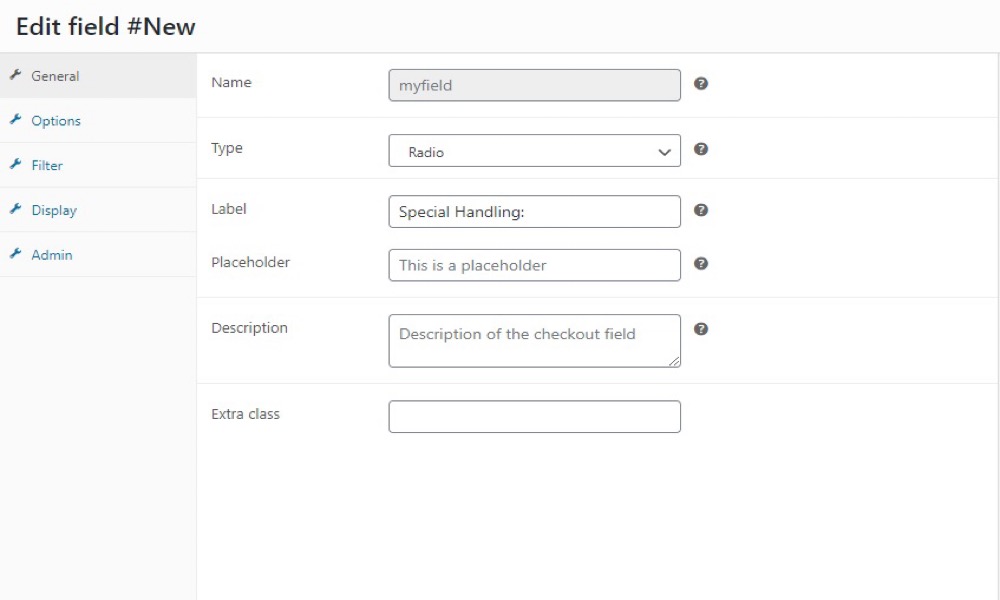
Go to Options, add the fields, and input the price you want to charge for speedy delivery after you have entered the details. After that, save your changes.
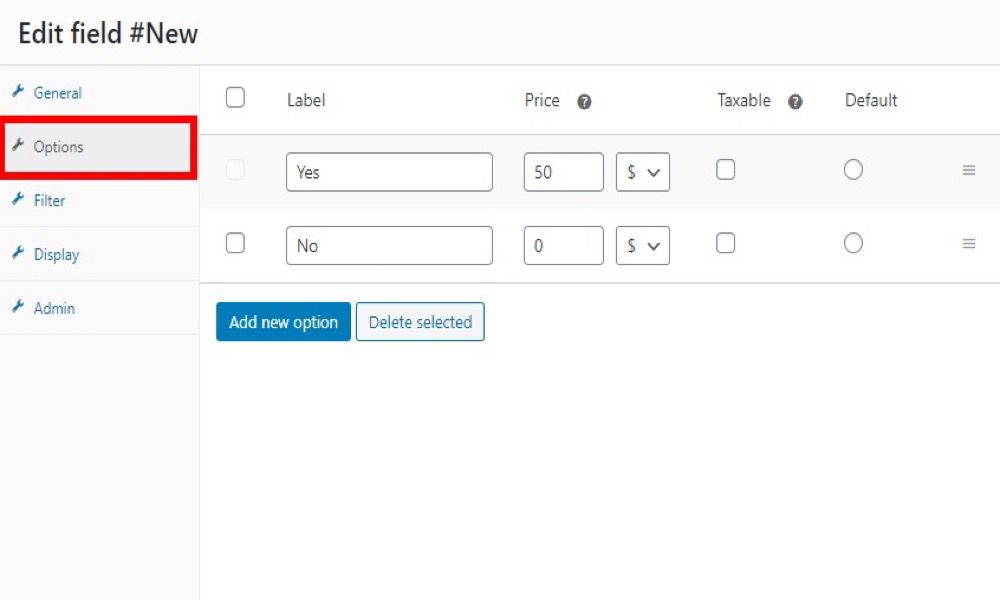
When customers choose “Yes” under Quick Delivery, an additional fee will be added to the total amount. You will also see the name and amount of the extra fee under Your Order, so customers can see the price breakdown.
-Add Fees With Using Conditional Logic
When we use conditional logic, we are saying that the conditional field will take one action if the condition is satisfied or true, but another if the condition is not met or false.
Even though adding extra fees to the WooCommerce checkout with conditional logic might get complicated if there are a lot of them, the Checkout Manager makes it simple. You’ll need to construct a parent field and a child field for this. Check out our article on how to add conditional fields to the checkout for more information.
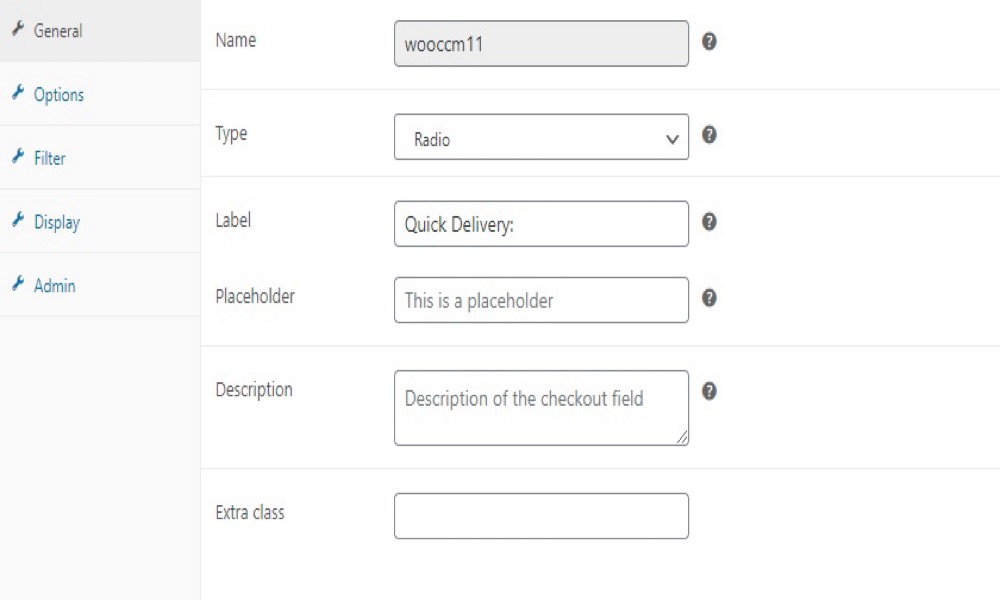
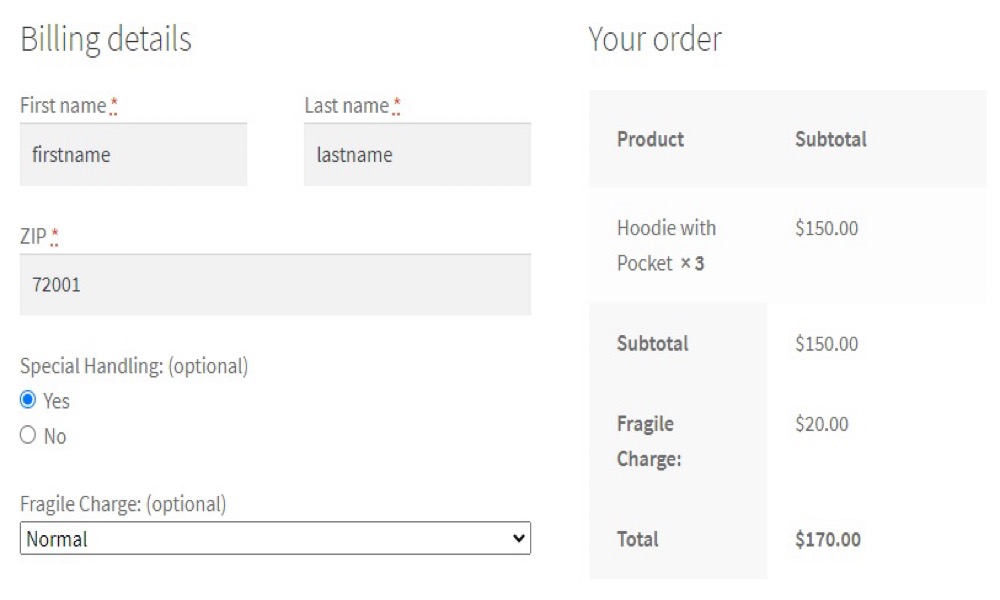
- Make a parent field: To begin, create a parent field and fill in the essential information. Field options for specific handling will be added here.
Then, under Options, enter the necessary information to charge fees when customers choose the Special handling option. Then, save your modifications.
- Make a child field: You will now need to use conditional logic to generate the child field. Add a new field by clicking Add New Field and filling in the details for your kid field. The extra charge for delicate items is shown by the child field in this scenario.

To use conditional logic, check the box on the right side of the screen that says “Activate conditional logic.” Then choose the parent field, which is “Special Handling:” in this case. Select “Yes” for the following option since the delicate charge can only be utilized when the buyer requests special handling.
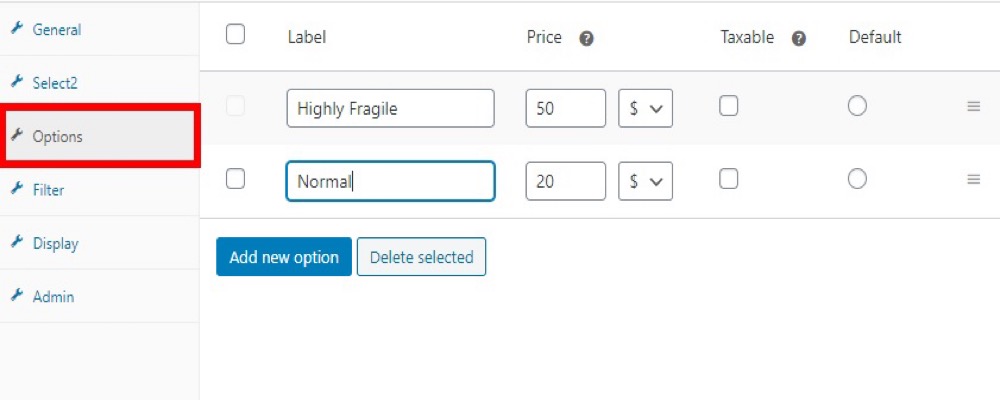
Then, under Options, select whether the tag should be exceedingly fragile or just standard. Then, for both selections, add the needed fees and save the modifications.
3. Programmatically
While using codes to personalize your store is not for everyone, it does provide you a lot more control over your website’s adjustments than using plugins. If you know how to code, you can dynamically add fees to the WooCommerce checkout.
You will need to alter the functions.php file to do this, so make a backup of your website before continuing. It is a delicate operation to edit these files, and even a single character in a code can ruin your website. Also, make sure you are using a child theme. You can either make one yourself or utilize one of these plugins.
Go to Appearance > Theme Editor in your WordPress dashboard to find your functions.php file. You can use plugins like Insert Headers and Footers or Code Snippets to put code snippets there. We have the ability to add a variety of different extra charges to the checkout.
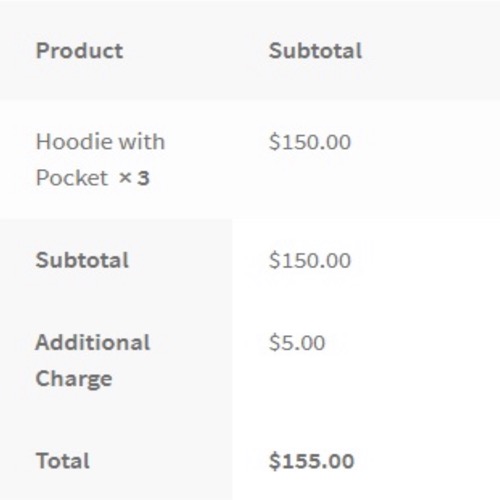
- Incorporate a fixed fee into the checkout process
The additional fees that we apply on the checkout page are usually set fees. Consider the previous examples of express delivery and additional handling fees. Use the following code and edit the required text for the field name to add this type of extra charge. We’ll label it “Additional Charge” in our case, and the price will be $5.
add_action('woocommerce_cart_calculate_fees', function() {
if (is_admin() && !defined('DOING_AJAX')) {
return;
}
WC()->cart->add_fee(__('Additional Charge', 'txtdomain'), 5);
});
This code will automatically add a $5 flat fee named Additional Charge to the total of the customer’s checkout page.
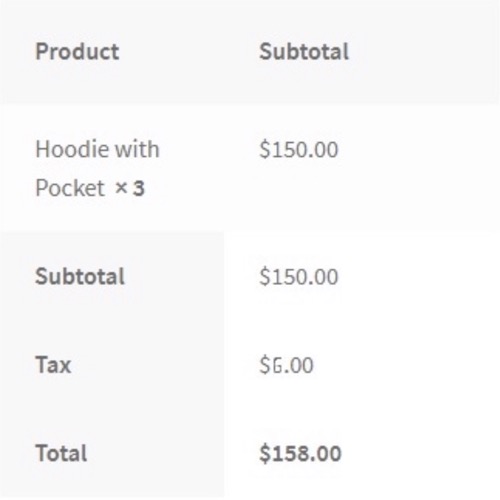
- Add a Fee Based on a Percentage
While most fees imposed during checkout are set, some, like as taxes and payment gateway fees, may be dependent on percentages. If you wish to add anything similar to your online store, the code below will come in handy. In this instance, we’ll tack on a 5% tax to the entire order price (items + delivery).
**add_action('woocommerce_cart_calculate_fees', function() {
if (is_admin() && !defined('DOING_AJAX')) {
return;
}
$percentage = 0.04;
$percentage_fee = (WC()->cart->get_cart_contents_total() + WC()->cart->get_shipping_total()) * $percentage;
 WC()->cart->add_fee(__('Tax', 'txtdomain'), $percentage_fee);
});**
Following the addition of these codes to the theme files, the additional cost will be computed automatically using the specified percentage. The fee, which is 4% of the entire cost, will then be added to your customers’ total during checkout. In this scenario, the tax amount is rounded to the decimal figure.
- Specific products should have a fixed fee added to them
Another approach is to charge a set fee for specified products. You can automatically apply a specific cost to products that require special handling or transportation, for example. If that’s the case, the following script can help:
/* Add fee to specific product*/
add_action('woocommerce_cart_calculate_fees', 'add_fees_on_ids');
function add_fees_on_ids() {
   if (is_admin() && !defined('DOING_AJAX')) {return;}
   foreach( WC()->cart->get_cart() as $item_keys => $item ) {
     if( in_array( $item['product_id'], fee_ids() )) {
     WC()->cart->add_fee(__('Additional Charge'), 10);
     }
   }
}
function fee_ids() {
   return array( 652,645,625 );
}
When the consumer adds products with IDs 652, 645, and 625, we charge a flat cost of $10. Simply alter the amount you want to charge and the ID of the products you want to apply it to using the code as a guide.
3 Best WooCommerce Custom fields plugins
1. Extra Fees Plugin for WooCommerce

Extra Fees Plugin for WooCommerce plugin allows you to build up extra fees based on numerous conditional rules in a simple and straightforward manner. It allows store owners complete freedom over the guidelines for additional fees. WooCommerce extra fees can be dynamically configured based on nation, product, amount, user, cart-subtotal, and other factors.
Features:
- Set WooCommerce additional costs based on country.
- Set up WooCommerce extra fees based on products.
- Multiple extra fees can be applied to a single product.
- Set additional fees based on a fixed or percentage-based value at checkout.
- Determine whether or not additional fees are taxable.
Rating: 4.7/5
2. WooCommerce Extra Fee Option
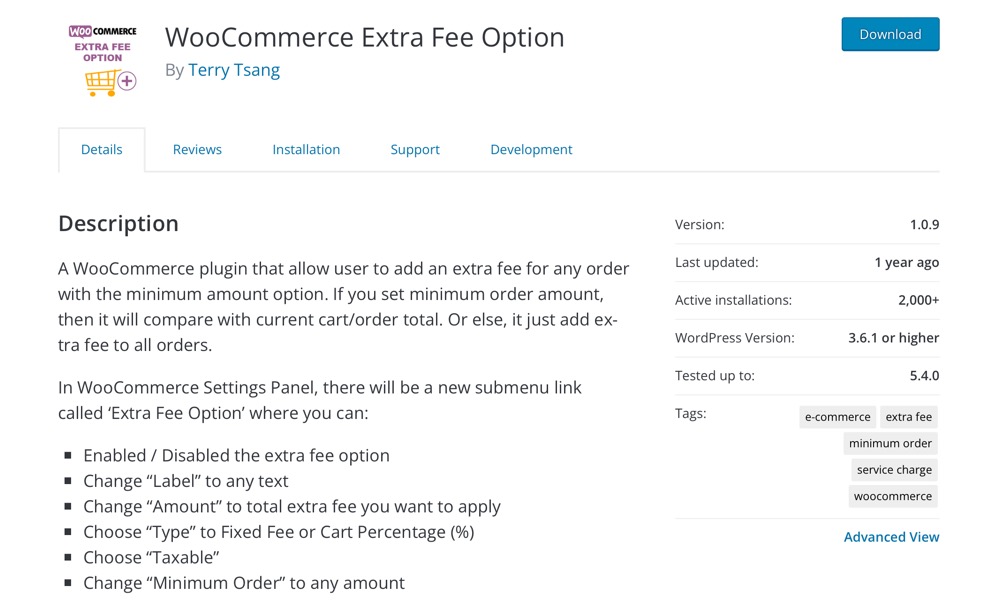
WooCommerce Extra Fee Option plugin that allows users to charge an additional fee for any order that meets the minimum amount requirement. If you select a minimum order amount, it will be compared to the total in your basket or order. Otherwise, it will simply charge an additional cost to all orders.
Features:
- Implement a surcharge for orders that are less than or equal to the minimum order amount.
- There are two languages available: English (UK) and Chinese (China).
Rating: 4/5
3. WooCommerce Advanced Extra Fees Lite
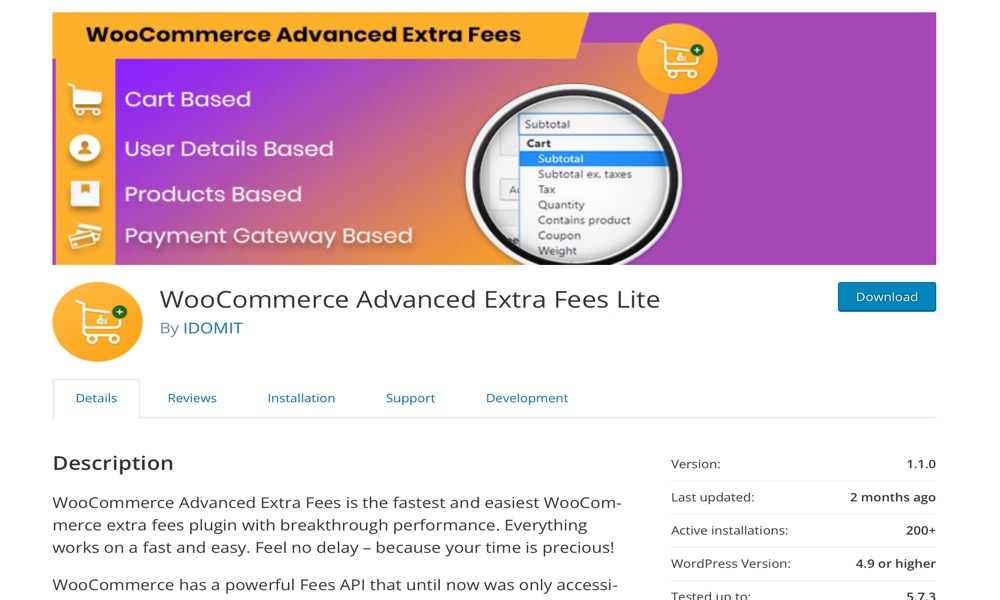
WooCommerce Advanced Extra Fees Lite is the most efficient and user-friendly WooCommerce extra fee plugin available. Everything runs smoothly and quickly. There will be no delays — your time is valuable!
WooCommerce includes a robust Fees API that was previously exclusively available to developers. With WooCommerce Advanced Fees, store owners can create rules that apply fees to the cart based on what’s in it, who’s buying it, and where the products are being sent to.
Features:
- Create distinct conditions based on geographic location and user role.
- Different operators are used to create various circumstances.
- When two or more conditions are present, it is referred to as a “combination.”
- Fees can be charged using either Either Conditions.
- Fees can be beneficial or harmful ( If you want to give discount, use negative sign )
Rating: 4.2/5
Conclusion
You want to provide your clients extras or upgrades in certain circumstances. Perhaps you’d like to provide other shipping options. Alternatively, you can just charge a premium to expedite an order. Using a plugin is your best bet in these situations.
It is simple to update your WooCommerce website, including conditional fees; all you have to do is choose the proper plugin. Several plugins can be used to change your store’s settings, add custom fees and upgrade restrictions. This is why store managers may struggle to make the best decision.
We hope you will find this post about How to Add Handling Fee to WooCommerce Checkout fundamental!


