
How to Add a Brand to WooCommerce Store

Regardless of your business type, you always need to customize your WooCommerce Store to meet your needs and expectations, including adding a brand. Do you know that a product brand will help to boost customers’ recognition? Therefore, it is a need to have a brand on your WooStore so that shoppers could know more about you and your products as well.
Now, let’s get started with us on a step-by-step guide related to how to add a brand to WooCommerce Store. Follow us strictly and you will explore a lot of great things with this instruction or collect useful tips for your online store.
How to Add a Brand to WooCommerce Store
In this piece of article, we aim at using plugins to add your brand to the WooStore. So, here we are going to mention popular plugins with a specific guide to give you extensive knowledge.
1. Use plugin WooCommerce Brands
This plugin has an increasing popularity in making brands for WooCommerce shops with pictures, names, coupled with descriptions. If you make up your mind to go on the journey with this plugin, what you could get is the ability to assign, create, and list your product brands. In each brand that you add, you could also name, assign, and describe an image.
To be more specific, the WooCommerce Brands plugin comes with the function of indexing or listing a page thanks to the assistance of shortcode A-Z. Along with that, filtering products with the use of a layered widget also becomes much easier.
Step 1: Install and configure the plugin used for adding brand on WooCommerce
The first and foremost task is to download this plugin for installation. After you install it, activate the plugin within WordPress.
Step 2: Create a brand for the WooCommerce store
Approach the section “Products”, then choose “Brands”. Go into and you can notice a section named “Add New Brand”. Here, you are able to assign several new brands. After that, assigned brands are listed down.
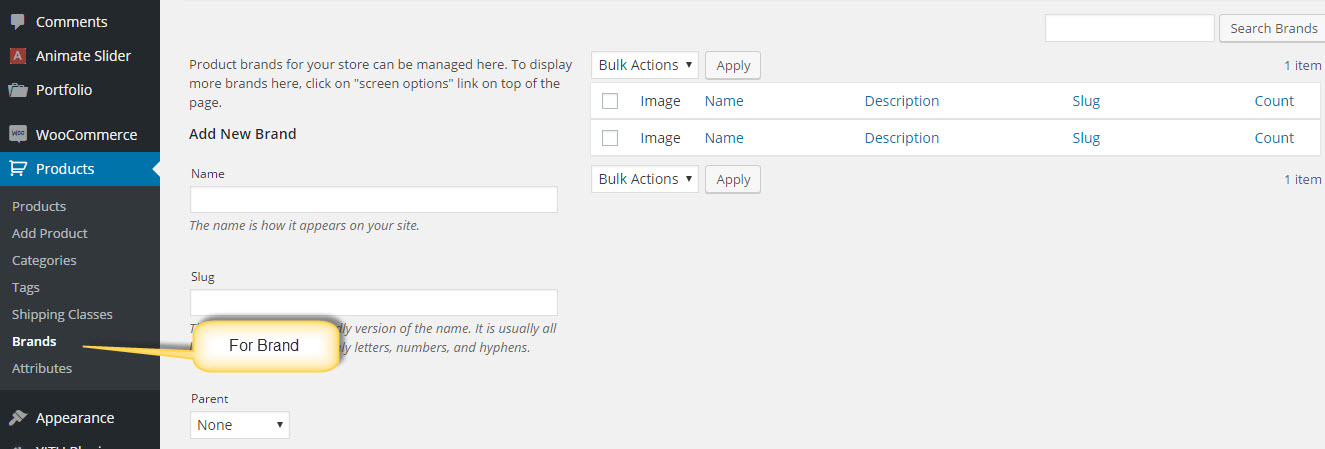
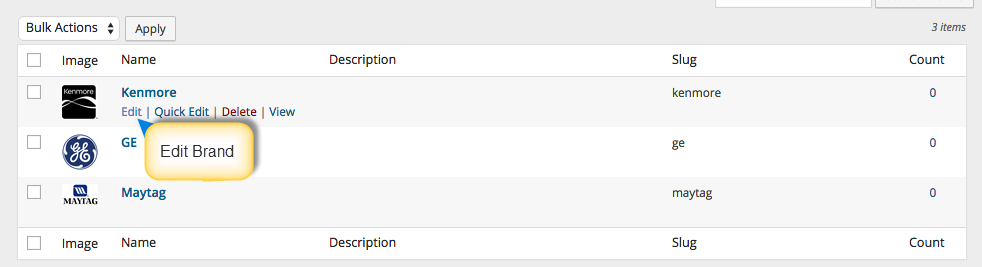
Move on to the next step to give a name, assign the image, and fill in a description for the created brand. If you want to edit something, click Edit as in the below screen to modify the brands that were previously added. Moreover, you could even delete the previous brands from your current list. To do it, look at the below screen’s right side and choose Delete.
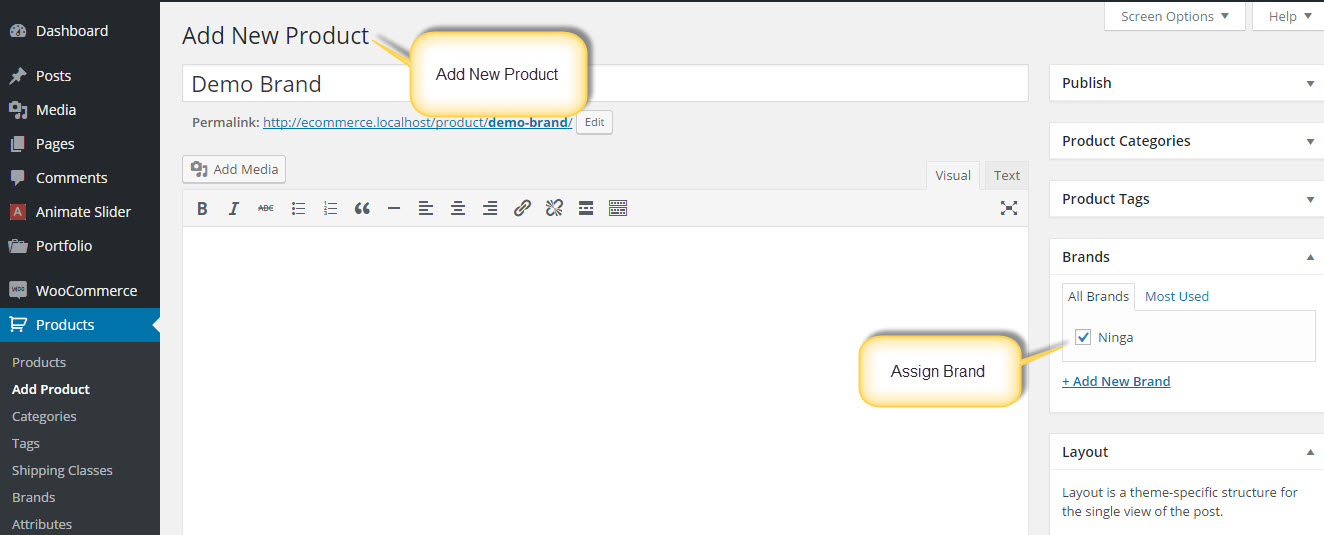
Step 3: Assign the created brand for a specific product
When you are done creating a new brand for your WooCommerce store, it is time for you to assign this brand for a certain product in your store. To execute that, navigate to the menu Products and select the section Add Product. When you go inside that tab, you could notice a window. On the left of the window, you could give a name to your product while you could assign it to your created brands on the below window’s right side.
Step 4: Enhance the product’s visibility (optional)
After adding a brand to your WooStore, we recommend you do this additional step (optional). It is to enhance the visibility of the product by using code references. What you should do is add customized logos for your corresponding product pages. Proceed to approach the file functions.php and add the below snippet to the image that you will apply to your products.
add_action( 'woocommerce_single_product_summary', 'wc_ninja_add_brand_to_product_page' );

function wc_ninja_add_brand_to_product_page() {

echo do_shortcode('[product_brand width="64px" height="64px" class="alignright"]');

}
Bear in mind that you are required to put in the above snippet myriad times for each brand separately to add the logo.
add_action( 'your_functions_name', 'wc_ninja_add_brand_to_product_page' );

function wc_ninja_add_brand_to_product_page() {

echo do_shortcode('[product_brand width="64px" height="64px" class="alignright"]');

}
2. Apply the plugin WooCommerce Product Brand
Like WooCommerce Brands, this plugin also promises to help you build a product brand for WooCommerce stores. Therefore, if you are seeking something creative, do not hesitate to use this plugin. It includes the list of your clients, your projects, as well as your portfolio.
Owing to this plugin, you could list the brands on any website page or create brand searching as easy as a pie. When it works, users can observe all of your brands on only one page. Furthermore, they could even filter to view which products belong to which brands. Let’s start with an easy installation as well as the configuration of the WooCommerce Product Brand.
Step 1: Install, then configure
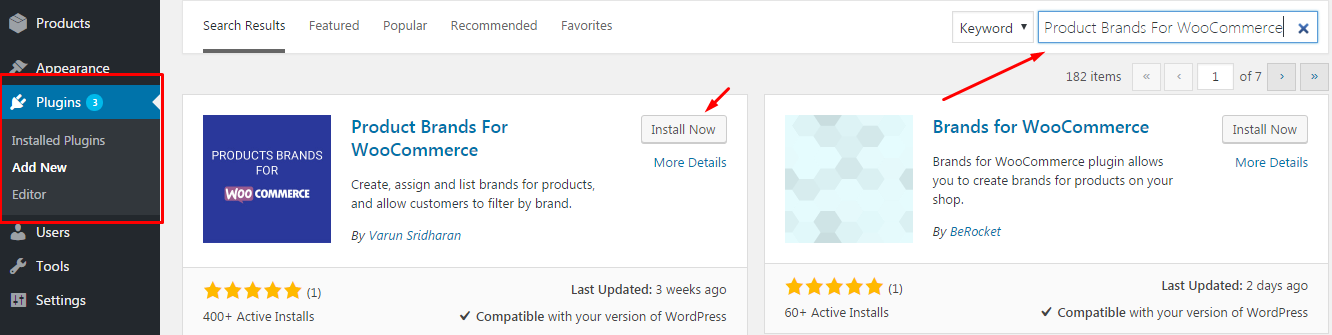
Before going into detail about how to add a brand, you must install the plugin first. Download a file with the name “**product-brands-for-woocommerce.zip**” from your account on WooCommerce. After that, approach the menu WordPress Admin, choose Plugins before clicking Add New & Upload Plugin. Now, just install it, then choose to activate this extension.
In case you are using the wp-admin dashboard’s side panel, your job is to select Plugins and choose Add New. Next, you move to search for the plugin named “Product Brands for WooCommerce”. Then, install & activate it. See the below screen:
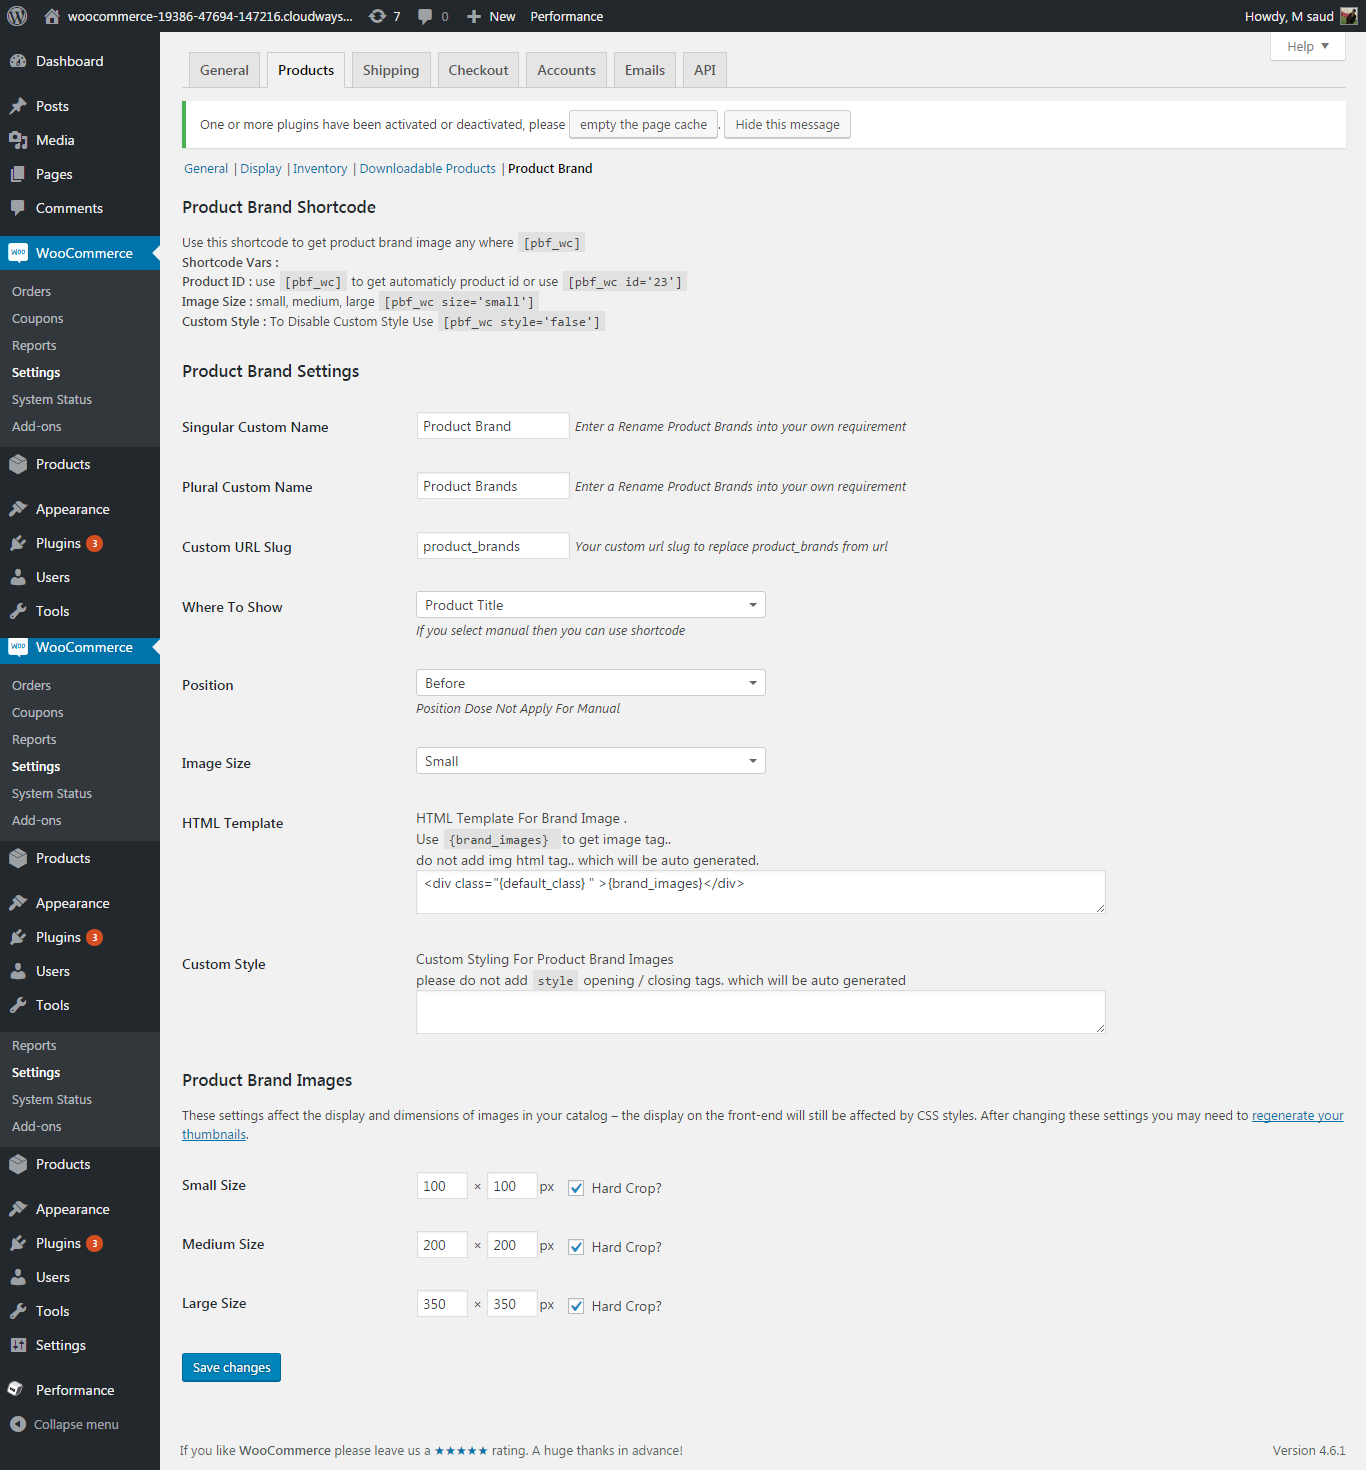
Step 2: Configure the plugin’s setting
Once you have finished installing and activating Product Brands for WooCommerce, you proceed to the settings section.
It is time to navigate to WooCommerce, then click “Settings” before choosing “Products”. Scroll down this tab, you could notice some menus such as “Product Brand Images”, “Product Brand Settings”, and “Product Brand Shortcode”. Here, you are supposed to fill in the values according to your requirement.
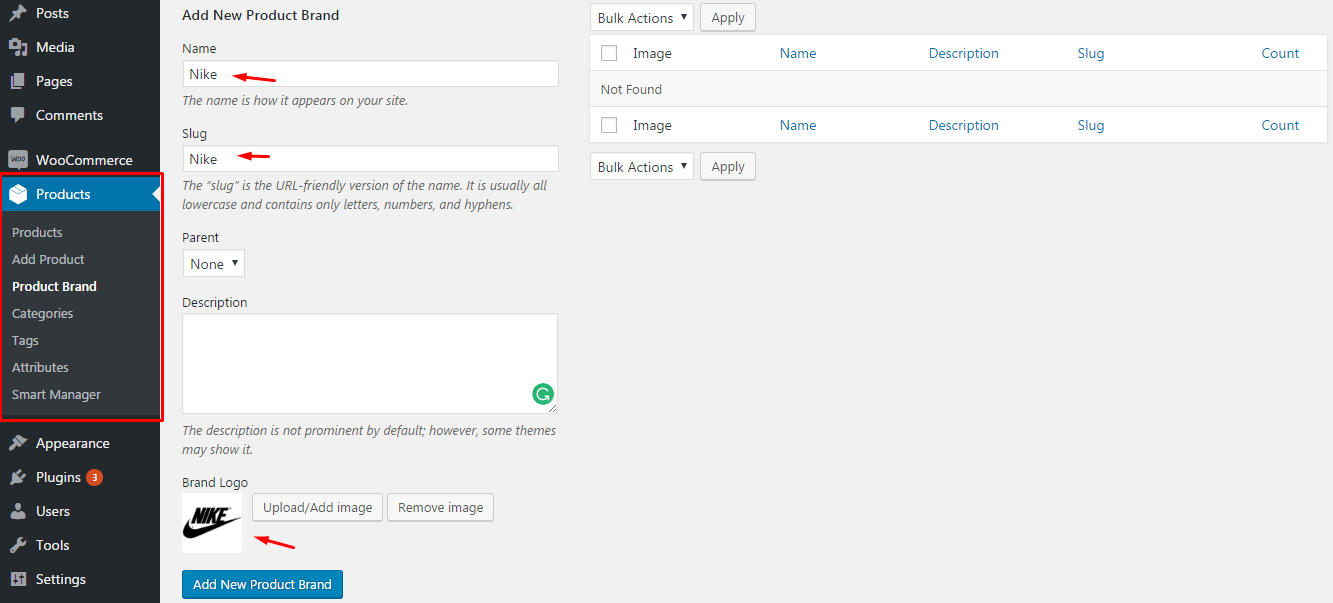
Step 3: Create a brand via plugin Product Brands for WooCommerce
With this plugin, your process is now much simpler. To create a brand, go to the section “Products”. There, you will see the section “Product Brands”. Navigate under this tab, you could notice the menu “Add New Product Brand”. From this, get started with adding your brands. After you finish adding, you will have a list of brands that have been added beside it.
A bonus note for you is that you can even add product tags, product categories, and product attributes besides adding a brand in WooCommerce. In particular, adding a brand name, description, and slug is also what this plugin can help you with. Additionally, it is a great thing to do as you can assign the brand logo as per your wish, or delete and edit your previously created brands.
Have a quick glance at the below screen to see how your listed brands will be displayed on this list. For example, your brands are Apple and Nike.

Step 4: Implement to assign a brand to your WooCommerce products
To do this, you will go to the section named “Products”, then click “Add Products”. When you are done, you can see the tab “Product Brand” which lies on your page’s left side. The next step involves selecting the button “Publish”. After clicking it, the result will appear on the web-store on WooCommerce. See the below image to see how your WooStore looks like after being added to its featured brand.

Top 3 WooCommerce brand plugins for your WooStore
1. WooCommerce Brands
It is obvious that the WooCommerce Brands plugin lets store owners add brands, then attach them to their store’s products. This activity has yielded a lot of benefits, including making your customers and clients find a specific product of a certain manufacturer. Furthermore, it comes with 3 widgets – brand thumbnails, featured brands, and layered navigation. They are for the sidebar. So, let’s discover why this plugin is so popular.
Main features
-
This plugin lets you add unlimited brands to your WooCommerce website.
-
It offers an A-Z shortcode
-
It comes with a thumbnail shortcode
-
You can receive 24/7 support with excellent service from the support team
-
3-widget option is available
Pricing: $29
2. Product Brands for WooCommerce
This tool has a reputation for being one of the best plugins to add brands on WooCommerce. With the ability to create product brands for WooCommerce stores and assign them an image as well as a name, Product Brands for WooCommerce can do that.
Thanks to this tool, you can now enable the configuration of the style, position, and image size via the settings of the plugin. In Particular, it has been optimized to achieve the expected speed.

Main features
-
This plugin provides users with automated manual or embedding.
-
It comes with HTML templates.
-
You could rely on it for customizing brand images, including banners and thumbnails.
-
The shortcode is available for displaying the brand list, brand groups, product page, brand information, and so on
-
It uses cache for speeding uploading page
Pricing: Free
3. Ultimate WooCommerce Brands Plugin
Another great plugin to help you add brands for your WooCommerce shop is Ultimate WooCommerce Brands Plugin. While the free version gives you basic functionalities with several limitations to customize, premium versions offer more amazingly advanced features.

If you choose to go with this tool, you could display your brands on categories as well as products. To be more specific, it is multilingual and responsive while working smoothly with some translation plugins, including Weglot and Polylang.
Main features
-
This tool comes with unlimited brands
-
It offers an available filter option and visual composer
-
The shortcode embedding is available
-
This plugin also provides sliders and widgets, as well as ready translation
Pricing: Free
Conclusion
There is no denying that using brand plugins seem the best way to help you create specific brands for your specific products and categories. Therefore, you could improve users’ experience, thus increasing your sales. So, if you are not an experienced developer or not good at writing codes, our instructions mentioned above are helpful for you. Follow this guide and be successful with your WooCommerce businesses.


