
How to Setup Conversion Tracking for BigCommerce stores?

Setting up BigCommerce Conversion Tracking is a must-do thing to ensure that all your efforts and resources into marketing techniques like SEO or Paid Ads for your own eCommerce business have been paid off. For example, you can see how effectively your ad clicks result in customer’s valuable actions on your eCommerce site, such as making a purchase, signing up to a newsletter, submitting the forms, or downloading your app.
Moreover, measuring the effectiveness of these techniques will allow you to find out which one works for your store and also optimize the techniques you use.
However, during the process of tracking conversions, many people usually just track the last click in a conversion route, which is a mistake. It is crucial that we have to follow and understand customers’ whole entire journey instead of just counting the clicks that the ads get in.
This article will provide the guidance to track BigCommerce organic conversions and conversions with ads.
BigCommerce Organic Conversion Tracking
Organic conversion is conversion coming from organic traffic, which refers to visitors arriving at your website after searching for a keyword you’re currently ranking for on a search engine like Google or Bing. This can happen when your site has certain keywords that fit a customer’s inquiry; the search engine will let the link to your domain appear among other relevant results. These keywords are classified as organic keywords.
Therefore, we have to focus on tracking organic keyword conversions when it comes to tracking organic conversion. In other words, this is how we determine if your SEO investments are worthwhile, as well as shortcomings in your sales funnel and SEO plan, such as targeting the wrong keywords or failing to optimize them. Also, understanding your organic conversion rate is critical because it is the essence of your business.
To this end, one of the most popular tools used mostly by SEO specialists to track keyword conversions is Google Analytics.
How to Use Google Analytics to Set Up Keyword Tracking
6 Steps to Monitor Organic Keyword Conversions
Step 1: Sign up for a free Keyword Hero account.
Step 2: Choose the Google Analytics view that includes the domain.
Step 3: Decide on a conversion or goal.
Step 4: Link the appropriate Search Console properties.
Step 5: Set up an upload account.
Step 6: Choose the best plan
When you’ve re-entered your keywords into Google Analytics, you can start tracking your conversion keywords once more.
BigCommerce Conversion Tracking for Google Ads
Google Ads conversion tracking can follow a visitor’s path through your site after they click on your paid listing in Google search results. For example, when you’ve set up a sign-up conversion action, the tracking code will trigger whenever anyone subscribes to your newsletter. The most useful way to understand how your ad campaigns are doing is to add the Google Ads conversion tracking tag to your shop.
Three Main Steps Before Setting Up BigCommerce Conversion Tracking for Google Ads
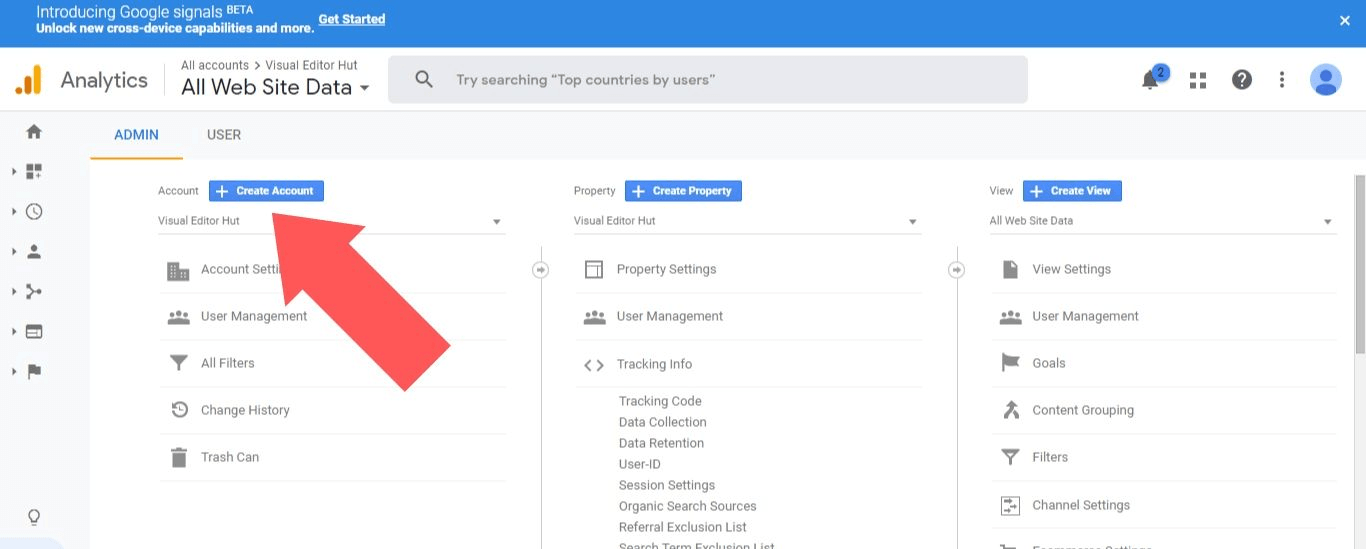
Step 1: Create a Google Analytics account and get your tracking ID.
- Sign in to Google Analytics and go to the “Admin” tab.

- Select “Create Account”.
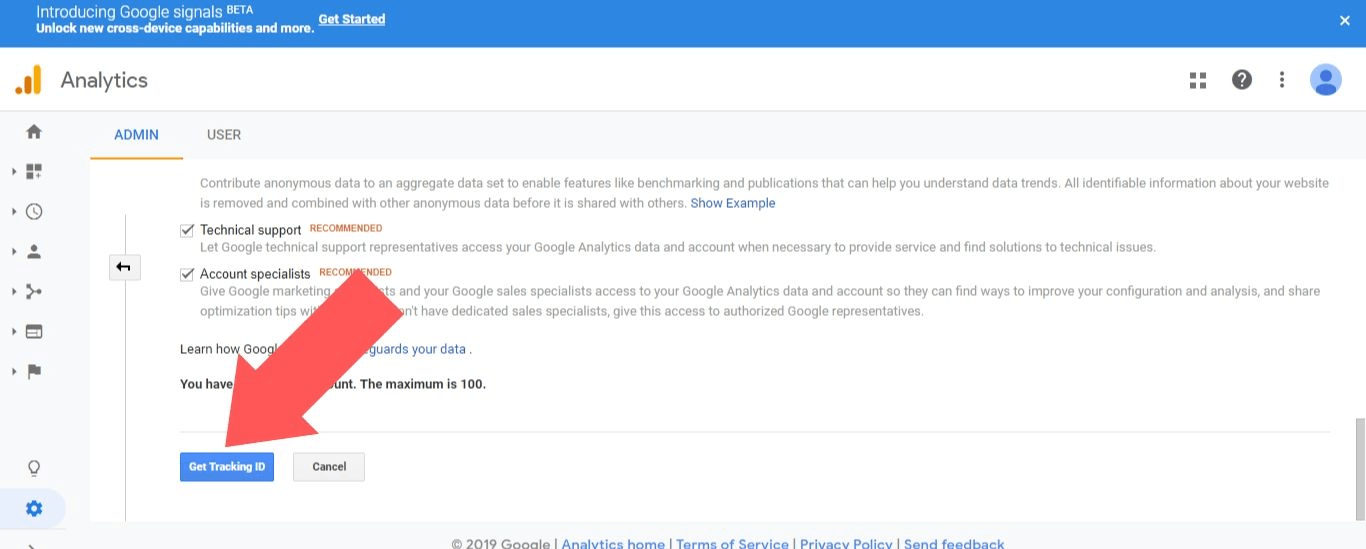
- Fill your account name, website name, website URL, industry category, and time zone. Then, simply click “Get Tracking ID”.

- . Once you’ve finished configuring your Google Analytics account, make a note of the “Tracking ID.” This information will be required later in the process.
Step 2: Verify that you are using BigCommerce’s One-Page Optimized Checkout.
Because Optimized One-Page Checkout is BigCommerce’s default setting, there’s a good chance you won’t need to change anything here.
If you’ve previously customized your checkout process, simply navigate to “Advanced Settings” > “Checkout” from the BigCommerce dashboard to restore it to Optimized One-Page Checkout.
Step 3: Checkout Labeling in Google Analytics should correspond to the checkout steps in your BigCommerce store.
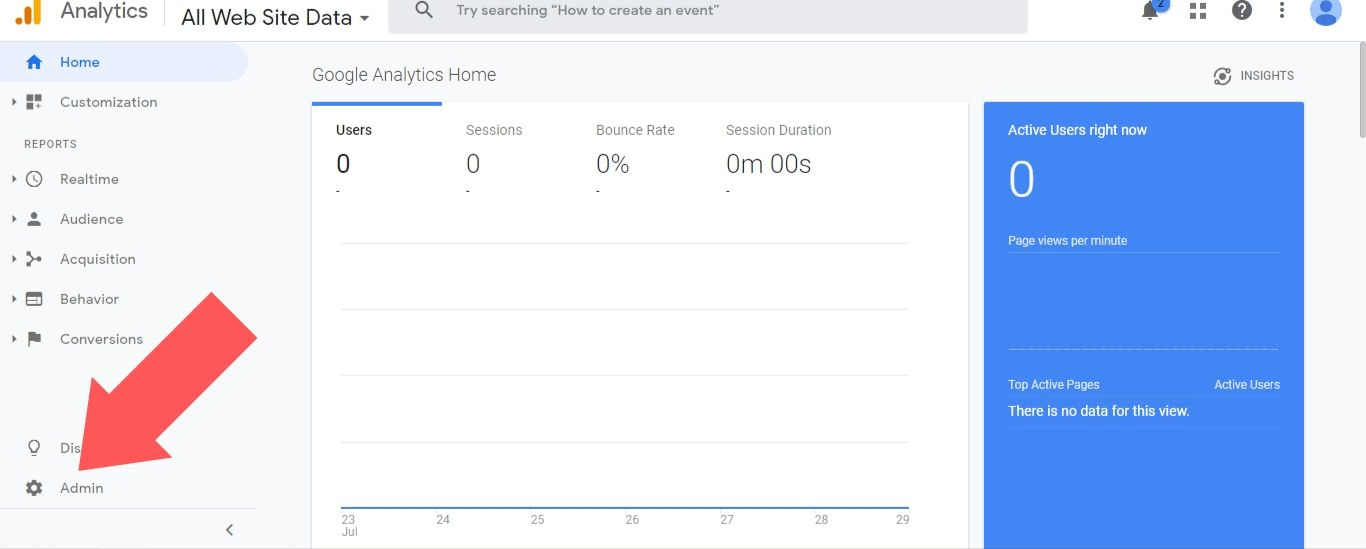
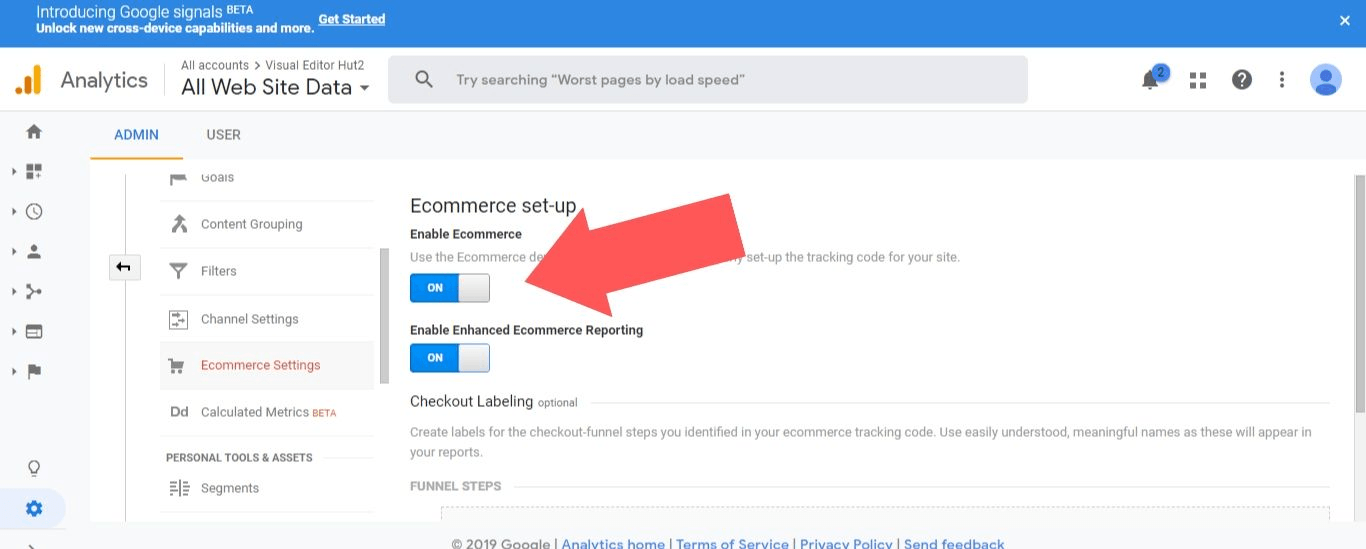
- After signing in to Google Analytics, click “Admin”.
-
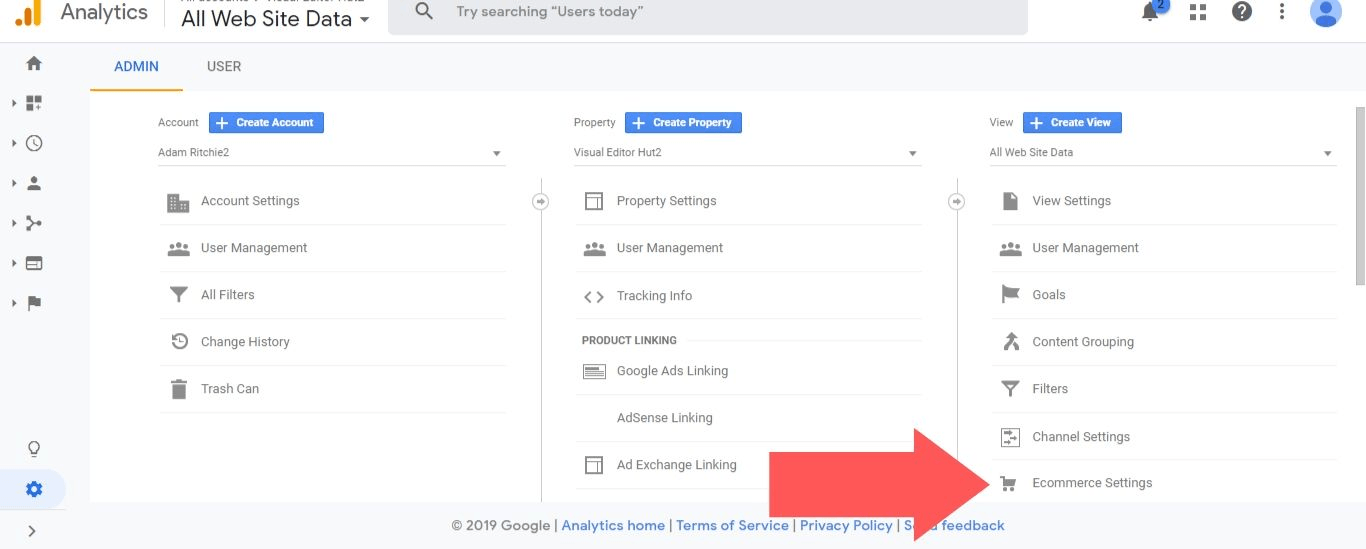
Select “Ecommerce Settings”.
-
Turn on the “Enable Ecommerce” and “Enable Enhanced Ecommerce Reporting” options”.
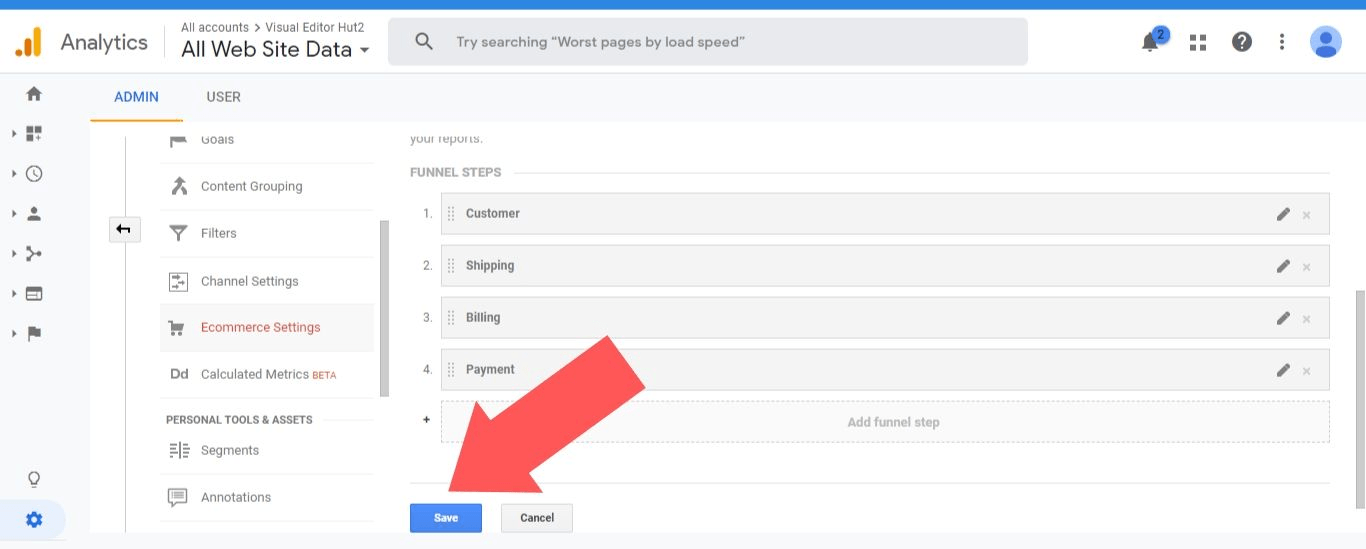
- Change the “Checkout Labeling” to “Customer” to “Shipping” to “Billing” to “Payment.” Then click the “Save” button.
Setting Up Conversion Tracking
Now that we’ve completed those initial steps, we’re able to integrate Google Ads with your BigCommerce store:
Step 1: Create a Conversion Action in Google Ads Account
- Log in to your Google Ads account and select “Tools & Settings”.
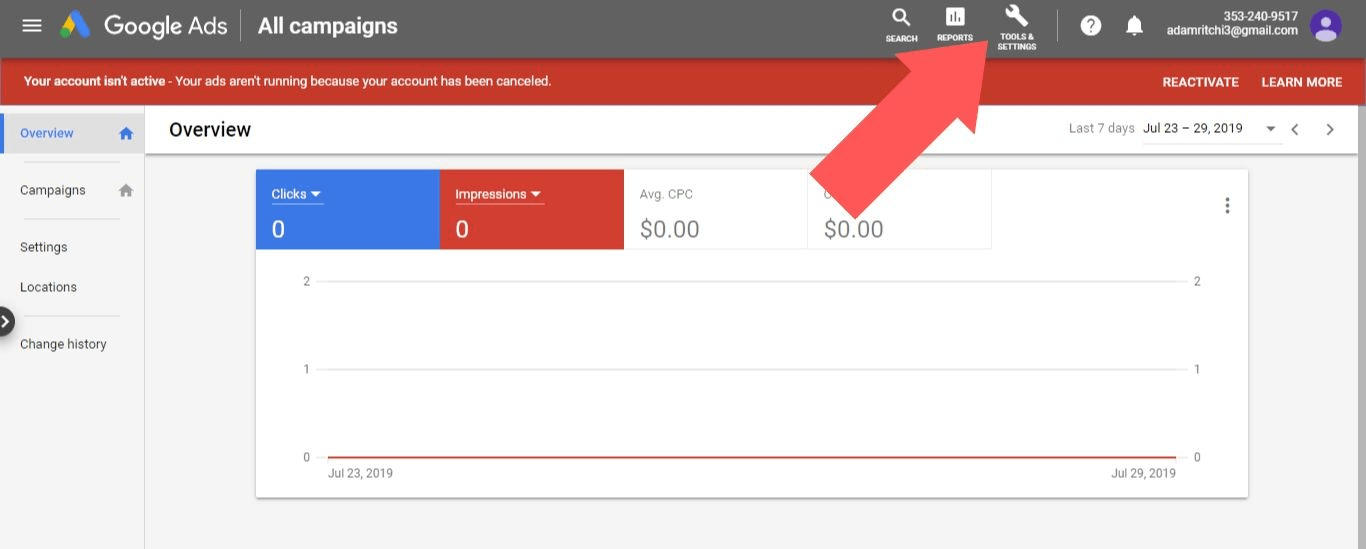
Following that, you’ll be taken to the conversion tab, where you’ll see the list of conversions you’ve made. Don’t worry if you don’t see a list; you’re about to make one.
- Select “Conversions”.
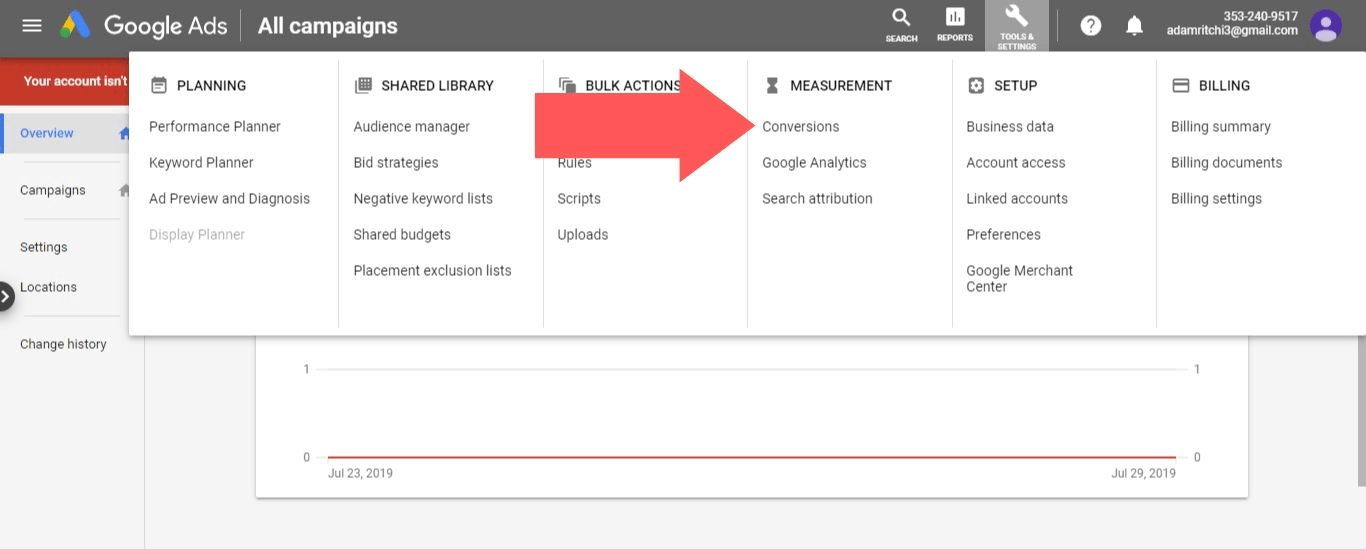
- Click on the blue plus sign button to generate a new conversion action.
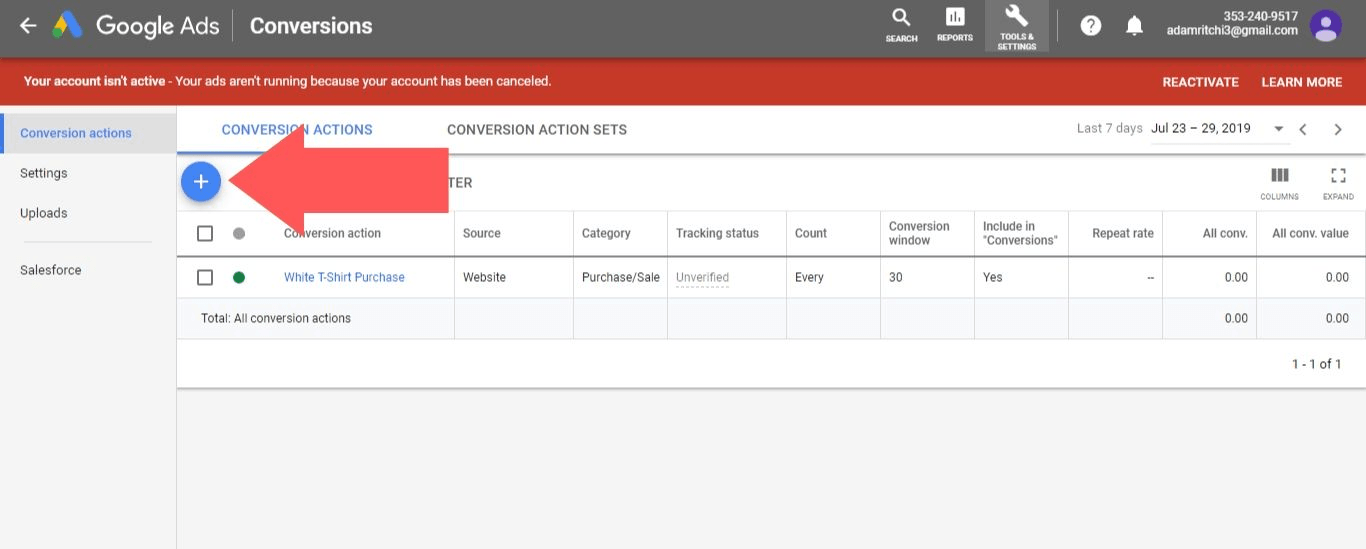
After clicking this blue button, you’ll be taken to a window where you can set up the attributes for the conversation.
- Select Website, as we’re establishing a BigCommerce shop.
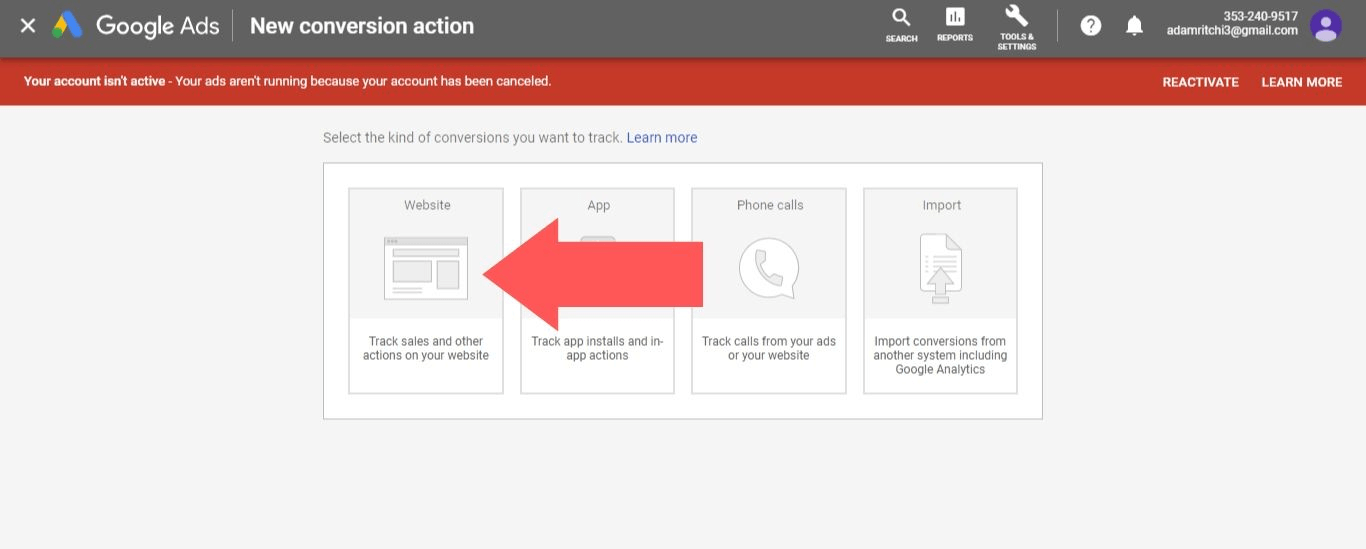
- Fill out some information as follows:
-
In the category: select which action you want to track (for this example, we’ll select “Purchase”).
-
In the “Value” section, select “Use different values for each conversion” and enter “1.5” for the value. Note: You can choose the currency as per your need or the BigCommerce store currency. I’ve chosen USD.
-
In the “Count” section, select “Every conversation”.
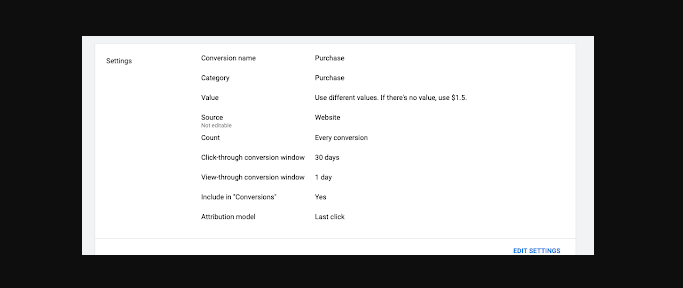
Enter a conversion name and fill out the rest of options as you see fit, then select “Create and Continue”
- Select Install the tag yourself.
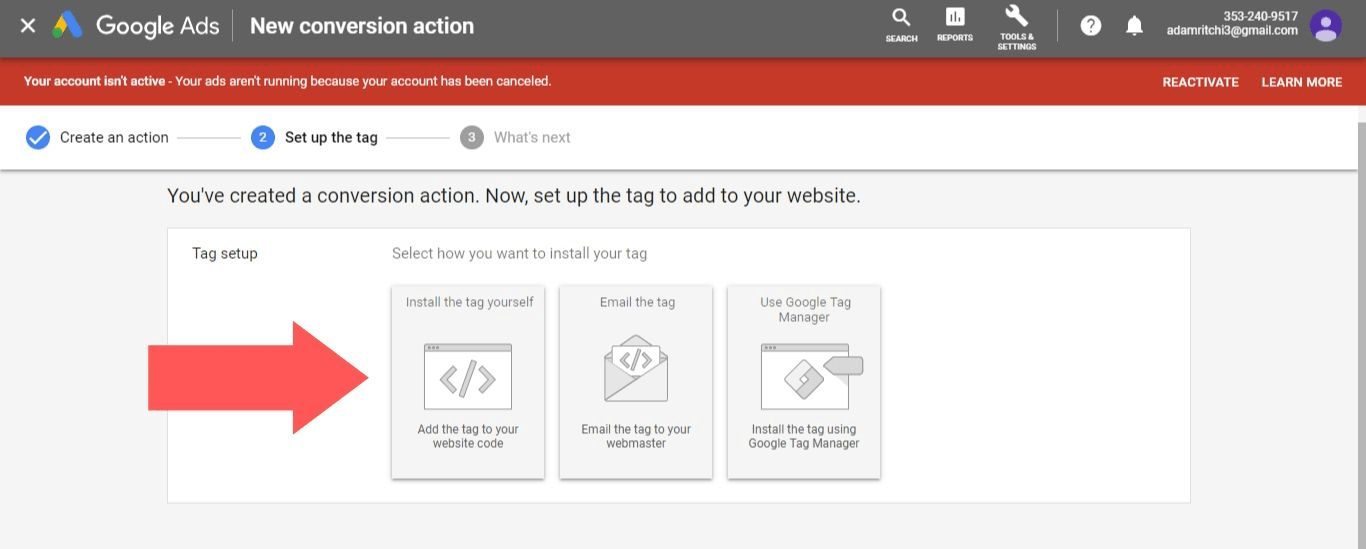
As we’ll be installing this directly on the website, select “Use Google Tag Manager” so we can grab the Conversion ID and Conversion Label.
- Fill out the details as follows:
-
In the “See code for” section, select “HTML”.
-
In the “Global site tag” section, select “The global site tag is already installed on all pages, but comes from another Google product (such as Google Analytics) or from another Google Ads account”.
-
In the “Event Snippet” section, select “Page Load”.
-
When you copy the Conversion ID and Conversion Label from the Event snippet that is generated, you need to replace the Conversion ID & Conversion Label where required, followed by the image below:
  * AW-CONVERSION_ID — stands for your conversion ID, which is the same for every conversion action created in your account.

  * AW-CONVERSION_LABEL — stands for the conversion label, which is unique per conversion action

Here is the code for you:
<!-- Global site tag (gtag.js) - Google Ads: XXXXXXXXX -->. // Replace your Conversion ID with XXXXXXXXX
<script async src="https://www.googletagmanager.com/gtag/js?id=AW-683916070"></script>
<script>
  window.dataLayer = window.dataLayer || [];
  function gtag(){dataLayer.push(arguments);}
  gtag('js', new Date());

  gtag('config', 'AW-XXXXXXXXX');  // Replace your Conversion ID with XXXXXXXXX
</script>
<script>
  gtag('event', 'conversion', {
      'send_to': 'AW-XXXXXXXXX/XXXXXXXXXXXXXXXXXXXXX',  // Replace your Conversion ID/Conversion label with XXXXXXXXX
      'value':  %%ORDER_AMOUNT%%,
      'currency': 'USD',
      'transaction_id': '%%ORDER_ID%%'
  });
</script>
- Click Next then Done to finish creating the conversion action.
Step 2: Add the conversion code to your BigCommerce shop.
The method you used to integrate with Google Analytics will determine how you install the Google Ads tracking code. We suggest using your Google Analytics property ID because it takes advantage of our updated integration, which now endorses Enhanced Ecommerce Tracking and Site Search.
Add The Conversion Code to your BigCommerce Shop with the Recommended Method
-
Navigate to Advanced Settings Web Analytics in your BigCommerce control panel.
-
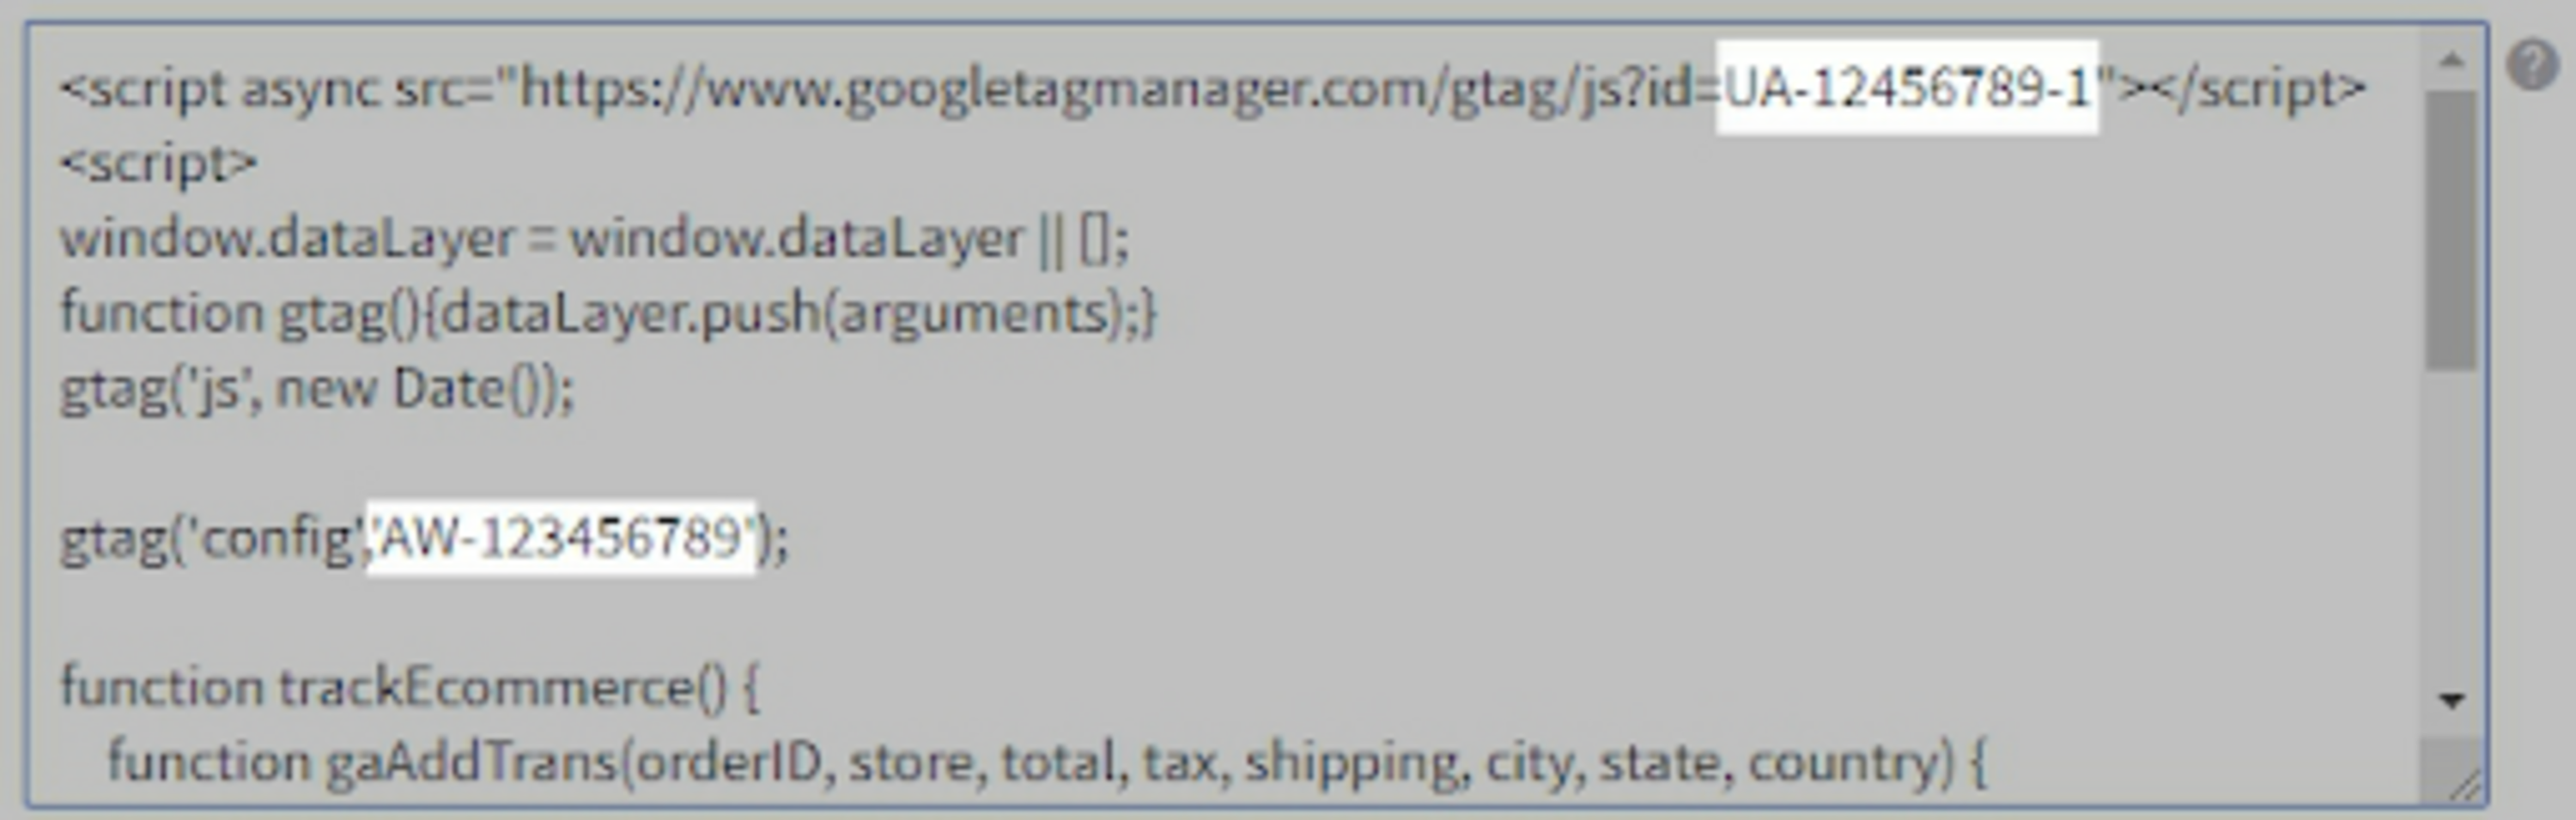
Navigate to the Google Analytics tab and copy your property ID from Google Analytics. You should now have three types of information prepared for the next stages:
- Property ID in Google Analytics
- Conversion ID for Google Ads
- Conversion label for Google Ads
- Return to General Settings and enable Site Verification Tags before saving.
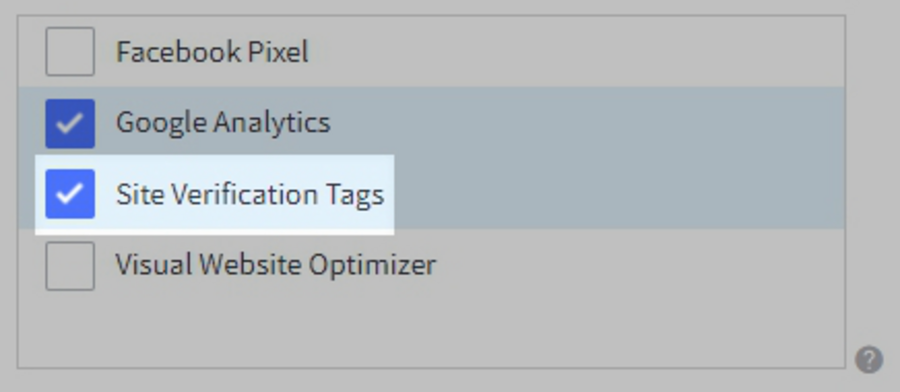
- Navigate to the Site Verification Tags tab and copy and paste the code below.
<script async src="https://www.googletagmanager.com/gtag/js?id=UA-xxxxxxxx-x"></script>
<script>
window.dataLayer = window.dataLayer || [];
function gtag(){dataLayer.push(arguments);}
gtag('js', new Date());
gtag('config', 'AW-CONVERSION_ID');

function trackEcommerce() {
    function gaAddTrans(orderID, store, total, tax, shipping, city, state, country, currency, channelInfo) {
        var transaction = {
            id: orderID,
            affiliation: store,
            revenue: total,
            tax: tax,
            shipping: shipping,
            city: city,
            state: state,
            country: country
        };

        if (currency) {
            transaction.currency = currency;
        }

        ga('ecommerce:addTransaction', transaction);
    }

    function gaAddItems(orderID, sku, product, variation, price, qty) {
        ga('ecommerce:addItem', {
            id: orderID,
            sku: sku,
            name: product,
            category: variation,
            price: price,
            quantity: qty
        });
    }

    function gaTrackTrans() {
        ga('ecommerce:send');
    }

    function gtagAddTrans(orderID, store, total, tax, shipping, city, state, country, currency, channelInfo) {
        this.transaction = {
            transaction_id: orderID,
            affiliation: store,
            value: total,
            tax: tax,
            shipping: shipping,
            items: []
        };

        if (currency) {
            this.transaction.currency = currency;
        }
    }

    function gtagAddItem(orderID, sku, product, variation, price, qty) {
        this.transaction.items.push({
            id: sku,
            name: product,
            category: variation,
            price: price,
            quantity: qty
        });
    }

    function gtagTrackTrans() {
        gtag('event', 'purchase', this.transaction);
        gtag('event', 'conversion', {
            'send_to': 'AW-CONVERSION_ID/AW-CONVERSION_LABEL',
            'value': this.transaction.value,
            'transaction_id': this.transaction.transaction_id,
        });
        this.transaction = null;
    }

    if (typeof gtag === 'function') {
        this._addTrans = gtagAddTrans;
        this._addItem = gtagAddItem;
        this._trackTrans = gtagTrackTrans;
    } else if (typeof ga === 'function') {
        this._addTrans = gaAddTrans;
        this._addItem = gaAddItems;
        this._trackTrans = gaTrackTrans;
    }
}

var pageTracker = new trackEcommerce();

</script>
- Substitute your Google Analytics property ID for UA-xxxxxxxx-x. Substitute your Google Ads conversion ID for AW-CONVERSION ID. Save your changes after replacing AW-CONVERSION LABEL with your Google Ads conversion label.
Drag the bottom corner of the box to make it larger so that you can edit the code more easily. Your completed code should look like the example below.
Add The Conversion Code to your BigCommerce Shop with the Manual Method
-
Navigate to Advanced Settings Web Analytics in your BigCommerce control panel.
-
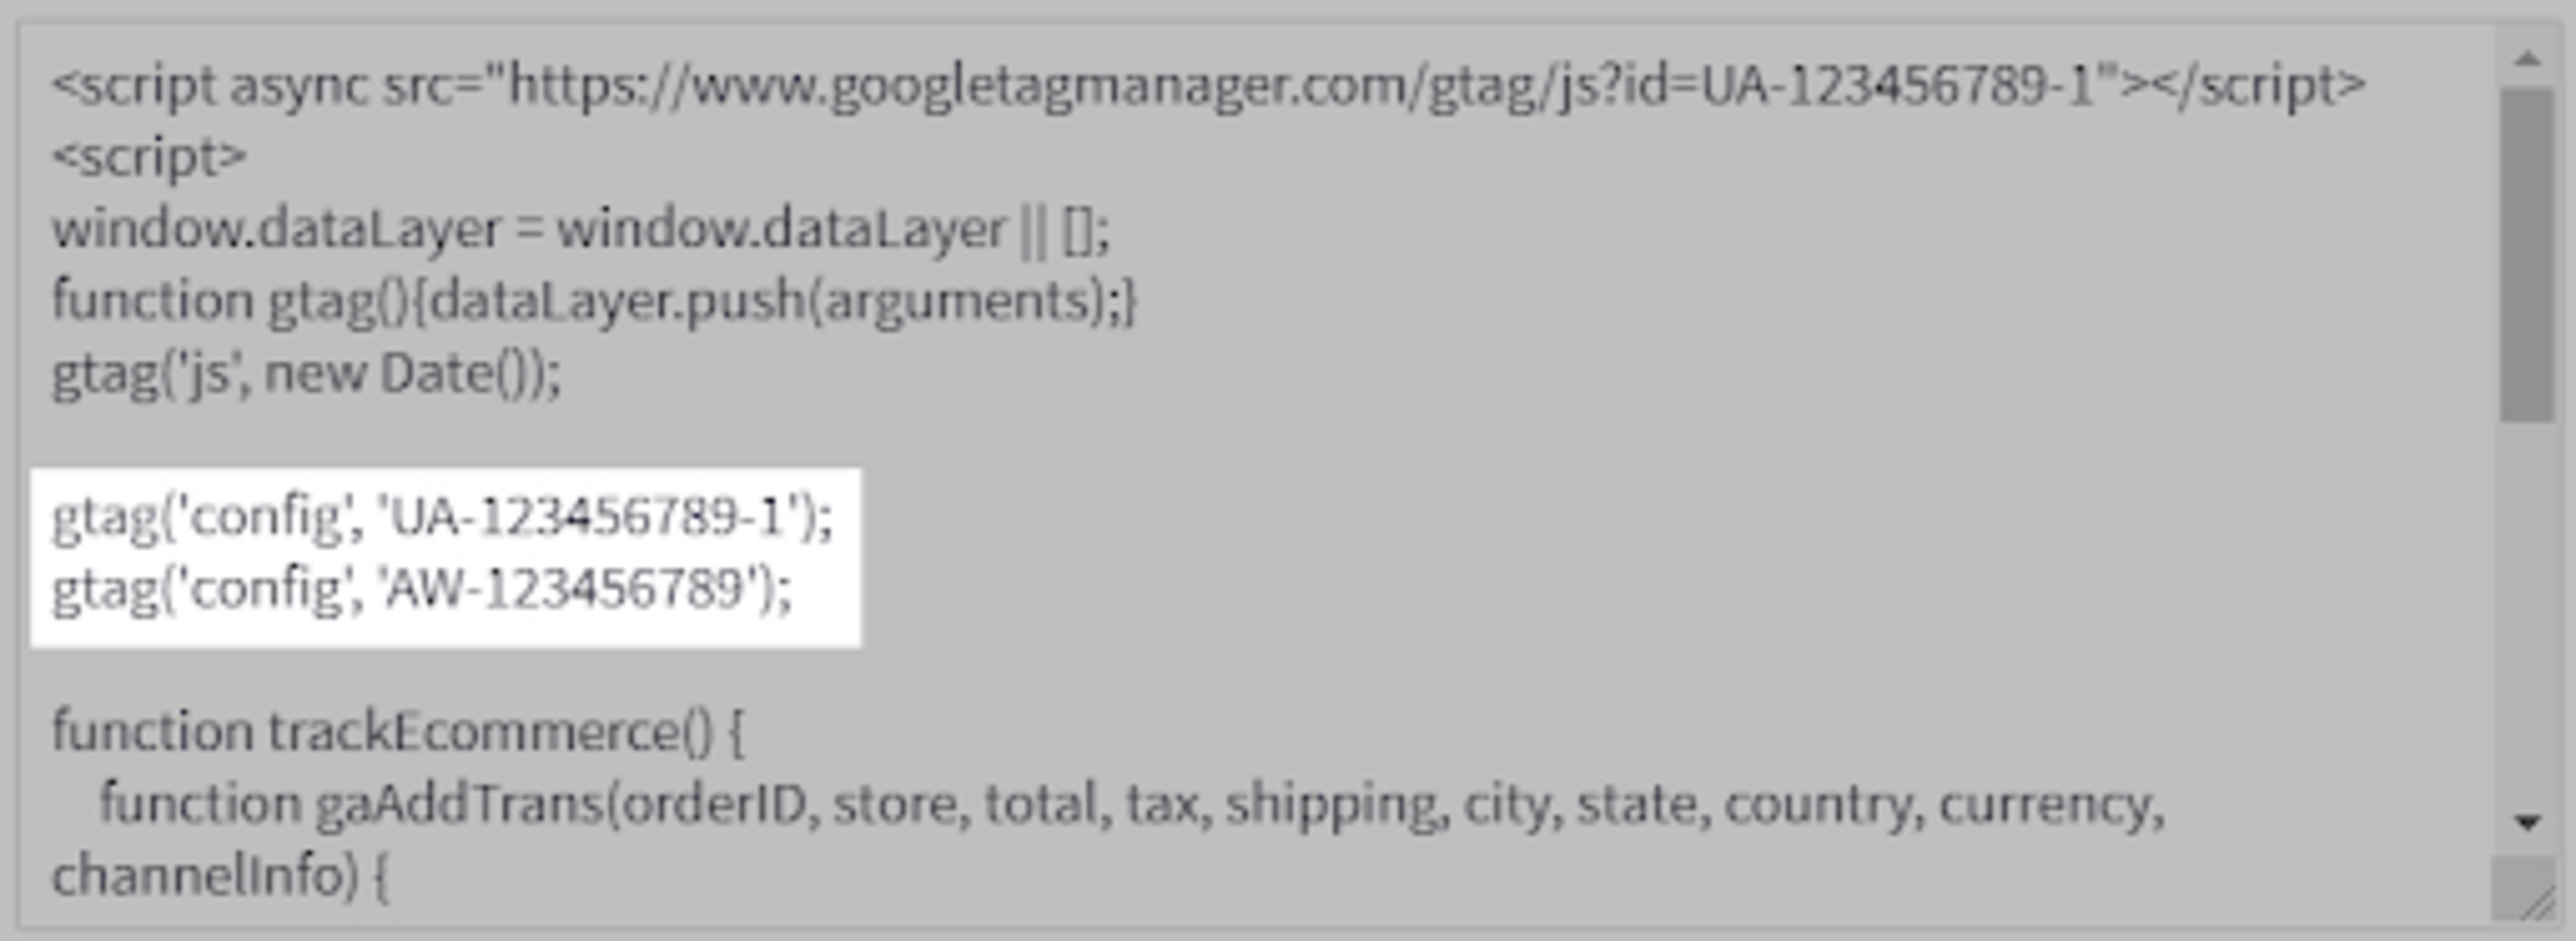
Navigate to the Google Analytics tab and paste the following code beneath
gtag('js', new Date());:
Substitute your Google Ads conversion ID for AW-CONVERSION ID. Your code changes should look like the example below.
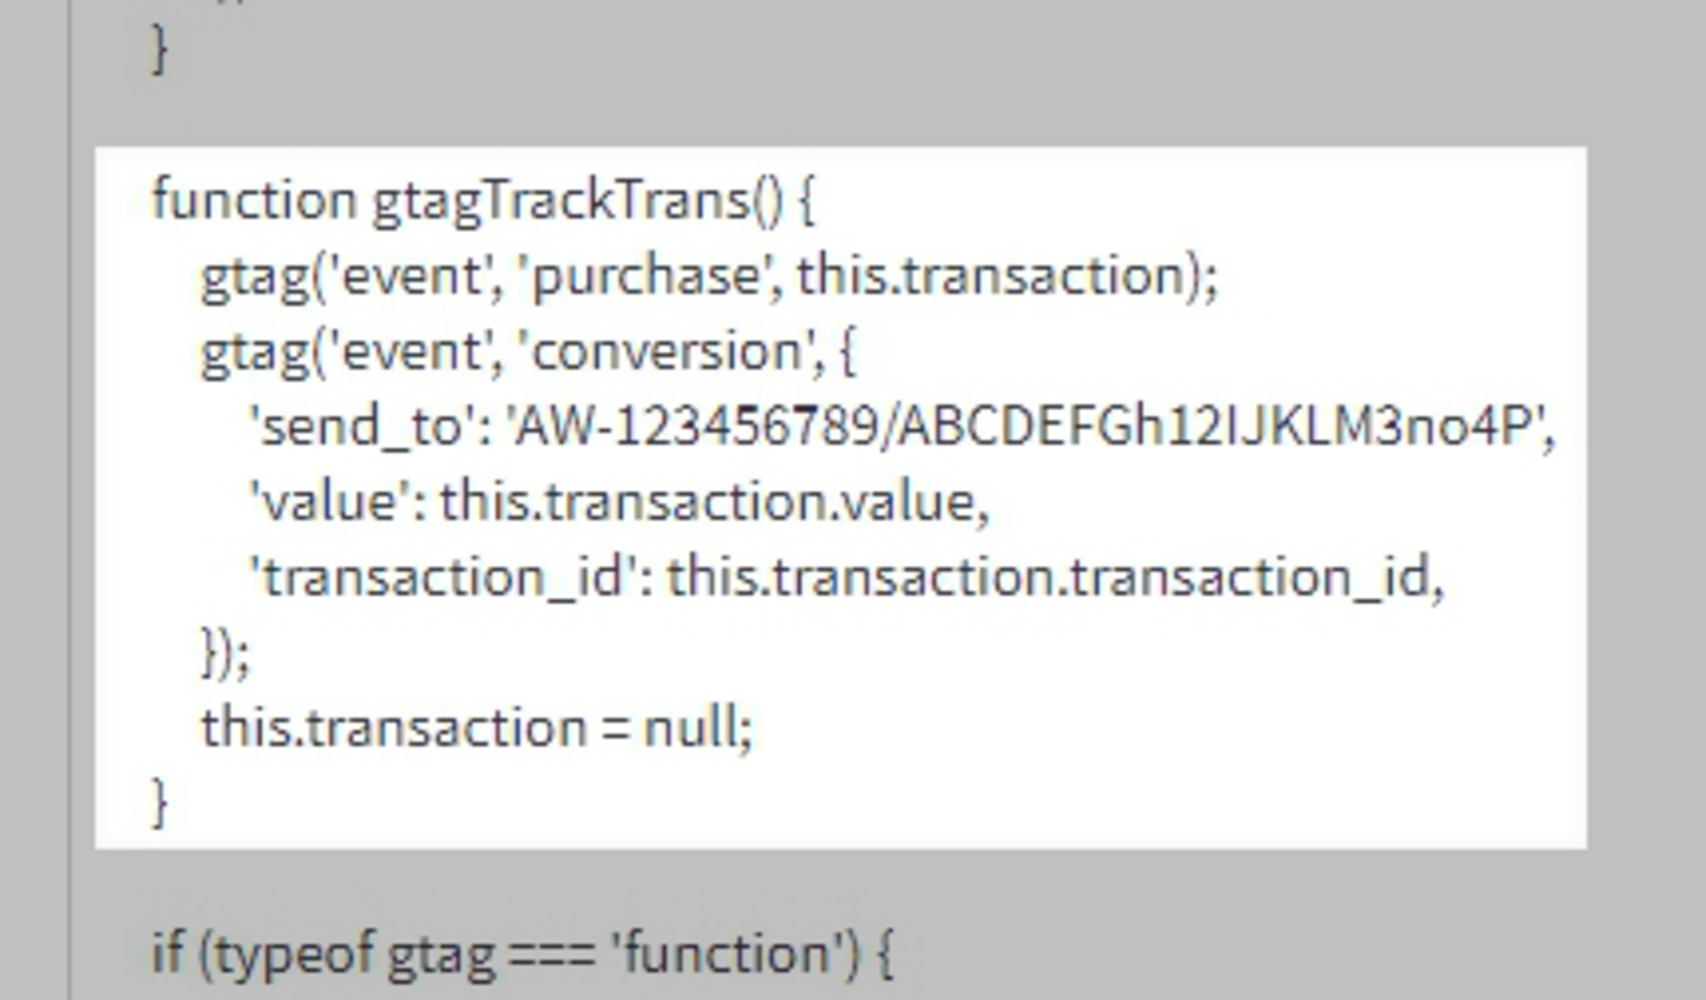
- Insert the following code into the tracking event function
gtagTrackTrans():
    gtag('event', 'conversion', {
            'send_to': 'AW-CONVERSION_ID/AW-CONVERSION_LABEL',
            'value': this.transaction.value,
            'transaction_id': this.transaction.transaction_id,
        });
- Substitute your Google Ads conversion ID for AW-CONVERSION ID. AW-CONVERSION LABEL should be replaced with your Google Ads conversion label. Your code changes should look like the example below.
- Save your changes
Final words
It is advisable for all merchants to set up Conversion Tracking for your BigCommerce store to run marketing and advertising techniques effectively. Through researching the data provided by this process, merchants can find out what technique works and what doesn’t so that they can make the best decision.


