
How to Add & Display a Product Option and Price Variation in BigCommerce?

If you want to sell different sizes, colors, or materials for your products? Can you allow for customizations such as engraving or specific delivery date? You may sell products with several combinations, such as different colors or shapes, using the Product Options feature in BigCommerce.
They also allow your consumers to customize or change items, such as a text area for personalization or a checkbox for an extra insurance premium. In this tutorial, you’ll learn how to create product choices like size and color, as well as how to create choice sets and add them to products.
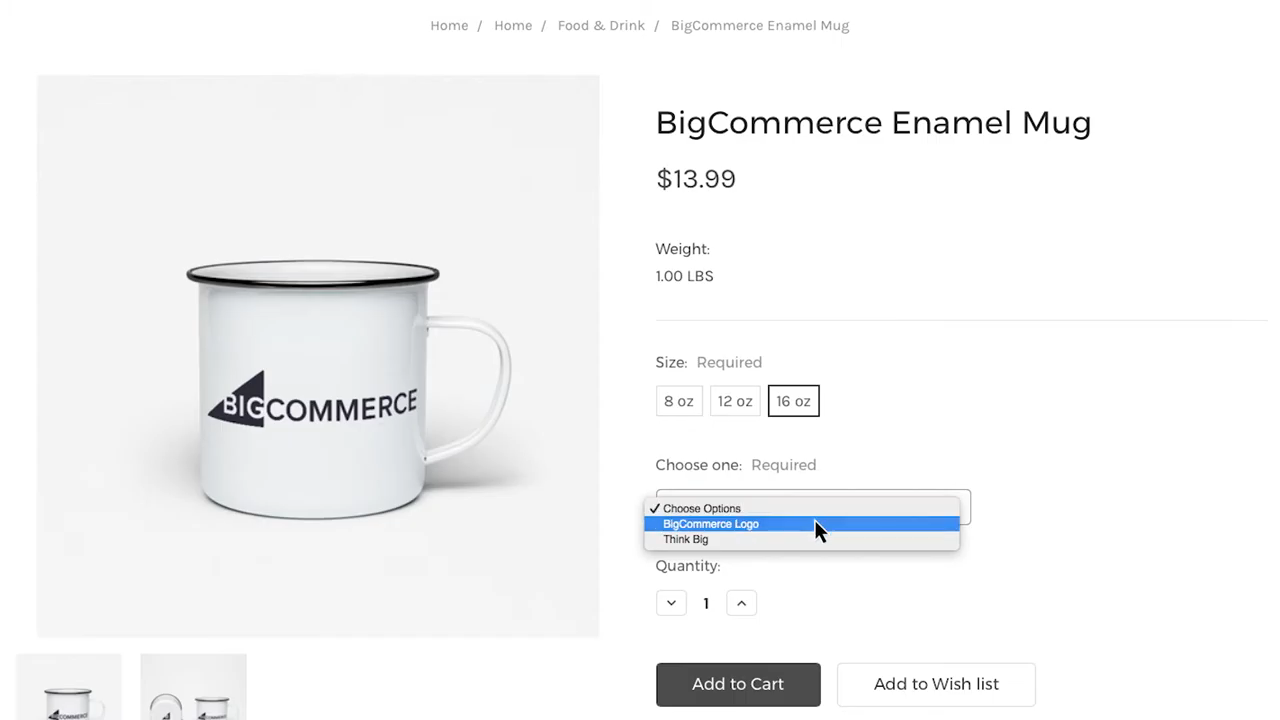
Demonstration of product options with price variation
For products that come in several versions, a product option is used. Product options can include elements like checkboxes or fields for personalized text, but they can also be things like size and colour.
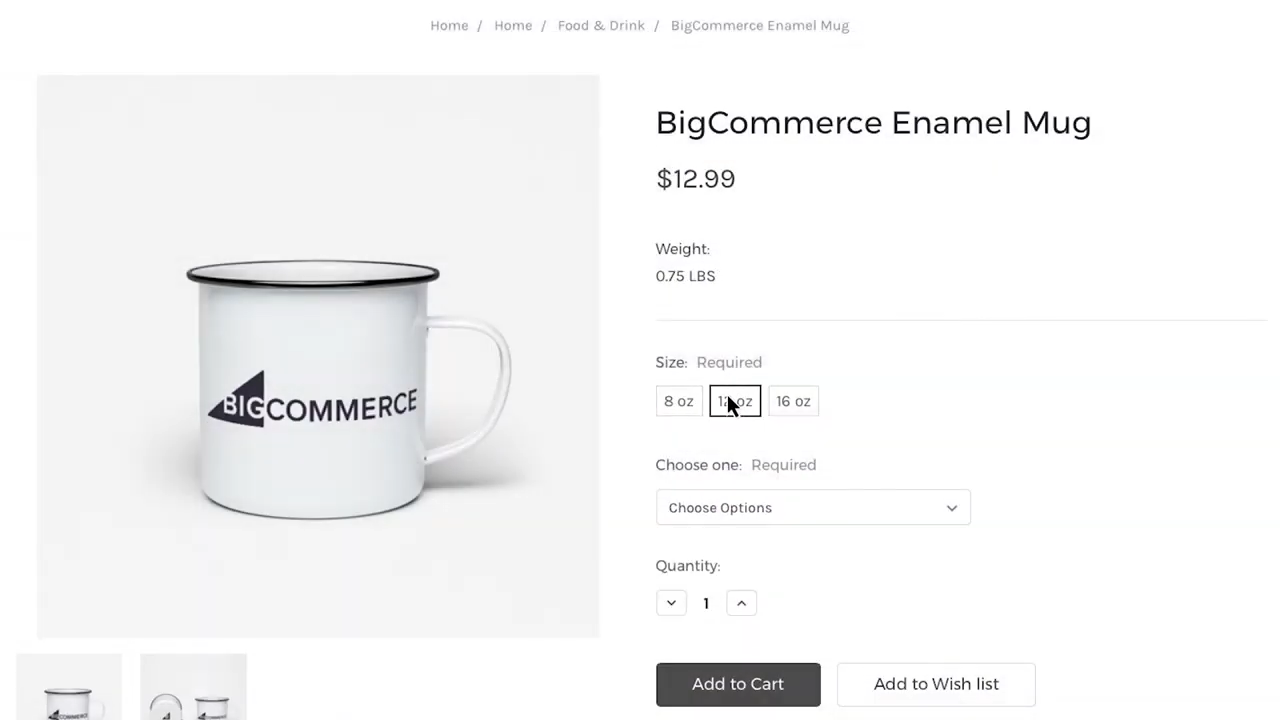
Variations are used to describe items that come in a variety of colors, shapes, or types. Clothing that comes in a variety of colors and sizes is a popular use case for variants. Variants usually have their own SKU and track stock, as well as their own image, price, and weight.
Values are created by the shopper for certain choice styles, such as custom text fields and file upload fields. For goods that require it, you can make it a mandatory option (like size for clothing). This means that the shopper must first choose a value (such as small) before adding the object to their cart.
Non-required options can also be provided. That is, the shopper has the option of selecting/entering a value but is not required to do so. This is ideal for add-ons or personalizations such as engraving.
How to add a product option in BigCommerce
Step 1: Create Option Sets
An option set is a collection of options that can be applied to a commodity. If the product was a t-shirt, for example, you could have a T-Shirts design package of Size and Color choices.
Individual options must be assigned to their appropriate option set before they can be added to a product; options cannot be extended “directly” to a product.
- Go to Products > Product Options and click on the Option Sets tab to generate a new option set or update an existing one. Click the name of an existing option set to update it, or build a new one, click Create an Option Set.
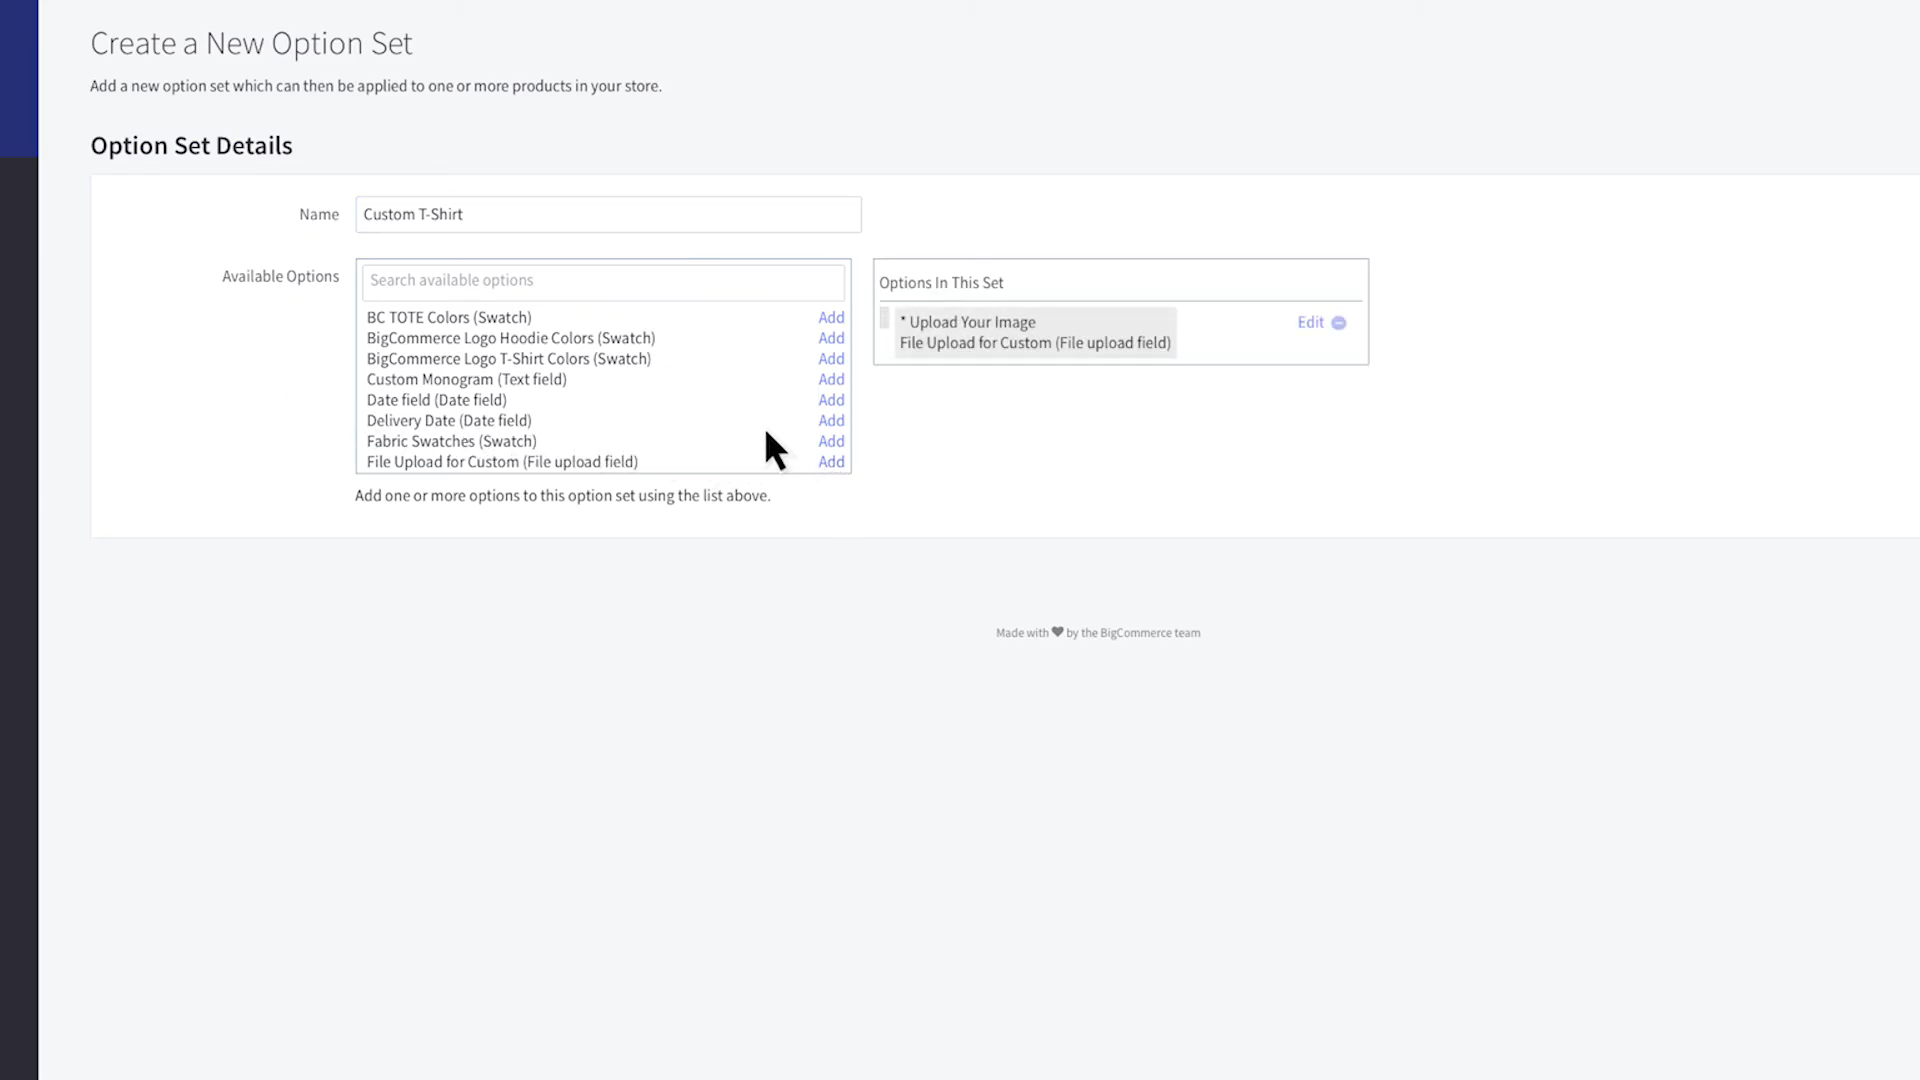
The choice set Name is not visible on the storefront but is used in the control panel to identify the product or brand, so give it a name that is appropriate to the product or brand.
- Select the choices you want to use in your package from the list of Available Options and press Add next to them. When you pick them, they will appear under Options In This Set on the right. To delete an alternative from the list, press the minus (-) button.
Step 2: Apply Option Sets to products accordingly
Applying an Option Set with a single product
Go to Products View and update a package to add an alternative collection to a product.
Using the Option Set drop-down on the Options & SKUs tab to apply a collection. The SKUs and Rules tabs on the left side would appear as a result. Select (None) to delete it an option set. Then tap Save and Exit when you’re done.
Applying an Option Set with multiple products
Note: The Multi-Channel Product List does not help applying an option set in bulk (enabled when you connect eBay or Amazon channels). Option sets can also be applied in bulk via import.
You may also use an option set to refer to several items at the same time. To add the option set to each product, go to Products View and check the box to the left of each product. Using the search bar, narrow down the product list. Choose Apply Option Set from the Choose an Action dropdown at the top of the page, then click Confirm. Pick the option set you wish to add to the tested items from the popup that appears.
Changing the display name of an option inside an Option Set updates the display name for all items that use the option set. All current SKUs or product-level guidelines will be removed if the option set on a product is changed. When modifying a current or live product’s choice set, keep in mind that removed SKUs or rules can either be restored manually or from a backup.
Step 3: Make SKUs for each product
SKUs(Stock-keeping unit) can be manually generated or created automatically with the Auto-SKU Generator. You will need SKUs to keep track of inventory on each type of goods, and no notify customers if their selection is available or it’s out-of-stock.
For the following option styles, SKUs can be created:
-
Color
-
Measurements
-
Swatch
-
Alternative Selections
-
Product pick list
-
Checkbox
Using the classic example of color and scale as an example, your SKUs might look like this:
| Product | SKU |
|---|---|
| Black, Refillable Pen | BR100 |
| Black, Non-refillable Pen | BN150 |
| Red, Refillable Pen | RR100 |
| Red, Non-refillable Pen | RN100 |
To make an SKU, edit a product, then go to the Options & SKUs tab at the top and choose SKUs. Create an SKU by clicking the Create an SKU button. Fill out the following SKU details in the popup that appears:
-
SKU (required) — the variant’s product code
-
UPC/EAN — UPC or EAN variants
-
Cost — used in accounting.
-
Price — Use this attribute if you want this SKU to be priced differently from the base model. Before any price adjustment rules or concessions are enforced, this will be the current base price.
-
Option for this SKU (required) — Choose the attributes that should be applied to this SKU. The related alternatives are used to populate these.
-
Weight — Use if you like this SKU’s weight to be different from your base product’s. It will be used as the starting weight for any rule modifications. This is used in real-time shipping quote calculations if enabled/offered. These fields can be modified in bulk as well; see Importing and Exporting Products for more information.
-
BPN — Bin Picking Number; used in warehouse/logistics organization.
-
MPN — Manufacturer Part Number
-
Enabled — Determine whether or not this SKU is available for purchase by your customers. You can set an extra, personalized Purchasing Disabled Message if this option is unchecked.
How to add a price variation in BigCommerce
Step 1: Create rules for price variations
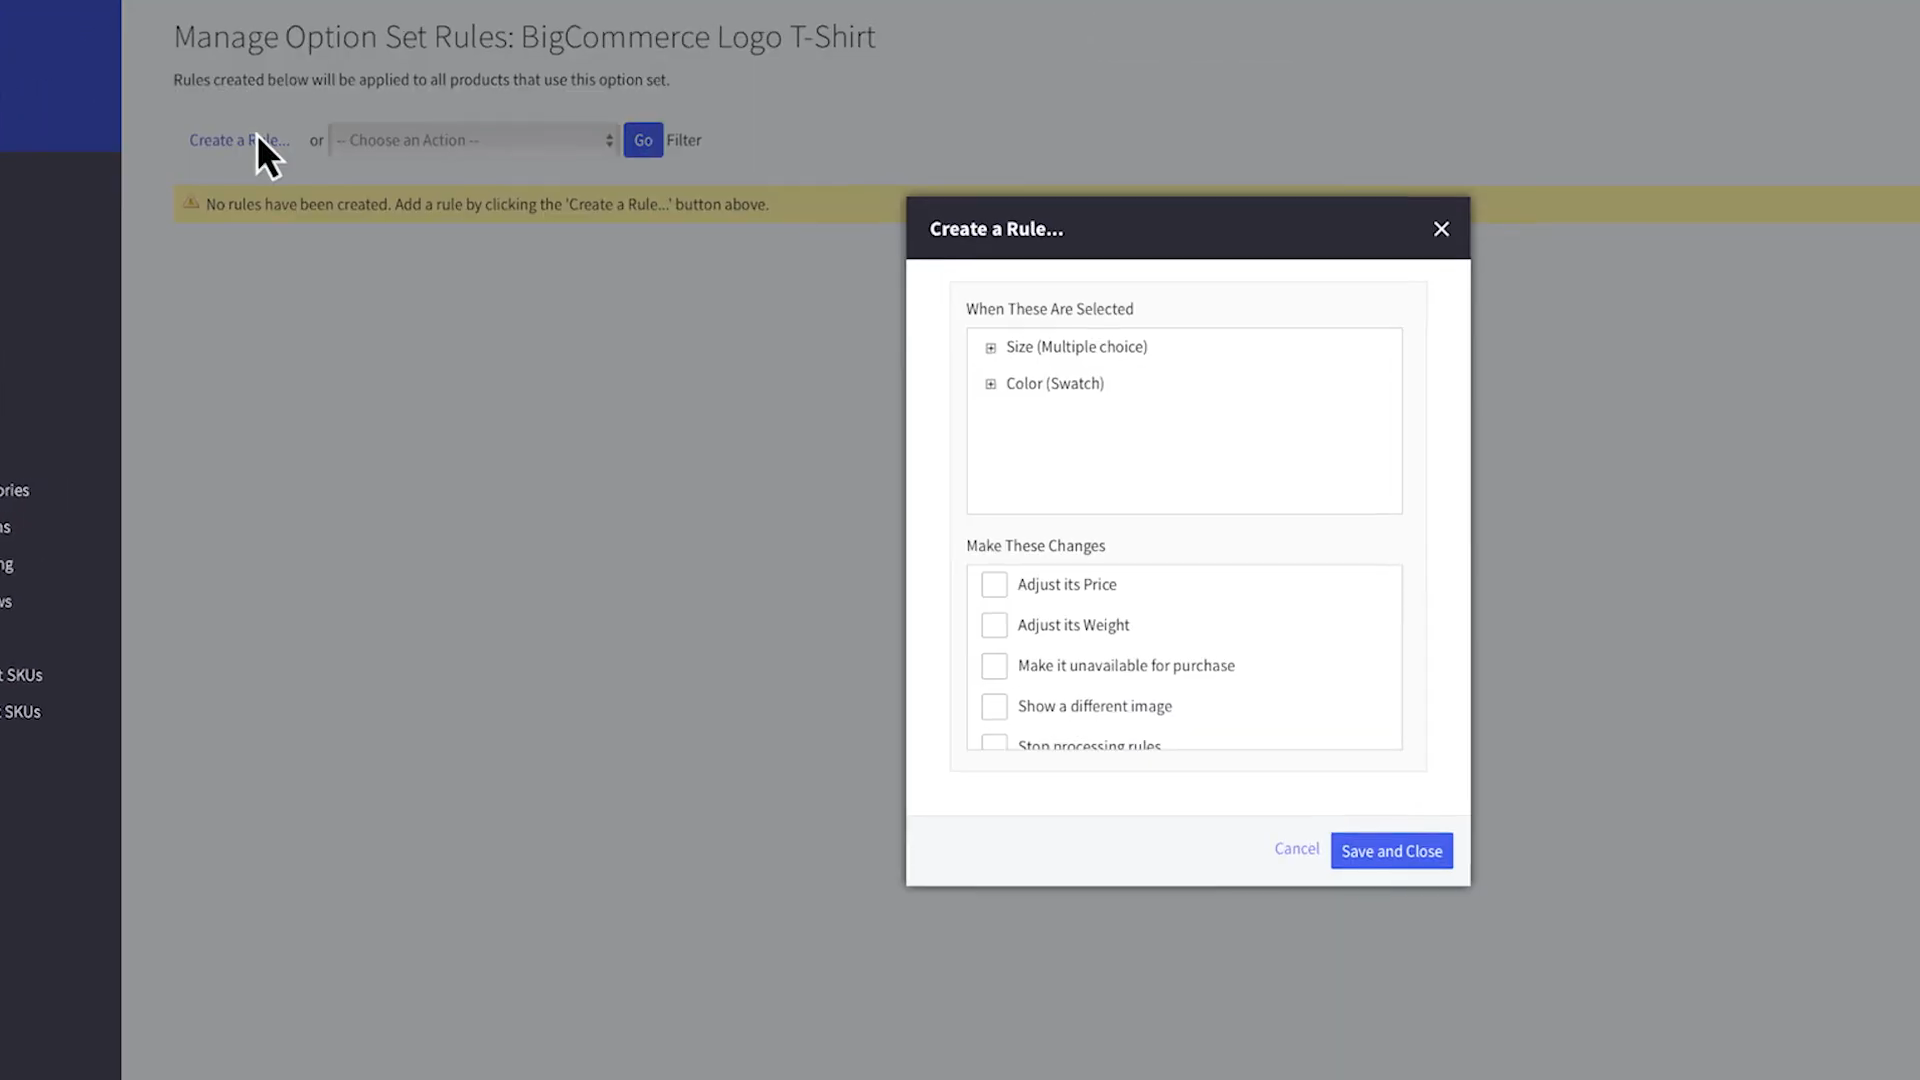
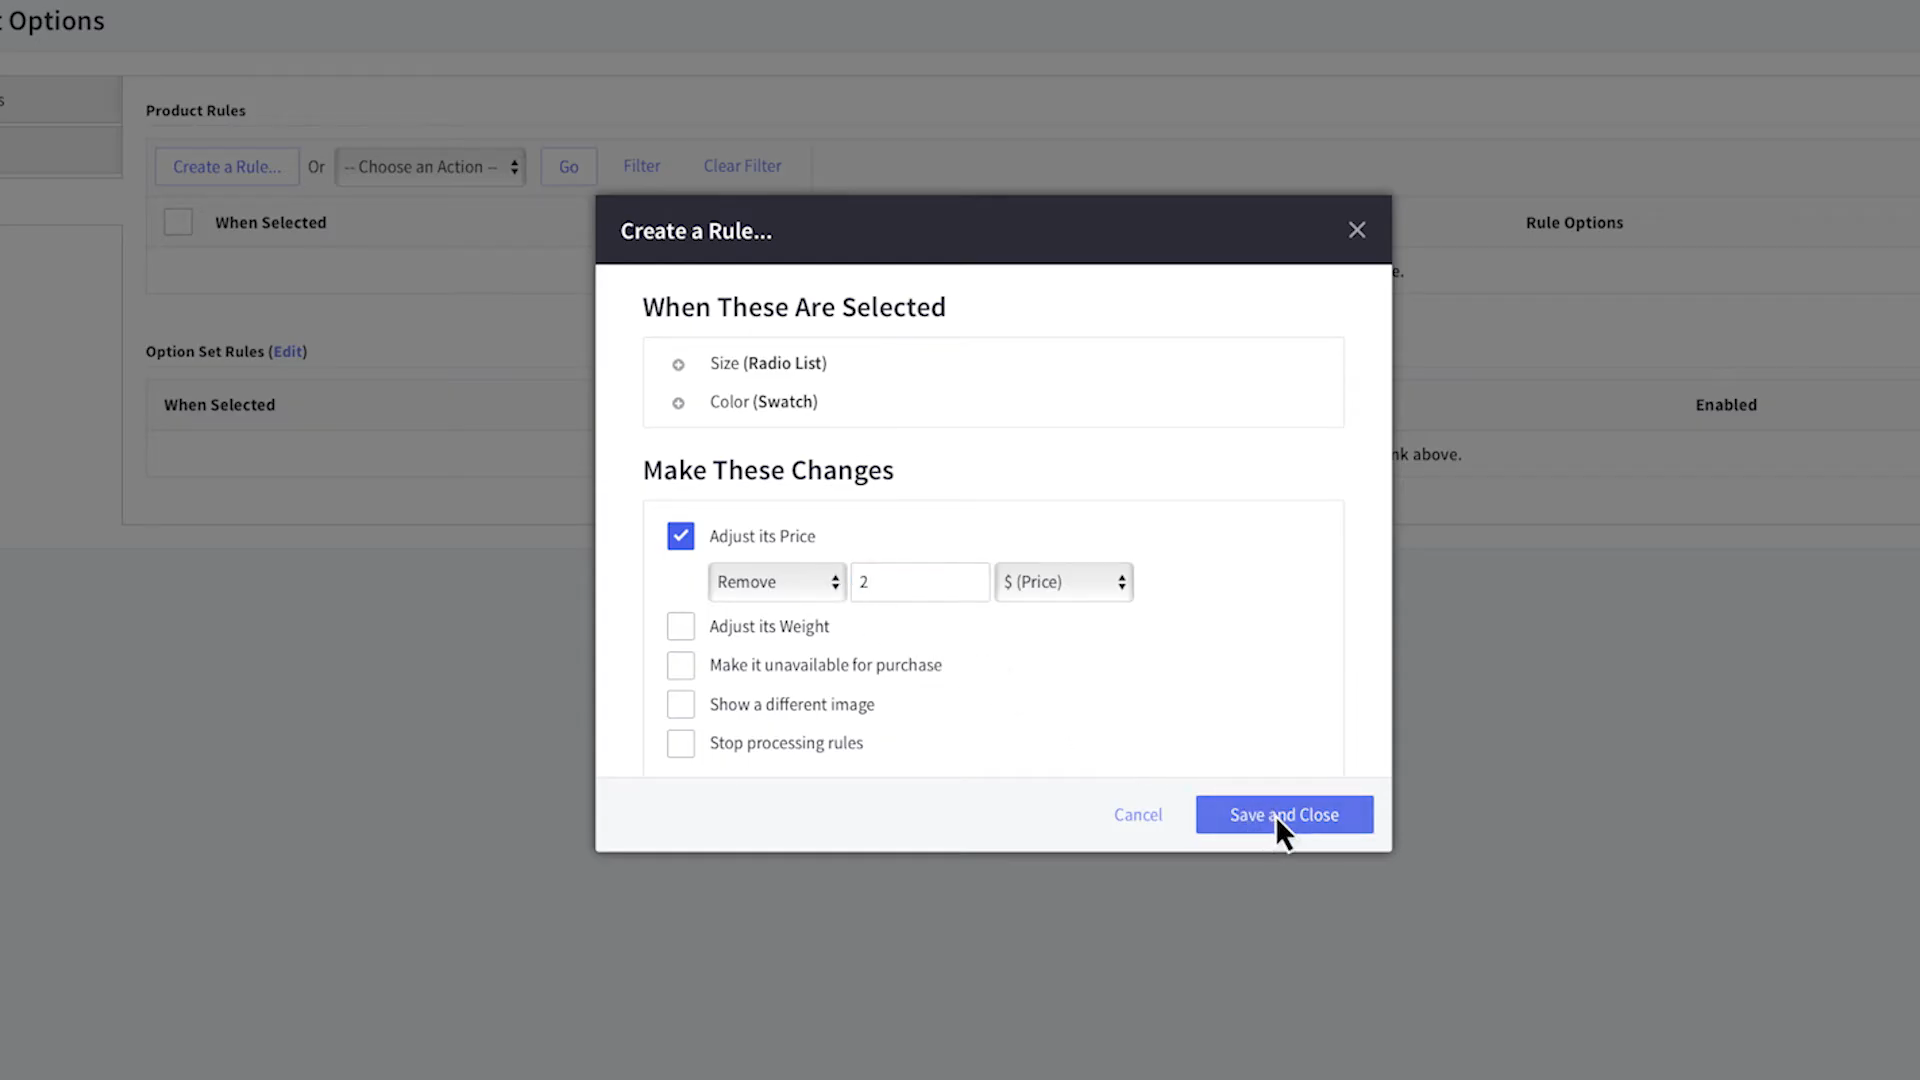
When making a rule, you may want it to only refer to one thing, in which case you’d make a product-based rule. To make a rule, edit a product, then go to the top and press the Options & SKUs tab, then Rules. Create a rule by clicking the Create a Rule button.
Pick the option/combination of choices you wish the law to refer to with When These Are Selected. To pick them, press the plus sign (+) next to the option’s name and make your selection. Place a checkbox next to each update you want to make when the customer chooses the alternative or combination you’ve chosen above under Make These Changes.
Step 2: Adjust prices
Different from Option Sets, when a certain value or combination of values is chosen, Rules allows you to change the price as you want. You can increase or decrease a certain number (or percentage) depending on your currency. A fixed price may also be set. It is not possible for a fixed price to be zero.
Check that the optional product’s price is added to the main product’s price; if you want to apply a different price, use a price adjustment rule or SKU product details instead.
How to display product options in BigCommerce
Step 1: Select dislay type
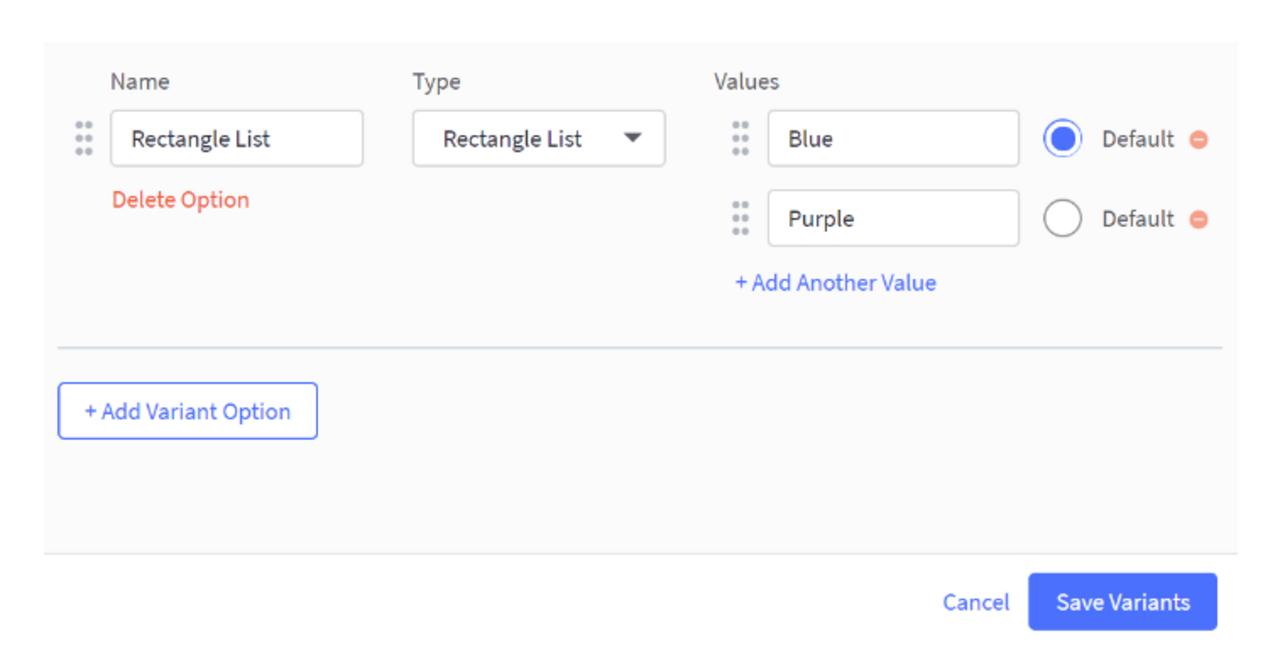
Press + Add Variant Option when generating or editing a product, or click Configure Options to update an existing Variant Option. Give your choice a tag, decide the display type, and the values that should be available, including your custom price. To add further values, click + Add Another Value. To replace an expired value, click the minus (-) button next to it
The Default attribute will be pre-selected when a shopper opens the product description tab. To adjust the sort order of options and values on the storefront, click and move the handle to the left of them. Select Save Variants when you’re finished.
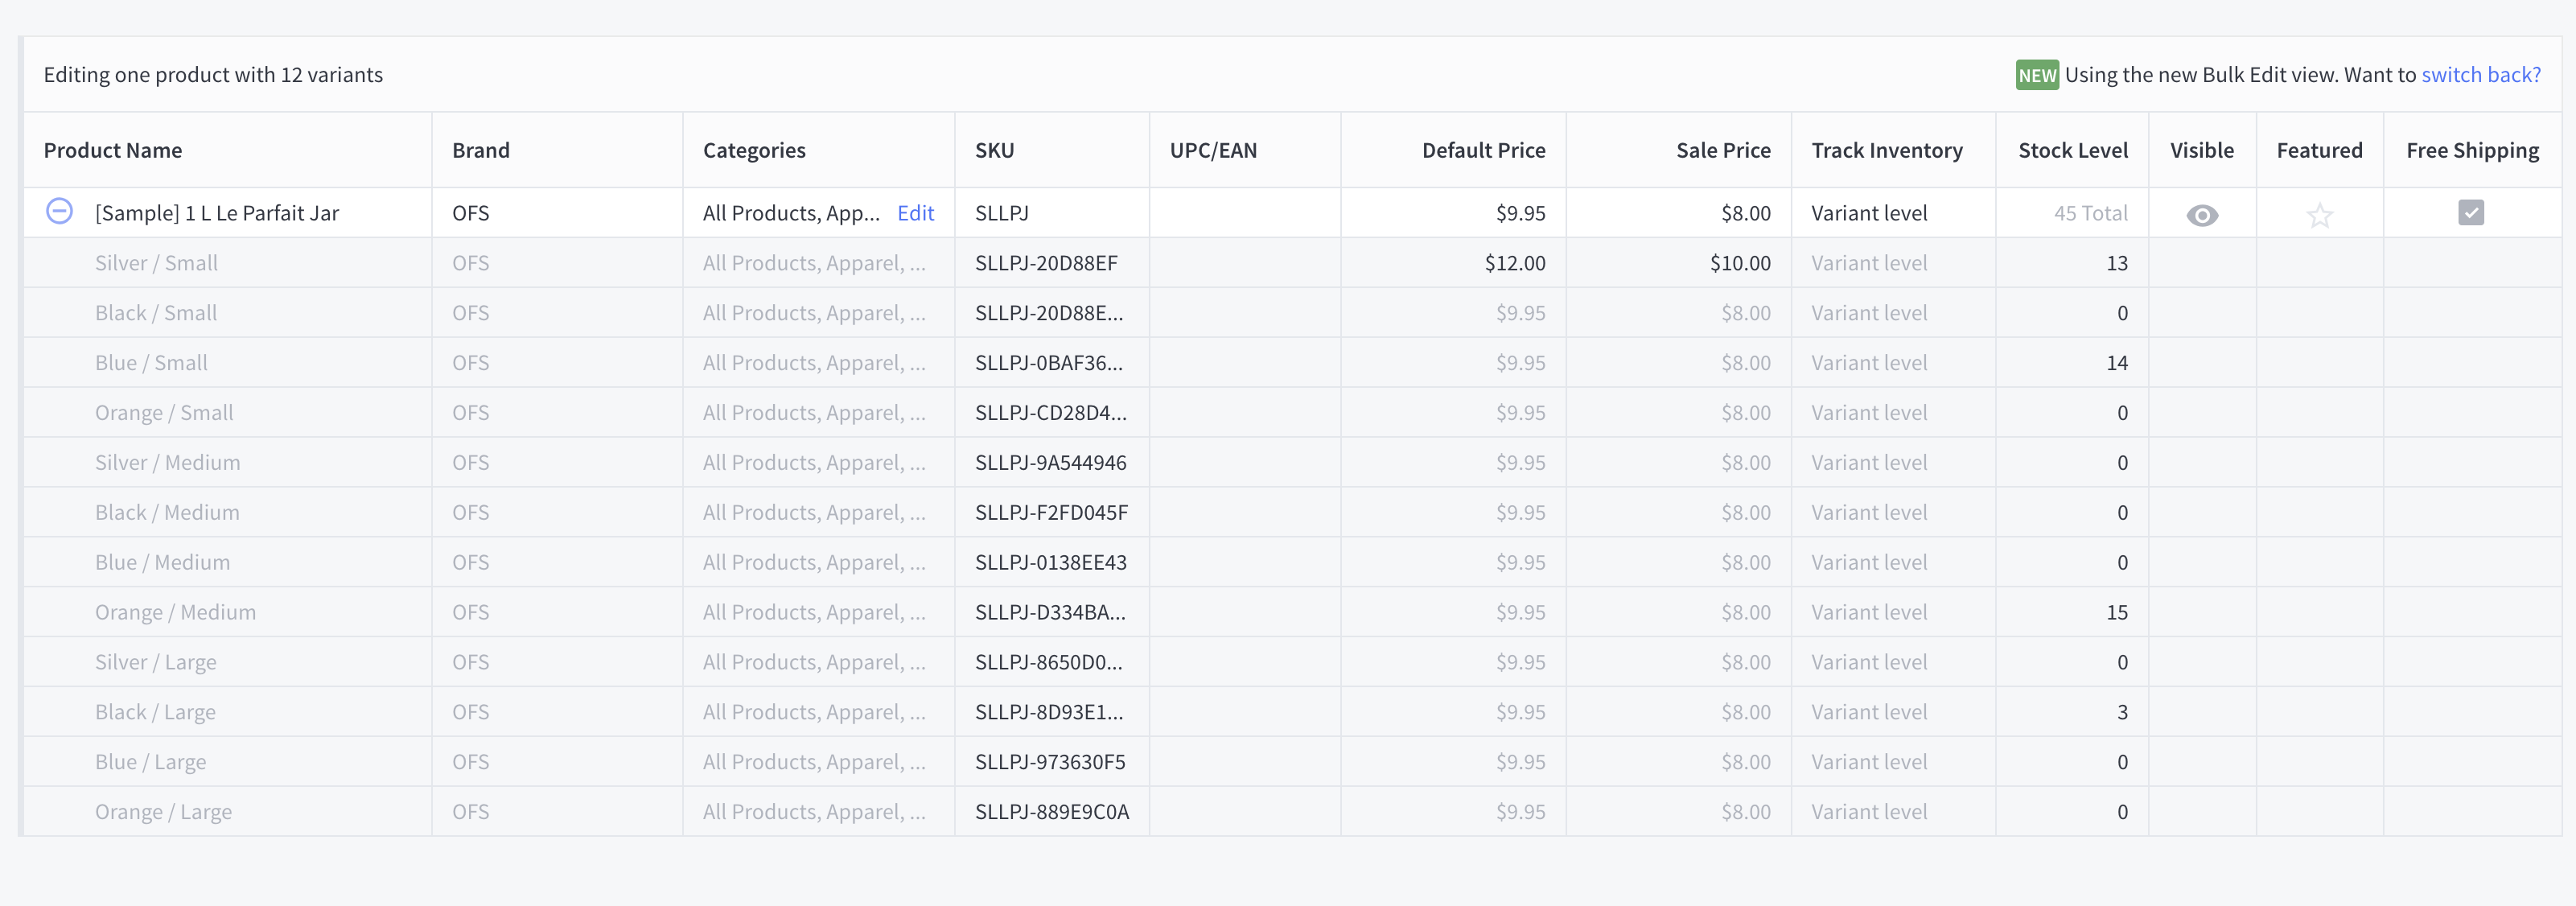
After you’ve developed your variant choices, a table called Variants will appear with all of your product’s variations. This section functions similarly to a spreadsheet, allowing you to add, edit, and copy data (such as price, image, and SKU) for individual variants. Additional fields, such as Sale Price or Weight, may be seen or hidden using the Edit columns dropdown.
Step 2: Setup the product
Go to Products Product Options and click Create Shared Variant Option to create a new shared variant option. To update an existing one, pick Edit from the menu button beside it.
-
Display label — This text defines a storefront alternative, such as Size.
-
Option name — This text is only included in the control panel to describe this common variant method (it is not shown on the storefront).
-
Type — Choose the option’s show type on the storefront (Dropdown, Radio Buttons, Rectangle List, or Swatch).
Configure the Values for your option; on the storefront, click and drag the handles next to values to adjust their sort order. When you’re done, click Save.
How to display price variations in BigCommerce
Step 1: Create Variant Pricing
A modifier choice is the component of a customization option that a shopper works with, and it can be anything from a checkbox to a text box for price to a file upload command. You will use a Rule if you choose all of your modifier choices to adjust the final commodity price as they are chosen.
If you sell customized items, for example, you could have a checkbox that adds $5 if customers want to include their name, as well as a text area where they can type it in. Since customizations are used to change current models or variants rather than create new ones, they don’t need SKUs or storage. They can be mandatory or discretionary. On your storefront, modifier choices can be shown in a number of ways.
Step 2: Edit Default Price
-
Choose the modifier alternative to which it will attach, then press +Add Rule. Click Configure Rules to make changes to an existing rule.
-
Choose the Modifier Option on which the law will be applied.
-
If the Modifier Option is a multiple-choice option, you must also decide which values will cause the rule to be triggered under When this is selected.
-
If the Modifier is chosen, you will customize how the price or weight can be changed under Make these adjustments.
Note: Customers can see price points for all of the models, including those without inventory. We suggest either incorporating pricing for out-of-stock versions or merely deleting their prices and allowing them to inherit the base product’s price to ensure the price ranges are accurate for your goods.
Conclusion
Pricing mechanisms in the eCommerce world can be very complicated. You aren’t really faced with straightforward prices for goods that need no customization.
Although BigCommerce is built to help entrepreneurs create, maintain, and operate their own eCommerce shops, I find that understanding product options and price variation settings is initially challenging. BigCommerce’s merchandise options scheme must be scalable in order to accommodate a variety of company types selling a variety of items.


