
How to Add & Configure Facebook Pixel in BigCommerce?

BigCommerce is one of the most popular e-commerce platforms. But setting up a BigCommerce store does not guarantee success. You need to answer several questions to determine whether or not you are doing it right.
The best way to do this is to seek help from analytics tools, for example, Google Analytics. But shopping is about interests, and speaking of interests, Facebook is a better way to find out more about your customers.
Facebook has launched an analytic tool called Facebook Pixel, which provides integrations for e-commerce platforms.
In this article, we’ll talk about the steps to add and configure Facebook Pixel in BigCommerce.
Let’s dive in!
What is Facebook Pixel?
You somehow get the idea of what Facebook Pixel is from its name. It must be related to Facebook, the hundred-of-million-user social media platform. A pixel refers to the smallest unit of an image that appears on a computer screen.
Facebook and Pixel go together to form Facebook Pixel. Facebook Pixel is an analytics tool that helps you monitor your ads’ success by looking at how users interact with your website.
On the official Facebook support website, the tool is described to do the following:
- Ensure your ads reach the right audience
- Increase your revenues
- Analyze the effects of your advertising campaigns

Pros and Cons of Facebook Pixel
Any marketers should use Facebook Pixel to get their jobs done right and effectively. Why is that? Let’s look at several advantages that it brings?
Pros
Advertise through Facebook ecosystems
One of its best things about Facebook is not Facebook systems, but the Facebook ecosystems. Even if you have no intention of advertising on Instagram, the pixel allows you to do so. What’s more, in 2014, Facebook introduced the Audience Network.
Audience Network enables advertisers to extend the scale of their ads beyond Facebook to third-party social platforms. Your ads can now reach other apps as well. In 2016, Facebook extended the network to mobile websites too. Some of its clients are TikTok, Tinder, Activision, and Pandora.
More Insight into Customers
Facebook Pixel is not solely for advertising purposes; it provides meaningful analytics as well. The pixel tracks behaviours of your current and potential customers, giving you accurate demographics into who are interested in your site. Hence, you can build up precise customer personas, adapt your digital marketing if necessary. Compared to one of the counterparts of Facebook Pixel, Google Analytics, Facebook has an advantage over its competitor. When it comes to interests and preferences, Google knows much less.
More Insight into Your Advertising Efficiency
With the data collected by Facebook Pixel, you can target:
- Abandoned carts
- Specific web page traffic
- Specific visitor time frames
- and much more.
As a result, you can track your advertising performance, thus modifying your campaign to get more satisfying results.
Cons
Slow down websites
Does Facebook Pixel slow down websites? Actually, the problem does not come from the pixel itself, but from how we install it. To add Facebook pixel, you can either manually edit the code yourself or use an available plugin so that you do not have to bother coding yourself. The first method costs you a little too much time, while the second costs your website much later.
The plugin you choose may not be the perfect match for your website. It takes time to load itself, then triggers the pixel, slowing down the whole system. Therefore, be careful about your plugin options.
Not GDPR Compliant
GDPR stands for General Data Protection Regulation. This EU policy is developed to protect users’ data. Failing to follow these rules means that companies face severe fines, possibly up to €20 million or 4% of annual global revenue, according to gdpr.eu website. It is a compulsory rule.
However, Facebook Pixel is not GDPR compliant unless you ask for opt-in. If you are not aware of this rule, and Facebook does not notify you of this, you may get into trouble. So learn all the mandatory rules regarding data, especially Facebook is quite famous for stalking.
How to Add Facebook Pixel to BigCommerce
Step 1: Create your Facebook pixel
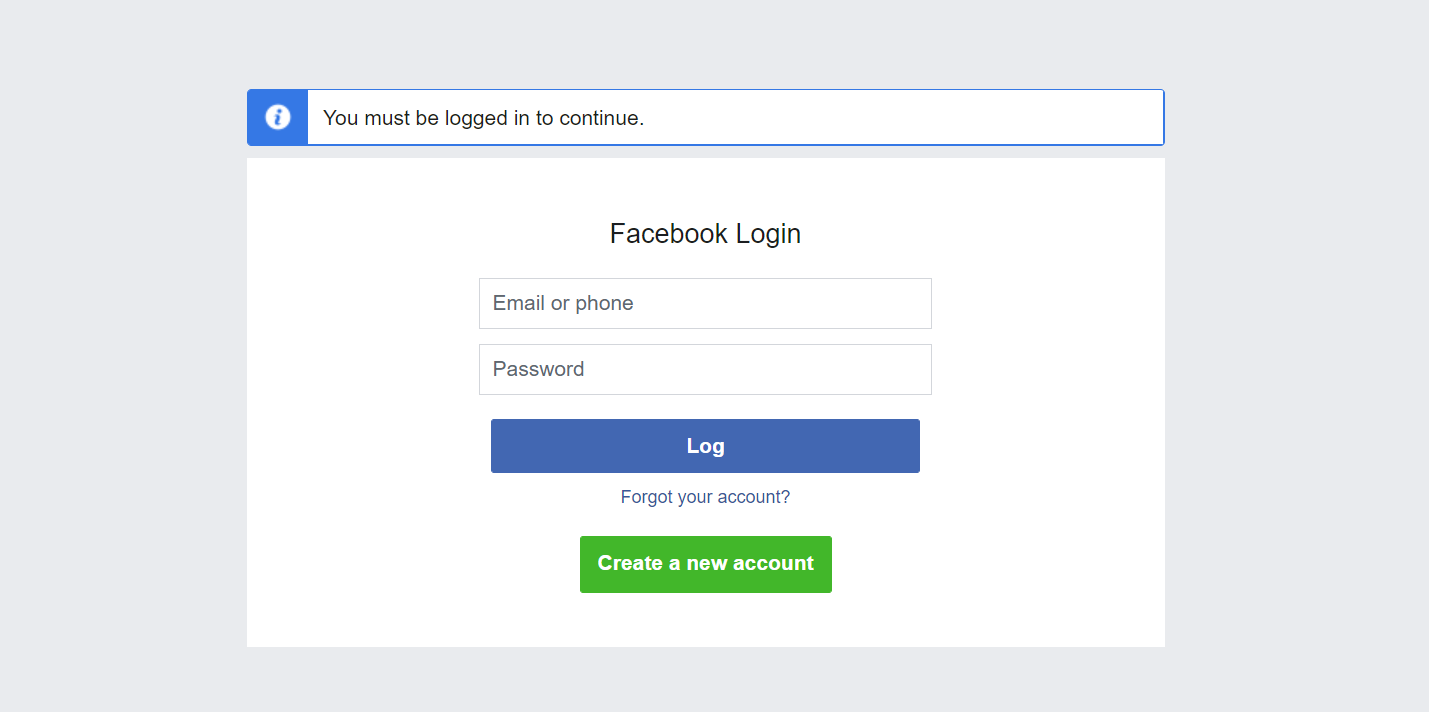
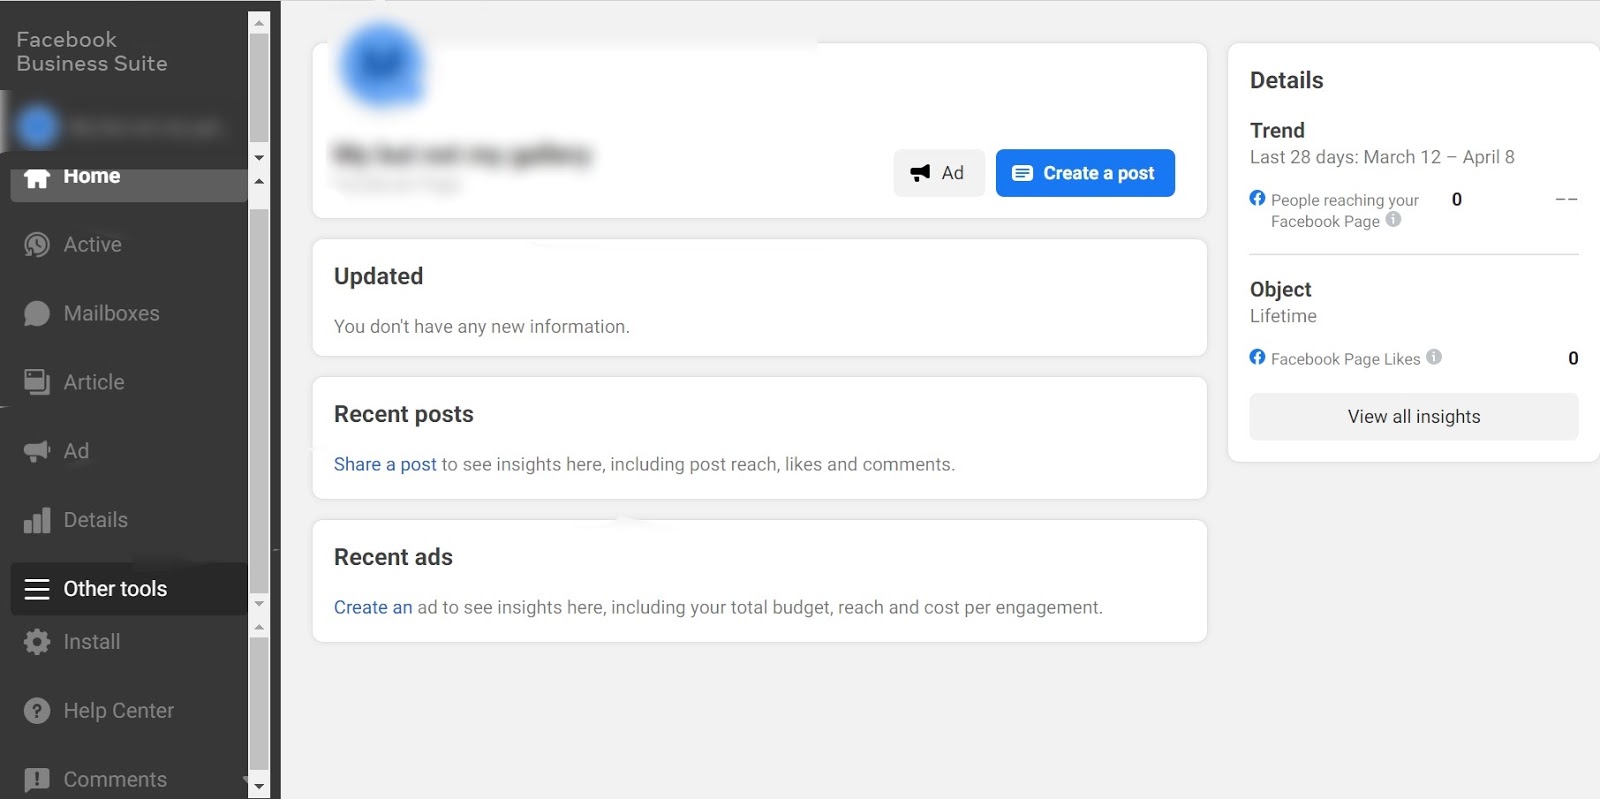
- First, you need to access Facebook Events Manager. If you haven’t signed in, the screen should look like this. If it does, you need to log in to your Facebook account or, be more precise, your Facebook business account. Once you have logged in, you will move to the Facebook Business Suite homepage.
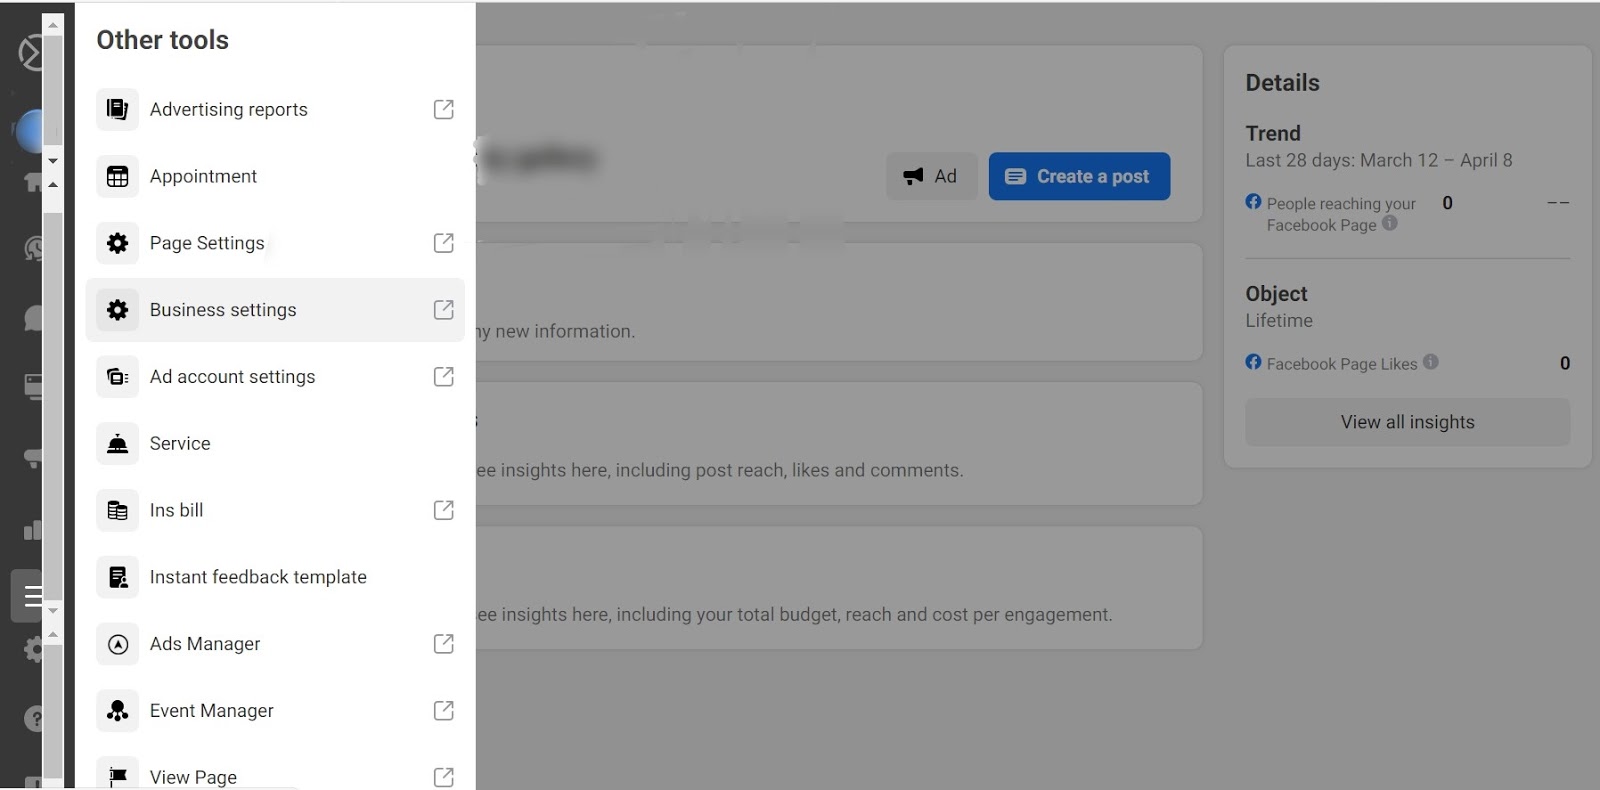
- Second, click the ‘Other tools’ button on the left sidebar.
- Third, click on the ‘Business Settings’ button.
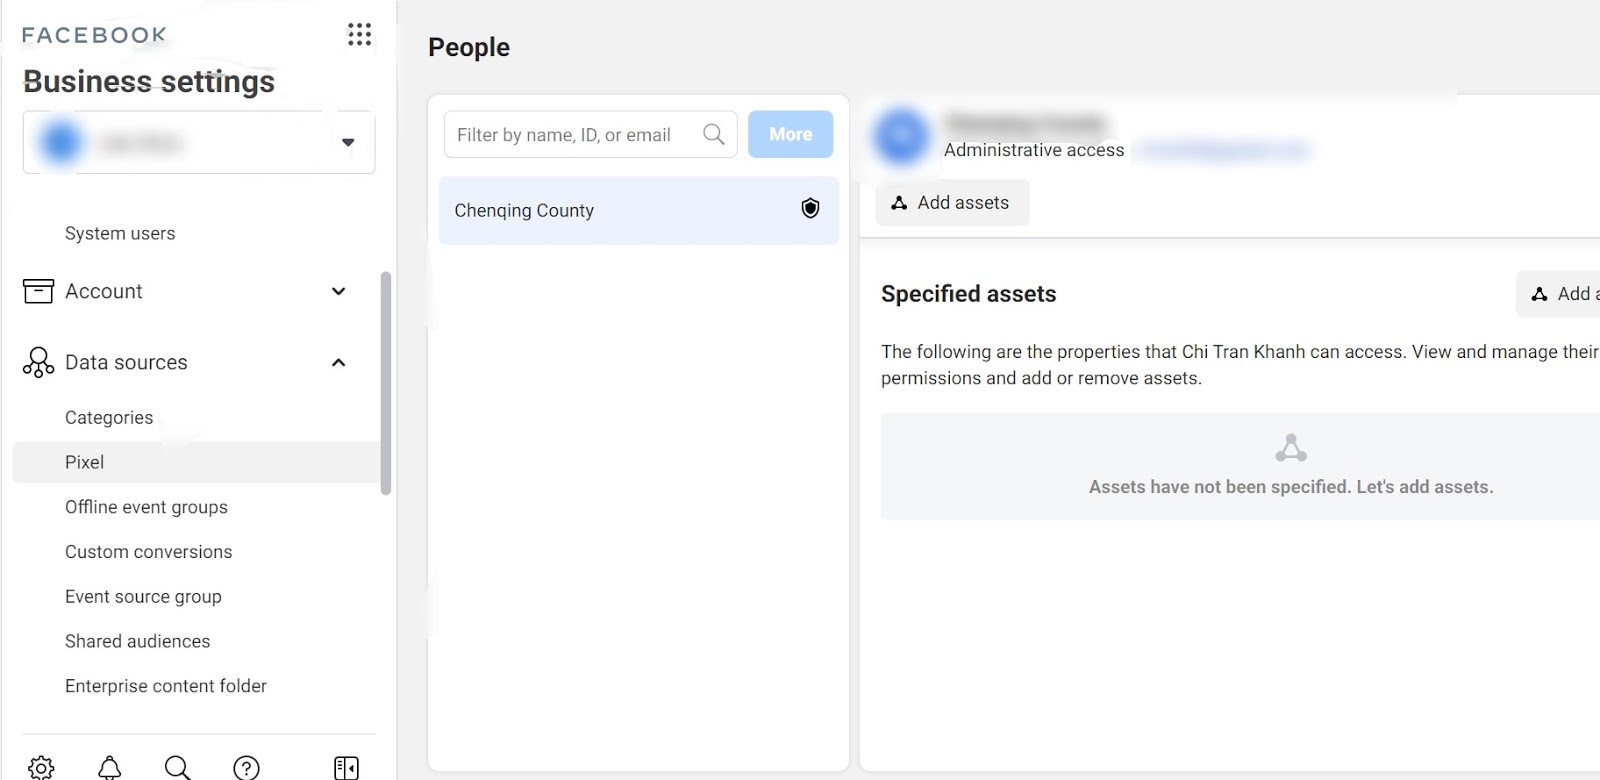
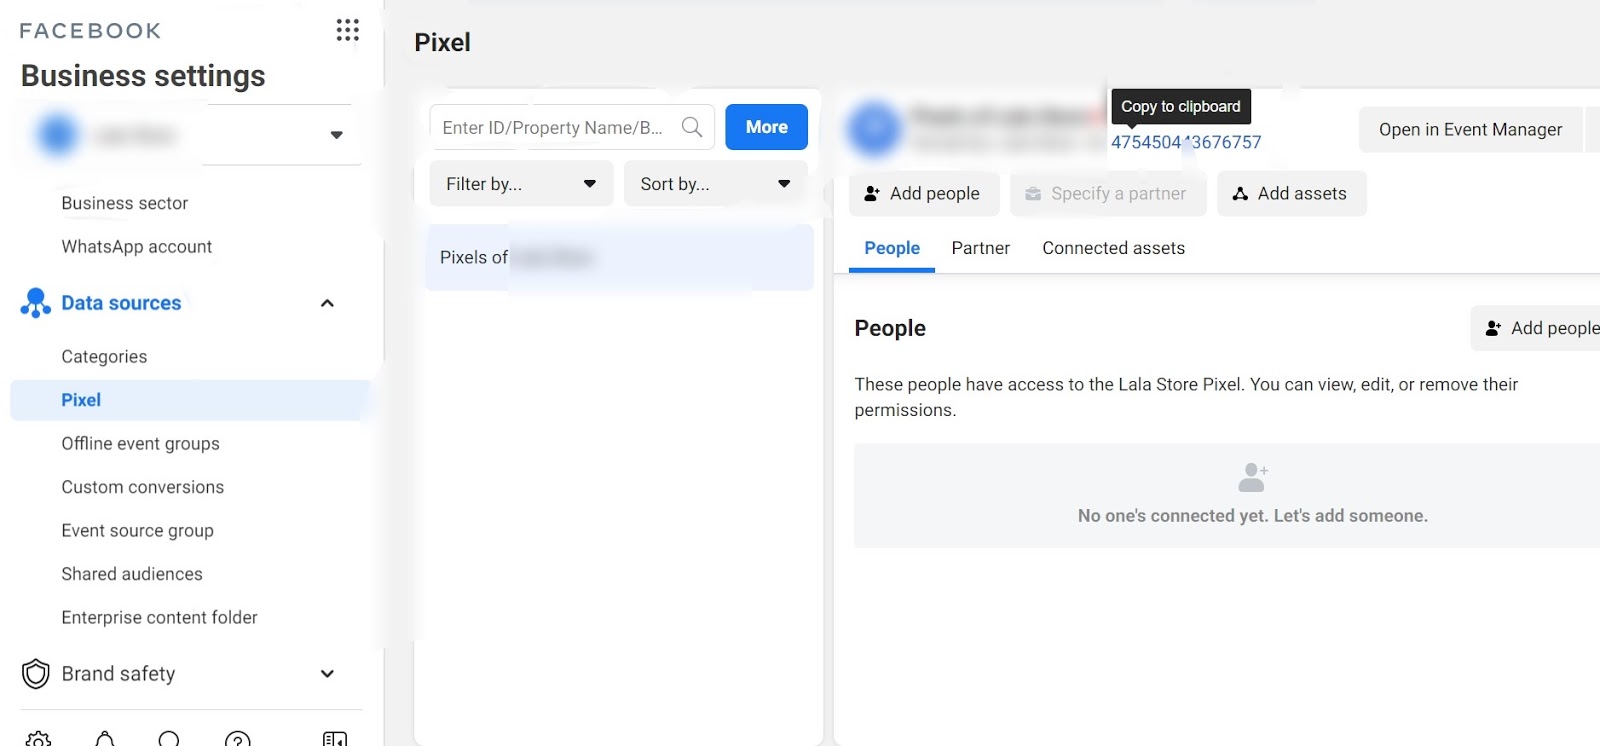
- Then, select ‘Data Sources’ to open a drop-down menu. Once all the options appear, click on the ‘Pixel’ button.
- Finally, click on ‘More’ to create a pixel if you haven’t created one before. All that is left to do is to name your pixel. Once you have done with that, click ‘Continue’. Please note that your pixel name is limited to 50 characters only.
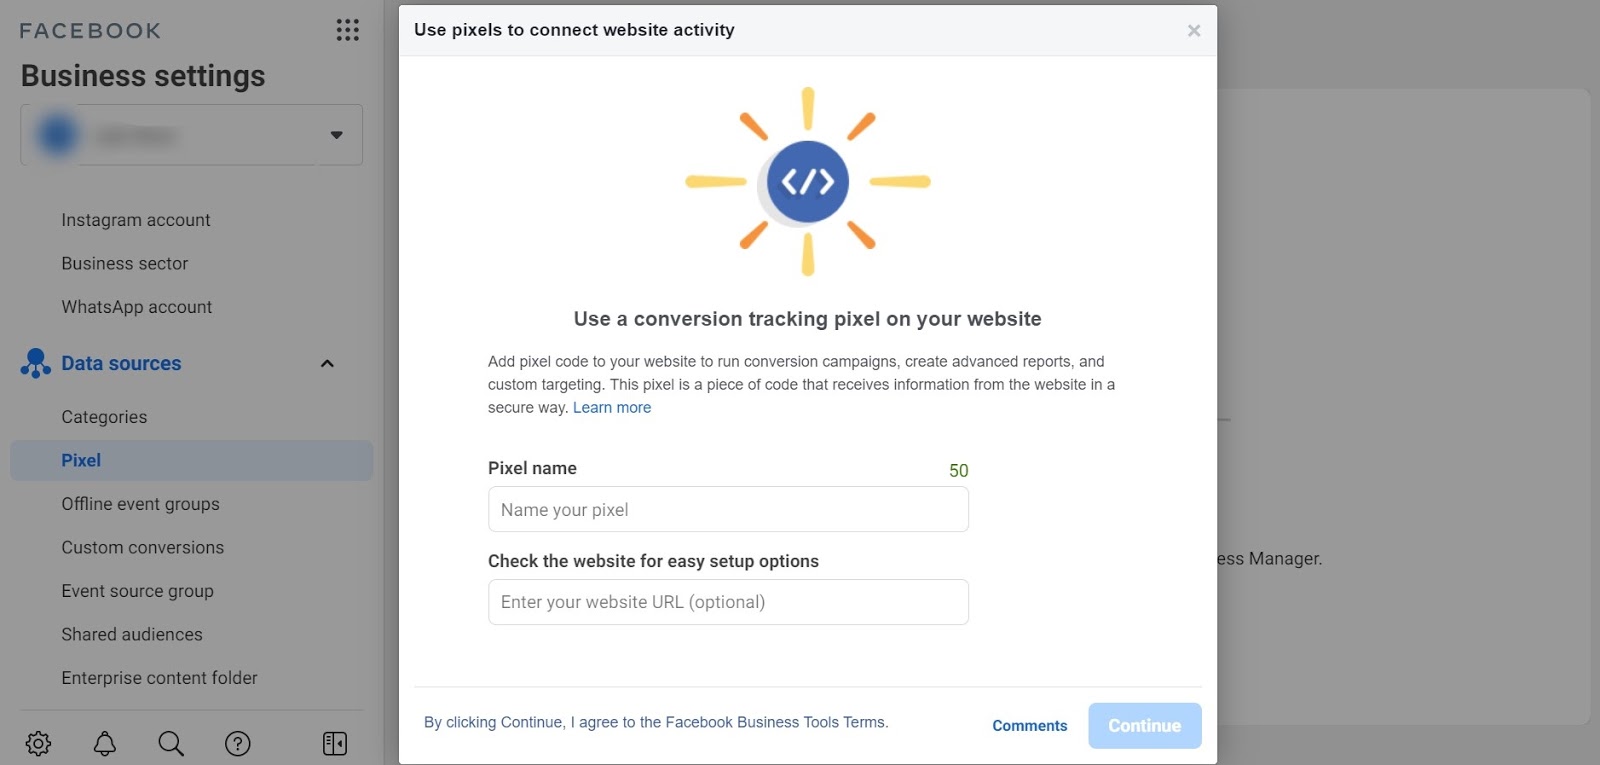
- Press ‘Continue’. Before adding your pixel to your BigCommerce store, remember to copy the pixel. It will be useful for later.
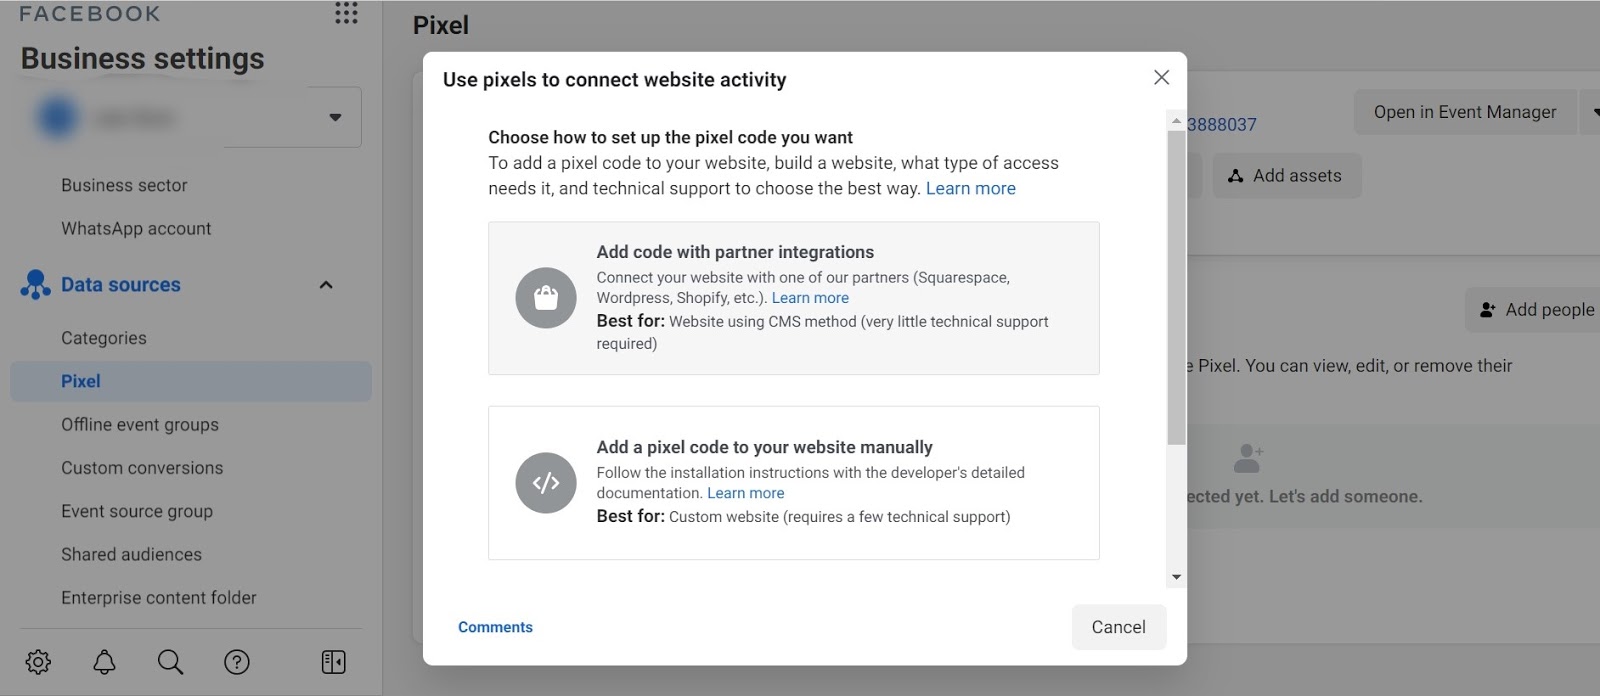
There are 2 options for installing Facebook pixel to your BigCommerce store: Add code with partner integrations or add pixel code to your store manually. In this post, we will provide instructions for the first, also the easier options.
Step 2: Add your pixel to your BigCommerce store
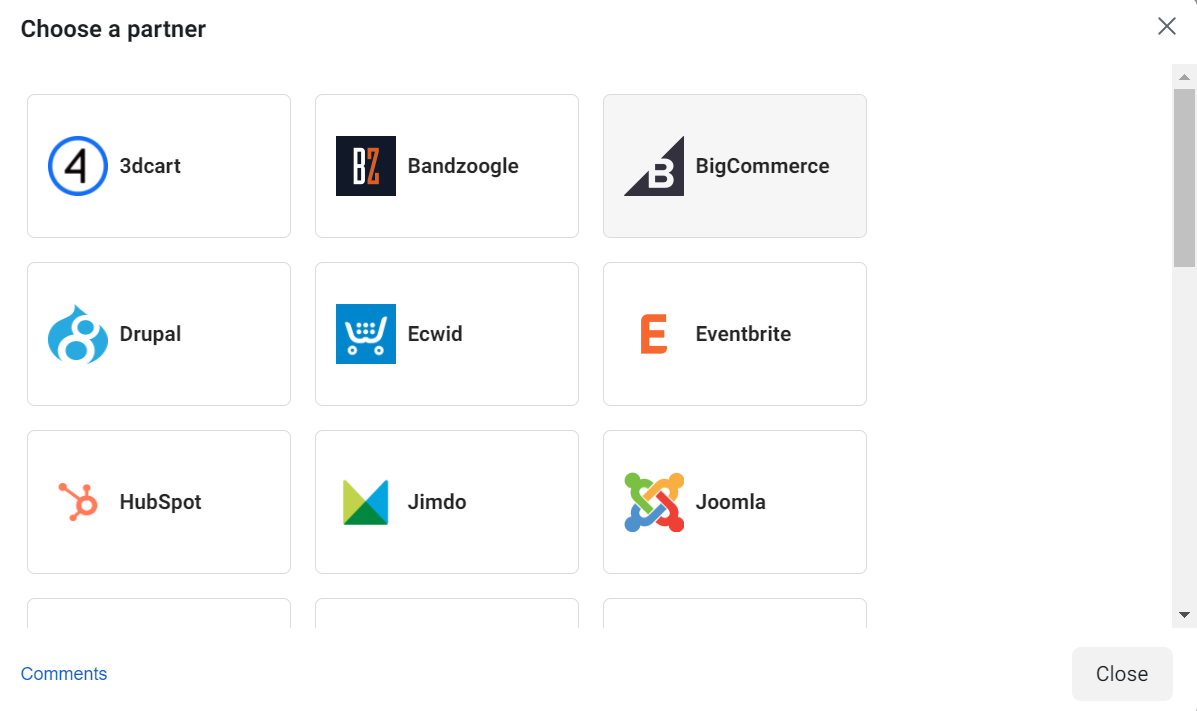
- Facebook will show a list of partners; remember to choose BigCommerce.
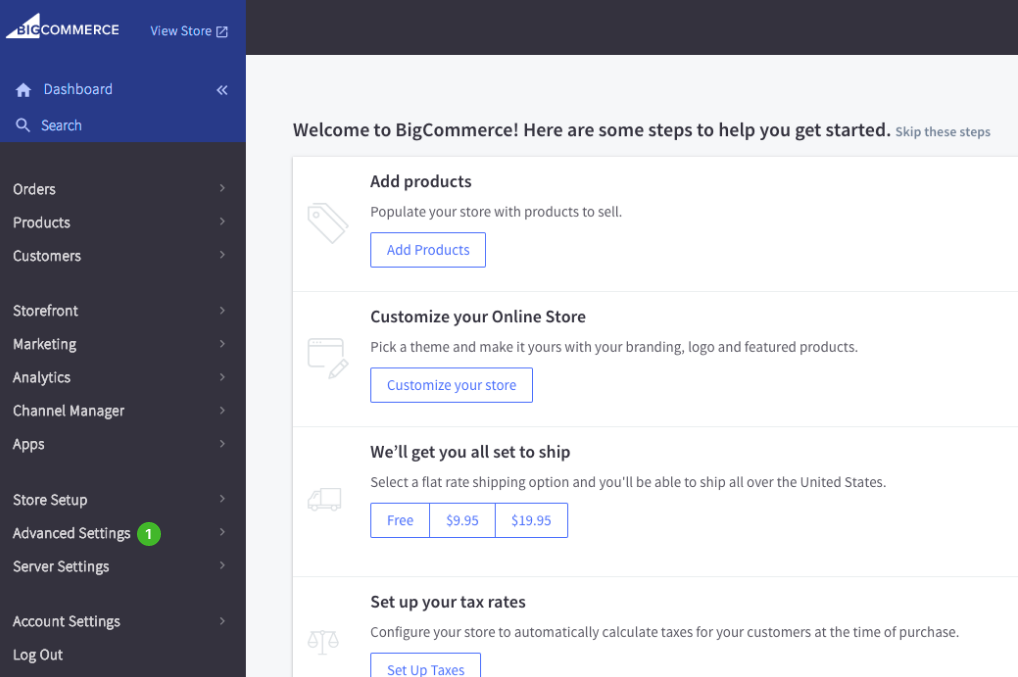
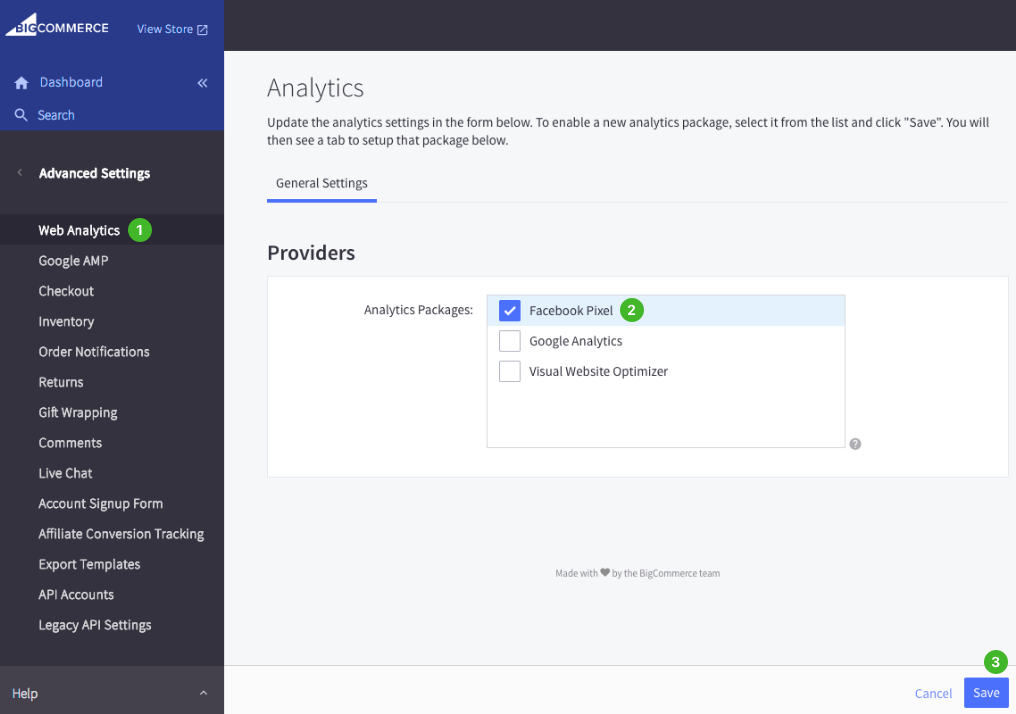
- Facebook then shows stages to complete integrating your pixel and your store on BigCommerce. First, log into your BigCommerce store. Select the ‘Advanced Settings’ in the navigation bar on the left.
- Choose ‘Web Analytics’ in the drop-down menu and tick the box that says ‘Facebook Pixel.’ Once you have done it, click ‘Save.’
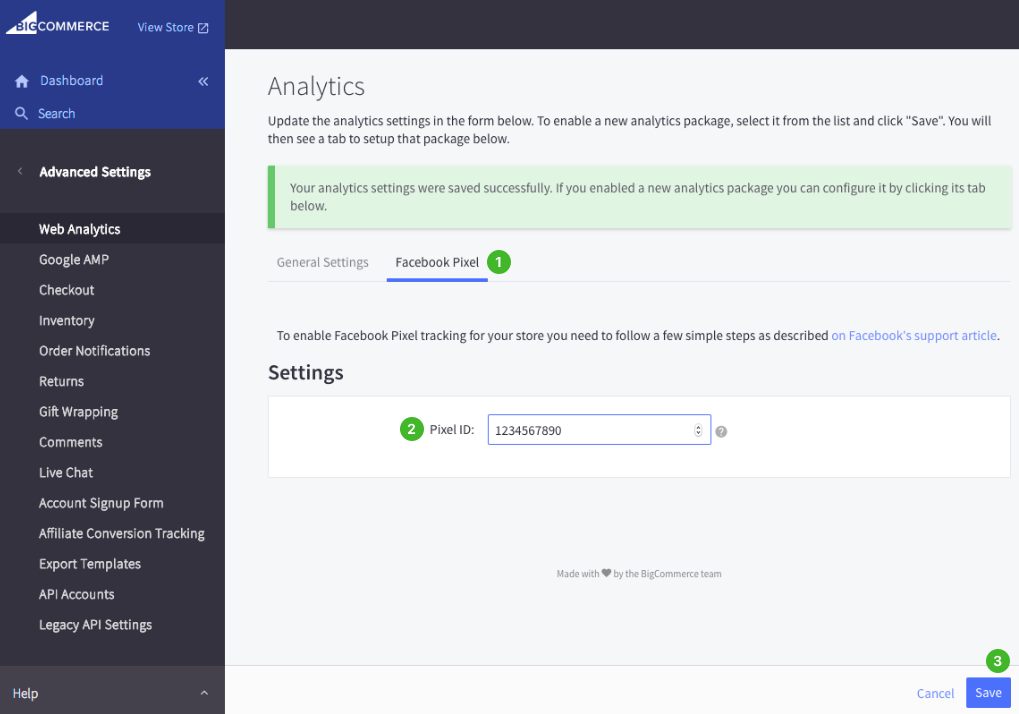
- Finally, click on the tab ‘Facebook Pixel’ and type in your Pixel ID. Remember to save it.
- Get back to Facebook. Now you are at the verification stage. Copy the URL link of your store and paste it into the box to check if the pixel is working properly or not.
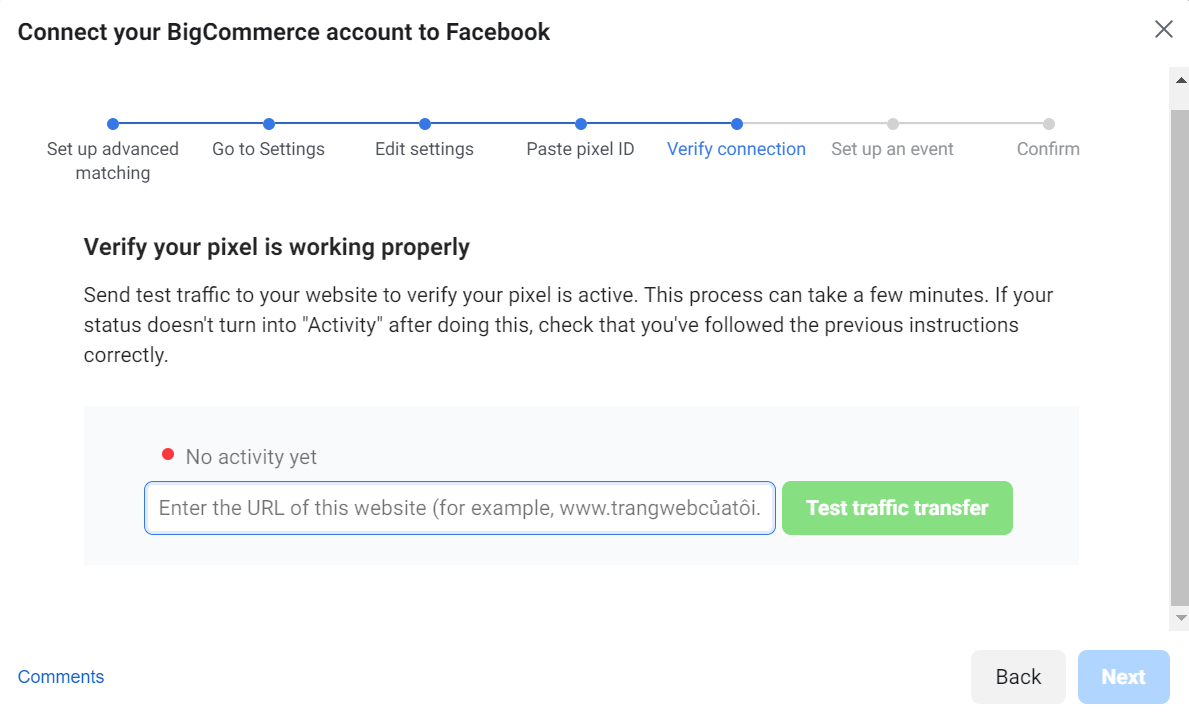
- Finally, set up an event and confirm.
About the event, you should make sure that:
- You do not forget your event name.
- You do fill in currency or value parameters, and they are valid.
- The standard event on your website must be similar to Facebook’s standard event.
Congratulations! You have just successfully added Facebook pixel to your BigCommerce store.
Common Errors
We hope that installing Facebook pixel will not cause you too much trouble through the tutorial we have just provided. However, we cannot avoid problems. Here are some common errors you may encounter when you add your pixel to your BigCommerce store.
Error 1: Sensitive Data in your Event
One thing you should remember is that your purchase event should comply with Facebook Business Tools Terms. Otherwise, “Events Containing Sensitive Data” will appear. Take note of what kind of information you will receive.
Error 2: Lack of Traffic
This error happens for two reasons. It may be either your pixel is very new or that your website is very new. In the former case, you will need to wait several hours before enough data is collected. For the latter, you will need to find ways to generate traffic for your website or get a number of people to browse through the site so that traffic is registered.
Error 3: Multiple events on an action
In this case, in response to an action, your pixel sends multiple events. Such an action may be something like clicking a button. This is opposite to the regular function of a pixel, which is only one event per action.
To solve this problem, you should add codes to specific pages or actions only. Moreover, this will optimise your advertising campaign and reports sent back to you.
Error 4: Pixel is Activated Many Times
When a pixel is activated many times, it means that the pixel sends the same message to you too many times.
So before committing, make sure that you are doing it the right way. First, only add the pixel to the page that has the event you would like to track. Second, just place the code once on a single page.
Conclusion
We have provided a detailed description of how to add Facebook pixel to your online store, specifically your BigCommerce store. The task is not challenging and does not take up much time as well. If you need to optimise ads and increase sales, what else are you waiting for? Create your own pixel and install it now!


