
BigCommerce Customization: A Step-by-Step Guide For Beginners

Unlock the full potential of your online store with BigCommerce customization. Tailor your website to fit your unique brand identity and meet the specific needs of your customers. This guide offers a straightforward approach to BigCommerce customization for beginners. It aims to simplify the process of personalizing your online store, covering everything from basic tweaks to advanced modifications. With practical steps and essential tips, this article will help you learn how to improve your site's functionality and user experience on the BigCommerce platform.
No-code BigCommerce Customization Options
BigCommerce Templates
When coming to creating your personalized BigCommerce theme with user-friendly customization features, you can experience two ways to do it:
- Using the built-in editor: Offering a variety of professionally designed themes that you will customize with logos, colors, and fonts.
- Custom themes: For more advanced customization with basic HTML and CSS knowledge, BigCommerce offers the ability to edit theme files.
Using the built-in editor (BigCommerce Page Builder)
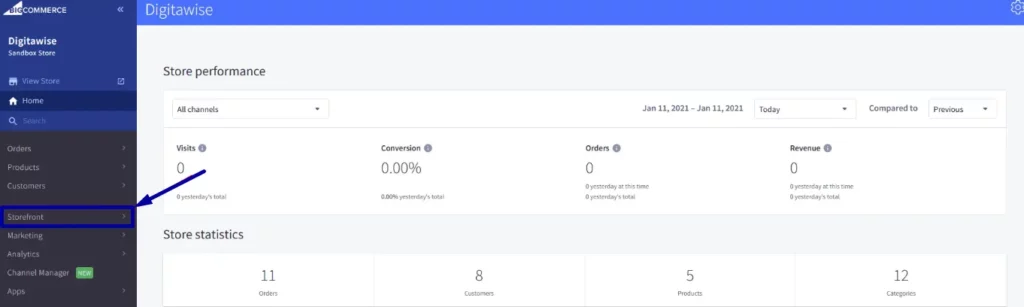
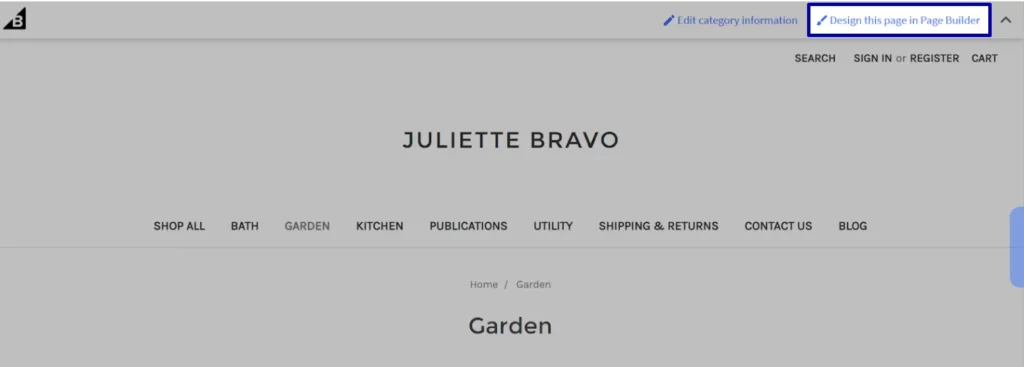
Step 1: Log into a Dashboard and go to a Page Builder, click on the “Storefront” button
- Once you are at your BigCommerce Dashboard, click on the "Storefront" button. Here, you can edit your logo and homepage slides, modify scripts, and more.
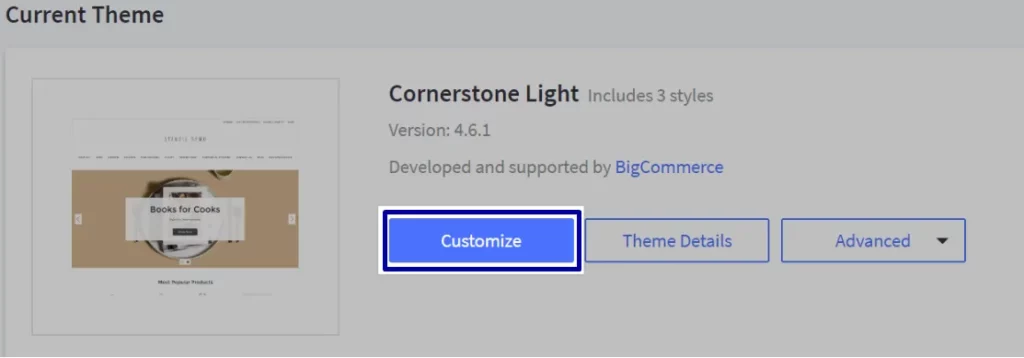
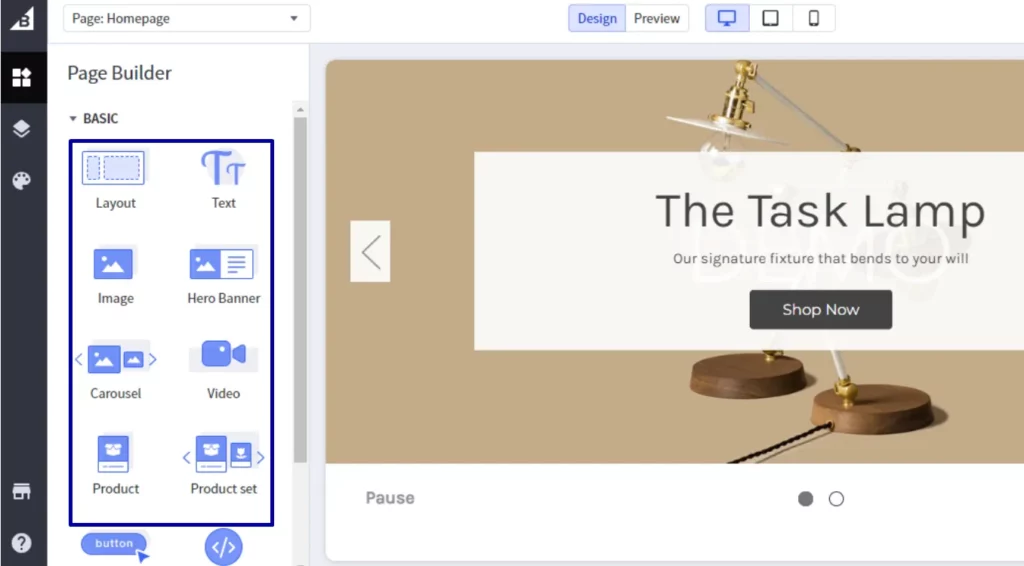
- Next, go to the Page Builder by clicking the "Customize" button. This default drag-and-drop visual editor makes it easy to create and customize your website template without coding.
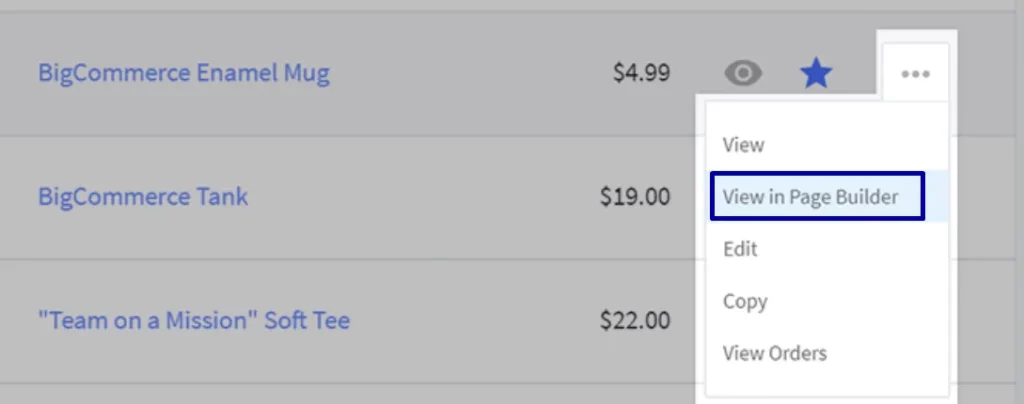
- Alternatively, directly open products, categories, and brands using the Action icon and selecting "View in Page Builder."
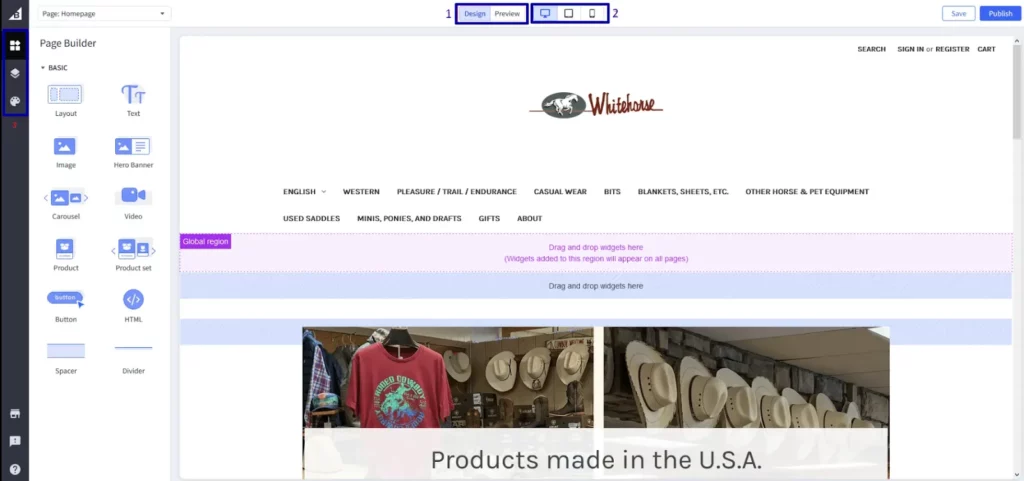
- When viewing your storefront while logged into the control panel, you'll see an admin bar at the top of the screen. This bar allows you to design the current page using Page Builder. Simply click on it, and start customizing your page.
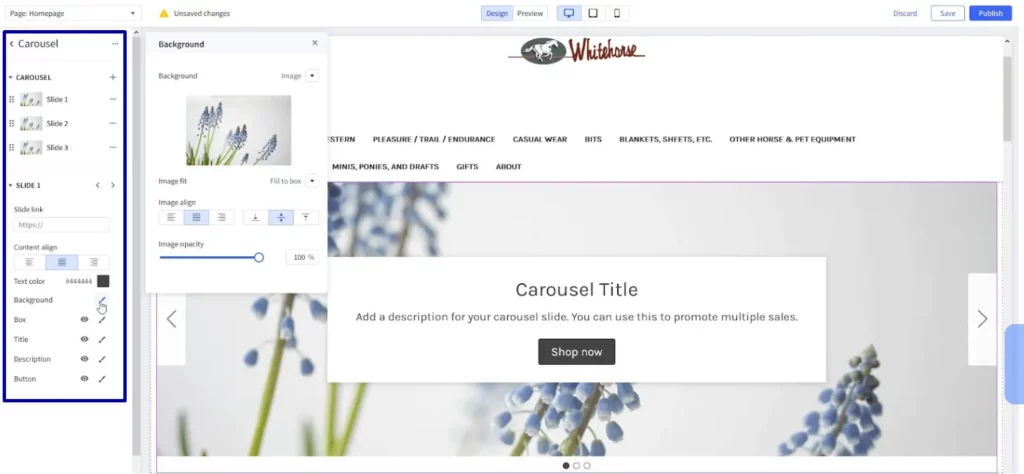
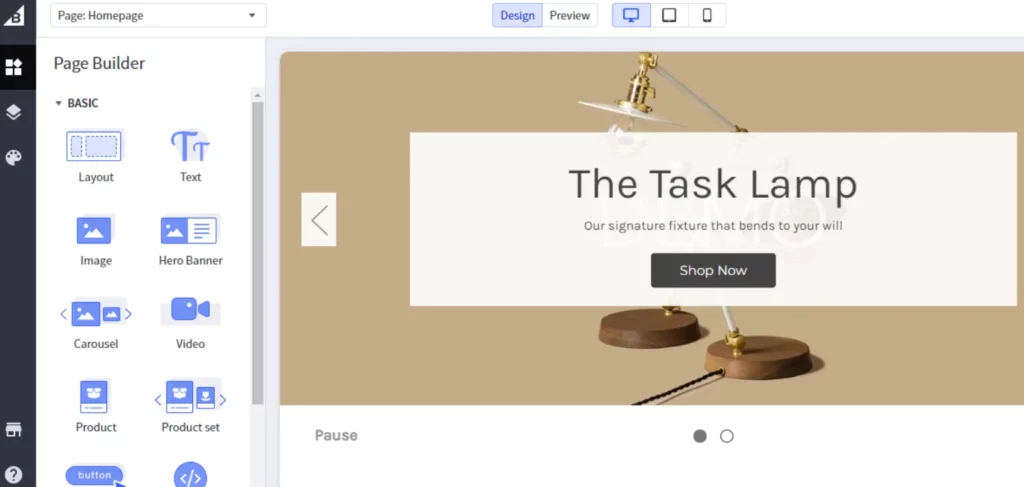
Step 2: Adding or Editing Widgets
In the Page Builder sidebar, you'll find all the widgets available. These widgets include images, carousels, videos, products, text, and custom HTML.
- For tablet and mobile views, click the icon again to switch between vertical and horizontal orientation. For a full-screen preview of your changes, click "Preview" to collapse the left navigation.
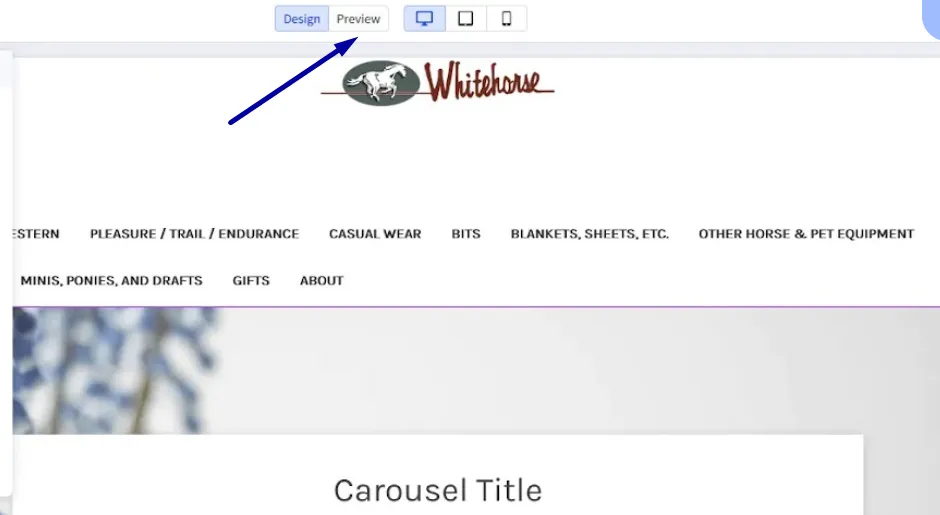
While in Preview mode, you can navigate your site just as you would on the storefront. This helps visualize how your style changes will appear on specific pages.
- After adding the carousel widget, you can edit the background image by clicking the brush icon next to "Background."
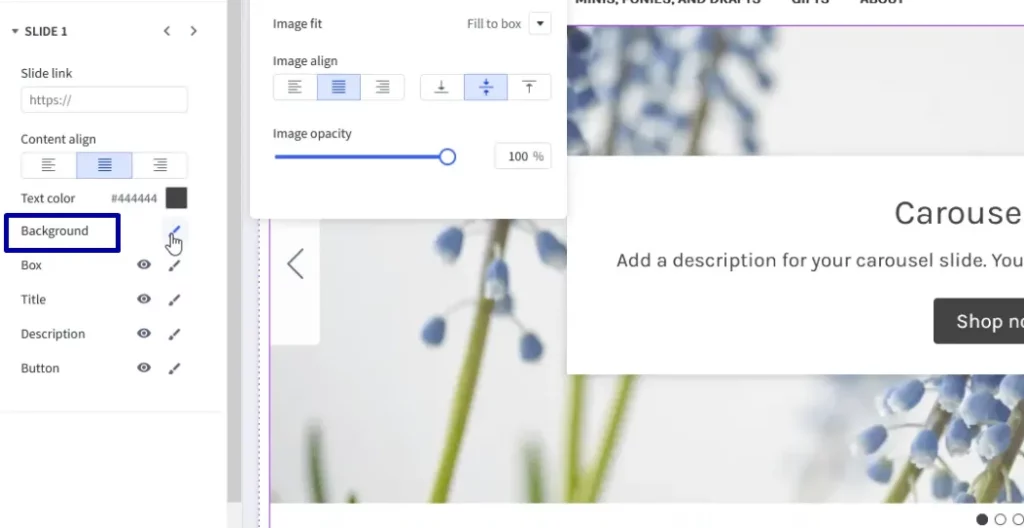
- Underneath, you can edit the Box, Title, Description, and Button. You can also hide any of these elements by clicking the "eye" icon next to them.
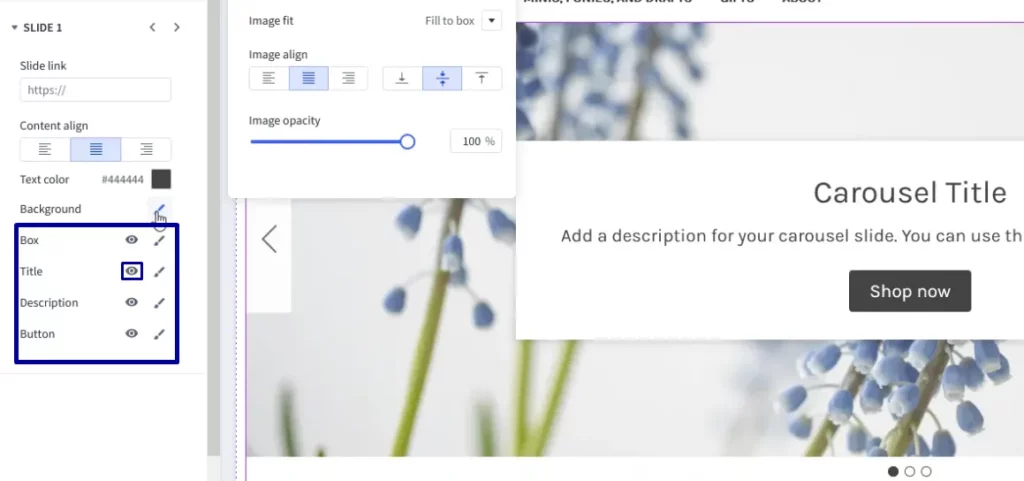
- Additionally, you can change the color of the box, customize the title and description's font, weight, and size, and adjust the color and shape of the CTA (call-to-action) button.
Edit theme file
BigCommerce allows users familiar with HTML and CSS to directly edit theme files for further customization. However, for JavaScript modifications, installing the Stencil CLI theme engine is necessary.
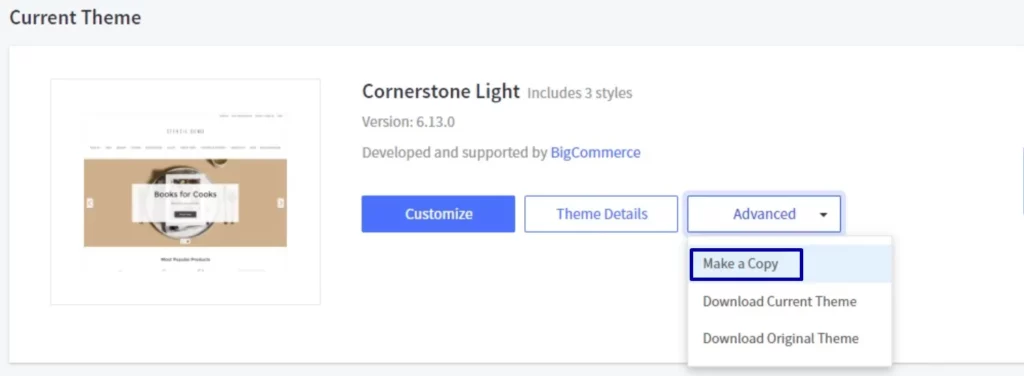
- Before making any changes, create a backup of your theme. Click on "Advanced" > "Make a Copy" to create a backup that will appear as an inactive theme under "My Themes."
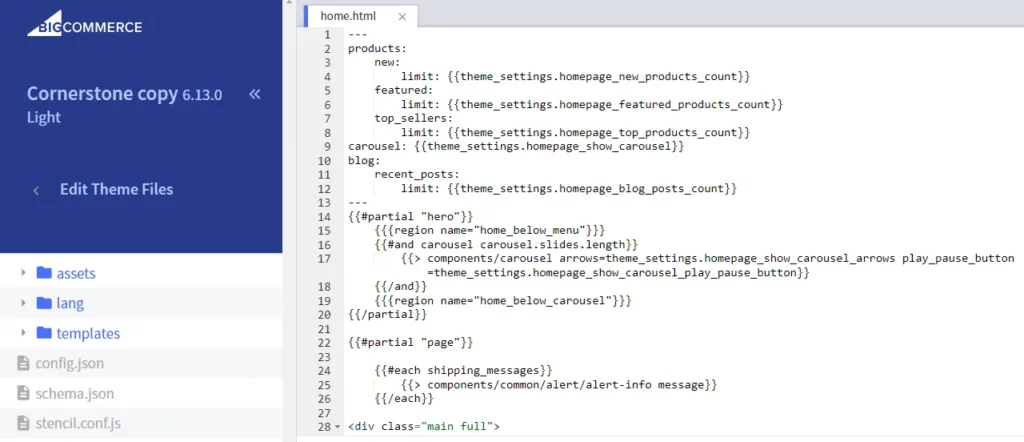
- Once the backup is ready, choose the copied theme; on the “Theme option,” click "Edit Theme Files" to customize your theme.

- After your backup is ready, it will appear under "My Themes" as an inactive theme. Click on "Edit Theme Files." If your browser blocks the pop-up window, you will need to allow it. A new window will open, displaying the structure of your homepage by default (home.html).
The left sidebar organizes files and folders, with JSON and JS files appearing greyed out, signifying they can only be modified using the Stencil CLI theme engine.
- Within the "assets" folder, you'll discover essential resources for customization, including fonts, icons, images, JS files, and CSS. Notably, the "theme.scss" file within "assets > scss > theme.scss" acts as the core CSS file, enabling you to adjust elements like size and color beyond the capabilities of the Page Builder.
- Exploring the "templates" folder reveals the underlying structure of your pages and components. For instance, you can alter the layout of the product page, modifying elements such as SKU and Availability.
BigCommerce Customize mobile version
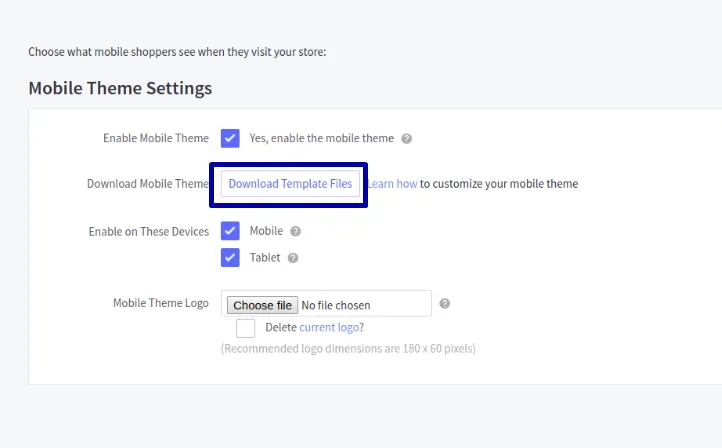
Step 1: Enabling the Mobile Theme
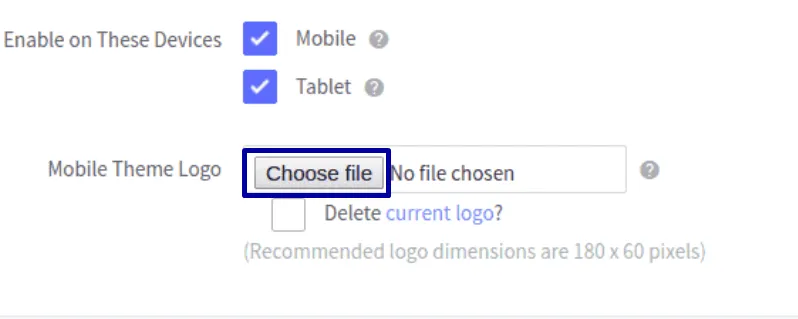
- Head to Storefront › Mobile Theme Settings. Check the "Yes, enable the mobile theme" box to activate it.
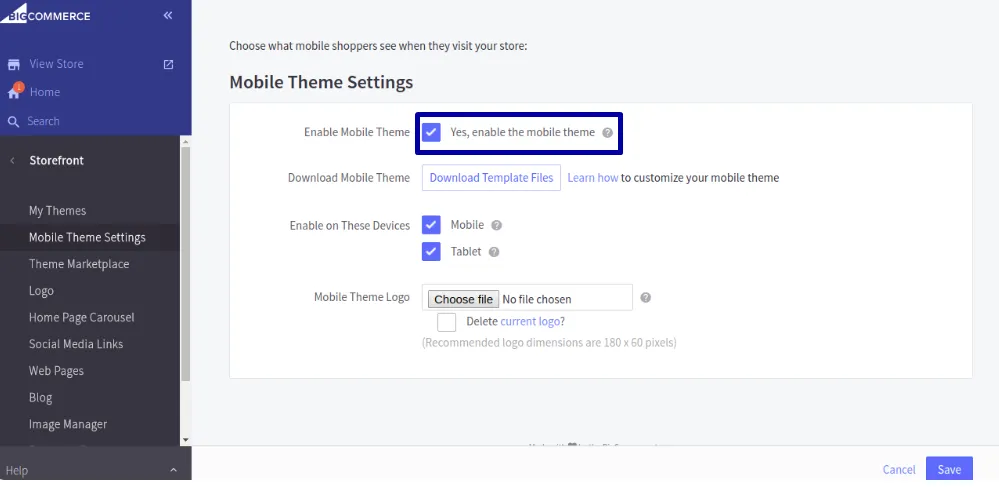
- Once enabled, click on “Download Mobile theme". Mobile theme files download as .zip file.
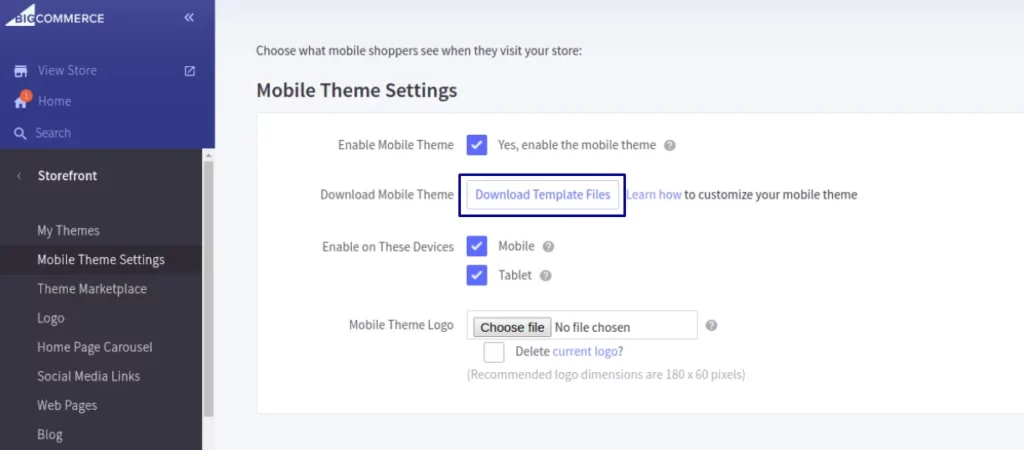
- Optionally, upload a mobile-specific logo under "Mobile theme logo."

Step 2: Customizing the Mobile Theme
- After activating the Mobile Theme option, click "Download Template Files" to make your mobile theme files in a .zip format.
- Create a designated folder on your desktop named "BigCommerce Mobile Theme Files."
- Transfer the downloaded .zip file into this folder and extract its contents using a suitable software like 7-Zip or WinZip.
Step 3: Making Changes
To customize your BigCommerce mobile theme, edit the HTML and CSS files using a plain text editor.
Step 4: Uploading Your Changes
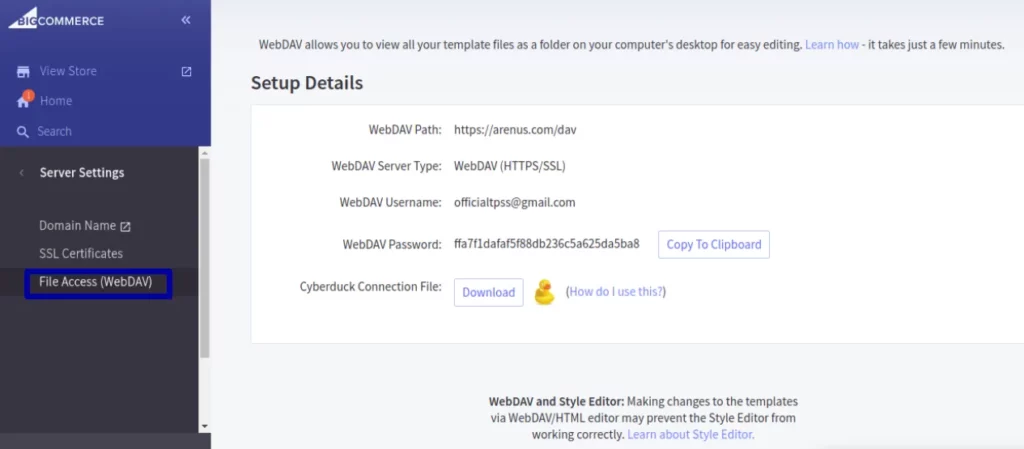
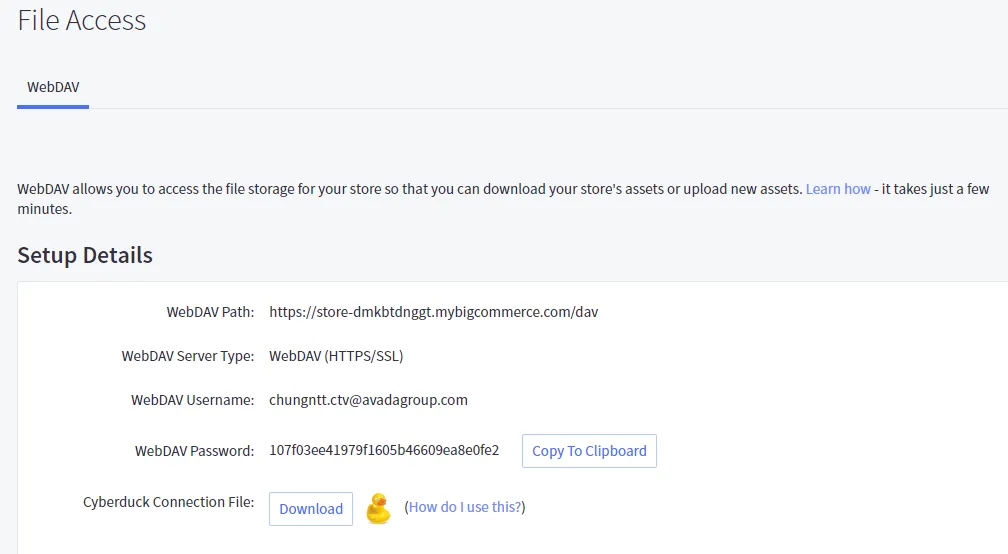
- To upload the mobile template file, we need to connect to WebDAV.
- In your control panel, navigate to “Server Settings” > “File Access (WebDAV).” Copy the WebDAV Username and Password.
Here are the steps to access WebDAV:
- In your control panel, navigate to Server Settings › File Access (WebDAV) and click Download. This will download a Cyberduck connection file to your computer.
- Open the downloaded file. It will automatically establish a connection to your store’s server in your WebDAV client.
- Upload any customized files to the mobile_template directory. Ensure you follow the same template structure as the one in the file you originally downloaded in the “Downloading the Mobile Template” section above.
Note: Files like "default.html" should be uploaded outside of the folders in WebDAV, mirroring their structure in the downloaded template.
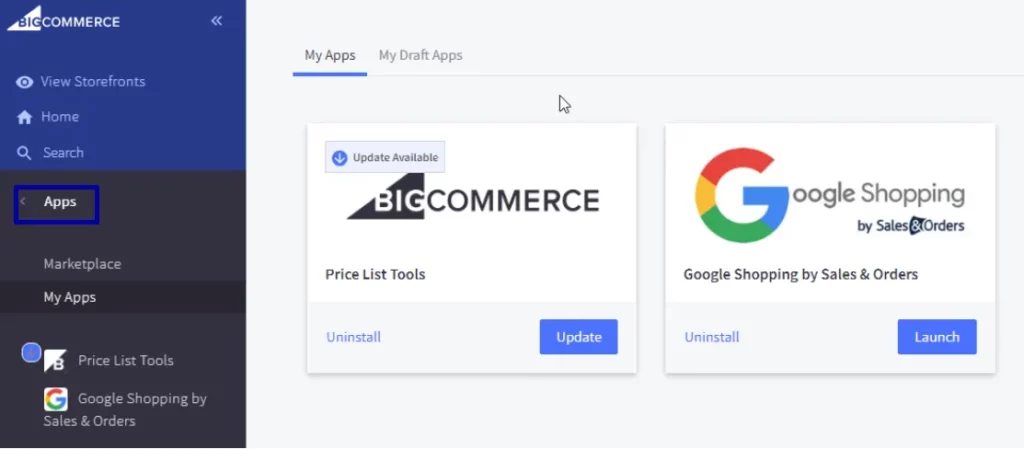
Pre-Integrated Apps
BigCommerce offers a wide array of pre-integrated apps that effortlessly integrate with your store, covering everything from marketing and sales to customer service and analytics. With seamless integration, adding these apps is as simple as a few clicks, eliminating complex setup or coding.
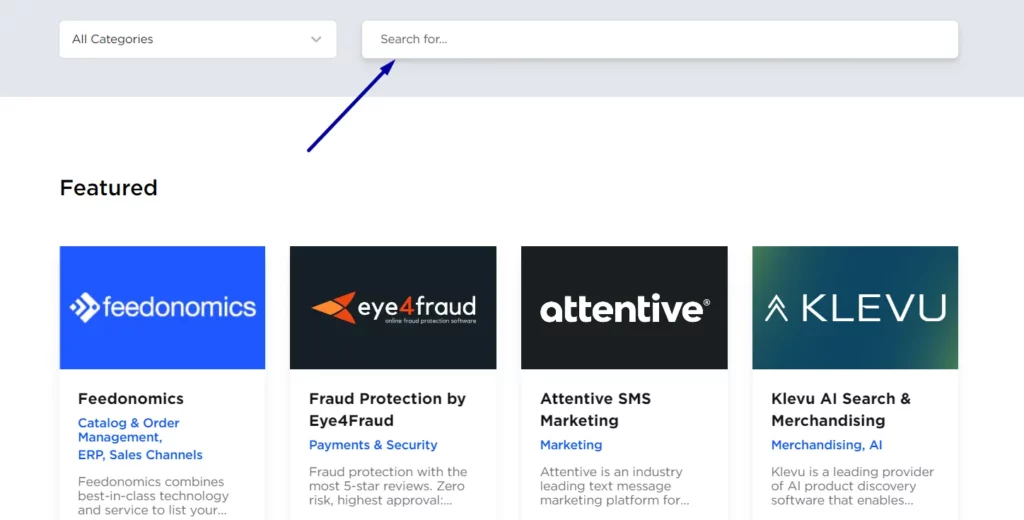
- On your dashboard, choose Apps > Marketplace > “BigCommerce.com/apps.”
- Search for apps related to your needs (e.g., email marketing, reviews, analytics).
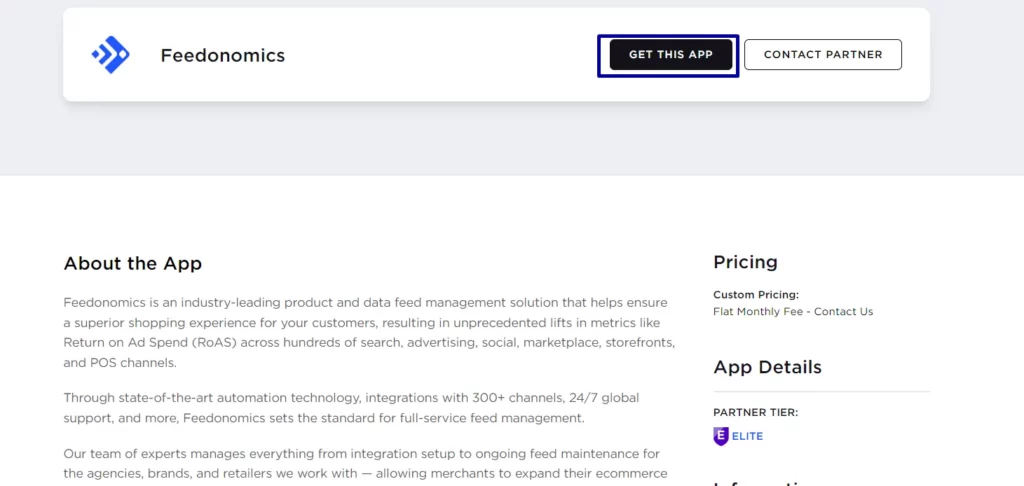
- Click “Get this app” > log in to your account > click “Install” and follow setup instructions, and configure settings.
- Once configured, activate the app on your store.
Operational Tasks
BigCommerce goes beyond design and functionality by offering tools to streamline various operational tasks for your online store. This includes managing orders, inventory, shipping, taxes, and payments. The platform provides intuitive interfaces and automated workflows, simplifying these tasks. Consequently, you can focus on growing your business rather than getting bogged down in administrative work.
- Log in to your admin panel.
- Product Management: Update product details, prices, and inventory.
- Order Processing: Process orders, handle refunds, and manage shipping.
- Customer Support: Respond to inquiries and manage customer accounts.
- Stay Organized: Use the dashboard to stay on top of tasks.
6 Advanced BigCommerce Customizations
Make the most of your BigCommerce store's capabilities by implementing these 6 advanced Bigcommerce customizations.
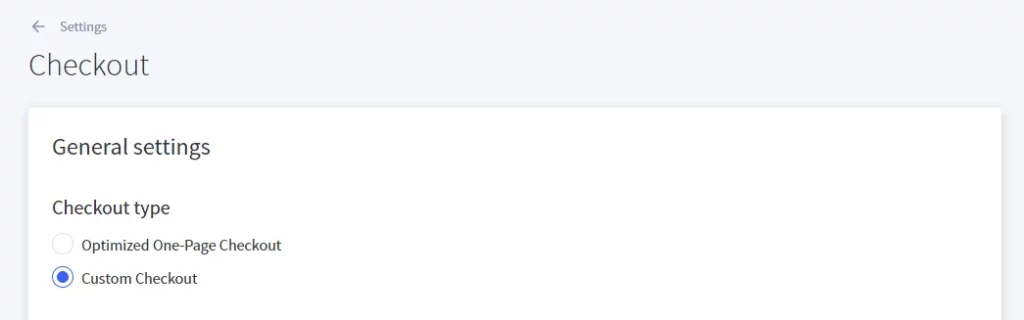
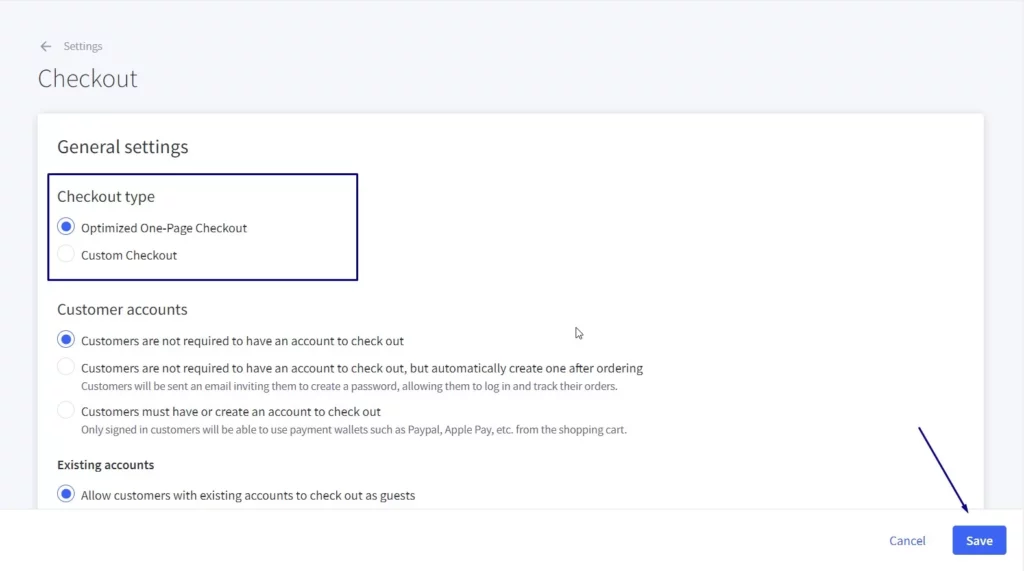
Checkout Customization
- Go to “Settings” > “Advanced” > “Checkout” in your store's admin area.
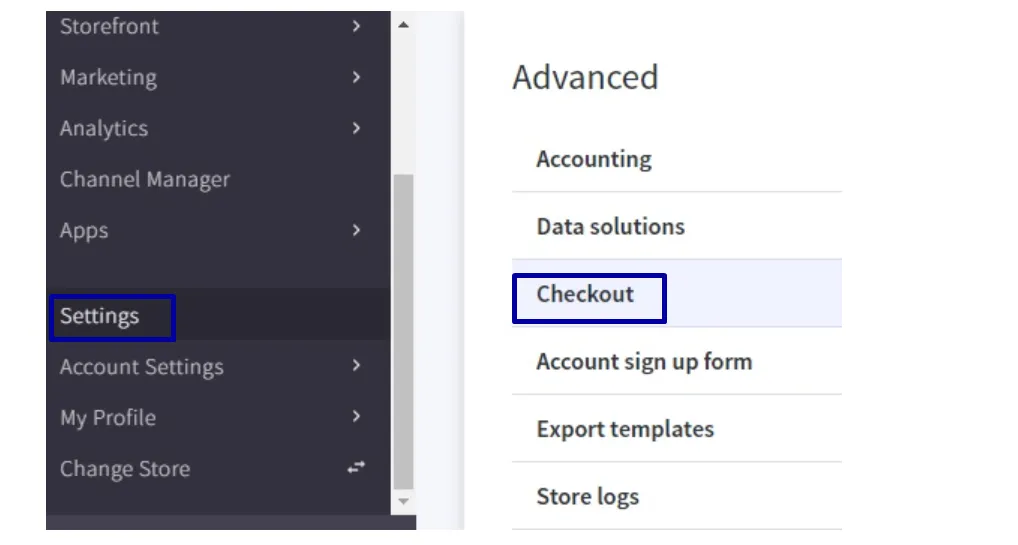
- Select "Custom Checkouts" from the "Checkout Type" menu.
After running the npm run release, enter the following in the Script URL field, replacing "<version>" with the version number provided by npm run release:alpha command:
webdav:checkout/auto-loader-<version>.
- Click the "Save" button to apply your changes.
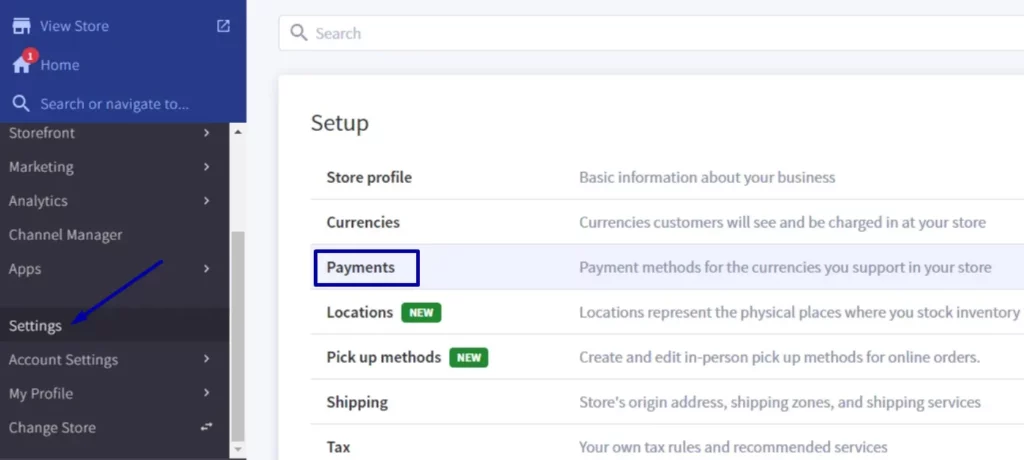
Third-Party Payments
Customizing third-party payments on BigCommerce enables you to integrate additional payment options beyond the platform's built-in solutions. Before integration, research and select a third-party payment gateway that suits your business needs and preferences.
- Go to "Settings" and select "Payments." Then, look for the option to add a new payment provider or gateway
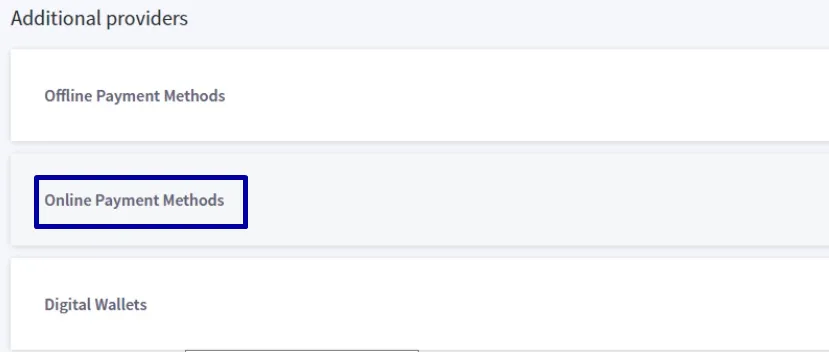
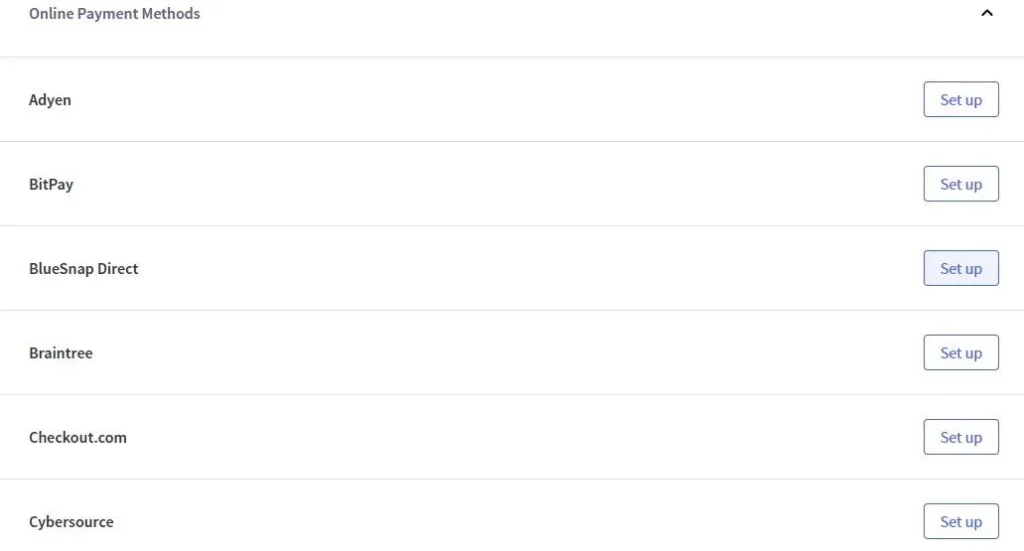
- Choose Your payment gateway by clicking “Online Payment Methods.”
- Choose the payment gateway that aligns with your needs and click the "Set up" button to initiate installation.
- Finish customizing your payment gateway by clicking “Save” at the end.
Subscriptions
To customize subscriptions on BigCommerce, follow these steps:
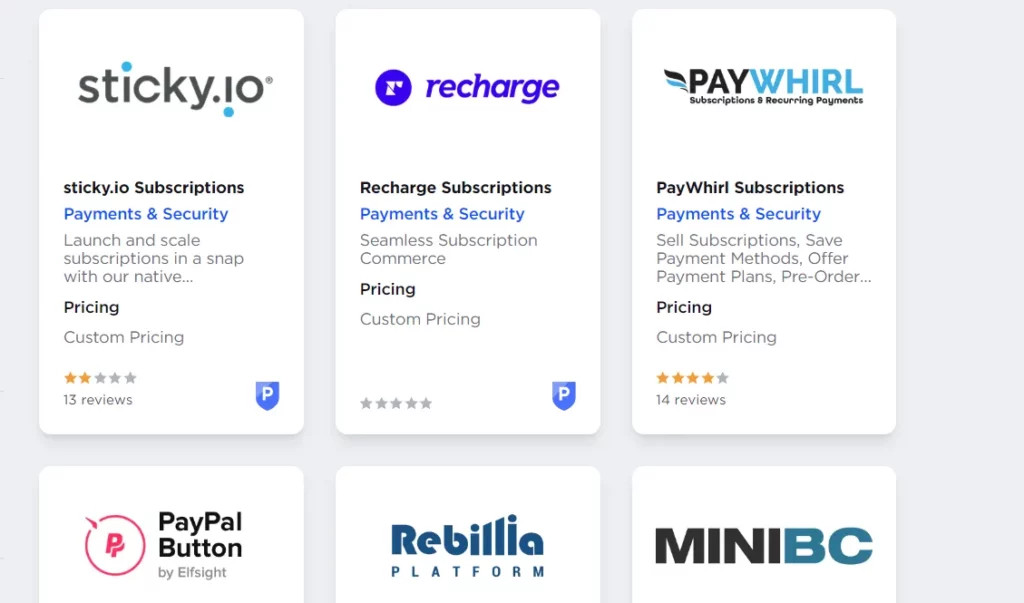
- Go to BigCommerce apps and search “Subscriptions” apps.

- Choose a platform compatible with BigCommerce, such as ReCharge or Bold Subscriptions.
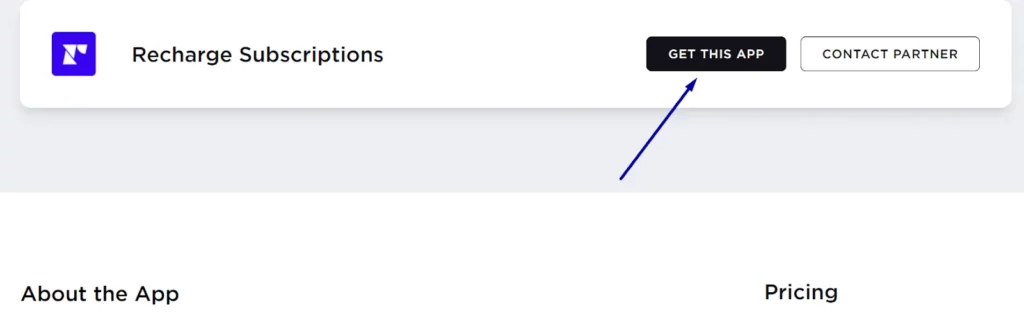
- Access the BigCommerce App Marketplace and install the chosen subscription app by clicking “Get this app.”
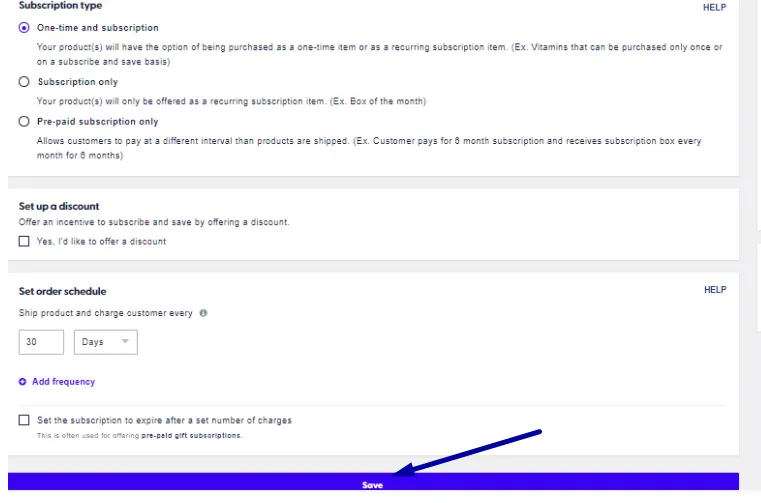
- Once installed, configure the subscription settings according to your business model. Set up subscription plans, pricing, billing intervals, and other relevant parameters.
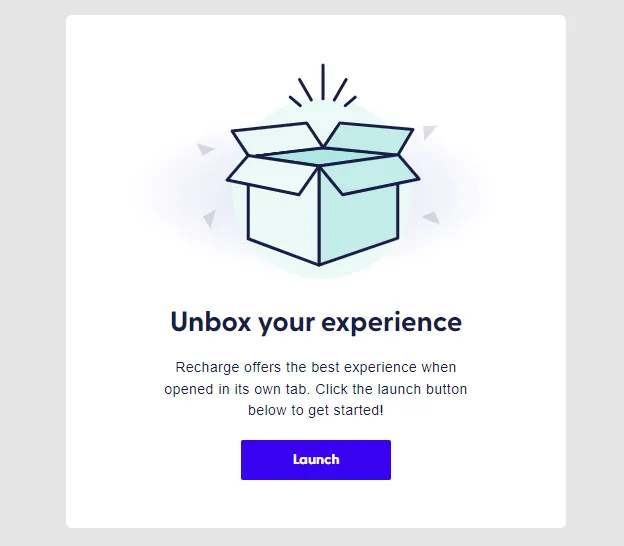
- From your dashboard, navigate to "Apps" > "Recharge" and select "Launch" to access the Recharge subscription app.
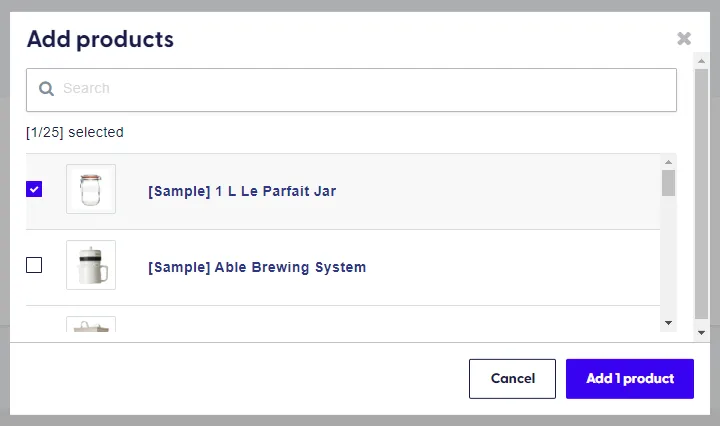
- From the Recharge Dashboard, select “Product” > “Add Product.”
- Choose the product you would like to add > “Add product.”
- Customize the subscription experience to align with your brand and customer preferences. Click “Save” to finish.
Customize Fronted Design
Customizing the front design of your BigCommerce store allows you to create a unique and visually appealing online shopping experience for your customers.
- Once you've installed a theme, access the theme editor in your BigCommerce dashboard. Navigate to “Design” > “Customize” to customize the theme, including colors, fonts, layout, and navigation.
- Use the theme editor to adjust the layout and structure of your store's pages. Arrange content blocks, sections, and widgets to create a cohesive and intuitive user experience.
- Upload your brand's logo, icons, and other visual assets to personalize the frontend design.
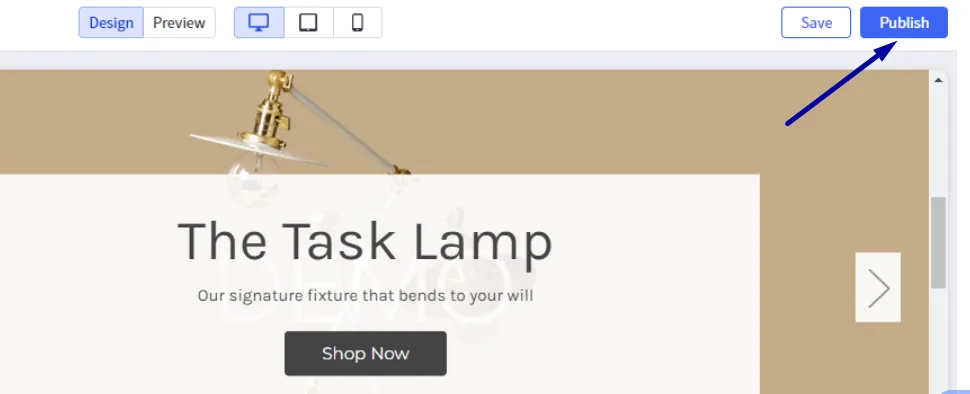
- When you’re ready, hit “Publish” to finish the customization.
Customize Data Analytics
Customizing data analytics in BigCommerce allows you to gain insights into your store's performance, customer behavior, and marketing effectiveness.
- Determine which analytics platform to track and analyze data. Some BigCommerce integrates with popular analytics tools like Google Analytics, Adobe Analytics, or Facebook Pixel.
These steps will show you how to connect Google Analytics with your store and unlock enhanced features and insights.
Step 1: Review The Requirements
Requirements for Adding Google Analytics 4 to Your BigCommerce Store:
- User Permissions: Ensure you have the "Manage Web Analytics" permission enabled on your account.
- Google Analytics Account: Set up a Google Analytics account if you don't have one. Consider creating separate accounts for each storefront if you have multiple.
- GA4 Measurement ID: Obtain your GA4 Measurement ID, as it's crucial for integration with BigCommerce.
- API Secret (Optional): Create an API Secret in Google Analytics to track refunds for deeper insights.
- Stencil Theme: Your storefront must be using a Stencil theme.
- BigCommerce Storefront: The integration only works with BigCommerce storefronts, not headless storefronts.
- Optimized One-Page Checkout: Your store must use Optimized One-Page Checkout. Legacy and Custom Checkouts are not supported.
Step 2: Add Google Analytics 4 Property
- Select Web as the data stream type.
- Keep the enhanced measurement enabled (Recommended)
- You can skip Set up data collection for websites; the integration will add the tag automatically.
If your BigCommerce store already uses Universal Analytics, refer to Google's official documentation on how to add a Google Analytics 4 property to your website. It's crucial to enable the option "Enable data collection using your existing tags" to ensure uninterrupted data collection during the transition.
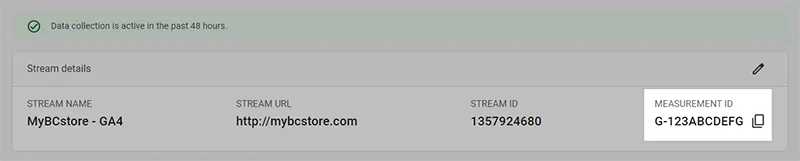
Step 3: Obtain GA4 Measurement ID
Go to “Admin” > “Data Streams” and click on your storefront’s stream. You need to ensure you’ve selected the right account.
Step 4: Set up Google Analytics 4 in Your BigCommerce Store
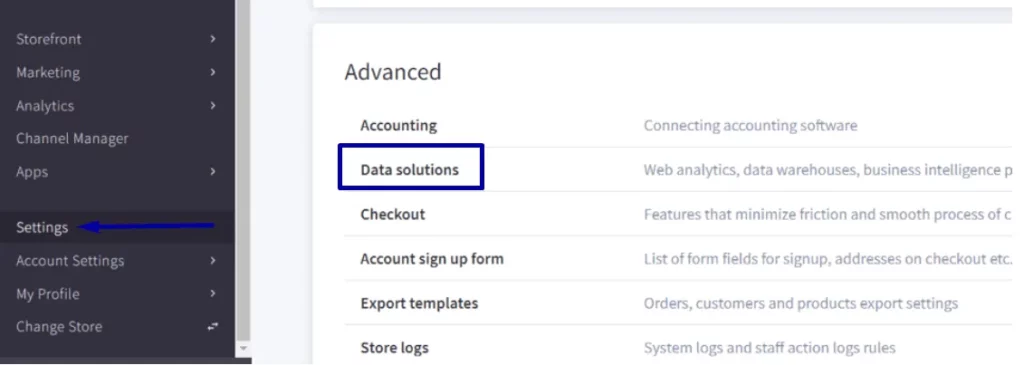
- Go to “Settings” > “Data Solutions.” In case, using Multi-Storefront, go to Channel Manager > Storefront Name > Data Solutions and then click “Connect next to Google Analytics 4.”
- Click “Connect” next to Google Analytics 4.

- Enter your Google Analytics Measurement ID and hit “Connect.”
- The refund event in Google Analytics requires an API secret for tracking. You can add it later if not immediately necessary.

Step 5: Check Your Tracking And Reports
After successfully connecting Google Analytics to your BigCommerce store, you can confirm data collection by checking the Realtime or DebugView reports.
To fully understand BigCommerce customization and setup in Google Analytics 4, refer to our article “How To Set Up Google Analytics 4 For Your BigCommerce Store.”
Customize Contact Form
Customizing the contact form on BigCommerce allows you to tailor it to your needs and branding. Let’s explore how to do it in this article.
Wrapping Up
With BigCommerce customization, you have the power to create a personalized and seamless shopping experience that sets your store apart from the competition. Start customizing today and watch your business thrive.
BigCommerce Customization: FAQs
Can I customize the design of my BigCommerce store?
Absolutely! BigCommerce offers robust customization options to tailor the design of your store to match your brand identity. You can customize themes, fonts, colors, layout, and more through the intuitive theme editor. Additionally, you can add custom CSS and HTML to further personalize your store's appearance.
Can I customize the functionality of my BigCommerce store?
Yes, you can customize the functionality of your BigCommerce store to suit your business needs. BigCommerce provides access to an extensive range of apps and integrations through the BigCommerce App Marketplace. Whether you need advanced shipping options, custom product configurators, or enhanced marketing tools, you can find and integrate solutions that meet your requirements.
Is it possible to customize the checkout process on BigCommerce?
Absolutely! BigCommerce offers flexible options for customizing the checkout process. You can modify checkout fields, add custom checkout steps, and integrate various payment gateways to create a seamless and tailored customer checkout experience. Additionally, you can enable features like guest checkout, address auto-completion, and abandoned cart recovery to optimize the checkout process further.
Can I customize product pages on my BigCommerce store?
Yes, you have full control over customizing product pages on your BigCommerce store. You can add custom product fields, display product variants, and customize product descriptions to highlight key features and benefits. Additionally, you can showcase product reviews, related products, and promotional offers to enhance the shopping experience and drive conversions.
How can I customize the navigation menu on my BigCommerce store?
Customizing the navigation menu is easy with BigCommerce. You can create custom menus, add dropdowns, and organize menu items to improve site navigation and help customers quickly find what they're looking for. Additionally, you can add links to product categories, blog posts, contact pages, and more to provide easy access to essential content and resources.


