
Shopify Balance: The Ultimate Guide
By Sam Nguyen

Looking to alleviate the stress of managing your ecommerce store’s finances? Shopify Balance is the solution you’ve been searching for.
As an ecommerce business owner, you know how frustrating it can be to deal with slow payment processing times, complicated expense tracking, and limited access to financial insights. That’s where Shopify Balance comes in.
In this comprehensive guide, we’ll dive into all the features and benefits of Shopify Balance and show you how it can help take the hassle out of financial management for your ecommerce store.
| Key Takeaways |
|---|
|
What is Shopify Balance?
Shopify Balance is a business financial account that allows Shopify merchants to receive payments, pay bills and manage their money and business in one place.
To make it easier to understand: Shopify Balance operates as a separate bank account, but it is to manage money for Shopify businesses.

But as Shopify claims, Shopify Balance is better than traditional banks.
Shopify Balance vs Bank account: Similarities and differences
Shopify Balance and a bank account are both financial accounts that you can use to store and manage your money, but there are some key differences and similarities between them.
Similarities between Shopify Balance vs Bank account:
- Both can be used to receive and store money: You can receive payments into both a bank account and a Shopify Balance account, and use the funds for various purposes.
- Both can be linked to payment methods: A bank account can be linked to a debit card, credit card, or other payment methods, and so can a Shopify Balance account.
- Both can be used to make purchases: You can use funds from both a bank account and a Shopify Balance account to make purchases online or in person.
Differences between Shopify Balance vs Bank account:
- Purpose: A bank account is typically used for managing your overall finances, whereas a Shopify Balance account is specifically designed for Shopify merchants to manage their online store sales and payouts.
- Availability: Bank accounts are widely available and can be opened at most financial institutions, whereas Shopify Balance is only available to Shopify merchants.
- Interest: Bank accounts may offer interest on the balance, whereas Shopify Balance does not offer interest.
- Regulation: Bank accounts are regulated by government agencies and must adhere to strict regulations, whereas Shopify Balance is not subject to the same regulations.
- Transfer speed: Bank transfers typically take longer to process than transfers between Shopify Balance and a linked bank account, which can be done instantly.
| Features | Shopify Balance | Bank Account |
|---|---|---|
| Receive and store money | ||
| Link to payment methods | ||
| Make purchases | ||
| Purpose | Specifically designed for Shopify merchants to manage their online store sales and payouts | Typically used for managing overall finances |
| Availability | Only available to Shopify merchants | Widely available at most financial institutions |
| Interest | Does not offer interest | May offer interest on the balance |
| Regulation | Not subject to the same regulations as bank accounts | Regulated by government agencies and must adhere to strict regulations |
| Transfer speed | Transfers between Shopify Balance and a linked bank account can be done instantly | Bank transfers typically take longer to process |
Pros and Cons of Shopify Balance
Like any financial service, Shopify Balance has its pros and cons. Here are the key pros and cons of Shopify Balance:
Pros of Shopify Balance
- Convenient and easy: With Shopify Balance, you can manage all your store’s financial transactions in one place, making it easier and more convenient to keep track of your finances. Just a few steps and you already have a Balance account ready.
- Faster payouts: Shopify Balance offers faster payouts compared to traditional payment methods. You can get your funds in as quickly as 1 business day, making it easier to manage your cash flow.
- Generous cashback programs: With 2%-10% cashback, Shopify Balance gives merchants such a deal.
- Secure payments: Shopify Balance is a secure payment solution that is PCI-compliant and protected by Shopify’s security measures. This means that your customers’ payment information is kept safe and secure.
- Secure money storage: Your Balance account is FDIC-insured, up to $250,000.
- Better control: With Shopify Balance, you have complete control over your store’s finances. You can see all your transactions in real-time, making it easier to track your sales and manage your cash flow.
- No transaction fees: Shopify doesn’t charge any fees for using your Balance card (but there may be ATM provider fees).
Cons of Shopify Balance
- Limited availability: Currently, Shopify Balance is only available to Shopify merchants who are based in the United States or Puerto Rico. This means that businesses located in other countries cannot take advantage of this feature.
- Limited usage: Though it works as a debit card, it is technically NOT a debit card – you can’t use Shopify Balance outside of Shopify transactions.
- Requirements: You have to use Shopify Payments in order to use Shopify Balance.
Who can use Shopify Balance?
You have to meet these requirements to be eligible for Shopify Balance:
- Your business is based in the United States or Puerto Rico.
- You have active Shopify Payments or have registered a Shopify Balance account before signing up for Shopify Payments.
- You have a US Social Security Number (SSN) that is valid.
- You own an account that has Shopify Payments.
- Your Shopify Payments account must be a single account holder.
- You are on any Shopify plan (other than Shopify Plus).
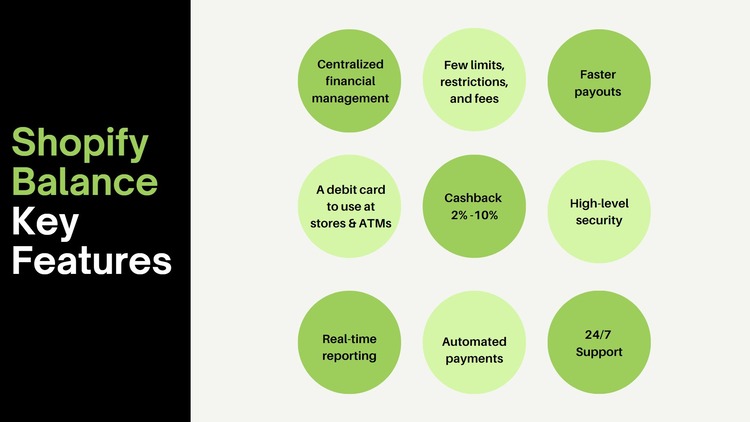
Key features of Shopify Balance
Shopify Balance offers a range of features designed to help businesses manage their finances more effectively. Some of the key features of Shopify Balance include:
Centralized financial management
With Shopify Balance, merchants can manage all of their financial transactions from one central location, making it easier to track their finances and keep their books in order.
Few limits, restrictions, and fees
Using Shopify Balance, there are only a few limits on how many transactions they want to make. There are no monthly account fees or overdraft fees, and many transactions, such as deposits and transfers, are free. Additionally, businesses can avoid costly foreign transaction fees, as Shopify Balance supports transactions in multiple currencies.
Faster payouts
Shopify merchants can receive payments for their sales directly into their Shopify Balance account, which eliminates the need for time-consuming bank transfers. As payments are processed quickly, merchants can access their funds and start using them right away.
A debit card to use at stores and ATMs
Not only can you receive payments for your online sales, but you can also use Shopify Balance as a debit card to make purchases at physical stores and withdraw cash from ATMs.
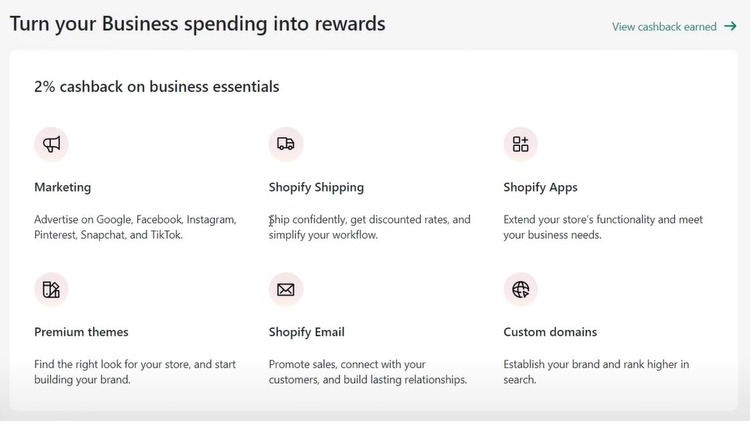
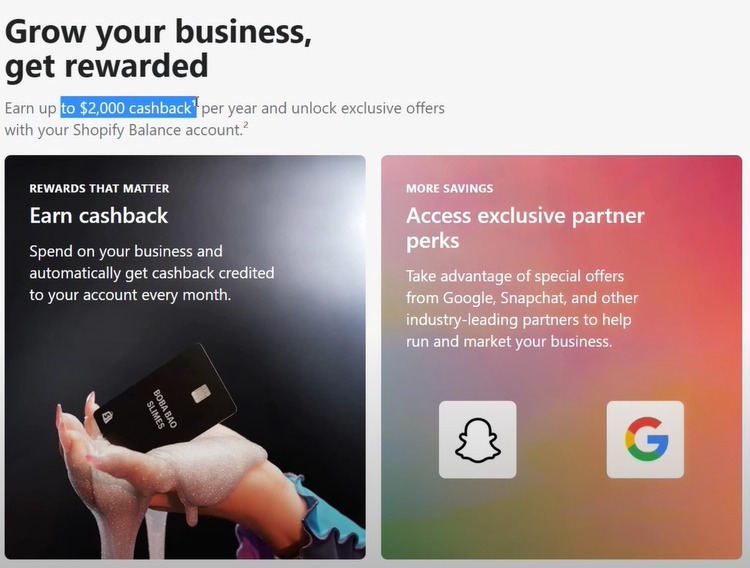
Cashback from 2% to 10%
Shopify Balance allows merchants to receive cashback ranging from 2% of the amount they spend on Shopify bills, such as apps, themes, shipping, and ecommerce marketing on social media sites and search engines. You’ll get 10% cashback as you hire designers and freelancers in the Expert Marketplace.
You can earn cashback only at a maximum of $2,000 per year.
High-level security
Shopify Balance uses state-of-the-art security measures to protect merchants’ funds, ensuring that their payments are secure and their information is protected. With its bank-level encryption, you can be confident that your money is safe.
Real-time reporting
With real-time reporting, merchants can see their financial transactions as they happen, helping them to stay on top of their finances and make informed decisions.
Automated payments
Shopify Balance makes it easy for merchants to pay for their expenses, including their , shipping costs, and other business expenses.
24/7 Support
Shopify Balance provides 24/7 support to help merchants with any questions or issues they may have, ensuring that their finances are always in good hands.
How To Set Up Shopify Balance
This section will walk you through setting up your Shopify Balance account, managing it effectively, and exploring various features.
How To Manage Your Shopify Balance Account
Getting Started
Start by going to the Shopify Balance landing page.
You have two options to create a Shopify Balance account:
Option 1: If you don’t have a Shopify store yet, you can take advantage of Shopify’s 3-day free trial to create a Shopify account and set up an online store before accessing Shopify Balance. Option 2: If you already have a Shopify account, log in to your account to set up Shopify Balance. Both options are available on the Shopify Balance homepage.
Accessing Shopify Balance
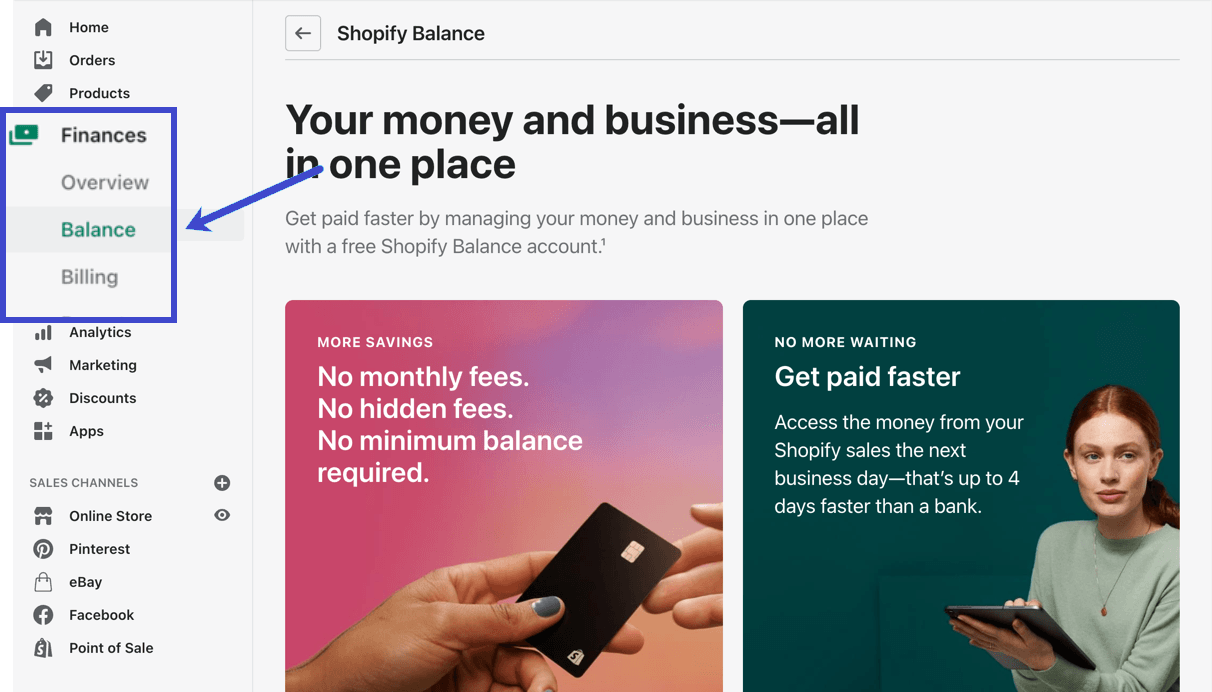
Once you’ve launched your store or logged into your existing account, navigate to Finances and click on Balance.
Note: This section may not appear in your dashboard unless you follow the steps on the Shopify Balance above.
You’ll be directed to a page that provides information about Shopify Balance, including the fact that it’s fee-free and can help you get paid faster.
If you don’t see a button to sign up for Shopify Balance, ensure you meet the following requirements:
- Your Shopify store must be located within the United States.
- You must have a valid US Social Security number and save it in your Shopify dashboard during the Shopify Payments setup.
- You need to have a mobile phone number saved in your Shopify account details, as it’s used for sending necessary text messages.
- Activate Shopify Payments within your dashboard.
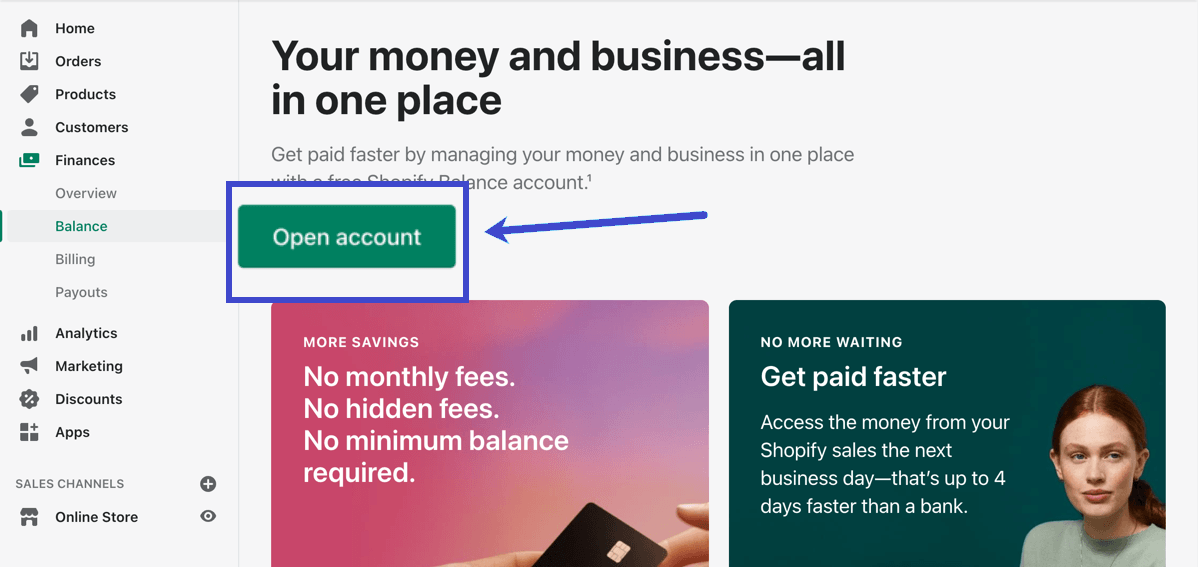
You should see an “Open Account” button on the Shopify Balance page if you’ve met all the requirements. Click it to proceed.
Account Setup
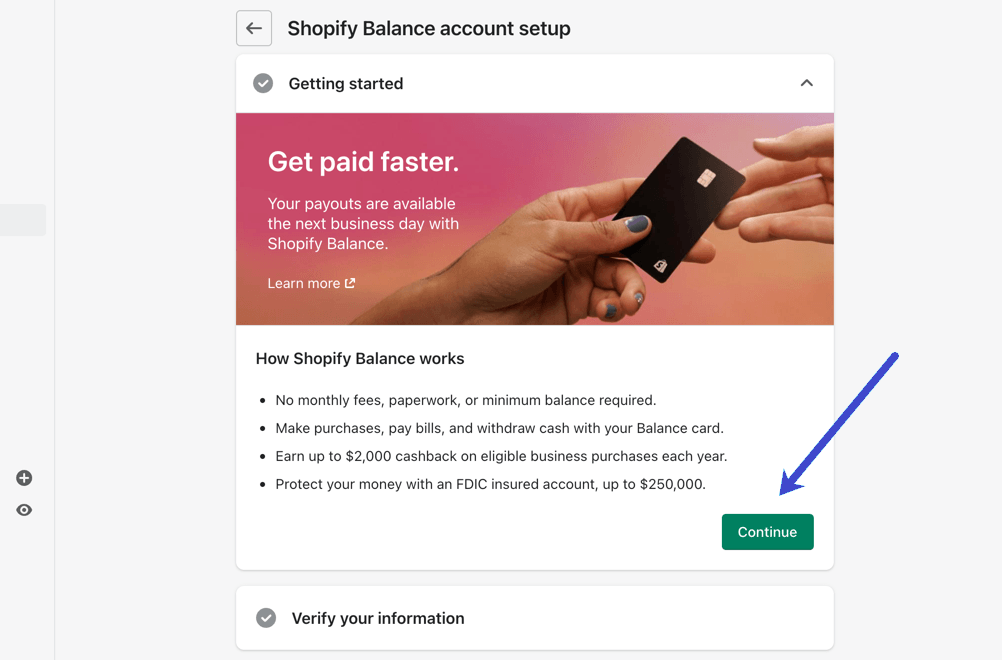
This will take you to the Shopify Balance Account Setup section, where you’ll find a few simple steps to set up your account and link it to your store.
- Choose the Getting Started tab to learn how Shopify Balance works, then click Continue.
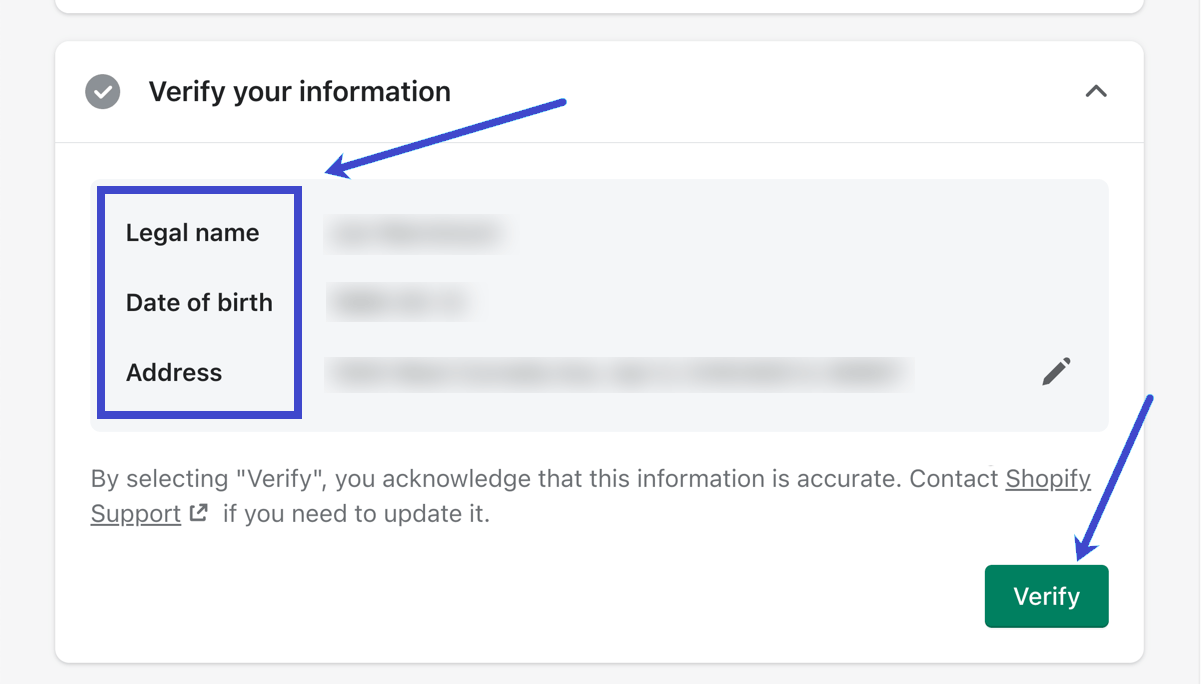
- Under the Verify Your Information tab, review the Legal Name, Date Of Birth, and Address fields. Make sure the information is accurate. Click the Edit (Pencil) icon to make corrections if needed.
- Click the Verify button once you’re satisfied with the information.
- You will now be prompted to enter your Social Security Number. Input your SSN and click Confirm.
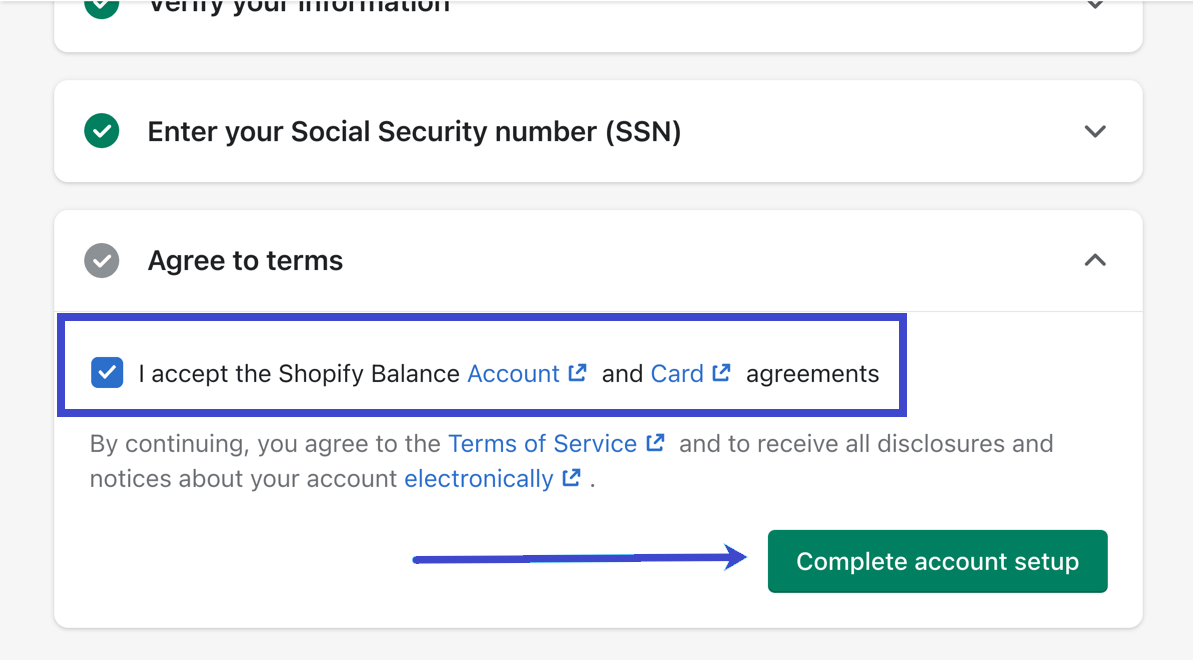
- In the Agree To Terms section, check the box to accept all Shopify Balance Account and Card agreements.
- Click the Complete Account Setup button to finalize the process.
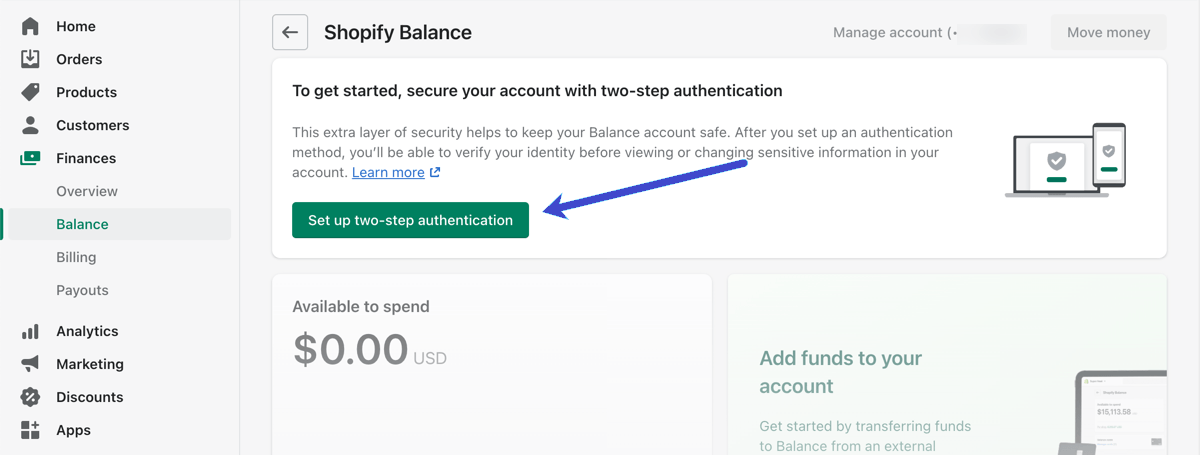
Two-Step Authentication
After completing the account setup, you’ll have a Shopify Balance management module within your Shopify dashboard. However, you must configure two-step authentication for security purposes. Click the Set Up Two-Step Authentication button.
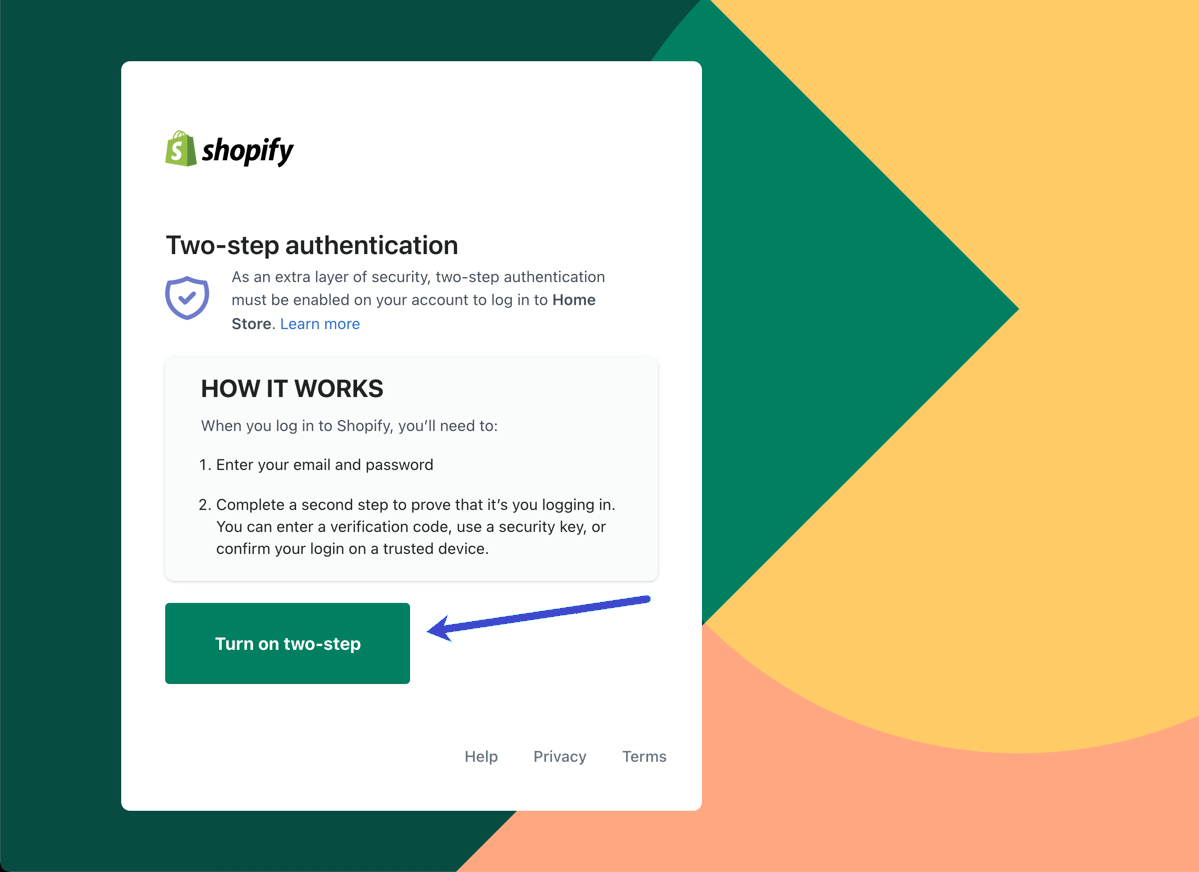
You will need to log into your account once more. Afterward, you can click the Turn On Two-Step button.
You have various two-step authentication options, including using a security key or biometrics, an authenticator app like Google Authenticator, or SMS delivery. Choose the method that suits you best and click Turn On.
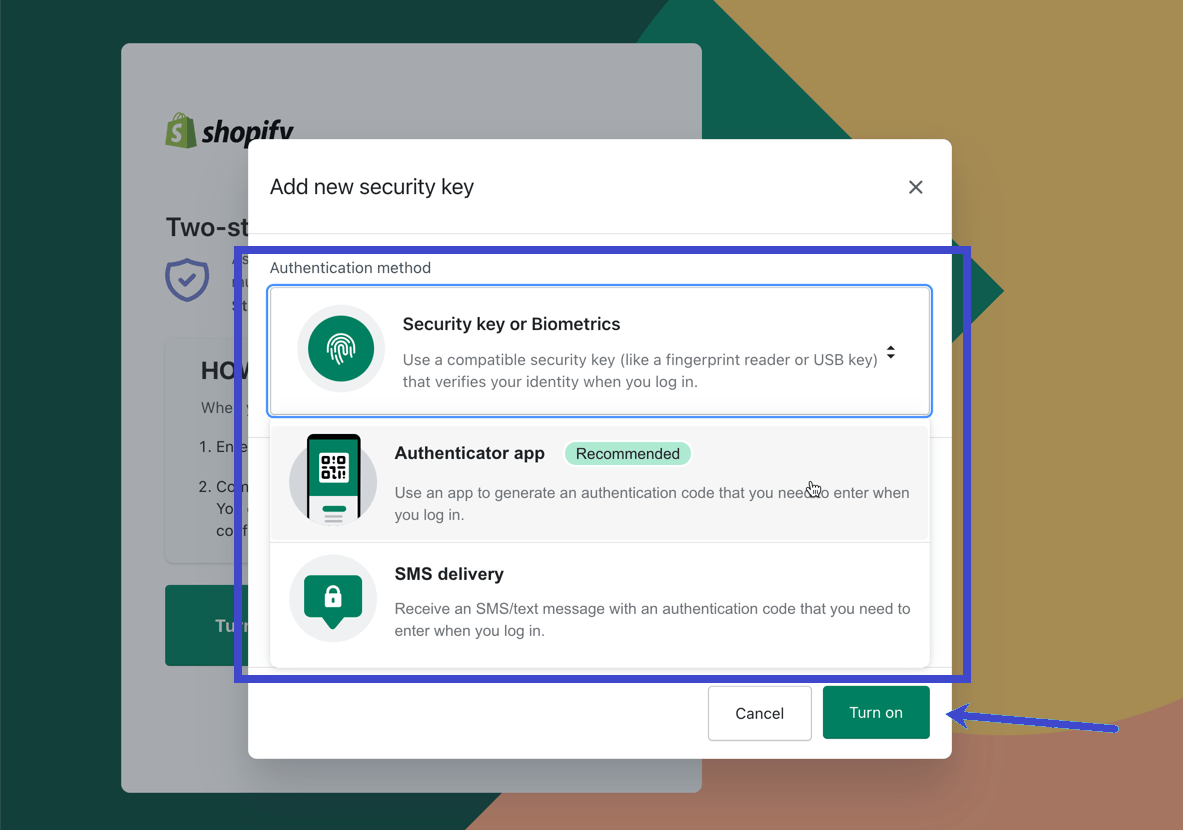
Note that authenticator apps store login codes on one of your devices, so it’s important to save recovery codes provided by Shopify in case you lose access to the app.
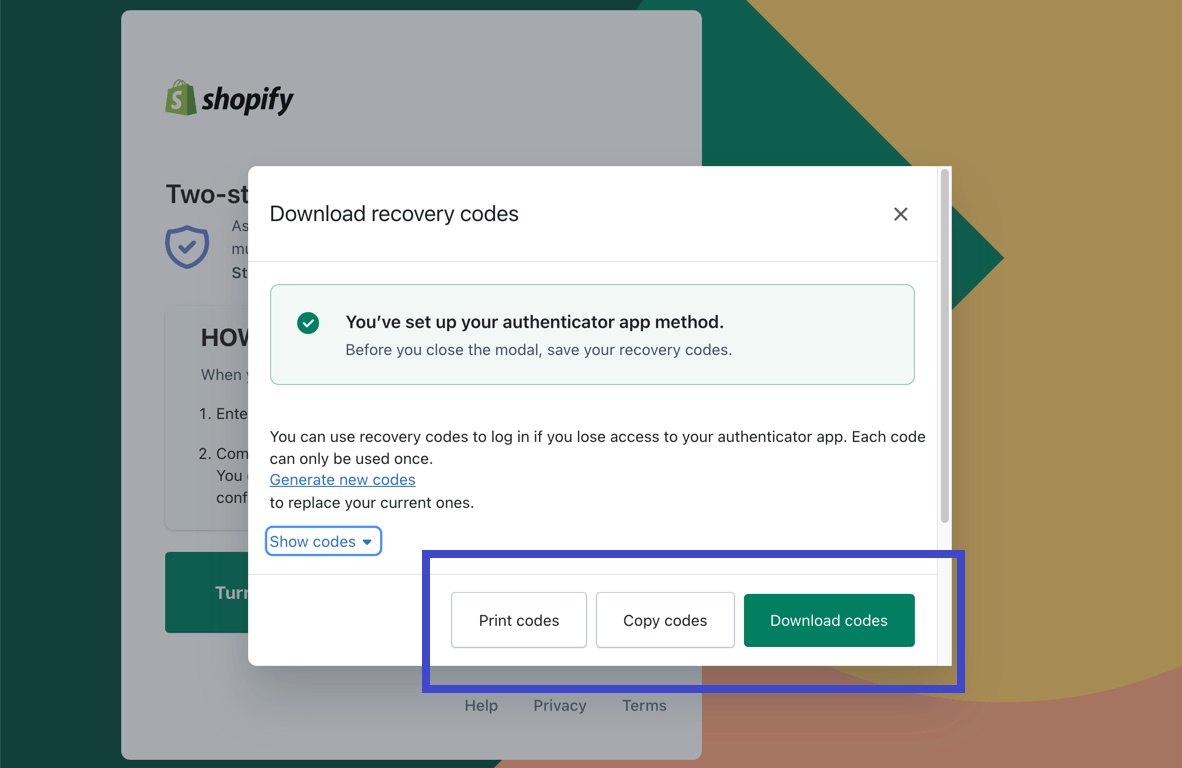
IMG
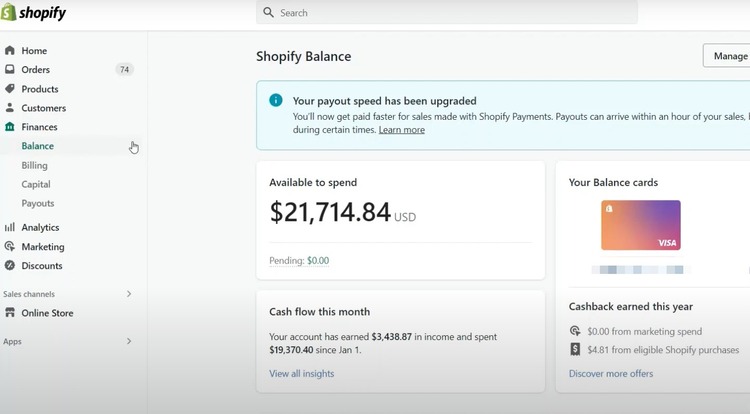
Accessing Your Shopify Balance Dashboard
With two-step authentication, you can now access your Shopify Balance dashboard. You’ll find information about your available spending cash, account management tools, and account activity here.
You now have a fully functional Shopify Balance account, ready to help you manage your finances conveniently within the Shopify ecosystem.
How To View All Account Statements
Follow these steps to view your account statements:
- Start by navigating to the Finances section in your Shopify dashboard.
- Click on Balance, which is where you can manage your Shopify Balance account.
- Look for the Manage Account link that displays the last four digits of your account number. Click on it.
- You’ll find a View Statements button on the following page. Click on this button to access your account statements.

- You will be directed to a list of recent transactions within the Shopify dashboard. Here, you can review your transaction history.
- Additionally, you can download multiple statements to your computer for your records.
![]()
How To View Transaction And Transfer Limits
There are limits for transactions and transfers with your Shopify Balance account and card. These limits might change based on how much you transact.
Transaction Limit:
- Begin by going to the Finances section in your Shopify dashboard.
- Select Balance to access your Shopify Balance account and card details.
- Look for the Manage Account link, which also displays the last four digits of your account number. Click on it.
![]()
- Scroll down to the Card Management section. If you have multiple cards associated with your account (perhaps from ordering physical cards or managing multiple ecommerce businesses), choose the card for which you want to check the Transaction Limit.
- In this section, you’ll find valuable information such as the cardholder’s name, billing address, card numbers, and, most importantly, the Daily Spending Limit.
![]()
Transfer Limit:
- To view your transfer limits, navigate to the Finances section and click Balance in your Shopify dashboard.
- Locate and click the Move Money button situated in the top right corner.
- The Transfer Funds page provides options to move money from your Balance account to another bank account. Additionally, it displays your daily transfer limit.
- To find the limit, click the Transfer Funds From Balance tab. Your Daily Transfer Limit will be visible under the Amount field.
![]()
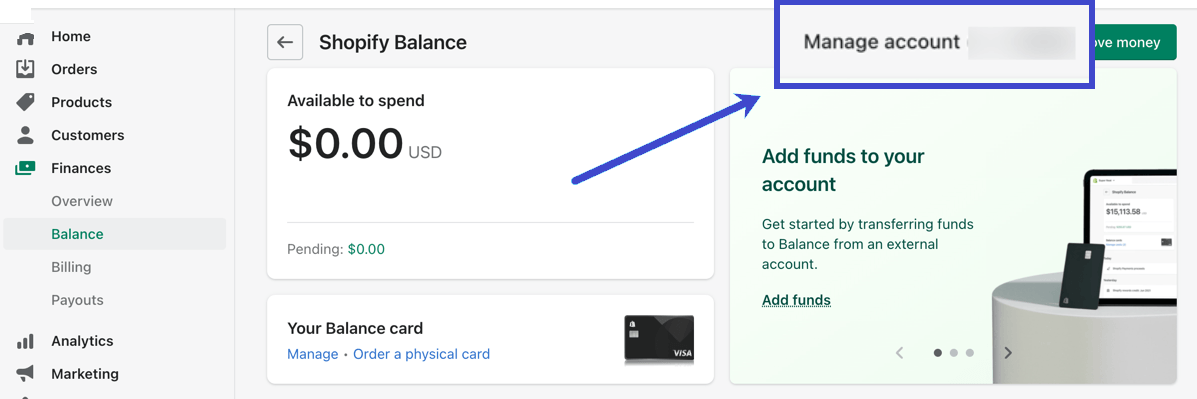
How To Send Funds To Or From Your Shopify Balance Account
Transferring Funds into Your Balance Account:
- Start by accessing your Shopify dashboard.
- Navigate to the Finances section and click on Balance.
![]()
- Find and click on the Move Money option.
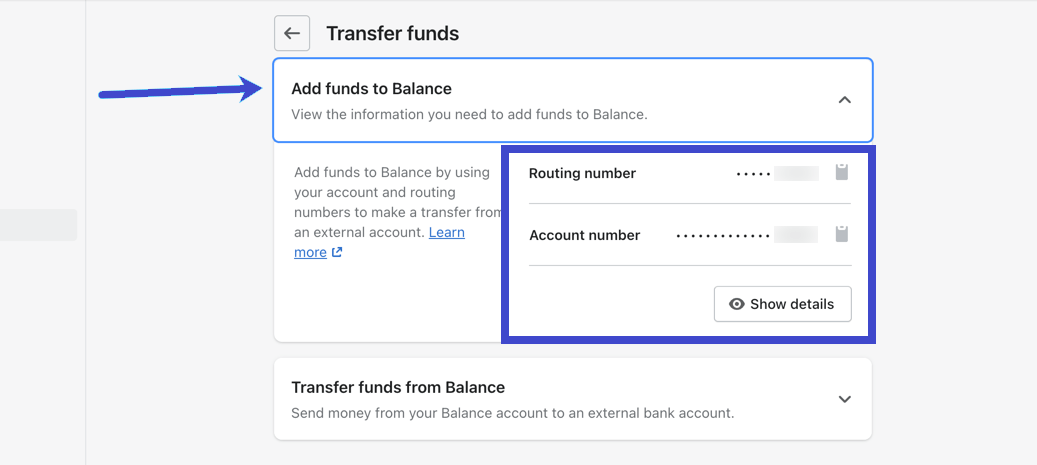
- Select the Add Funds To Balance tab to transfer money into your Balance account. Here, you’ll find the routing and account numbers associated with your Shopify Balance account.
- If you need to access the full routing and account numbers, click the Show Details button, allowing you to copy each number.
- To initiate the transfer, you’ll need to go to the account dashboard from which you plan to send money. For instance, if you’re transferring funds from your Chase or Bank of America account, log in to that respective account.
- Paste the routing and account numbers from your Shopify Balance account within your bank’s transfer tools. Follow the provided steps to complete the transfer.
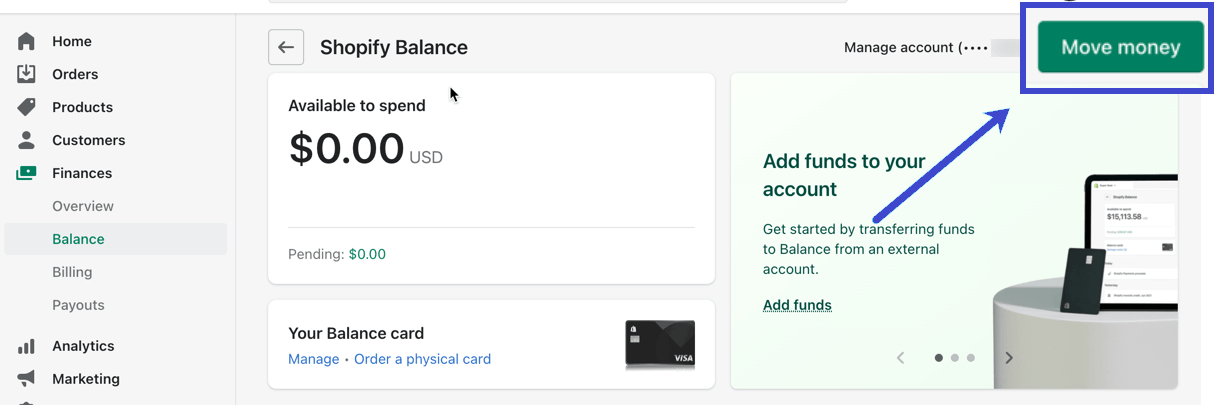
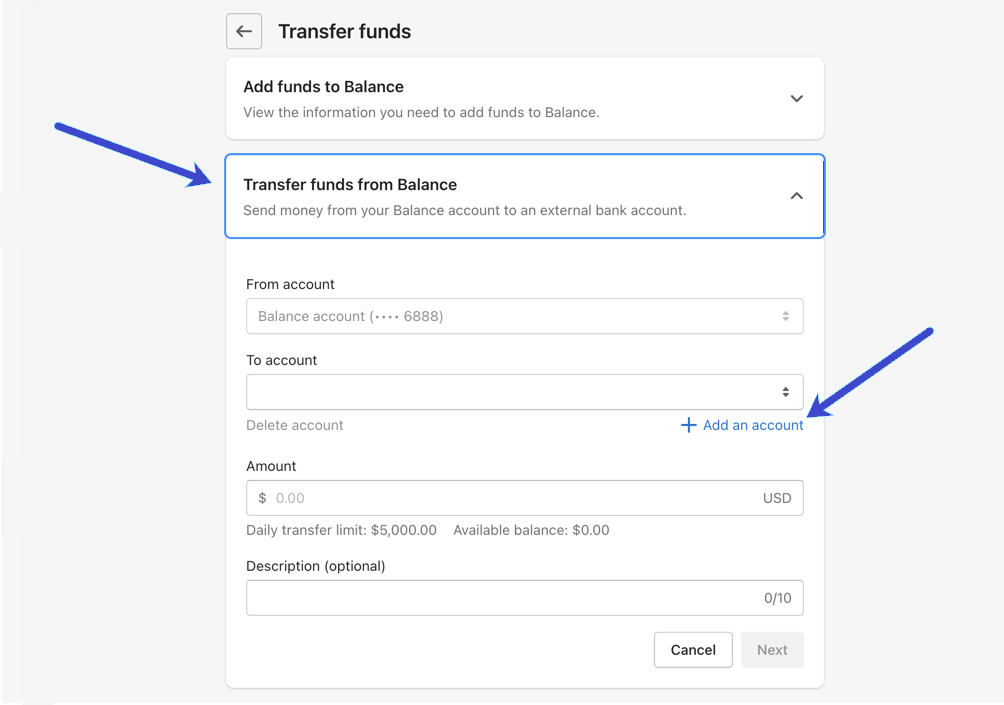
Transferring Funds from Your Shopify Balance Account:
- Similarly, go to the Finances section in your Shopify dashboard and click Balance.
- On the Balance page, click the Move Money button.
IMG
- Select the Transfer Funds From Balance tab to transfer funds from your Shopify Balance account to another destination, such as a third-party savings or checking account.
- Choose your From Account, which is your Shopify Balance account.
- Click the Add An Account link to fill the To Account field with your third-party bank’s routing and account details.
- Specify the amount you wish to transfer in the Amount field. You can also provide an optional description for your reference.
- Once you’ve filled in the necessary information, click the Next button to proceed through the final steps of the transfer.
How To Receive Online Store Payouts To The Shopify Balance Account
One of the primary reasons many merchants choose Shopify Balance is to streamline the process of receiving online store payouts while maintaining all their financial management within the Shopify dashboard. Fortunately, setting up your Shopify Balance account to receive payouts is a seamless process:
- Shopify Balance Setup: To begin, ensure you have Shopify Payments enabled, as this is a prerequisite for using Shopify Balance. If you meet this requirement, Shopify automatically designates your Shopify Balance account as the default payout destination.
- Automatic Payout Configuration: There’s no need for manual configuration. Once Shopify Balance is set as your default payout account, online store payouts are automatically directed to your Shopify Balance account.
- Swift Payouts: Shopify is committed to providing swift payouts. Payouts are usually deposited into your Shopify Balance account within one business day.
How To Change The Payout Account
While having a Shopify Balance account requires using Shopify Payments, you may still decide to route your payouts to a different account apart from Shopify Balance. Here’s how to change your payout account:
- Start by accessing your Shopify dashboard.
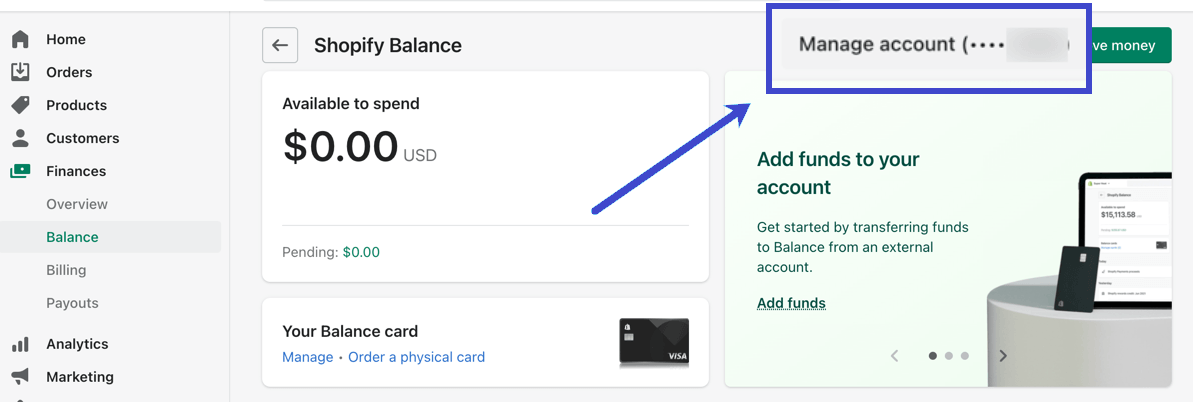
- Navigate to the Finances section and click on Balance.
- In the Balance section, locate and click on the Manage Account link.
- Under your Account Details, look for the Change Payout Account link and click on it.
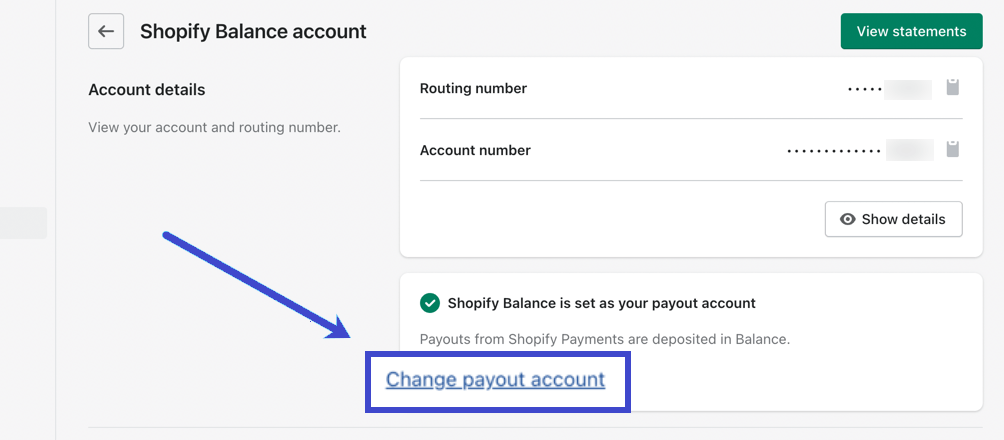
- You’ll be directed to the Replace Bank Account section. Here, you can make the necessary adjustments to switch your payout destination.
- Fill in the New Routing Number and New Account Number fields by entering the information from the bank account where you want to receive your payouts.
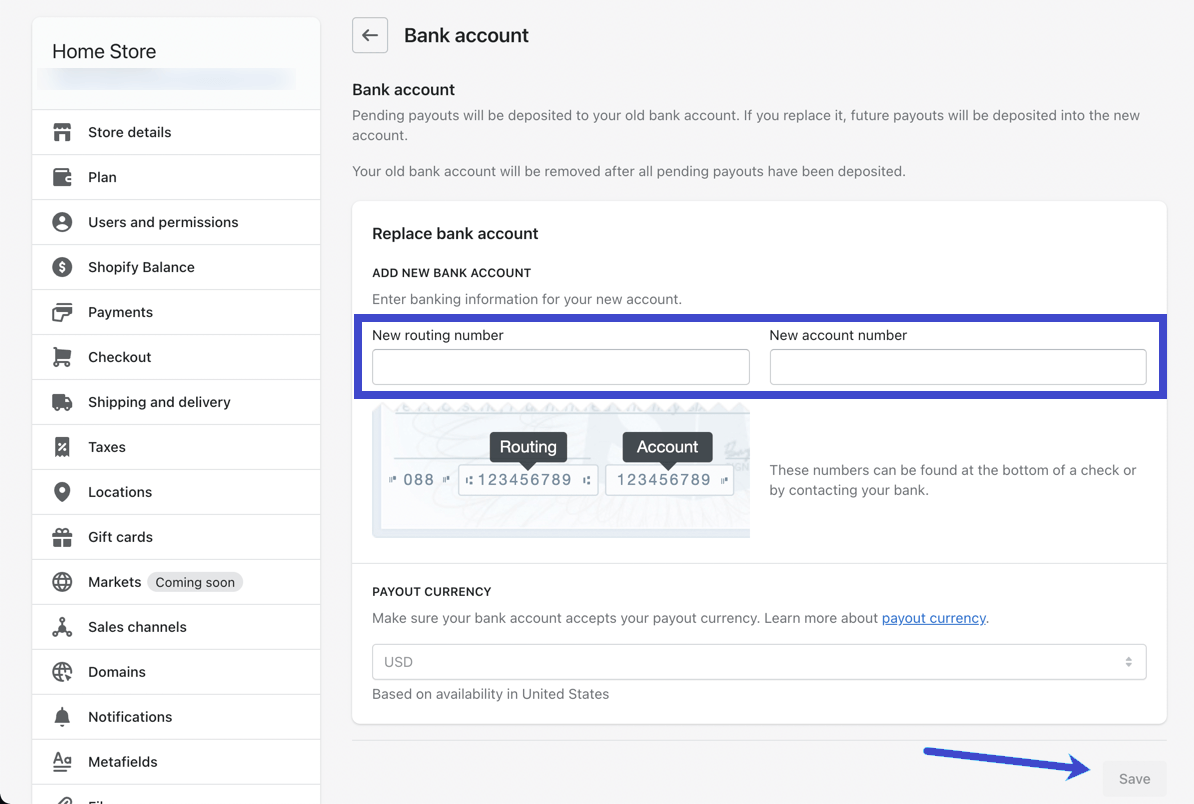
- Additionally, you can select the preferred payout currency.
- After making these changes, click the Save button to confirm and update your payout account.
How To View Shopify Balance Insights
Main Shopify Balance Page:
- Start by heading to the Finances section and click on Balance in your Shopify dashboard.
- On the main Shopify Balance page, you’ll find a quick module that displays the amount of money available in your Shopify Balance account. This module provides a dollar amount indicating your spendable balance.
Account Activity Section:
- As transactions occur in your online store, the Account Activity section will begin to populate with details of these transactions.
- This section also tracks the money processed into your Shopify Balance account from those payouts.
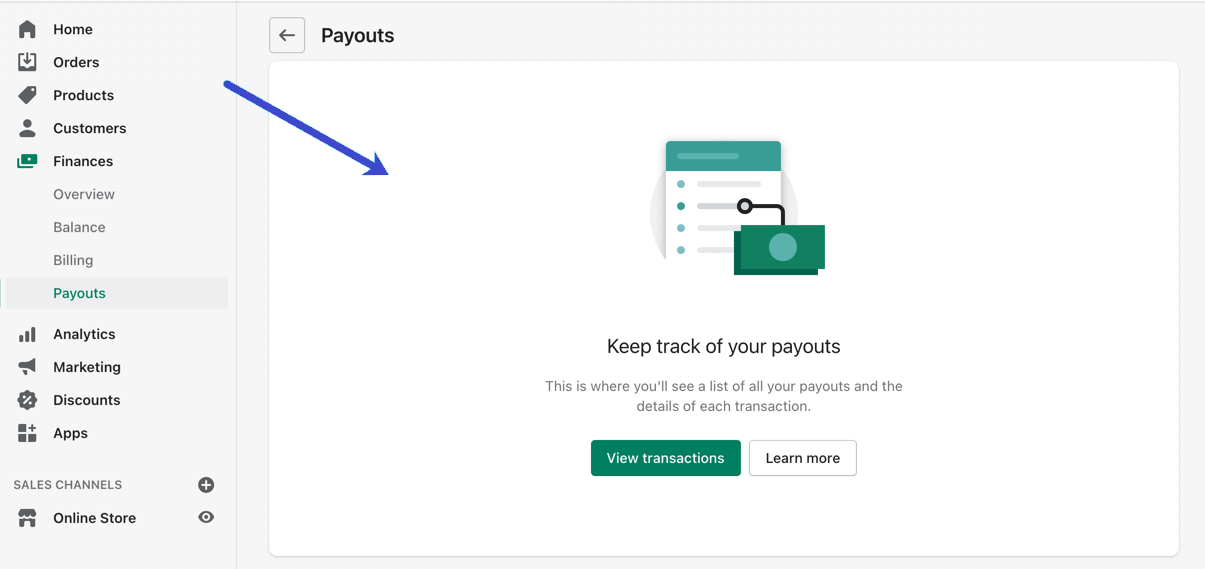
Viewing Payouts:
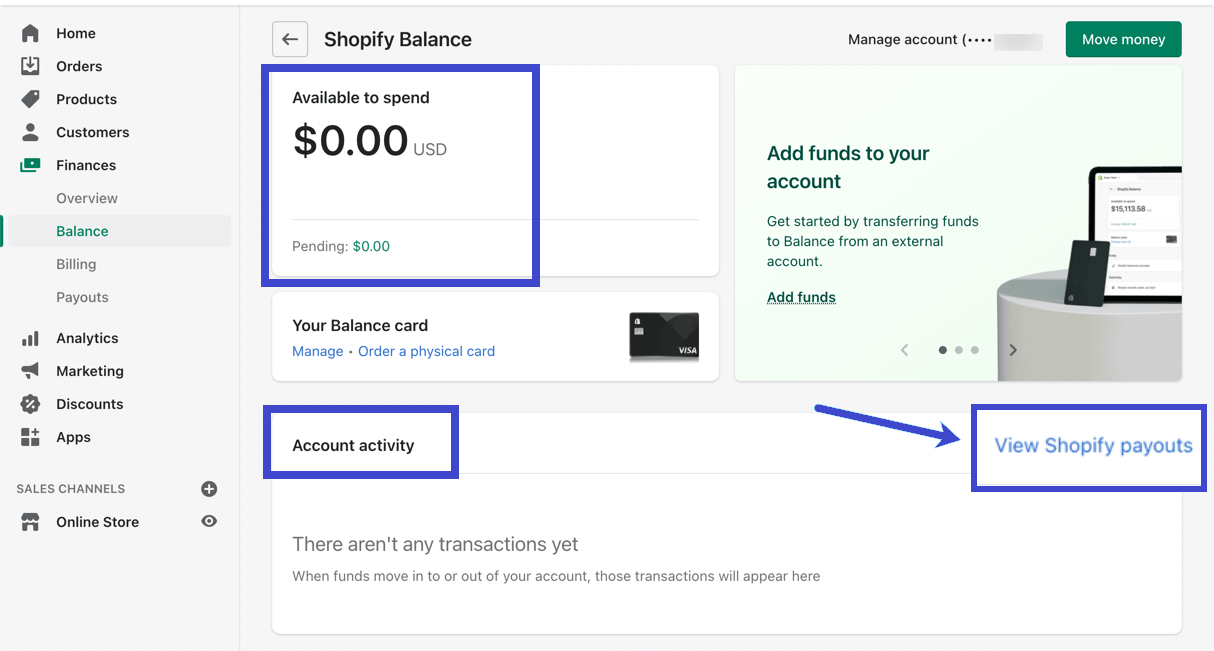
- For more detailed insights into your payouts, click the View Shopify Payouts link in the Account Activity section.
- You’ll find a complete list of your most recent payouts, offering a clear overview of your incoming funds.
Viewing Transaction Details:
- To delve deeper into your financial transactions, click View Transactions to access the specific details of the transactions included in those payouts.
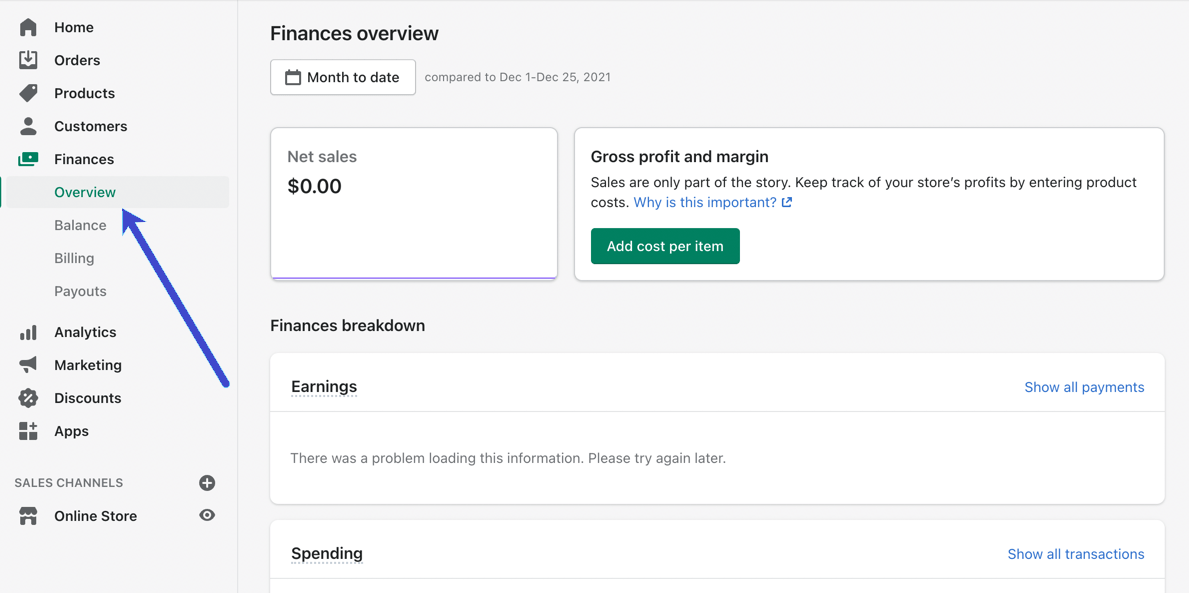
Overview Tab:
- Under the Finances section, explore the Overview tab for the most comprehensive collection of insights related to your Shopify Balance account and overall finances.
- This page provides a wealth of information, including net sales, gross profits, margins, earnings, spending, your current Shopify Balance, and the current bill.
- You can filter these insights based on date and access more detailed information by clicking on links that provide extended insights. For instance, you can click Show All Transactions in the Spending module for a more in-depth breakdown of your spending activity.
How To Create Multiple Shopify Balance Accounts
You can create up to 5 additional Balance accounts on Shopify to better manage your expenses and allocate funds for specific purposes. These accounts can be useful for budgeting and organizing your finances efficiently.
Limitations
Before proceeding, it’s important to be aware of the limitations of multiple Balance accounts:
- You can create a maximum of 5 additional Balance accounts.
- Only your main account can have a Balance card and associated rewards.
- Low balance alerts are available only for your main account.
How To Create a New Account
Follow these steps to create a new additional Balance account:
- From your Shopify admin, navigate to Finances > Balance.
- Click on Create account.
- Enter a suitable name for the new version.
- Click Create an account.
Managing Your Account
You have the option to edit the name of your additional Balance account. Here’s how:
- From your Shopify admin, go to Finances > Balance.
- Select the account you want to rename.
- Click Manage Account.
- Under Account details, next to the account name, click Edit.
- Enter the new name for the account.
- Click Save.
Transferring Funds Between Your Balance Accounts
To move funds between your Balance accounts, follow these steps:
- From your Shopify admin, go to Finances > Balance.
- Click Move money > Transfer funds between your Balance accounts.
- From the From drop-down, select the account from which you want to transfer funds.
- From the To drop-down, select the account where you want to move the funds.
- Type the amount you want to transfer.
- Optionally, provide a description of the transfer.
- Click Transfer.
Setting Aside Sales Tax in a Dedicated Balance Account
To save funds for tax filing time by setting aside sales tax, here’s how:
- From your Shopify admin, go to Finances > Balance.
- Click Settings.
- Under Sales tax account, click Turn on.
- Choose the appropriate option based on your account setup:
- Select an existing account to save your sales tax funds.
- Create a new Balance account to save your sales tax.
- Click Turn on.
Make use of these features to efficiently manage your finances and allocate funds for various business needs using Shopify Balance.
Shopify Balance Mobile App
The Shopify Balance mobile app provides convenient access to your Shopify Balance account directly from your iOS or Android mobile device. With this app, you can perform various essential actions to manage your finances effectively. Here’s what you can do with the Shopify Balance mobile app:
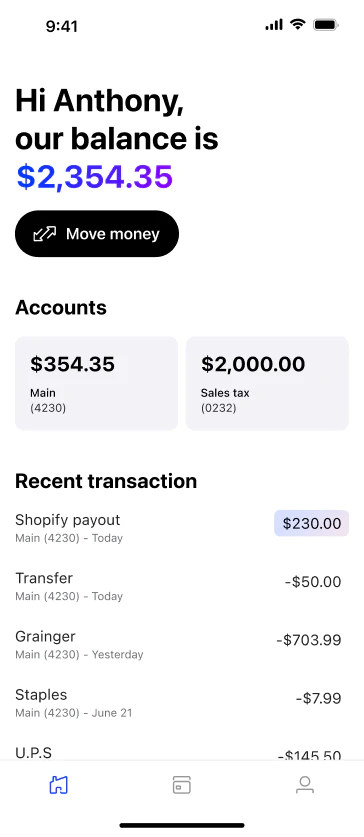
- View Account Information: Access detailed information about your Shopify Balance account, including your account balance.
- Access Card Details: View information related to both your digital and physical Shopify Balance cards.
- Mobile Wallet Integration: Add your digital or physical card to your mobile wallet for easy and secure transactions.
- Card Locking: Lock or unlock your Shopify Balance card for added security.
- View Transaction and Transfer Limits: Check your transaction and transfer limits within the app.
- Transfer Funds: Conveniently transfer funds to and from your Shopify Balance account.
Requirements for Using the Shopify Balance Mobile App
To use the Shopify Balance mobile app, you must meet the following requirements:
- Active Shopify Balance Account: Ensure you have an active Shopify Balance account associated with your store.
- Mobile Device: Possess an iOS or Android mobile device. Note that the Shopify Balance mobile app is not compatible with tablet devices.
Installing and Logging In to the Shopify Balance App
To get started with the Shopify Balance mobile app, follow these steps:
- Install the App:
- If you’re using an iOS device (iPhone or iPad), find the Shopify Balance app on the App Store.
- If you have an Android device, locate the app on Google Play Store.
- Open the App: Launch the Shopify Balance app on your mobile device.
- Log In: Sign in using your Shopify account credentials.
- Select Your Store (if applicable): If your Shopify account is associated with multiple stores, choose the store you wish to access.
Uninstalling the Shopify Balance App
If you decide to stop using the Shopify Balance app, you can uninstall it from your mobile device. Here’s how to do it:
- For Android devices, refer to the instructions for uninstalling apps on Android.
- For iOS devices, follow the steps to uninstall apps on iOS.
The Shopify Balance mobile app offers on-the-go access to your account, empowering you to manage your finances efficiently from your mobile device.
Shopify Balance: FAQs
Here are several alternatives to Shopify Balance that Shopify merchants may consider:
- Shopify Payments
- Other payment methods like PayPal, Stripe, etc.
- Traditional bank
Conclusion
Shopify Balance is a great option for Shopify store owners looking to simplify their financial management. With its easy setup, comprehensive features, and secure transactions, Shopify Balance is definitely worth considering for businesses of all sizes. Whether you’re just starting out or looking for a more efficient way to manage your finances, Shopify Balance has something to offer.


