
How to Integrate ActiveCampaign with WooCommerce
By Sam Nguyen

WooCommerce is a well-known and simple-to-use Wordpress ecommerce plugin. One of the benefits of utilizing WooCommerce is the large number of plugins that can be used to extend its functionality and personalize it for various scenarios.
You may combine your ActiveCampaign account with WooCommerce in a few different methods, and which one you choose will depend on your plan level and business procedures.
Today’s tutorial will show you How to integrate ActiveCampaign with WooCommerce to upgrade your online store.
ActiveCampaign Overview
Over 130,000 organizations in 170 countries use ActiveCampaign’s category-defining customer experience automation platform (CXA) to engage with their consumers meaningfully. Customers and transaction data, including abandoned carts and whether or not the customer opted-in to marketing, are immediately synced into ActiveCampaign with ActiveCampaign for WooCommerce.
You may use ActiveCampaign for WooCommerce to:
- In real-time, sync all customers and their purchase data into ActiveCampaign.
- Set the time limit for when a cart is declared abandoned.
- Allow customers to opt-in to marketing by including an opt-in checkbox on your checkout form.
- Change the text of the opt-in checkbox and whether it is checked by default.
- Set up automation when a customer abandons their shopping basket.
Reasons to integrate ActiveCampaign with WooCommerce
- Create tailored experiences across all of your customer touchpoints by automating them.
- Track buyer preferences, activity, and a variety of custom factors across the customer lifetime to improve segmentation and marketing.
- Customize sends depending on nearly any parameter, ensuring that your communications are always sent to the proper people. Choose the optimum content, send time, and delivery channel for each customer based on their complete customer lifecycle data.
- With minimal effort, create completely customized campaigns, then improve your send strategy in real-time based on customer behavior.
- No matter how big your company becomes, replicate the one-on-one personal experience for every consumer.
How to integrate ActiveCampaign with WooCommerce
1. Using Zapier
-
Set up a Zap:
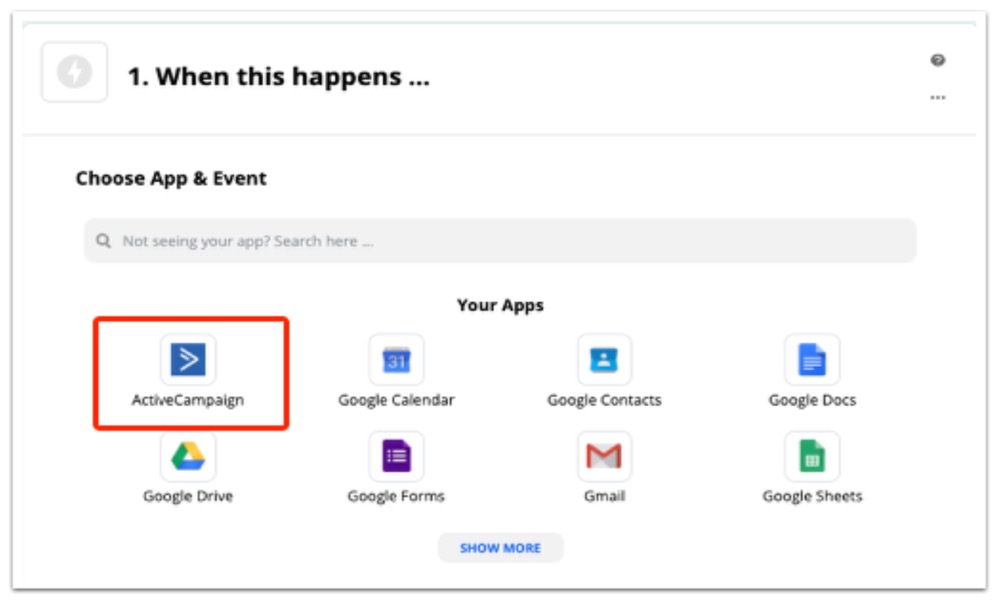
- Click “Make a Zap!” button after logging into your Zapier account.
- Select **ActiveCampaign&& from the drop-down menu. Your Zap will be triggered by this.
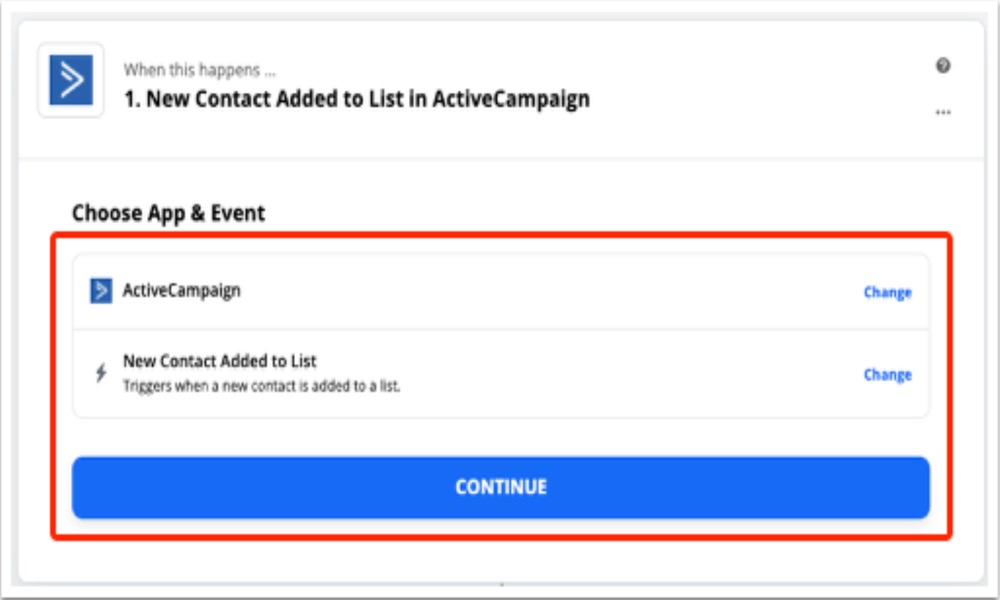
- Select New Contact Added to List from the drop-down menu. Then press Continue.
- To connect your ActiveCampaign account, click Connect an Account.
- A pop-up modal window will emerge. Type or paste your ActiveCampaign API URL and Key into the areas provided in the modal pop up. Then select Yes, Continue from the drop-down menu.
- Zapier will be updated using the ActiveCampaign API credentials. Select Continue from the drop-down menu.
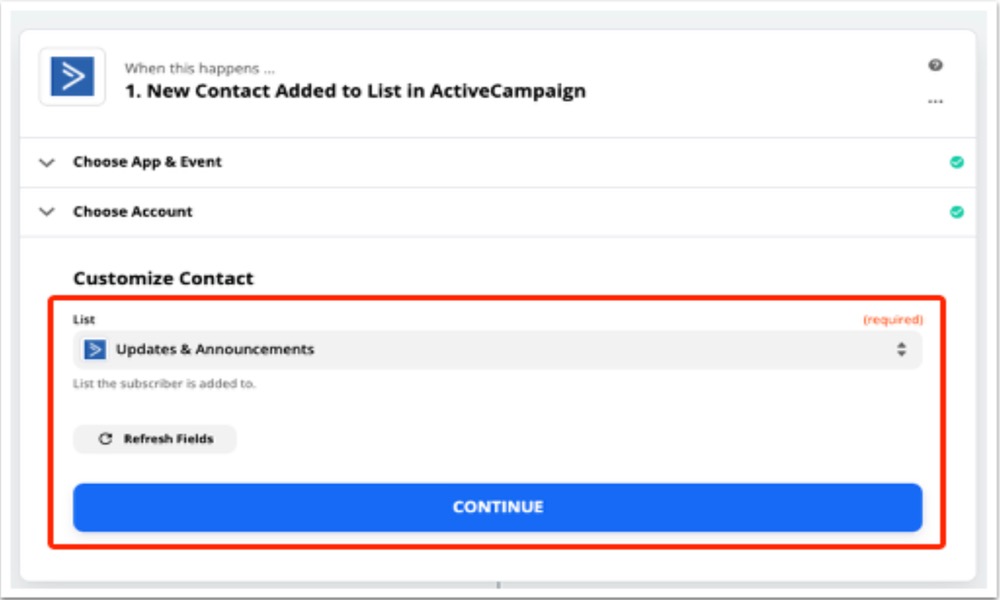
- Select List from the dropdown menu, then the list to which you want to add contacts. Select Continue from the drop-down menu.
- As part of the setup, Zapier will prompt you to test the trigger. Select Test trigger from the drop-down menu. Click the Continue button once the test is finished.
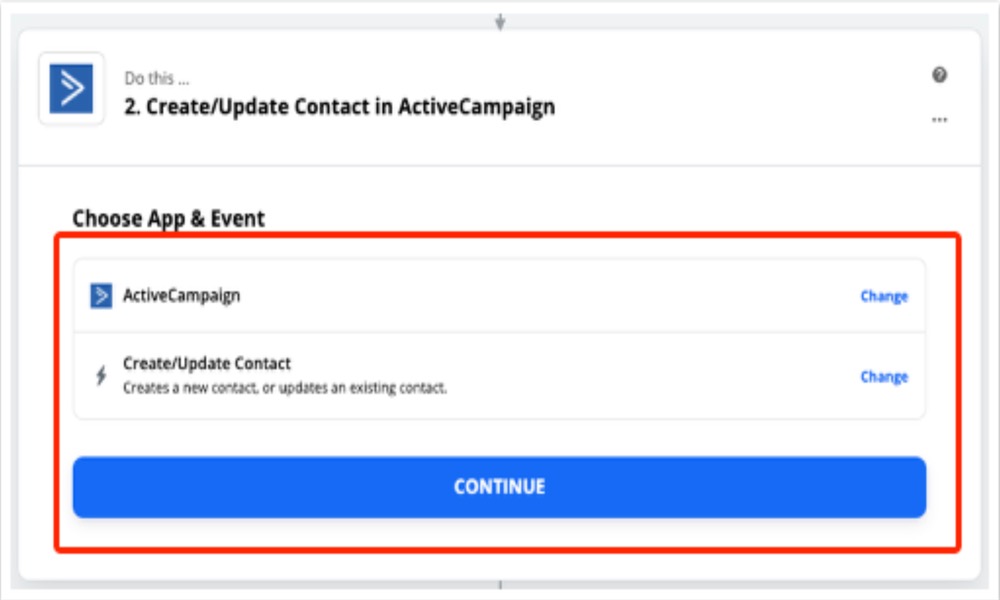
- Select the ActiveCampaign option for the activity.
- Select Create/Update Contact from the drop-down menu. Then select Continue from the drop-down menu.
- Select your ActiveCampaign account from the Choose Account dropdown menu. Select Continue from the drop-down menu.
- Select List from the dropdown menu, then the list to which you want to add contacts. Then, using the dropdowns provided, map fields. When you are finished, click the Continue button.
- You will be prompted to test the action via Zapier. Select Test & Continue from the drop-down menu.
-
When you’re done, press the Turn on Zap button.
- Get access to https://zapier.com/apps/woocommerce/integrations/activecampaign and complete the integration.
2. Using ActiveCampaign plugin on WordPress
-
Install the ActiveCampaign WordPress plugin:
- Go to your WordPress site and log in.
- In the sidebar, select Plugins.
- Select Add New from the drop-down menu.
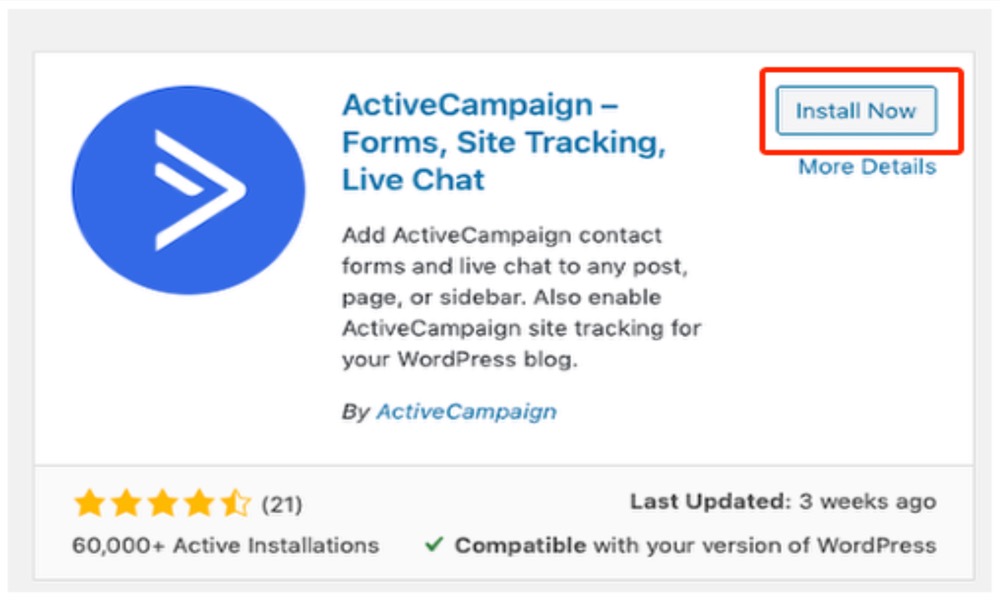
- A list of plugins will appear on the screen. Find the ActiveCampaign - Forms, Site Tracking, Live Chat option using the search field.
- Select Install Now from the drop-down menu.
- Select Activate from the drop-down menu.
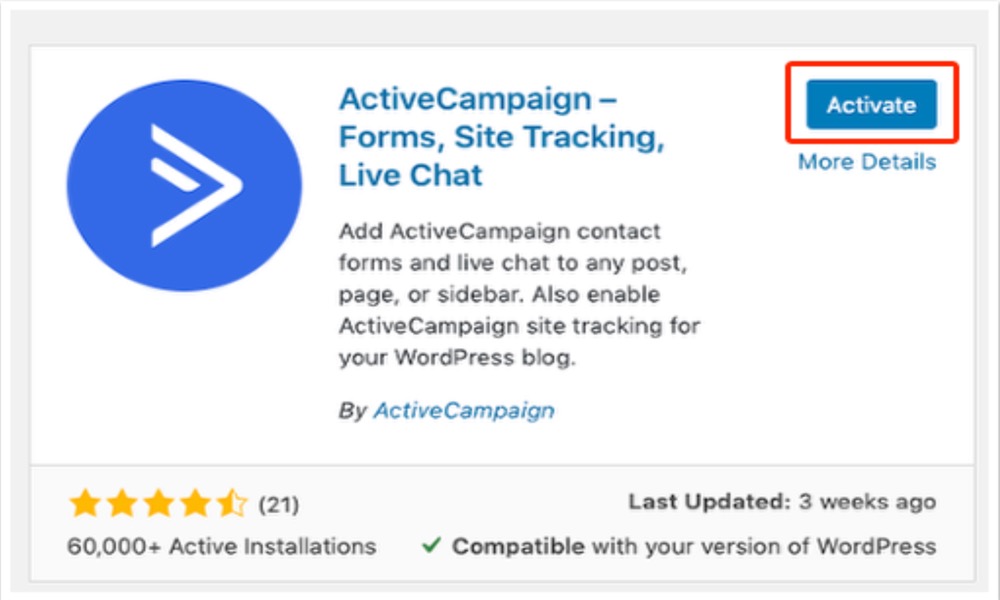
The plugin is now active in WordPress and can be found in the list of active plugins.
-
Configure the plugin settings:
-
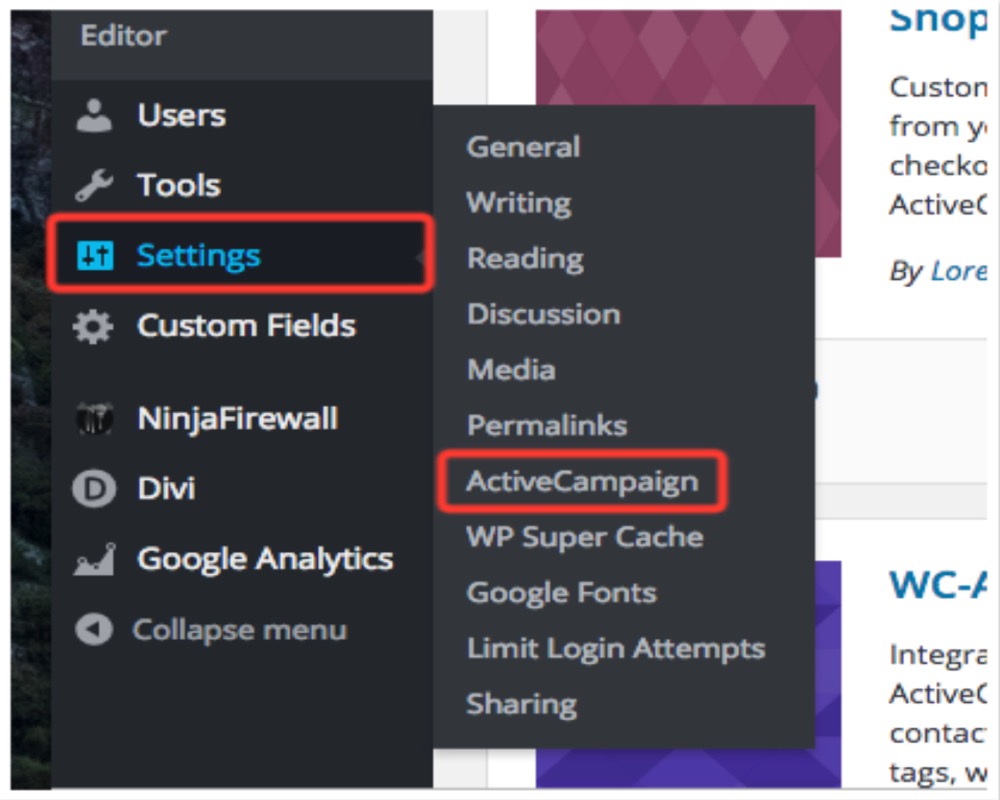
Hover your mouse over Settings in the sidebar in WordPress, then select ActiveCampaign.
- Log into your ActiveCampaign account in a new window or tab and look for your API URL and Key.
- Copy and paste the API URL from your ActiveCampaign account into the WordPress API URL box. Apply the same procedure to the API key.
- Click the Connect button in WordPress. Your ActiveCampaign account and WordPress account are now connected.
3. Using Autonami
The first step is to use Autonami to link your WooCommerce store to ActiveCampaign.
To do so, go to your ActiveCampaign account and look for the ActiveCampaign API URL and key.
Navigate to Settings > Developer in the sidebar of your ActiveCampaign account.
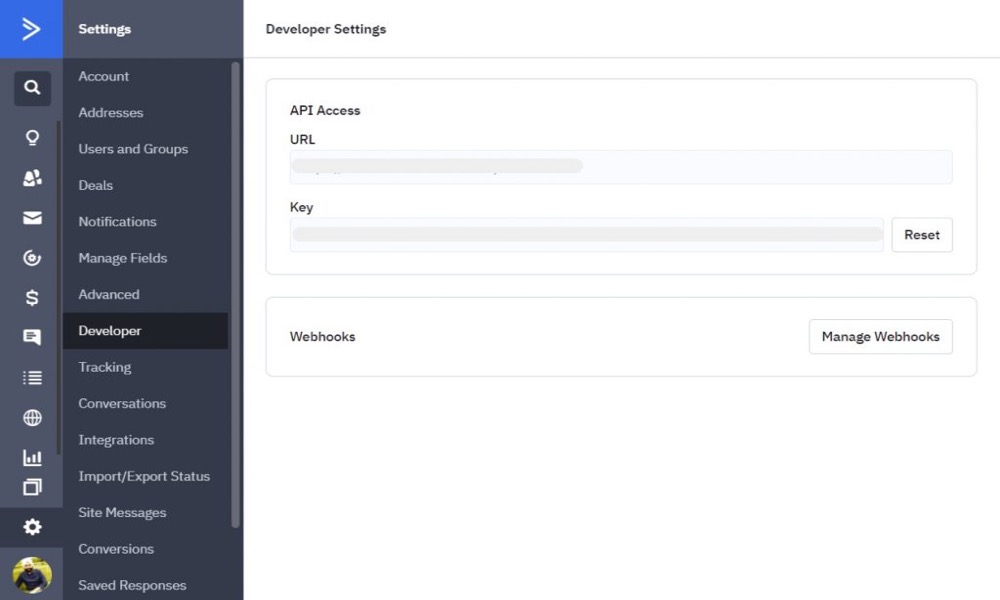
You will find the API URL and key here, which will allow you to link ActiveCampaign to Autonami. This will assist you in integrating WooCommerce ActiveCampaign.
Copy the ActiveCampaign account’s codes.
Return to WordPress and go to Autonami > Automations from the WordPress menu, and then click the Connector button at the top of the screen.
Under ActiveCampaign, select Connect.

Finally, in the Connect with ActiveCampaign boxes, paste the API URL and API key you copied before.
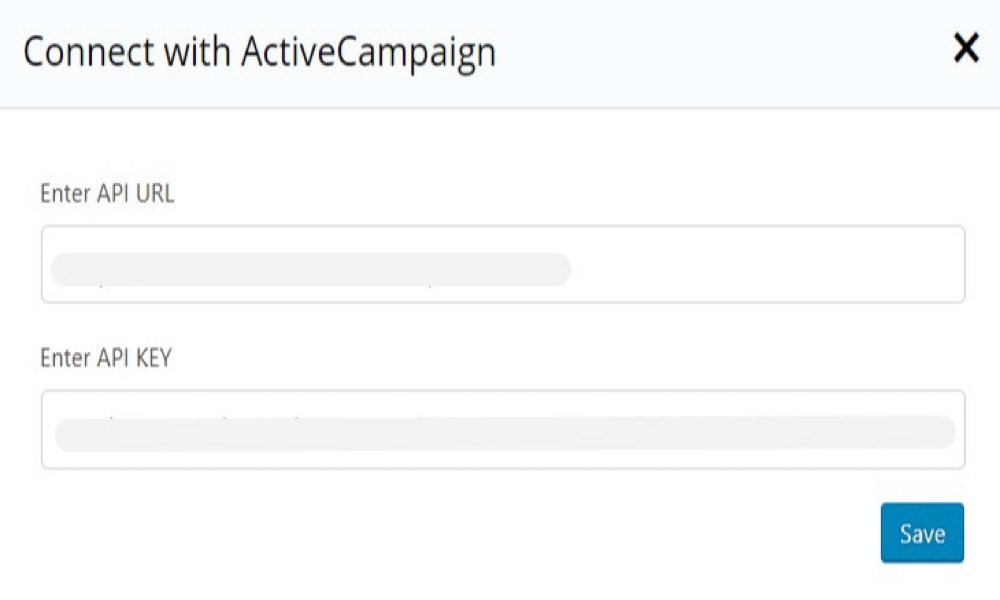
To proceed, click the Save button, then the Sync button to ensure that all of the data is properly synced.
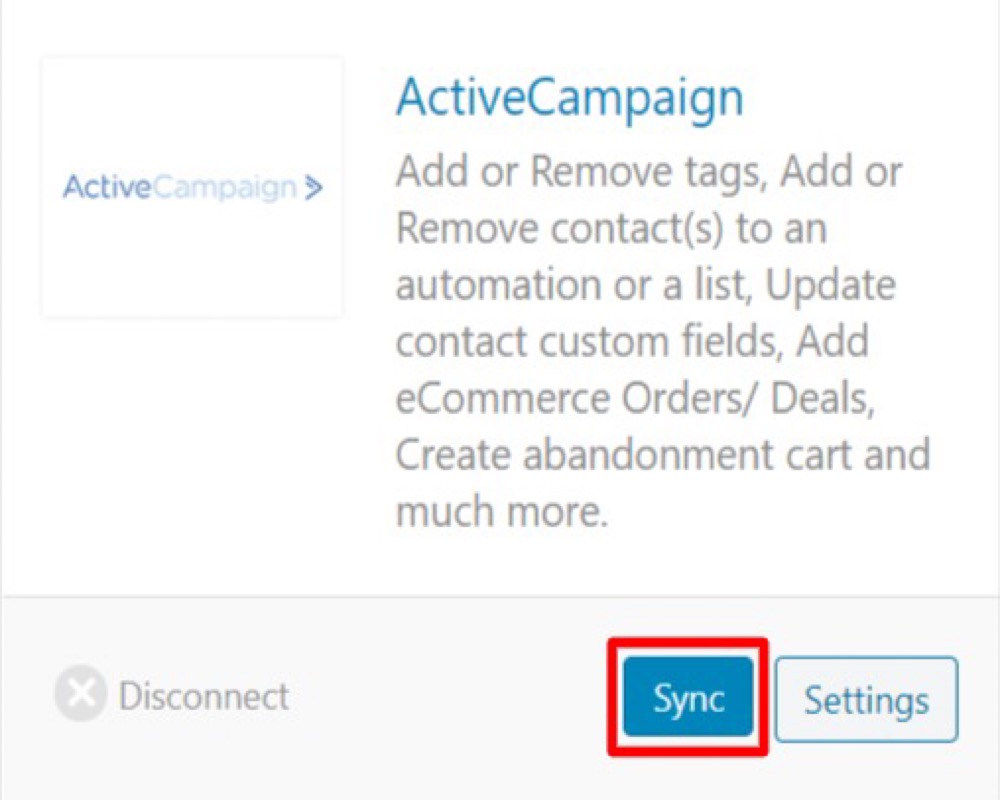
The WooCommerce ActiveCampaign integration has been completed successfully.
Conclusion
One of the most popular connections in the WordPress community is WooCommerce ActiveCampaign. ActiveCampaign is software that automates the customer experience. Through automated emails and broadcasts, it may assist WooCommerce business owners in connecting and engaging with customers. With ActiveCampaign, WooCommerce store owners can automate behind-the-scenes marketing, sales, and customer care procedures.
We hope that you will find this article about How to integrate ActiveCampaign with WooCommerce fundamental!


