
How to Create Bundle Products in WooCommerce
By Sam Nguyen

Online customers are often attracted by great deals when they can pay less to buy many products. Businesses tend to sell their complimentary items as a package and offer it at a discount. By doing so, they can easily increase sales and impress more and more customers.
In this post, we will cover all things you need to know How to create product bundles in WooCommerce in three simple ways.
Let’s follow us!
How do bundle products work?
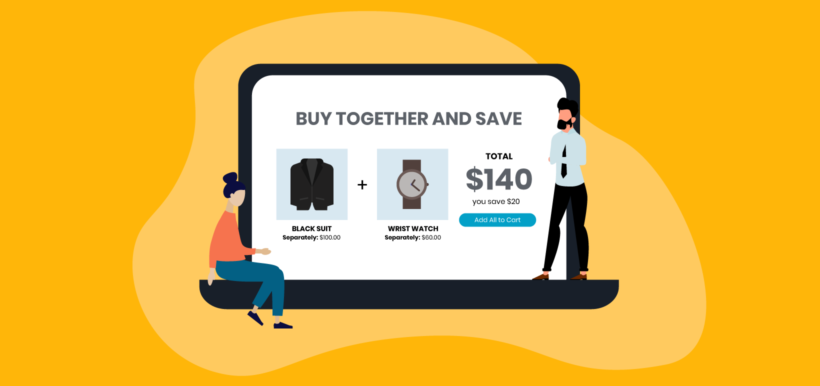
For those who don’t know, product bundles are multiple numbers sold as a package. The products, items, or services in these packages are complementary. What’s more noticeable is that these packages are often sold at a cheaper price than the sum of the price of each item separately. Product bundles are beneficial for both customers and business owners.
By scrolling through the product bundles of WooCommerce stores, customers can add one or all the products to their carts and move to the checkout process. In terms of customers, they have the chance to buy items that they are interested in at a more affordable price. Also, they can increase the chance of conversions by securing the discount code and bundling products together in WooCommerce.
How to create bundle products in WooCommerce?
Before coming to three guides, you should make sure the following things:
- Setting up WooCommerce store already
- Adding the individual products that you want to add in the bundles
Using Grouped products
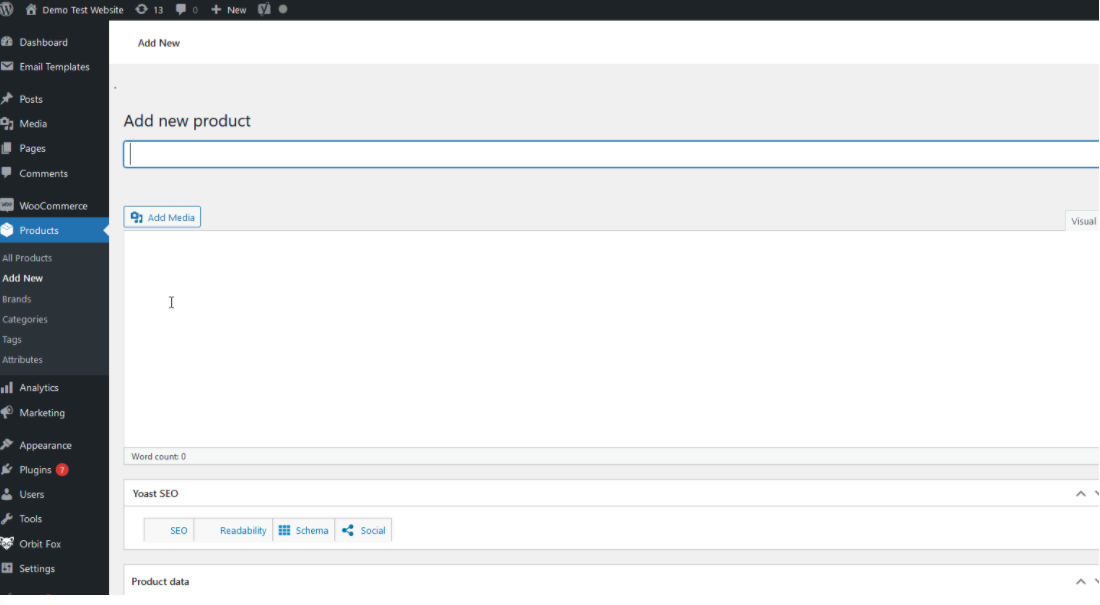
Step 1: Create a new product
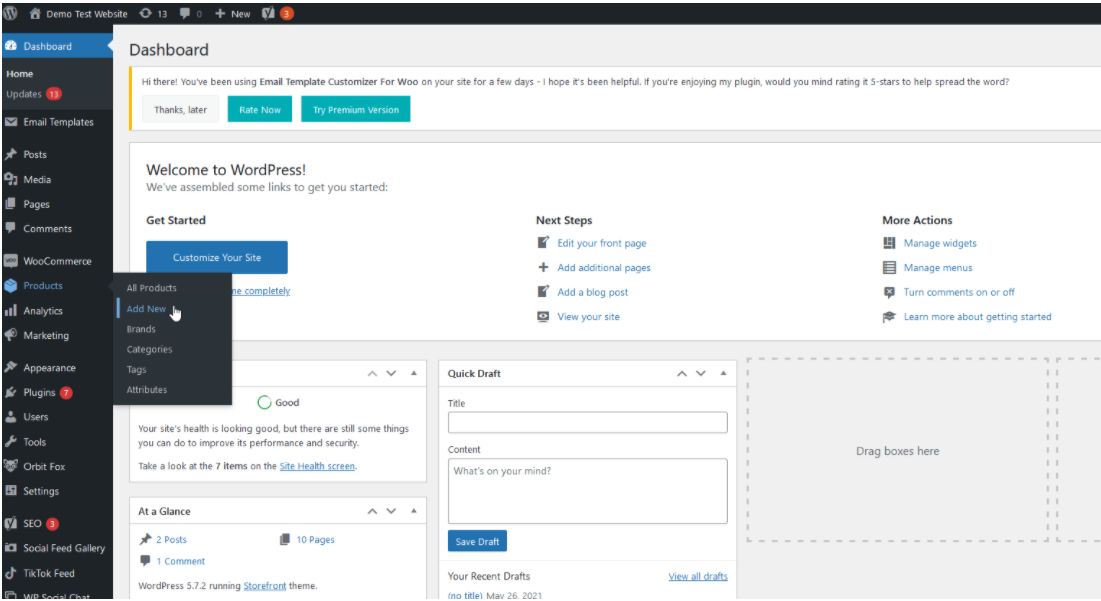
When it comes to making WooCommerce bundle products, simply go to the WordPress main dashboard first. Then, click on the Products option and continue to choose Add New.
A bundled product needs linking to other items. That’s why you should already have items in your store. Then, name your bundle and add a short description if necessary. We suggest you should have a relevant name and includes the word “bundle” so that customers can realize it easily.
In terms of the description, you should make it short, including information about each product within the bundle. In this way, customers can make up their minds whether to buy the whole pack or the individual items.
Step 2: Edit product information
Next, let’s scroll down until you see the Product data box. Under this box, choose the option of Grouped product in the dropdown. Then, simply click on the Linked Products tab and add the name of the products you want to add to this bundle.
When setting up, you can let them as the defaults. However, when it comes to Grouped products field, you should make sure to edit the product information. This field is where you can add all the products you want as well as give them names. If the product already is in your store, you will be given some suggestions to choose from.
Step 3: Upload images and choose categories
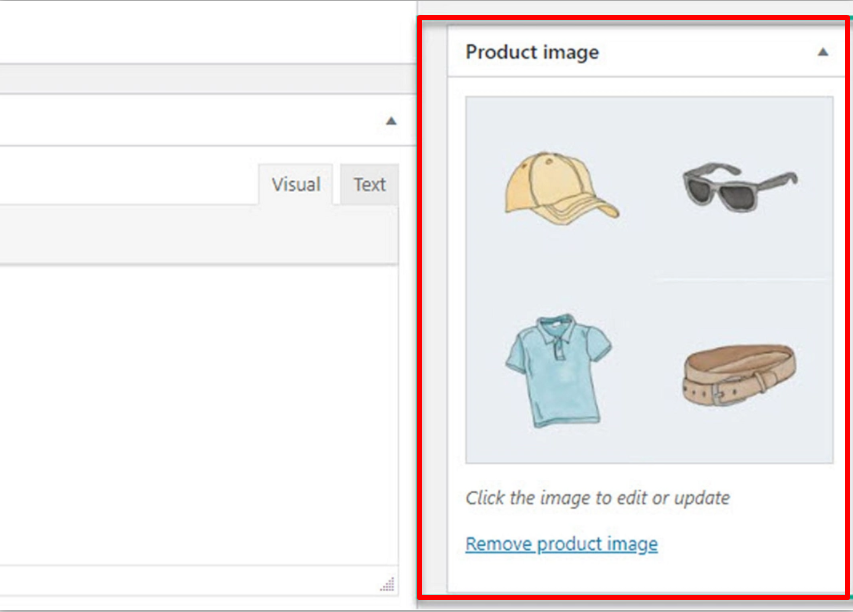
After that, it’s time you can upload the product images, descriptions, gallery images, or product-bundle categories. You can see that all steps are filling in information and complete the description. It’s essential since your customers only make a purchase when they know exactly what they will get from the deal.
On the right hand of the page, you can see the box of the Product image, you can now upload or remove images that you want. Besides, you can also add a category for the bundled products so that both you and customers can find them easily.
When it comes to images of bundled products, we suggest you should be as creative as possible in order to increase the shopping desire of customers. Some of the common ideas are:
- Taking screenshots of each item and combine them in a general image so that you can show all the bundled products without swiping again and again
- Hiring a model putting on all the products in the bundle
After uploading photos and adding the category, click on Publish or Update the new grouped product to save your changes.
Step 4: Check the front end
Finally, check the front end to ensure all the information you make is correct. Go to the bundled product and view the product page to check it.
On the product page, the bundle products section will include the title, pricing, and quantities. Each item will be listed so that customers can choose which and how many items to take. When a customer adds the pack to their cart, each item will be displayed as a separate item.
In general, adding product bundles using Grouped products right from the WooCommerce dashboard is the most basic and simplest way. However, if you choose this way, you cannot set fixed discounts for each product or display individual prices. So, if your business tends to develop more, we recommend you should make use of the following ways.
Using Coupons
Step 1: Go to WooCommerce
First of all, go to WooCommerce and choose the Coupons section.
Step 2: Add coupons
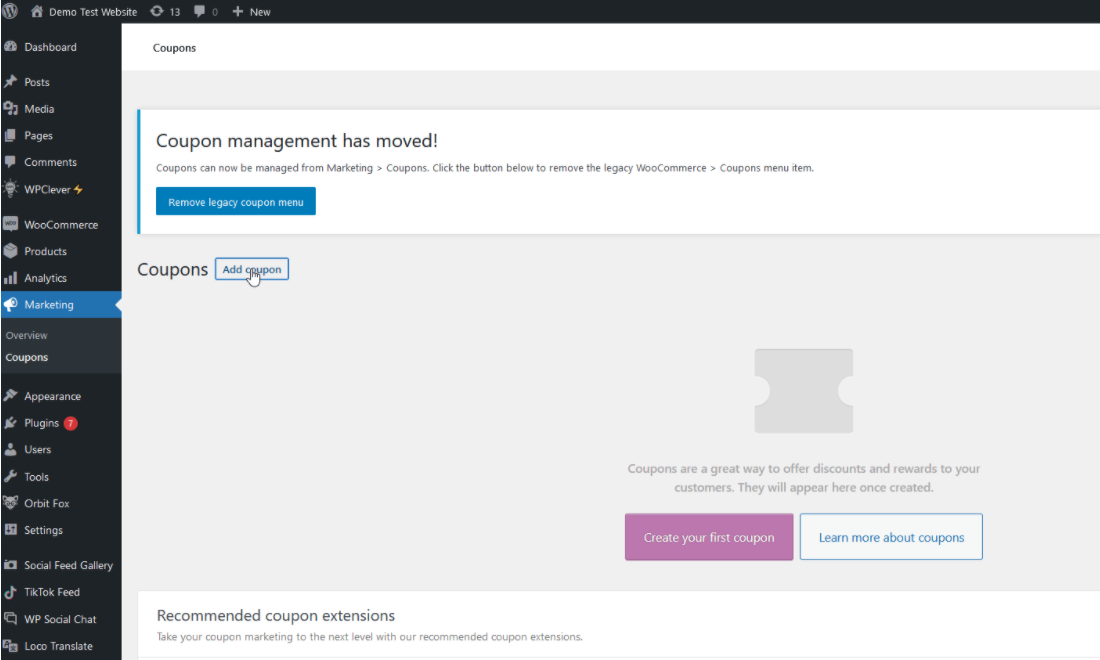
Then, when a new page appears, find the Add coupon button, which is next to the Coupon section, and click on it.
Step 3: Edit coupon’s general data
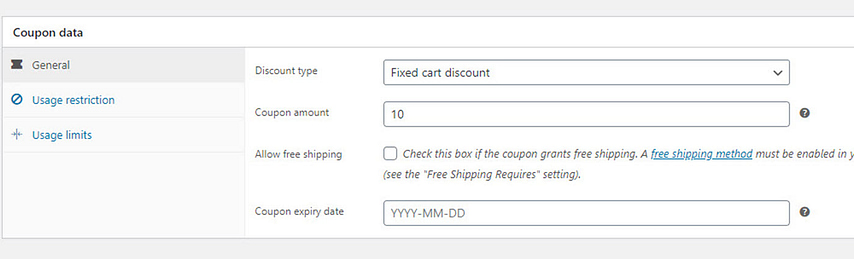
Now, it’s time you edit the general information of the coupon, which includes:
- The coupon code: What your customers will enter if they are purchasing the specific bundle. Coupon Type: Scroll down the Coupon data box, open the drop-down under the General tab, and choose the Fixed cart discount as the Coupon type.
- Expiry date: Edit the time when the coupon is no longer used.
- Amount: You can set it like 20% discount for all bundles for example
Step 4: Choose Usage restriction section
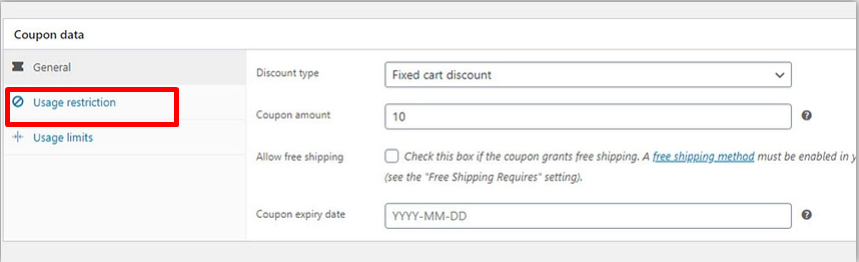
On the Coupon data section, choose the Usage restriction option.
Step 5: Add products under the Product field
Under the Product section, you can add all products in the bundle. This means the discount you have just created will be offered whenever any of these products are in the shopping cart.
In some situations, you want the coupon to be only available for some purchases. For example, you may not want to offer a discount for those who buy a few of the products from the pack. In order to do that, you have to set a minimum value that the user needs to spend to get the coupon. In this way, you can make sure the coupon is only valid for customers that buy those products, and if a customer removes one of them from the bundle, the discount won’t work.
Besides, you can also exclude products and sale items in this step.
Step 6: Publish the coupon code and check the front end
Coming to the last step, remember to publish the coupon code by selecting the Publish button and share this code with your customers.
In order to check the front end, you should navigate to the front end page. Let’s leave the products in the bundle in the cart and the total of the cart is higher than the minimum amount you set before to see what happens.
Using Plugins
Step 1: Install the plugin
We have said earlier, all the two mentioned ways have their drawbacks. So, we recommend you should make use of dedicated plugins to maximize the features.
To add product bundles to the WooCommerce store using plugins, you should install and activate them first. Navigate to the WordPress dashboard and go to the Plugins section. Then, click on Add New and find the plugin you want to install by using the searching bar on the top right. Next, click on Install on the plugin card and activate it.
Step 2: Create a new product
When using plugins to create a product bundle, you will have to create a new product by selecting the Product section and click on Add New. Then, you can add your product bundle’s information like name or description.
Step 3: Enable the plugin option
Go to the Product data section, click on Smart Bundle to enable the options of this plugin. Under the Bundled Products tab, you can see extra options. Besides, you can find products to add to the bundle by using the search option. You just need to click on them and they will be added to the pack right away.
Step 4: Set up options for Product bundle
Now, it’s time you set up options for your product bundle. What you can edit will depend on each plugin. Here are some common options that you can set up:
- Quantity selector: Set the number of each item you want to add to the package
- Discount: Set the sale price by entering a percentage or fixed discount. Additionally, you can also charge a shipping fee and control the stock if necessary.
- Fixed price: Disable the auto price calculation and set a fixed price by enabling this option.
Step 5: Publish the products
After setting up all necessary information of your product bundles, keep in mind to publish the products to save your changes.
4+ Best plugins to create bundle products in WooCommerce
WooCommerce Bundled Products by iconic
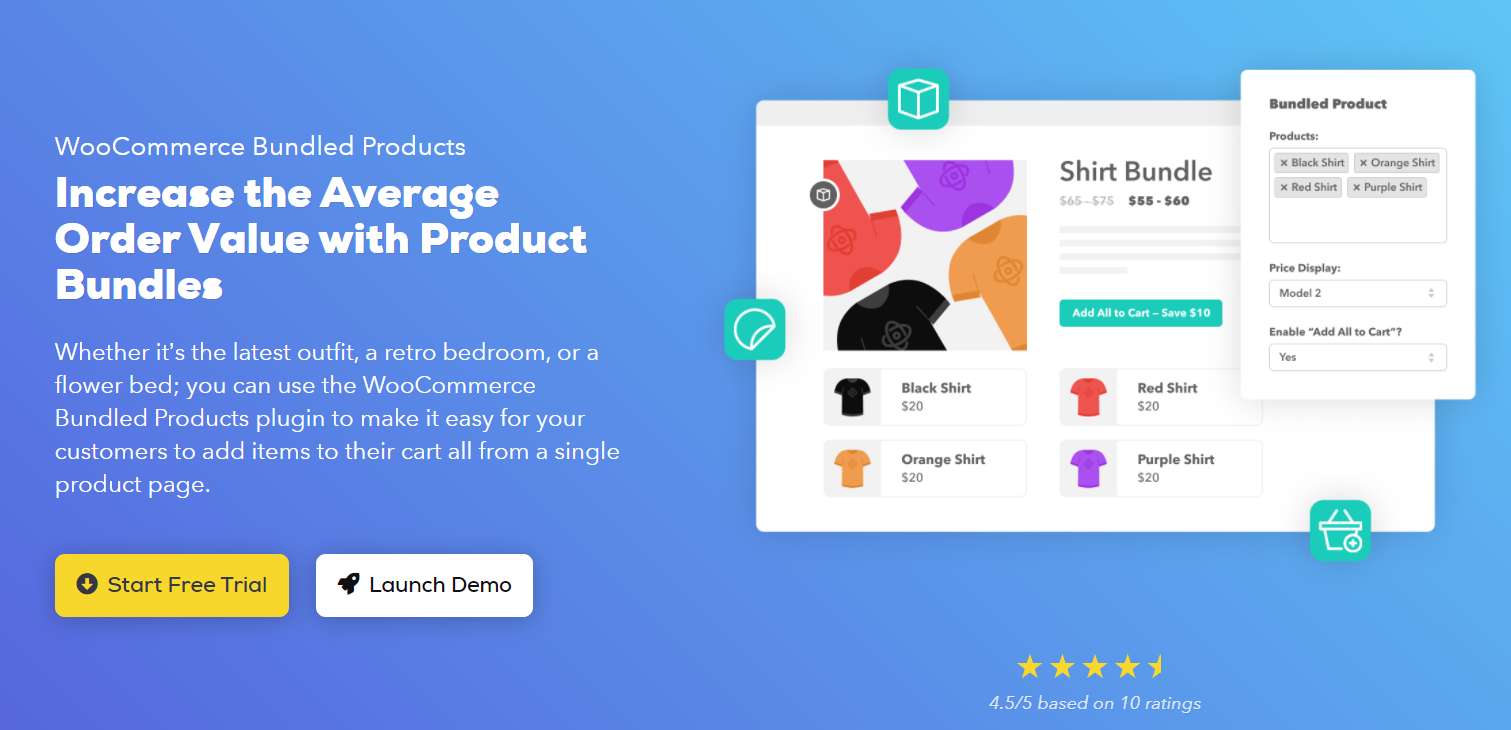
WooCommerce Bundled Products by iconic is a simple-to-use plugin which helps you create bundles of any product categories. By using this plugin, you can freely add fixed discounts and custom prices to convince your customers to buy more from your store. You can not only show the bundled product price as a range but also as a combined or custom price.
Highlight features
- Enable customers to add all products in the bundle to their cart with just one click
- Able to bundle many products together via only one products page
- Able to add product bundles for simple or variable products
- Able to add fixed coupons or custom prices for the products
- Display the bundled product price as a range, custom price, or combined price.
Price: $49
Ratings: 4.5/5
WISDM Custom Product Bundles by WisdmLabs
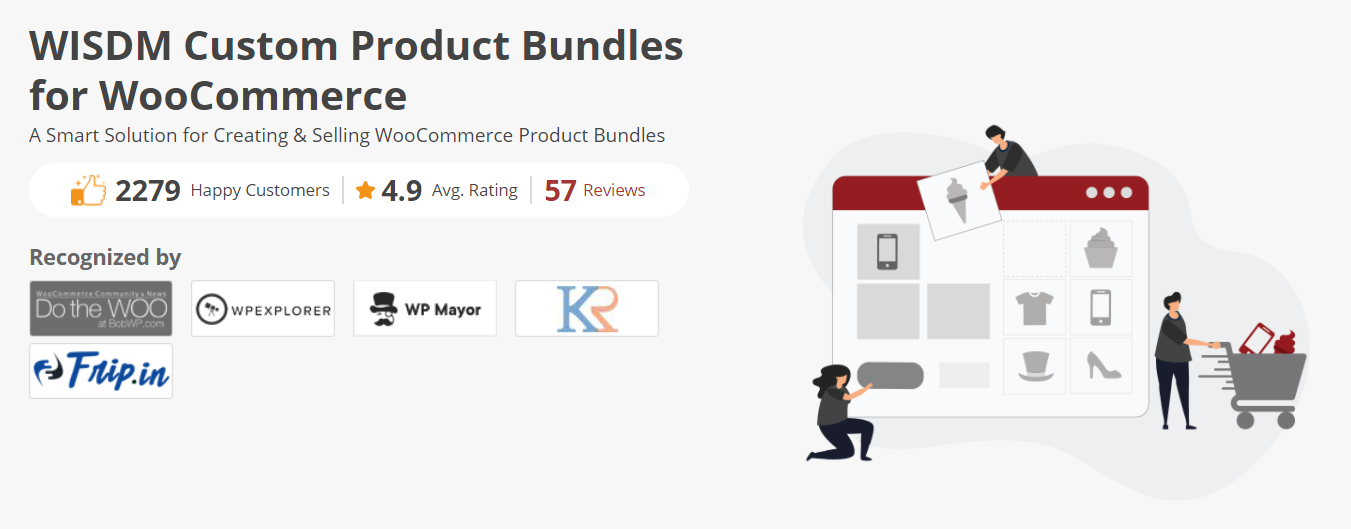
WISDM Custom Product Bundles by WisdmLabs is perhaps one of the most powerful plugins. If you are looking for an add-on to help your business earn more advanced features in bundled products, this one is for you. You have the chance to group products together into a package and sell them to boost your sales. What’s more noticeable, the layouts of WISDM Custom Product Bundles by WisdmLabs are so modern and you can freely choose the orientation and layout options to make the bundle suit the style of your website.
Highlight features
- Able to add unlimited product bundles
- Customers can add a gift message to bring about a feeling of customization
- Able to set a fixed price or variable pricing type for the bundles
- Ability to choose modern layouts and color palettes to suit the website’s style
- Add pricing tiers to push for upsell
Price: $80
Ratings: 4.9/5
Product Bundles by SomewhereWarm
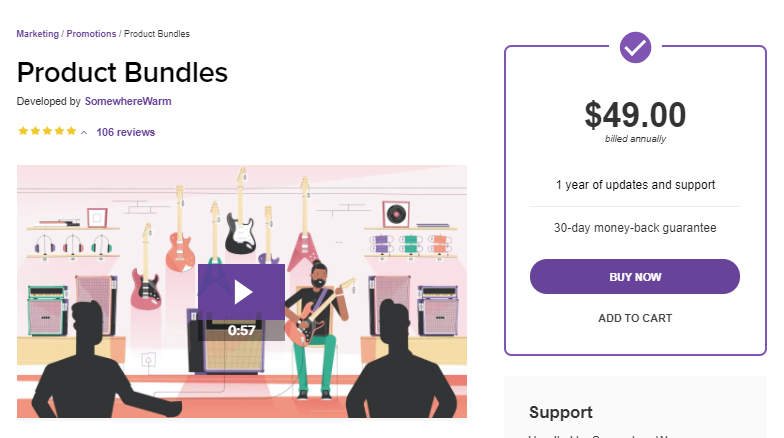
Product Bundles by SomewhereWarm is a fast and flexible plugin designed by SomewhereWarm. Users are allowed to provide personalized bundles, bulk discount packs, or combined products on their WooCommerce online site. When making use of Product Bundles by SomewhereWarm, you can approach full control over bundling, shipping, inventory, and pricing features in your store. To make the package more attractive, you can also offer discounts on the whole bundle or only some individual items within it.
Highlight features
- Personalized subscription bundles with the help of WooCommerce Subscriptions
- Customers can choose the number of products within bundles as they wish
- Full control over pricing and shipping functions
- Add bulk discount packages with the help of dynamic pricing rules
- Able to edit the style and design of product bundles
Price: $49
Ratings: 4.9/5
Final thought
Creating a product bundle in your store is beneficial for both your customers and your business. This is a familiar tactic to increase sales as much as possible. Creating product bundles is simple, with just a few steps. However, in order to gain more advanced functions, we suggest you should approach plugins to help you with the process.
Hopefully, in this post, we have given you an in-depth guide to add product bundles to your WooCommerce store in three ways as well as introduced some best plugins to create product bundles. If you have any questions, don’t hesitate to leave a comment for us in the section below. We will reply to you soon. If you find this interesting, remember to share it with your friends and visit us for more.
Thank you, and wish you luck!


