
How to add Color Swatches on Shopify Collection Page?

It can’t be denied that color has a crucial impact on a customer’s purchase decision. According to an article on Neilpatel - a bestseller author recognised by the New York Times and one of top 100 entrepreneurs under 30 by Former president Barack Obama , it helps increase the rate of recognizing the brands by 80% and 85% of people being asked affirmed that color is one of the most important reasons why they buy products from a shop. Therefore, adding numerous colors of the product to collection page should be regarded as the top priority when uploading new items in online marketplaces and Shopify is not an exception.
But, how can we do it effectively? Uploading different color versions of products as separated ones?
Actually, it is not a good idea. If you choose this option, you will waste lots of space in your online store for just one item. Instead, you should take advantage of a special feature that will display a specific version of the product with different colors when visitors click on the equivalent ones. It is Color swatches.
What is a color swatch?
Before learning how to add color swatches on the Shopify Collection Page, it is necessary to understand what color swatch is.
Let’s look at these examples!
When hiring people paint your house? What should you do first? Of course, it’s selecting the paint. In the paint store, you will be shown a table including plenty of colors, patterns, gradients, and tints. This table is called swatch. Swatch is used as a tool to help you compare and contrast color and try mixing them to find out the suitable paint for you.
Besides, when using such platforms as Photoshop or Illustrator, you are also provided with the color swatches panel that gives you the ability to save swatch for next time, generate your own color library, and exploit it for your work in the future.
From these two cases, it can be said that color swatch is a panel, including a list of colors that help viewers compare the color to find the best one.
Therefore, it’s obvious that adding color swatches on Shopify will make it much easier to boost sales. By offering the color swatches, your customers have more choice in terms of color and directly change the color of items from the product page. Now, let’s go into more detail about the way to activate and customize color swatches on Shopify.
How to activate and customize color swatches on Shopify?
In fact, there are 4 main steps to activate and customize color swatch on Shopify, which are:
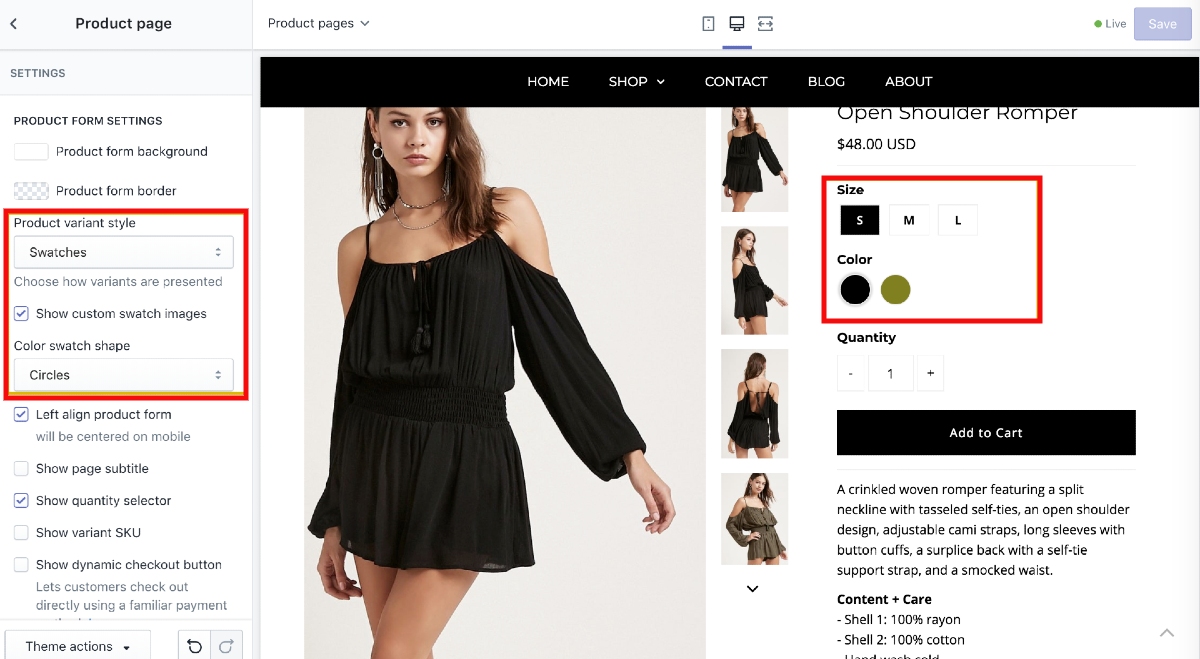
Step 1: Activate color swatches
- To make the swatches start working is access the Shopify admin then open the part named Online store.
- If you desire to change a theme, click on Customize located next to it.
- Select the product page from the top bar
- Click on Swatch on the left of the screen and then tick off the section named Show custom swatch images below.
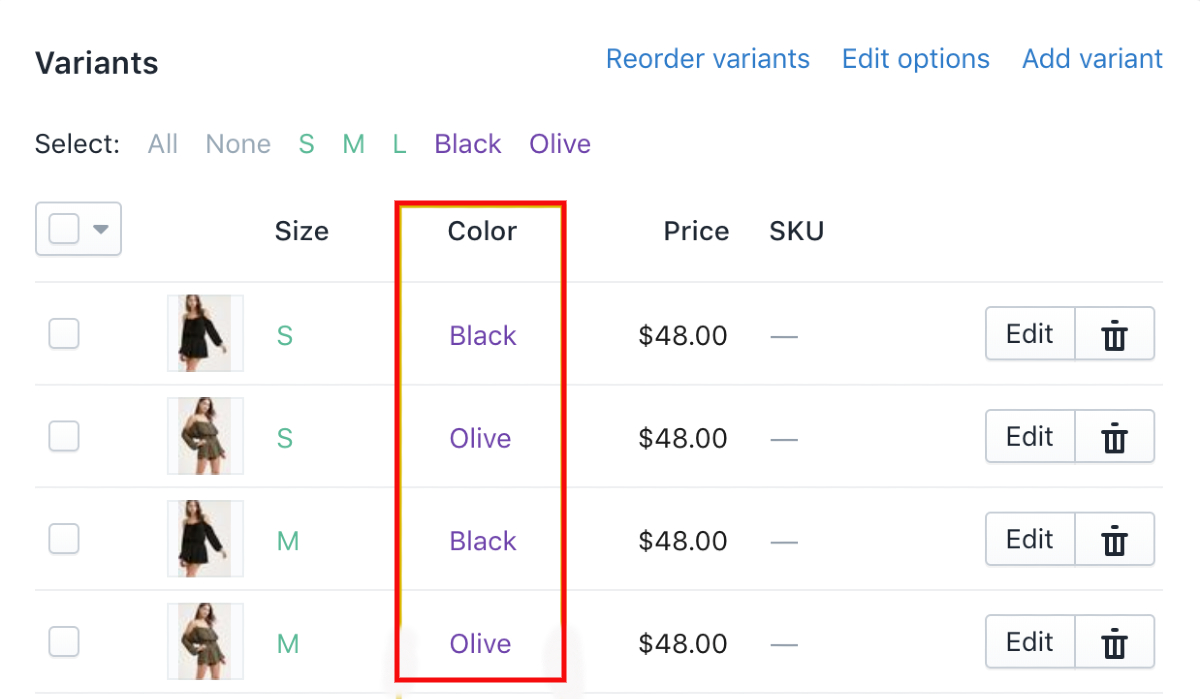
Step 2: Name the product colors
- You are required to set a name for the product options between these two names Color and Colour to display the color swatches. Note: The HTML color spectrum is the default spectrum for color swatches on Shopify, so there are two cases that can occur when setting names for the color swatches: The color name is available in the list of HTML colors, It will show the color based on the name. For example, you set the name for your variant color option as Red; the HTML color Red will be shown on the screen. The color name is unavailable in the HTML color list. In this situation, it will be automatically changed to white. To deal with this situation, it is necessary to create a custom color swatches.
Step 3: Customize your color swatches
- Screenshot the item with the size of 50 x 50 pixel. Remember to the best place to screenshot is the one you can see the color proportion clearly
- Save the picture just taken according to this rule: all the letters in the name are lowercase with the hyphen “-” used as space, after the color name, add “.png” at the end). For instance:
- The color isLight Grey > save as light-grey.png
- The color is White/black > save as white-black.png
- The color is Gold > save as gold.png
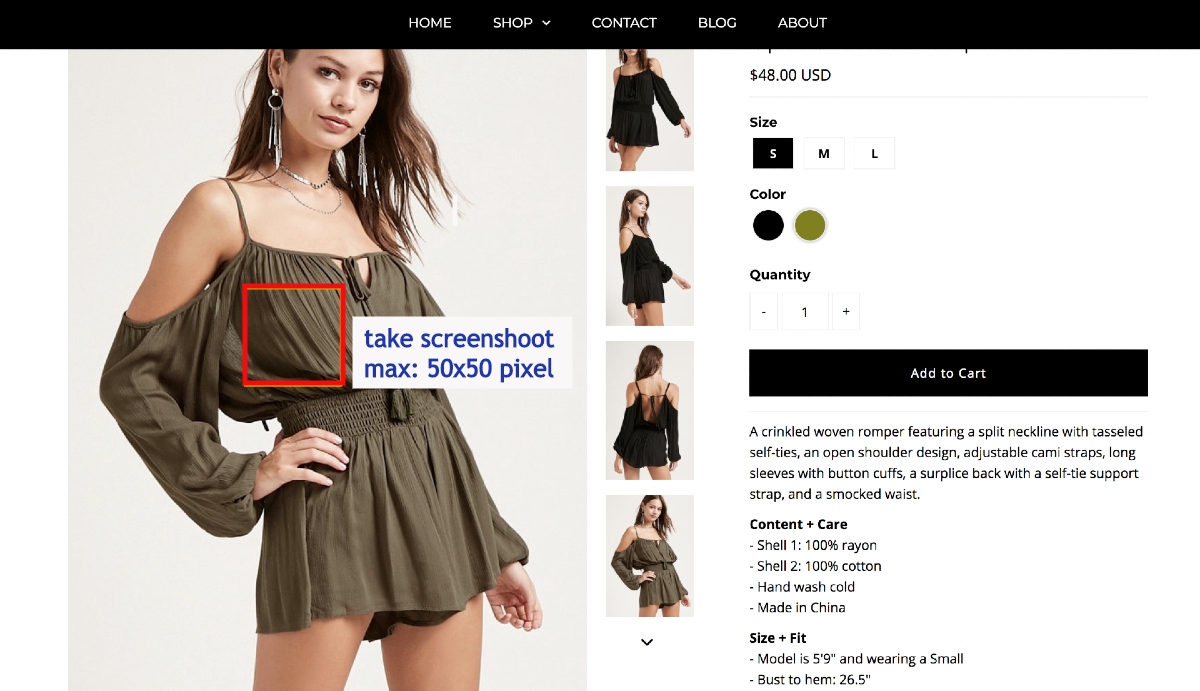
Screenshoot to make color swatches
</figure>
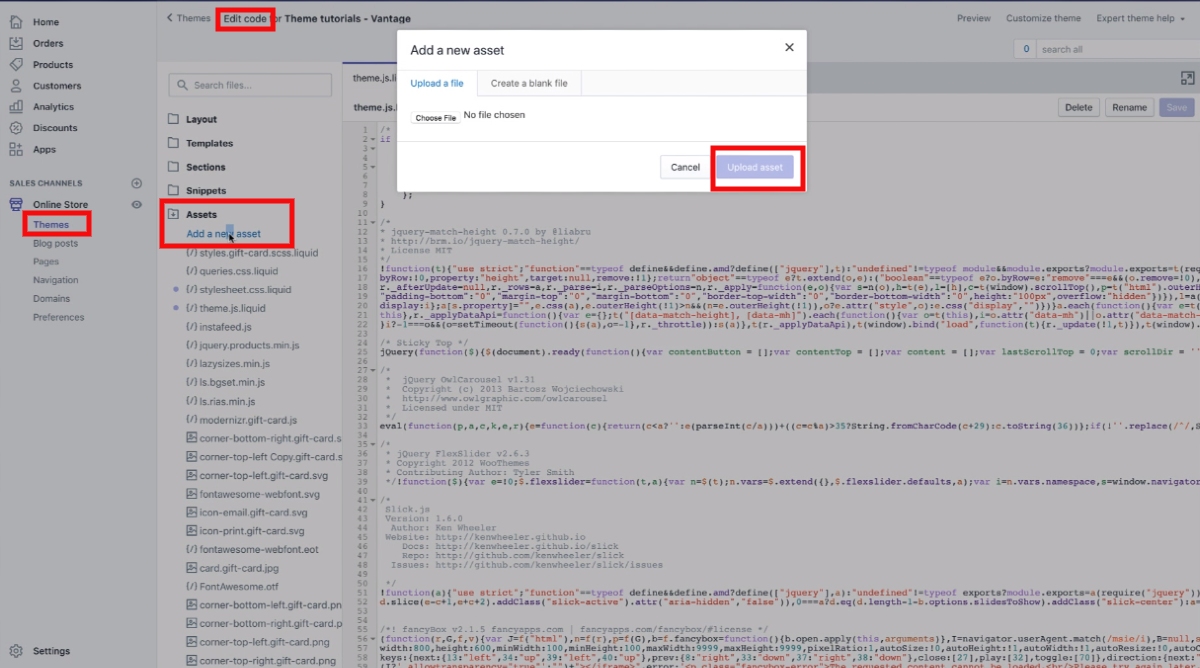
Step 4: Upload the swatches
- Come back to Online Store, open Themes
- Click on Edit Code
- Select the folder named Assets from the sidebar lying on the left of the screen. There, click Add a new asset, which is right under Assets
- Upload the color swatch in the form of png one at a time
Besides, if you are making use of these following themes: Mr. Parker V6.5+, Icon 7+ & Vantage 7+, you will be given another way to upload your color swatch. This way, especially, is regarded as not only easier but also faster, which is uploading the png swatch to the Shopify Admin Files:
- Open Shopify admin, choose Settings at the bottom
- Click Files and then upload all the images for color swatches (if you choose this option, there is no need to upload the png swatch one by one. Instead, you can upload all at a time)
- Refresh the product page, and you will see the png swatches you have just uploaded
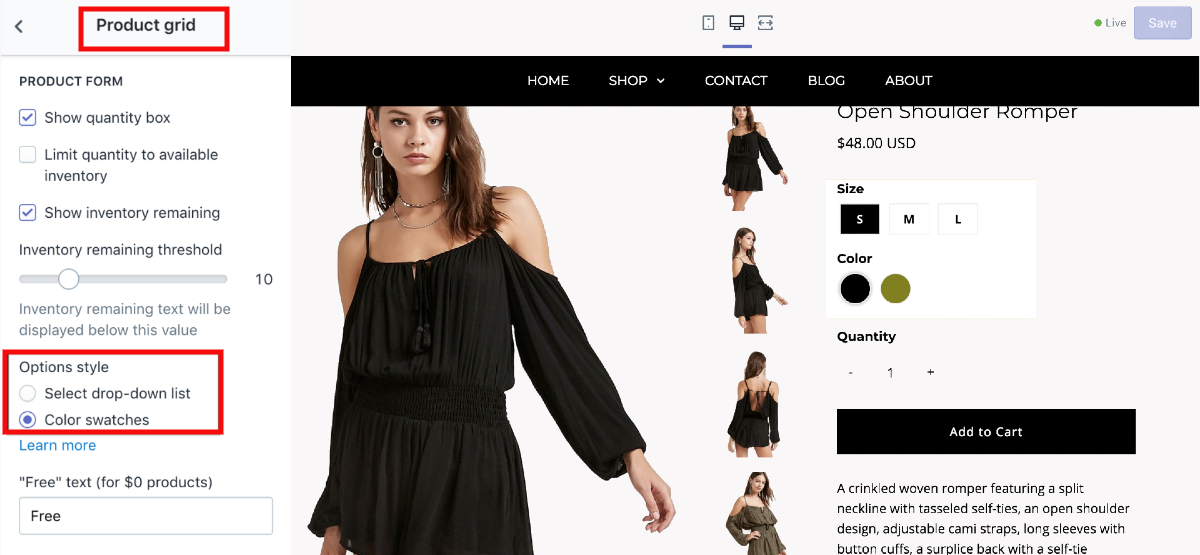
How to display color swatches on the collection page on Shopify?
Step 1: Open Theme settings
- Open Themes from the Shopify Admin
- There, choose Theme Settings
Step 2: Open Product Grid
- Click Product Grid on the left side of the screen
Step 3: Check off Show color swatches
- In the Collection and search result section of Product Grid, tick on the part named “Show color swatches.”
- Now, you will see the color swatches displayed under the item thumbnail images on the collection page.
What to do if the swatches are not appearing?
In cases, you have already completed all the steps above, but the color swatches are still invisible, please the list of seven crucial things following to handle the problem:
- Your color swatch names must be .png. If it is .jpg or other formats, change the image format.
- Your images must be uploaded in the Asset folder in Themes (not Files in the Settings)
- All the letters in the names must be lowercase, and each word is separated by a hyphen “-”. If there are any accented characters with letters or uppercase letters in the word, remove the accented characters, and replace them with the lowercase letters. Don’t forget that there is no space in the image name.
- The size of the swatch image cannot be smaller than 50px x 50px
- Make sure that you have already activated the swatch settings In case neither “Color” nor “Colour” in the title of your product option doesn’t make the color swatches displayed on the collection page, it means the language of your site is not English. Consequently, it is necessary to make some changes in the product-swatch.liquid (to access this file, you need to open these folders respectively (Online store -> Themes -> Actions -> Edit codes -> Snippets)
- Find this code:
{% if downcased_option contains 'color' or downcased_option contains 'colour' %}
- And then change them into:
{% if downcased_option contains 'your-option-title' %}
- In the part “your-option-title”, you will change the option title by the equivalent words for “color” in the language of your Shopify store. For example, if the language is French, type “couleur” or if it is German, fill the word “farbe” in “your-option-title”.
Conclusion
That is all about the instruction to enable and customize color swatches on Shopify and show your color swatches on the collection page there. You are also given a list of 7 things to check in case your color swatches don’t appear in your Shopify store account.
As a result, if you are interested in color swatches and tend to add them to your Shopify store, this article is precisely for you. Here you will find any integral things to work with color swatches on Shopify. So, don’t miss it!
If you have any questions, trouble, or advice related to color swatches on Shopify, don’t hesitate to tell us by leaving a comment below this post.


