
The Ultimate Guide To WordPress To Shopify Migration
By Sam Nguyen

In this post, we’ll explore the intricacies of WordPress to Shopify migration, providing the ultimate guide to transition your website between these platforms seamlessly.
Can You Migrate Your WordPress Site To Shopify?
Yes. Migrating your WordPress site to Shopify is a feasible task due to the similarities in their underlying processes. This process involves transferring your products, customer data, and content from WordPress to the Shopify platform.
While Shopify provides tools and apps to facilitate this migration, it may require careful planning and execution to ensure a smooth transition. Additionally, you might need to consider adapting your site’s design and functionality to fit Shopify’s platform.
How to Move Your WordPress Site To Shopify: Our Step-by-step Guide
Moving your WordPress site to Shopify involves several steps to ensure a smooth transition. Here’s how to do it.
Pre-Migration Preparation

First, preparing to migrate your WordPress site to Shopify is very important. Take some key notes below to prepare it perfectly.
Creating a backup of your WordPress site
Before diving into the migration process, creating a backup of your WordPress site is essential. Backing up safeguards your data and content in case of unexpected issues during migration.
Use a reliable WordPress backup plugin to easily save your website files, themes, plugins, and databases. Ensure that the backup is stored securely, either on cloud storage or an external drive.
Setting up a Shopify account and choosing a plan
You should begin by setting up your Shopify account, the foundation for your new online store. Visit the Shopify website and sign up for an account, providing necessary details such as your store name, email, and password.
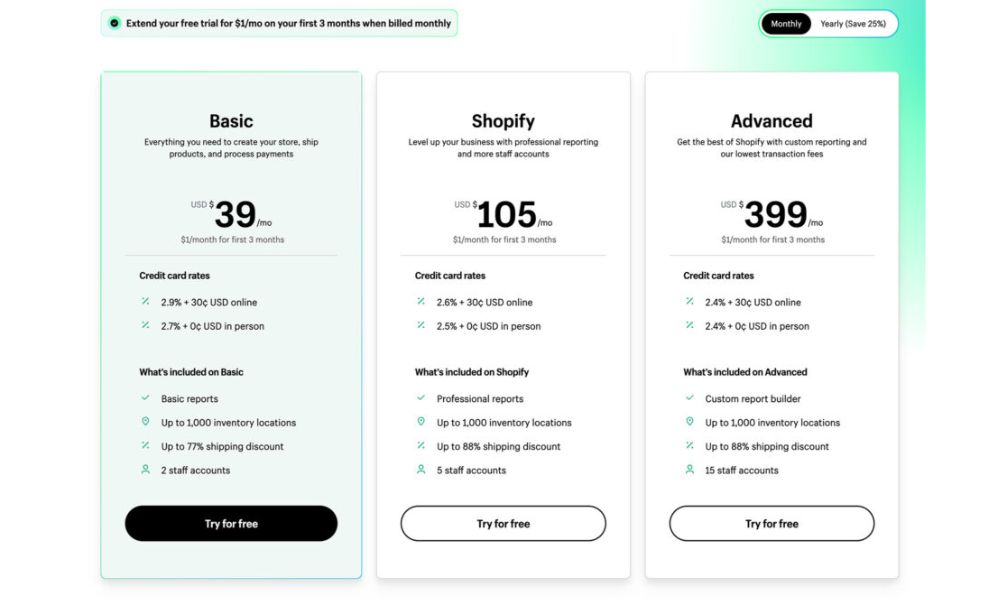
Once your account is created, explore Shopify’s plans to choose the one that suits your business needs and budget. Shopify offers 4 plans to create a full-functioning website catering to different requirements, with pricing ranging from $39 to over $2,000.
Evaluate your requirements and select the appropriate plan that aligns with your goals and ambitions for your online store. This step ensures you have the necessary infrastructure to transition your WordPress site to Shopify seamlessly.
It’s worth mentioning that you can take advantage of Shopify’s 3-day free trial and special deals of $1/month for the first 3 months to test which plans best suit your business needs.
WordPress To Shopify Replatforming: Our Detailed Tutorial
Here is a step-by-step guide to make the WordPress to Shopify product migration process easy.
Configure your basic administrative settings
Before progressing to product addition and payment setup, focus on these critical administrative tasks:
- Review ecommerce store migration considerations.
- Complete the initial setup and update the store address, email, and other settings.
- Manage accounts, access billing information, and add staff for secure access.
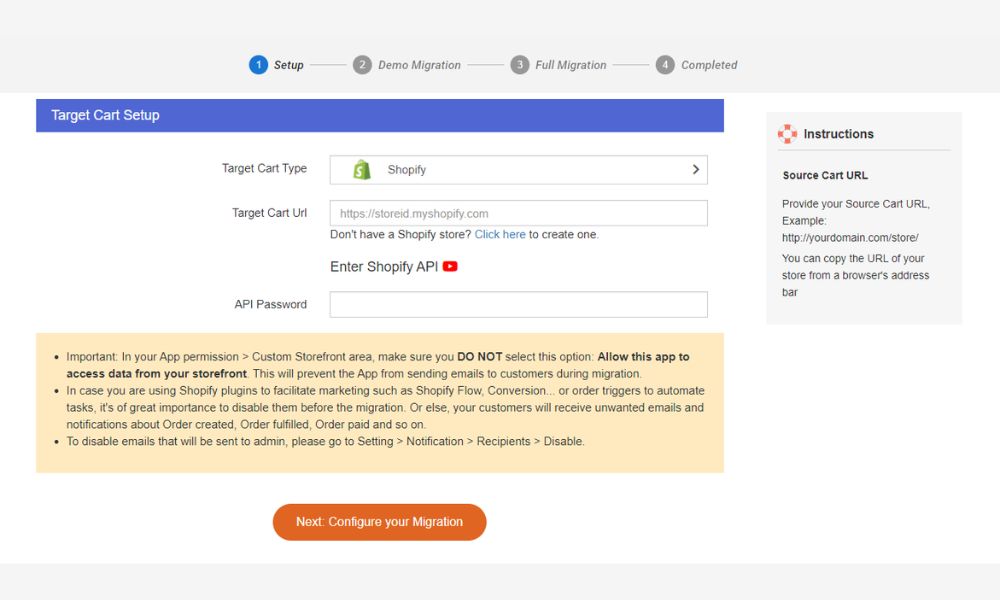
Import your store’s content and data to Shopify
The most extensive migration phase involves moving your data, as it serves as the foundation of your store. This task demands substantial time and commitment due to the sheer volume of transferred information.
The most important types of data that you might want to migrate include:
- Products
- Customer Information
- Order History
The table shows various data types and their available migration options:
| Data | Migration Options |
| Products | CSV file, Product API, Shopify App Store |
| Customers | CSV file, Customer API, Shopify App Store |
| Historical orders | Order API, Transaction API, Shopify App Store |
| Gift cards, certificates, and store credits | GiftCard API, Shopify App Store |
| Blogs | Blog API, Blog Article API, Shopify App Store |
| Pages (shipping policy, contact, and other web pages) | Page API, Shopify App Store |
There are three primary methods for transferring your store’s content and data, each offering unique advantages and considerations. These methods are provided in detail below:
Use a Shopify migration app
Opting for a swift and effortless data migration process is achievable by utilizing migration applications. These apps leverage APIs, enabling the seamless transfer of nearly all your store data in a single operation. Furthermore, migration apps provide the most efficient method for migrating blog posts to your Shopify platform.
Fortunately, the Shopify App Store offers many free and paid migration apps catering to diverse user needs. These migration tools prove invaluable when transferring WordPress to Shopify, ensuring a smooth and streamlined migration experience.
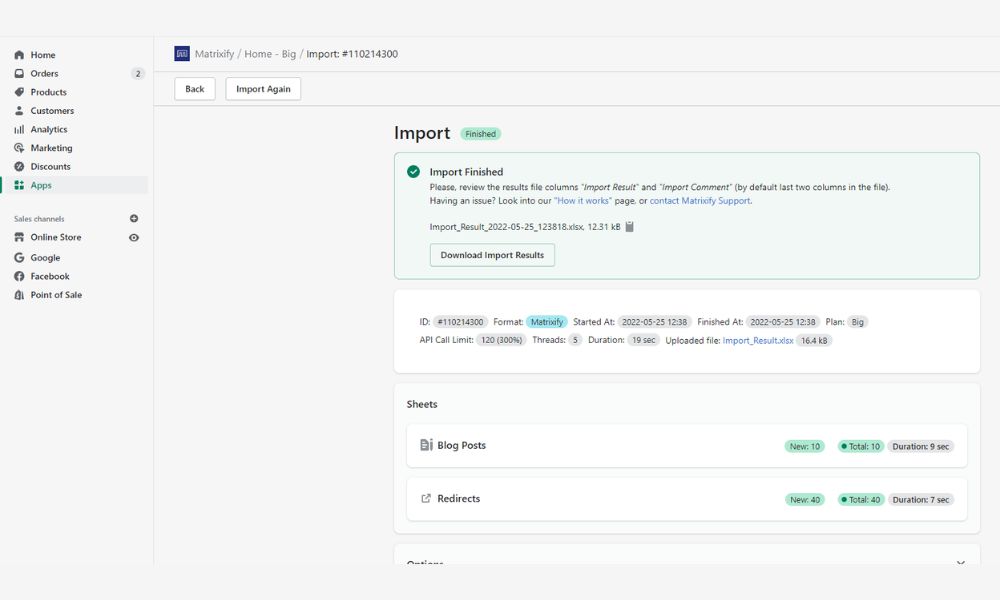
Matrixify, LitExtension Store Migration, and Cart2Cart Store Migration App are the three most popular apps to migrate WordPress to Shopify.
Matrixify provides flexible pricing plans to cater to varying user needs. They offer a free installation option and three paid plans, with monthly prices ranging from $20 to $200. The service provides essential features, including:
- Transfer data effortlessly using Excel, Google Sheets, or CSV files.
- Migrate seamlessly from platforms like Magento, WordPress/WooCommerce, BigCommerce, Lightspeed, and more.
- Safeguard your data with easy backup and restoration options.
- Optimize your workflow with scheduled and auto-repeated Export and Import tasks. Keep a close eye on ongoing operations, monitor and manage.
- Export and Import jobs in real-time, with access to detailed job history.
Litextension is the next option. It is free to install, but you can pay additional charges when applying. LitExtension Store Migration offers some key features you should not miss:
- Data migration from 140+ eCommerce platforms or CSV/Excel/Database files to Shopify.
- Three simple steps to initiate your migration with an available free demo.
- Emphasis on data security to guarantee the highest level of protection for your information.
- Maintenance of regular store activity during migration, ensuring no sales disruptions.
- The seamless process with no technical skills required, alongside 24/7 live support and a 30-day money-back guarantee.
The final option to migrate WordPress to Shopify is the Cart2Cart Store Migration App. The pricing will based on the number of products, customers, and orders. It provides some features below:
- Service demonstration to visualize data presentation on the new platform.
- Efficient data transfer accelerated by the app, enabling focus on business objectives.
- The broadest data importation offered by the app compared to similar tools.
- Assurance of secure and precise data migration to shopify by the app.
Manually transport data via CSV files
CSV files function as text archives and are ideal for manually transferring product and customer data.
Within WordPress, a vast array of plugins, including numerous export plugins, is available. By installing one of these plugins, you can effortlessly export products and migrate customer information.
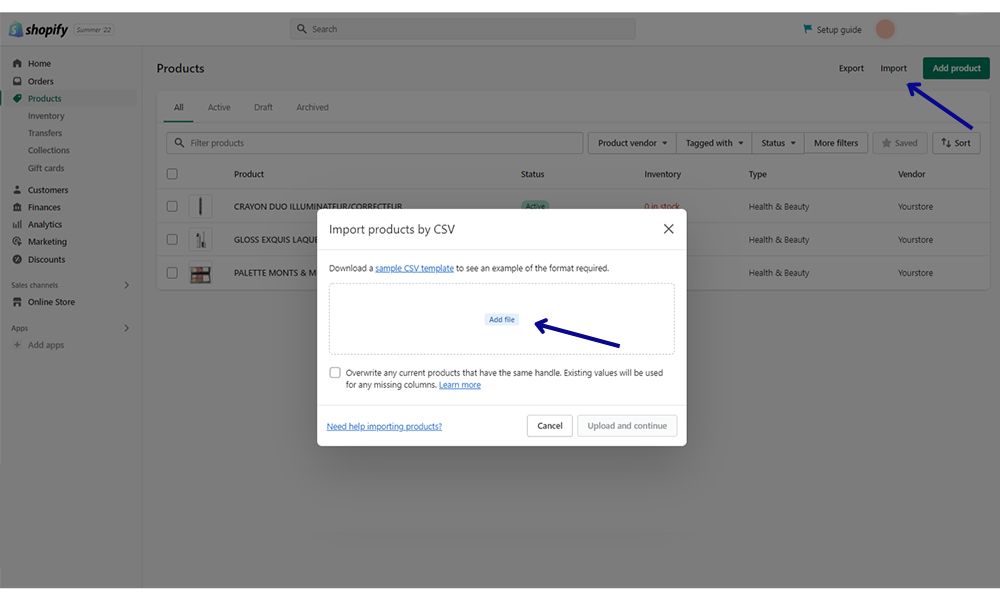
Once you possess the exported CSV files, follow these steps to import them into your Shopify store:
- Access your Shopify Merchant Dashboard and navigate to Products.
- Locate and select the Import option.
- Click on Add File, then browse your files until you find the exported WordPress file.
- Choose Upload and Continue to initiate the import process.
- Preview the product details, and once satisfied, proceed to Import the products.
Copy & paste content
This approach is efficient for blog posts, product descriptions, About Us details, shipping information, and policies.
Simply select and copy the content from your WordPress site and then paste it into the relevant sections of your Shopify store. It’s worth noting that this method is best suited for smaller stores with a smaller amount of data to migrate.
Hire a professional
Opting for a professional to handle your store’s content and data import to Shopify ensures a seamless and accurate transition. Experts proficiently manage the migration process, providing all crucial information, from product details to customer data, is transferred flawlessly. This approach saves time, minimizes errors, and allows you to focus on growing your business without the hassle of technical intricacies.
You can find a professional on the Shopify Partners marketplace. They are qualified designers, developers, and consultants with deep knowledge and a successful track record with the platform who can help you migrate your store easily.
Post-migration Setup
Post-migration setup is a critical phase when moving your WordPress site to Shopify, as it ensures that your new Shopify store operates smoothly and provides a seamless experience for your customers. Here’s a comprehensive guide to help you navigate this crucial stage:
Choosing And Customizing Your Shopify Theme
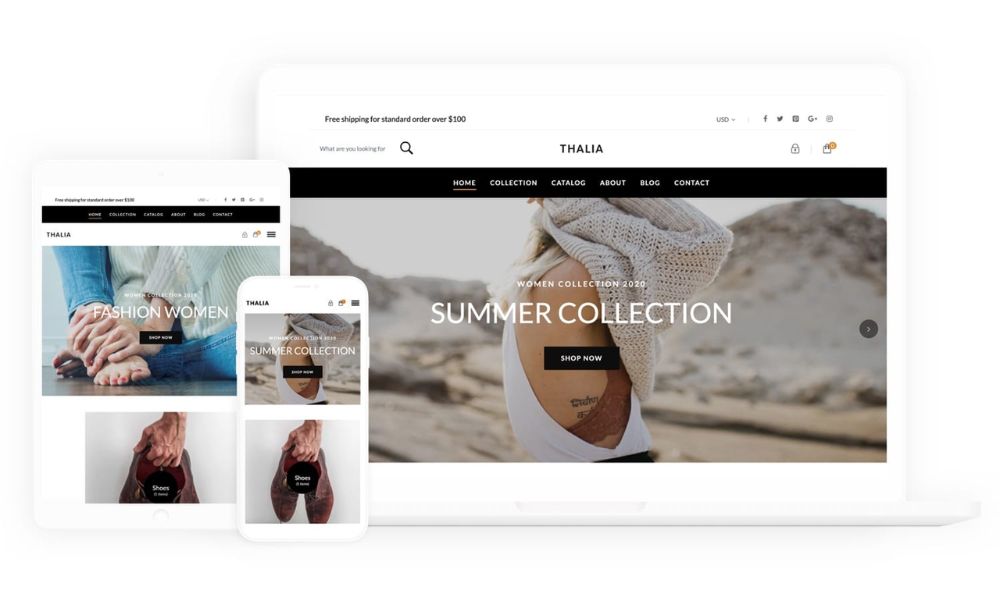
After successfully migrating from WordPress to Shopify, choosing and customizing the right theme for your store is crucial. This phase is all about aligning the design and functionality of your Shopify store with your brand identity and the needs of your customers.
You should list all the essential features and functionalities you need, such as product filters, search capabilities, specific product page layouts, etc., before designing your store.
To initiate the customization of your online store’s appearance, Shopify provides a default theme when you create an account. However, if you prefer a pre-made template, visit the Shopify Theme Store and add one to your admin section. Here’s how:
- In your Shopify admin, navigate to Online Store > Themes or visit the Shopify Theme Store.
- Browse themes based on your industry, desired features, and design preferences. Remember to look at user reviews and ratings to get insights into the theme’s performance and support quality.
- To try out a theme, click Add theme, and it will be added to your Shopify admin. If it’s a free Shopify theme, you can customize and publish it once you’re finished. For paid Shopify themes, you can use the unlimited free trial to tweak and explore the theme. However, you must make a one-time payment if you decide to publish it.
Organize Your Products
After completing the migration process from WordPress to Shopify, it’s essential to organize your products effectively.
Review Product Data:
- Product Descriptions: Check and edit product descriptions for accuracy and completeness. Ensure they are enticing and provide all necessary details.
- Images: Verify product images for quality and relevance. High-resolution images enhance the visual appeal of your products.
- Pricing: Double-check product prices. Ensure they are competitive and in the correct currency.
- Variants: Review product variants (sizes and colors) and ensure they are correctly listed with accurate stock counts.
Organize Products into Categories:
- Create Collections: Group similar products into collections or categories. For example, if you sell clothing, create categories like “Men’s Apparel,” “Women’s Fashion,” etc.
- Assign Tags: Use tags to label products with specific attributes (e.g., “Sale,” “New Arrivals”). Tags make it easier for customers to find relevant products.
Set Up Your Domain
When establishing your Shopify store, you can purchase a new domain or transfer the domain from WordPress to Shopify.
To prepare for your store migration, it’s essential to disconnect any existing domains you plan to transfer from your previous platform’s settings. Failure to do so may lead to errors related to SSL certificates.
The most straightforward method is to buy a domain directly from Shopify with some steps below:
- Purchase your domain through Shopify.
- Designate your Shopify domain as your primary domain. This ensures it appears in customers’ browsers, search results, and social media platforms.
- Establish email forwarding to redirect customer emails sent to your custom domain and your personal email address.
If you already have a custom domain, transfer it to Shopify by following these steps:
- From your Shopify admin, click Settings > Domains.
- Do one of the following:
- If you haven’t connected additional domains, click Connect existing domain, and then click Transfer it to Shopify.
- If you have other domains connected, then click Transfer domain.
- On the Transfer an Existing Domain page, enter the domain you want to transfer to Shopify. Don’t include www. at the beginning of the domain.
- Click Next.
- In the Authorization code field, enter the authorization code from your domain provider.
- Click Verify domain.
- On the Approve charge page, review the Domain to be registered section. If you want to ensure that your domain is automatically renewed before it expires, then select Auto-renew this domain every year.
- Review the Contact information section to confirm that the Shopify store’s email address and information are correct.
- Read the ICANN policy and the Domain Registration Agreement.
- In the Charge summary section, click Approve.
- Check the email account that’s associated with your domain for a transfer-approval message, and then follow the instructions in that message to approve the domain transfer to Shopify. If you don’t approve the transfer, it won’t be processed.
It can take up to 20 days for your domain to be transferred. After it’s transferred, you receive a confirmation email from Shopify. You can access your domain settings on the Domains page from your Shopify admin.
If your domain hasn’t transferred to Shopify after 20 days, review your Junk or Spam email folders for any notices about the transfer or required actions. If you didn’t receive any email messages, then contact Shopify Support.
Setting Up Payment Gateways and Shipping Options
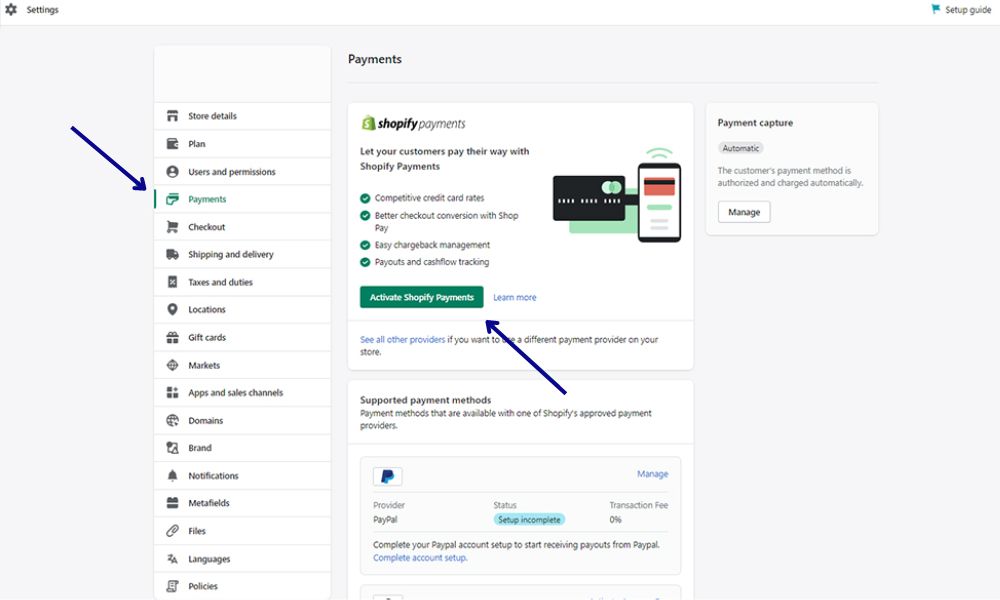
To ensure you can receive payments after migrating, follow these steps to set up payments with Shopify:
Choose Payment Providers:
- In your Shopify Merchant Dashboard, navigate to Settings and then Payments.
- If you don’t have a credit card payment provider, complete the account setup in the Payments section.
- If you already have a credit card payment provider, click Activate Shopify Payments in the Shopify Payments box and confirm in the dialogue box.
- Enter your banking details where required and click Save.
Complete Store Checkout Setup:
- Add your store policy by going to Settings on your dashboard and clicking Policies. Paste your policy, make the necessary changes, and click Save.
- Edit customer checkout information under Settings. Locate the Checkout option and click on it. Here, configure the checkout experience and specify the data needed before customers can purchase. Click Save when you’re finished.
One of Shopify’s significant advantages over platforms like WordPress is its extensive automation of commerce processes. With minimal adjustments, Shopify can handle and compute all shipping and tax-related tasks seamlessly.
To prevent overcharging, it’s crucial to input precise information in the upcoming steps. Follow these guidelines:
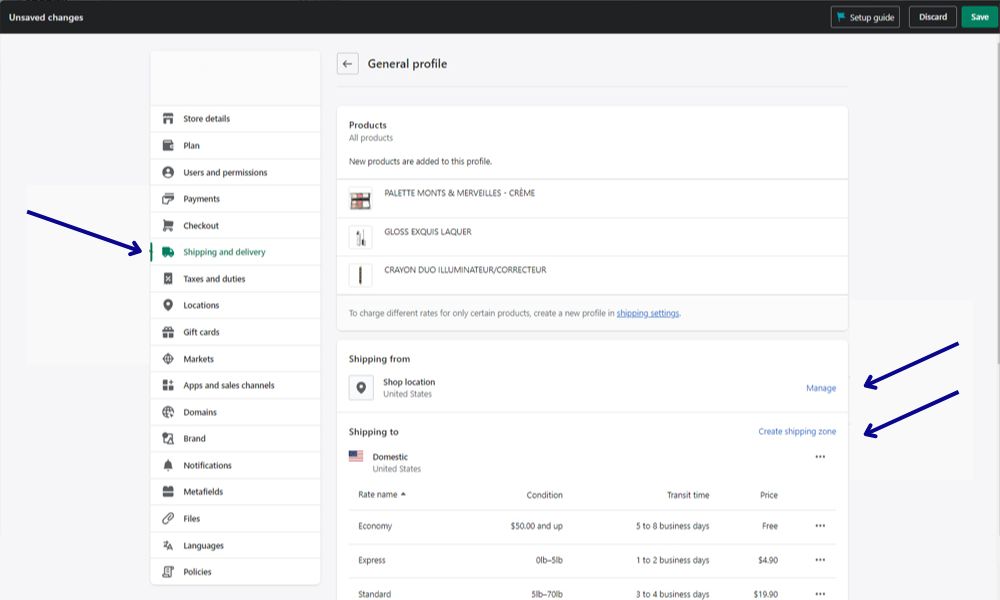
- Access the “Settings” tab on your dashboard and navigate to the “Shipping and Delivery” section. Click on it.
- Input your current shipping address accurately to ensure precise shipping rates.
- For destinations with longer shipping distances, activate shipping options for various regions and, if applicable, international locations.
- Establish shipping rates for the specified shipping zones. If your chosen carrier relies on package dimensions, configure the shipping dimensions meticulously to ensure accurate shipping cost calculations.
Configure your taxes
WordPress does not offer specialized e-commerce features, and handling sales tax might not have been straightforward, requiring manual calculations.
In contrast, Shopify streamlines this process, automating the task. It’s crucial to conduct thorough research and provide accurate information to adhere to legal tax procedures.
Shopify allows automatic tax calculation based on the shipping destination and relevant tax regulations collected during Step 6 of the setup process. If you have tax-exempt products, such as digital items, Shopify enables you to override tax:
- Navigate to the Shopify dashboard and select “Products” on the left-hand side.
- Locate and click on the “Pricing” section.
- Find the specific product you want to override and uncheck the option “Charge taxes on this product.”
- Once done, click “Save” to apply the changes.
Redirecting URLs to Maintain SEO Ranking
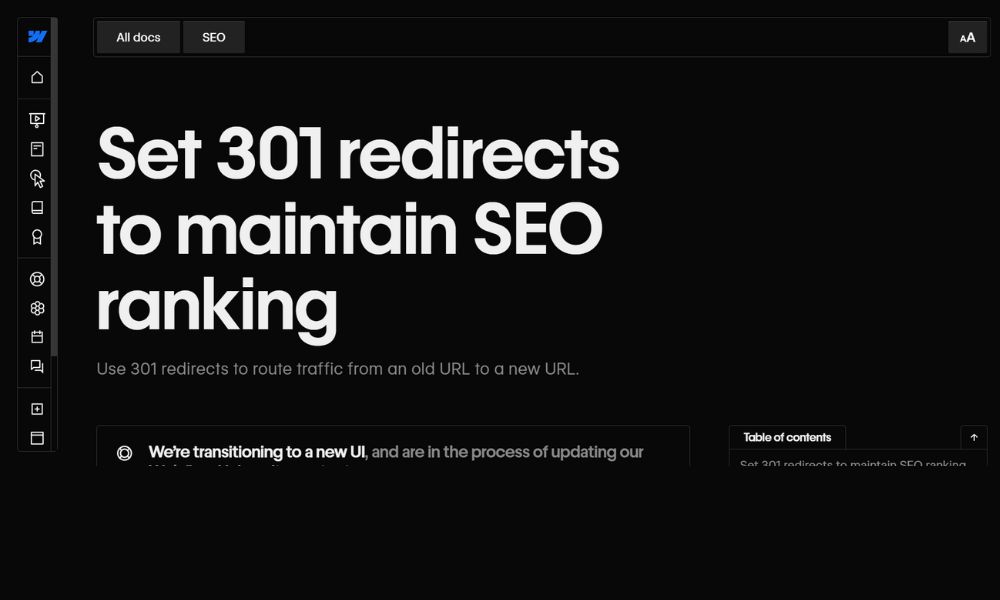
Setting up 301 redirects is a crucial step in maintaining SEO ranking during the migration from WordPress to Shopify. A 301 redirect is a permanent redirect from one URL to another. When you set up 301 redirects, you tell search engines that a specific page has permanently moved to a new location.
Here’s how to create a URL redirect:
- From your Shopify admin, click Settings > Apps and sales channels.
- From the Apps and Sales Channels page, click Online Store.
- Click Open sales channel.
- Click Navigation.
- Click URL Redirects.
- Click Create URL redirect.
- In Redirect from, enter the old URL that you want to redirect visitors from.
- In Redirect to, enter the new URL that you want to redirect visitors to. If you want to redirect to your store’s home page, enter “/”.
- Click Save redirect.
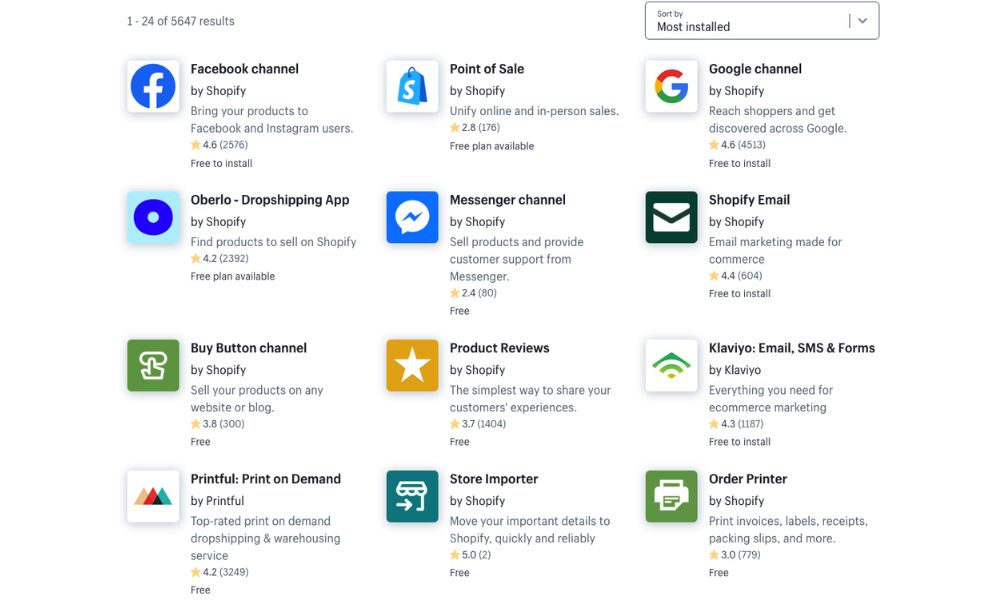
Installing Essential Shopify Apps
Before installing essential Shopify apps, ensure you have successfully migrated your website from WordPress to Shopify. Once the migration process is complete and your Shopify store is live, follow some steps:
- Go to the Shopify App Store.
- Explore relevant categories like SEO, marketing, support, and analytics.
- Read reviews and app descriptions to choose suitable apps.
- Check compatibility with your Shopify plan and version.
- Click on the app, then “Add app.”
- Review permissions and click “Install.”
- Find installed apps in your Shopify dashboard under “Apps.”
Testing Your Shopify Store
Once you’ve successfully transferred all your WordPress store data and set up the components that couldn’t be migrated, it’s essential to conduct a thorough test before your store’s official launch.
Here’s a testing checklist:
- Check Link Functionality: Ensure all internal and external links are working correctly.
- Assess User Flow: Navigate through the store as a customer would, ensuring a logical and intuitive user experience.
- Optimize Load Speed: Ensure that all pages load quickly and efficiently.
- Check Product Information: Ensure all product details, images, and prices are correct and consistent.
- Test Add to Cart Function: Confirm that products can be added to the cart without issues.
- Verify Inventory Levels: Ensure that inventory levels are accurate and updated correctly when a purchase is made.
- Test Payment Gateways: Ensure that all payment options are working correctly.
- Verify Shipping Options: Confirm that all shipping options and rates are correctly configured and displayed.
- Check Order Confirmation: Ensure that order confirmation and notification emails are sent out correctly.
- Test on Various Devices: Ensure that your store is accessible and functions well on various mobile devices and tablets.
- Check Content Accuracy: Ensure that all content has been correctly migrated and is displayed accurately.
Monitor And Fine-tune
After migrating to Shopify, continuous monitoring and fine-tuning of your store are imperative to ensure optimal performance and a seamless customer experience. Regularly analyze your website’s traffic, user behavior, and conversion rates using tools like Google Analytics and Shopify’s built-in analytics.
Pay close attention to customer feedback and reviews to identify areas for improvement. Update your product listings, content, and design elements based on these insights and emerging e-commerce trends. Additionally, conduct A/B testing for elements like product descriptions, images, and call-to-action buttons to determine what resonates best with your audience.
WordPress To Shopify Migration: Common Challenges and Solutions

Here are four common challenges faced during WordPress to Shopify migration, along with their solutions:
Data Migration
Transferring products, customer information, orders, and other essential data from WordPress to Shopify without losing crucial information can be challenging. Data formats in WordPress might not directly match Shopify’s requirements.
Solution: Utilize Shopify’s Importer Tool or hire a professional service. Shopify offers an importer that helps you transfer data from WordPress. However, for complex websites with large datasets, it might be beneficial to enlist the help of a migration expert or a specialized migration app. These tools can map data fields accurately and ensure a seamless transfer.
SEO Preservation
Preserving SEO rankings and ensuring that the website’s SEO attributes, like meta tags, descriptions, and URLs, remain intact after migration is crucial. Changes in URLs and site structure can negatively impact SEO if not appropriately handled.
Solution: Create a comprehensive SEO migration plan. Redirect old URLs to corresponding new Shopify URLs using 301 redirects. Update meta tags and descriptions to match the new website’s structure. Additionally, submit an updated sitemap to search engines and monitor the site’s performance using tools like Google Search Console to identify and address any SEO issues promptly.
Design and Theme Transition
WordPress and Shopify use different templating systems and coding languages. Transitioning the design and layout seamlessly from WordPress to Shopify while maintaining the website’s branding can be challenging.
Solution: Choose a suitable Shopify theme and customize it. Shopify offers a wide range of professionally designed themes that you can customize to match your brand. If your WordPress site has a unique design, consider hiring a Shopify expert or developer who can create a custom theme tailored to your specifications. Ensure that the new design is responsive and optimized for both desktop and mobile devices.
Functionality and Feature Parity
WordPress websites often rely on plugins and custom functionalities. Replicating these features on Shopify, which has its ecosystem of apps, can be challenging.
Solution: Evaluate and choose Shopify apps wisely. Shopify’s App Store provides numerous apps that can replicate most WordPress functionalities. Research and select apps that align with your specific requirements. Additionally, if your WordPress site has custom functionalities, work with Shopify experts or developers to build custom apps tailored to your needs.
Wrapping Up
With your store data successfully migrated to Shopify and all necessary setups in place, the transition from WordPress to Shopify is now seamless, allowing you to effortlessly launch your online store and invite customers to explore and purchase your products. Thanks to our comprehensive guide, your WordPress to Shopify migration journey has been made simple and efficient, ensuring a swift and successful online presence.
FAQs
You can also set up professional email addresses associated with your domain using third-party email hosting services or Shopify’s email hosting solution, ensuring seamless communication with your customers.


