
Strikingly Review: Building Your Website for $0/Month
By Sam Nguyen

This article will dive into “What is Strikingly website builder, providing a comprehensive understanding of its capabilities and pricing plans for individuals and businesses looking to create their website.
Key Takeaways
- Strikingly is an all-in-one website builder offering pre-made layouts, templates, and sections without coding skills, making it an accessible platform for building an online store and showcasing products effectively.
- With a user-friendly interface, Strikingly is ideal for individuals and small businesses seeking a straightforward and budget-friendly solution. The platform offers a range of pricing options to suit diverse needs, including a complimentary plan for those seeking essential website functionalities.
Strikingly Website Builder: The Goods & The Bad
Strikingly website builder helps store owners build an online store without coding knowledge. Let’s look deeper at where Strikingly shines and where it falls short.
Pros
- User-friendly interface
- Affordable Plans
- Mobile Optimization
- No-code site building
- Free plan available
- Thoughtfully designed templates
- 24/7 support
Cons
- Limited customization
- Lack of ecommerce capabilities
- Expensive to remove branding
- Worst site speed performance
Strikingly Review: A Brief Overview
Strikingly is a user-friendly no-code website builder that allows you to create a website quickly, starting at just $ 15 per month. It caters to individuals and entrepreneurs who want a simple site without complex design features.
This guide will walk you through the Strikingly pricing plans and their features, helping you choose the right plan for your needs.
Strikingly Website Builder: A Detailed Review
Strikingly offers numerous features and tools for creating and marketing your site. Here are several features every website owner would want, including.
Pricing
Strikingly website builder offers four pricing plans:
- Free plan
Best for: Hobbyists, personal use, and brand new website creators
- Limited ($12 per month)
Best for: Freelancers, new entrepreneurs or tiny ecommerce sites
- Pro ($ 20 per month)
Best for: Small web agencies, e-commerce sites, or franchises
- VIP ($59 per month)
Best for: International businesses, growing web agencies, real estate brokers, and large e-commerce businesses.

Ease of Use
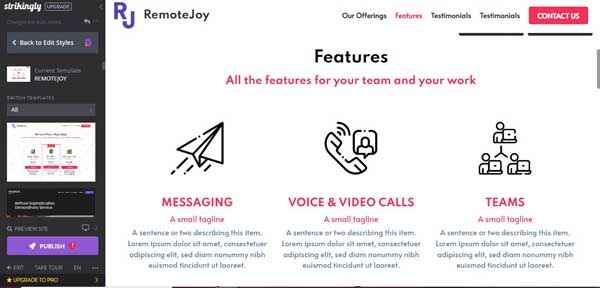
Strikingly’s editor is remarkably user-friendly, offering a smooth and hassle-free website-building experience. Its balance of options and simplicity make it an appealing choice for beginners and those seeking a complete website builder.

Upon signing up for a Strikingly account, your initial step involves selecting a template for your site. The templates are well-designed, and convenient , and you can preview a full working site while choosing.

Once you have picked a template, you can start editing right away. This editor is well-designed, ranking among the best in terms of both user-friendliness and customization options.
Moreover, any modifications you make are immediately reflected on your site. This comes in handy when you tweak elements like font styles and text dimensions.
The dashboard is well organized into distinct sections—settings, promotion, audience, and analytics—each designed to be user-friendly and devoid of unnecessary complexity.
There is also an SEO checklist to ensure your site is well-prepared for search engines.
Ecommerce features
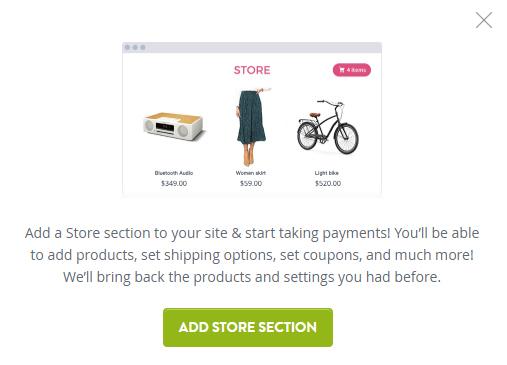
Strikingly offers eCommerce capabilities, and your new online store seamlessly integrates as a section within your one-page site. This means you can swiftly begin selling physical products through your website.
Strikingly allows you to arrange items into categories, manage shipping and taxes, and enable payment processing. While the eCommerce features are limited and may not be suitable for more extensive inventories, they are valuable if you sell a few items.
Notably, a recent update to Strikingly’s Simple Store allows you to sell digital products, automatically creating download links for your customers.
Tools & features
- Social Media Integration
Social media integration directs the flow of your target audience from your website to social media platforms and vice versa.
Strikingly offers various methods for incorporating social media into your site. One approach involves placing social media icons in your website footer, leading visitors to your social pages or facilitating easy sharing of your site via the platforms.
Additionally, you can enhance integration by implementing features such as live chat through Facebook Messenger, setting up a Twitter card, or adding a social feed section. This section showcases recent content from your social pages, providing fresh updates without needing constant content creation efforts.
- Analytics
Like other website builders, Strikingly offers a built-in analytics feature to track your site’s visitor count, providing a basic overview of your website’s traffic, such as visitors’ countries, visit times, and device types (mobile or desktop). You can also access these statistics for the past 24 hours, 7 days, 30 days, and 90 days.
- SEO
While Strikingly provides some SEO features, they are relatively limited. A fundamental SEO checklist is available with all plans, helping you set a site’s title and meta description. However, this checklist lacks comprehensive coverage and doesn’t actively assess your website’s SEO effectiveness.

- Marketing
Strikingly offers a comprehensive range of tools, including email marketing for newsletters, seamless social media integration for cross-promotion, and custom domains to enhance SEO feature.

Additionally, Strikingly aids in improving your site’s ranking by enabling the implementation of basic SEO strategies such as adding alt text for images, crafting meta descriptions for web pages, and customizing blog post URLs.
- Domains
Strikingly provides a convenient and secure way to register, configure, and manage domain names for your websites, starting at just $24.95 annually. In addition, Strikingly allows for the smooth transfer of previously registered domains through third-party providers.
For those using a custom domain, Strikingly presents a compelling deal – a free custom domain for a year upon subscribing annually to one of their premium plans. This provides flexibility and affordability in establishing your online presence.
Security
Strikingly enables a Secure Sockets Layer (SSL) certificate on all custom domains, allowing visitors to access your site over Hyper Text Transfer Protocol Secure (HTTPS). This gives them a satisfied experience and also improves your ranking on Google.
Support
Strikingly offers remarkable 24/7 customer support, better than most other website builders.Whether you’re in the initial stages of building your website or need help later on, Strikingly’s support team is available through live chat or email. They’re really quick – they respond to live chat in 20 seconds or less, and emails in just 15 minutes.

Additionally,Strikingly’s Knowledge Base serves as a valuable resource, featuring an extensive array of articles that comprehensively cover all aspects of website creation on their platform.
How To Create Your Own Website: An Ultimate Step-By-Step Guide
If you want to know how to create a Strikingly website, you only need to follow these few steps:
Step 1: Register for a Strikingly Account
Firstly, go to the Strikingly website, type in your name, email address, and a password, and then click on the “Get Started, It’s Free!” button to sign up.

Step 2: Click the “Create New Site” Button
After entering your Strikingly username and password, you’ll access the Dashboard. From the drop-down menu, select “Create New Site,” which will prompt you to choose a template. This leads to step three, where you’ll learn how to create a website using templates.

Step 3: Decide on a Website Template
Changing a Strikingly Template
Updating or changing your selected template in the Strikingly Editor is a straightforward process. While various Strikingly templates are designed for specific industries, you can adjust the selected theme.
To change a Strikingly template:
- Step 1: In the Strikingly Editor’s left-hand “Site Design” menu, you click on the “Styles” block at the top to open the “Edit Styles” menu

- Step 2: In the “Edit Styles” menu, select “Change Template” to choose the “Switch Templates” menu.
- Step 3: Automatically preview different templates.
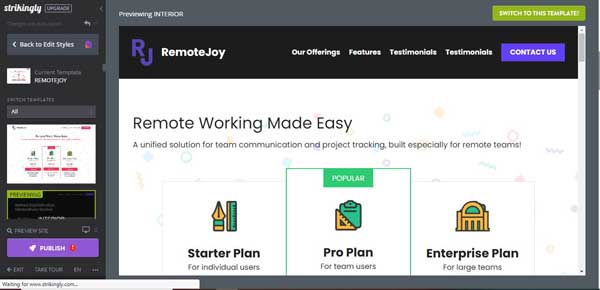
- Step 4: Click “Switch To This Template” button in the upper-right corner of the preview page after choosing a template you prefer.
Changing a Template’s Accent Color
The Strikingly website builder allows you to change the template’s accent color in headings, buttons, backgrounds, and other elements.
To change a template’s accent color:
- Step 1: In the Strikingly Editor’s left-hand “Site Design” menu, click on the “Styles” block at the top to open the “Edit Styles” menu.
- Step 2: Select “Color Scheme” to open a drop-down menu with a color-picker tool.
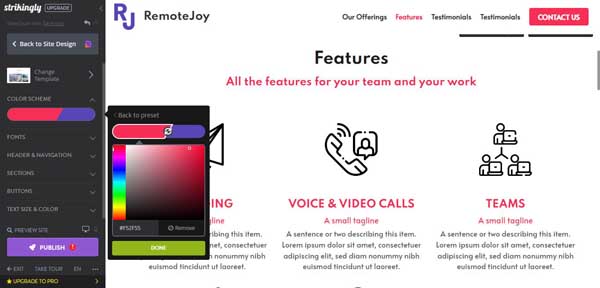
- Step 3: Use the color-picker tool to change the color, shade, tone, and brightness.
Changing the Fonts
The Strikingly website builder enables you to choose from a large library of fonts and also lets you use Google to search for fonts or upload your own.
Your website can use up to four different fonts for its title, headings, text, and buttons. However, to keep things simple, you should stick with two fonts: one for your site’s title and headings and another for the text and buttons.
To change the fonts:
- Step 1: In the Strikingly Editor’s left-hand “Site Design” menu, choose “Styles” block at the top to open “Edit Styles” menu
- Step 2: Select “Fonts” from the “Edit Styles” menu to choose “Title”, “Heading”, “Text”, and “Button” menu from “Styles” block.
- Step 3: To update the site’s title font, choose “Title” option to open “Font Library”.
- Step 4: Hover over each font in the “Font Library” to view:
- Its “weight” options
- See a preview on your screen, showing you how it will appear in your website’s template.
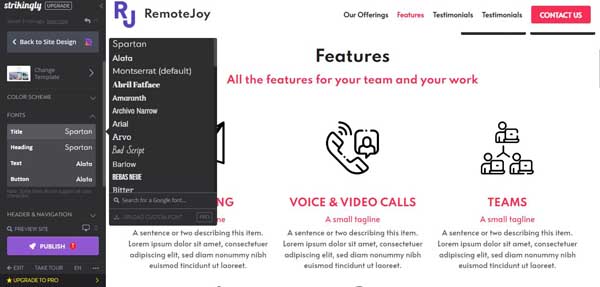
- Step 5: Choose the selected font to update the title font throughout your template
- Step 6: Repeat five steps to update the fonts in headings, text, and buttons.
Changing the Buttons
The Strikingly website builder allows you to add buttons anywhere on the website and use them as a “Primary” button for your main CTA (Call-to-action) and “Secondary” button for supporting actions such as “Learn More”.
To change the buttons:
- Step 1: In the Strikingly Editor’s left-hand “Site Design” menu, choose “Styles” block at the top to open the “Edit Styles” menu
- Step 2: Select the “Buttons” from the “Edit Styles” menu to open a drop-down menu with various options such as “Color”, “Shape”, and “Fill”
- Step 3: Click on the “Color” option to choose from a limited color selection
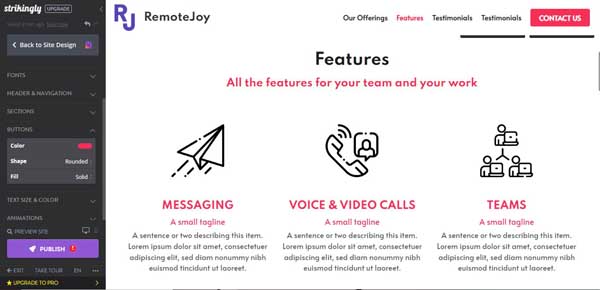
- Step 4: Click on the current color button to open “Color-picker took” to choose the preferred color and then click “Done” button
- Step 5: Click on the “Shape” button. From there, you can choose your buttons to be in a “Square”, “Rounded” or “Pill” shape.
- Step 6: Click on the “Fill” option and then choose either “Solid” for a complete fill or “Ghost” to appear as an outline of your button.
Customizing the Homepage Header in Strikingly
While your Strikingly template dictates the appearance of your website’s homepage header, you can personalize its background to align with your business’s branding.
Many templates allow you to use image, videos, or slideshows as the background. Additionally, you can modify test positioning, navigation menu style, and the brightness of your background or text.
To customize the homepage header:
- Next, click on the “Styles” block in the Strikingly Editor’s left-hand “Site Design” menu to open the “Edit Styles” menu.
Step 1: Click on the “Styles” block in the Strikingly Editor’s left-hand “Site Design” menu to open the “Edit Styles” menu
Step 2: Select “Header & Navigation” from the “Edit Styles” menu to adjust the majority of elements within the homepage header
Step 3: Click on “Colors” to open “Color” drop-down menu. In case you want a header image, select “Transparent” option
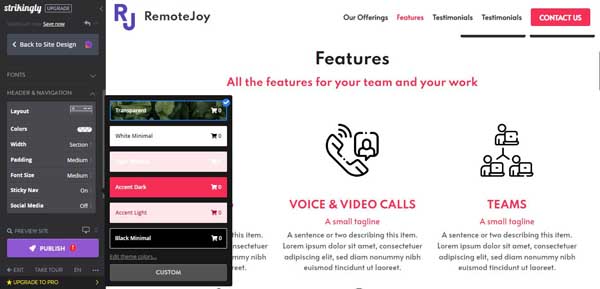
Changing a Header Image
Here are steps to change a static header image:
To change a header image:
Step 1: In the Strikingly Editor, click on the “Background” button in your homepage header to open a drop-down menu with several options
Step 2: To upload your own photo, click the “Upload Image” button to open the “Upload Image” window
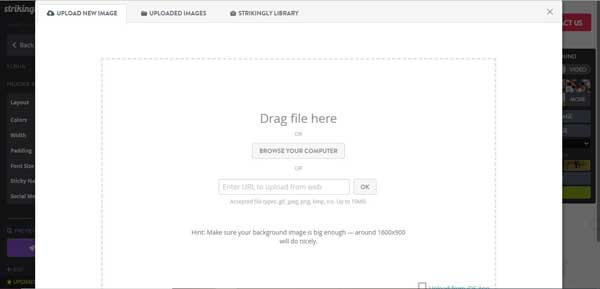
Step 3: Use the window to upload an image from internet, your computer, or access the Strikingly Image Library
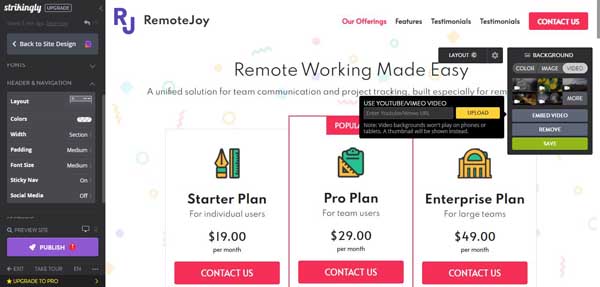
Adding a Video to the Header
Using a video in your homepage header helps your website attract your visitor’s attention.
Note: Video in headers shouldn’t have sound and won’t play on tablets or mobile devices.
To add a video to the header:
Step 1: In the Strikingly Editor, click on the “Background” button in the homepage header to open the “Background” drop-down menu
Step 2: Select “Video” tab at the top of “Background” drop-down menu
Step 3: Alternatively, click on the “Embed Video” button and enter the YouTube or Vimeo video’s link in the pop-up window
Adding a Slideshow to the Header
Slideshow headers are a highly effective way to capture visitor’s attention. However, the usage of “Slider Sections” in the Strikingly website builder is only available with the Strikingly Pro plan or higher-tier plans. Consequently, users of the Strikingly Free and Strikingly Limited plans need to upgrade to create a slideshow header.
To add a slideshow to the header:
- Step 1: In the Strikingly Editor’s left-hand “Site Design” menu, choose the “Add New Section” button
- Step 2: In the left-hand column of the “Add a New Section” menu, click on the “Image & Video” option
- Step 3: From the available section options, select the “Banner Image Slider” section
- Step 4: This step will automatically position your new slider within the Strikingly Editor, though not in your homepage header
- Step 5: Move the image slider to the homepage header, hover over the three horizontal lines to the left of the “Banner” page in the “Site Design” menu
- Step 6: Drag the “Banner” page section to the top of the navigation to place it in the homepage header
- Step 7: To update the “Banner” images, click on the “Image & Link” button to open “Image & Link” drop-down menu
- Step 8: Click on the “Upload Image” button to open the “Upload New Image” pop-up for adding your own images or choosing from the provided library
- Step 9: Enter a link in the “Link URL” field, enabling the entire slider to be made clickable, directing visitors to other sections of your site or external web pages.
Making Other Header Adjustments
The Strikingly website builders offer several options to change the homepage header appearance.
For instance, you can change the header image overlay color, the text alignment and layout, or the font size to make it stand out.
To make other header adjustments:
Step 1: In the “Site Design” menu, click on the “Styles” block to open the “Edit Styles” menu
Step 2: Choose “Header & Navigation” from the “Edit Styles” to open the corresponding drop-down menu
Step 3: Click on the “Layout” button in this drop-down menu to open navigation layout options
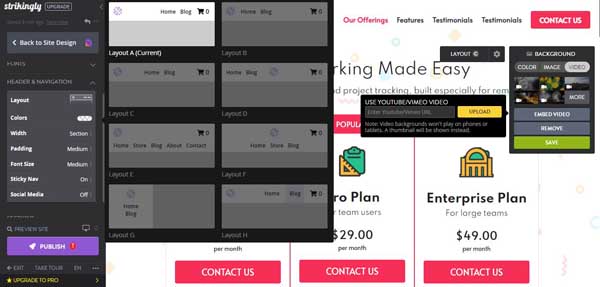
Step 4: Click on the “Colors” button to open the menu with various colors, or click the “Custom” button to choose your own.
Step 5: Click on the “Font Size” option to choose from the “Small”, “Medium”, and “Large” options.
Step 4: Setting up Pages and Site Navigation
As you know, websites have multiple pages, so a navigation menu helps visitors easily find and move between pages. The first task is setting up your website’s navigation menu, including all pages showcased in your menu.
Adding a Page in Strikingly
Most Strikingly website templates follow a single-long page format. Through the navigation menu, visitors can navigate various sections on a single page. However, to create a site with multiple pages and other advanced capabilities, you need to opt for the Strikingly Pro or higher-tier plans.
Before you add pages to your Strikingly website, you need to activate the “Multiple pages” functionality within your chosen template/
To activate multiple pages:
Step 1: First, you should ensure to upgrade to Strikingly Pro plan or higher-tier plan to access this feature
Step 2: In the “Site Design” menu, choose the “Add Another Page” button to open “Settings & Multiple Pages” menu
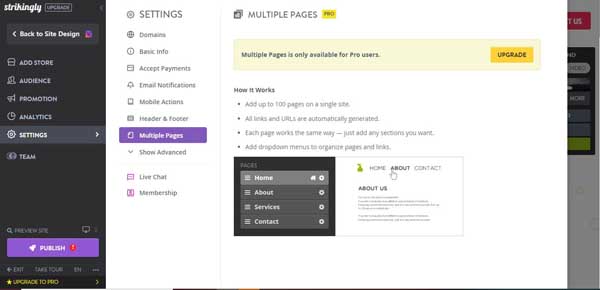
Step 3: Click on the “Activate Multiple Pages” button and simply click on the “OK” button to continue
To add a page:
Step 1: In the Strikingly Editor’s left-hand “Site Design” menu, you find a “Pages” section and then click on it to open the “Select Page” Drop-down menu
Step 2: Click on the “Manage Pages” button to open the “Manage Pages” menu
Step 3: Click on the “+Add New Page” button and enter the page title into the text box
Step 4: Click on the green checkmark to add your new page to your website and its navigation menu
Reordering the Navigation Menu
To reorder pages in the navigation menu:
Step 1: In the Strikingly Editor’s left-hand “Site Design” menu, choose the “Pages” section to open the “Select Page” drop-down menu
Step 2: Click on the “Manage Pages” button to open the “Manage Pages” menu
Step 3: In this menu, click on “Three horizontal lines” to the left page you need to reorder. After that, simply drag and drop the page in the order to appear in your site’s navigation menu
Adding Pages to a Drop-Down Menu
Crafting a drop-down menu featuring subpages offers an effective way to limit the number of items in your site’s primary navigation menu to five or six. To accomplish this, begin by creating the pages as the instructions above. After that, you add a drop-down menu and select which page it will include.
To add a drop-down menu:
- Step 1: In the Strikingly Editor’s left-hand “Site Design” menu, choose the “Pages” section to open the “Select Page” drop-down menu
- Step 2: Click on the “Manage Pages” button to open the “Manage Pages” menu
- Step 3: In this “Manage Pages” menu, choose the “Add Dropdown Menu” button to open a text box for entering a title on the new drop-down menu
- Step 4: Clịc on the “Green Checkmark” to get the new drop-down menu appear in the site’s navigation menu
- Step 5: To add more pages to the drop-down menu, drag and drop them into the new menu page
Deleting Pages
You can flexibly hide a page from your navigation menu or delete it from your website.
To delete a page:
- Step 1: In the Strikingly Editor’s left-hand “Site Design” menu, click on the “Pages” section to open the “Select Page” drop-down menu
- Step 2: Click on the “Manage Pages” button to open “Manage Pages” menu
- Step 3: To delete a page, click on the “Gear” icon placed to the right of the desired page. This action will make the “Settings” drop-down menu to appear.
- Step 4: In the “Settings” drop-down menu, choose the “Delete this page” button at the bottom
- Step 5: A pop-up window asks you to confirm deleting this page. Click on the “OK” button to remove the page and the contents it contains.
To remove a page from the navigation menu:
- Step 1: In the “Site Design” menu, choose the “Pages” section to open the “Select Page” drop-down menu
- Step 2: Click on the “Manage Pages” button
- Step 3: Click on the “Gear” icon to the rights of the page and then move to the “Settings” drop-down menu
- Step 4: In the “Settings” drop-down menu, choose “Show in Navigation” option
- Step 5: In the “Manage Pages” menu, you see an “Eye Strikethrough” icon next to that page, confirming it’s invisible in your site’s navigation menu
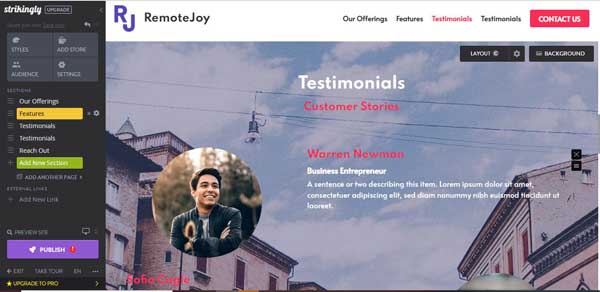
Step 5: Working With Strikingly Sections
When you create a new page on your Strikingly website without content, so you need to add section to fill it. The Strikingly offers multiple section options for different content purposes. We will dive into more details tailored to specific sections.
Adding a Section
The Strikingly website builder provides 10 types of sections, each offering various style options and containing customizable placeholder content to suit your business.
To add a section:
Step 1: In the Strikingly Editor’s left-hand “Site Design” menu, click on the “Add New Section” button under “Sections”
Step 2: The “Add a New Section” menu will appear with section types and layout options
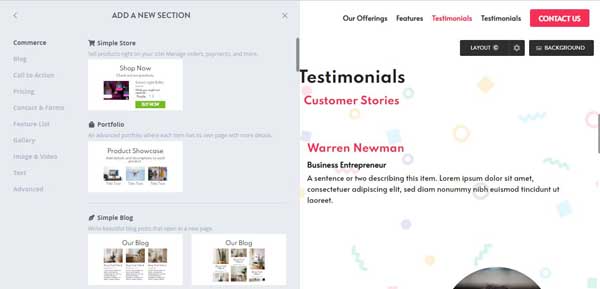
Step 3: Scroll through the available sections and then click on the one you want to add in your page
Using the “Sections” Menu
The “Sections” menu in the Strikingly website builder allows you move, duplicate and delete sections easily.
To move, duplicate, or delete a section:
Step 1: To move a section, choose “Sections” on the Strikingly Editor’s left-hand “Site Design” menu
Step 2: Click on the “Three horizontal lines” to the left of this section you want to change. Drag and place the section into the order you would like to appear on your page
Step 3: To duplicate, go to the “Sections” of the “Site Design” menu and click on the “Gear” icon to the right of the section
Step 4: From the “Section Settings” drop-down menu, select “Duplicate” to place a copy of this section below the existing section.
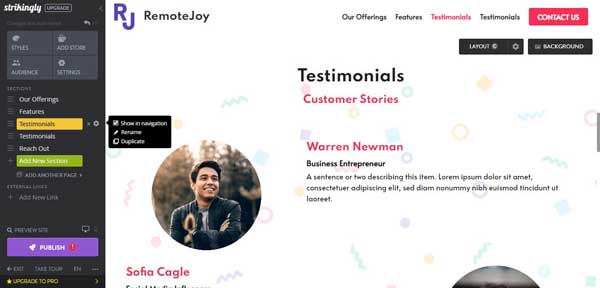
Step 5: To delete a section, click on the “X” to the right of the section
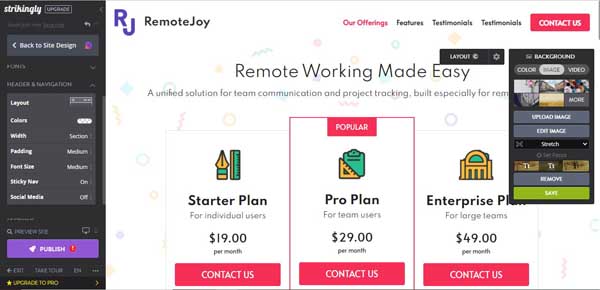
Changing a Section’s Background
Some sections feature solid backgrounds, while others use image. Using a mix of background styles enhances visitors’ engagement while navigating your website.
To change a section’s background color:
Step 1: In the Section part, click on the “Background” button.
Step 2: Select a background for your section by using the “Background” drop-down menu. You can pick from a list of suggested colors or click “Custom” to access a color-picker tool for a personalized choice.
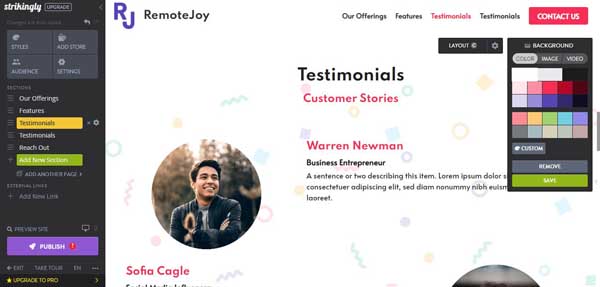
Step 3: Click on the “Save” button to make changes appear in that section.
To change a section’s background image:
Step 1: In the Section part, click on the “Background” button.
Step 2: Choose “Image” tab within the “Background” drop-down menu
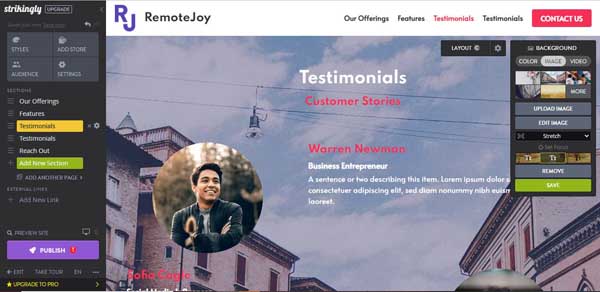
Step 3: Choose from the suggested photos or click on the “Upload Image” button. Then click on the “Save” button
Customizing a Content Section
Content section allows you to edit text, videos, and images. Each section offers various choices, but for most of them, you can adjust the layout, background color, alignment, text, images, and CTA buttons.
To choose a different layout:
- Step 1: In the section you edit, click on the “Gear” icon within the “Layout” button. The “Layout Settings” drop-down menu will appear
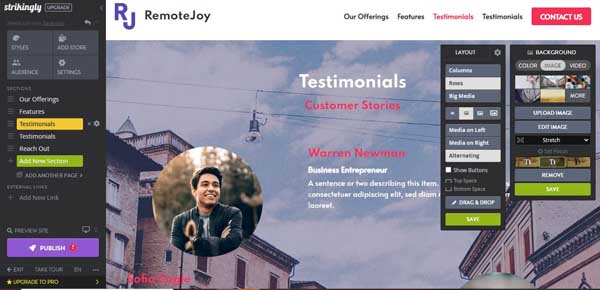
- Step 2: Select different layout options to find the best for you
- Step 3: Click on the “Save” button to return to the Strikingly Editor
To edit the content:
- Step 1: In a section you choose, simply click on it to open “Text Editing” toolbar
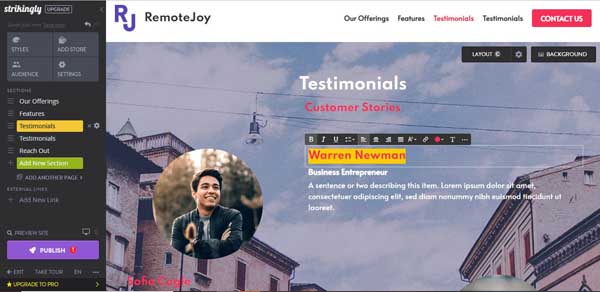
- Step 2: Modify the text to match your business’s branding. Use the “Text Editing” toolbar to change alignment, font, color, and more.
- Step 3: To remove any parts of the selection, hover over it until an “X” exists in the upper-right corner. Click on the “X” to remove the content.
- Step 4: To relocate any parts, hover over it until the “Navigate” icon appears to drag and drop this portion of content.
To change an image:
Step 1: Hover over the image you want to update to make the “Edit” button appear
Step 2: Click on the “Edit” button to open the corresponding menu
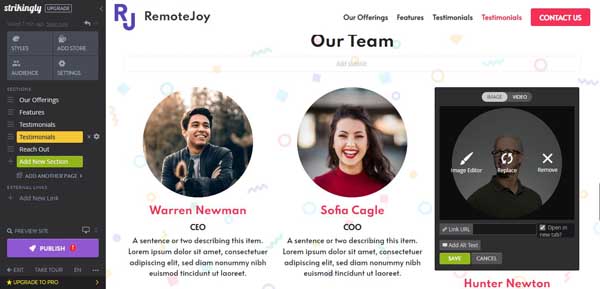
- Step 3: From the menu, upload your own image, edit the current image, and remove it if unnecessary
- Step 4: Insert “Link URL” into the image
- Step 5: Click on the “Save” button to confirm your changes
To add or edit a CTA button:
Step 1: Click on the “Add Button” button to instantly place one and open the “Button Content & Design” menu
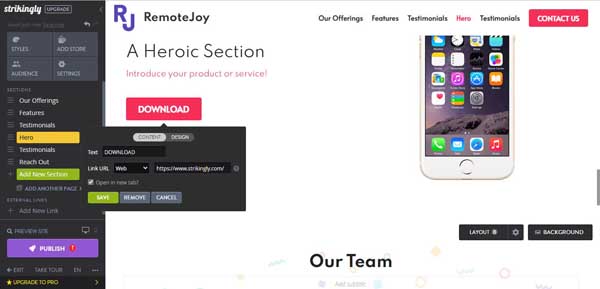
- Step 2: Click on the “Design” Tab at the top of the menu to alter the size, style, color, alignment, and color of the button
- Step 3: Click on the “Save” button to confirm these changes
Step 6: Add Images and Other Media
You can flexibly add various media to the Strikingly website, including:
Adding a Photo Gallery
A photo gallery showcases a collection of images, employed by artists, photographers, and graphic designers to present their portfolios. Additionally, various businesses use photo galleries to highlight their products or showcase different aspects of their businesses.
To add a photo gallery:
- Step 1: In the Strikingly Editor’s left-hand “Site Design” menu, click on the “Add New Section” button
- Step 2: Scroll down to the “Gallery” section to view all photo gallery layouts
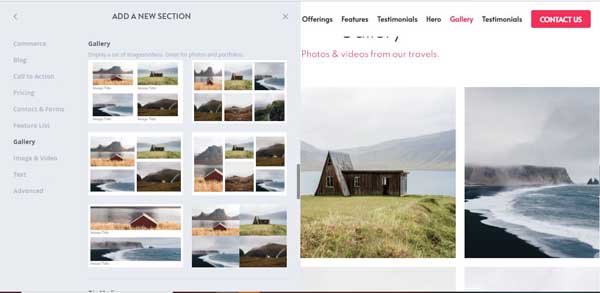
- Step 3: Click on the photo gallery layout you want to place it in your Strikingly website
Uploading Videos
With the Strikingly website builder, you can easily embed videos from Vimeo or YouTube.
To add a video:
- Step 1: Hover your mouse over the image area to see the “Edit” button, then click it to open the “Image & Video” menu.
- Step 2: Select the “Video” Tab and then enter the video URL
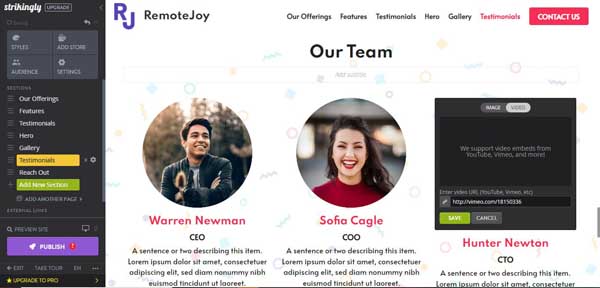
- Step 3: Click on the “Save” button to upload your video.
Step 7: Establish a Social Media Page
The Strikingly website builder offers multiple ways to connect with your site visitor by:
- Add social media icons that direct people to your business’s social media channels
- Embed a social media feeds
- Add an email subscription form
- Add a contact form
Adding Social Media Icons
Strikingly provides pre-made icons for the social media platforms such as Facebook, Twitter, Instagram, Pinterest, LinkedIn, YouTube, Snapchat, and TikTok.
These icons allow you to connect your website with your business’s social media profiles. Facebook, Twitter, and Instagram can be linked directly to your Strikingly account, facilitating the integration of features like updating your business address, operating hours, and reviews automatically.
To add social media icons:
- Step 1: In the Strikingly Editor, scroll down to your site’s “Footer” section, where you’ll locate social media icons already placed. Hover over these icons to see the “Edit” button.
- Step 2: Click on the “Edit” button to open “Share & Links” menu and then click on the “Links” tab.
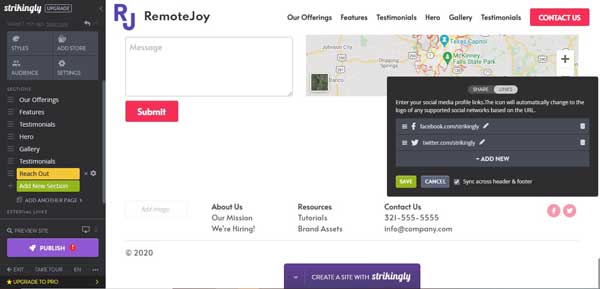
- Step 3: Enter the social media account’s address you wan to connect to your business website. Check the box next to “Sync across header & footer.”
- Step 4: Click on the “Save” button to add a social media icon to the website’s header and footer.
Embedding a Social Media Feed
The Strikingly website builder offers a useful feature that lets you effortlessly embed your Instagram, Twitter, and Facebook feeds into your website. This ensures that any posts you make on these platforms will automatically be shown on your website.
To embed your social media feed:
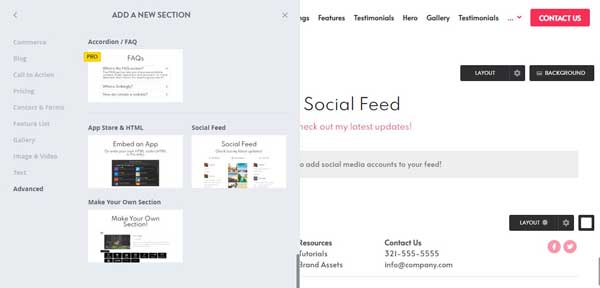
- Step 1: In the Strikingly Editor’s left-hand “Site Design” menu, click on the “Add New Section” button
- Step 2: Scroll down to the “Advanced” section or click on “Advanced” in the left-hand list
- Step 3: Click on the “Social Feed” button to add “Social Feed” to your site
- Step 4: In this section, click on the “Edit” button to open “Social Feed Manager” pop-up window
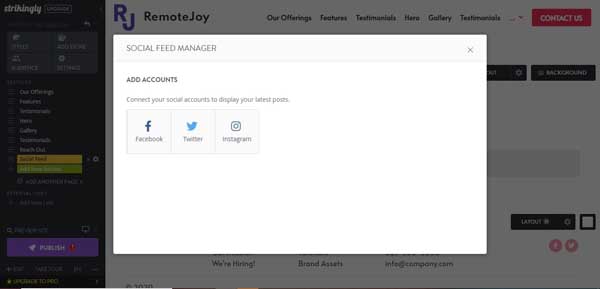
- Step 5: Choose the options you want to link to your site. If you are not already signed in on your current device, you will need to provide your login details for the specific social media account
- Step 6: If you receive an authorization request, click “Allow”, then go back to the Strikingly “Social Feed Manager” pop-up window
- Step 7: Once verified, close the “Social Feed Manager” window to view your recently linkd social media feed on your Strikingly site
Adding an Email Subscription Form
Collecting email addresses from website visitors is an effective method for small business owners to connect with their desired audience through regular news and updates. While many Strikingly templates come with a built-in “Subscribe” section, you can also follow these instructions to set it up or add one if your chosen template doesn’t include it.
To. add a “Subscribe” section:
Step 1: In the Strikingly Editor’s left-hand “Site Design” menu, click on the “Add New Section” button
Step 2: Click on “Contact & Forms” in the menu’s left-hand list, and then choose “Sign-up Form” to place the new sign-up form section
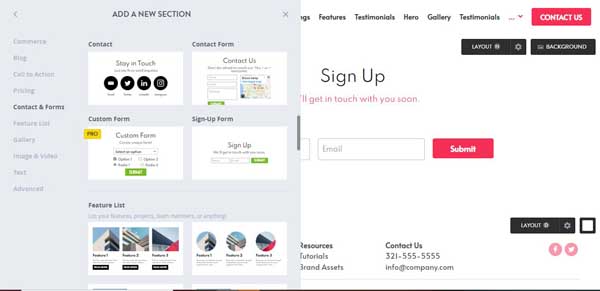
Step 3: In the Strikingly Editor, hover over the new sign-up form and then click on the “Edit” button to open “Form Field & Form Options” menu

- Step 4: Use the “Form Fields & Form Options” menu to updates the form’s name, text that appears on its submission button.
- Step 5: Add the email address to the form submissions
- Step 6: Click on the “Save” button
Adding a Contact Form
Contact forms offer an additional avenue to engage with your website visitors. These forms are commonly located on a website’s “Contact” page but can be integrated onto any page within your site.
To add a contact form:
- Step 1: In the Strikingly Editor’s left-hand “Site Design” menu, click on “Add New Section” button
- Step 2: Click on “Contact & Forms” in the menu’s left-hand list and choose “Contact Form option” to place the new contact form section
- Step 3: In the Strikingly Editor, hover over the new contact form and click on the “Edit” button
- Step 4: Use the “Form Fields & Form Options” menu to update names, and texts that appear on its submission button and its response message
- Step 5: Click on the “Save” button
Step 8: Add a Favicon to a Strikingly Website
A favicon is a small image that shows up on the left side of a web browser tab, aiding internet users in quickly recognizing the website they’re browsing.
Most favicons are scaled-down versions of a company’s logo or relevant graphics, maintaining brand consistency. These icons are usually small and square, typically measuring around 16 by 16 pixels.
If you don’t already have a favicon, you can easily create one using a tool like Favicon.io. This tool provides a downloadable ZIP file that you can set as your website’s favicon.
To add a favicon:
- Step 1: In the Strikingly Editor’s left-hand “Site Design” menu, select “Settings”
- Step 2: From the “Settings” pop-up menu, select “Basic Information” button
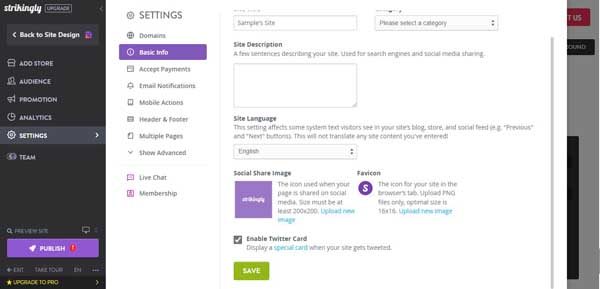
- Step 3: In the Favicon section, click on the “Upload new image” link from your own computer or connect to one from the internet
Step 9: Publish Your Strikingly Website
When you finish creating your website using the Strikingly website builder, the final step is to publish your website to your permanent domain.
Publishing to an Existing Domain
If you have already purchased a domain from Strikingly, connect your new website to the domain.
To use a Strikingly domain you already own:
- Step 1: In the Strikingly Editor’s left-hand menu, click on the “Settings” option and select “Domains”
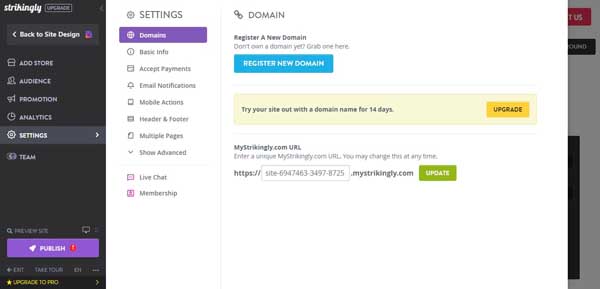
- Step 2: Enter the custom domain you purchased from Strikingly in the “Custom Domain & Subdomain”
- Step 3: Click on the “Update” button
Purchasing a Domain from Strikingly
If you haven’t purchased a domain yet, you will receive a free custom domain for the first year of a Strikingly paid plan.
To purchase a domain from Strikingly:
- Step 1: In the Strikingly Editor’s left-hand menu, click on the “Settings” option and select “Domains”
- Step 2: In the “Domain” screen, click on the “Register New Domain” button
- Step 3: Fill in your desired domain name and then click “Search Domain”
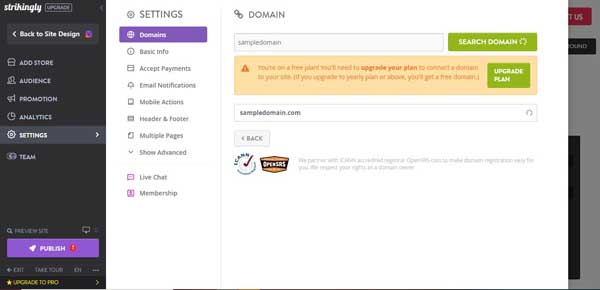
- Step 4: Choose the domain you want to register and then click “Register” button
- Step 5: Complete all required fields such as your contact and billing information before clicking on “Submit” button
- Step 6: Click on the “Confirm Purchase” button after viewing all the information accuracy
Who Do We Recommend Strikingly For?
Strikingly is comprehensive solution designed for individuals and businesses lacking coding experience and time for website development. With zero coding required, you create a website within minutes.
Moreover, Strikingly is ideal for personal websites or small businesses not heavily reliant on website income. For e-commerce or professional services, Strikingly’s higher-tier plans offer advanced features like unlimited bandwidth for high traffic and advanced e-commerce capabilities.
Strikingly vs WordPress: Which Website Builder Should I Use?
Here is a comparison table to answer this question “WordPress Website Builder vs Strikingly: Who wins the battle of the website builders”?
| Strikingly | WordPress | |
| Pricing Plans | A free version to build an online store | A free account lack of eCommerce support |
| Ease of use | User-friendly interface for beginners and individuals with little coding knowledge | User-friendly website editor. However, if you want more customizations, it requires HTML and CSS knowledge |
| Template Selection | Free | Highly cost |
| App integrations | Need to update app versions | Without the need to update app versions |
| SEO and Marketing | Integrate with third-party plugins | Create its templates & tools with SEO |
Strikingly Website Builder: FAQs
- Limited at $12.00 per month.
- Pro at $20.00 per month.
- VIP at $59.00 per month.
Bottom Line
Strikingly is an all-in-one website builder that offers user-friendly features and templates for creating websites, making it a suitable choice for those seeking simplicity and uniqueness in website design.


