
QuickBooks Desktop POS to Shopify POS migration: Our Ultimate Guide
By Sam Nguyen

In this tutorial, we will walk you through the steps to migrate from QuickBooks Desktop POS to Shopify POS.
Why Migrate from QuickBooks Desktop POS to Shopify POS?
Intuit, the company that develops QuickBooks POS, has announced that they will discontinue support and updates for the desktop version of QuickBooks POS as of October 3, 2023.
The company has partnered with Shopify to create QuickBooks Desktop Connector, an app designed to assist merchants in transitioning from QuickBooks Desktop POS to Shopify POS.
There are other reasons why you might consider migrating to Shopify POS, including:
Improved Integration
Shopify Point-of-Sale (POS) enables merchants to seamlessly integrate their in-store sales with their online sales. This means that inventory levels, customer data, and sales data are automatically synchronized across all sales channels.
Better Performance
Another reason why a merchant might consider migrating to Shopify POS is because it offers better performance.
In reality, Shopify POS works a cloud-based app that can be quickly installed on a smartphone or tablet, making it more responsive and faster than QuickBooks Desktop POS, designed as a desktop-based point-of-sale system.
Easier to Use
A key reason businesses may switch from QuickBooks Desktop POS to Shopify POS is that Shopify POS offers an intuitive and clean user interface, making it easier to use, even for users that aren’t tech-savvy.
More Features
Shopify POS is a more comprehensive and robust point-of-sale solution than QuickBooks Desktop POS, offering businesses access to more features to enhance their sales operations.
Exclusive Offers & Discounts
When you migrate from QuickBooks POS to Shopify POS, you are eligible to receive the following exclusive offers and discounts:
- 50% off a one-year subscription to Shopify POS Pro, which offers advanced point-of-sale features for managing your inventory and sales.
- 50% off additional POS hardware, such as barcode scanners and receipt printers.
- Free Tap & Chip Card Reader, which allows you to accept contactless payments and chip cards in your store.
- Free 3-year Basic Shopify plan, which provides access to essential features for building and managing your online store.
- Free custom-built QuickBooks Desktop POS migration tool, which streamlines the migration process and ensures that your data is transferred accurately.
Grow your customer base and sell in-person effectively with Shopify POS, and unlock top-tier tools with Shopify POS Pro, from seamless checkout experience to powerful apps to advanced reporting. Start your free trial now.
What Can Be Migrated from QuickBooks Desktop POS to Shopify POS?
The following data can be migrated from QuickBooks Desktop POS to Shopify POS using the Connector app:
- Customer data - names, emails, and phone numbers.
- Vendors data.
- Location data (maximum 20 locations).
- Inventory items - product titles, barcodes, quantity, location, price, and variants.
What Cannot Be Migrated from QuickBooks Desktop POS to Shopify POS?
The following data cannot be migrated from QuickBooks Desktop POS to Shopify POS using the Connector app.
- Product images.
- Product SKUs.
- Transfer slips.
- Orders, purchase orders, and discounts.
- App Store credit.
- Customer loyalty information.
What to Do Before Migration?
Before migrating from QuickBooks Desktop POS to Shopify POS, there are a few requirements that you should meet:
- Make sure you have created a Shopify account. You can start a Shopify free trial here and gain access to all the features at no cost.
- Ensure you are on the latest versions of QuickBooks POS and QuickBooks Desktop.
- Enable Shopify Payments, Shopify’s built-in payment gateway, in your online store.
- Add your store’s location in your Shopify admin.
- Install the QuickBooks Desktop Connector app in your Shopify admin.
- Have an active Shopify POS Pro subscription.
Step-by-step Guide for Migrating from QuickBooks Desktop POS to Shopify POS
Assuming you have fulfilled all the abovementioned requirements, let’s proceed with our step-by-step guide.
Step 1: Export your QuickBooks Desktop POS data
The first step to migrating from QuickBooks Desktop POS to Shopify POS is to export your data. You can export the following data from QuickBooks Desktop Point of Sale to Excel by default.
- Inventory items
- Customers
- Vendors
- Departments
- Employees
Here’s our detailed guide
- Open the QuickBooks Desktop Point of Sale app on your desktop computer and click File at the top.
- In the Data Export Wizard, select Inventory Items, then click Next.
- Provide the required data for the following fields:
- Select destination file: choose the location where the file will be saved.
- Write records to (sheet): select the worksheet where the data should be entered.
- Begin exporting data to row: specify the row where the data should start.
- In the Choose export template section, select the default inventory template or manually manage the mapping to match the details to be exported from QuickBooks Desktop Point of Sale.
- Click Next.
- Verify if the records are ready for export, then click Export.
Step 2: Acquire Your Stocky API Key
Once you have exported your QuickBooks POS data, the next step is to locate your Stocky API key. This step aims to migrate your QuickBooks data to Stocky, an inventory management app that Shopify developed and included with Shopify POS subscriptions.
To find your Stocky API key, follow the steps below:
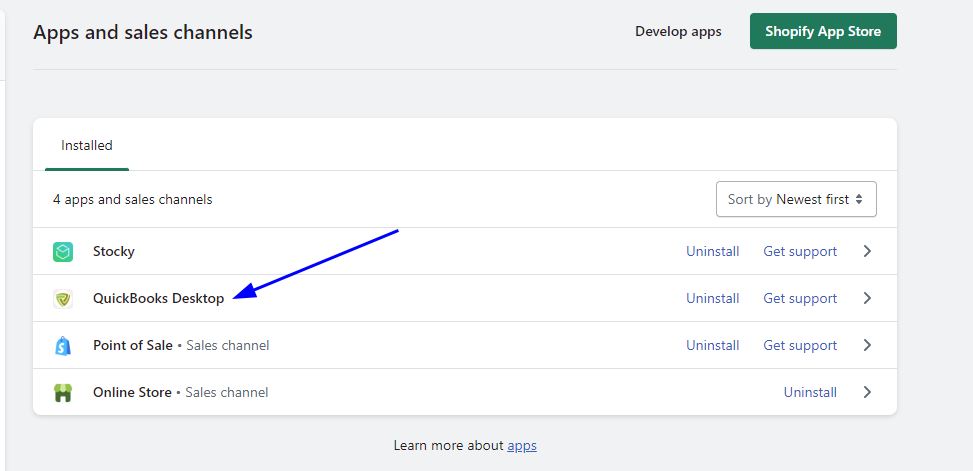
- From your Shopify admin, click Settings and select Apps and sales channels.
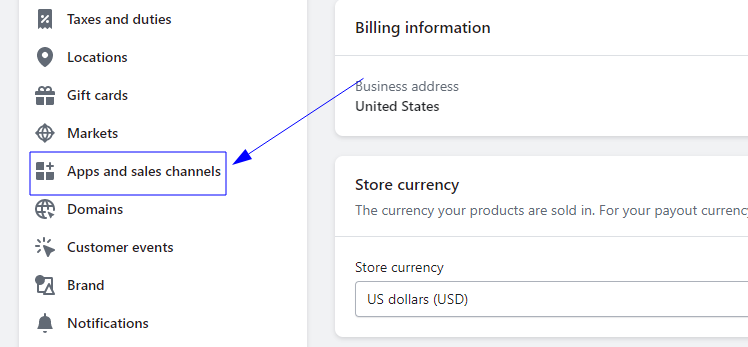
- From the Apps and sales channels page, hit Stocky and click Open App.
Note: If you do not see the Stocky app option, open the Shopify App Store and add it to your Apps and sales channels page.
- Your products, variants, and orders will then be synced to the Stocky app.
- From the Stocky app’s admin, click Preferences

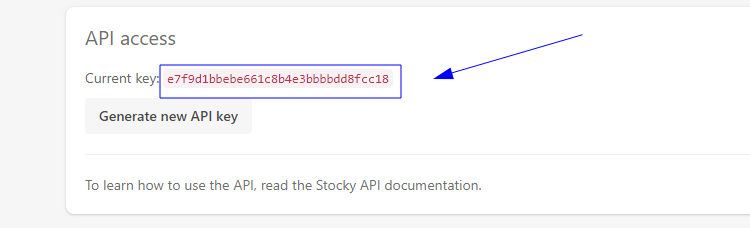
- Click API access > Generate new API key
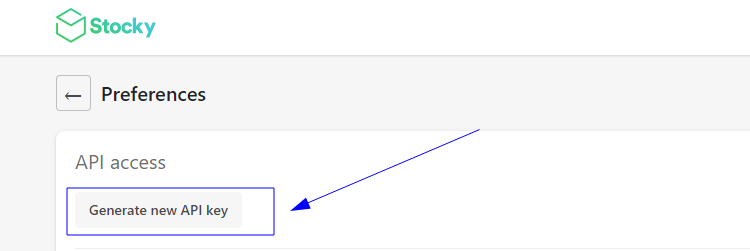
- You now can copy and paste your API key
Step 4: Import QuickBooks Desktop POS Data to Shopify
Once you have acquired your Stocky API key, it’s time to upload your QuickBooks Desktop POS data to Shopify.
- Go to Apps and sales channels from your Shopify admin.
- From the Apps and sales channels page, open the QuickBooks Desktop Connector app > Get Started.
- Under the Upload QuickBooks POS data files section, upload the following data files:
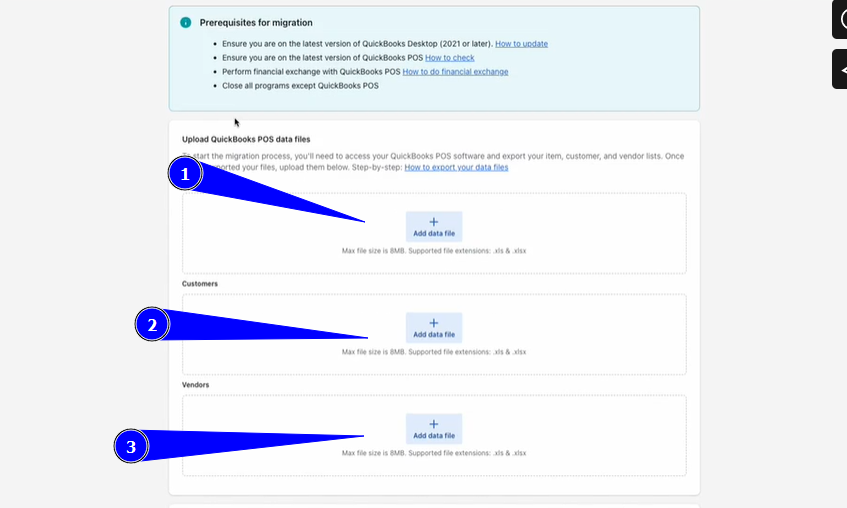
1. Inventory items
1. Customers data
1. Vendors data * Enter the <b>Stocky API key</b> you obtained earlier into the input field and hit <b>Next.</b>
Step 5: Match QuickBooks Locations to Shopify Locations
Now that your data has been uploaded, the next step is to match your QuickBooks location with the locations you create in Shopify.
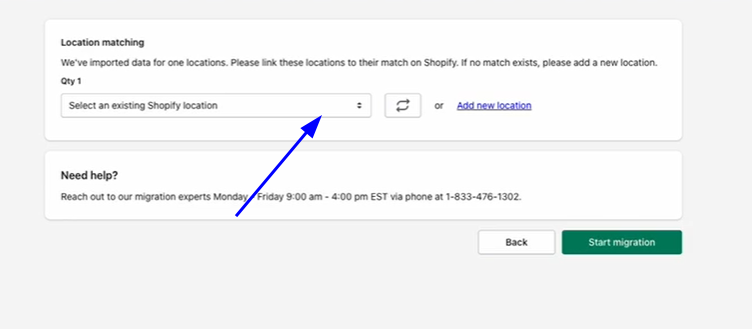
This step ensures products are associated with inventory stock at the correct physical store locations. You can add all of your existing Shopify locations under the QTY sections.
Learn more about QuickBooks POS and Shopify POS data mapping
Step 6: Start Migration
Once you are done mapping your locations, you can initiate the migration process. To start, click the “Start migration” button, and the migration process will begin.
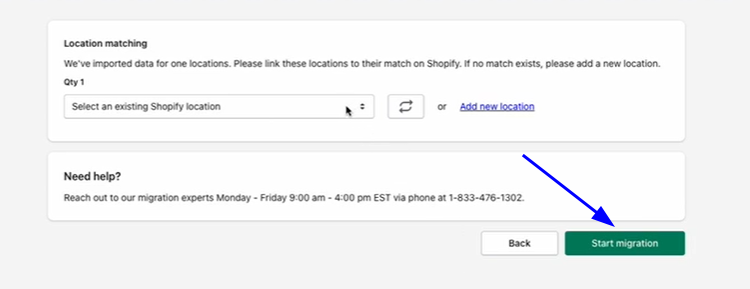
The process may take up to 5-6 hours, depending on how much data you migrating to Shopify POS.
Note: Your product variants are imported in a draft state and remain unpublished on any sales channels. Make sure to review your products before making them available for sale on the new platform.
Step 7: Integrate Your Accounting Data with Shopify
With your QuickBooks Desktop POS data now migrated to Shopify, you can now integrate QuickBooks Desktop accounting software with Shopify. This step aims to keep your financial data and sales information synced between QuickBooks Desktop accounting software and Shopify.
Set Up Tax Preferences in QuickBooks Desktop App
Before you perform the integration, ensure to set up your tax preferences in the QuickBooks Desktop accounting software. Here is how to do it:
- Open the QuickBooks Desktop app.
- Click Edit > Preferences.
- In the “Do you charge sales tax” section, select Yes.
- Select or add a sales tax item:
- If you have the most common sales tax item, select it in the “Most common sales tax item” field.
- To add a new sales tax item, follow these steps:
- Click “Add sales tax item.”
- In the “Sales Tax Name,” provide a name for your sales tax item.
- In the “Description” field, enter “Sales Tax.”
- In the “Tax Rate (%)” field, enter 0%.
- Click OK.
- Click OK.
Create An App Token
Once you have set up your tax preferences, it’s time to generate an app token in the QuickBooks Desktop accounting software. Here are the steps:
- Launch the QuickBooks Desktop app on your computer
- Click File > App Management > Manage Web Apps.
- Search “Shoppinpal QBD connector” in the Search Apps field.
- Hit Set up from the Action column > Generate Token.
- Now Copy to clipboard
Map your QuickBooks Data
Now, you need to add the app token, map your QuickBooks data fields with Shopify categories and add the Stocky API that you obtained earlier.
- Click Settings from your Shopify admin dashboard and select Apps and sales channels.
- From there, click the QuickBooks Desktop app.
- Open the app and click Start Integration > Generate app token next.
- In the D.Enter token section, add the app token and hit Next.
- Under the Account mapping section, select your QuickBooks fields that match your Shopify categories.
- Enter your Stocky API key under the “Enter Stocky’s API key to start the sync” section.
- Hit Start Integration.
Step 8: Inform your Customers about the Migration
Now that you have completed the data migration process, it is important to inform your customers about the migration and any maintenance that may occur. Here’s how you can do it:
- Notify your customers about the migration through social media channels, email lists, or websites.
- Provide the reasons for the migration.
- Explain how the re-platforming will affect your customers, such as changes to payment methods, order processing, or shipping.
- Provide updates to your customers throughout the migration process to keep them informed.
Step 9: Get Your Staff Ready
To ensure a successful migration from QuickBooks Desktop POS to Shopify POS, it is crucial to train and prepare your staff for the transition. By involving them in the migration process and familiarizing them with the important features of Shopify POS, you can ensure a smooth transition and maximize the benefits of the new system.
Migrating Product Images from QuickBooks POS to Shopify
You cannot migrate your product images from QuickBooks POS to Shopify using the Connector app. However, you can manually export product images in bulk from QuickBooks POS and then import them to Shopify. Here are the steps to follow:
Exporting Inventory pictures in bulk from QuickBooks POS
- Open the QuickBooks Desktop POS app on your computer.
- Click on File and select Utilities > Export.
- From the Data Export Wizard, check the box next to Item Pictures under the Export files to a folder section.
- By default, pictures for all items in your inventory will be exported. You can select which items you want to export by clicking on the “Export pictures” pull-down menu.
- Next up, click Browse and choose where to save the exported pictures.
- Create file names and select which types of pictures you want to export.
- Check the box next to “Open the destination folder when export is complete” and click Export.
- Wait for the export to complete, and then click Finish.
Importing images to Shopify
After you export your images, you can now import them to Shopify. There are several ways to import product images to Shopify:
- Import images using the CSV file
- Use a third-party app from the Shopify App Store, such as Hextom: Bulk Image Edit & SEO, Smart Image Upload, or ifyApps Image Manager.
Other Ways to Migrate from QuickBooks Desktop POS to Shopify POS
There are some alternative methods to migrate QuickBooks POS to Shopify POS. They are as follows:
Third-party migration services
Several services are designed to streamline the migration process and help minimize risks such as data loss or corruption. Two of these services are LitExtension and Cart2Cart.
LitExtension: LitExtension is a popular service for data migration between different e-commerce platforms. It can migrate data, including customers, orders, products, and vendors, from QuickBooks POS to Shopify. Always contact their customer service for specifics about your migration project.
Cart2Cart: Cart2Cart is another service that offers a similar function. It supports many data migration options and boasts a simple, user-friendly migration process. As with LitExtension, it’s essential to reach out to their support team for detailed information regarding your specific migration needs.
Hiring a Professional
Another alternative method to migrate from QuickBooks POS to Shopify POS is to hire a professional. This method is more expensive but saves time and ensures the migration process is handled correctly.
QuickBooks Desktop POS to Shopify POS Migration: Common Issues and How to Fix
You may encounter some common issues when migrating from QuickBooks Desktop POS to Shopify POS. Here are some of the most common issues and how to fix them:
Data files Won’t Upload
Unable to upload data due to pre-requisites not being met
If you receive an error message saying, “Unable to upload file due to pre-requisites not being met”, here are the possible fixes:
- Ensure you have met all of the requirements listed for the migration process.
- Confirm that your files are in the correct formats. The supported formats for data migration to Shopify POS are .xlsx or .xls.
- Check the file size. Make sure that your file is under the maximum size limit of 8 MB. If it exceeds this limit, you can compress the file or split it into smaller files.
Unable to upload files due to missing headers
If you receive an error message saying “Unable to upload file due to missing headers” during the data migration process, your data file is missing some required columns or headers.
- Inventory data file: Item Number, Item Name, Item Description, Attribute, Size, Average Unit Cost, Regular Price. Vendor Name, Qty 1, QB ListID.
- Customer data file: Company, Last Name, First Name, Street, Street2, State, ZIP, Phone 1, EMail, QB ListID, City.
- Vendor data file: Company, Last Name, First Name, Street, Street2, City, State, ZIP, Phone 1, EMail, QB ListID.
Data Import & Export Issues
Cannot Generate Stocky API Key
If you cannot find your Stocky API key from the Stocky app in your Shopify admin, then try logging out of your Shopify account and repeat the process.
Stocky API Key is not Correct
If your Stocky API key is not correct, then try generating the key again to see if the problem is fixed.
Products Imported with Incorrect Quantity
If your products are imported to Shopify with incorrect or zero quantity, check the Adjustment History section of your product in QuickBooks Desktop POS to identify any issues.
Adjustment History in QuickBooks Desktop POS keeps track of any changes you make to the number of your products, including any inventory adjustments or corrections.
QuickBooks Desktop POS Migration: FAQs
Can I Migrate Product SKUs to Shopify?
Yes, you can migrate product SKUs from QuickBooks POS to Shopify. However, this would need to be done manually for each product in the SKU field in Shopify.
Can I Migrate Orders, Purchase Orders, and Discounts to Shopify?
No, you cannot migrate your orders, purchase orders, and discounts from QuickBooks POS to Shopify.
After migration, your new purchase orders can be created in the Stocky app, which is integrated with Shopify POS. These purchase orders will be automatically synced with the QuickBooks Desktop accounting software.
Can I Migrate Existing Store Credits to Shopify?
No, you cannot natively migrate your existing store credits to Shopify. However, you can see a third-party app called Selling Point to transfer your QuickBooks store credits to Shopify. Your existing credits will be mapped as gift cards in Shopify.
What Happens to My QuickBooks Desktop POS Data After Migration?
Once your data has been successfully migrated to Shopify POS, you can continue to access your QuickBooks POS data. However, you won’t be able to accept customer payments through QuickBooks Desktop POS after October 3, 2023.
How Much Does It Cost to Migrate from QuickBooks Desktop POS to Shopify POS?
The cost of migrating from QuickBooks Desktop POS to Shopify POS can vary depending on several factors, including Shopify subscription fees, migration tools, apps and services.
| Costs & Fees | Prices | |
|---|---|---|
| Shopify subscription plan | At least Basic Shopify plan | $39 per month |
| Migration tool | QuickBooks Desktop Connector app | Free |
| Shopify POS Subscription | Shopify POS Pro | $89/month per location |
| Migration app | Image Edit & SEO, Smart Image Upload, etc | $5 to $49 per month |
Bottom Line
That’s how to migrate from QuickBooks Desktop POS to Shopify POS. Shopify POS offers a more robust point of sale solution that works for all sizes of businesses. Migrating from QuickBooks Desktop POS to Shopify POS can be a significant step towards optimizing your business operations and embracing a modern, cloud-based point-of-sale system.


