
10 Steps To Add Google Analytics To A Website
By Sam Nguyen

In this post, we’ll explore a comprehensive roadmap consisting of ten essential steps to integrate Google Analytics on a website seamlessly.
Key Takeaways
- Google Analytics is a potent tool that tracks website performance and provides insights into visitor behavior, particularly suited for small and medium-sized businesses.
- It offers valuable data on customer actions, allowing informed decisions to optimize websites and marketing strategies.
- Google Analytics is free to use, and the process to add this tool to your website is easy, which can be done in 10 simple steps.
Why Should You Use Google Analytics?

Google Analytics is a powerful tool for tracking website performance and gaining insights into visitor behavior. Designed for those seeking a comprehensive overview, especially within small and medium-sized businesses, it offers valuable data on customer actions, such as their origin and on-site activities.
Data collected through Google Analytics can be leveraged to examine customer behaviors, including their origins and activities on your site. This valuable insight aids in optimizing your website for better visitor retention and conversion rates. Furthermore, Google Analytics data informs strategic enhancements to marketing campaigns, guiding the efficient allocation of your budget for maximum impact.
How To Add Google Analytics To Your Website
To integrate Google Analytics on the website, follow these steps:
Step 1: Creating a Google Analytics Account or Sign In
If you don’t have an account or prefer a distinct one for business management purposes, like your website, you can establish a new account, you should create a dedicated business account to run Google Analytics.
The setting up process is straightforward but varied slightly based on whether you want to use an existing email, such as your work email, or create a new Gmail account.
For existing email:
- Visit Google Accounts sign-in page.
- Choose ‘Create an account.’
- Input your first and last name.
- Opt for ‘use my current email address.’
- Provide your current email address.
- Click ‘Next.’
- Verify via the received code in your email.
- You’re all set!
For a new Gmail account:
- Visit Google Accounts sign-in page.
- Select ‘Create an account.’
- Enter your first and last name.
- Choose your desired username.
- Set a password.
- Click ‘Next.’
- You’re good to go!
You can use the tips and tricks below to create a Google Analytics account.
- Use an Existing Google Account: If you already have a Google account for services like Gmail, Google Drive, or YouTube, consider using it to sign in to Google Analytics. This centralizes your Google services and simplifies account management.
- Choose Relevant Email: When creating a new account, opt for an email address associated with your business or website. This helps maintain a professional image and keeps your work-related activities organized.
- Organize with Properties: If you manage multiple websites or apps, use separate properties within your Google Analytics account for each. This helps maintain precise data segmentation.
- Use Google Tag Manager (Optional): Google Tag Manager can simplify the process of adding tracking codes and other tags to your website. It provides a centralized platform for managing various codes without directly modifying your site’s code.
Step 2: Setting Up a Property in Google Analytics
As you embark on your journey with tools like Google Analytics, the term ‘property’ will become quite familiar. However, in this context, the term “property” doesn’t refer to your physical residence but rather encompasses your entire online presence, including websites, blogs, or even applications. Each entity within Google Analytics is assigned a unique ID, allowing it to be distinguished from other entities.
To initiate the setup of your property (website) on Google Analytics, adhere to these straightforward guidelines:
- Log into your Google account and access Google Analytics.
- Navigate to the ‘Admin’ section in the screen’s left corner.
- In the ‘Property’ column, click the ‘Create Property’ button, denoted by a blue hue.
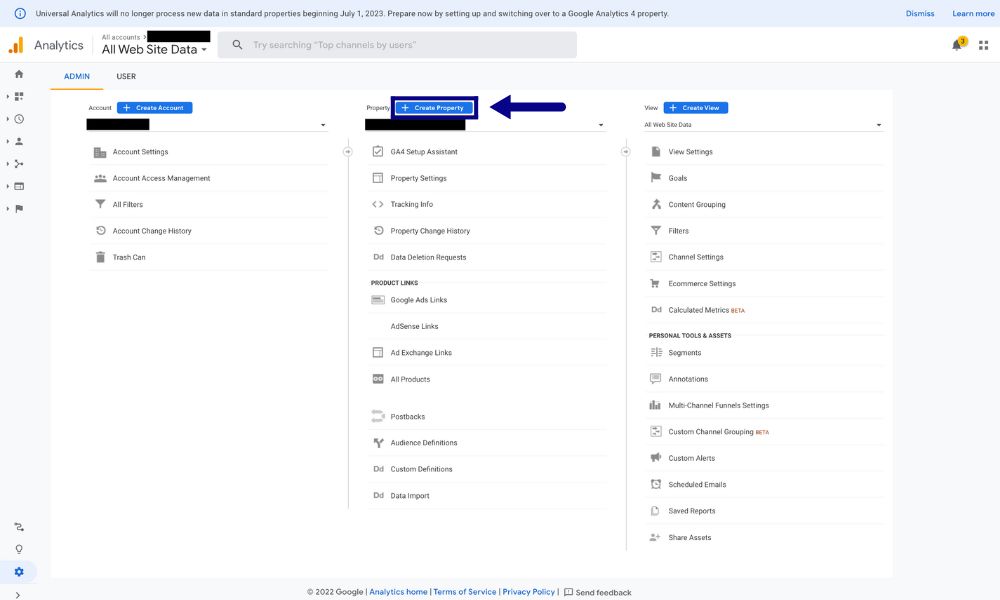
- Enter an easily recognizable name for your property.
- Opt for ‘Show Advanced Options.’
- Activate the ‘Create a Universal Analytics property’ feature.
- Input your website’s URL.
- Take advantage of the opportunity to establish both a Google Analytics 4 and Universal Analytics property – a prudent step for future utility.
- Proceed by clicking ‘Next.’
- Furnish the requested details, including the number of employees in your business and your intended usage of the Google Analytics platform.
- Conclude by clicking ‘Create.’
- Affirm your acceptance of the Terms of Service and finalize the process by clicking ‘Finish.’
Having successfully integrated your property into Google Analytics, you’re now prepared to delve into platform setup and data importation.
Here’s a tip: A pivotal attribute of Google Analytics lies in its proficiency to track conversions (in GA4) or goals (in Universal Analytics). Prioritize configuring these aspects at an early stage for enhanced analytics insights.
Step 3: Filter the Data
Crafting a customized view becomes essential to access the data pertinent to your business goals. This process is straightforward – follow these instructions:
- Navigate to ‘Admin’ in the left-hand menu.
- Within the ‘View’ column, opt for ‘+ Create View.’
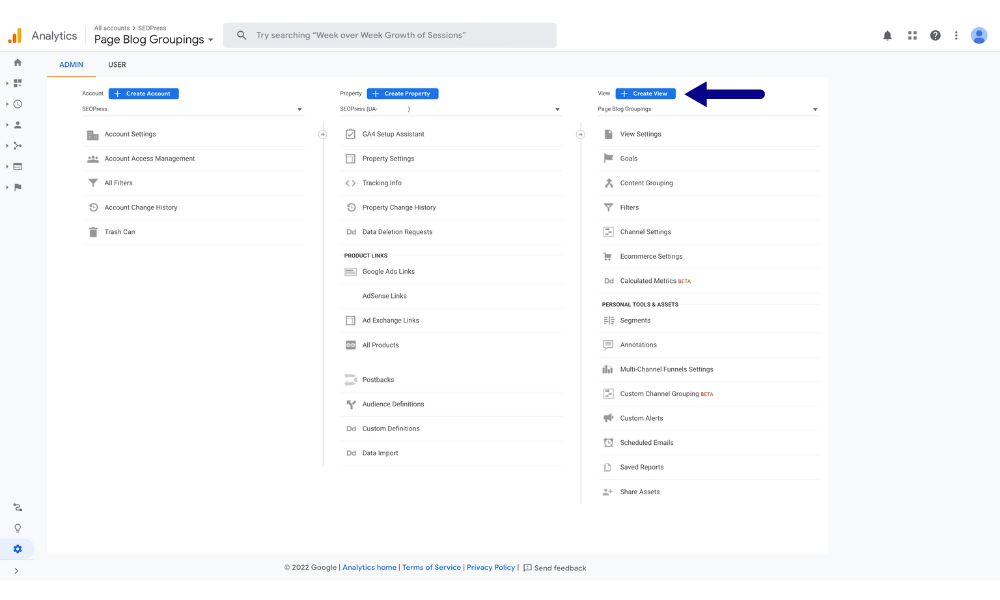
- Choose ‘Website’ as your selection.
- Assign a distinct name to your view.
- Designate the reporting time zone suited to your needs.
- Conclude by selecting ‘Create View.’
Customizing your view extends further, allowing adjustments like renaming or selecting your preferred currency for reports. Here’s how:
- Click ‘Admin.’
- In the ‘View Column,’ ensure the desired view is selected from the drop-down.
- Opt for ‘View Settings.’
- Execute any necessary modifications.
- Preserve changes by clicking ‘Save.’
Generally, you can generate up to 25 views for each property, although direct communication with Google might expand this limit. Each view can be tailored to spotlight distinct insights, proving particularly valuable for businesses housing multiple divisions. For instance, the finance department’s data requirements differ from the marketing department’s.
Switching between views is simple: select the ‘all accounts’ box in the upper left corner, designate your account, choose your property, and then pinpoint the desired view. This fluid navigation empowers swift access to specific insights aligned with your requirements.
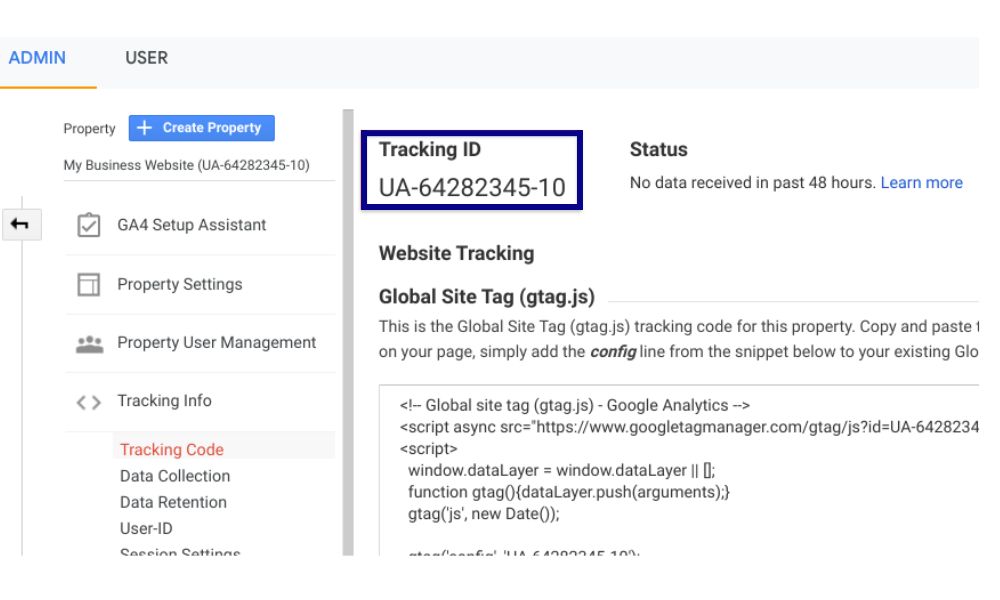
Step 4: Getting the Tracking Code
To facilitate data acquisition from your website and its subsequent integration into reports, embedding Google Analytics’ tracking code is essential.
Before incorporating the code into your website, securing the code itself is the initial step. To procure your distinct tracking code, adhere to the following directions:
- Access your Google Analytics account by signing in, if not already.
- Click ‘Admin’ situated in the lower left corner.
- Choose the relevant account requiring the code From the drop-down menu in the ‘Account’ column.
- Within the ‘Property’ column, opt for the property necessitating the code.
- In the ‘Property’ column, select ‘Tracking Info,’ followed by ‘Tracking Code.’
- Your tracking code is positioned in the upper left corner, while the global site tag is presented within a highlighted box below.
Step 5: Installing the Tracking Code
Once you possess your tracking code, the next vital stride is its integration into your website. The approach you take depends on the platform you operate. Here’s a breakdown of methods for distinct platforms, accompanied by clear instructions and visual examples.
Custom-Built Websites:
You need to embed the global site tag within each tracked page manually.
- Open your website’s source code.
- Locate the <`
head`> tag on each desired page. - Insert your Global Site Tag immediately before the <`
/head`> tag.
Shopify
- Retrieve your tracking ID from Google Analytics.
- Access your Shopify Admin.
- Go to “Online Store” > “Preferences.”
- Paste your tracking ID in the Google Analytics section.
Here’s a tip: Simplify the tracking code integration process further by employing Google Tag Manager, streamlining your website’s analytics setup.
Step 6: Verifying Tracking Code Installation
After embedding your tracking code, the next crucial phase involves its verification. Ensure accuracy by following these steps:
- Log into your GA account and select your targeted website.
- Navigate to the “Admin” section.
- Within the “Property” column, access “Tracking Info.”
- From the drop-down menu, choose “Tracking Code.”
At this juncture, a tracking status will be displayed. Different statuses signify varying conditions:
- “Tracking Not Installed”: Indicates the absence of Google Analytics tracking code on your site. Ensure proper implementation across all essential pages.
- “Receiving Data”: Reflects successful tracking code installation, with data being processed by Google Analytics. This confirms imminent data visibility and analysis within reports.
- “No Data Received”: Typically arises during initial Google Analytics setup or due to data processing delays. Wait 24-48 hours; if no data accrues, reevaluate code installation and inspect for potential technical impediments.
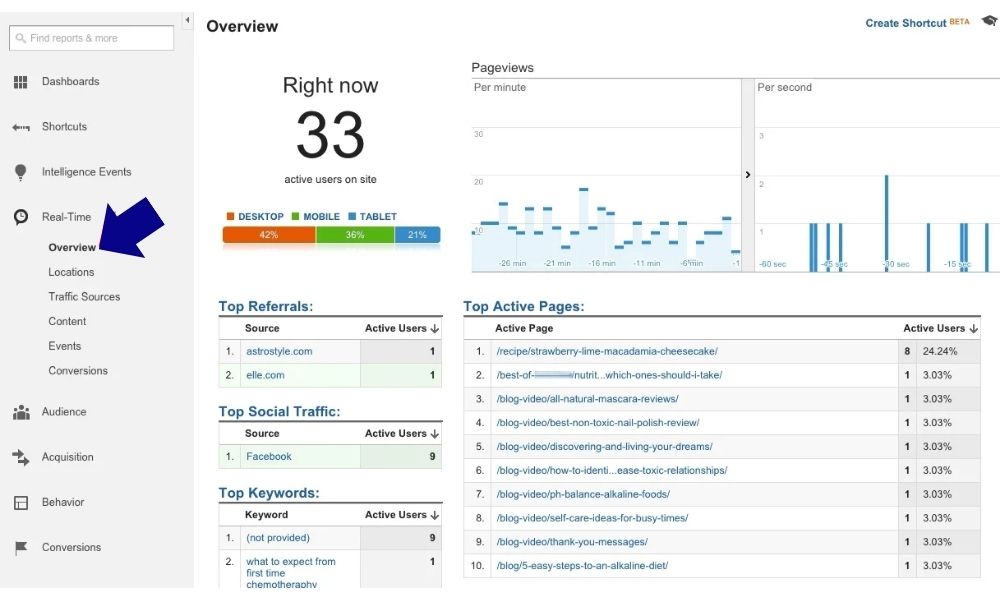
To further validate tracking functionality, utilize the “Real Time” report in GA:
- Open GA and access “Real-Time” via the left-hand menu, then proceed to “Overview.” This provides a live user snapshot.
Should discrepancies arise, consider third-party browser extensions like Google Tag Assistant. Install the tool on your web browser, navigate to your site, and it will scrutinize tracking code implementation, yielding comprehensive feedback.
Several factors could contribute in case tracking issues persist:
- Incorrect code placement: Verify the code’s location just before the closing </head> tag.
- Conflicting plugins or scripts: Temporarily disable plugins or scripts to pinpoint potential conflicts.
- Theme and design updates: Ensure code retention post-updates.
- Cache and cookies anomalies: Address these by clearing your browser cache and cookies, then revisit your site to assess tracking code efficacy.
Step 7: Understand Basic Google Analytics Reports
With your live and operational tracking, it’s time to delve into the practical utilization of Google Analytics, amplifying your website and business enhancement. This necessitates a foundational comprehension of essential reports.
Real-Time Report
Witness the pulse of your website through the real-time report. While it might feel somewhat intriguing, this feature offers invaluable insights into visitor engagement. Locate your view on the left-hand menu, providing real-time data on active users, their geographical locations, and the specific pages they’re exploring.
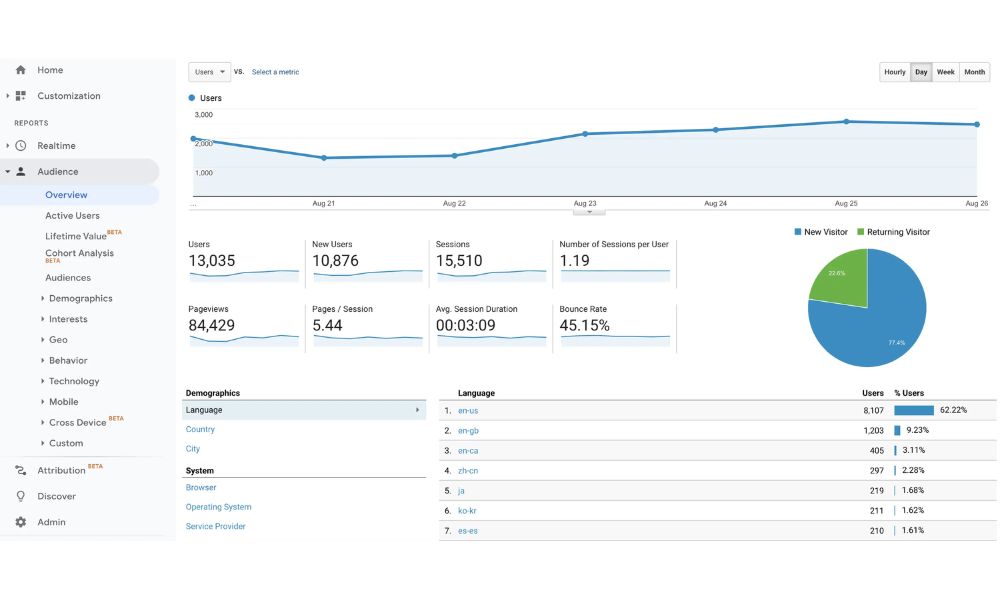
Audience
The audience tab unfolds a treasure trove of information about your website visitors. Delve into demographics, interests, geographical details, behavior patterns, and technology usage. This comprehensive view aids in refining content, marketing strategies and optimizing user experiences for enhanced engagement.
Acquisition
Unearth how users stumble upon your website with the acquisition report. Grasp the origins of visitors – organic searches, referrals, social media, direct visits, or paid searches. Leveraging this data unveils invaluable insights into your top acquisition channels, marketing efficacy, and avenues for enhancing traffic flow.

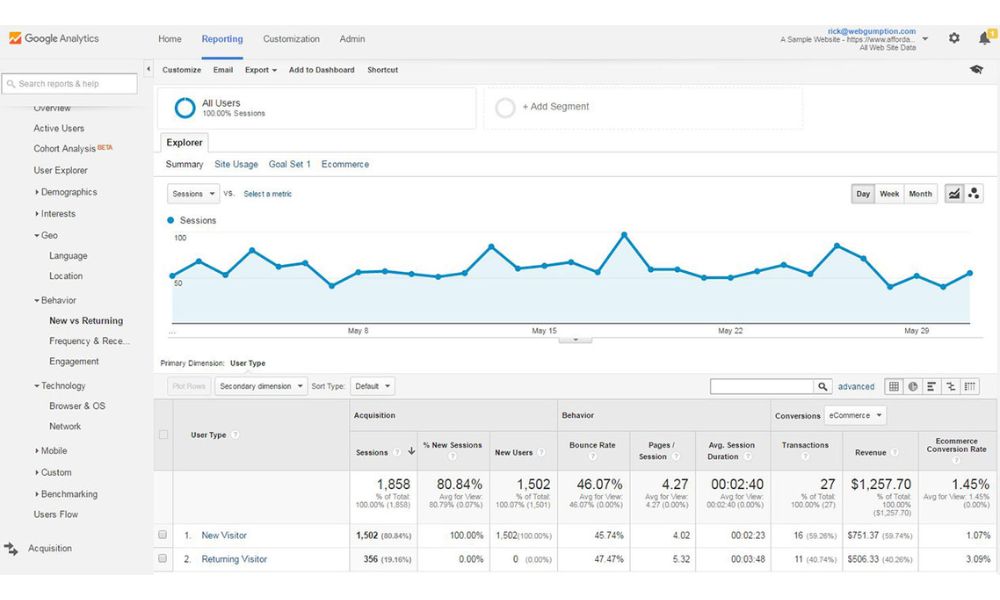
Behavior
Navigate the behavior tab to unearth intricate details about website content, search activities, loading speed, and user interactions. Gain insight into user behavior, preferred pages, search trends, loading times, and engagements. Utilize this data to fine-tune performance, identify popular content, heighten user experiences, and amplify site engagement.
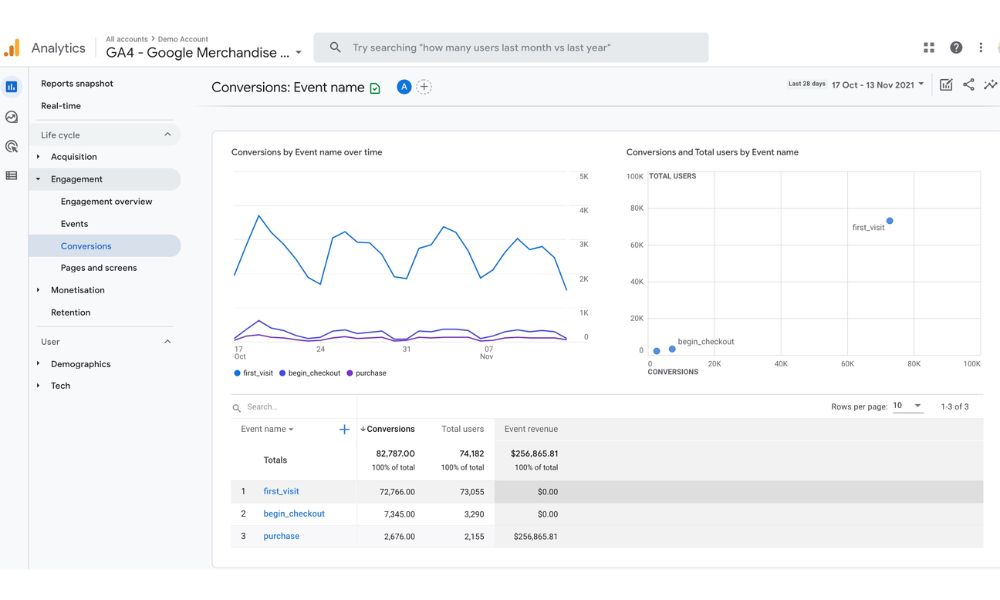
Conversion
Conversions, the pinnacle of visitor interactions, find their home in the conversion tab. Track and analyze your website’s goals, ecommerce transactions, and other crucial conversions. Monitor actions like purchases, form submissions, or newsletter sign-ups. This comprehensive report empowers you to gauge conversion strategy effectiveness, fueling website optimization.
Here’s a tip: Use annotations to mark crucial changes made on your website, enhancing your ability to correlate shifts with corresponding analytics fluctuations.
Step 8: Set Up GA4
Elevate your analytics with the inception of Google Analytics 4 (GA4), the most recent evolution of this dynamic tool. As GA4 ushers in advanced tracking and measurement capabilities, you can embrace the future, opening the door to an enhanced platform.
This recent update provides a comprehensive perspective of user actions across various platforms and devices, including websites, mobile apps, and even offline interactions. GA4 also introduces event-based tracking, insights powered by machine learning, and improved data privacy features.
There are numerous advantages to utilizing GA4. Most notably, it assists businesses in gaining a deeper understanding of customer journeys, enhancing customer targeting, and enabling data-driven decision-making.
Here’s how to seamlessly transition to the cutting-edge rendition of Google Analytics.
- Originate a New GA4 Property: Initiate the setup of a fresh GA4 property.
- Establish a Data Stream: Lay the foundation for data flow by setting up a data stream in GA4.
- Fine-Tune Configuration: Tailor GA4 settings to align with your specific requirements.
- Embed GA4 Code: Integrate the GA4 code meticulously onto your website.
- Confirm and Overcome: Validate the setup and troubleshoot any issues.
- Grasp Data Interpretation: Unlock insights as you delve into comprehending and analyzing your GA4 data.
Step 9: Setting Up Goals and Events
Distinguishing between events and goals reveals separate data dimensions and highlights different aspects in various reports.
For instance, consider the need to determine where your sales or leads originate from different traffic sources. In such cases, goals become essential for tracking these crucial interactions, providing a clearer understanding of the path to conversion.
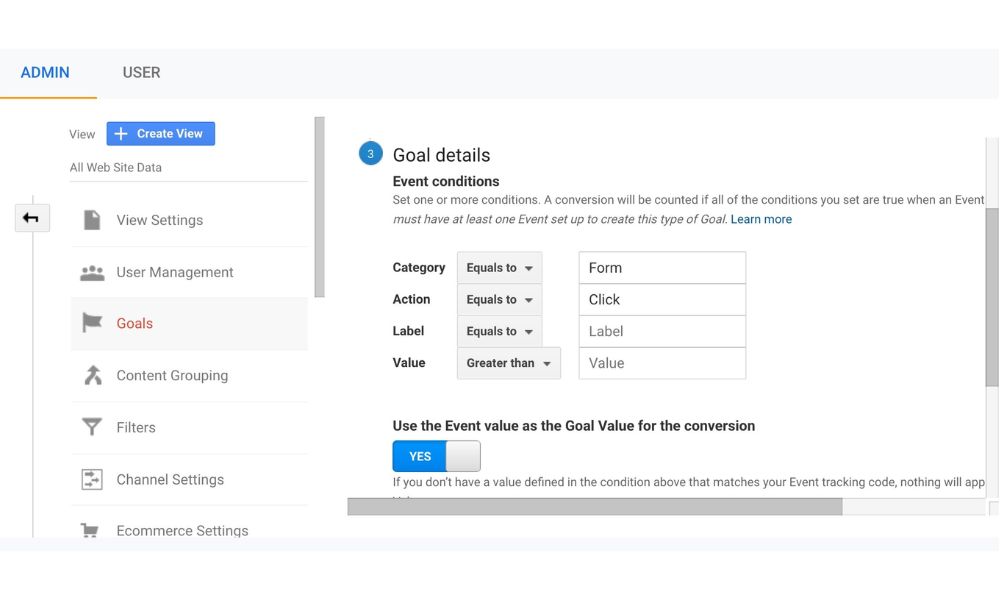
Here are ten steps to set up an event goal in GA:
- Access ‘Admin’ in Google Analytics -> Navigate to ‘Goals’ (within ‘View’).
- Initiate a ‘New Goal’ creation.
- Opt for the ‘Custom’ goal type.
- Bestow a distinctive moniker upon your innovative goal.
- Designate ‘Event’ as the chosen goal type.
- Progress with a decisive ‘Continue’ click.
- Add attributes: Category, Action, and/or Label.
- Validate the goal to ensure accuracy.
- Seal the deal by saving your freshly minted goal.
- Celebrate your achievement – you’ve successfully established your event goal!
Step 10: Customizing Analytics Settings
Customizing Google Analytics settings is crucial to gather accurate and relevant data that aligns with your tracking needs. Here’s how you can customize settings in Google Analytics, including advanced features like excluding internal traffic, enabling demographics tracking, and enabling enhanced e-commerce tracking:
- Excluding Internal Traffic: Internal traffic refers to visits to your website from within your organization. To exclude internal traffic from your analytics data, follow these steps:
- Go to your Google Analytics account and select the specific property you want to work with.
- Click on the “Admin” tab at the bottom left corner.
- In the “View” column, click on “Filters.”
- Click the “+ Add Filter” button.
- Name your filter (e.g., “Exclude Internal Traffic“).
- Choose the “Predefined” filter type.
- Select “Exclude” > “traffic from the IP addresses” > “that is equal to.”
- Enter the IP addresses or IP ranges you want to exclude (these are the IP addresses of your organization’s network).
- Save the filter.
- Enabling Demographics Tracking: Demographics tracking provides insights into the age and gender of your website visitors. To enable demographics tracking, follow these steps:
- Go to your Google Analytics account and select the specific property you want to work with.
- Click on the “Admin” tab.
- In the “Property” column, click on “Tracking Info” > “Data Collection.”
- Enable “Demographics and Interest Reports.”
- Save your changes.
- Enabling Enhanced E-commerce Tracking: Enhanced e-commerce tracking provides detailed insights into user behavior throughout the purchase process on your e-commerce website. To enable enhanced e-commerce tracking, follow these steps:
- Go to your Google Analytics account and select the property you want to work with.
- Click on the “Admin” tab.
- In the “View” column, click “E-commerce Settings.”
- Enable “E-commerce” and “Enhanced E-commerce Reporting.”
- Save your changes.
- You must update your tracking code to include the enhanced e-commerce plugin. If you’re using Google Tag Manager, you can configure tags and triggers to capture e-commerce events.
Remember, after making any changes to your Google Analytics settings, it might take some time for the new configurations to take effect and for data to be collected accordingly. Always double-check your settings and periodically review your analytics reports to ensure your tracking aligns with your goals.
The Google Analytics interface and options might have evolved since my knowledge cutoff date, so it’s recommended to refer to the latest Google Analytics documentation for the most up-to-date instructions.
Summarize
In this guide, we’ve provided you with ten steps to adeptly incorporate Google Analytics on your website. By meticulously following this comprehensive roadmap, you can seamlessly integrate the power of Google Analytics into your online presence, enabling precise data-driven decision-making and unlocking the full potential of your website’s performance analysis.
FAQs
When configuring Analytics accounts to oversee multiple websites, it’s important to remember the subsequent details: Each Analytics account can accommodate up to 2,000 properties, and each property can encompass up to 25 views.
By leveraging Ecommerce Tracking within Google Analytics, you’ll gain valuable insights into various aspects, including:
- Identification of products experiencing high or low sales volumes.
- Calculation of average revenue and the number of products per transaction.
- Assessment of your online store’s conversion rate.
- Recognition of shifts and patterns in transactions and revenue over specific periods.
- Verify that you’re examining the correct property within Google Analytics.
- Confirm the functionality of Real-Time Reports to ensure data is being captured.
- Diagnose potential problems with your Google Analytics Tag using the Google Tag Assistant tool.
- Inspect your Google Developer Tools for any JavaScript errors affecting data collection.
- Customize the dimension picker
- Customize the metrics
- Customize filters
- Customize the charts
- Link or unlink the report
- Delete the report


