
Top 5 Free Website Builders in Australia: Unveiling the Best of 2024
By Sam Nguyen

Let’s explore free website builder Australia’s features, pros, cons, and real-life success stories.
Shopify
Shopify, a renowned website builder, stands out for its user-friendly interface and powerful e-commerce capabilities.

Pros & Cons
Pros
- Seamless e-commerce integration
- Extensive and professionally designed theme library
- User-friendly interface for businesses of all sizes
- Robust security features for safe online transactions
- Dedicated customer support
Cons
- Transaction fees with third-party payment gateways
- Potential higher subscription costs for businesses with significant transaction volumes
- The steeper learning curve for advanced customization options
Personal Review
I appreciate website builders that prioritize user-friendliness. Navigating the interface should be seamless, making it accessible to users with varying technical expertise.
In the mobile-centric world, a website builder that ensures my site looks good and functions well on all devices earns my favor.
As my online presence grows, scalability becomes crucial. I consider how well a website builder can accommodate the expansion of my site, preventing the need for a disruptive migration in the future.
Shopify’s Key Features
Let’s explore why Shopify stands out in the crowded digital landscape.
Choose your theme.
Selecting the perfect theme for your Shopify store is crucial in crafting a visually appealing and user-friendly online presence. Follow these step-by-step instructions to choose your theme:
Step 1: Access Your Shopify Admin:
- Log in to your Shopify account.
- From the dashboard, navigate to “Online Store” and select “Themes.”

Step 2: View Top Free Themes:
- Click “Visit theme store” to explore the entire collection of available themes.

Step 3: Add the Chosen Theme:
- Once you’ve decided on a theme, click the “Add” button associated with that theme.
- The selected theme will be promptly added to the “Theme library” section of your Themes page within the Shopify admin.

Customize your theme
- Add logo
Step 1: Accessing Theme Customization
From Your Shopify Admin:
- Log in to your Shopify account.
- Navigate to “Online Store” and select “Themes.”

Step 2: Choosing the Theme to Edit
Find and Click Customize:
- Locate the specific theme you wish to customize.
- Click on “Customize” next to the chosen theme.

Step 3: Accessing Theme Settings
Click Theme Settings:
- Once in the customization panel, find and click on “Theme settings.”

Step 4: Adding Your Logo
Navigate to the Logo Section:
- Look for the “Logo” option within the Theme settings.
Select or Upload Your Logo:
- In the Logo area, click “Select image.”
- Choose one of the following options:
- To use a pre-uploaded image, click on the image and then click “Select.”
- To upload an image from your computer, click “Upload.” Choose the image, and it will be automatically selected upon upload completion. Click “Select.”
- To use a free image, click “Free images” and either search for or click on an image to select it.

Adding Alt Text to Your Logo:
- Click “Edit alt text.”
- In the Edit Image window, provide a brief description of the image.
- Click “Save.”
- Change layout
Step 1: Accessing Theme Customization
From Your Shopify Admin:
- Log in to your Shopify account.
- Navigate to “Online Store” and select “Themes.”

Step 2: Choosing the Theme to Edit
Find and Click Customize:
- Locate the specific theme you wish to customize.
- Click on “Customize” next to the chosen theme.

Step 3: Accessing Theme Settings
Navigate to Theme Settings > Layout:
- Within the customization panel, find and click on “Theme settings.”
- Select “Layout” from the available options.

Step 4: Adjusting Page Width
Use Range Slider for Page Width:
- Look for the range slider to adjust the page width.
- Slide the range slider to choose between a page width of 1000px or 1600px.
- The default setting is typically 1600px.

Step 5: Adding Vertical Space (Optional)
Optional: Add Vertical Space Between Sections:
- Utilize the range slider to add vertical space between sections.
- You can add a maximum of 100px between sections.
Step 6: Adjusting Grid Layout (Optional)
Optional: Adjust Horizontal and Vertical Space in Grid Layout:
- If your theme uses a Grid layout, use the Horizontal space and Vertical space range sliders.
- Adding horizontal space will add a maximum of 40px to your rows.
- Adding vertical space will add a maximum of 40px to your columns.
Step 7: Save Your Changes
Click Save:
- Once you’ve made the desired adjustments, click “Save” to apply the changes to your layout.
- Change fonts
Step 1: Accessing Theme Customization
From Your Shopify Admin:
- Log in to your Shopify account.
- Navigate to “Online Store” and select “Themes.”

Step 2: Choosing the Theme to Edit
Find and Click Customize:
- Locate the specific theme you wish to customize.
- Click on “Customize” next to the chosen theme.

Step 3: Accessing Theme Settings
- Within the customization panel, find and click on “Theme settings.”
- Look for the option labeled “Typography” and click on it.
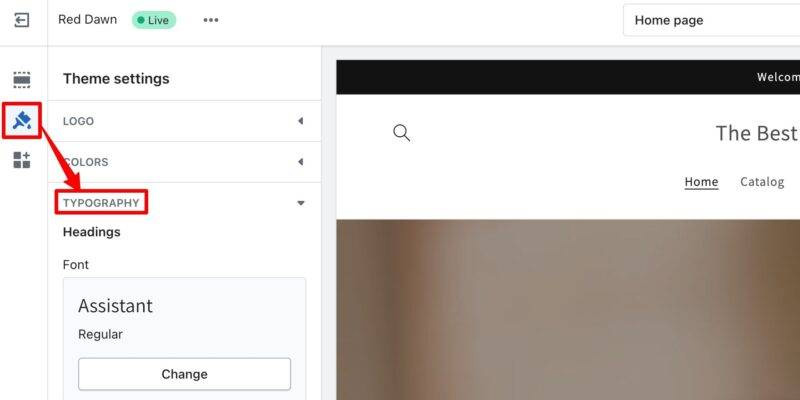
Step 4: Customizing Fonts
For Each Type of Text, Click Change:
- Under Typography, you’ll find options for various types of text (e.g., headings, body text).
- Click “Change” next to the type of text you want to modify.

Step 5: Using Font Picker
Explore and Choose Fonts:
- In the font picker, explore available fonts using the search field or by clicking “Load more” to see additional options.
- Click the name of the font you wish to use.
- After choosing the font, click “Select” to confirm your choice.
- Once you’ve adjusted the fonts for each text type, click “Save” to apply the changes to your Shopify store.

Add pages and content
- How to create Home Page, Product Page
Step 1: Accessing Page Creation
From Your Shopify Admin:
- Log in to your Shopify account.
- Navigate to “Online Store” and select “Pages.”

Step 2: Adding a New Page
Click Add Page:
- Look for the “Add page” button and click on it to create a new page.

Step 3: Title and Content Input
Enter Title and Content:
- Provide a descriptive and clear title for your page. This title will appear in the browsers tab or title bar and search engine results.
- Enter the content for your page, including any text, images, or multimedia elements.

Step 4: Visibility Settings
Visibility Settings:
- In the Visibility section, choose when the page should be published.
- By default, your new page is visible after you click “Save.”
- Select the “Hidden” option if you want the page to be hidden from your online store.
- Alternatively, click “Set a specific publish date” to control when your page is published.

Step 5: Save Your Page
Click Save:
- Once you’ve entered the necessary information and adjusted visibility settings, click “Save” to create your new page.
Optional Step: Adding Page to Navigation
Optional: Add to Navigation Menu:
- To display a published page in your online store navigation, you can add a link to it in a menu. This step is optional but can enhance the accessibility of your new page.
- Create content for About Us and Contact sections
Contact Us Page:
Step 1: From Your Shopify Admin:
- Log in to your Shopify account.
- Navigate to “Online Store” and select “Pages.”
Step 2: Adding a New Page:
- Click “Add page” to create a new page for your Contact Us section.
Step 3: Title and Content Above the Form:
- Add a title like “Contact Us” or “Get In Touch.”
- In the Content box, you can enter any text you want to show above the contact form. You can leave it blank if no introductory text is needed.
Step 4: Theme Template Selection:
- Choose “Contact” from the theme template dropdown menu in the Online Store section. This ensures that the page is formatted appropriately for a contact section.
Step 5: Save:
- Click “Save” to publish your Contact Us page.
Add products
Step 1: Accessing Product Page
From Your Shopify Admin:
- Log in to your Shopify account.
- Navigate to “Products.”

Step 2: Adding a New Product
- Click “Add product” on the Products page to start adding a new product to your store.

Step 3: Product Details Entry
- Enter a title for your product, along with additional details.

Step 4: Save Your Product
- After entering all the necessary information, click “Save” to add your product to your Shopify store.

Add a payment method
Step 1: Access Payment Settings
- Log in to your Shopify admin.
- Navigate to “Settings” > “Payments.”

Step 2: Choose and Activate
- Search and select your preferred payment provider.
- Click “Activate” and enter your provider’s account credentials.
- Click “Activate” again to enable the new payment method.

Successful Case Studies
The Outrage is a socially conscious brand that supports numerous causes. Graphic tees and merchandise with impactful slogans raising awareness for social issues.
The website is noted for its user-friendly design and compelling content, mainly through impactful slogans on merchandise. Users appreciate the easy navigation, allowing them to explore and understand the brand’s mission effortlessly.

Joomla
Joomla stands out as a dynamic website builder, offering a user-friendly interface and robust features for individuals and businesses.

Pros & Cons
Pros
- Intuitive Interface
- Extensibility with Extensions
- Multilingual Support
- Robust Security Measures
- Developer Flexibility
Cons
- Learning Curve
- Customization Complexity
Personal Review
Having used Joomla for website building, I can offer insights into its strengths and areas that may benefit from improvement. The intuitive interface makes navigating Joomla a breeze, even for those with limited technical expertise. The availability of numerous extensions allows for tailored functionality, offering a wide range of possibilities for website customization.
Joomla’s Key Features
Let’s delve into the distinctive features that make Joomla a preferred choice for many in the web development landscape.
Selecting your Template
Joomla templates define your website’s front end, determining its overall appearance. To select a template in Joomla:
Step 1. Access the Templates Menu
- Navigate to the Templates menu, available in the backend sidebar and under the Extensions category in the top ribbon.
Step 2. Explore Styles Submenu
- Within the Templates menu, go to the Styles submenu. Here, you can apply a template to the entire website by clicking the button under the Default column.
Step 3. Default Templates
- Joomla includes default templates like Beez3 and Protostar. Clicking on their names allows you to modify color schemes and add extra images.

Installing your Template
While default Joomla themes suit beginners, many business projects demand more. Thankfully, you can easily install alternative templates from third-party websites like ThemeForest and Template Monster:
Step 1. Access the Extensions Menu
- Go to the Extensions menu and navigate to Manage > Install.

Step 2. Choose the Upload Package File Tab
- Within Install, select the Upload Package File tab.
Step 3. Upload Your Template
- Drag and drop your template archive into the designated area, or use the Browse for File button to select the ZIP file.
Step 4. Complete the Installation
- After a few seconds, the installation will be complete. You’ll now see the new template alongside the default ones.
Customizing Templates
To customize templates in Joomla and tailor them to your preferences, follow these straightforward steps:
Step 1. Access Templates Submenu
- In the Templates submenu, find the installed templates with previews.
Step 2. Preview and Access Files
- Click on a template name to view previews and access its files.
Step 3. Modify HTML and CSS
- You can alter HTML and CSS, upload new images, and adjust the template structure within the template files.
Step 4. Exercise Caution for Advanced Changes
- Note that modifying core theme files requires coding knowledge and is suitable for advanced users. Proceed with caution, as changes can impact your entire website.
Joomla Extensions
Joomla stands out for its extensive range of extensions, enhancing the CMS’s capabilities. Here’s a quick guide to installing extensions:
Step 1. Access Joomla Extensions Directory
- In the Joomla dashboard, locate the Extensions menu in the top ribbon and choose Manage > Install.
Step 2. Download Desired Extension
- Find the desired extension on Joomla’s Extensions Directory or other third-party sources. Download the ZIP file.
Step 3. Install Extension
- In the Install menu, select the Upload Package File tab. Drag and drop the ZIP file or use the Browse for File button.
Step 4. Complete Installation
- Joomla will automatically upload and install the extension, making it ready for use on your website.
Joomla Modules
Joomla modules offer enhanced functionality and improved user experience, including search boxes, login forms, and banners. Here’s a brief guide to managing Joomla modules:
Step 1. Access Modules Menu
- Go to the Extensions section in the backend and locate the Modules menu.
Step 2. Explore Pre-Enabled Add-Ons
- View all pre-enabled add-ons with details on their position, type, and accessibility.
Step 3. Customize Modules
- Click on a module name to customize its position, size, and visual interface.
Step 4. Add New Modules
- Introduce new modules by clicking the New button. Choose from various types or create a custom module.

Creating New Articles
To add new content to your Joomla website in the form of articles, follow these straightforward steps:
Step 1. Access Article Management
- Find the Content menu or the left sidebar in the Joomla admin dashboard. Click on Articles.

Step 2. Initiate a New Article
- Click the New button to create a new article.
Step 3. Enter Content
- Use the editor to input your article content. You can use the Toggle Editor option if you prefer manual HTML tags.
Step 4. Adjust Settings
- On the right sidebar, modify the article status and category. Utilize the tabs above the editor to add media files and configure publishing options.
Step 5. Save Your Article
- Save your article to publish it on your Joomla website.
Adding Articles to Navigation Menus
To include articles like “About Us” or “Contact Us” in your Joomla website’s navigation menu, follow these quick steps:
Step 1. Access Menu Management
- In the Joomla admin dashboard, navigate to Menus.
Step 2. Choose Menu Section
- Click on the section you want to edit; all menu items in the selected section will be displayed.
Step 3. Add a New Menu Item
- Click on New to create a new menu item.
Step 4. Configure Menu Item
- Enter the menu item title. In Menu Item Type, select Articles > Single Article. Click Select, and choose the article you want to add to the menu.
Step 5. Save Your Menu Item:
- Save the menu item to ensure the article is part of your website’s navigation.

Successful Case Studies
Titan Window Films Ltd, an authorized Dealer & Applicator for 3M, specializes in premium window film solutions across Lower Mainland and Vancouver Island. With 26 years of expertise, they offer 3M Sun Control, Safety & Security, Decorative Films, and more.

The website’s design is visually appealing, creating a positive first impression. The use of images and videos adds value to the content. Moreover, the detailed information on different window film products, their applications, and their benefits is highly informative. It helped me make an informed decision.
Jimdo
Discover the world of website building with Jimdo—an all-encompassing platform that caters to your online business needs.

Pros & Cons
Pros
- Customization
- Mobile Optimization
- E-commerce Integration
- User-Friendly Design
- Free Image Library
- Flexible Layouts
- Real Examples of Inspiration
Cons
- Basic SEO Features
- Template Design Rigidity
Personal Review
As a user navigating the realm of free website builders in Australia, the experience with Jimdo is notably user-friendly and empowering. The platform offers various digital tools tailored for businesses, providing a home for your online presence.
Users can make changes anytime, adding personal touches with images and text. The availability of a free image library and photo editing tools further enhances the creative possibilities.
Jimdo’s Key Features
Discover the essential features that set Jimdo apart and elevate your online experience.
Edit your design—anytime
- Log in to your Jimdo account.
- Select your website.
- Select “Design”

- Select “Templates” from the design menu

- Choose the system page you want to edit.
- Modify existing content or add new areas as needed.

Put your domain on it
- Log in to your Jimdo account.
- Select your website and click “Edit” to enter edit mode.
- Go to “Menu” > “Domains & Emails” > “Domains.”

- Click “Add a new domain” and select “Choose a new domain.”

- Enter your desired domain and click “Check Domain” for availability.

- If the domain is available, click “Register domain.”
- Complete the registration form for the domain and submit it.
Add pages
- How to create Home Page, Product Page
- Log in to your Jimdo account and select the desired website.
- Click “Edit” to enter your Jimdo Creator website’s edit mode.
- Hover over the navigation bar until the blue “Edit Navigation” button appears.
- Click “Edit Navigation.”

- Select “Add a new page” and give the new page a name.

- Click “Save.”

- Create content for About Us and Contact sections
- Log in to your Jimdo account and select the desired website.
- Click “Edit” to enter your Jimdo Creator website’s edit mode.
- Navigate to the page where you want to add the contact form.
- Click on “Add Element > More Elements and Add-ons” and choose the “Form Element.“
- Find the form settings at the bottom, where you can choose the email address for messages, activate CAPTCHA for spam filtering, and set a confirmation message.
- Add a blog post
- Log in to your Jimdo account and select the desired website.
- Click “Edit” to enter your Jimdo Creator website’s edit mode.
- In the menu, navigate to “Blog > Main > Posts.”
- In the “Status” column, click on the eye icon. When it turns green, the post has been published.
Successful Case Studies
Genix Textile is an online store representing a European brand specializing in high-quality home textile linen products. The website, built using the standard WYSIWYG Jimdo editor, exudes a stylish and trendy aesthetic. The overall design, characterized by a soothing and comfortable impression, aligns perfectly with the nature of linen products.

Wix
Wix empowers you to create a website with a comprehensive suite of advanced functionalities, providing limitless possibilities for bringing your vision to life.

Pros & Cons
Pros
- User-friendly interface
- Versatile templates
- Drag-and-drop editor
- Scalability options
- Comprehensive features
- Built-in SEO capabilities
- Enterprise-grade security
- Inclusive accessibility tools
- eCommerce solutions
- Business Management app
Cons
- Template-based design constraints
- Limited flexibility in page editor
- Varied loading speeds
Personal Review
I find Wix a versatile website builder with an intuitive drag-and-drop interface, making it accessible for beginners. The platform’s extensive template library offers a solid starting point for various industries, although some design constraints may limit absolute creativity. Advanced design capabilities and full-stack web development tools cater to novices and experienced users.
Wix’s Key Features
Dive into an array of crucial features tailored to elevate your website-building experience.
Choose your theme
- In Wix, visit the Templates Page, which has 800+ templates categorized for easy browsing.

- Click “View” to preview a template or “Edit” to start customization.

- After editing, click “Publish” to share your website.
Customize your theme
- Click on “Site Design” in the Editor’s left sidebar.

- Hover over “Color & Text Theme” and select “Customize.”
- Choose a theme from the list.

- Optionally, customize fonts and colors:
- Colors: Pick the color palette featured on your site.
- Text: Customize styles for different text types, like headings and paragraphs across your site.

Add pages and content
- How to create Home Page, Product Page
- In Wix Editor, click “Pages & Menu” on the left side. Click “Site Menu.”

- Click “+ Add Page” at the bottom.

- Choose a blank page by clicking “+ Blank Page” or selecting a template.
- If using a template, hover over and click “Add Page” for your chosen design.
- Enter the new page name in the Pages panel.
- Click “Done.”
- Design the new page to your liking.
- Create content for About Us and Contact sections
- In Wix Editor, click “Add a Section” on the left side.
- Click a category.
- Click your chosen section to add it to your page.
- Add a blog post
- Open the Wix Owner app and go to your site.
- Tap the Manage icon.
- Select “Blog” under Content & Community.
- Tap “Create New Post.”
- Write your post title and content.
- Optionally, add formatting or tap the Add icon for images, galleries, or dividers.
- Tap “Next.”
- Access “Post Settings” and customize each tab.
- Tap “Save.”
- Choose to “Save Changes,” “Schedule” for a future publish, or “Save & Publish” for immediate publication.
Add products
- Open the Wix Owner app and navigate to your site..
- Select “Products” in “ Store Products”.

- Tap “+ New Product“.

- Add an image, GIF, or video for the product.

- Enter the product name.

- Enter the product price.

- Optional: Add a discount, product description, ribbon, and info sections.

- Optional: Add the product to categories, create options, and manage inventory.

- Optional: Use the Barcode Scanner icon to add the product’s barcode as your SKU.
- Choose whether to add the product to a tax group and select the fulfillment method.
- Decide whether to hide the product from your online store.
- Tap “Save.”

Successful Case Studies
Wendy Ju‘s graphic design website features a welcoming minimalistic animation. As you scroll, a two-column gallery showcases large thumbnails providing a glimpse of diverse projects. The site maintains a cohesive look with subtle animations on each page, complemented by custom mouse cursor effects implemented by Wendy using code.

Weebly
Get started with Weebly‘s powerful free website builder, offering customizable webpage designs and essential tools for building and growing your business.

Pros & Cons
Pros
- User-friendly interface
- Customizable webpage designs
- Integrated eCommerce tools
- Professional website appearance
- Access to expert starter guides
- Seamless Square integration for payments
Cons
- Basic functionality for advanced users
- Dependency on Square for eCommerce integration
Personal Review
I love Weebly’s customizable web page designs. The platform offers a range of templates that are not only visually appealing but also highly adaptable. As someone who values a unique and professional website appearance, the freedom to customize these designs is crucial. The user-friendly interface makes the customization process seamless, allowing me to create a website that aligns with my brand identity.
Weebly’s Key Features
Unlock the potential of your online presence with Weebly’s powerful key features, designed to elevate your website-building experience.
Choose your theme
- In your Weebly dashboard, go to the Theme tab.

- Click Change Theme on the left-hand menu.
- Preview different themes to see how your content will look.
- Click to apply the selected theme to your Weebly site.

Customize your theme
- Change color scheme
- After selecting a theme, use Theme options to fine-tune it.
- Explore color scheme options within the theme settings.
- Some themes offer color palettes for buttons, menus, and more.
- Choose the desired color scheme or use Light and Dark palettes if available.
- Apply the changes to enhance the visual appearance of your Weebly site.

- Change fonts
- Locate the “Change Fonts” button in the theme customization options. Click the button to access font modification settings.
- Modify font components such as family, style, color, size, weight, uppercase setting, letter spacing, and line height.
- These changes are optional but can significantly impact your website’s appearance. Apply the desired font adjustments to enhance the overall design of your Weebly site.

Add pages and content
How to create Home Page, Product Page
- Click the “+” button at the top of the Pages sidebar to open the Add page menu.
- Choose the “Standard Page” option for creating a new page.
- Give the new page a name and configure options like Header type, visibility settings, and SEO.
- Click “Done” to save and return to the list of pages; your new page will be added at the bottom.
- Rearrange page order by dragging them up or down the Pages list; the top page becomes the Home page.
- Create subpages by dragging a page under and to the right of another page; repeat to make sub-subpages.
- The navigation menu displays main pages, and hovering reveals sub-pages in a drop-down menu.
- Main menu items can be functional links or non-clickable navigational menus; choose the type when adding a page.
- Arrange subpages by going back to the main Pages tab.
Add a blog post
- Click the Pages tab at the top.
- Expand the Pages menu by clicking on the Plus (+) sign.
- Click the Plus sign again.
- Choose Blog Page from the menu.
- Enter the name of your blog page and click Done.
Add products
- In your Weebly dashboard, navigate to Store > Add item.
- Manually enter product details such as title, description, available sizes, and colors.
- Click Save to save the product information.
Add a payment method
- Click on “My Services.”
- Choose the specific service to which you want to add a payment method.
Successful Case Studies
KidsParkz is an online hub designed for parents and individuals engaged in preschool education. The user-friendly interface and categorization of materials make it easy for users to navigate and choose resources based on different themes. Despite its playful appearance, KidsParkz is a functional and comprehensive repository for a vast collection of educational materials.

Wrapping Up
In conclusion, selecting the right free website builder in Australia is a crucial decision that can significantly impact your online presence.
Free Website Builders Australia: FAQs


