
5 Best Website Builders For Non-Profit Organizations In 2024
By Sam Nguyen

Discover the top five website builders for non-profit organizations, providing the perfect blend of functionality, user-friendliness, and innovation.
Shopify
Shopify is the leading website builder for non-profit organizations, with extensive customization options and robust support for donations.
- Builder type: Drag and drop
Personal view
In creating a nonprofit website builder, Shopify‘s interface provides an intuitive canvas to express the organization’s mission.
- Seamless Onboarding: The platform’s user-friendly interface ensured that even those without extensive technical knowledge could kickstart their website-building building store.

- Diverse Template Options: I found the diversity of templates accommodating various causes and missions particularly impressive. From environmental initiatives to humanitarian causes, there’s a template for every non-profit endeavor.

- Page Creation Simplicity: Creating pages on Shopify is a straightforward process that aligns with the needs of non-profits. Whether crafting a compelling landing page or organizing content for a blog, the step-by-step guidance ensures that even novice users can bring their ideas to life.
- E-Commerce for Non-Profits: Shopify’s prowess in e-commerce seamlessly translates into the non-profit sector. Adding products, whether for sale or as part of a fundraising campaign, is uncomplicated.
Pros & Cons
Pros
- Versatile for diverse industries and business sizes.
- Intuitive and user-friendly interface.
- Excellent e-commerce functionalities.
- Extensive customization options.
- Free 3-day trial for exploration.
- No-code builder for hassle-free website creation.
- Secure transactions with fraud analysis.
- 24/7 dedicated customer support.
Cons
- Cost considerations beyond the free trial.
- The learning curve for advanced features.
- Some limitations in particular design requirements.
Key Features
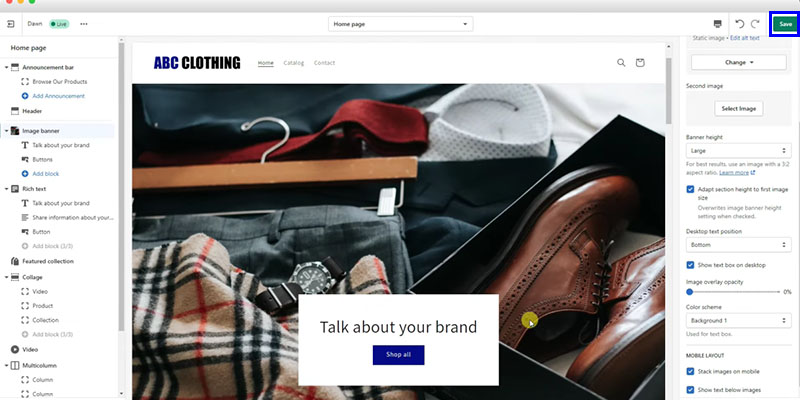
Select a theme and set up templates
Choosing a theme on Shopify goes beyond aesthetics; it’s about aligning with the essence and mission of a non-profit organization. The platform provides diverse themes thoughtfully crafted to resonate with various causes. These themes serve as a visual cornerstone, reflecting the identity and values that define non-profits.

The user-friendly interface ensures that even those with limited web development knowledge can effortlessly navigate and configure their chosen templates. This simplicity in template setup becomes a valuable asset, allowing non-profits to focus on what truly matters – their mission.
Use themes and edit your theme settings
Create and customize pages
Let’s embark on a step-by-step journey to build and customize pages that leave a lasting impression.
Step 1: Creating a Page Template
- Navigate to your Shopify dashboard and select “Online Store” > “Customize” to open the customizer.

- Within the customizer, click the drop-down at the top and choose “Pages” > “Create Template.”
- In the ensuing modal, assign a name to your new page template and click “Create Template.”

Step 2: Customizing Your New Page Template
- Head to the newly created page template and initiate the customization process.
- Begin by concealing any content from the classic editor. Use the eye icon next to “Page” in the left-hand menu.
- With traditional editor content hidden, click “Add Section” to introduce engaging sections and blocks.
- Once satisfied with your design, hit the “Save” button in the top right-hand corner.

Step 3: Assigning Your New Template to a Page
- Shift back to the dashboard and select “Online Store” > “Pages.”

- Opt for “Add Page” in the top right corner.

- Furnish your page with a title and opt for the new template from the drop-down in the bottom right corner.
- Click “Save” and witness your new page come to life on the front end of Shopify.

Step 4: Viewing Your Custom Page on the Front End
- To visualize your masterpiece, click the “View Page” link at the top of the screen.

Create a landing page with a starter template
Let’s dive into the step-by-step process to craft a landing page that reflects your brand’s uniqueness.
Step 1: Log in to Shopify
Access your Shopify account using your unique login credentials.
Step 2: Navigate to the Shopify Theme Editor
Upon logging in, you’ll land on your Merchant Dashboard. Look for the “Online Store” option on the left side of the dashboard. Click on “Online Store” and then select “Themes” under the Online Store section. On the themes page, locate the currently published theme and click on the “Actions” button next to it. From the dropdown menu, choose “Customize.”

Step 3: Create a Landing Page
Once in the Shopify editor, you can add a landing page template.
- Click on the dropdown menu at the top of the theme editor.
- Select the “Pages” option.
- Scroll to the bottom and choose “Create template.“
- You’ll now have a blank landing page template to fill with your content.

Step 4: Add Landing Page Sections to the Template
The left-side menu provides various options to edit your landing page. Explore and select the desired sections, utilizing the easy drag-and-drop feature to position them on the template. Note that the template is fixed, so if you need more options, consider creating additional templates.

Step 5: Add the Landing Page to Your Store
After creating the template, proceed to add the landing page to your store.
- Exit the theme editor and return to the Shopify Merchant Dashboard.
- Navigate to “Online Store” in the left menu.
- Under “Online Store,” click on “Pages.”
- In the top right corner, select “Add page.”
- Choose the landing page template you created earlier from the options and input the relevant information.
- Once all necessary details are added, click “Save.”
Set up a blog
With Shopify, establishing your blog is a seamless process that allows you to share insights, stories, and updates with your customers.
Step 1: Select Blog Posts
After logging into your Shopify admin, go to Online Store > Blog Posts.

Step 2: Click “Add Blog”
Click on “Add blog post” to proceed.

Step 3: Complete Your Blog
Fill in the necessary details for your blog, such as title and content. Also, choose how you want to manage comments on your blog.
Step 4: Save
Save your created blog by clicking on the “Save” button.

Successful store examples
Dowse Design‘s layout is clean and intuitive, ensuring a seamless browsing experience. The well-organized categories, such as “Christmas Shop,” “Gifts Under £30,” and others, make it easy for users to find what they want.

Each product is presented with clarity and elegance. High-quality images and concise product descriptions enhance the shopping experience, giving customers the information they need to make informed decisions.
Hubspot
Hubspot’s website builder is a powerful, integrated tool for creating and managing marketing-focused websites for non-profit organizations.
- Builder type: Drag and drop
Personal view
As a user with hands-on experience and currently revisiting HubSpot for review, their free drag-and-drop website builder is a valuable asset for both beginners and experienced users.
- Pre-Built Themes for Quick Launch: The availability of pre-built themes expedites the website development process. Users can choose from various professionally designed themes, ensuring a quick and visually appealing start to their online presence.

- Customization with Modules: Using custom modules enhances the overall user experience. It enables users to tailor their websites to specific needs, offering flexibility in design and functionality.
- Theme Variety and Customization: HubSpot offers a broad selection of themes, allowing users to choose designs that align with their brand identity. Customization options, including style settings and built-in page templates, contribute to a diverse and personalized website.

- Free Custom Domain Integration: The seamless integration of a custom domain enhances the website’s professional appearance. HubSpot’s provision of free domain connection simplifies the process, allowing users to focus on delivering a remarkable customer experience.
Pros & Cons
Pros
- Intuitive Drag-and-Drop Functionality
- Pre-Built Theme Library for Quick Website Launch
- Custom Modules Enhance User Experience
- Diverse Theme Options and Customization Features
- Easy Integration of Custom Domains
- Streamlined Process for Connecting Domains
- Interconnected with HubSpot’s Comprehensive Customer Platform
- Simplified Reporting and Analytics
- Access to Tools Like Forms, Live Chat, and Meetings
Cons
- Limited Advanced Customization for Experienced Developers
- Theme and Template Options May Not Cater to Highly Specialized Needs
Key Features
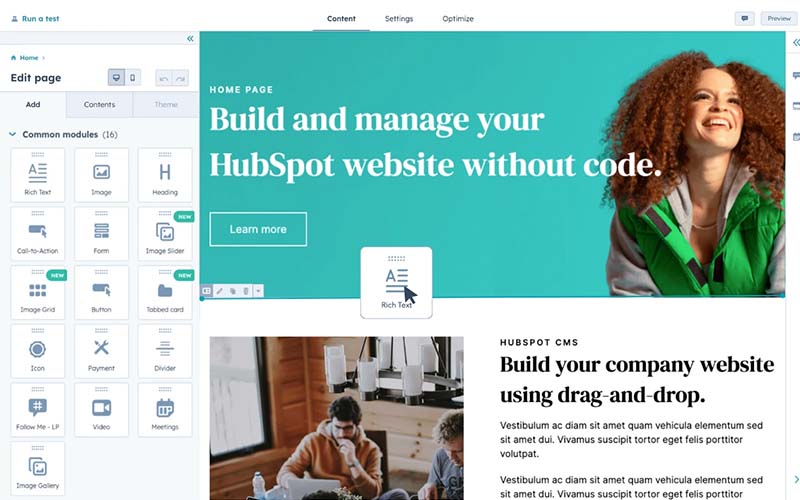
Select a theme and customize
The builder simplifies crafting a unique website by offering a variety of default themes. Users can easily select a theme that aligns with their organization’s identity and customize it to create a distinct online presence.

For those seeking more advanced customization, developers can leverage the Command Line Interface (CLI) to create and modify themes locally. This opens up possibilities for unique design elements beyond the default offerings.
Create and customize pages
HubSpot’s content editor is where you bring your non-profit’s narrative to life. Within this editor, you can infuse your content with multimedia elements such as images, videos, and custom fonts. This versatility allows you to create visually stunning and information-rich pages that resonate with your audience.

Create a landing page with a starter template
HubSpot’s platform has an array of built-in page templates specifically designed to enhance efficiency. These templates cover a variety of purposes, allowing you to choose the one that best suits your non-profit’s goals. Whether you’re aiming to drive donations, showcase impactful stories, or promote events, there’s a template ready for you.
HubSpot eliminates the need for intricate coding or navigating complex content editors. The “what-you-see-is-what-you-get” (WYSIWYG) editor makes the process intuitive and visual. This editor lets you see precisely how your website will appear to visitors as you make changes.
Create and manage a blog page
HubSpot’s intuitive content editor simplifies the process of crafting engaging blog posts. Write and format your content effortlessly, ensuring that your non-profit’s stories and messages are presented in a compelling and reader-friendly manner.

Managing your blog content becomes a breeze with HubSpot’s array of features. Implement blog tags to categorize and organize your posts, making it easy for visitors to navigate and discover content relevant to their interests. Assign blog authors to attribute posts and showcase the diverse voices within your non-profit.
Successful store examples
The Room‘s website design goes beyond mere awareness of the dual user journeys; it caters to each group’s needs. By presenting tailored resources, distinct color schemes, and purposeful CTAs, The Room ensures an authentic and engaging brand and influencer experience. This approach enhances user satisfaction and reinforces the brand’s commitment to providing value in a personalized manner.

Wix
In the website builder sector, Wix is another name to spotlight, with numerous templates and flexible customization.
- Builder type: Drag and drop
Personal view
I appreciate the unparalleled flexibility Wix offers. The drag-and-drop editor simplifies the website creation process, allowing for infinite customization. Wix’s emphasis on unlimited creation aligns perfectly with the diverse needs of nonprofits, offering a comprehensive suite of advanced functionalities to bring any vision to life.
- Website Templates for Every Cause: Wix stands out with its curated collection of 800+ free and customizable website templates strategically tailored for various industries. Nonprofits can leverage these templates or start from a blank canvas, ensuring a headstart on their online journey.

- Smart Editing Tools and Advanced Design Capabilities: Wix provides an intuitive drag-and-drop editor with thousands of advanced design capabilities. The platform empowers users to customize their websites, incorporating brand tools such as custom domains and logos. For those seeking a higher level of customization, Wix offers full-stack web development tools.

- AI Technology for Effortless Website Creation: Wix integrates AI technology to create a site tailored to your preferences. This feature streamlines the initial stages of website development, making it accessible even for users without extensive technical expertise.
- Engineered for Growth: Wix prioritizes performance with faster loading times and ensures enterprise-grade security for data protection. With multi-cloud hosting and accessibility tools, Wix caters to diverse user needs, fostering inclusivity in website creation.
Pros & Cons
Pros
- Intuitive Drag-and-Drop Editor
- Limitless Creativity and Advanced Functionalities
- Comprehensive Built-in Marketing Solutions
- Diverse Collection of 900+ Customizable Templates
- Smart Editing Tools with Thousands of Design Capabilities
- AI-Powered Website Creation for Quick Setup
- Faster Loading Times for Improved Performance
- SEO-Optimized for Enhanced Search Visibility
- Enterprise-Grade Security and 24/7 Data Protection
Cons
- Advanced Users Might Prefer More Coding Control
- Customization Limitations in Some Templates
Key Features
Choose a Wix theme and customize
- Step 1: Log in to Your Wix Account
Access your Wix account to manage and customize your website.

- Step 2: Go to the “Templates” Section
Navigate to the “Templates” section within your Wix account.

- Step 3: Browse or Search for the Custom Template
Explore the available templates or use the search feature to find your desired custom template.

- Step 4: Select “Edit Site” to Start Customizing
If the template meets your preferences, decide “Edit Site” for customization.

- Step 5: Make Changes Using the Wix Editor
Utilize the Wix Editor to make personalized changes, including modifying content, design elements, and layout.

- Step 6: Preview Your Changes
Review and preview your adjustments to ensure they align with your vision.

- Step 7: Click “Publish” to Go Live
When satisfied with your custom-designed template, click “Publish” to make the changes live on your Wix website.

Create and customize pages.
Whether opting for professional pre-designed pages or starting from scratch, Wix provides the tools to shape a unique online presence. Here’s a step-by-step guide on how to add and customize pages on Wix:
1. Navigate to Pages & Menu on the left side of the Editor.
2. Click “Site Menu.”
3. Click “+ Add Page” at the bottom of the panel.
4. Choose between a blank page or a template:
- Add a blank page: Click “+ Blank Page” at the top left.
- Choose a template: Hover over your preferred design and click “Add Page.”
5. Enter the new page name in the Pages panel.
6. Click “Done.”
7. Design the new page according to your preferences.

Create a home section.
Setting up a compelling home section on your Wix website is crucial to engaging visitors right from the start. Here’s a simple guide to help you designate a page as the home page of your site:
- Click on “Pages” on the left side of the Editor.
- Locate and click on the relevant page you want to set as the home page.
- Click the “Show More” icon (usually represented by three dots).
- Select “Set as Homepage.”

Add logo and adjust color to the page.
To enhance the visual appeal of your Wix website, follow these steps to add a logo and customize the color scheme:
- Open your Wix Editor and navigate to the header section of your site where the logo is placed.
- Click on the header section to select it.
- Locate the “Change Strip Style” button and click on it.
- Choose “Customize Design” from the options provided.
- Access the “Colors” tab in the customization menu.
- Explore the color palette options available and select the one that complements your site’s background color.

Create and manage a blog page.
If you want to establish a blog on your Wix website, follow these step-by-step instructions:
Step 1: Add Wix Blog to Your Site
- Incorporate Wix Blog into your website through the Wix Editor.

Step 2: Set Up Your Blog
- Configure the initial settings for your blog, including its title, description, and other relevant information.

Step 3: Change the Display Settings
- Adjust the display settings to control how your blog appears on the website.

Step 4: Change the Layout
- Customize the layout of your blog, choosing the arrangement that suits your preferences.

Step 5: Customize the Design
- Personalize the design of your blog to align with your overall website aesthetics.
Step 6: Create Post Categories
- Establish categories to organize and classify your blog posts effectively.

Step 7: Create Your First Blog Post
- Start crafting your initial blog post, adding content and media as desired.

Successful store examples
Fresh Prints leverages Wix’s capabilities to offer customization options for their products. This lets customers personalize their purchases, creating a more engaging and interactive shopping experience.

The store excels in providing targeted recommendations, ensuring customers discover products that align with their preferences. This personalized approach enhances customer satisfaction and encourages repeat business.
Squarespace
Squarespace offers a range of industry-leading templates, designer fonts, and color palettes, allowing users to customize their websites.
- Builder type: Drag and drop
Personal view
Creating a website on Squarespace is a seamless experience.
- Template Variety: Squarespace boasts many industry-specific templates, from online stores and local businesses to portfolios and personal CVs. This diversity ensures that users can find a template that suits their requirements.

- Ecommerce Capabilities: For those looking to sell products or services, Squarespace offers a robust ecommerce solution. Users can manage payments, streamline checkout processes, and handle shipping and fulfillment—all within the Squarespace platform.

- Educational Offerings: Squarespace supports users in transforming their expertise into a passive income stream. Whether creating courses or tutorials, the platform allows for easy video uploads, lesson design, and a seamless online learning experience.
- Marketing Tools: Squarespace equips users with built-in SEO tools and social media integrations to enhance online visibility. Email campaigns, seamlessly incorporating site colors, products, and blog posts, contribute to a cohesive and effective marketing strategy.
Pros & Cons
Pros
- Excellent design templates
- User-friendly interface
- Suitable for selling online courses
- Robust image management tools
- Free domain with annual plans
Cons
- Lack of multi-currency selling features
- Inability to switch templates easily
- Absence of support for Google Pay
Key Features
Choose your website template
Here is how users can add domains, build pages, and create content.
Add custom domain
These steps will help you create, customize, and maintain an effective and dynamic website.
Step 1: Choose Your Website Template
Select a visually appealing template that suits your website’s purpose and style. Ensure it aligns with your brand image and overall theme.

Step 2: Secure a Custom Domain Name
Register a unique and memorable domain name that reflects your brand. Choose a name that is easy to remember and relevant to your content.

Step 3: Start Adding Your Content
Customize the template by adding your unique content. Update text, images, and other elements to your website. Ensure that the content is engaging and relevant to your audience.

Step 4: Spread the Word
Promote your website by leveraging various channels. Share it on social media platforms, email newsletters, or other marketing channels to increase visibility and attract visitors.

Step 5: Continue to Update Your Website
Regularly update your website with fresh content to keep it relevant and engaging. This could include new blog posts, product updates, or any other information that adds value to your audience.

Build pages and create content
Step 1: Create and Customize Pages
- Log in to your Squarespace account and access the website editor.
- Navigate to the Pages section to view your site’s structure.
- Add new pages by clicking the “+” button and customize their content.
- Use the drag-and-drop editor to arrange sections and blocks within each page.
- Customize the design, layout, and style using Squarespace’s intuitive tools.

Step 2: Add Images and Optimize for Search Engines
- Edit existing pages or create new ones to incorporate images.
- Use the image block to upload and place visuals within your content.
- Optimize images for search engines by adding descriptive file names and alt text.
- Ensure images are high-quality and relevant to enhance user experience.
- Implement SEO best practices, including adding meta titles and descriptions.

Continually update website information
- Regularly review and update your site’s content to keep it fresh.
- Add new blog posts, articles, or pages to provide up-to-date information.
- If you run an online store, refresh product details, pricing, and availability.
- Update event information, schedules, or any time-sensitive content.
- Consider seasonal changes, promotions, or announcements to keep visitors engaged.

Successful store examples
1st R.O.W. Estate Winery specializes in premium wines; this focus is evident throughout the website. The design and content reflect a commitment to quality and craftsmanship, appealing to wine connoisseurs.

Clear call-to-actions guide visitors through the site, making it easy to explore the offerings and make purchase decisions. The homepage strategically showcases popular products, immediately capturing the attention of visitors. This approach highlights key offerings and encourages exploration of the wine collection.
Weebly
Weebly is another choice for non-profit organizations to select.
- Builder type: Drag and drop
Personal view
Having hands-on experience with Weebly, I’m revisiting the platform from the lens of someone actively using it and reviewing it for the broader audience. This perspective is specifically tailored to the needs of non-profit organizations.
- User-Friendly Interface: Weebly stands out with its user-friendly interface, which is particularly beneficial for non-profits with diverse teams. The drag-and-drop feature streamlines the website-building process, making it accessible for users who may not have extensive web development skills.

- Template Selection: When choosing templates, Weebly offers a range of options catering to non-profits’ distinct needs and branding requirements. Adding templates quickly and customizing them according to the organization’s visual identity is noteworthy.

- Logo Integration: Adding a logo to your non-profit website is a seamless process with Weebly. The platform allows easy logo integration, ensuring your organization’s branding is prominently displayed across the site.
- Page Creation and Customization: Creating pages, a fundamental aspect of any website, is straightforward on Weebly. The drag-and-drop functionality extends to page creation, allowing for the intuitive arrangement of content. Non-profits can efficiently communicate their mission, showcase projects, and engage with their audience through customized pages.
Pros & Cons
Pros
- Intuitive Drag-and-Drop Interface
- Diverse Template Selection
- Seamless Logo Integration
- Versatile Functionality for Various Website Needs
- Mobile-Responsive Designs
- App Center for Additional Features
- Basic SEO-Friendly Features
Cons
- Limited Flexibility in Highly Customized Designs
- Design Elements Restricted to Template Layouts
- Some Advanced Features May Require Third-Party Apps
Key Features
Select Weebly theme
Weebly presents a diverse selection of approximately 50 free themes, catering to various website needs. The expansive range spans business, portfolio, personal, and blog categories. The platform’s user-friendly approach allows easy navigation through the theme library. Users can filter themes based on the intended website type, enabling a more tailored selection process.

Choose your domain
When creating your website on Weebly, the platform facilitates domain selection. Weebly conveniently prompts you to input a domain name. Opting for a free domain is possible by selecting the Weebly subdomain. While this includes “.weebly.com” in your website address, it comes at no cost, making it a budget-friendly option.

For those seeking a more professional and unique identity, Weebly offers the option to register a custom domain. By clicking “Choose,” users can register their preferred domain. It’s important to note that this feature comes with a cost, and to fully utilize the custom domain, upgrading to a paid plan is required.
Design your website
- Edit text boxes
Weebly’s user-friendly WYSIWYG editor allows you to edit text boxes effortlessly effortlessly. Click on any text box to make instant edits and customize content without coding. This streamlined process ensures a hassle-free text modification experience.
- Add new elements
Enhance your website’s appeal by incorporating diverse elements using the “Element Menu.” Drag and drop media icons such as text, videos, buttons, and more onto your page. However, keep in mind that Weebly’s template structure, organized in rows, imposes some limitations on full customization.

- Add new pages
Expanding your website is a breeze with Weebly’s straightforward page addition process. Navigate to the “Pages” tab in the top Navigation Menu, click the plus icon, choose the page type (e.g., blog), and assign a name. Weebly automatically loads the new page with pre-filled content for you to personalize.

- Changing the Color Scheme
Tailor the overall look of your page by adjusting the color scheme in the Theme section of your dashboard. Whether choosing between light, dark, or specific colors, this customization feature provides a basic yet effective way to alter your theme’s color palette. For added personalization, you can even introduce a custom color.

- Adding New Layouts
For a more personalized touch, consider adding new sections to your pages. Utilize the “Sections” element by dragging it to your desired location on the page. Choose from various section types such as Gallery, Contact, Menu, Featured, and Team. Weebly then presents you with a selection of layouts, allowing you to incorporate new design elements into your pages easily.

Successful store examples
A.W. Dreyfoos School of the Arts effectively reflects the essence and uniqueness of this Florida-based communication and music arts school. The well-organized layout provides easy navigation for users to explore the diverse offerings for grades 9-12. The site balances academic and artistic elements, showcasing the school’s specialty in the arts.

Bottom Line
Selecting the right website builder for a non-profit organization is pivotal to its online engagement and fundraising success. Consider your organization’s specific needs and goals before opting for a platform.
Website Builder For Non-Profit Organizations: FAQs


