
How to Skip the Cart Page in WooCommerce

Your ultimate objective as a business owner is to make the purchasing process straightforward for your customers and enhance conversion rates. There are a variety of approaches you can take to accomplish this. One of them is to reduce the number of steps in your online store’s checkout procedure.
With this in mind, in today’s article, we will give you a detailed step-by-step guide to skipping the cart page in WooCommerce.
Without further ado, let’s get started!
Benefits of Skipping the Cart Page in WooCommerce
-
By skipping the cart page, after customers click the Add to cart button, they will jump straight to the checkout page, and place their order.
-
Customers will less likely to abandon the cart.
-
Customers can avoid a tedious and cumbersome checkout process and will enjoy a straightforward checkout flow.
-
Customer shopping experience will be better.
-
Your sales and conversion rates will increase.
Therefore, you should take skipping the cart page in WooCommerce into consideration.
How to Skip the Cart Page in WooCommerce?
This part will show you how to skip the cart page in three ways: WooCommerce default settings; using the plugin “Direct Checkout for WooCommerce”; and adding a code snippet using the plugin “Code Snippets”.
Method 1. WooCommerce Default Settings
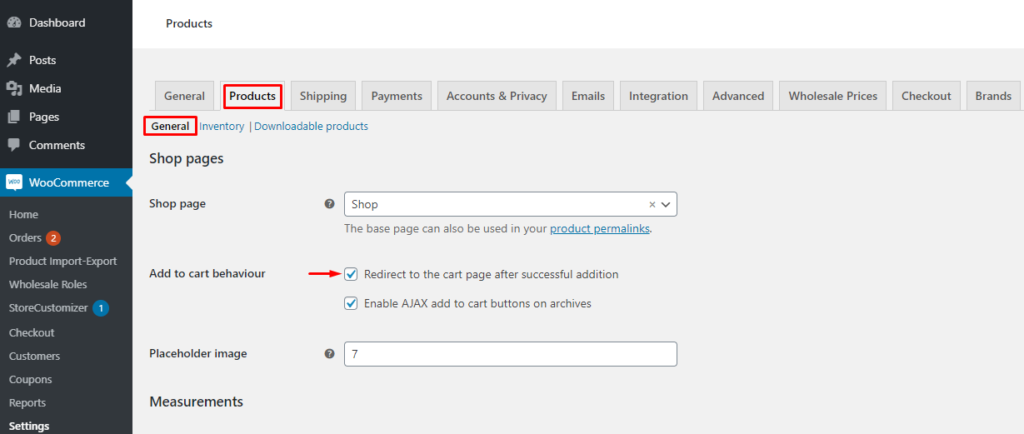
Step 1: Redirect the cart page after successful addition
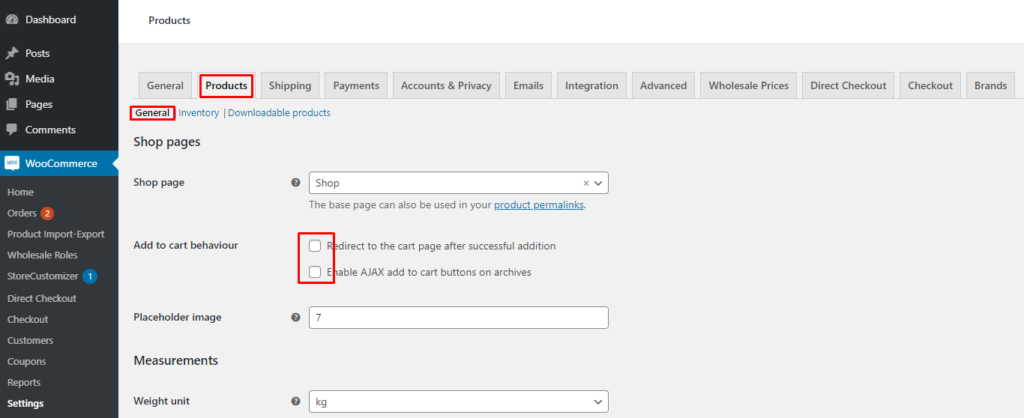
First off, you need to go to the WooCommerce dashboard and then navigate to WooCommerce > Product settings.
After that, under the Products tab, you click on the General settings option. Then, under the Add to cart behavior settings, check the box Redirect to the cart page after successful addition and save the changes you’ve just made.
Step 2: Redirect the cart page link to the checkout page
Following this, you go to the Advanced tab and click on the Page setup section.
For the Cart page setting, you have to set Checkout as the default Cart page by simply choosing the option Checkout from the drop-down menu.
Once done, you need to save changes.
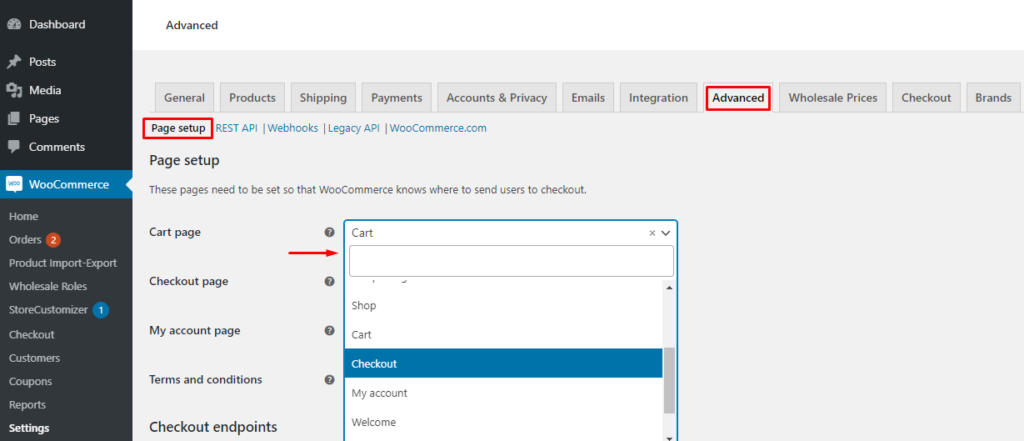
By doing all of this, the Add-to-Cart button will now redirect to the Checkout page rather than the Cart page.
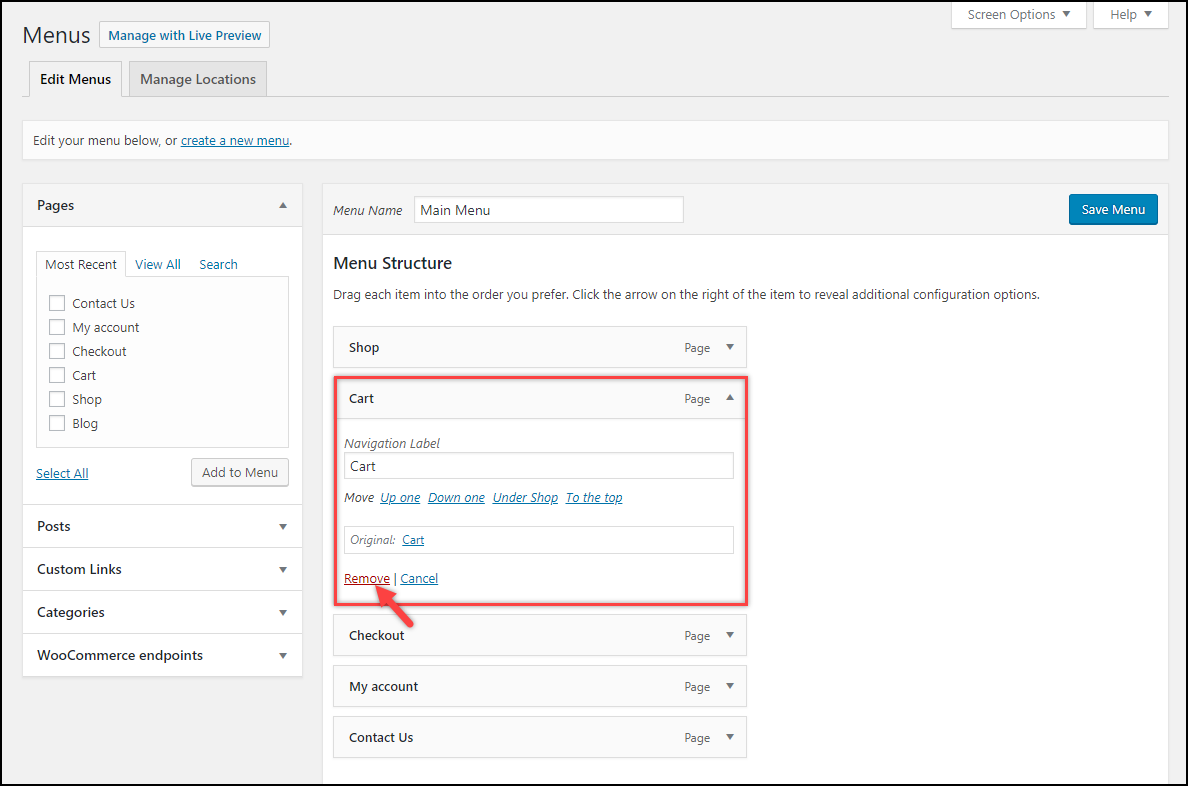
Step 3: Remove the cart page link from the menu
If you have a Cart page link in your website’s main menu, it will still take you to your cart page. As a result, you can choose to keep it or remove it from the menu.
To remove the cart page link from the menu, you need to navigate to Appearance > Menu settings. Click the Cart option under the Menu Structure section, then click Remove, as seen in the image below.
Step 4: Change Add-to-Cart button text
As you can see, even though the Add-to-Cart click action takes you to the checkout page, the text still reads Add to Cart. As a result, you need to change the Add-to-Cart button text.
To do that, you have to go to Appearance > Editor, and then click on the functions.php file, which is listed on the right, to find the Themes function file of your activated website theme.
After that, you need to add the following code snippet in the Themes function file:
add_filter( 'woocommerce_product_single_add_to_cart_text', 'lw_cart_btn_text' );
add_filter( 'woocommerce_product_add_to_cart_text', 'lw_cart_btn_text' );
//Changing Add to Cart text to Buy Now!
function lw_cart_btn_text() {
 return __( 'Buy Now!', 'woocommerce' );
}
In both the store and individual product pages, the Add to cart text will be replaced with Buy Now! thanks to the preceding code snippet.
It’s worth mentioning that you can also use free plugins to add a code snippet and have more customization with the action button. We recommend that you make use of the two below plugins:
-
WC Custom Add to Cart labels : This plugin enables you to change the text of the Add-to-Cart button based on the product type. For single product pages and archive/shop pages, you can customize the text for simple, grouped, external, variable, and bookable products.
-
Woo Button Text : This plugin allows you to customize the Add-to-Cart button text for single product pages and shop pages, as well as the Place Order button on the Checkout page. Besides, the plugin also lets you modify the button’s color and style.
So that’s all you need to keep in mind to skip the cart page and redirect to the checkout page in your WooCommerce store.
Method 2. Plugin “Direct Checkout for WooCommerce”
By using the plugin Direct Checkout for WooCommerce , you can enjoy the perks of more customization and flexibility. This freemium plugin also allows you to customize the Add-to-Cart button text, besides skipping the cart page and redirecting to a custom page.
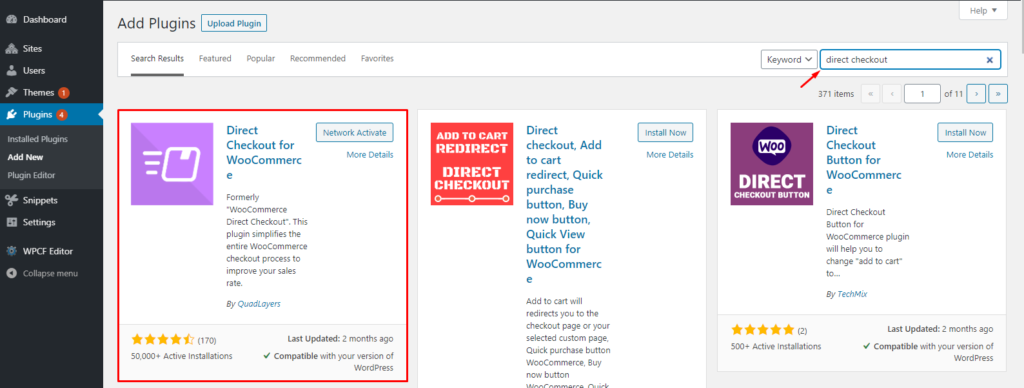
Step 1: Install and activate the plugin
First of all, you need to go to the WordPress admin dashboard, and then move to Plugins > Add New.
After that, search the keyword Direct Checkout to find the plugin. Then, click Install Now and after the installation is complete, you need to click on the button Activate.
Step 2: Uncheck both Cart Behavior options
Go to WooCommerce > Settings from the WP Admin Dashboard. Under the tab Products, you need to go to the General section and uncheck both Cart Behaviour options so they don’t affect the plugin settings.

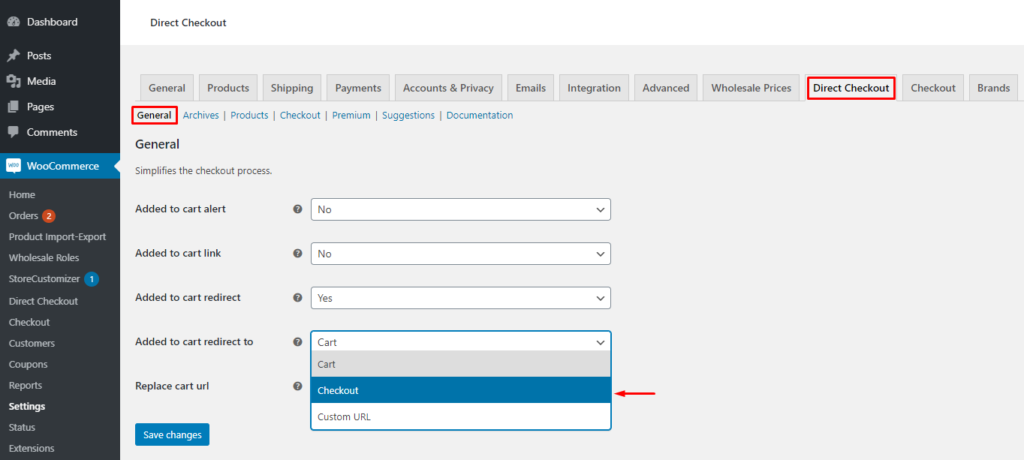
Step 3: Set the Added to cart redirect to Checkout
Now go to the Direct Checkout tab, and then choose General settings. For the Added to cart redirect to setting, please choose Checkout from the dropdown list.
After that, save the changes you’ve just made.
And that’s all you need to do to skip the cart page and redirect to the checkout page using the plugin Direct Checkout for WooCommerce.
There are also plenty of other features in this plugin that can help you enhance your checkout and increase conversion rates, so do explore this plugin more to get the most out of it.
Method 3. Adding a code snippet using “Code Snippets”
In this part, we’ll show you how to skip the cart page programmatically. In other words, you will learn how to add a code snippet using the plugin Code Snippets .
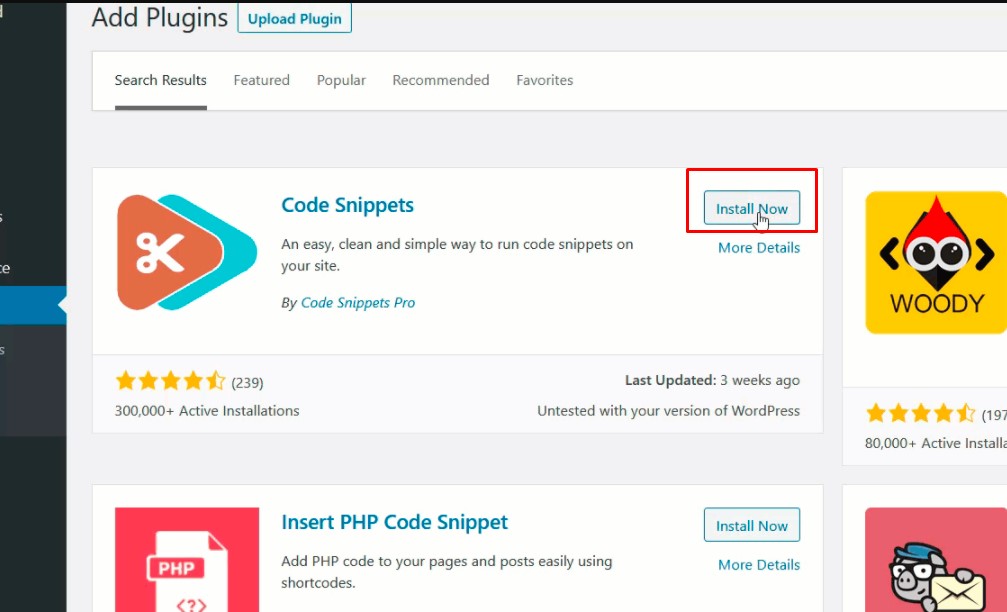
Step 1: Install and activate the plugin
To begin, click on Plugins > Add New in your WordPress dashboard and then search for the Code Snippets plugin. Then, click on Install Now and activate it once the installation is complete.
Step 2: Uncheck both Cart behavior options
From the WP dashboard, go to WooCommerce > Settings > Products > General.
After that, uncheck both Cart behavior options so that the plugin doesn’t interfere with the code’s functionality.
Step 3: Add the code snippet
Go to Snippets > Add New from your WordPress admin dashboard.
Then copy and paste the following code snippet** in the Code section.
add_filter('add_to_cart_redirect', 'ql_skip_cart_page');
function ql_skip_cart_page () {
 global $woocommerce;
 $redirect_checkout = $woocommerce->cart->get_checkout_url();
 return $redirect_checkout;
}

You can also give your code snippet a name to remember the functionality of this code in the future. And don’t forget to save the changes.
Once done, customers will be sent straight from the store page to the checkout page, bypassing the cart page.
And that’s all the steps you need to take to skip the cart page by adding a code snippet with the plugin Code Snippets.
Final Words
Overall, every online store should offer customers a quick and straightforward checkout process. Skipping the cart page eliminates a step from the checkout process, significantly faster and more convenient for shoppers.
Hopefully, our comprehensive instructions on how to skip the cart page in WooCommerce bring you lots of useful information.
Please feel free to ask any questions in the comments section below. We would love to help you out.
Thank you for reading.


