
How to Set Up a Variable Subscription in WooCommerce

WooCommerce is such an excellent platform that there are infinite possibilities for helping you transform your site design and selling any type of product and service. Moreover, you can also customize a lot of things within this platform to make your store perform better. And one of the worthiest things to do is create a variable subscription.
It is undeniable that this will be a perfect way to make recurring sales to existing customers of your store. So, do not hesitate to go through our tutorials about how to set up a variable subscription in WooCommerce. Now, let’s get started!
Why do we need to set up a variable subscription in WooCommerce?
Overall, there are two principal reasons that you should take the variable subscription into consideration. First, you are recommended to have an in-depth into why we should set up this variable subscription. By knowing that, you could have a deeper understanding of this kind of subscription and find it easier to follow in the later detailed steps.
-
Recur billing for the digital products: The variable subscription in WooCommerce will help recurring billing for such digital products as monthly software bills, hosting, or membership.
-
Construct the recurring order for the physical products: The second reason is that it is useful in constructing the recurring order for your physical products, for example, subscribe to the club named Dollar Shave for receiving a razor each month.
How to set up a variable subscription in WooCommerce
Now move on to the main part of this article to know how to set up a variable subscription in WooCommerce with several simple steps. From this, you could know about recurring payments that let your customers subscribe to items and products or services, then allow them to pay money on an annual, monthly, or weekly basis. In this situation, we will make use of the plugin WooCommerce Subscriptions to accomplish this activity.
Step 1: Install and activate the plugin
First of all, you need to install and activate the plugin for later use. To begin with, you are required to purchase the plugin WooCommerce Subscriptions. Then, you will receive an email notification where you could be able to download the file .zip. After that, you need to go to your WordPress dashboard to hover over the section “Plugins” before hitting on “Add New”. Proceed to upload the downloaded .zip file by clicking on “Upload Plugin” and “Choose File”. Next, press on “Install Now”, then “Activate” to enable this plugin for use.

An important note is that you should use the payment method in which the automated recurring payment is supported. This lets the billing method of your customers automatically run on the upcoming payment date.
Step 2: Construct the new variation
It is also necessary to implement the configuration of settings within the plugin WooCommerce Subscriptions. On the WordPress dashboard, you will head to your “WooCommerce” to hit on the section “Settings”. Here, you could be able to encounter the tab “Subscriptions”, hit on it. Next, you scroll under the heading “Renewals”, you will need to uncheck the section “Accept Manual Renewals”.

Unless you could give out a reason for accepting manual renewals, you are highly suggested that unchecking this is preferred. WooCommerce Subscription will be set up to run the payment method automatically each billing interval, such as every year, every month, every week, or every day for your customers.
If the credit card of one customer gets declined, payments won’t keep running without a requirement for consumers to re-add the payment method. Next, you will navigate to find out the section “Retry Failed Payment” that is at the page bottom. Here, you will need to tick “Enable automatic retry of failed recurring payments”.

In case any customer does not succeed in the subscription renewal of the order, this will let his/her payment be subjected to a 5x retry in the upcoming week. In case, that kind of payment keeps failing after five retries, the order’s status would be marked as “Failed”. Finally, click on “Save changes” to save what you have made changes.
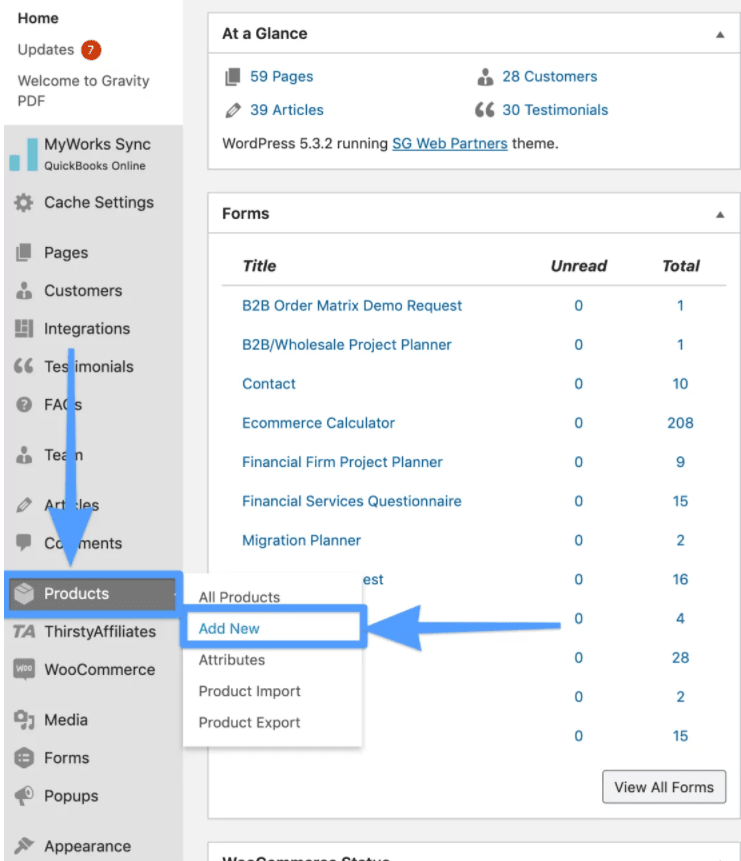
To set up this kind of variable subscription in WooCommerce, you first have to construct the new variation. From your WooCommerce dashboard, your task is to hit on the section “Products” and select “Add New”.
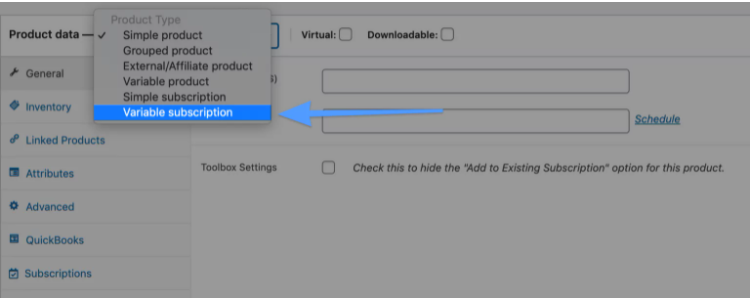
Go ahead with approaching your product page, then scroll down a bit to the section “Product data” where you can choose the “Variable Subscription” section from your dropdown menu. You should also rest assured that “Variable Subscription” as well as not “Variable Product” is selected.
Step 3: Add Attributes
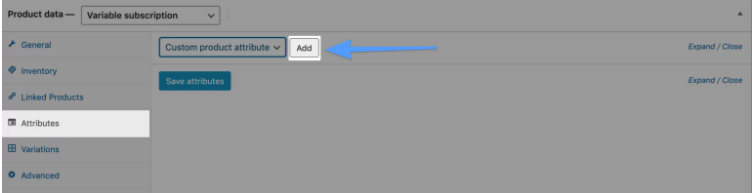
Proceed to the next step for adding attributes. Here, remember to click on “Attributes” and continue to hit on “Add”.
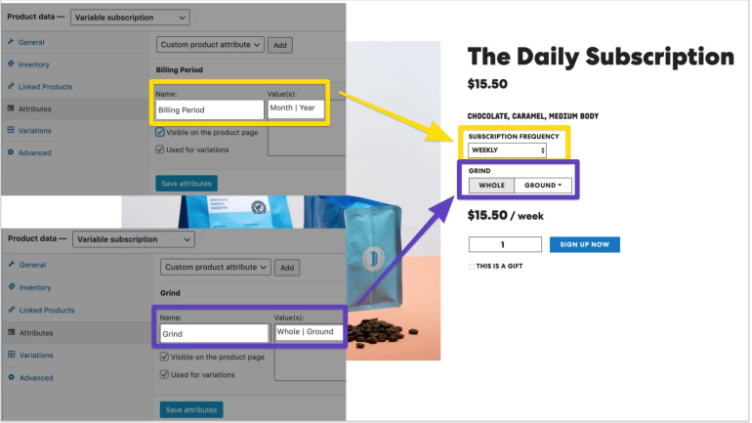
With Attribute #1, you need to name the attribute and enter the value of that attribute. Afterward, it is a must to check the checkbox to activate visibility on your product page, coupled with used for your variations.
To help you understand deeper, let us cite an example about the attributes executed for a consumer, thus helping you have an in-depth look into how to work with this information.
-
Attribute Name: Billing Frequency will be the name that is taken for this attribute.
-
Value(s): Month or Year will be the value for this attribute.
-
Enable/Checkbox: They should be “Used for variation” and “Visible on the product page”.

When you are done, do not forget to click on “Save”.
When it comes to Attribute #2, it is optional while Attribute #1 is required. In case of necessity, you can add one more additional attribute such as color, flavor, scent, and so on. With this attribute, you can follow a similar procedure as before. It is also vital to press on “Add” to enter the needed information for the attribute. Like Attribute #1, an example is also taken to help you have a deeper understanding.
-
Attribute Name: The name here will be Grind.
-
Value(s): Ground or Whole will be the value for this attribute.
-
Enable/Checkbox: In this situation, they are “Used for variation” and “Visible on the product page”.
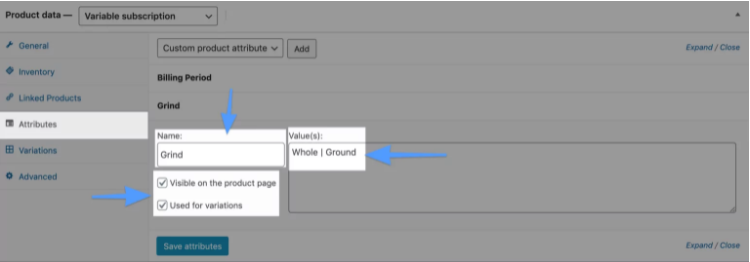
When you are down, click on “Save”.
In some cases, store owners are keen on setting up multiple attributes. So, look at the below screenshot to see what your product page looks like when every attribute is filled in the backend.
Step 4: Construct variants from each attribute
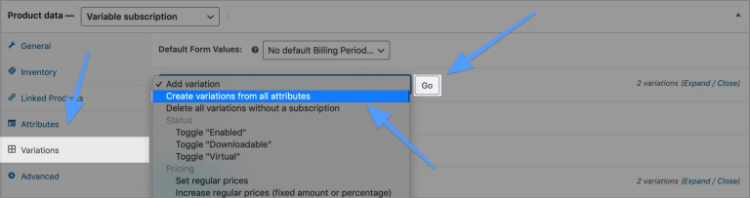
The final step is to construct variants from each attribute. The next thing to do is to hit on “Variations” as well as choose “Create variation from all attributes” from your dropdown menu before picking up “Go”.
What is more, you are supposed to fill in information related to pricing or SKU for every subscription variation. And each variation needs to be entered into the price as the subscription variation will not display on the product page in case, they do not have a price.
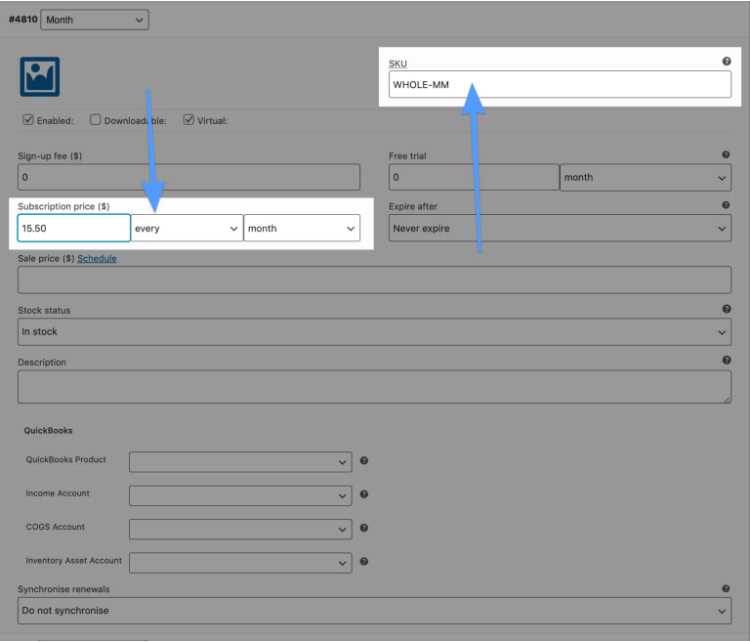
Specifically, you will have a lot of options for pricing, including downloadable product, virtual product, stock management, bank orders, variation image, one-off signup fees, free trials (years, months, weeks, days), the price for a recurring subscription (annually, monthly, weekly, and daily), the length of subscription expiry, sale price, and variable descriptions.
You should keep in mind that each variation will have one subscription price. This might be marked as zero, being displayed as “Free” within your WordPress site. To be more specific, if you fail to add one value in your subscription field, this failure tends to show that option as “Unavailable for purchasing”.
Top 3 plugin to add variable subscription in WooCommerce
Plugins have become an easy way for store owners to customize their store, especially setting a variable subscription in WooCommerce. Thanks to the use of plugins in accomplishing this task, you could build a cycle of consumer satisfaction and business growth. While you need to invest a lot of resources and time in enhancing customer experience, using plugins is effective yet effortless to do so. Here, we have listed out the top three plugins to add variable subscriptions in WooCommerce, keep reading to figure out which one will fit your online business best.
1. YITH Subscription
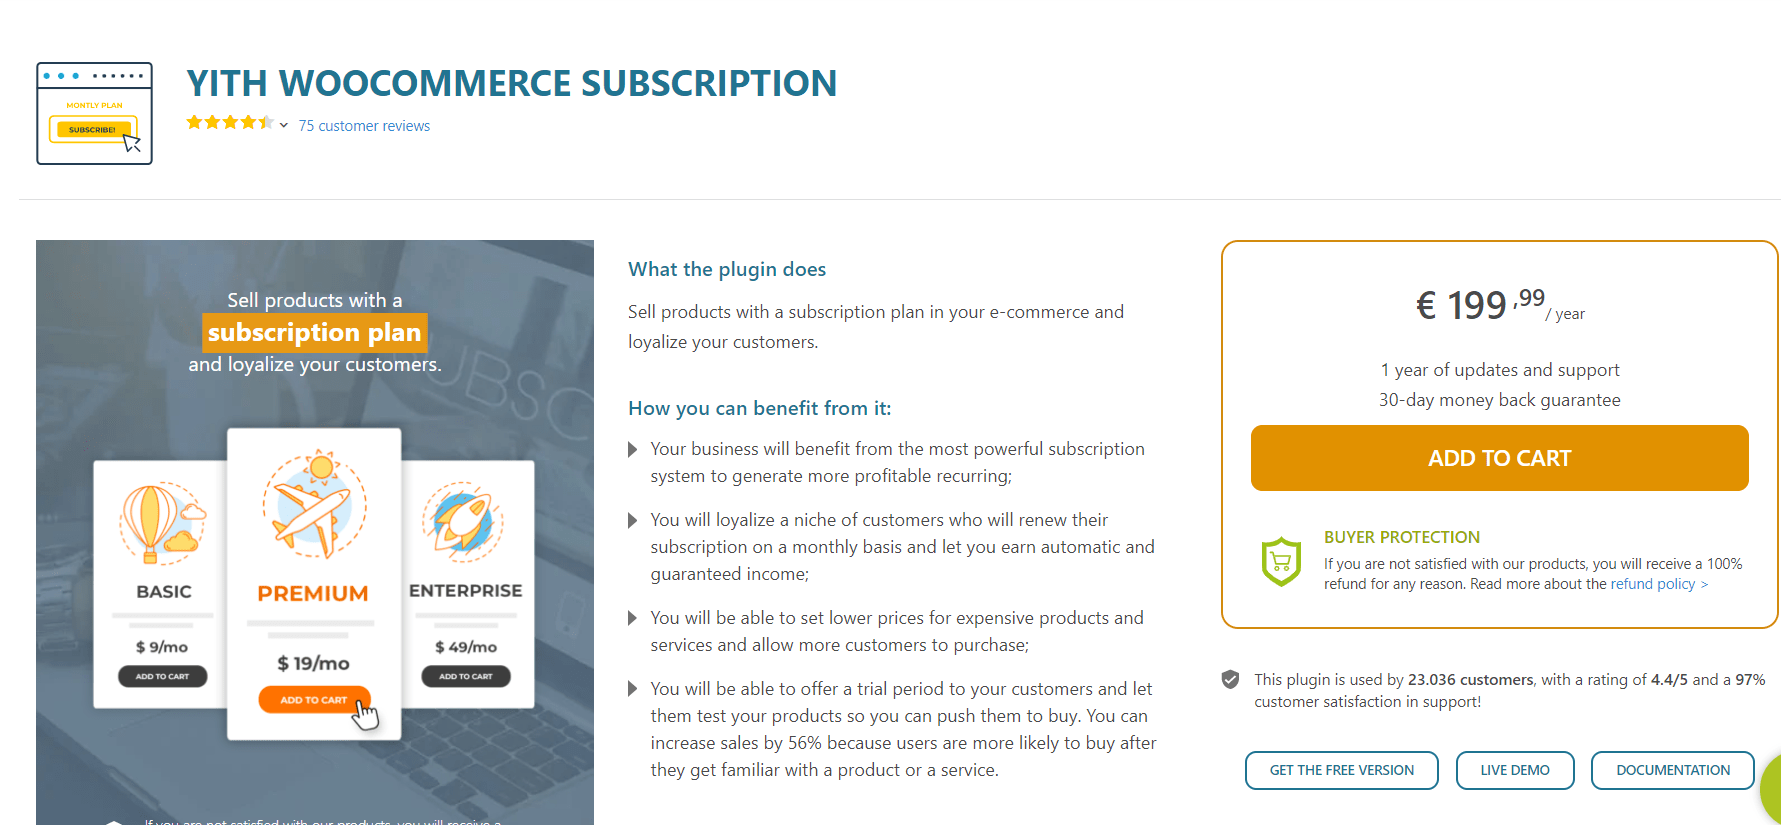
YITH Subscription is enjoying an ever-increasing reputation for being a great extension to help store owners create variable subscriptions. This is even more wonderful that you need to pay no penny to use it because it is free for download as a WordPress plugin. YITH Subscription is efficient in creating unlimited subscriptions. Whether they are downloadable products or services, and physical ones, you are able to set the renewal period, including yearly, monthly, and daily subscriptions. You could set the time limit as two years for maximum. Then, your customers could choose to cancel their subscriptions from PayPal accounts. So, take no more hesitation to purchase this plugin and get a good income as well as grow your business.
Main features
-
Be user-friendly and free for download as a WordPress plugin
-
Be able to create myriad types of subscriptions regardless of physical or tangible products and services
-
Assist store owners in setting the renewal period, which is convenient for consumers
-
Let customers cancel their subscriptions right from PayPal accounts
-
Be effortless to create new subscriptions
2. Subscriptio
The second not-to-be-missed plugin to create a variable subscription in WooCommerce is Subscriptio. Hence, you could take into consideration this solution to see if it works for your store and products or not. Subscriptio is perfect to handle myriad subscriptions in your store. By setting up various subscriptions on the WooCommerce site, it is of great significance with the satisfaction of the recurring payment. Regardless of variable or simple subscriptions, this plugin is a must to go.
Main features
-
Set up various subscriptions with recurring payments
-
Be easy for configuring subscription terms, upfront charges, and free trials
-
Come with the option for sending warnings, coupled with reminders to customers in case of due payment
-
Provide the flexibility for both shop owners and customers to cancel, resume, and pause subscriptions
-
Help store owners define the billing cycle length as well as subscription maximum length
3. SUMO Subscription
Another worthy plugin in creating a variable subscription is SUMO Subscription. This can be considered a comprehensive option for selling and creating any type of subscription for your WooCommerce store. Whether it is simple, grouped, or variable product subscriptions, this plugin will be a helping hand. You will be allowed to choose the subscription duration as well as the renewal numbers for your order subscription. The great thing is that customers will have an opportunity to purchase both non-subscription and subscription products at a single checkout.
Main features
-
Create simple, grouped, and variable products
-
Let customers select subscription duration, along with renewal cycle
-
Provide automatic renewal of description with various payment gateways
-
Have email reminders to send warnings or reminders to customers
-
Allow store owners to create subscriptions manually from the back-end
Conclusion
It is undeniable that a subscription is a perfect way to boost your store revenue. It has provided the recurring income and helped you have a better understanding of your key customers. In setting variable subscriptions, you can construct customer-friendly products as well as product bundles, thereby paying attention to the target audience, coupled with maintaining wonderful customer relationships. This is to say; if you are running an online business in WooCommerce, your store will be on the crest of the wave if you focus on creating a variable subscription.
Hopefully, our above tutorial will be helpful for you. Follow it and create a variable subscription for your store. Stay tuned and keep updated with our upcoming helpful tips and tricks that can be a helping hand for your online store.


