
How to Customize a Registration Form in WooCommerce

Your WooCommerce store cannot exist with online registration. Registering has become a standard process to make your consumers create their new accounts to buy products or items from your WooCommerce store. This is to say, it is a not-to-e-missed part of your online business. However, there are several situations in which you are subjected to drop-offs. Therefore, you are highly advised that you should rest assured your WooCommerce registration forms should be tailored to the store as well as come with the essential fields.
Do not worry if you have trouble with any registration forms. We are here to support you in accomplishing this task. There are different methods to help you achieve the goal. Now, let’s thrive in to see how to customize a registration form in WooCommerce. Then, you can follow and take your WooCommerce business to the next level.
Why should we customize the registration form in WooCommerce?
Before getting to know to perform each step, you should understand why you should customize the registration form in WooCommerce. By knowing that, you will appreciate its importance and understand how much it will contribute to the success of your store.
-
Avoid the long process of registration: As customers need extra information, they are required to go through a very long process. Hence, shoppers might feel confused and frustrated, thus losing interest in shopping on your WooCommerce store.
-
Come with various designs: Customizing registration forms offers consumers a wide choice of designs that make them engaged in your store and increase their interest.
How to customize a registration form in WooCommerce
The customization of registration forms in WooCommerce is a key to attracting and retaining your visitors to your store. Do not hesitate to implement this customization as soon as possible for a better performance of WooCommerce business. There are three main methods to help you accomplish the task. Then, you should pay attention to each of them and figure out what you could make use of to apply to your store.
1. Customize manually
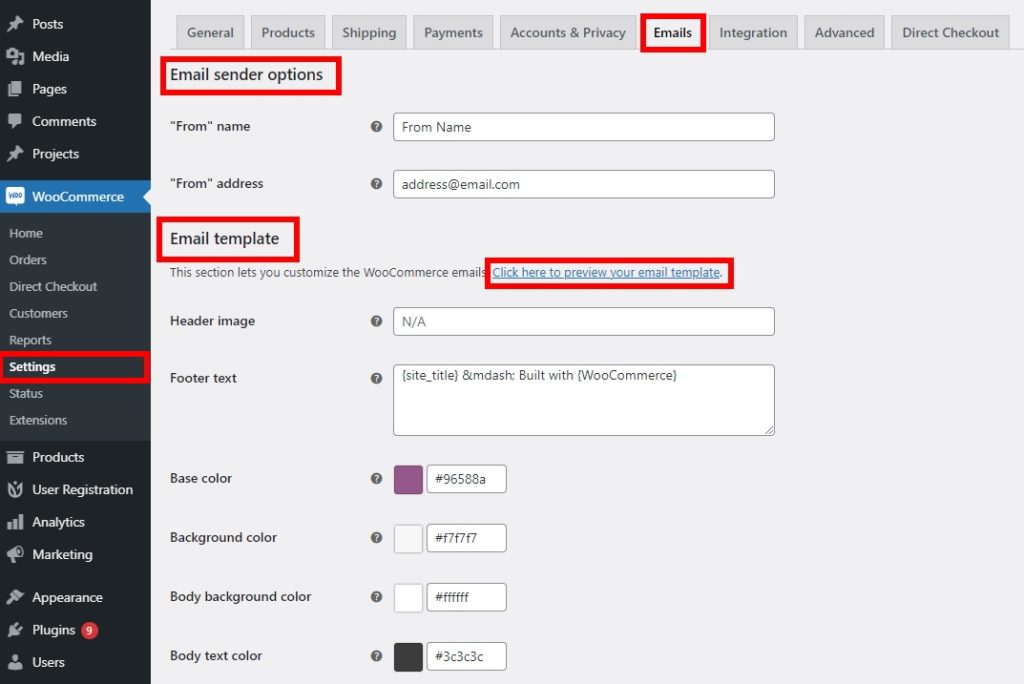
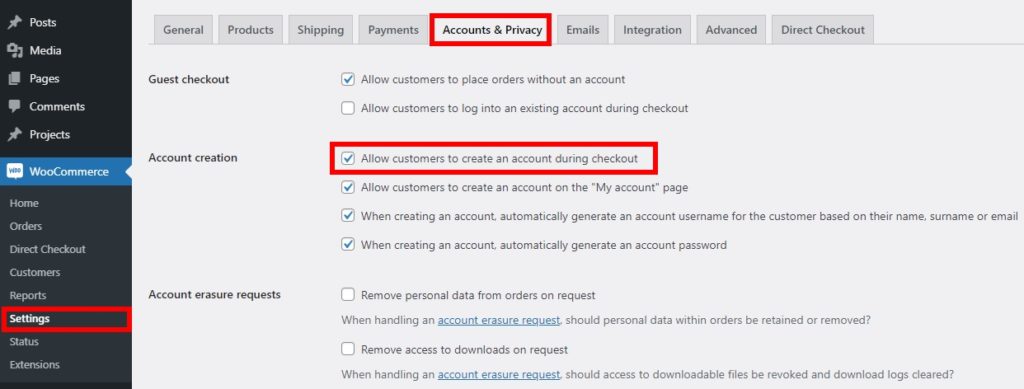
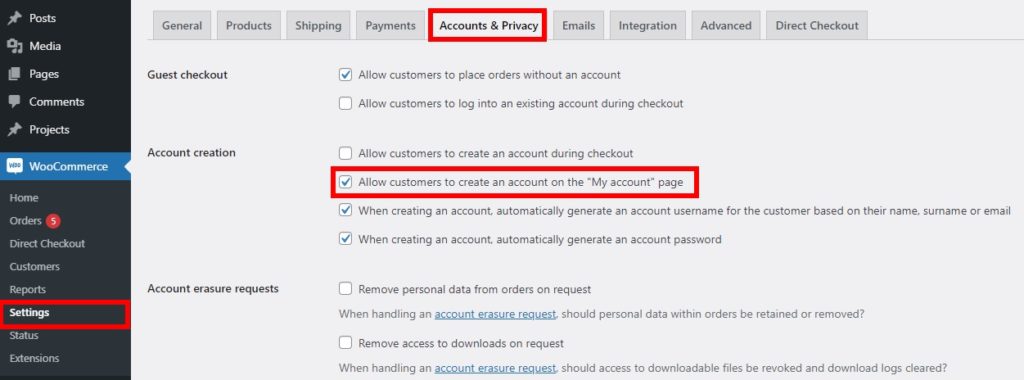
Customizing manually is always an easy but no less demanding task for any store owner. In this method, we will walk you through how to customize your registration form from the dashboard of your WooCommerce account. You could be able to edit it by default from the dashboard. In doing so, you are required to navigate to your “WooCommerce” where the section “Settings” will be chosen. Next, remember to open the tab “Accounts & Privacy”. In this section, it is possible for you to modify several options when it comes to creating new accounts by customers in your online store.
To be more specific, you can activate the options to generate the usernames, along with passwords, automatically when creating accounts. By default, those options will be activated; however, you are capable of disabling them if you want.
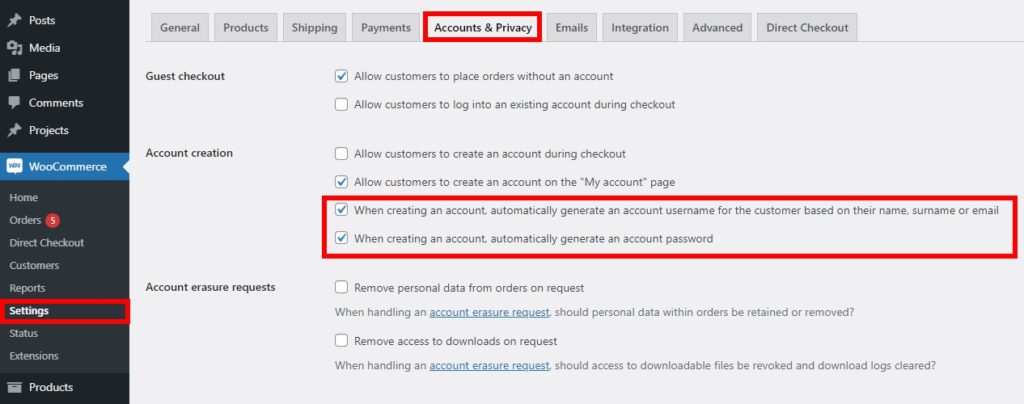
Moreover, you can also encounter several other options in which customers are allowed to create their accounts on the “My Account” or checkout page. Therefore, this will let them place their orders with no requirement of an account. What you need to do is just make sure the options to be enabled and save them.
As you can notice, there is a limitation in default options in editing registration forms in WooCommerce. So, in case you are fond of adding additional fields or making bigger changes, it will be better to use different methods. That is why we mention two other ways below. Thus, to achieve your bigger purpose, keep reading the following methods for your reference.
2. Use code
Using code is one of the most common methods in executing any customization in WooCommerce. It makes no exception to customizing WooCommerce registration forms. Do not worry if you have no programming skills, just by reading our article; you could know how to deal with coding in registration form customization. Especially, you can edit any registration form in WooCommerce in multiple ways using code snippets.
You should strictly follow several minor steps to avoid unwanted issues while using code snippets for this customization.
Step 1: Backup your WordPress site
You should backup your WordPress site manually by using cPanel. It is a straightforward way to do it. The reason is that many people prefer to apply for shared hosting and access their cPanel. Hence, if you do not fancy using plugins or backup services, this approach is a must to go.
To implement the backup for your site, you first need to log into the cPanel.
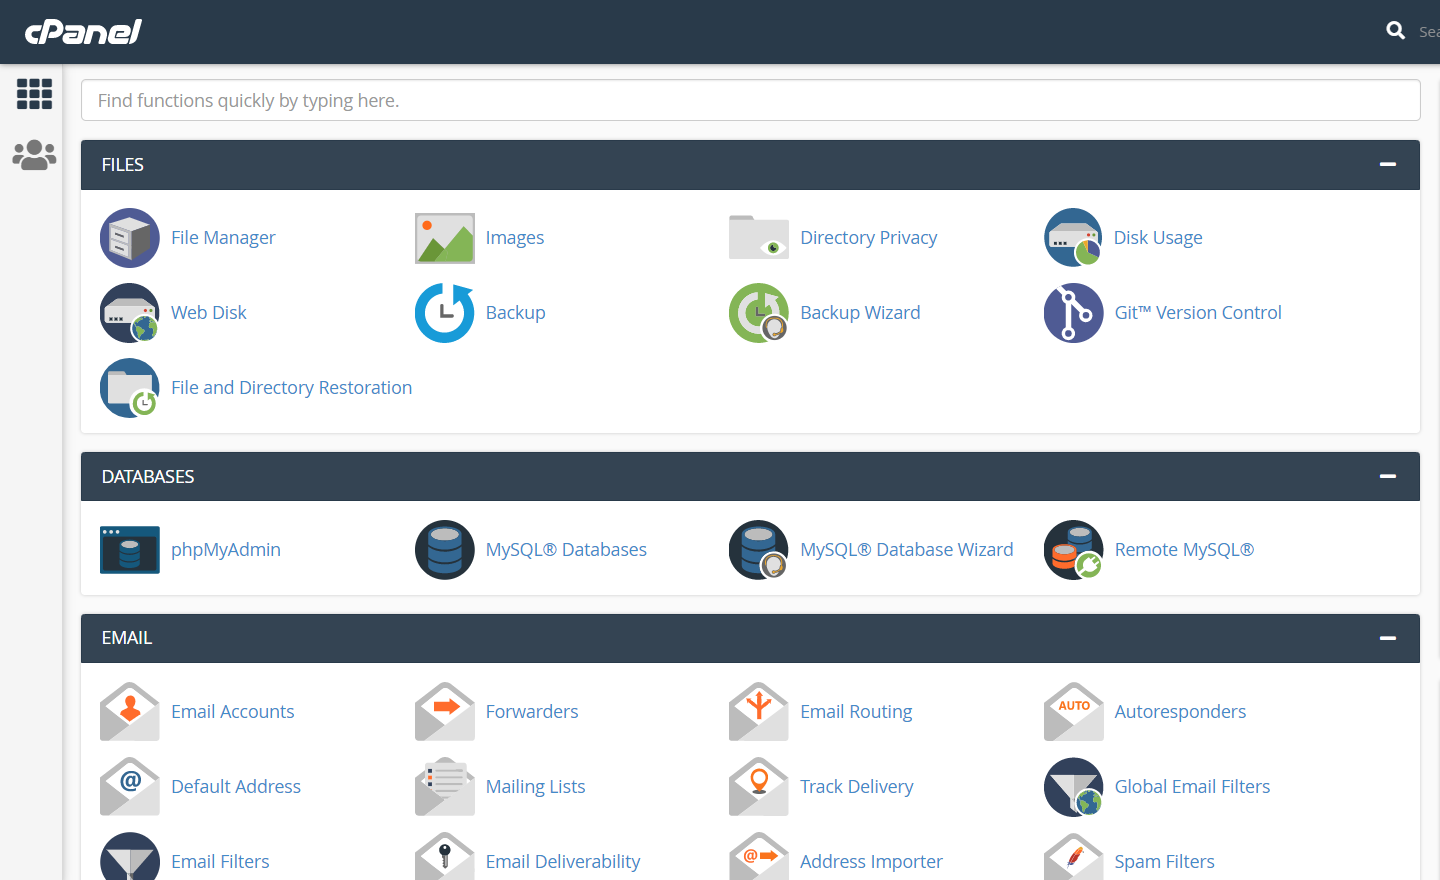
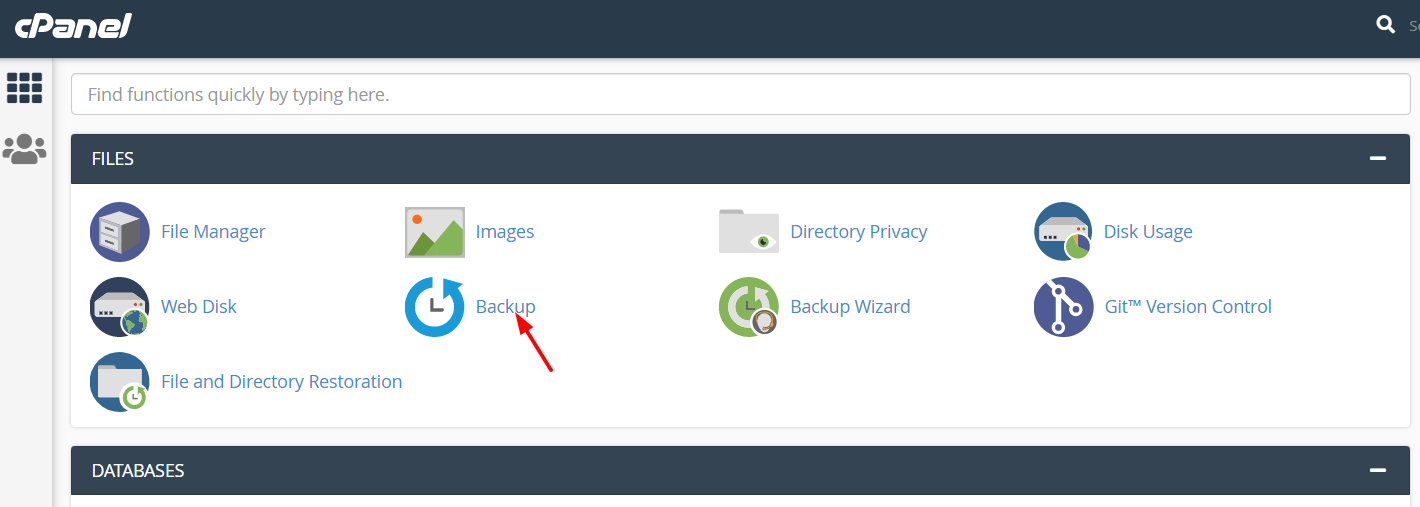
Navigate under the section “Files”, you will choose “Backup”.
When you are here, you are allowed to download the complete site backup, or you could choose only the partial backup. There is a little difference between these two options. When it comes to one partial backup, it aims to download the files inside the directory public_html. On the other hand, the complete backup tends to download every file of your sites and configuration. You are recommended that you should generate the complete backup, then include the email address.
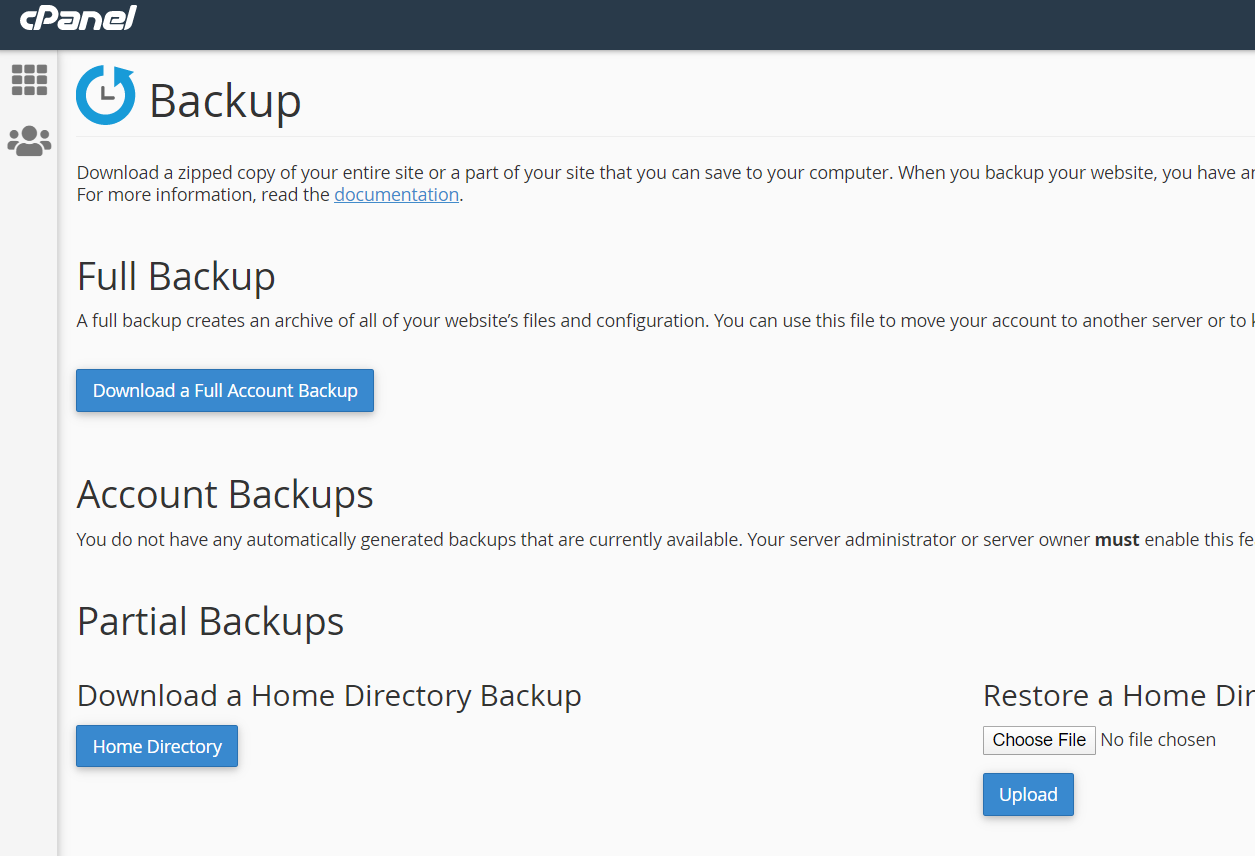
The next step is to click on the button “Download”. After that, the file is generated inside the website server. Then, the admin can receive one notification email for downloading the backup here. Be noted that that backup file might vary, determined by the size of your website.
Step 2: Construct the child theme
It is easy to create your child’s theme manually. What you should do first is to activate your parent theme before creating the child one. Next, you will have to use your site’s control panel web hosting to access the server folders. Here, it is a must to apply the file manager of your panel or your FTP client to open your site’s theme folder. This will be under public_html/wp-content/themes.
After locating the folder of this theme, you need to create one folder that will be inside your themes directory. This comes with the child theme name as well. In this situation, the demo child themes will be used. And you could also use the parent theme name that is followed by the child suffix, so it helps you manage easier.
Keep ahead with creating the file style.css, then copy the below code and paste it inside this file.
/*
Theme Name: Demo Child theme
Template: Blacklite
Theme URL: Quadlayers.com/blog
Description: Demo Child Theme
Theme author: sam
Author URL: Qualayers.com
Version: 1.0.0
*/
One more no less important part you need to do here is to keep your theme name as unique as possible. This is known as with the name stylesheet. You should keep in mind that changing this kind of information for the child theme is important. Hence, do not forget. What is more, your template name should be designated according to the parent theme name that you are using.
Go ahead with creating another file with the name Functions.php. This file will belong to the folder of your child theme, then copy the below code.
<?php
add_action( 'wp_enqueue_scripts', 'enqueue_parent_styles' );
function enqueue_parent_styles() {
wp_enqueue_style( 'parent-style', get_template_directory_uri().'/style.css' );
}
?>
When you are here, your next task is to save these two files before heading to the “Dashboard”, choosing “Appearance” and “Themes”. Here, you can be able to notice a new theme that comes with the description inserted in the folder Style.CSS.
Step 3: Edit the WooCommerce registration form
After you have successfully backed up your website as well as created your child theme, it is time to edit your WooCommerce registration forms. First of all, it is your job to place the code snippets into your file functions.php in the child theme. In doing so, you have to go to the section “Appearance” in your dashboard of WordPress, select “Theme Editor” for opening the file functions.php.
Before you get started, you need to rest assured that you have already carefully checked the option of letting customers create their accounts on the page “My Account”.
Step 4: Display the registration forms during checkout
If you fancy adding your registration forms to your checkout page, it is possible for you to do so. This will be a huge convenience for customers because they will be allowed to browse your store, then create their accounts only when they prefer to buy something.
Now, you need to head to your “WooCommerce” and opt for “Settings”. Here, remember to open the tab “Accounts & Privacy”. Next, it is a must to choose the option “Allow customer to place the order without the account” before saving what you have made recent changes.
This activity will give you customers an opportunity to sync the checkout registration with WooCommerce user registration. Then, you should make sure you have checked every field label in your table and save what you have made changes.
3. Use a plugin
The third method we want to introduce is to use a plugin for customizing your WooCommerce registration forms. There is no denying that using the plugin is also an optimal method to make everything effortless. While you might be easily confused with tons of plugins out there, we suggest you use the plugin User Registration as it is user-friendly and brings about many benefits. With the use of it, you can create your custom WooCommerce registration forms. Especially it promises to be 100% responsive.
Step 1: Get the plugin installed and activated
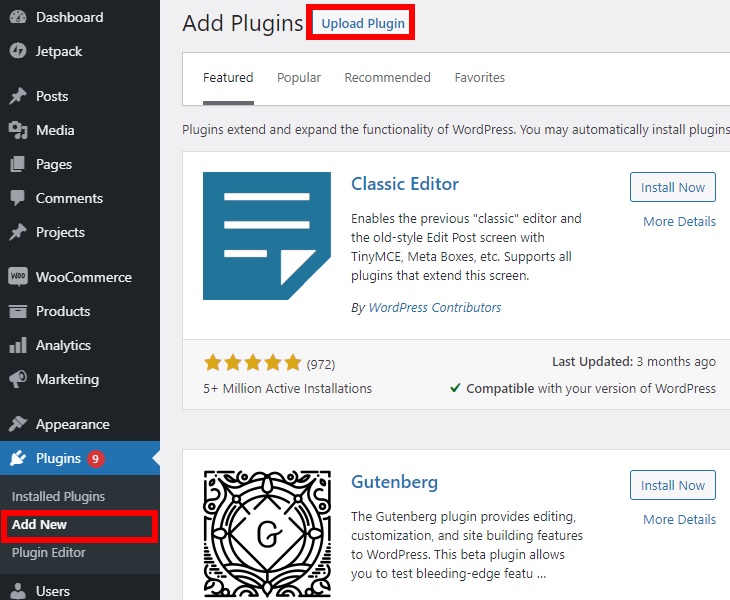
To use this plugin, you need to install as well as activate it. You are supposed to have a subscription to its premium plans integrated with your WooCommerce. It is time to head to the WooCommerce dashboard, and choose the section “Plugins” before pressing on “Add New”. You can encounter “Upload Plugin”, and your task is to click on it.
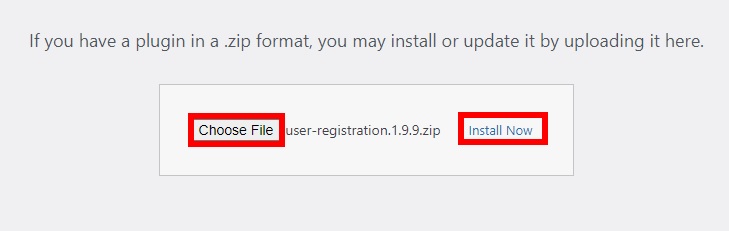
The next step involves choosing the button “Choose File”. Here you will select the downloaded file that you had from purchasing the plugin. Then, do not hesitate to hit on the section “Install Now” for getting the plugin installed.
When you finish the installation, the plugin needs to be activated for use. What you need to do next is to choose “Plugins” and press “Installed Plugins”. Keep going by clicking on “Activate” beside the extension “User Registration WooCommerce”. Check out the following screen to have a deeper understanding of what you need to do.

Step 2: Construct custom registration forms
Now, this plugin will facilitate your procedure of customizing your registration forms to your needs and requirements. First of all, you have to head to the section “User Registration” to pick up “Add New”.
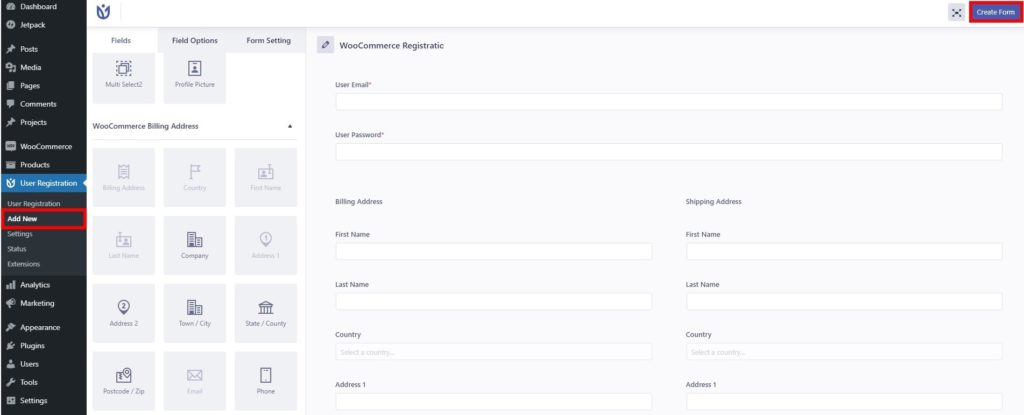
You should also give your created registration a name. In this case, we would call it “WooCommerce Registration”. And you can call it in the way you want. The form, by default, asks for the email, coupled with the password of the user. However, you could add such other fields as shipping or billing address, phone number, or zip code. Next, you just need to drag, then drop them into the form. When you are satisfied with the new registration form in WooCommerce, simply hit “Create Form” to save it.
Step 3: Replace your default registration page
It is also essential to replace your default registration page in WooCommerce. In doing so, you will replace it on your registration page after creating your customizable registration form. In implementing this task, you navigate to your “WooCommerce” to choose “Settings”, then open the tab “Accounts & Privacy”. Execute the similar task as above by choosing the option “Allow customer to create the accounts on “My Account”page.
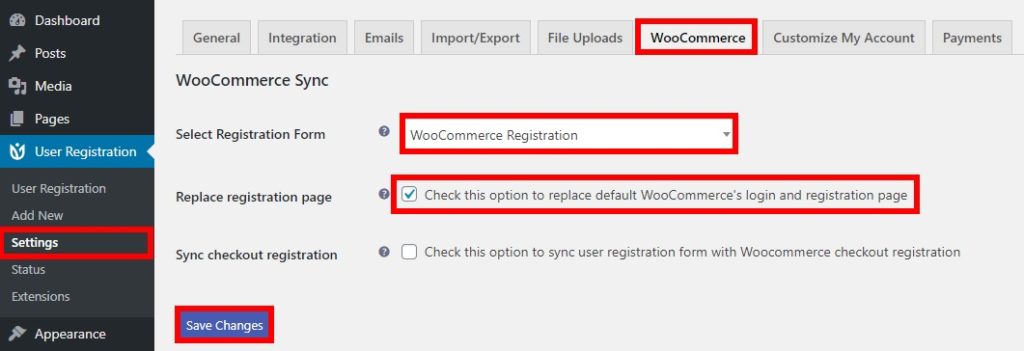
After that, you can see the “User Registration” and select “Settings”. Do not forget to open the tab “WooCommerce” for opting for the registration forms that you have created in your option “Select Registration Forms”. Next, there will be several fields appearing. There, you will have to choose the option “Check this option to replace default WooCommerce login and registration page”. This option aims at replacing the default login as well as registration page in WooCommerce. Then, remember to click “Save Changes” for completing this procedure.
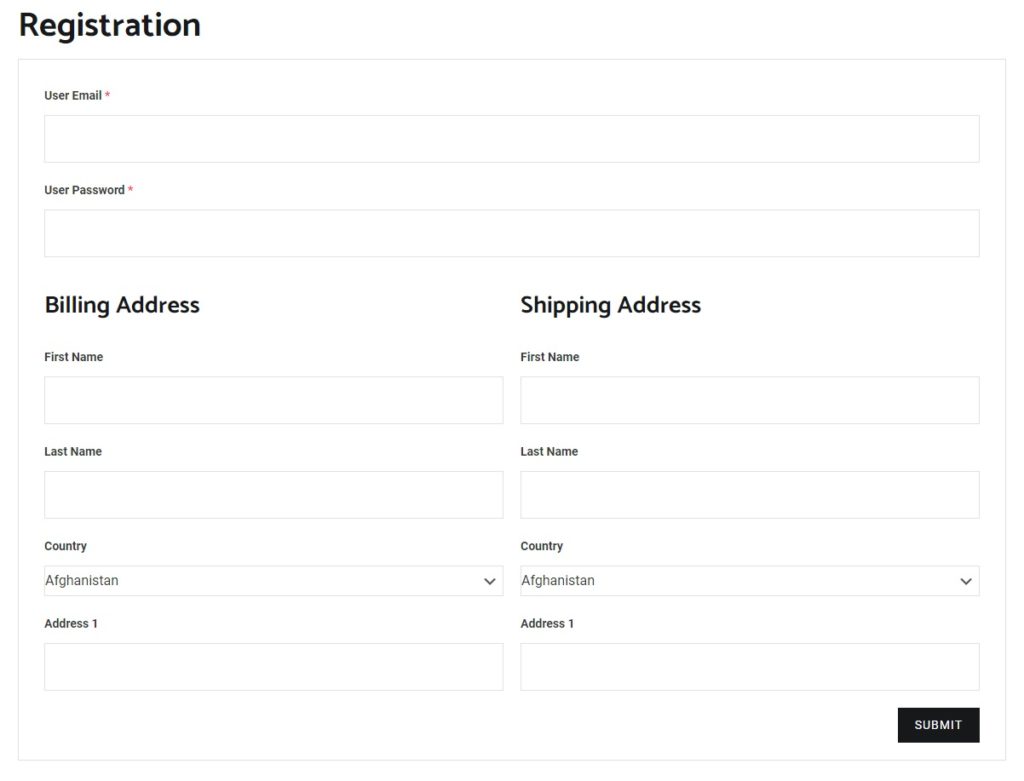
You have successfully created your new WooCommerce registration form. Now, you can check it at your front end. By going to your registration page, you can preview it and see what the newly created registration forms in WooCommerce look like.
Top 3 plugins to customize the registration form in WooCommerce
It is undeniable that using plugins is always prioritized in any customization process in WooCommerce. That is why many plugins have appeared to assist store owners in customizing their store effortlessly and straightforwardly. This article aims to keep you updated with the top three plugins that you could apply to perform the task successfully.
1. Custom User Registration Fields for WooCommerce
The first and foremost plugin you should not miss is Custom User Registration Fields for WooCommerce. As its name states, you could take advantage of this plugin to collect additional information from customers using existing custom fields on the registration forms. What is more, it allows users to have manual or automatic user registration to their convenience. Now, thanks to this plugin, customers can enjoy great flexibility to choose from checkboxes, selected options, dropdowns, date pickers, or file uploads.
Custom User Registration Fields for WooCommerce
Main features
-
Come with up to 14 customized fields where you could apply to your sign-up or registration forms
-
Offer the choice of selecting user roles when it comes to registration forms
-
Be able to send automatic notifications to both store owners and customers
-
Display data involving registration fields from registration emails and page “My Account”
-
Be supportive in making other plugins create customizable user roles
Pricing: $49
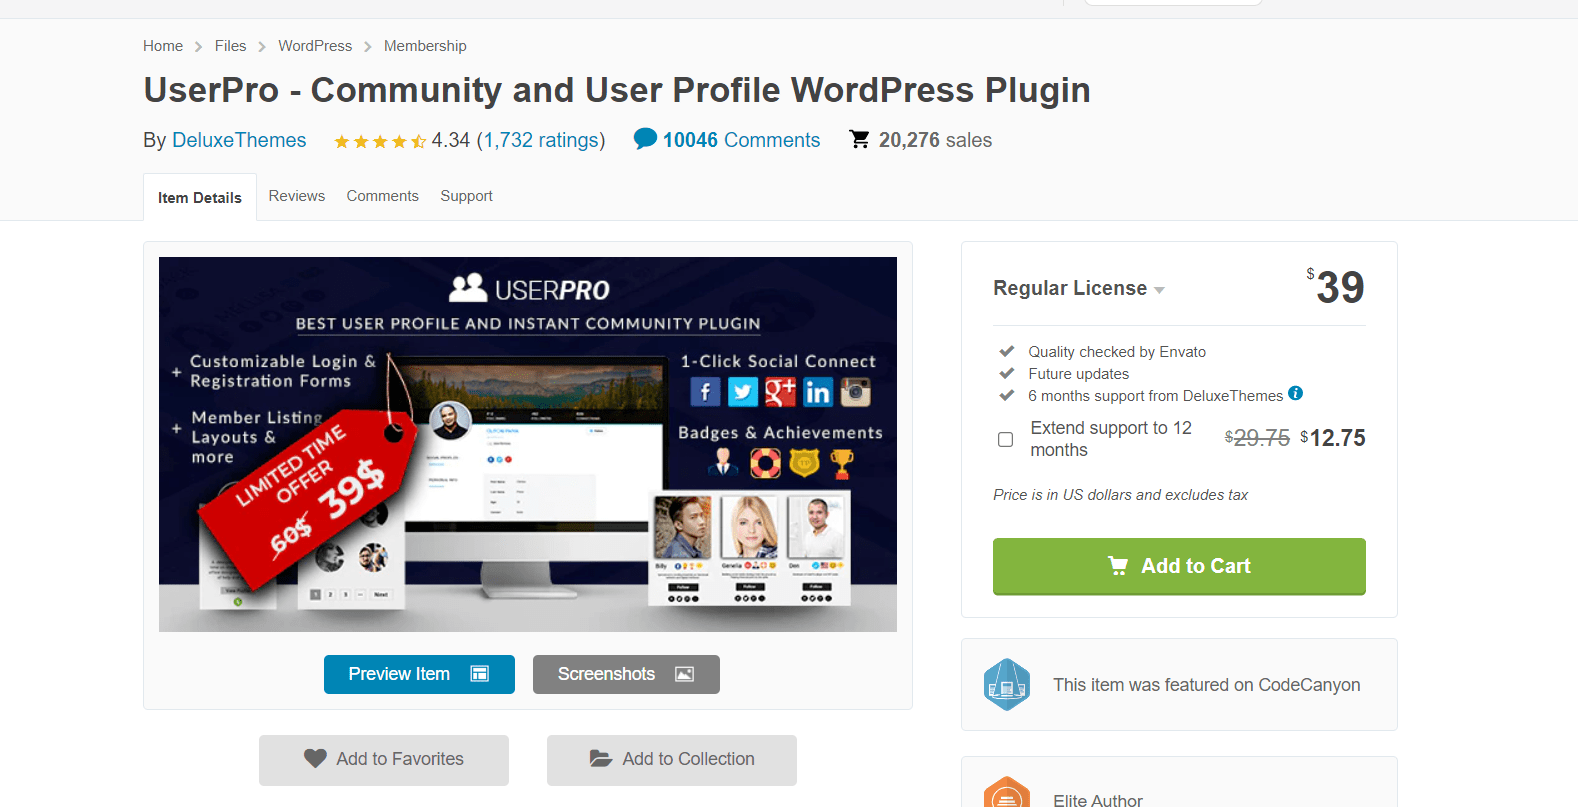
2. UserPro
This list would not be complete without mentioning UserPro. It works great to provide various registration forms for WooCommerce and WordPress. Additionally, it is possible for you to select what fields that you are keen on including in your registration forms, thus organizing to your need and requirement. The interesting thing you could have from using UserPro is that your users can log in with the profiles of social media.
Main features
-
Offer myriad custom registration forms
-
Provide users with a wonderful login experience
-
Come with the intuitive panel of admin to customize fields and forms easily
-
Have some features for creating community websites, including content restriction, user badges, and social connect
-
Work well with most WordPress plugins and themes
Pricing: $39
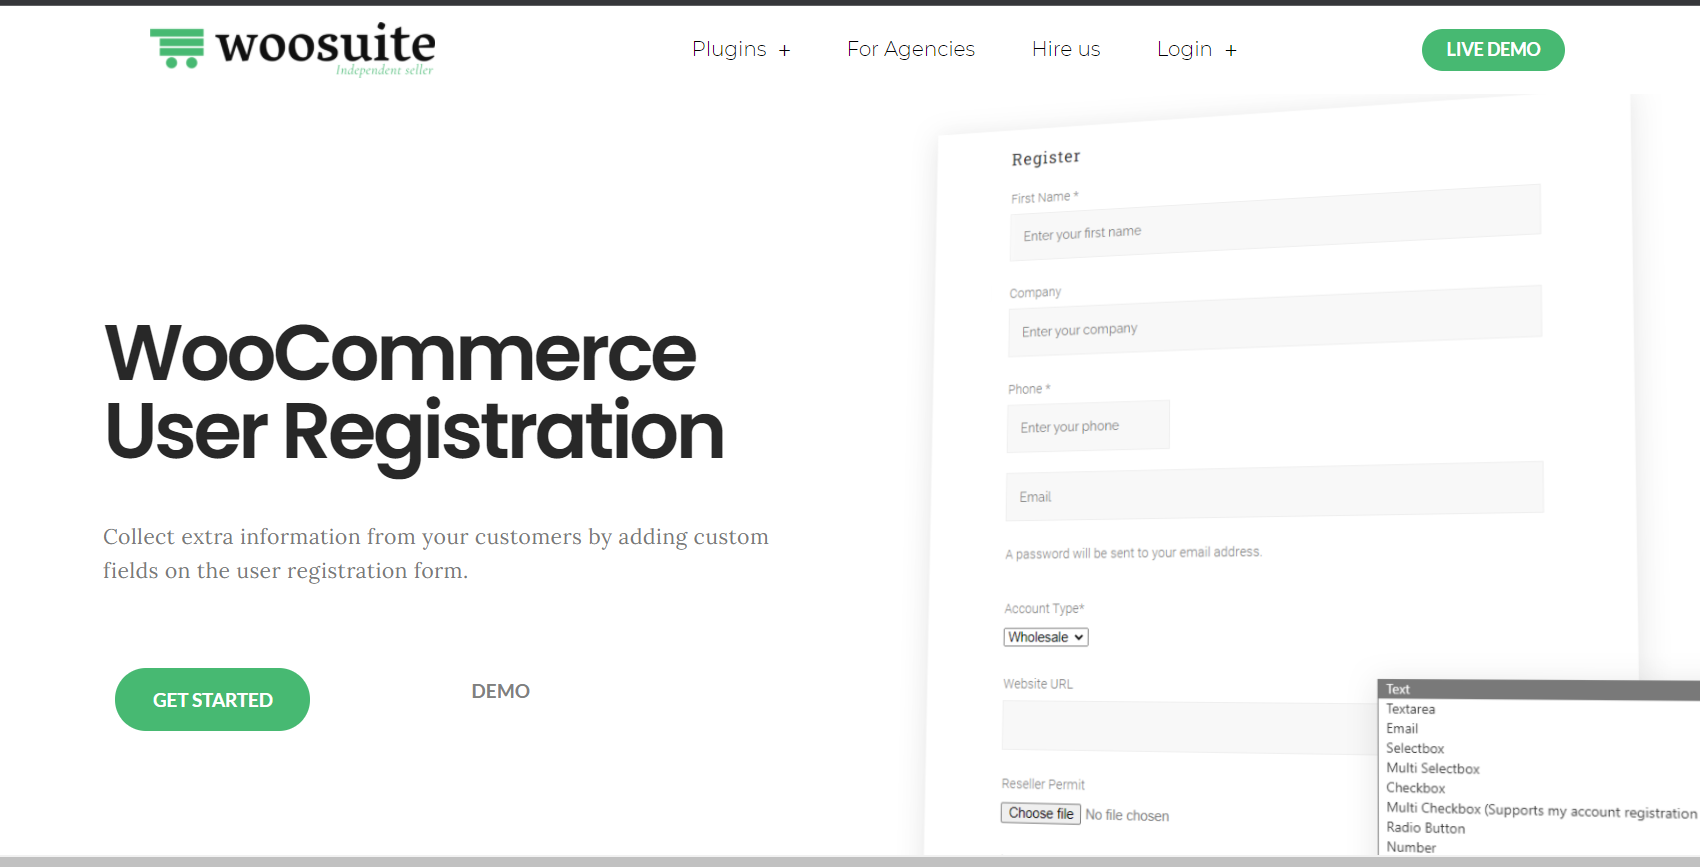
3. WooCommerce User Registration
The third not-to-be-missed plugin to appear in this list is WooCommerce User Registration. This plugin is fantastic in the way that it helps you collect additional information from customers by putting extra customizable fields on registration forms. Furthermore, it is very useful if you fancy adding some custom fields, including file uploads, dropdowns, dates, and checkboxes. By including the roles of users in your registration form, you could be able to keep which users get rejected or accepted in control.
Main features
-
Be able to add custom fields to WooCommerce registration forms for the extra information collection
-
Come with the ability to include the roles of the user such as distributor or wholesaler
-
Offer the option of manually or automatically approving new users’ registration
-
Work great with third-party plugins or themes
-
Be able to enable the default registration field
Pricing: Start at $49
Conclusion
The importance of customizing WooCommerce registration fields should be appreciated. The reason is that it would contribute a lot to the success of your online business, along with retaining loyal customers. So, do not hesitate to make up your mind on a perfect method to customize your desirable registration forms. Hopefully, this article is helpful for you to accomplish the task. Share the words with those concerned, and keep yourself updated with our upcoming tips and tricks.


