
How to Create the WooCommerce Customer Login Page

The login page you offer on your online store plays a pivotal role in improving the customer experience. Therefore, in today’s blog postpost, we are going to give you a comprehensive guide to creating the WooCommerce customer login page.
If this is something you’re interested in, let’s dive right in!
Why Create the WooCommerce Customer Login Page?
-
Creating a customer login page can come in handy when you encourage users to register and log in to purchase on your store.
-
You wish to provide your visitors a more pleasant login experience, but you don’t get a WooCommerce login shortcode by default, so you’re limited in how you can let them log in.
-
Due to the limited field options available in WooCommerce, you can create and customize the default WooCommerce login page to add and display fields such as checkboxes, dropdown menus, billing, shipping,…
How to Create a Customer Login Page in WooCommerce by Coding?
As you know, coding gives you complete control over your website’s features, design, and functionality. Thus, in this section, we’ll show you how to create the WooCommerce customer login page by coding.
Step 1: Log in to your web server to access folders
First off, you need to log in to your web server with an SFTP client to access your website folders. The form-login.php file can be found at /wp-content/plugins/woocommerce/templates/myaccount/. Then, open the file with your preferred editor.
Both the login and registration forms are coded in this file. The contents of this file are available on the official git website.
Step 2. Customize the Login Form
Go to wp-content/themes/ my theme and generate a ‘woocommerce’ folder if you’re already signed in using your SFTP client. Also, you need to make a copy of the WooCommerce templates in this folder. The file structure must be maintained; however, the /templates/ subdirectory must be removed.
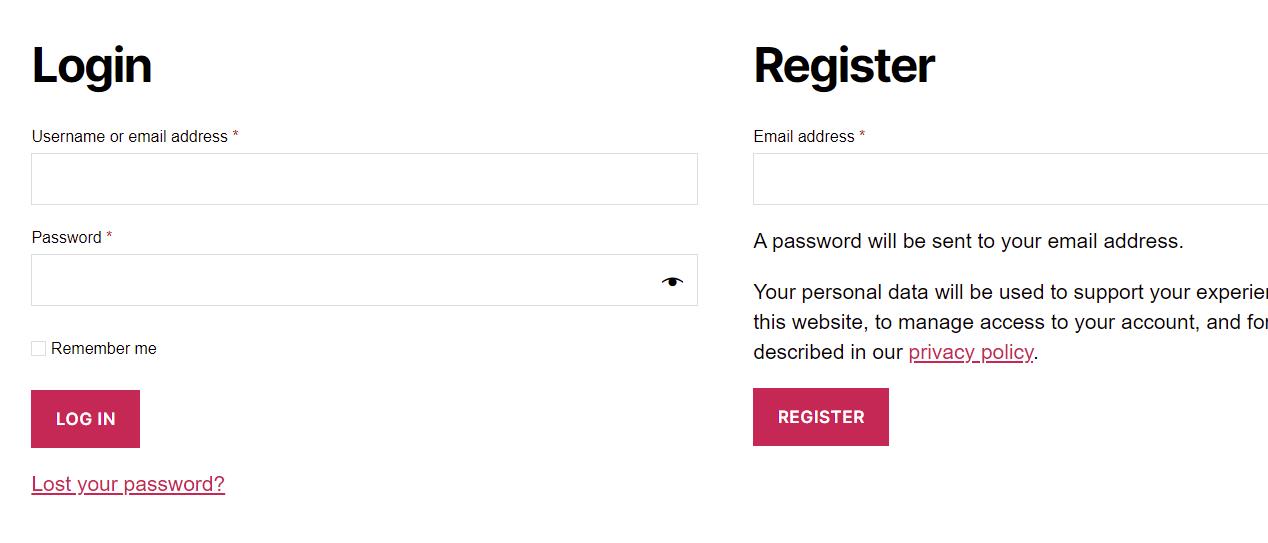
For instance, we have the Twenty Twenty theme installed, and the WooCommerce form-login.php is located in the plugins/woocommerce/templates/myaccount/ folder. That implies we’ll need to create a hierarchy like this to override the form: /themes/twentytwenty/woocommerce/myaccount/. Then, insert the form-login.php file in the hierarchy.
Here is the result when you visit the Account page on the front end:
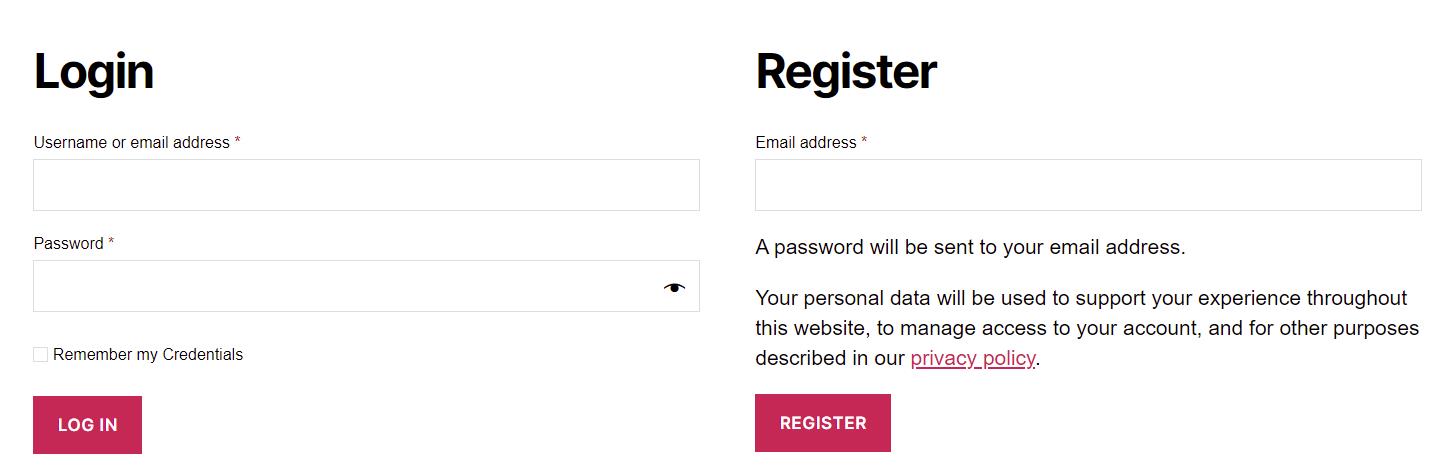
Now, if you try to modify anything in the form-login.php duplicate’s code, we will see that the layout is adjusted.
For example, here we change the “Remember me” text to “Remember my Credentials” and below is the result:
Step 3. Separate Login/ Registration
1. Register a new custom template
First, you need to register a new custom template by creating a new file named register.php and placing it in the templates folder. You will need to add the following code to this file:
<?php
/*
* Template name: Registration Form
*/
?>
<?php if(is_user_logged_in()){
wp_redirect(get_permalink(get_option('woocommerce_myaccount_page_id')));
} ?>
<?php get_header();?>
<?php do_action( 'woocommerce_before_customer_login_form' ); ?>
<div class="custom-registration">
<h2><?php esc_html_e( 'Register', 'woocommerce' ); ?></h2>
<form method="post" class="woocommerce-form woocommerce-form-register register" <?php do_action( 'woocommerce_register_form_tag' ); ?> >
<?php do_action( 'woocommerce_register_form_start' ); ?>
<?php if ( 'no' === get_option( 'woocommerce_registration_generate_username' ) ) : ?>
<p class="woocommerce-form-row woocommerce-form-row--wide form-row form-row-wide">
<label for="reg_username"><?php esc_html_e( 'Username', 'woocommerce' ); ?> <span class="required">*</span></label>
<input type="text" class="woocommerce-Input woocommerce-Input--text input-text" name="username" id="reg_username" autocomplete="username" value="<?php echo ( ! empty( $_POST['username'] ) ) ? esc_attr( wp_unslash( $_POST['username'] ) ) : ''; ?>" /><?php // @codingStandardsIgnoreLine ?>
</p>
<?php endif; ?>
<p class="woocommerce-form-row woocommerce-form-row--wide form-row form-row-wide">
<label for="reg_email"><?php esc_html_e( 'Email address', 'woocommerce' ); ?> <span class="required">*</span></label>
<input type="email" class="woocommerce-Input woocommerce-Input--text input-text" name="email" id="reg_email" autocomplete="email" value="<?php echo ( ! empty( $_POST['email'] ) ) ? esc_attr( wp_unslash( $_POST['email'] ) ) : ''; ?>" /><?php // @codingStandardsIgnoreLine ?>
</p>
<?php if ( 'no' === get_option( 'woocommerce_registration_generate_password' ) ) : ?>
<p class="woocommerce-form-row woocommerce-form-row--wide form-row form-row-wide">
<label for="reg_password"><?php esc_html_e( 'Password', 'woocommerce' ); ?> <span class="required">*</span></label>
<input type="password" class="woocommerce-Input woocommerce-Input--text input-text" name="password" id="reg_password" autocomplete="new-password" />
</p>
<?php else : ?>
<p><?php esc_html_e( 'A password will be sent to your email address.', 'woocommerce' ); ?></p>
<?php endif; ?>
<?php do_action( 'woocommerce_register_form' ); ?>
<p class="woocommerce-form-row form-row">
<?php wp_nonce_field( 'woocommerce-register', 'woocommerce-register-nonce' ); ?>
<button type="submit" class="woocommerce-Button woocommerce-button button woocommerce-form-register__submit" name="register" value="<?php esc_attr_e( 'Register', 'woocommerce' ); ?>"><?php esc_html_e( 'Register', 'woocommerce' ); ?></button>
</p>
<?php do_action( 'woocommerce_register_form_end' ); ?>
</form>
</div>
<?php do_action( 'woocommerce_after_customer_login_form' ); ?>
<?php get_footer();?>
The template name is defined in the Template name: Registration Form comment. After that, we have to check whether the user is already logged in. The remainder of the code is basically a copy of the registration form-related information from login-form.php wrapped in a <div class="custom-registration"> element.
2. Add a new page on the wp-admin pages
Then, on the wp-admin Pages screen, we create a new Page and name it whatever we want. It might be more appropriate to name it something like “Registration Page”. After that, use the template selector on the right sidebar, and make sure that you choose the correct template (the one we just created).

3. Provide access to the registration and login page
All we have to do now is to offer a method for users to visit this page. You can either create a “Register” menu item and connect it to the Registration Page you just created, or edit form-login.php and replace the registration code with a link to the Registration Page.
If we did this, we’d change the form-login.php file in themes/twentytwenty/woocommerce/myaccount/. As a result, the content will look like this:
<?php
/**
* Login Form
*
* This template can be overridden by copying it to yourtheme/woocommerce/myaccount/form-login.php.
*
* HOWEVER, on occasion, WooCommerce will need to update template files, and you
* (the theme developer) will need to copy the new files to your theme to
* maintain compatibility. We try to do this as little as possible, but it does
* happen. When this occurs, the version of the template file will be bumped and
* the readme will list any important changes.
*
* @see https://docs.woocommerce.com/document/template-structure/
* @package WooCommerce\Templates
* @version 4.1.0
*/
if ( ! defined( 'ABSPATH' ) ) {
exit; // Exit if accessed directly.
}
do_action( 'woocommerce_before_customer_login_form' ); ?>
<h2><?php esc_html_e( 'Login', 'woocommerce' ); ?></h2>
<form class="woocommerce-form woocommerce-form-login login" method="post">
<?php do_action( 'woocommerce_login_form_start' ); ?>
<p class="woocommerce-form-row woocommerce-form-row--wide form-row form-row-wide">
<label for="username"><?php esc_html_e( 'Username or email address', 'woocommerce' ); ?> <span class="required">*</span></label>
<input type="text" class="woocommerce-Input woocommerce-Input--text input-text" name="username" id="username" autocomplete="username" value="<?php echo ( ! empty( $_POST['username'] ) ) ? esc_attr( wp_unslash( $_POST['username'] ) ) : ''; ?>" /><?php // @codingStandardsIgnoreLine ?>
</p>
<p class="woocommerce-form-row woocommerce-form-row--wide form-row form-row-wide">
<label for="password"><?php esc_html_e( 'Password', 'woocommerce' ); ?> <span class="required">*</span></label>
<input class="woocommerce-Input woocommerce-Input--text input-text" type="password" name="password" id="password" autocomplete="current-password" />
</p>
<?php do_action( 'woocommerce_login_form' ); ?>
<p class="form-row">
<label class="woocommerce-form__label woocommerce-form__label-for-checkbox woocommerce-form-login__rememberme">
<input class="woocommerce-form__input woocommerce-form__input-checkbox" name="rememberme" type="checkbox" id="rememberme" value="forever" /> <span><?php esc_html_e( 'Remember me', 'woocommerce' ); ?></span>
</label>
<?php wp_nonce_field( 'woocommerce-login', 'woocommerce-login-nonce' ); ?>
<button type="submit" class="woocommerce-button button woocommerce-form-login__submit" name="login" value="<?php esc_attr_e( 'Log in', 'woocommerce' ); ?>"><?php esc_html_e( 'Log in', 'woocommerce' ); ?></button>
</p>
<p class="woocommerce-LostPassword lost_password">
<a href="<?php echo esc_url( wp_lostpassword_url() ); ?>"><?php esc_html_e( 'Lost your password?', 'woocommerce' ); ?></a>
</p>
<?php do_action( 'woocommerce_login_form_end' ); ?>
</form>
<a href="/?p=202">Sign Up</a>
<?php do_action( 'woocommerce_after_customer_login_form' ); ?>
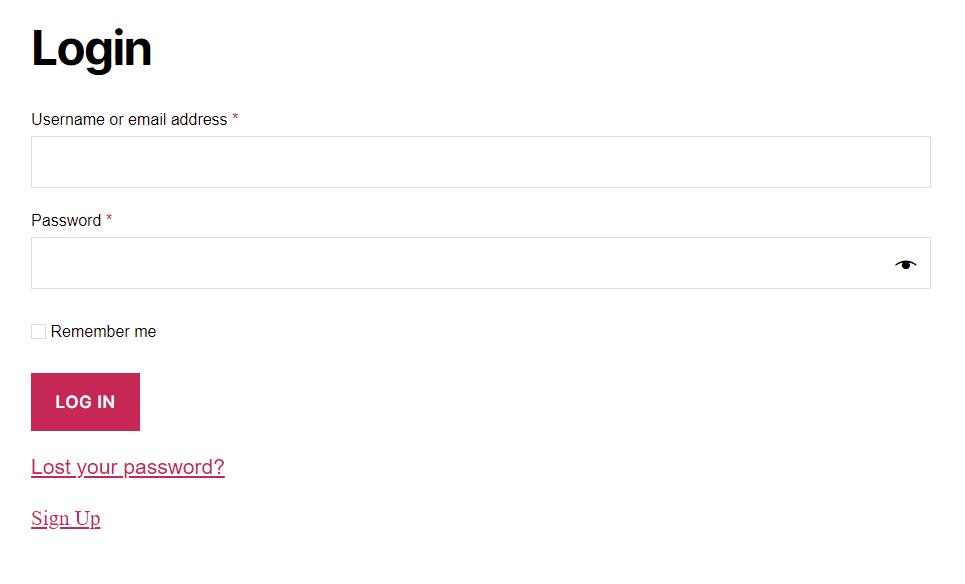
The id of the custom registration page is 202. When the page is open in the back-end editor, you can see the page id in the URL.
If you access the account information page from the front end, you should see something like this:
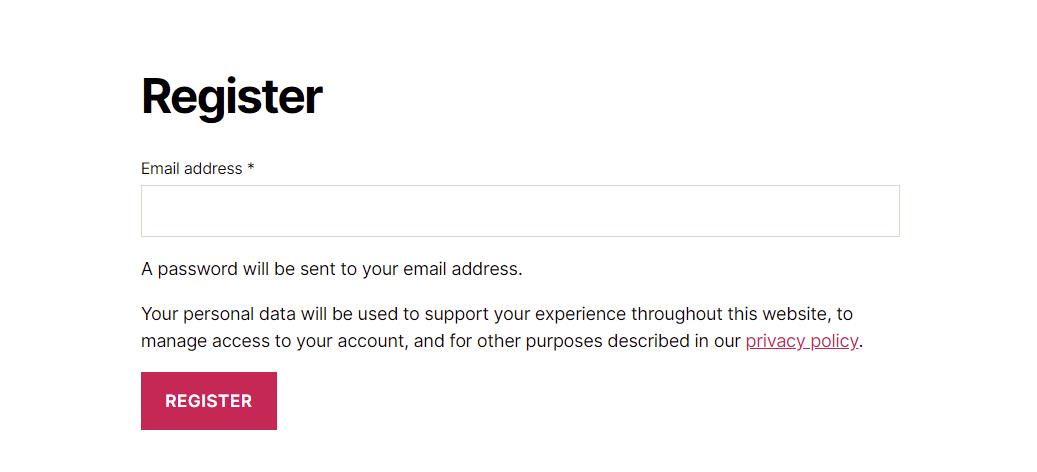
If you click the Sign Up link, you should be sent to the registration page we created, which looks like this:
3 Recommended Plugins to Create WooCommerce Customer Login Page
Apart from coding to create the WooCommerce customer login page, plugins are another great alternative. In fact, we suggest you should use plugins to create a WooCommerce customer login page most conveniently and quickly.
Below are 3 recommended plugins that we think you should take into consideration.
1. Profile Builder
Profile Builder is a WordPress user profile plugin that can do wonders for your WooCommerce store. With this user profile plugin, you can utilize shortcodes to create front-end login, user registration, and profile change forms.
Profile Builder helps you to customize your website by giving all of your users’ access to a front-end menu where they can quickly edit their user profiles or sign up.
The built-in Role Editor enables you to manage user roles and capabilities.
Features
- Drag and drop to reorder user profile fields
- Email confirmation for registration users
- WordPress password requirements
- Assign users a specific role at registration
- Redirect users after login
Price
Profile Builder’s Hobbyist plan is charged at €69 and the Pro version costs you €149.
2. Login/ Signup Popup

Login/Signup Popup is a simple and lightweight plugin that makes registering, logging in, and changing your password easier. Two amazing completely adjustable designs from this plugin are included, featuring Popup and Inline forms with shortcodes.
Features
- Supports Woocommerce
- Fully Ajaxed (no refresh)
- Login, Sign up, Lost Password, and Reset password Form.
- Customizable Fields
- Fully Customizable.
- WPML compatible
Price: Free to use
3. WooCommerce Login/ Signup Lite
Woocommerce Login / Signup Lite makes it simple to set up a sign-up and login procedure for your e-commerce store. This WordPress plugin provides three basic shortcodes that may be pasted into your website’s code to build a simple signup/login system.
Widgets or Pages can also be used to generate Sign Up/Login Widgets. This plugin includes shortcodes for the login, signup, and both login and registration forms.
Features
- Create your own custom registration fields
- Autoload the login pop up on the Checkout page
- Set Popup Style as Lightbox or Dropdown
- Styling Options for Advanced Customization
- Show or Hide the Username and Password field label in the login form
- Show or Hide the Placeholder field in the login form
Price
The single site, 5 sites, and 25 sites licenses cost $39, $69, and $129, respectively.
Final words
You’ve come to the end of this tutorial. Hopefully, our instructions on creating a WooCommerce customer login page bring you lots of helpful information.
Please don’t hesitate to contact us via the comments section below if you have any questions.
Thank you for reading and we’ll see you in the following article.


