
How to set up Shopify integrate with Wordpress

Nowadays, with Shopify and WordPress, starting up an online business is not a big deal for merchants. They can easily raise their appealing stores without any effort and then begin to sell their amazing products right away. All you need to do is to integrate Shopify with WordPress.
There’s no need to worry about this setting because we are here to help and support you. In this article, we’ll show you detailed directions on how to set up Shopify integrate with WordPress, quickly and effectively.
3 Benefits of Integrating Shopify with WordPress

Shopify is such a wonderful choice for both new merchants and experienced ones. Beginners probably receive more benefits as this platform is so easy and simple to use. No need to install anything and you can start very quickly. Read more about Shopify pricing plan to learn how to choose the perfect plan for your Shopify store.
Besides, Shopify offers a basic plan with a price of $29 per month. You don’t have to pay a large amount of money on eCommerce hosting strategies and optimization for your store on Shopify. In addition, the risks of beginning an online store will be significantly decreased and it’s possible for you to upgrade your plan to meet your requirements.
Are you wondering why you should integrate your Shopify store with WordPress? Because if you do that, you can run your business through two different platforms. Moreover, it’ll be so convenient when you pay WordPress hosting costs and Shopify monthly subscription.
Now let’s see how many advantages we can get from integrating Shopify with WordPress!
Easy to Use
Shopify is a platform that makes starting an online store become easier than ever before. Shopify will take full responsibility for the eCommerce part. You just need to handle your shop with WordPress only, without knowing a thing about code, CSS or anything else.
Better Security
A 256-bit SSL certificate is available in every online shop on Shopify. This helps ensure the safety and security of business data and customers’ documents. Plus, the level-1 PCI compliant of this platform will keep the detailed information of your customer’s credit card safe and secure.
Better Shopping Cart Options
Shopify provides built-in payment options that allow you to make Visa, Discover, American Express and Mastercard payments immediately. Besides, more than 70 payment gateways such as PayPal, Stripe or Bitcoin are available on Shopify. This platform also assists you in calculating delivery costs and adding automatic taxes so that you can ship to any locations in the world.
Easy to Customize
When you have a store on Shopify, it’s easy for you to change the design of the theme. Moreover, with a premium theme, you will possess limited customization choices. If you use WordPress, you can apply a premium theme and modify or change the design to your favorite.
How to Integrate Shopify with WordPress
WordPress is considered to be one of the most well-known website builders. If you are not currently running a WordPress website, you have to construct one to open an online store with Shopify.
When you’ve already owned a WordPress website, it’s time for you to integrate it with Shopify.
Step 1: Set Up Your Shopify Store
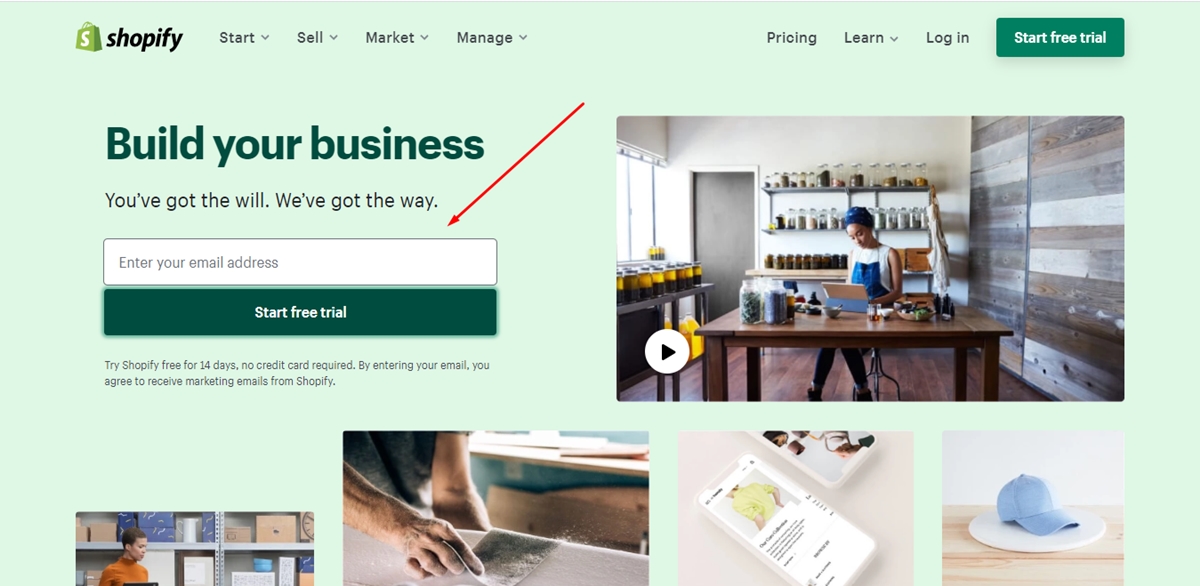
First, you need to create an account with Shopify. Go to the Shopify website. Shopify offers a free 14-day trial. On their home page, fill in your email address and then click the Start free trial button.
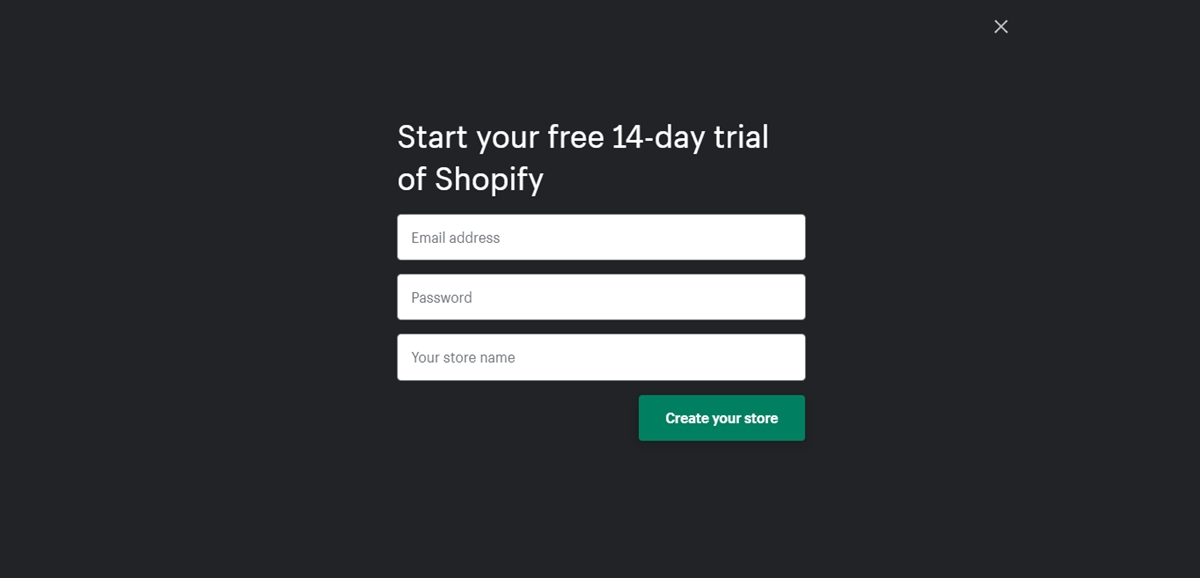
In the next area, you need to create a password for your account and type your store name as well. Press the Create your store button after entering all the details.
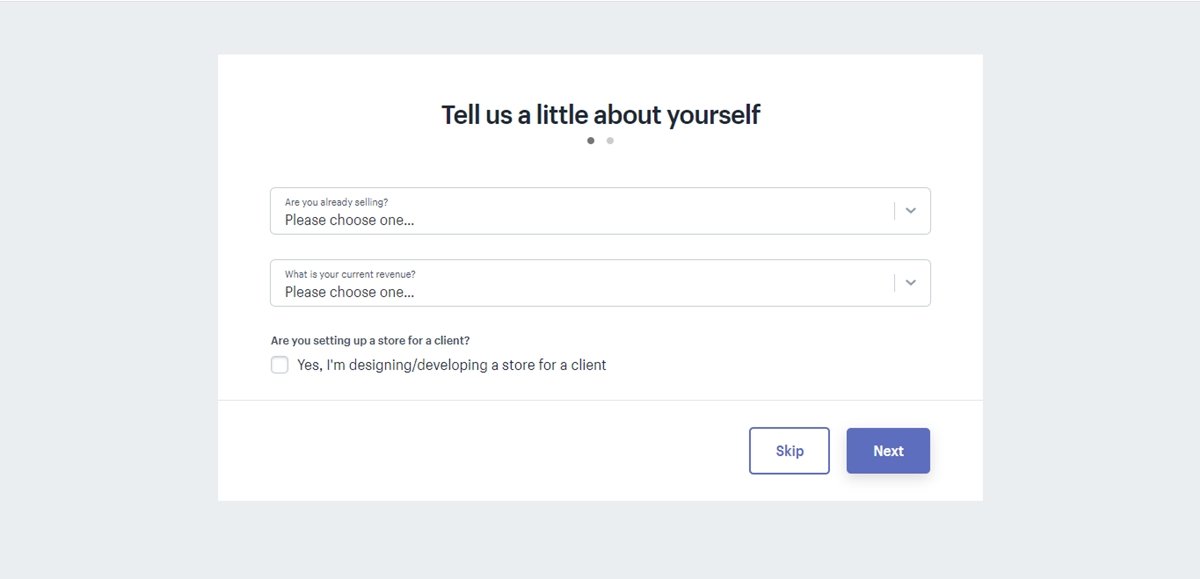
Then, you have to answer some questions to let Shopify know more about you and your needs. Select your answers from the dropdown and then click on Next.
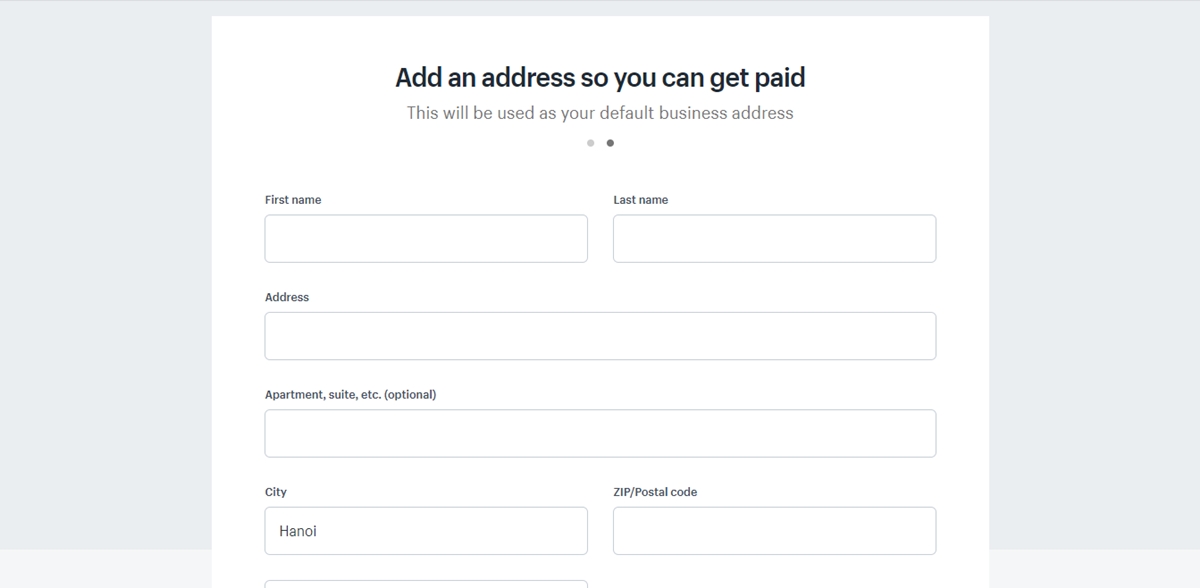
Next, you’re asked to enter your name, address, phone number and website address.
Completing this part, press the Enter my store button. Then you will be brought to the homepage of your Shopify account.
Step 2: Set Up Payments for Your Store
In your Shopify admin, go to Settings in the bottom corner and then click Payment providers to set up payments for your online shop on Shopify.
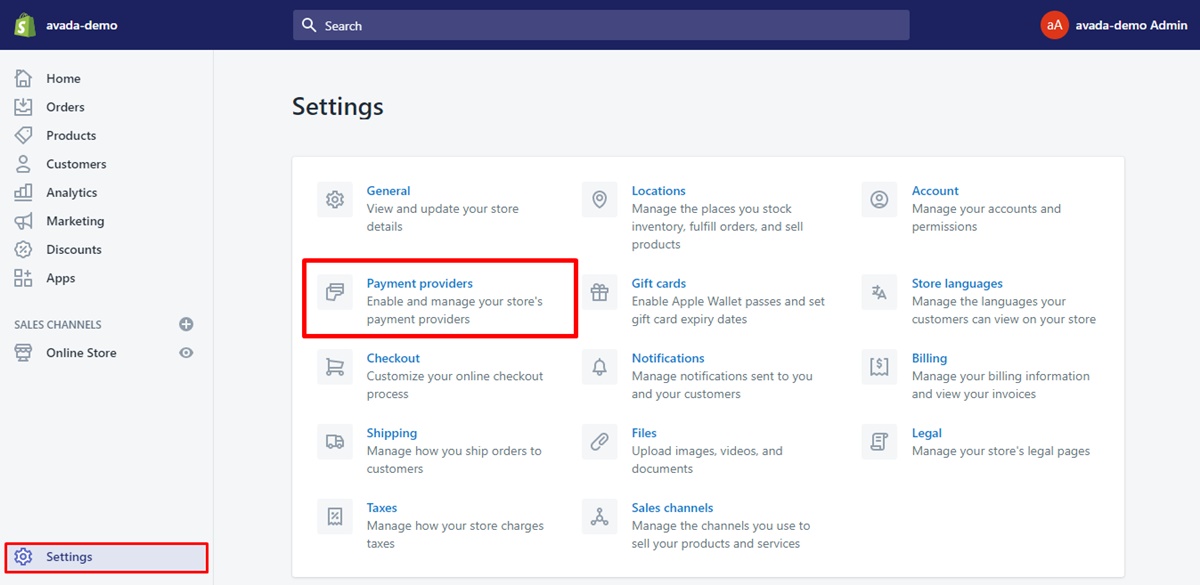
PayPal payments with PayPal Express Checkout are already set up for your Shopify account. If you already have a PayPal account set up with the email address you opened your Shopify account, you can accept payments instantly. In case you don’t have one, Shopify will instruct you on how to set up a PayPal Merchant account via your email. Read our article to learn How to add Paypal to Shopify
It’s possible for you to accept other payment forms such as credit cards, BitPay or GoCoin. Just press the Complete account setup button to let Shopify know more about your business’s details.
Then, you need to set up shipping. Go to Settings and click the Shipping section.
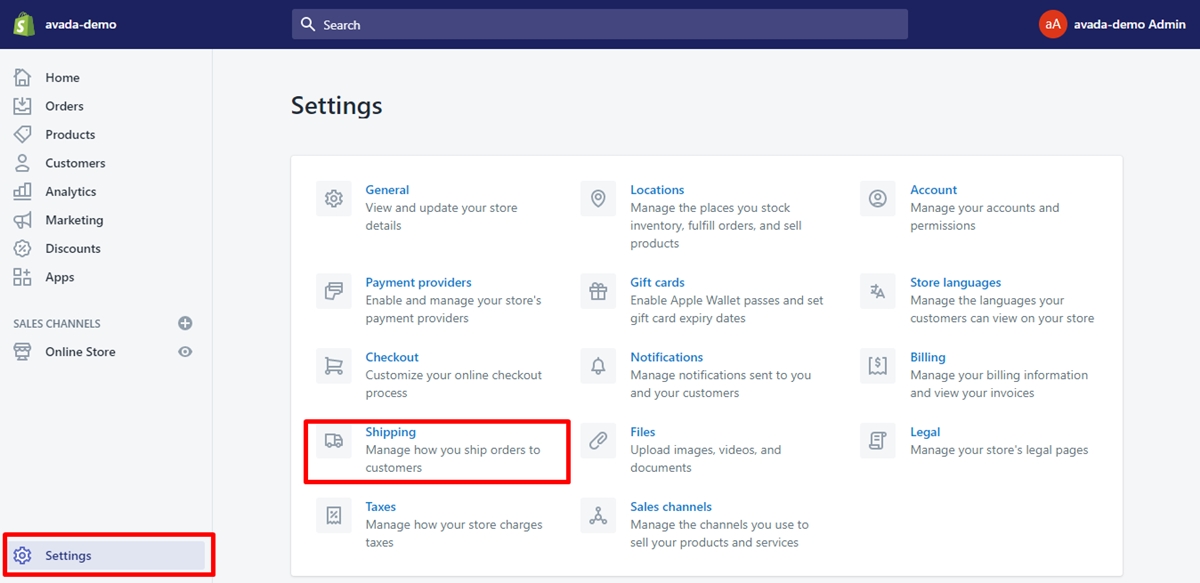
When you configure your Shopify account, the shipping origin is automatically set to the store address. You can change the shipping origin if you want. Click on the Change shipping origin button.
Moreover, you can create shipping zones and calculate delivery costs to those destinations. Ask for some advice at your local post office if you find it difficult to define shipping rates.
Step 3: Set Up Shipping for Your Store
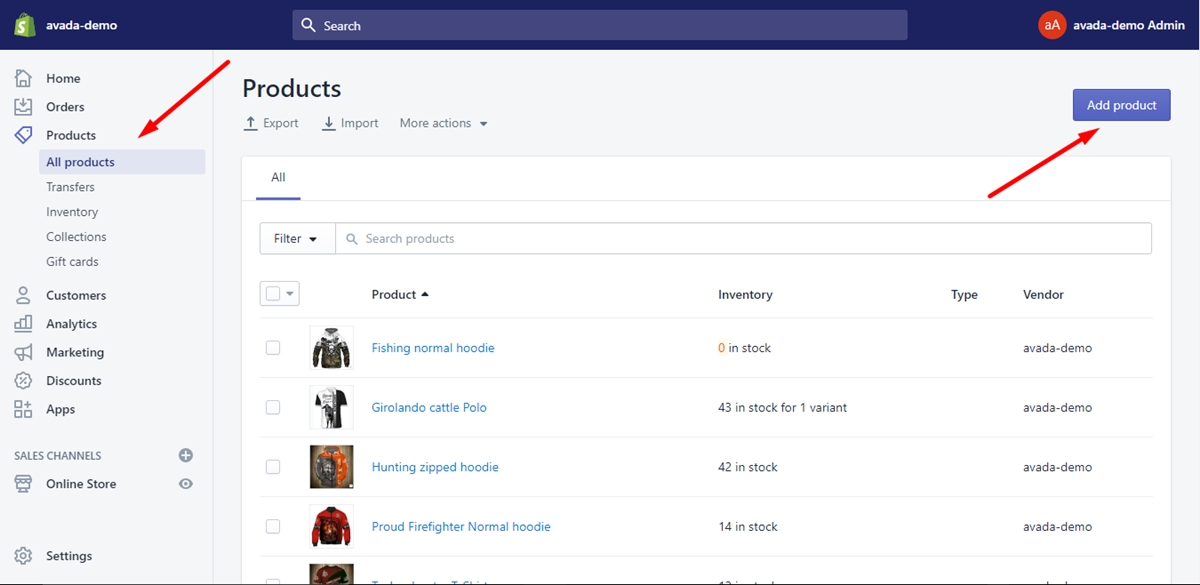
In order to add your products to your Shopify store, look for the Product tab and then click Add product.
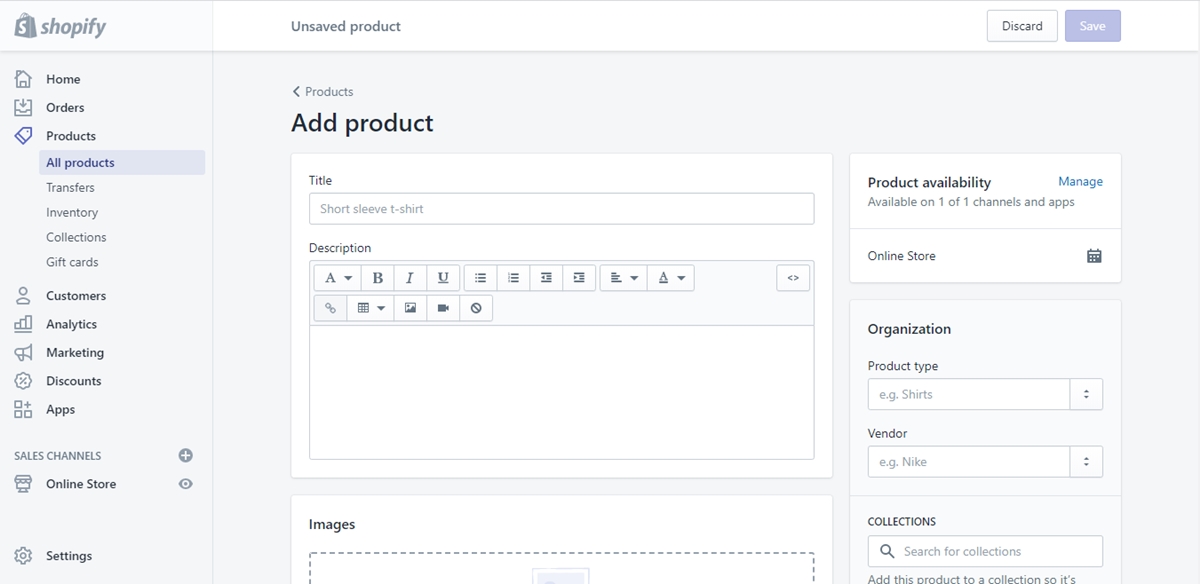
Then, enter all the details of your products such as product’s name, product description, shipping rates, price and beyond. You also can post a beautiful image of your product so that customers will see what it looks like. Plus, it’s possible to add the product to a collection in your shop. When you are done with all the information about your product, press the Save button.
Step 4: Choose Your Shopify Plan
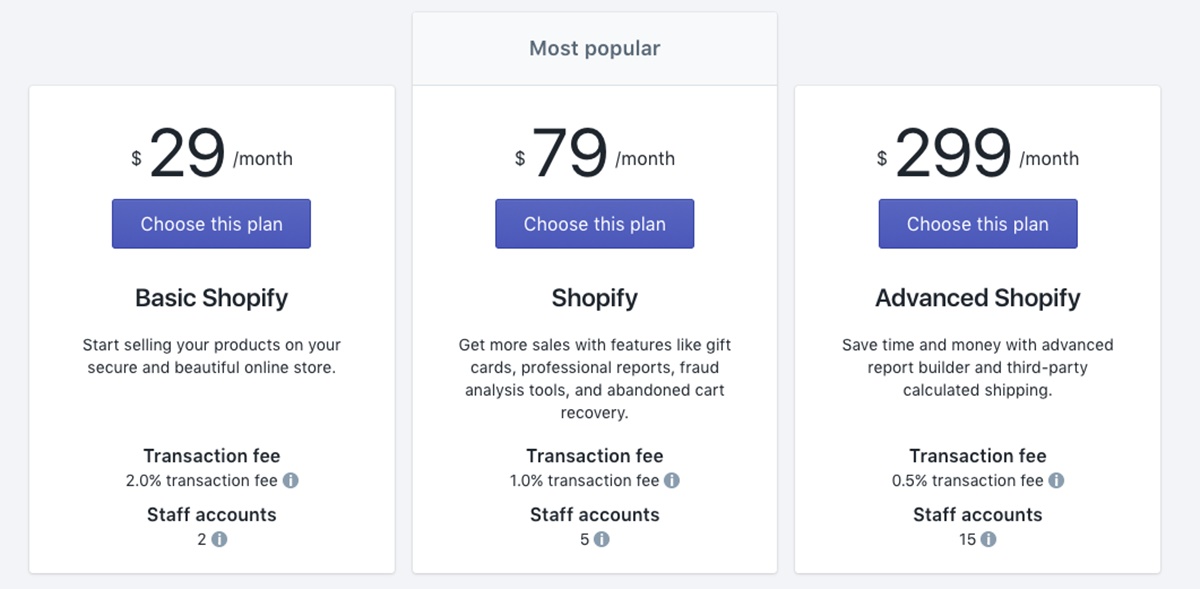
Next, you’ll need to select a pricing plan to run your online shop. At the bottom of the screen, press the Select a plan button.
Shopify offers 3 different plan choices. If you are a beginner, it’s highly recommended purchasing the Basic Shopify plan ($29/month). You can change your plan whenever you want. Click Choose this plan to choose your own plan.
Next, fill in your credit card’s details and click on the Start plan button.
Step 5: Activate Shopify Buy Button
Now, let’s set up Shopify with your WordPress page with Buy Buttons. Buy Buttons are available in all Shopify plans and they direct to your checkout on Shopify. Buy Buttons allow your products to be sold on your website. Shopify Buy Buttons also help you have a checkout link to send to customers through email or social media.
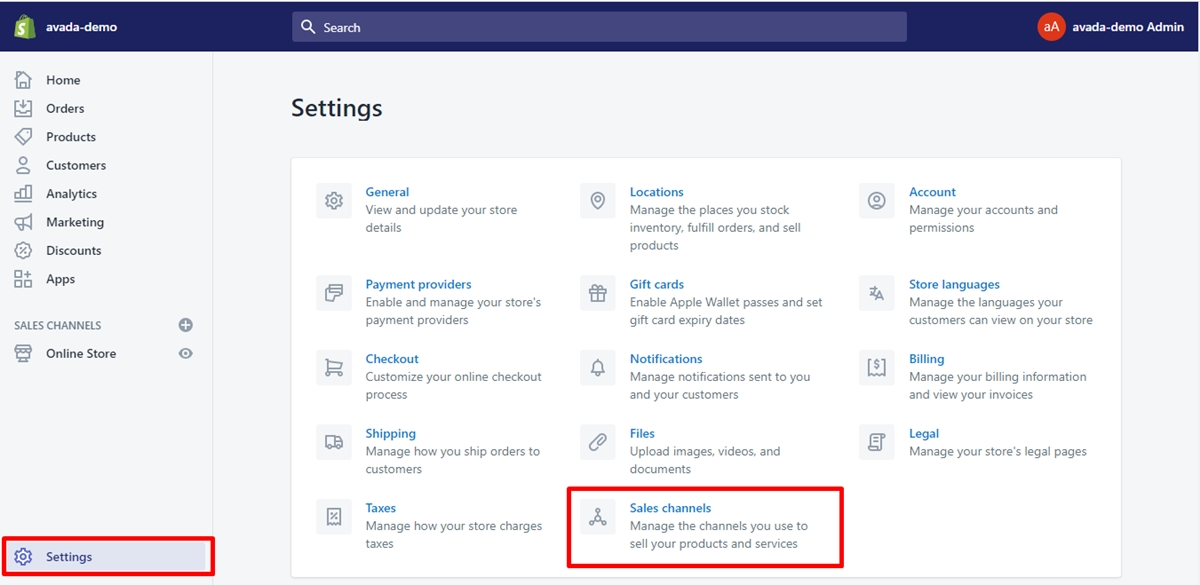
If you don’t see the Buy Button sales channel, go to Settings and then click the Sales channels button.
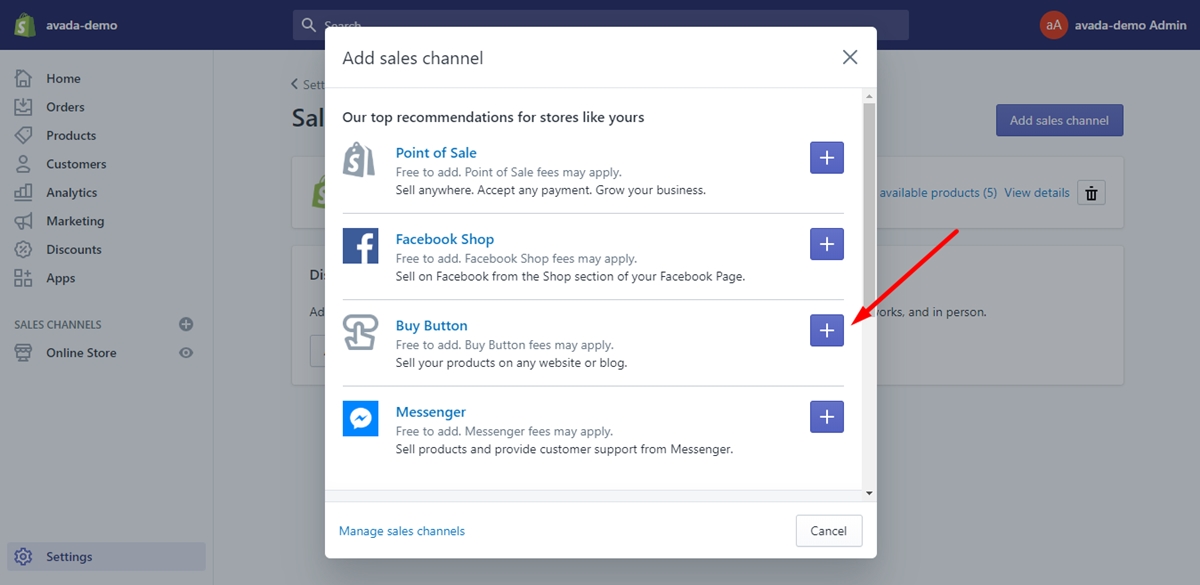
Next, click on the Add sales channel button. On the scroll bar, look for the Buy Button channel and click the blue + button to install.
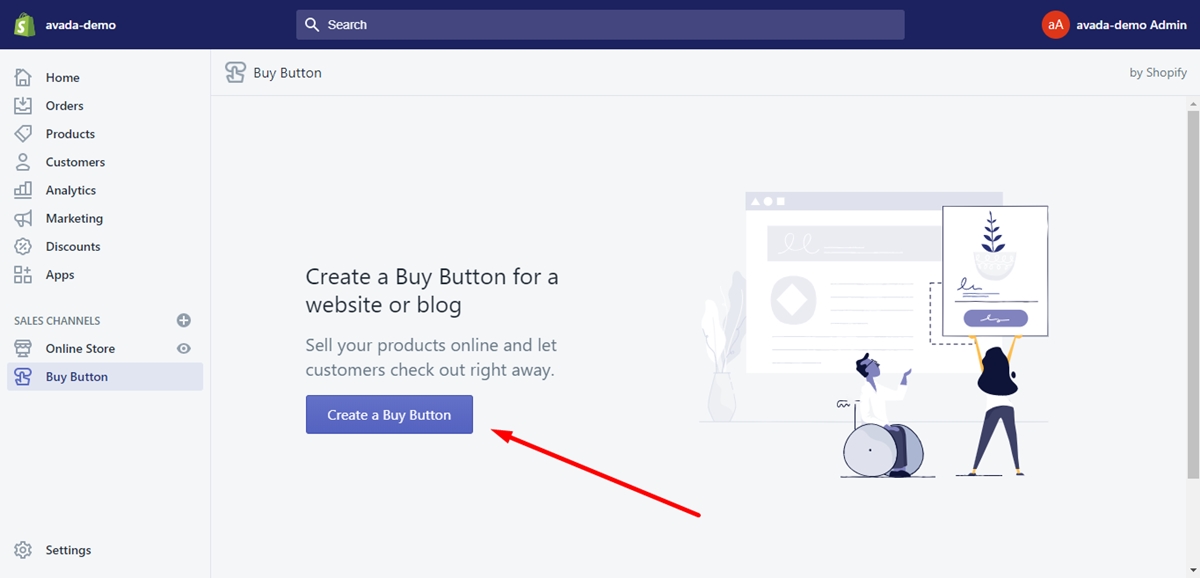
Then, press the Create Buy Button button.
Next, choose the product you’ll create a buy button for from the scroll.
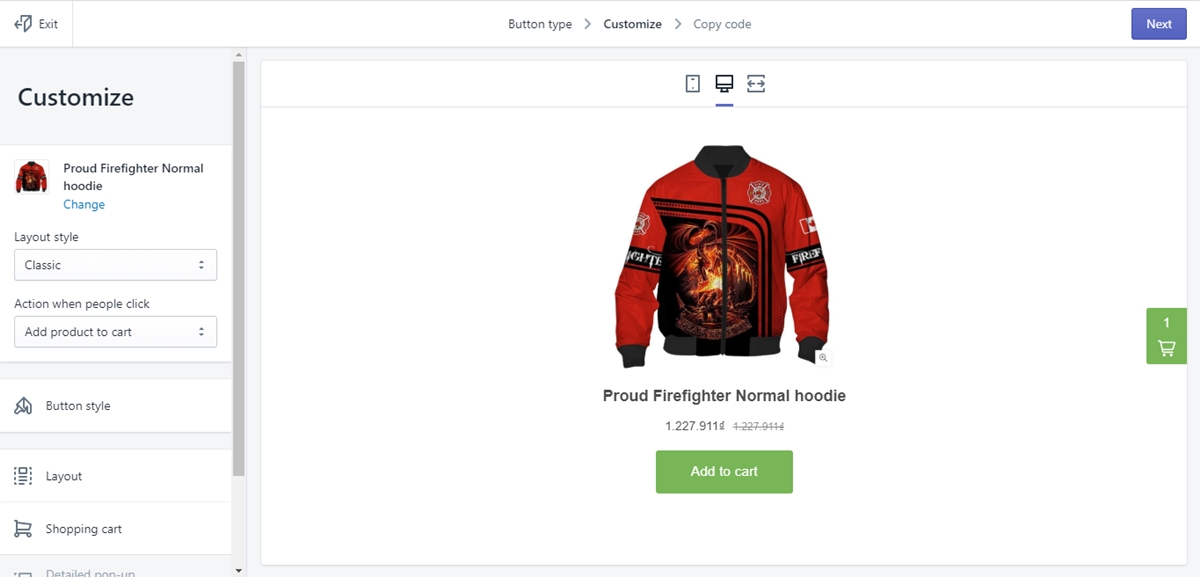
Then you can freely set up the look of your Buy Button including template, color, text and the action that occurs when a customer presses the button. When you finish that, click on the Next button. The next thing you need to do is to copy the code and paste it to your WordPress site.
Step 6: Add Shopify Products on Your WordPress Pages
In this step, you’ll have to move your products to your WordPress page in order to sell them. Click on the Copy code button.
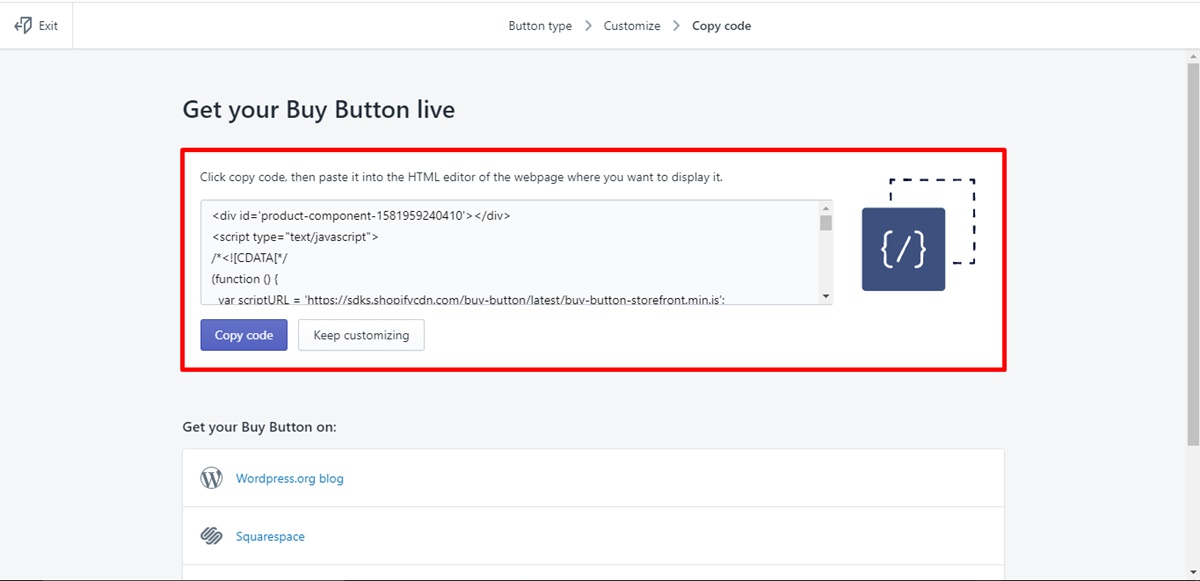
It’s your choice to add this code to any area on your website where you’d like your Buy Button to appear.
Related Posts
The Best Shopify WordPress Plugin (for People Who Hate Code)
What is WP Shopify?
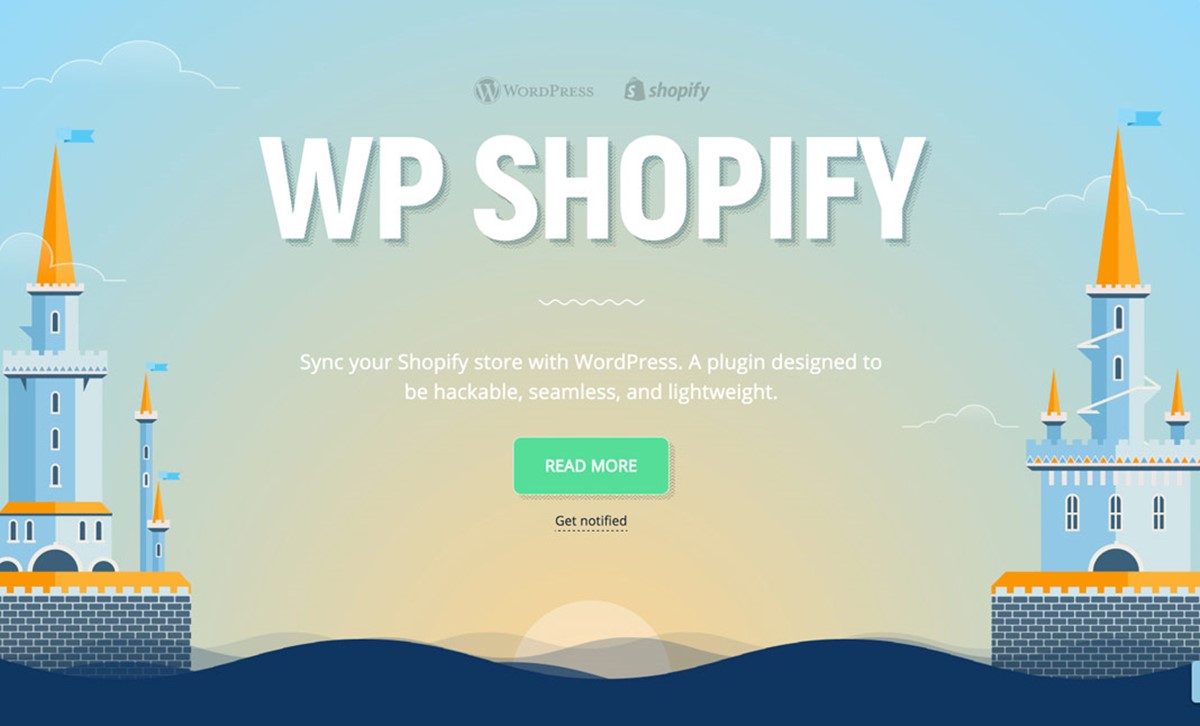
WP Shopify is a nifty plugin that lets you sell Shopify products on your WordPress site without installing and setting up an eCommerce system.
The plugin syncs your Shopify shop data as custom post types, which allows you to take advantage of the WordPress CMS as much as possible. In addition, WP Shopify also can add the Shopify Buy Button anywhere on your WordPress page, creating a smooth purchasing experience.
WP Shopify doesn’t take responsibility for payments. When the shopper clicks the checkout button, they are linked to your Shopify checkout page to finish the transaction. That means you only use Shopify for payments.
Some great features of WP Shopify include:
-
Allow you to import your Shopify products and collections as WordPress posts
-
Numerous templates that aid you to create a unique online shop
-
Save a shopping cart on your WordPress store through the Shopify SDK
-
No iFrames because of the Shopify Buy button
-
Have an SEO-ready design
-
Ability to store your Shopify details in custom WordPress database tables
-
A list of more than 100 actions and filters to customize your online shop
-
Compatibility with WordPress themes and plugins
Why You Should Use WP Shopify
WP Shopify promises to bring you a number of wonderful benefits when you sell products on your online Shopify store.
-
Rights to take control of the URL structure of your products due to WordPress permalinks
-
Countless WordPress themes and visual page developers allow you to design your dream store without any effort
-
It’s simpler to customize WordPress themes rather than using Shopify’s Liquid template engine
-
A wide range of WordPress plugins will help you add functionality to your shop
-
You can totally control the store data synced with WordPress
-
Discounted delivery costs
-
WP Shopify is simple to install and set up
-
The free version of WP Shopify offers everything you’ll need to begin selling Shopify product on your WordPress page
-
Extensive documentation and FAQ
-
Good support and assistance
Conclusion
With our detailed instructions, we believe that you can totally understand and know how to set up Shopify integrate with WordPress. Hope that this writing somehow can assist you in running an online store on the Shopify platform.
Is this article useful? Please let our team know by leaving a comment below. Or if you still have any concerns or questions, don’t hesitate to ask us. We will answer as fast as possible.
Thank you all for reading!


