
How to Set Up Shipping on Shopify for Dropshipping

While the concept of dropshipping is not something new to many Shopify users, it is still a question for some people. Dropshipping is one of the greatest business models for inspiring online merchants to begin with since it is accessible. When it comes to dropshipping, you can try to check and test various business ideas, along with registered downside that can allow you to gain more knowledge on how to choose as well as market demand items.
Hence, you will be introduced what exactly dropshipping is and how to Set Up Shipping on Shopify for Dropshipping. This ultimate guide will provide you with the complete answer and won’t let you down for such misunderstanding concepts.
About shipping on Shopify when dropshipping
Before going further, you had better equip yourself with a little understanding of shipping on Shopify with dropshipping.
Basically, there are two common ways of accessing dropshipping in Shopify. They are searching for the supplier situated in North America or anywhere else you can find all over the world and using the supplier databases or even discover a Shopify app to help connect you and your stores to thousands of outsider suppliers.
Shopify users are able to apply the two main shipping strategies in their own Shopify store:
- Request customers to pay for their products and for the shipping cost.
- Insert the shipping cost to your price and make the shipment become free for the customers.
You are highly recommended to use Oberlo, which is known as a marketplace run and grown by Shopify. This aims at supporting independent online sellers to find out products to sell. When it comes to Oberlo, you are able to refer to AliExpress, then getting all of the products imported.
After a customer purchases a product, you can find it easy to fulfill their order in the Oberlo app. More interestingly, Oberlo currently makes this process automatic so that all you need to do is to check the details are correct or not, then choose the Order button. Right after, this product will be sent directly from the AliExpress to your customers or any places in the world they can do.
Set Up Shipping on Shopify for Dropshipping
To set up shipping on Shopify for dropshipping, you should follow a number of simple steps below:
Create shipping origin on Shopify for dropshipping
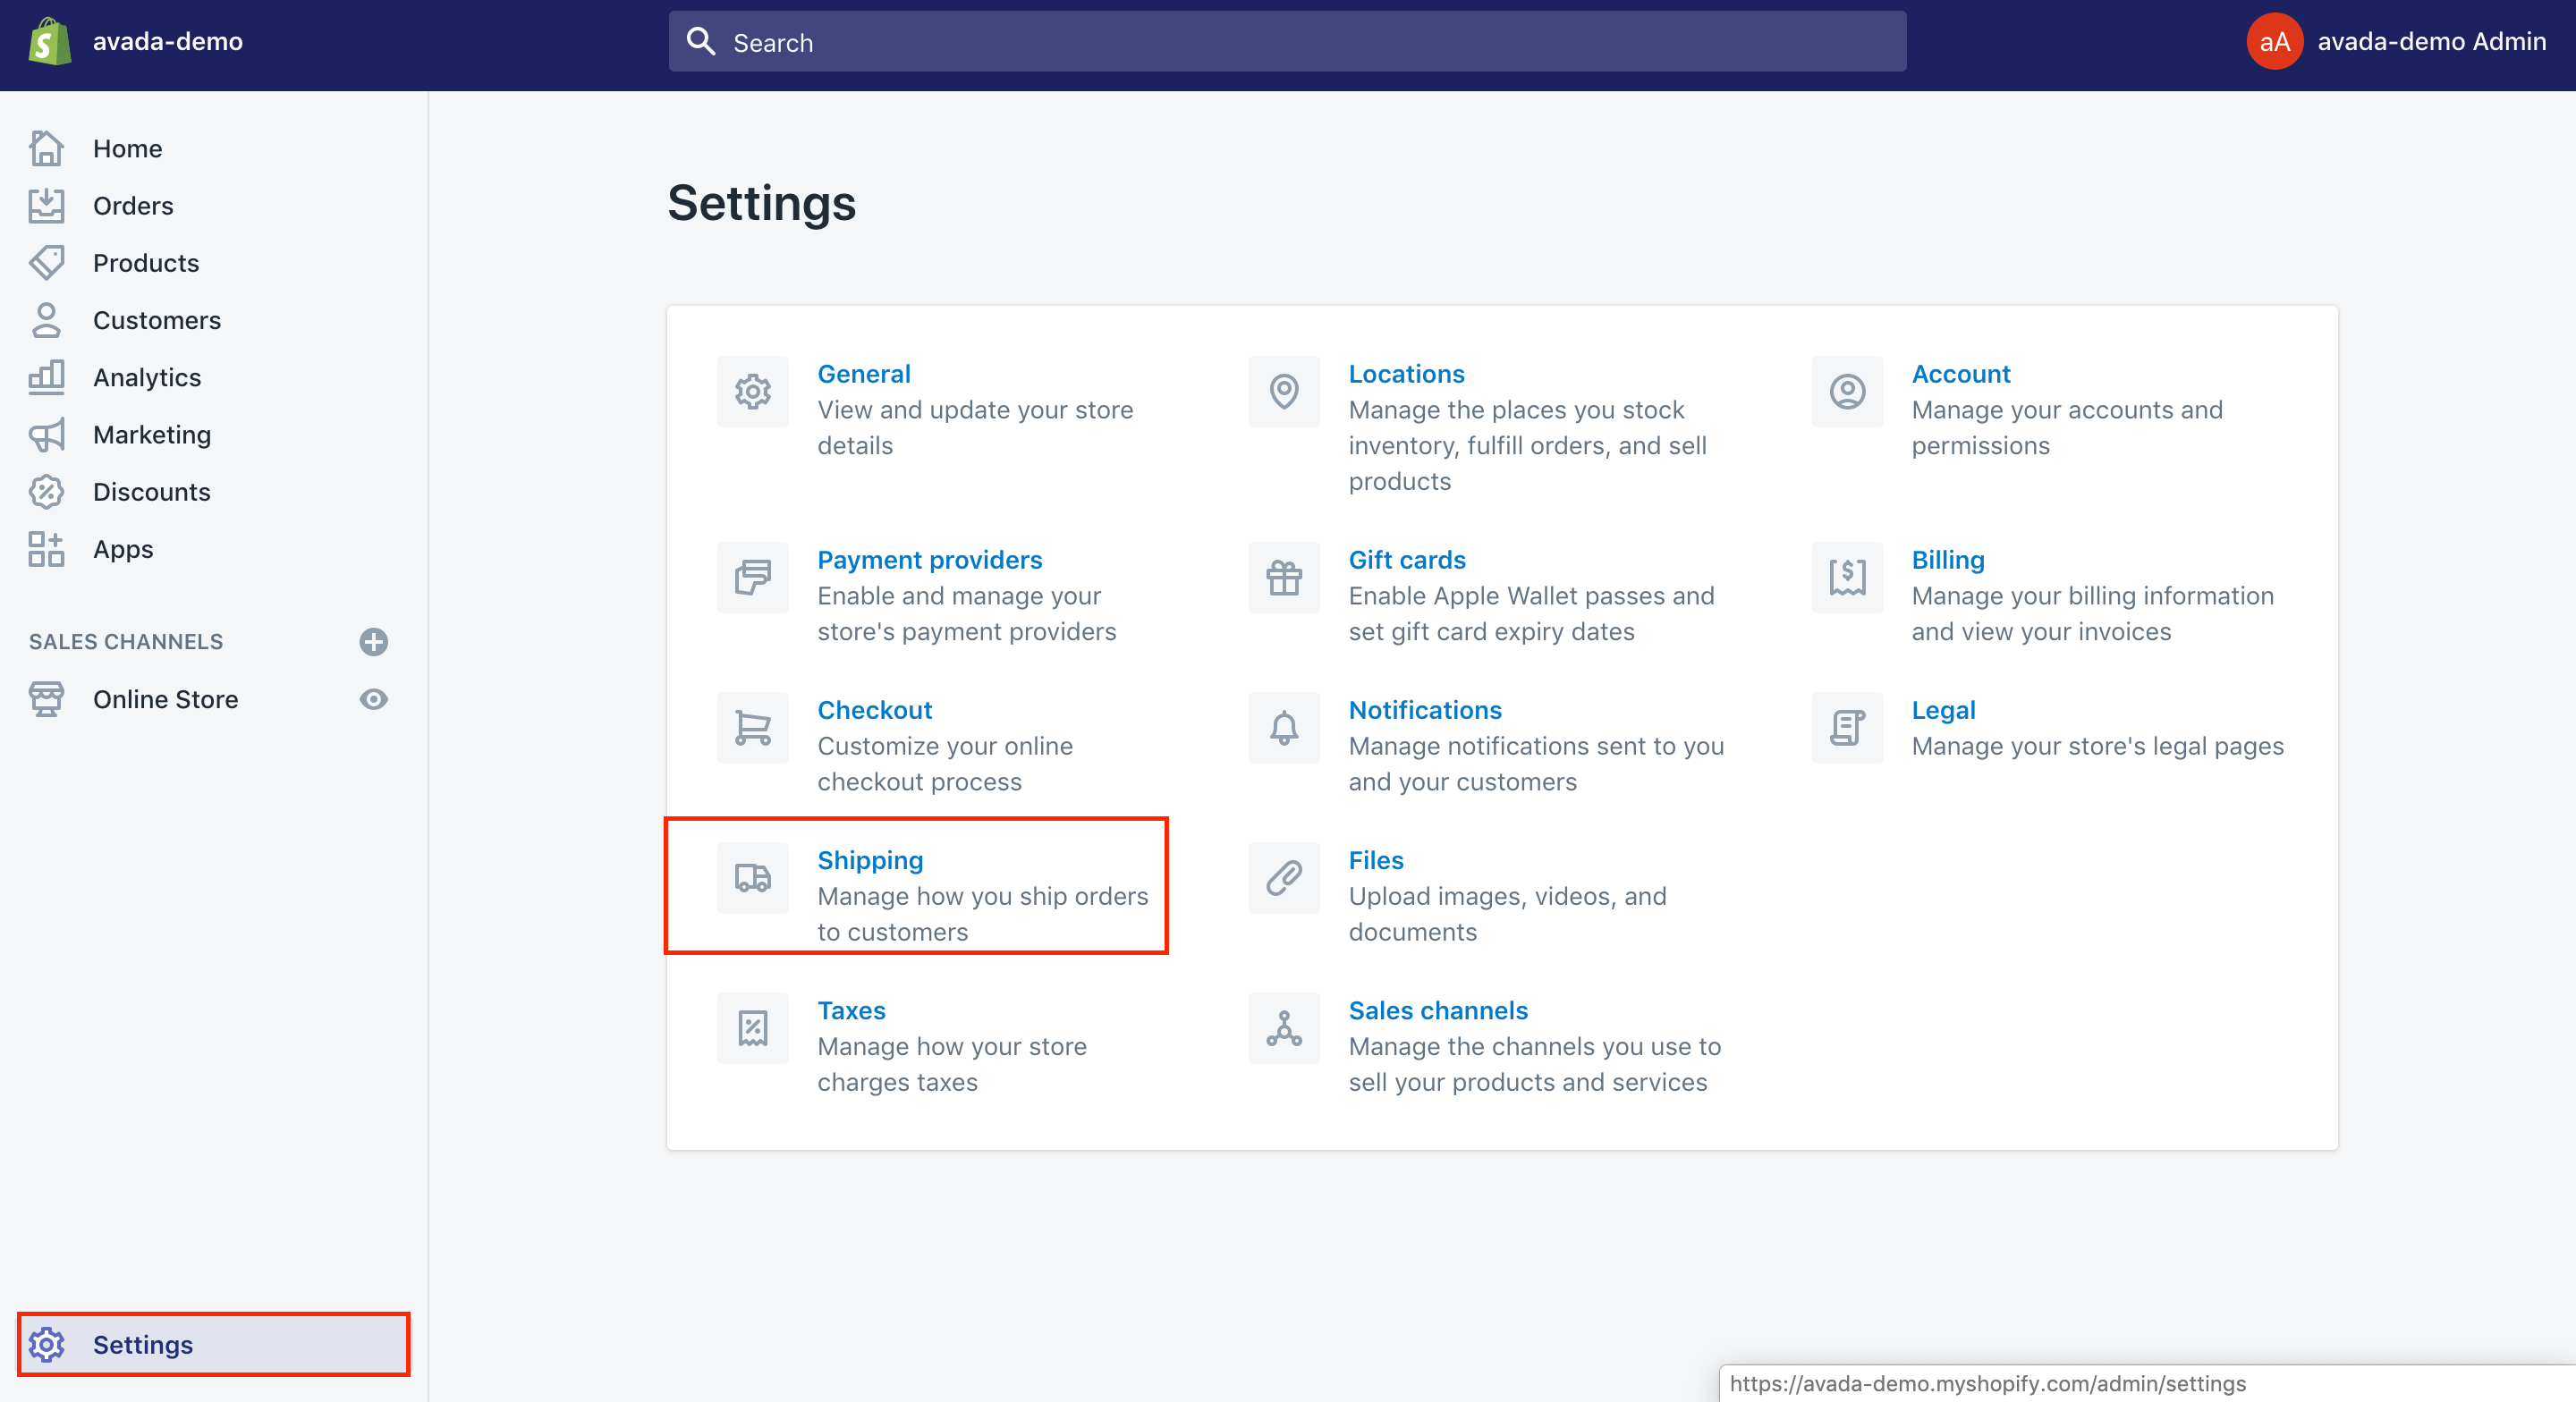
From your Shopify admin, you can go to Settings > Shipping. There, you only have to focus on the Shipping profiles area. Settings below the shipping profiles are used as you sell as well as ship the products on your own or use another service.
As you can see, shipping profiles give you a good chance to customize the shipping settings to help fit your business requires no matter if you are dropshipping with Oberlo or not and help orders to be fulfilled from many locations or you can ship your products from home. That means you can be offered different shipping rates for specific items with locations.
Moreover, Shopify lets you produce up to 100 shipping profiles. The General profile will be created on each store by default.
What your stores need to do is to help you define the number of shipping profiles you have:
-
In case you would like to include the same shipping rules for all of the products, it is enough to create a general profile.
-
In case you would like to set various shipping rules for various products or locations, then creating multiple shipping profiles are a must.
The basic guide for Setting up shipping rates
Produce flat shipping rates
As you might not know about, flat shipping rates can charge an amount for the shipment at checkout. Shopify lets users to produce the flat shipping rates for each order in the shipping zone or only for orders that weigh or cost in a specific range. For instance, in the shipping zone for Europe, you are able to set up a flat rate of $10 or other flat rates of $5 for orders which are over $50. Learn How to Add Flat Rate Shipping
Generally, shipping rates are counted based on the order price that considers the cart’s total value while the shipping rates are based on the order weight considering only items in the location group or shipping profile they belong to.
- Step 1: Head to
Settings > Shippingunder your Shopify admin
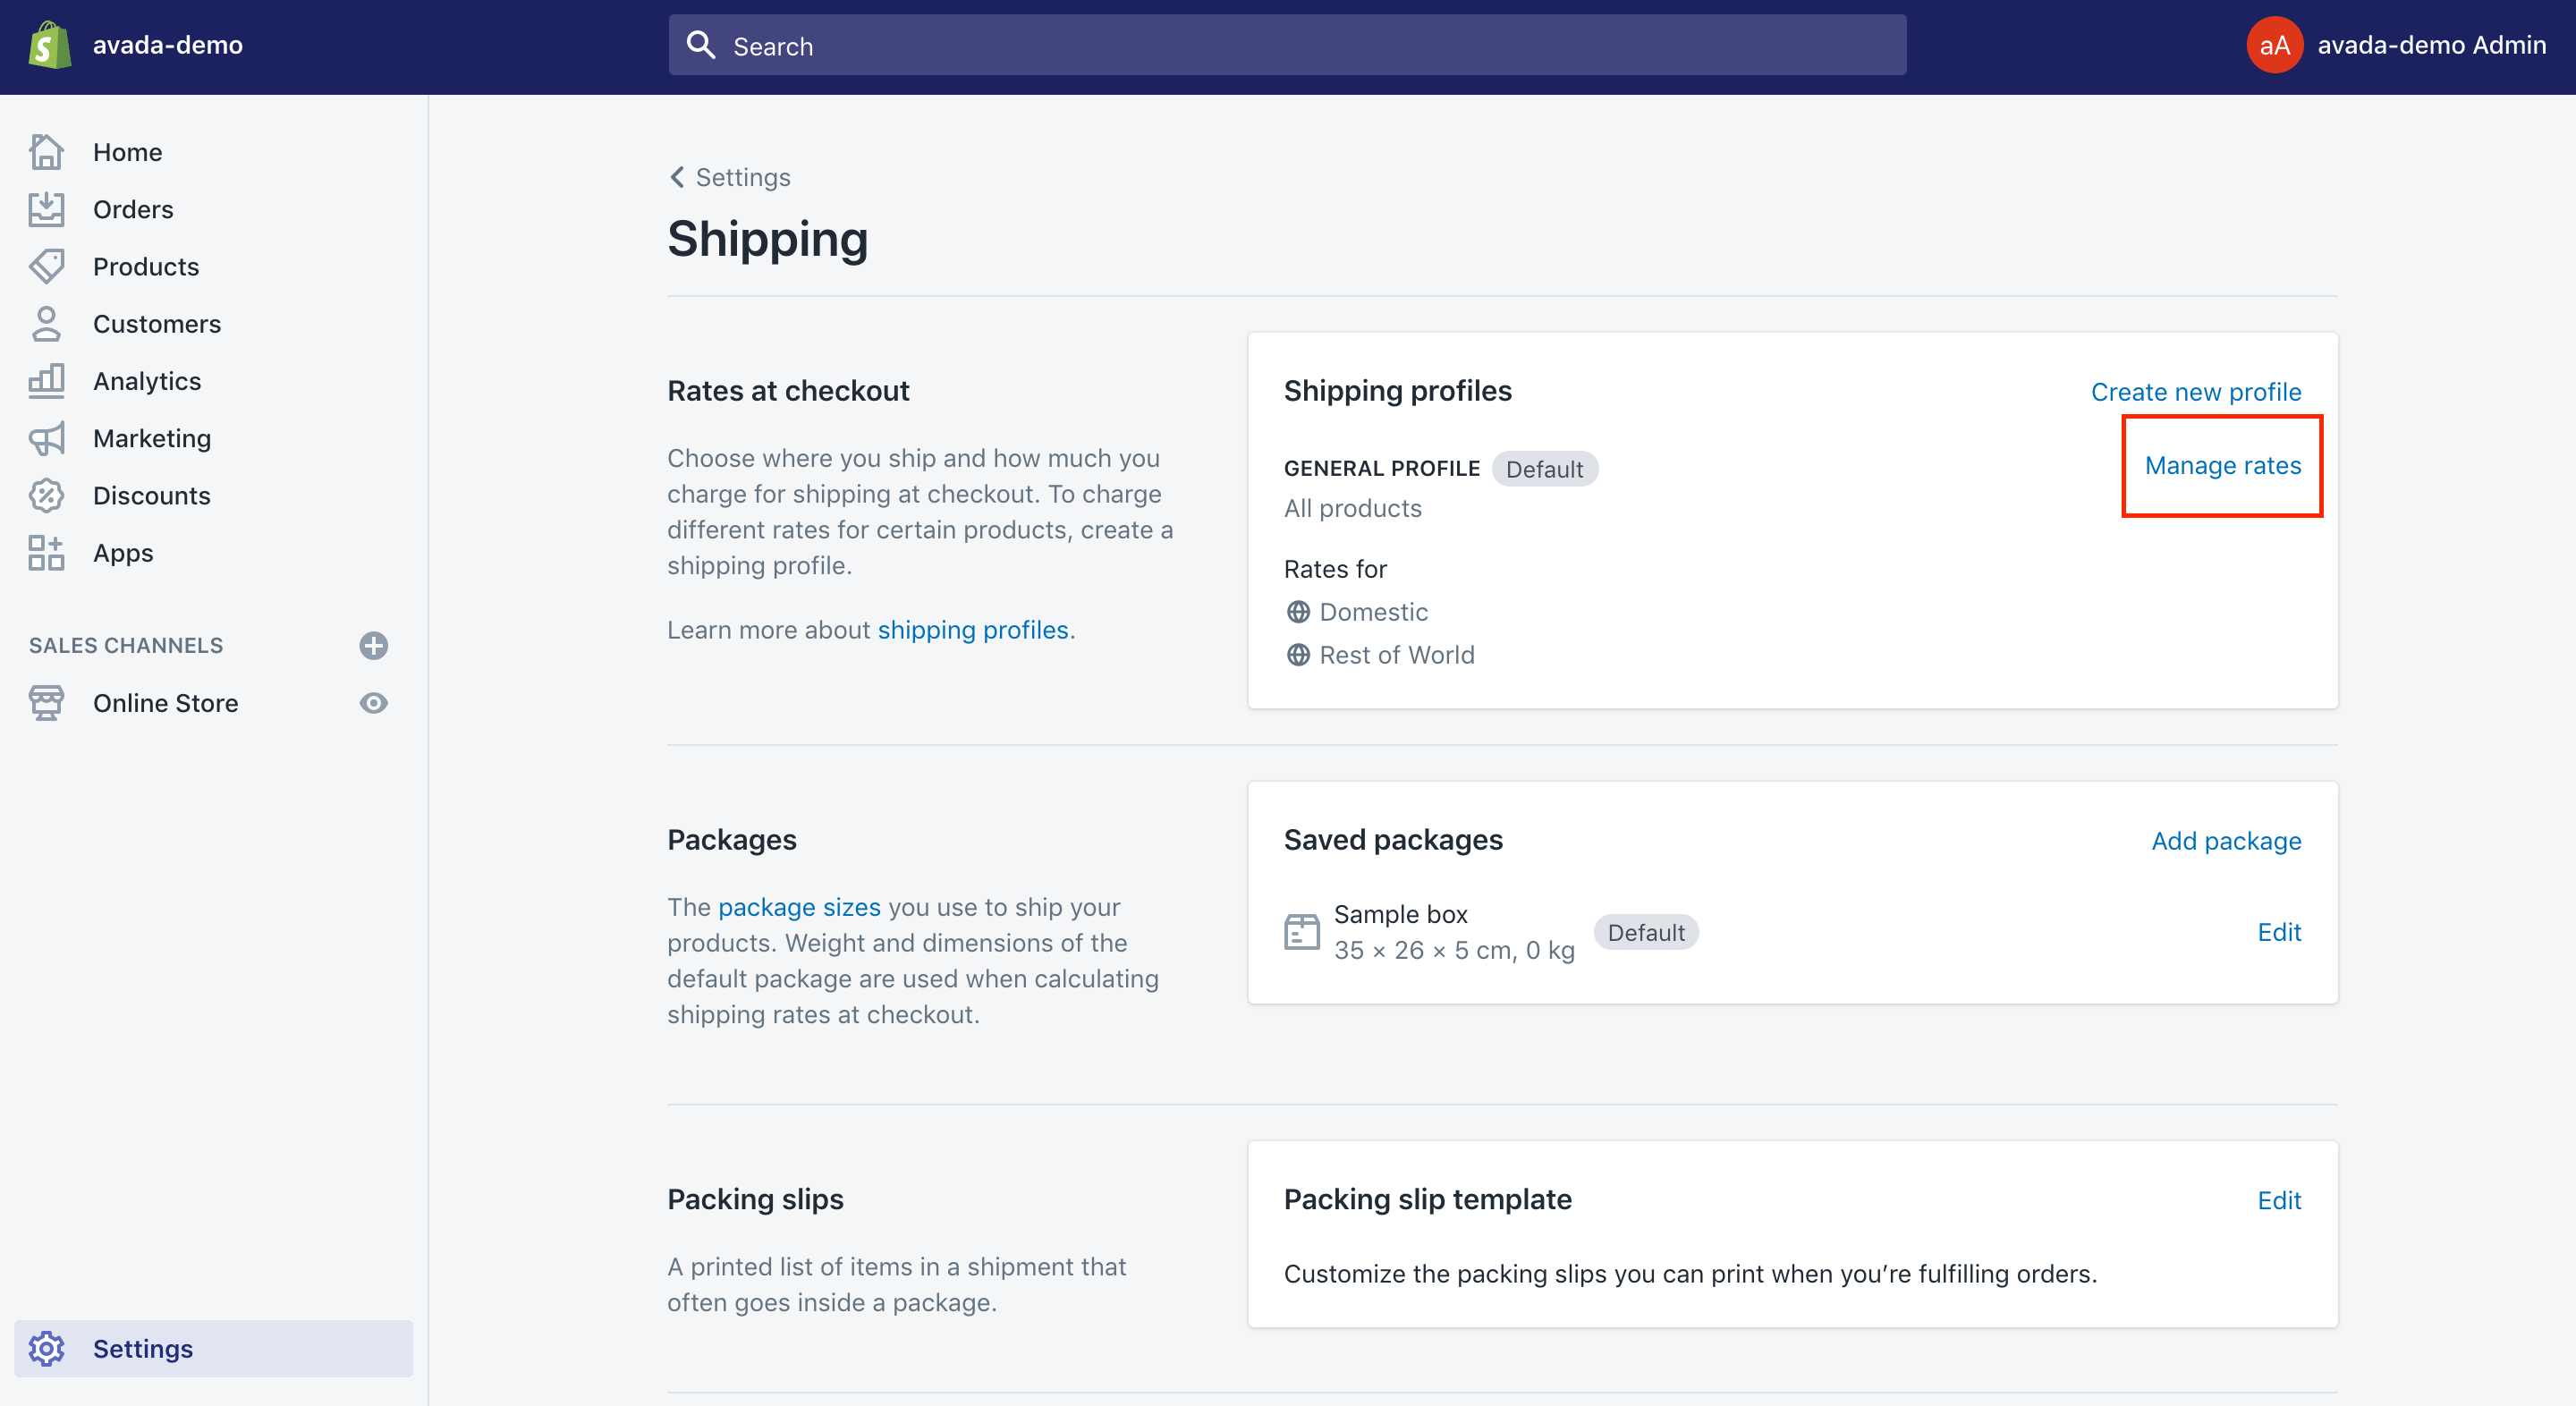
- Step 2: Choose
Manage ratelocated next to the shipping profile you wish to insert a shipping rate.
- Step 3: Select
Add ratesituated beside the zone you really want to include a rate into.
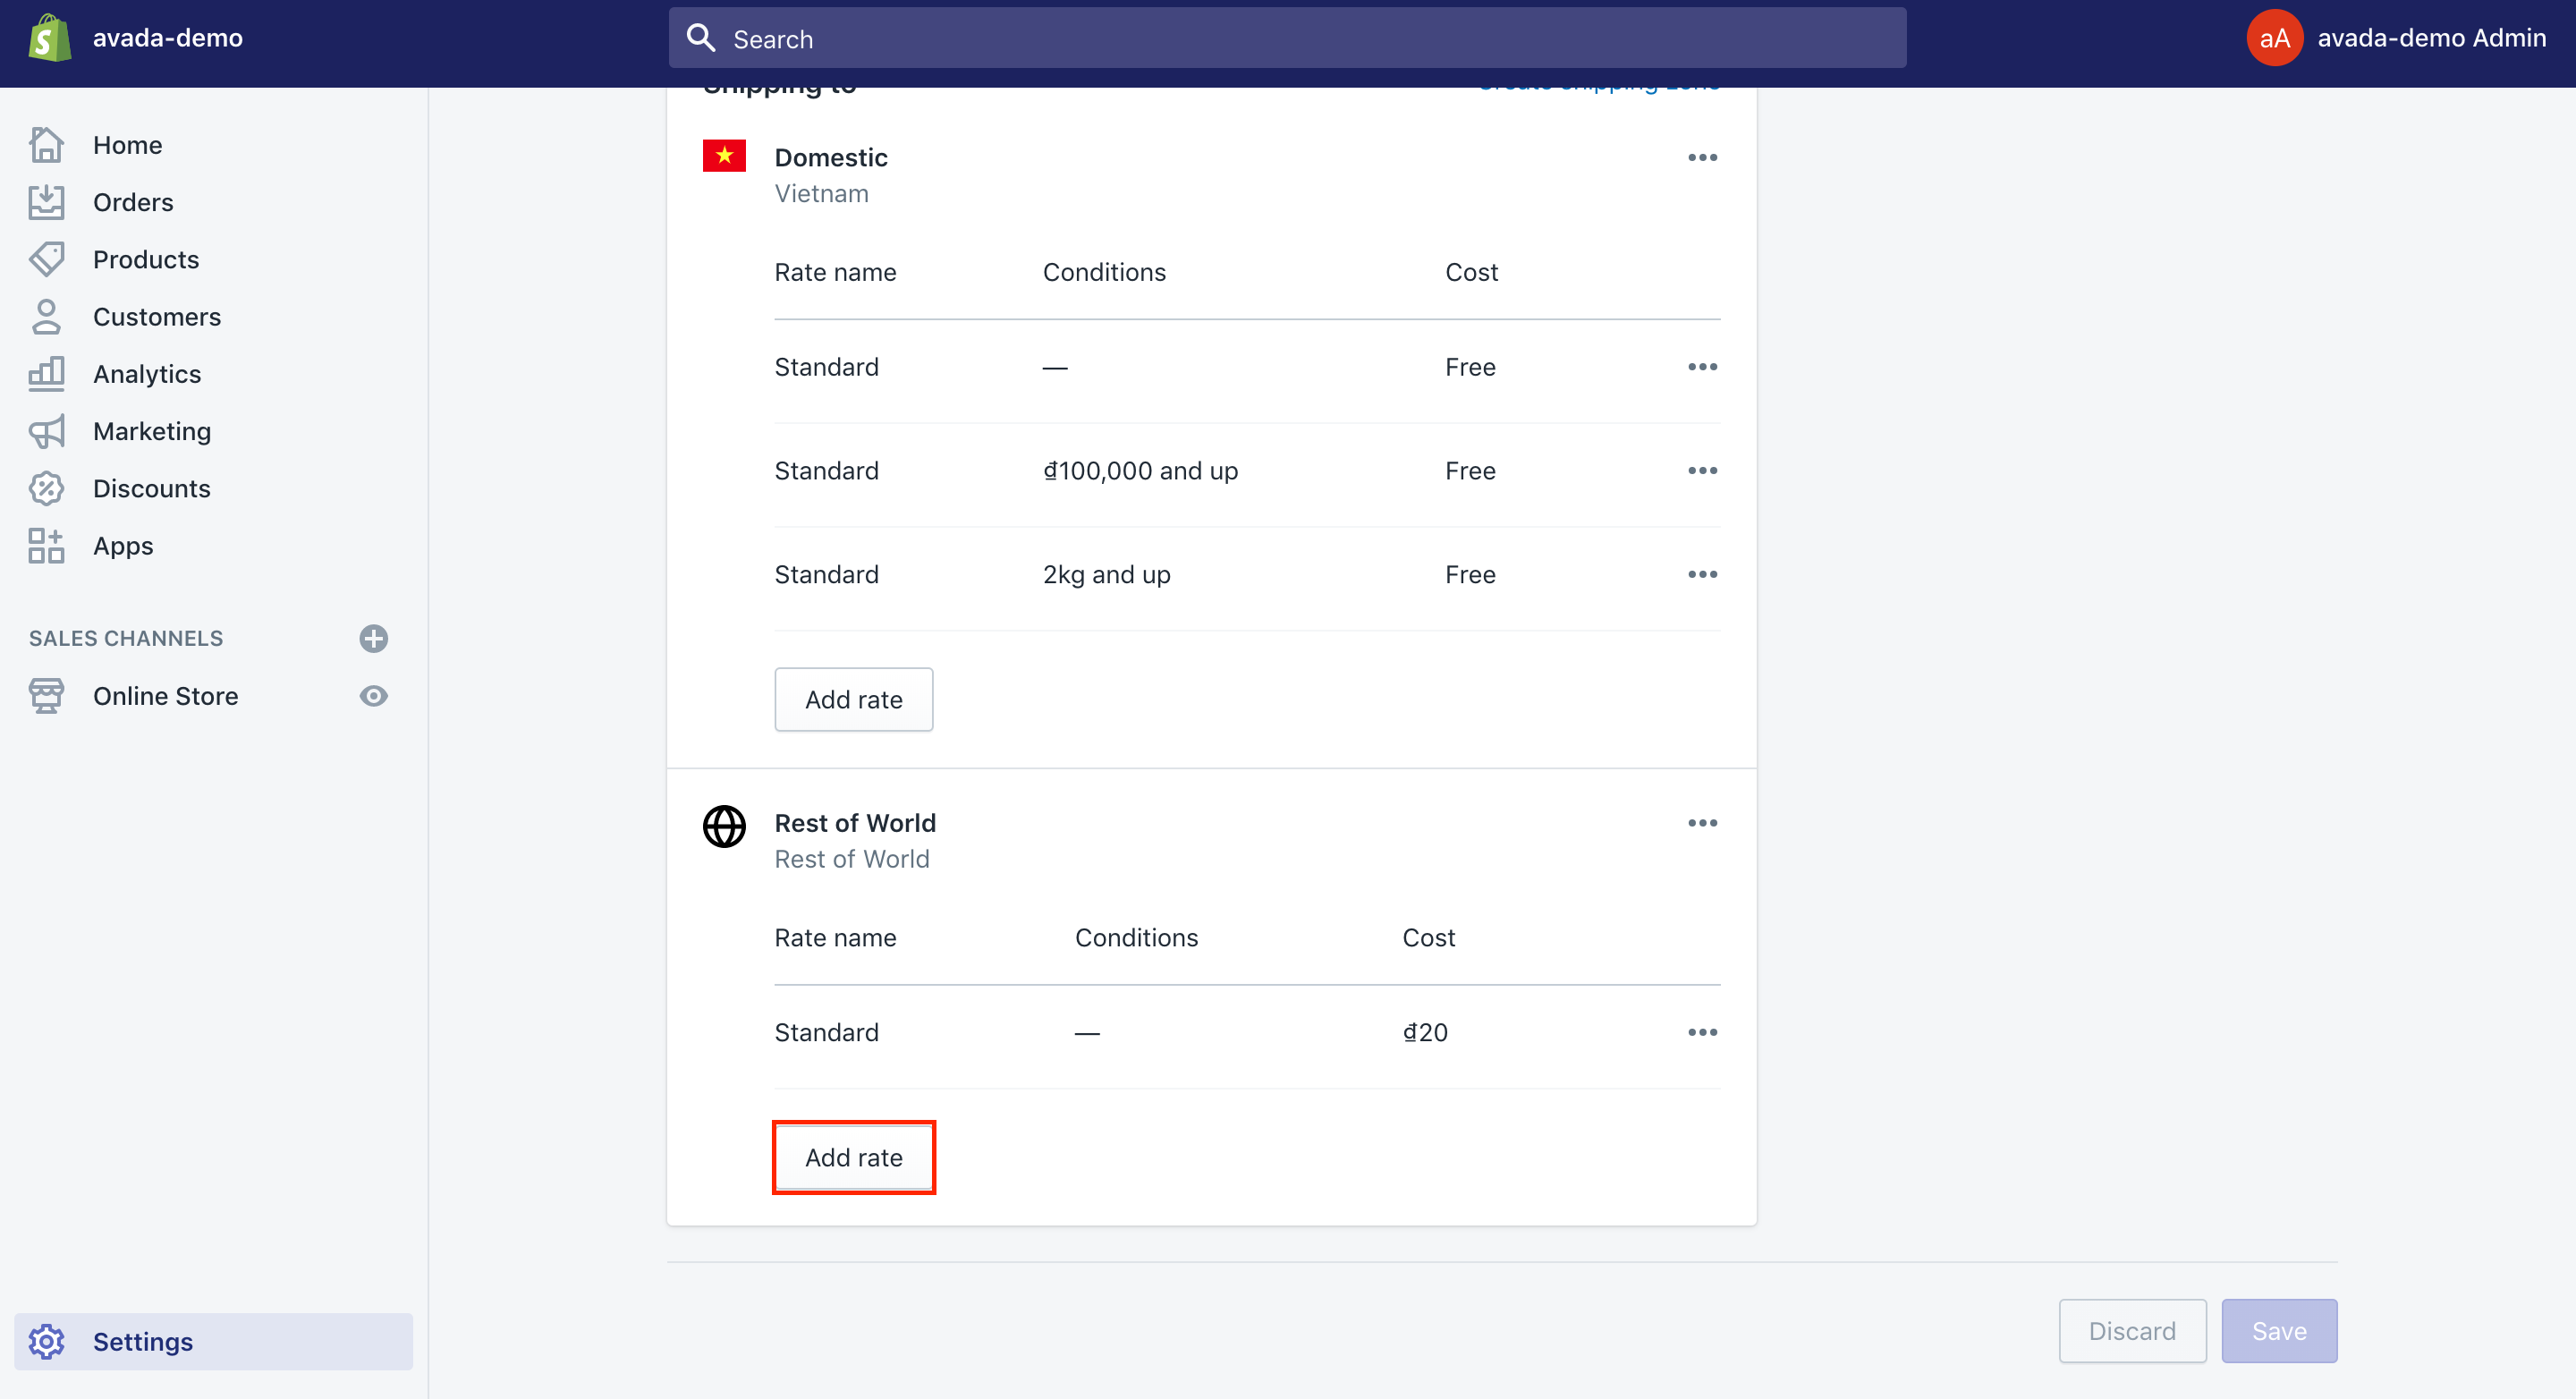
- Step 4: Type the name as well as the amount for the rate.
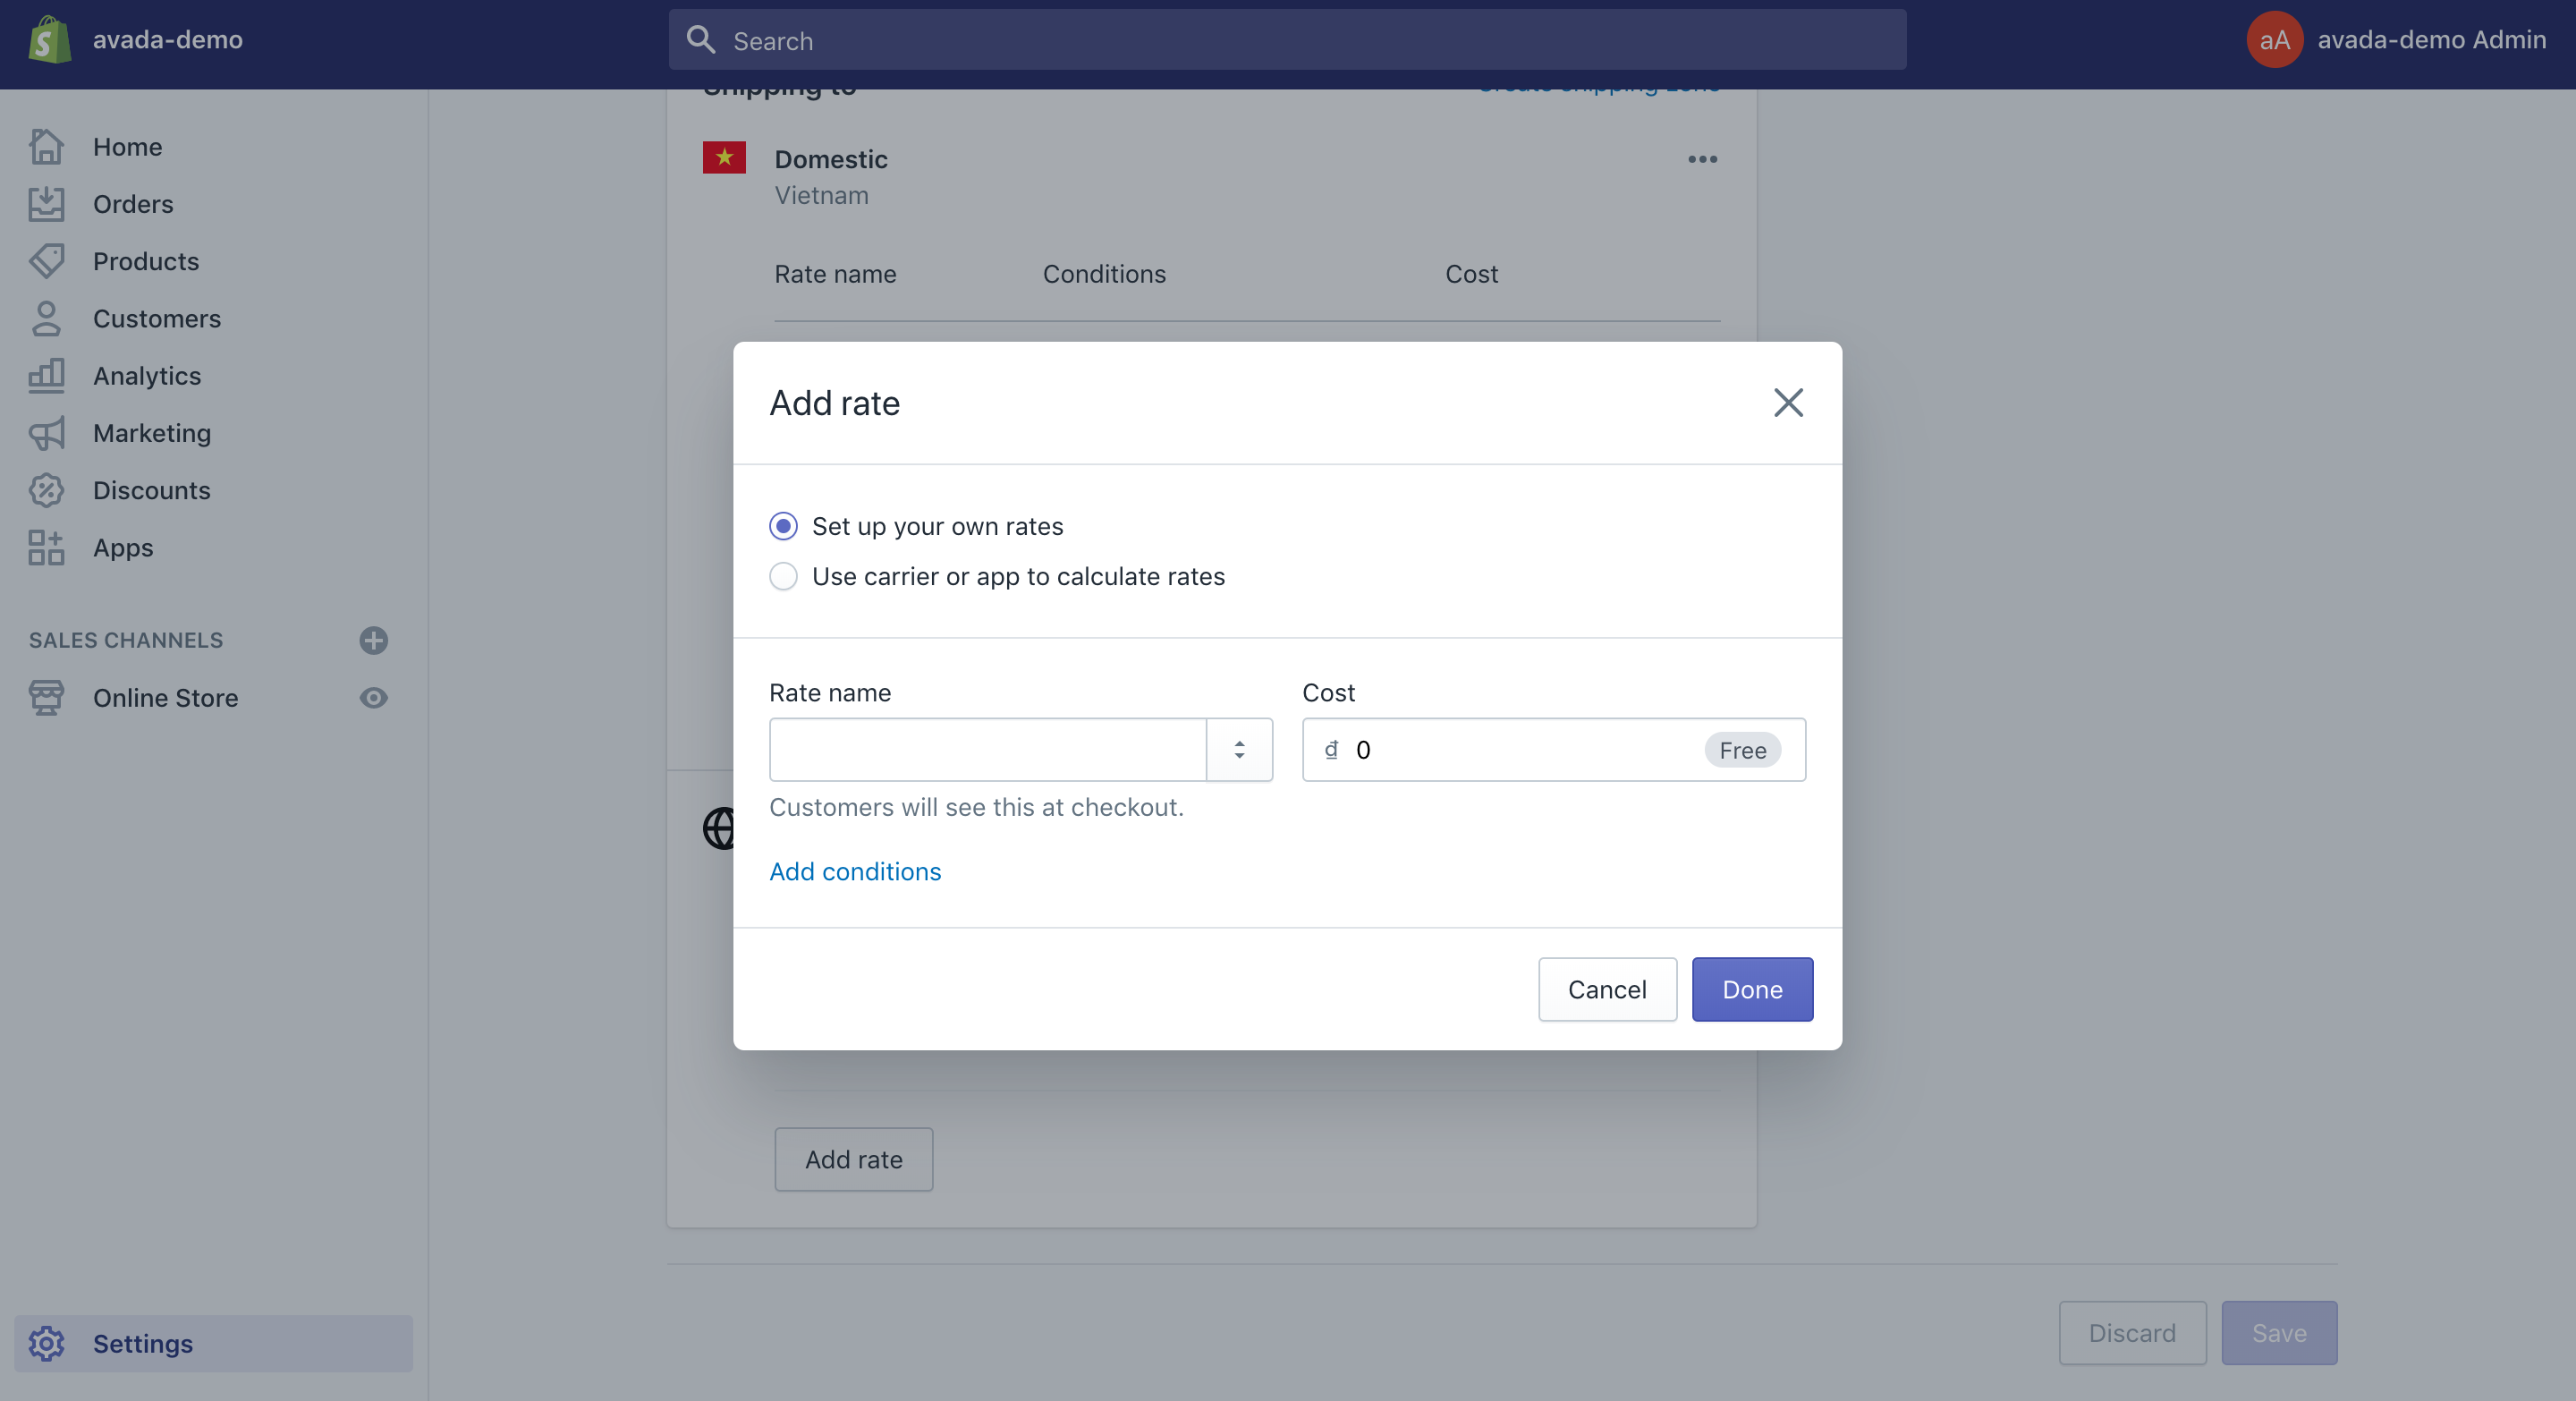
- Step 5: This step is optional. If you want to add weight-based or price-based conditions:
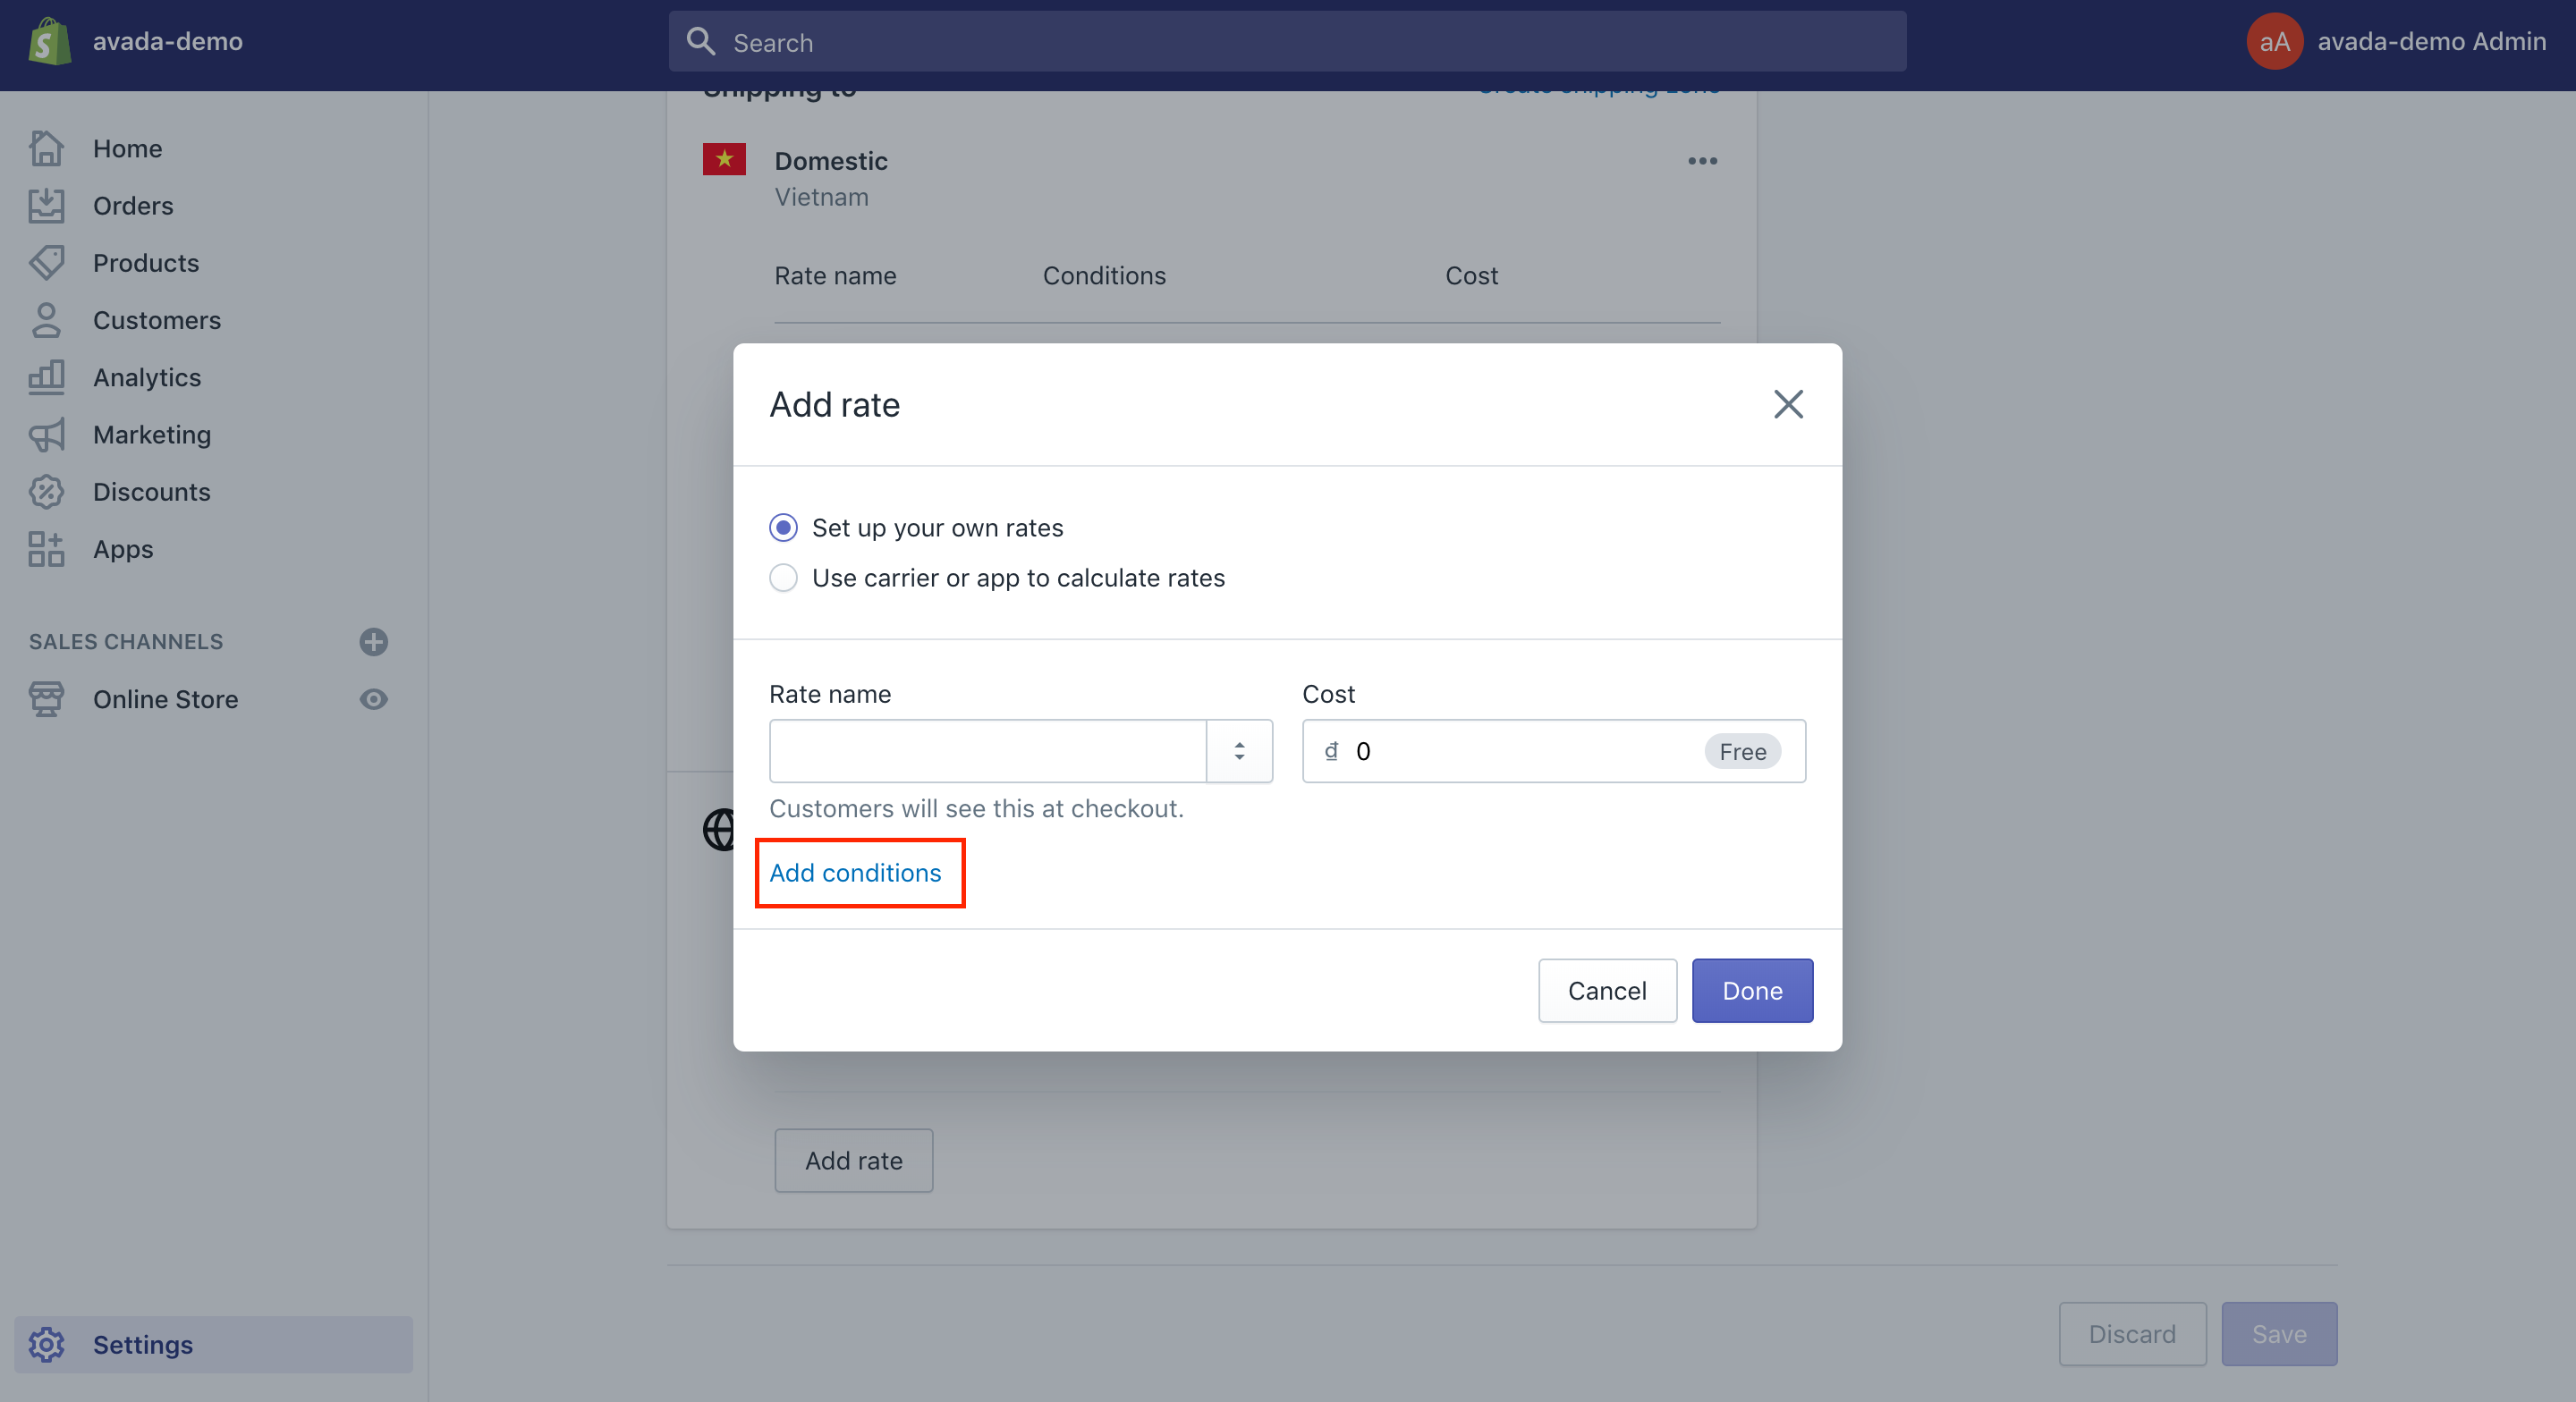
- Choose
Add conditions. - Opt for whether you want to base the condition on order price or weight.
- Type both minimum and maximum value for this condition.
- Step 6: Don’t forget to click on
Done, then click onSave.
Generate calculated shipping rates
Calculated shipping rates are used to be decided at the checkout by the third-party shipping service that is based on the order’s details. This can aid you in charging the customers the exact amount you will be charged by a shipping carrier like FedEx or UPS when purchasing a shipping label.
Take note that the carrier-calculated rates are also available to the store in the scenarios below:
- If you are in the US and are currently use the Shopify Shipping, you can insert calculated rates from DHL, UPS, and USPS.
- If you are living in Canada and using Shopify Shipping, you are able to insert calculated rates from the Canada Post.
- If you possess the carrier-calculated shipping feature on the Shopify plan, you can add rates from your account with UPS, USPS, Canada Post, and any calculated rates from shipping apps. Right before you add your rates from those shipping carriers, you have to make sure that you add your carrier accounts to the shipping settings in the Shopify platform.
As you are able to add the carrier-calculated shipping rates, you can type the extract weights for each item so that the shipping rates can be accurately given to the customers at checkout.
- Step 1: Head to
Settings>Shipping
- Step 2: Choose
Manage ratesnext to the shipping profile in which you want to insert a shipping rate.
- Step 3: Select
Add ratelocated to the location where the rate is added.
- Step 4: Go to
Use carrier or app to calculate rates.
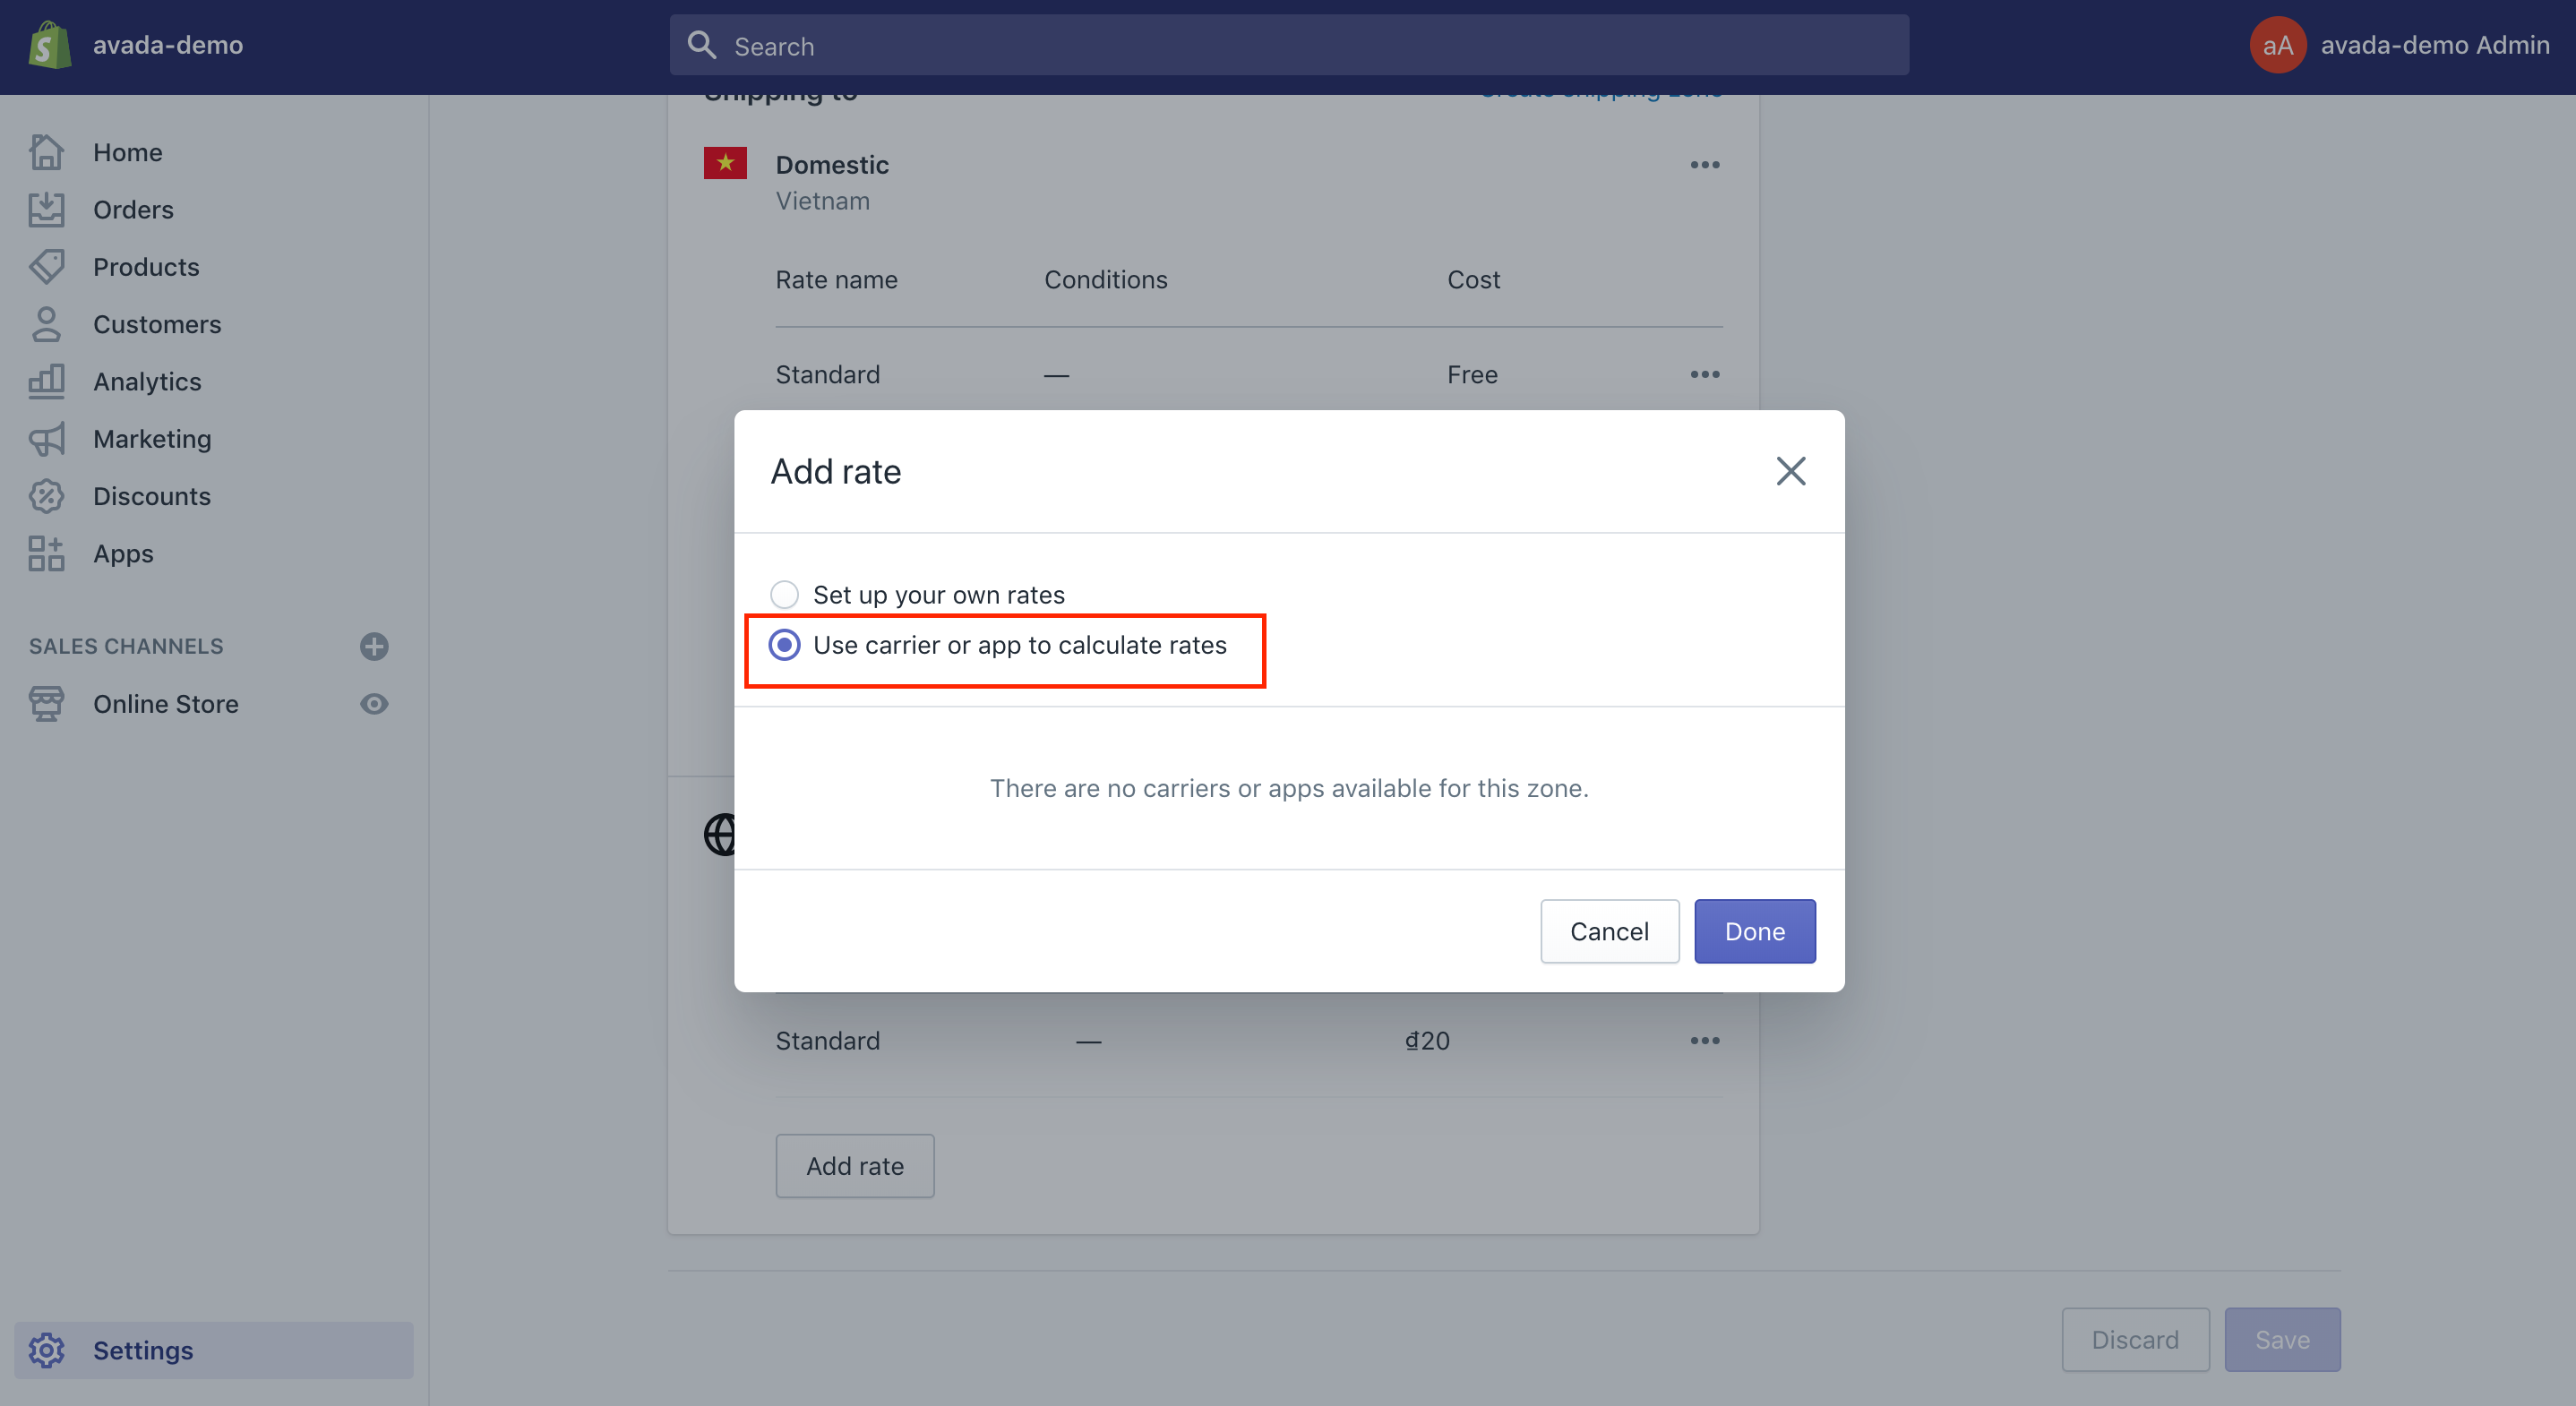
- Step 5: Opt for the shipping service you would like to insert the calculated rates in your drop-down list.
- Step 6: Click on the shipping methods from the shipping service you want to give it as options when the customers are at the checkout.
- Step 7: This step is optional. Press on if it can offer a new service automatically which the shipping services are available.
- Step 8: This step is optional. Shopify users are able to add handling fees you want to add to your calculated rate.
- Step 9: Don’t forget to click on
Saveto save what you have done.
Discount or markup calculated rates
With the Shopify eCommerce platform, its users are capable of editing and adjusting the calculated shipping rates to discount or markup rates your customers can see at the checkout. Let’s take an example. In case the rate is high to grab customers’ attention, you can discount it by a particular percent to boost up your sales. Instead, if the rate is rather low to cover all of your handling and packing costs, you had better raise it.
At the same time, you can markup the calculated shipping rates by an extra flat fee or by a percent of the shipping rate. In case you can change or edit the calculated shipping rate to contain an extra flat fee or a percent markup, the percent will be calculated prior to the added flat fee.
- Step 1: Head to
Settings>Shippingfrom the Shopify admin.
- Step 2: Choose
Manage rateslocated to the profile having the rate.
- Step 3: Click the drop-down list and
Edit ratenext to the rate you want to get it adjusted. - Step 4: Set up the rate adjustments in the
Handling feearea. - Step 6: Go to
Donebefore pressing onSave.
Produce free shipping rates
Shopify users are able to insert free shipping rates into a shipping zone that the customers do not have to pay anything for the shipment at the checkout. Do remember that there are several businesses who want to ask for free shipping on all of their orders and some request free shipping on orders over a specific value.
- Step 1: Head to
Settings>Shippingfrom your Shopify admin.
- Step 2: Click on
Manage rateslocated beside the shipping profile where you want to create a free shipping rate.
- Step 3: Choose
Add ratenext to the area where you want to add a free shipping rate.
- Step 4: Type the name for this rate.
- Step 5: You have to make sure that the value of
Costsection is0. - Step 6: This step is optional:
Set weight-based or value-based conditions
- Choose
Add conditions - Opt for if you want to base the condition on order value or weight.
- Type the minimum as well as the maximum value for this condition.
- Step 7: Go to
Donebefore clicking onSave.
- Step 7: Go to
Edit a rate
- Step 1: Head to
Settings>Shipping.
- Step 2: Choose
Manage rateslocated beside your shipping file where you wish a rate to be edited.
- Step 3: Select the
...button next to the rate you want to edit. - Step 4: Opt for
Edit ratein your drop-down list. - Step 5: Click on
Doneto make changes. - Step 6: Go to the
Savebutton.
Delete a rate
- Step 1: Head to
Settings>Shipping.
- Step 2: Choose
Manage rateslocated beside your shipping file where you wish to remove a rate.
- Step 3: Select the
...button next to the rate you want to delete. - Step 4: Choose
Deletelocated in the drop-down list. - Step 5: Go to the
Savebutton.
How to set up e-packet shipping on Shopify
ePacket delivery is a shipping selection which is launched by online merchants in Hongkong China. It acts as an agreement between the Hong Kong post and the US Postal Service (USPS). ePacket has now gained its popularity and expanded to a great number of countries. Its aim is to raise international eCommerce sales for China. ePacket enables you to faster your ePacket delivery for products from Hong Kong and China to dozens of various countries. The sellers can be allowed to send the small packages that weigh up to 2kg.
When it comes to shipping options for your online shop, there is no relation to what the customers will see in your store or what you will see as you order the products from your dropshipping suppliers.
When you finish buying from the supplier, you only need to make sure that your e-packet is included in the shipping option you have chosen. Before that, you also need to be sure that all of the items you have in your store consist of e-packet as one of the helpful shipping options.
One of the most amazing things about applying the China post’s ePacket shipping service is known as the ePacket tracking facility. It can become hard to keep track of the parcels, particularly you are shipping a huge amount in once. Foreign postal services, customers, or another barrier can be the obstacles of tracking of each item. The tracking info is sometimes valuable to customers so that they can know exactly where the location of your delivery is. Moreover, ePacket helps stop customers from worrying scams.
Hence, it is vital to learn how to set up ePacket shipping in Shopify. ePacket shipping can feature ePacket tracking, followed by the delivery confirmation in the US Postal Service network.
Take note that your ePacket tracking codes need to be taken from the suppliers. ePacket shipments can be tracked by using ePacket China Post, USPS or some sites like 17track.net.
- Step 1: Go to
Oberlo > My Ordersto see the tracking code located to all of the fulfilled orders.
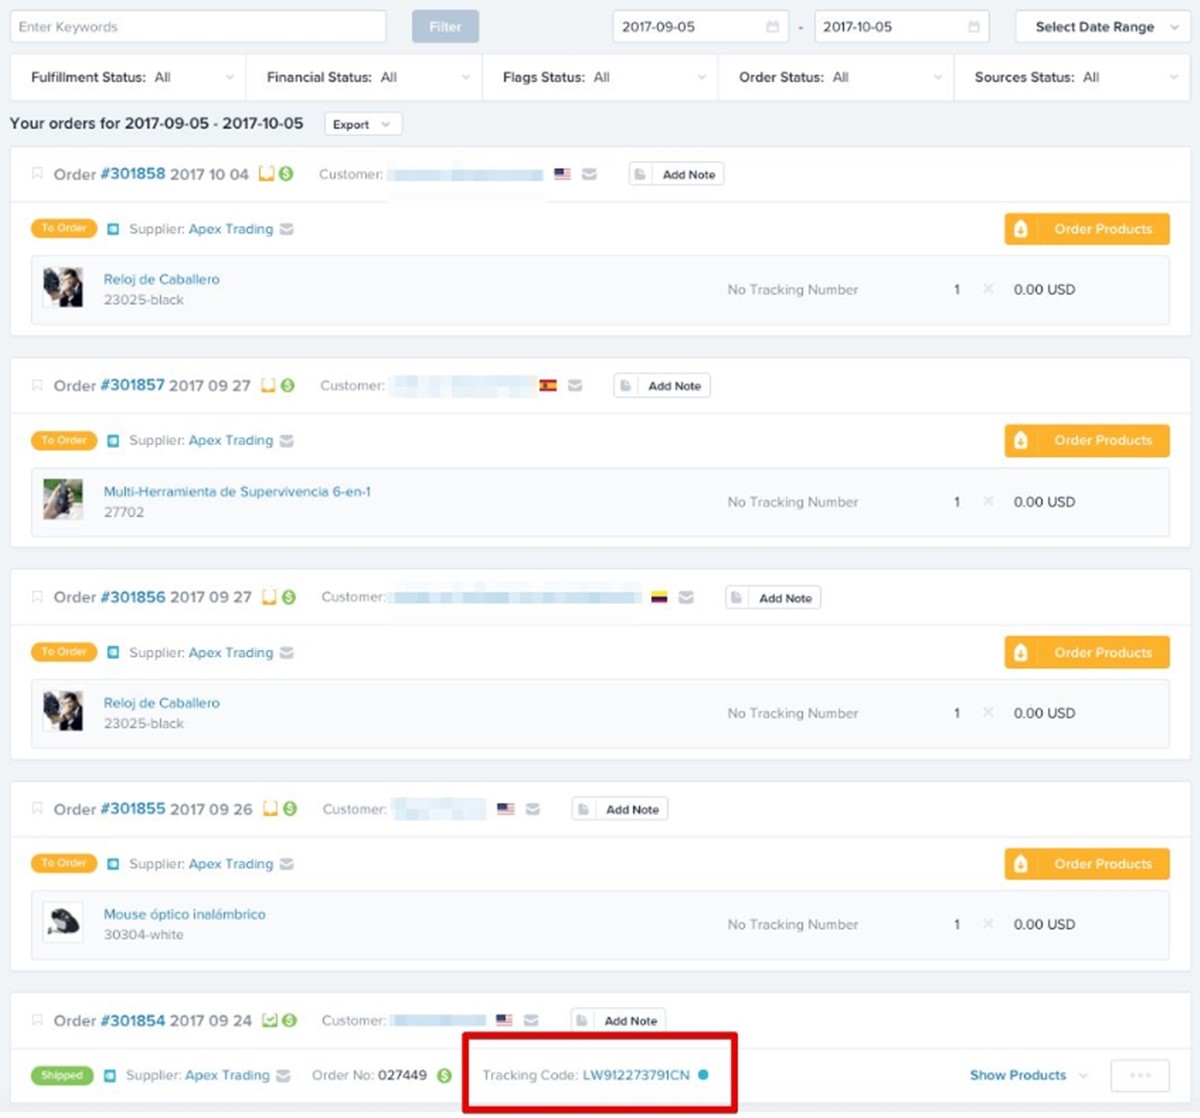
- Step 2: In case you are selecting the
BasicorProOberlo plan, all you need to do is to click right on the product and check the shipment’s status.

- Step 3: If you are selecting the
Starterplan in Oberlo, you will track your order status manually by using other external sites.
Conclusion
It is time for any readers to review every section about dropshipping in Shopify in this tutorial. We hope that you can have a better understanding of what dropshipping is and how it works perfectly on this eCommerce platform. The answer on how to Set Up Shipping on Shopify for Dropshipping is finally solved.
In case you have any questions or further discussion, don’t hesitate to contact us immediately since we would love to hear more from you.
Related Posts


