
How to Add A Quickview to Shopify Store

Quickview is a popular e-commerce feature used by about half of the top 50 U.S. e-commerce websites, according to Baymard. However, although this is a feature you see a lot of, but if added incorrectly, it will become useless. You need to add Quickview properly to get the best effect.
What you shouldn’t do is automatically open a quick view when someone goes through the product. This results in only about 8.1% of customers interacting with a quick view. Below is a detailed tutorial on how to add a Quickview to Shopify store to help you do it properly and take advantage of the great effect of this feature.
Related Posts:*
- How to Add Social Media Icons on Shopify store?
- How to Add About Us Page on Shopify?
- How to Choose Language for your Theme on Shopify?
Why should we add a “Quick view” feature to the eCommerce store?
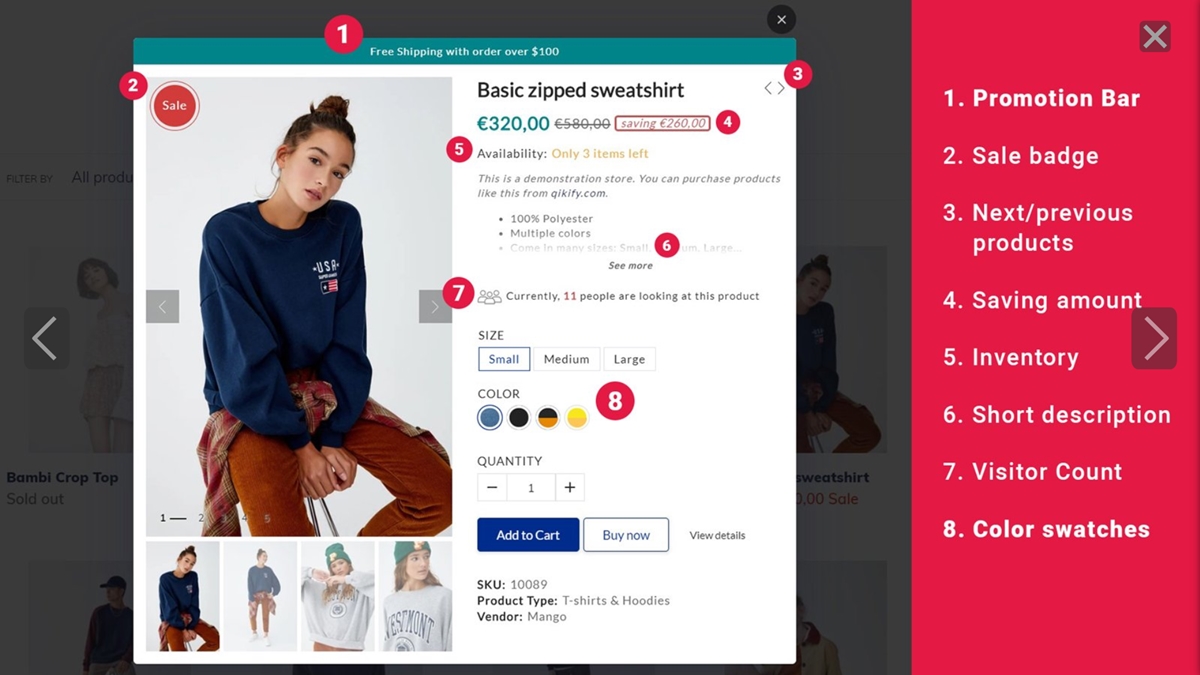
One of the key secrets of a successful shop owner is knowing how to please customers. In this article, I will guide you quickly and simply, helping you save customers time while ensuring your benefits. Using the Quickview feature is a wise choice.
First, this option will help your customers quickly understand the basic and necessary information about the product. Thanks to this, they can quickly decide to buy the product by adding it to their cart. They will find it convenient to read brief and informative information instead of a lengthy piece of information. Besides, your website can eliminate many obstacles, including clicks. Your customers also don’t need to refresh the page, so they can access product details quickly.
Second, Quickview brings key benefits to make your store more optimal. Such as reducing server load and expedites shopping as explained above. In addition, you can display interesting details such as discount deals.
Finally, you should note the following main ideas in a Quickview to ensure you implement it in the best possible way at your e-commerce store:
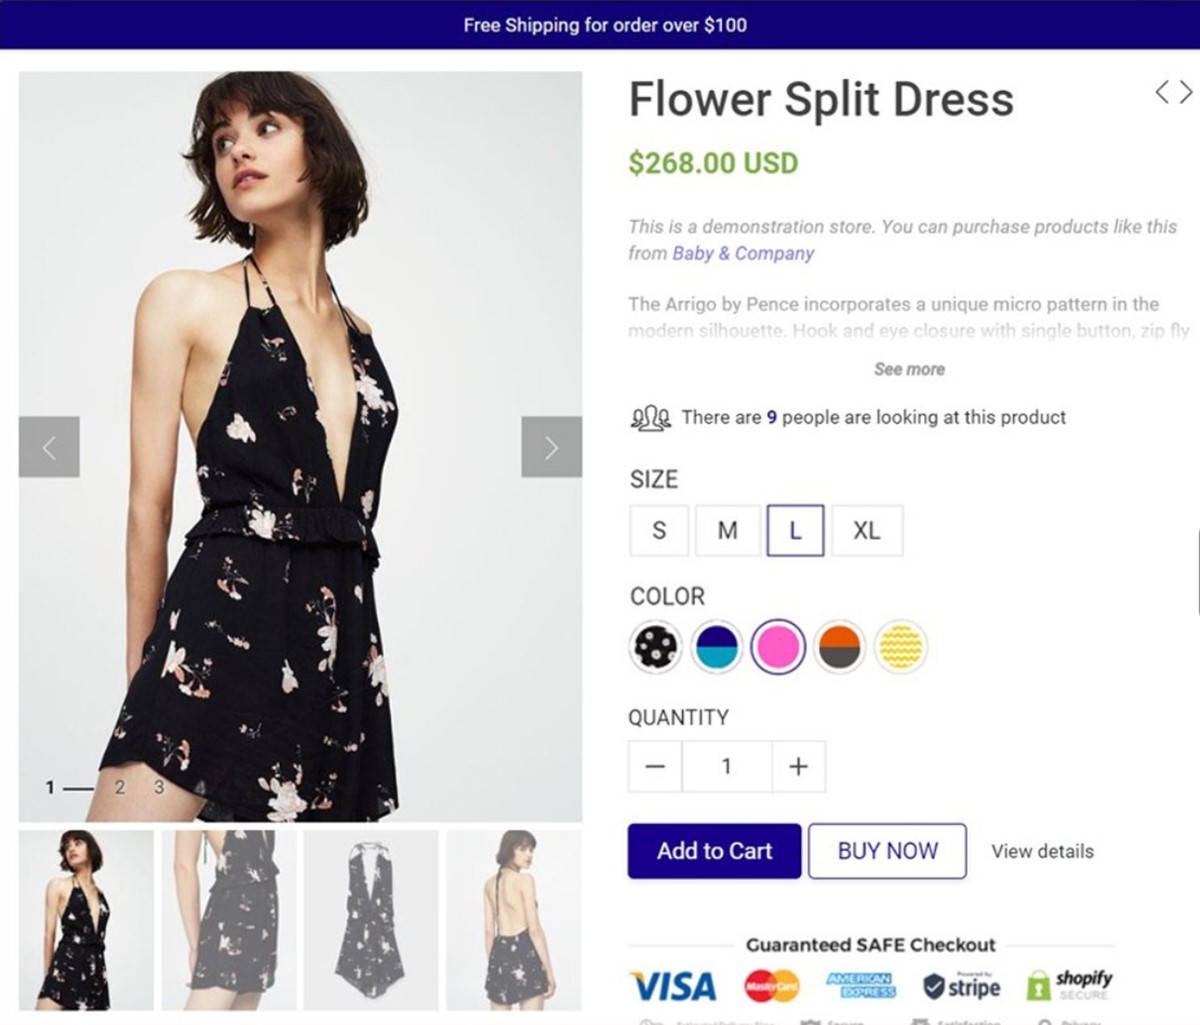
- Keep it short and simple. Trying to add too many product details to Quickview will make it messy and confusing. Therefore, with a small space, you need to organize the information properly.
- You need to call for clear action, avoid confusion in using words or sentence structure.
- Include a link to the full product page.
- Include the Add to cart button in the featured position.
- Emphasize product images. Note the product image needs to be larger than any other information.
In general, Quickview is a feature that brings many benefits. It is predicted to be a standard in website usability. Therefore, you need to take good care of it.
Add a “Quick view” feature with code
There are two ways you can add Quickview to your Shopify store simply and quickly. One of them is the add a “Quick view” feature with code. Using the code is no longer complicated as now you just need to copy the code we have prepared and pasted it according to the instructions. Let go ahead.
-
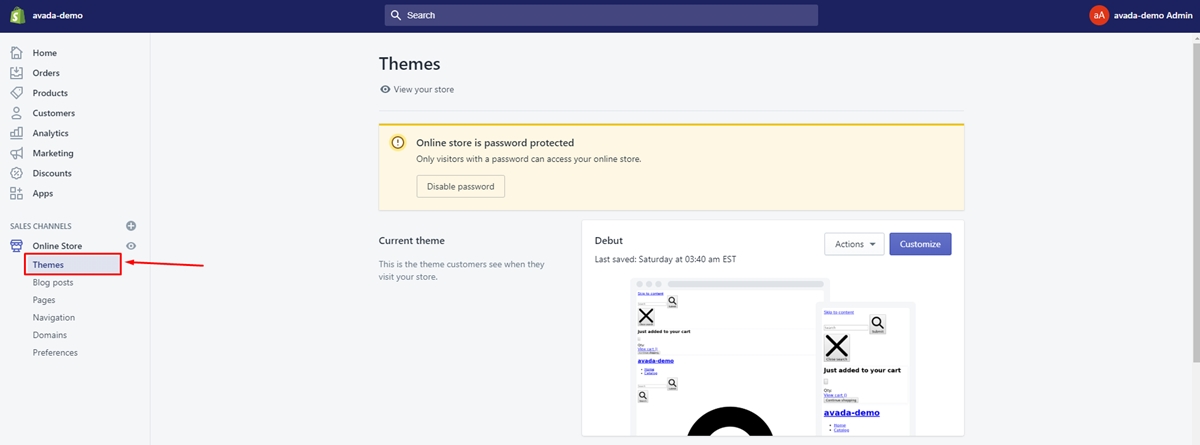
First of all, you need to make sure that you’ve logged in your Shopify account and go to the
Online Storesection. -
Then, click on
Themesto view a list including all of your themes. Select the theme that you want to add a quick view feature.
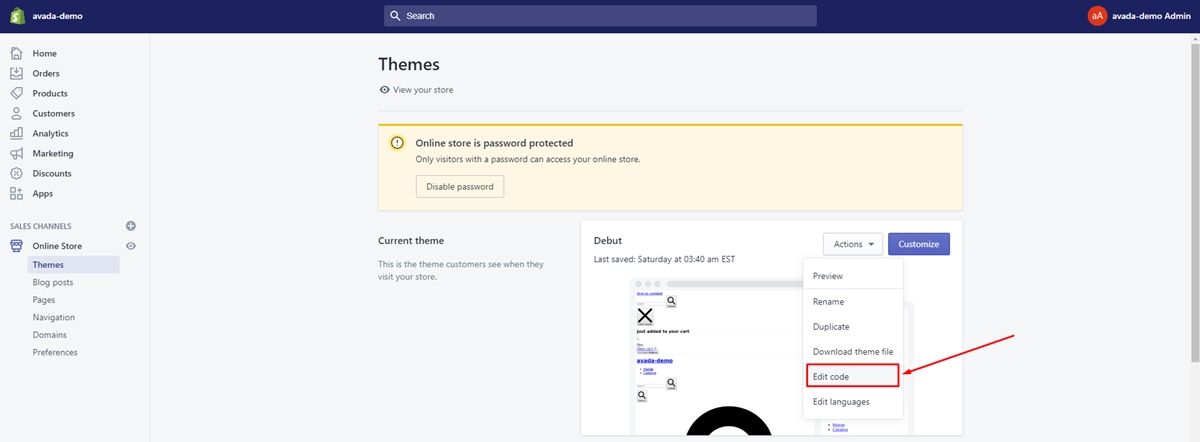
- Tap on
Actionsand clickEdit codein the drop-down list
After you’ve done the above steps, you can choose to add a Quickview feature by using one of the following codes.
Using NodeJS
In the ` Assets field, tap on Add a new asset. A dialog will appear. Make sure to click Create a blank file. Then, name the file quickview and choose the file format .js. Click Add asset`.
Copy the following code and paste it in the file you’ve created.
//Quick View

$(document).ready(function () {
 $.getScript("//cdnjs.cloudflare.com/ajax/libs/fancybox/2.1.5/jquery.fancybox.min.js").done(function() {
   quickView();
 });
});

function quickView() {
 $(".quick-view").click(function () {
   if ($('#quick-view').length == 0){$("body").append('<div id="quick-view"></div>');}
   var product_handle = $(this).data('handle');
   $('#quick-view').addClass(product_handle);
   jQuery.getJSON('/products/' + product_handle + '.js', function (product) {
     var title = product.title;
     var type = product.type;
     var price = 0;
     var original_price = 0;
     var desc = product.description;
     var images = product.images;
     var variants = product.variants;
     var options = product.options;
     var url = '/products/' + product_handle;
     $('.qv-product-title').text(title);
     $('.qv-product-type').text(type);
     $('.qv-product-description').html(desc);
     $('.view-product').attr('href', url);
     var imageCount = $(images).length;
     $(images).each(function (i, image) {
       if (i == imageCount - 1) {
         var image_embed = '<div><img src="' + image + '"></div>';
         image_embed = image_embed.replace('.jpg', '_800x.jpg').replace('.png', '_800x.png');
         $('.qv-product-images').append(image_embed);

         $('.qv-product-images').slick({
           'dots': false,
           'arrows': false,
           'respondTo': 'min',
           'useTransform': false
         }).css('opacity', '1');

       } else {
         image_embed = '<div><img src="' + image + '"></div>';
         image_embed = image_embed.replace('.jpg', '_800x.jpg').replace('.png', '_800x.png');
         $('.qv-product-images').append(image_embed);
       }
     });
     $(options).each(function (i, option) {
       var opt = option.name;
       var selectClass = '.option.' + opt.toLowerCase();
       $('.qv-product-options').append('<div class="option-selection-' + opt.toLowerCase() + '"><span class="option">' + opt + '</span><select class="option-' + i + ' option ' + opt.toLowerCase() + '"></select></div>');
       $(option.values).each(function (i, value) {
         $('.option.' + opt.toLowerCase()).append('<option value="' + value + '">' + value + '</option>');
       });
     });
     $(product.variants).each(function (i, v) {
       if (v.inventory_quantity == 0) {
         $('.qv-add-button').prop('disabled', true).val('Sold Out');
         $('.qv-add-to-cart').hide();
         $('.qv-product-price').text('Sold Out').show();
         return true
       } else {
         price = parseFloat(v.price / 100).toFixed(2);
         original_price = parseFloat(v.compare_at_price / 100).toFixed(2);
         $('.qv-product-price').text('$' + price);
         if (original_price > 0) {
           $('.qv-product-original-price').text('$' + original_price).show();
         } else {
           $('.qv-product-original-price').hide();
         }
         $('select.option-0').val(v.option1);
         $('select.option-1').val(v.option2);
         $('select.option-2').val(v.option3);
         return false
       }
     });
   });

   $(document).on("change", "#quick-view select", function () {
     var selectedOptions = '';
     $('#quick-view select').each(function (i) {
       if (selectedOptions == '') {
         selectedOptions = $(this).val();
       } else {
         selectedOptions = selectedOptions + ' / ' + $(this).val();
       }
     });
     jQuery.getJSON('/products/' + product_handle + '.js', function (product) {
       $(product.variants).each(function (i, v) {
         if (v.title == selectedOptions) {
           var price = parseFloat(v.price / 100).toFixed(2);
           var original_price = parseFloat(v.compare_at_price / 100).toFixed(2);
           var v_qty = v.inventory_quantity;
           var v_inv = v.inventory_management;
           $('.qv-product-price').text('$' + price);
           $('.qv-product-original-price').text('$' + original_price);
           if (v_inv == null) {
             $('.qv-add-button').prop('disabled', false).val('Add to Cart');
           } else {
             if (v.inventory_quantity < 1) {
               $('.qv-add-button').prop('disabled', true).val('Sold Out');
             } else {
               $('.qv-add-button').prop('disabled', false).val('Add to Cart');
             }
           }
         }
       });
     });
   });
   $.fancybox({
     href: '#quick-view',
     maxWidth: 1040,
     maxHeight: 600,
     fitToView: true,
     width: '75%',
     height: '70%',
     autoSize: false,
     closeClick: false,
     openEffect: 'none',
     closeEffect: 'none',
     'beforeLoad': function () {
       var product_handle = $('#quick-view').attr('class');
       $(document).on("click", ".qv-add-button", function () {
         var qty = $('.qv-quantity').val();
         var selectedOptions = '';
         var var_id = '';
         $('#quick-view select').each(function (i) {
           if (selectedOptions == '') {
             selectedOptions = $(this).val();
           } else {
             selectedOptions = selectedOptions + ' / ' + $(this).val();
           }
         });
         jQuery.getJSON('/products/' + product_handle + '.js', function (product) {
           $(product.variants).each(function (i, v) {
             if (v.title == selectedOptions) {
               var_id = v.id;
               processCart();
             }
           });
         });
         function processCart() {
           jQuery.post('/cart/add.js', {
             quantity: qty,
             id: var_id
           },
                       null,
                       "json"
                      ).done(function () {
             $('.qv-add-to-cart-response').addClass('success').html('<span>' + $('.qv-product-title').text() + ' has been added to your cart. <a href="/cart">Click here to view your cart.</a>');
           })
           .fail(function ($xhr) {
             var data = $xhr.responseJSON;
             $('.qv-add-to-cart-response').addClass('error').html('<span><b>ERROR: </b>' + data.description);
           });
         }
       });
       $('.fancybox-wrap').css('overflow', 'hidden !important');
     },
     'afterShow': function () {
       $('#quick-view').hide().html(content).css('opacity', '1').fadeIn(function () {
         $('.qv-product-images').addClass('loaded');
       });
     },
     'afterClose': function () {
       $('#quick-view').removeClass().empty();
     }
   });
 });
};

$(window).resize(function () {
 if ($('#quick-view').is(':visible')) {
   $('.qv-product-images').slick('setPosition');
 }
});
- Tap on
Saveto finish.
Using CSS
-
In the ` Assets
field, tap onAdd a new asset. A dialog will appear. Make sure to clickCreate a blank file. Then, name the filequickviewand choose the file format.scss.liquid. ClickAdd asset`. -
Copy the following code and paste it in the file you’ve created.
#quick-view {
 display: flex;
 height: 100%;
 justify-content: flex-end;
 flex-wrap: wrap;
 position: relative;
 -ms-overflow-style: -ms-autohiding-scrollbar;
 .qv-product-images {
   width: 60%;
   height: auto;
   display: inline-block;
   position: absolute;
   margin: 0 auto;
   left: 30px;
   top: 0;
   height: 100%;
 }
 .slick-list, .slick-track {
   height: calc(100% - 12px);
 }
 .slick-initialized .slick-slide {
   display: flex;
   flex-direction: column;
   justify-content: center;
 }
 .slick-slide {
   padding: 0 50px;
   height: 100%;
   position: relative;
   img {
     margin: 0 auto;
     max-height: 100%;
     position: absolute;
     top: 50%;
     left: 50%;
     width: auto;
     height: auto;
     -webkit-transform: translate(-50%,-50%);
     transform: translate(-50%,-50%);
   }
 }
 .slick-dots {
   right: auto;
   left: 50%;
   bottom: 10px;
   -webkit-transform: translateX(-50%);
   transform: translateX(-50%);
   li {
     margin: 0 8px 0 0;
     button {
       background-color: #cacaca;
       width: 12px;
       height: 12px;
     }
     &.slick-active button {
       background-color: #ff0000;
     }
   }
 }
 .qv-content {
   width: 36%;
   display: inline-flex;
   float: right;
   flex-direction: row;
   justify-content: space-between;
   height: calc(100% - 40px);
   -webkit-transform: translateY(20px);
   transform: translateY(20px);
   flex-wrap: wrap;
   overflow: auto;
   box-sizing: border-box;
   > * {
     width: calc(100% - 25px);
     box-sizing: border-box;
   }
 }
 .qv-product-title {
   padding-right: 20px;
   text-transform: lowercase;
   margin-bottom: 0;
   color: #575757;
 }
 .qv-product-type {
   color: #a18466;
   font-family: 'proxima-nova-semibold';
   text-transform: lowercase;
 }
 .qv-product-price, .qv-product-original-price {
   display: inline-block;
   color: #5a5a5a;
   margin-bottom: 0;
 }
 .qv-product-original-price {
   margin-left: 8px;
   text-decoration: line-through;
   color: #000;
 }
 .option-selection-title {
   display: none;
 }
 hr {
   border-top: 1px solid #f5f5dc;
   margin: 15px 0 20px;
 }
 .quantity {
   margin-bottom: 25px;
   span {
     text-transform: lowercase;
     display: inline-block;
     min-width: 100px;
   }
   input[type="number"]{
     width: 60px;
     text-align: center;
     -moz-appearance: textfield;
     margin-left: -4px;
     padding: 4px;
     border: 1px solid #d3d3d3;
     &:focus {
       outline: none;
       border: 1px solid #ff0000;
       display: inline-block;
     }
   }
   input[type=number]::-webkit-inner-spin-button,
   input[type=number]::-webkit-outer-spin-button {
     -webkit-appearance: none;
     margin: 0;
   }
 }
 .qv-product-options {
   > div {
     margin-bottom: 8px;
   }
   span {
     text-transform: lowercase;
     display: inline-block;
     min-width: 100px;
   }
 }
 .qv-add-button {
   display: block;
   background-color: #ff0000;
   text-transform: uppercase;
   letter-spacing: .1em;
   text-align: center;
   padding: 10px 20px;
   border: 0;
   width: 100%;
   color: #fff;
   &:hover {
     background-color: #ff0000;
   }
   &:focus {
     background-color: #3a3a3a;
     outline: none;
   }
   &:disabled {
     background-color: #ccc;
   }
 }
 .qv-add-to-cart-response {
   margin-top: 20px;
   display: none;
   font-family: 'proxima-nova-semibold';
   &.success, &.error {
     display: block;
     padding: 8px;
     border: 1px solid;
   }
   &.success {
     border-color: #008000;
     color: #008000;
     a {
       color: #000;
       text-decoration: underline;
     }
   }
   &.error {
     border-color: #ff0000;
     color:#ff0000;
   }
 }
 .qv-product-description {
   padding: 20px 0 30px;
 }
 .view-product {
   display: inline-block;
   text-transform: uppercase;
   letter-spacing: .05em;
   font-family: 'proxima-nova-semibold';
   span {
     color: #5a5a5a;
     border-bottom: 2px solid #5a5a5a;
   }
   &:hover {
     span {
       color: #ff0000;
       border-bottom: 2px solid #ff0000;
     }
   }
 }
 @media (max-width: 1200px){
   .qv-product-images, .qv-content {
     width: 50%;
   }
   .qv-content {
     padding-left: 60px;
   }
   .slick-slide {
     padding: 0;
   }
 }
 @media (max-width: 900px){
   display: block;
   height: calc(100% - 40px);
   -webkit-transform: translateY(20px);
   transform: translateY(20px);
   .qv-product-images {
     top: 0;
     left: 0;
     height: 50%;
     max-height: 350px;
     position: relative;
     width: 100%;
   }
   .slick-slide {
     position: relative;
     img {
       max-height: 300px;
       margin: 0 auto;
       position: relative;
       top: auto;
       left: auto;
       -webkit-transform: none;
       transform: none;
       height: 100%;
       width: auto;
     }
   }
   .slick-dots {
     bottom: 0;
   }
   .qv-content {
     width: 100%;
     height: auto;
     padding: 0 10px 10px 30px;
     overflow: auto;
     -webkit-transform: none;
     transform: none;
   }
   .slick-initialized .slick-slide {
     display: block;
     text-align: center;
   }
   .slick-slide img {
     width: auto;
     display: inline-block;
     max-width: 300px;
   }
 }
}
Tap on Save to finish.
Using Liquid
-
In the ` Snippets
field, tap onAdd a new snippet. A dialog will appear. Then, name the filequickview. ClickCreate snippet`. -
Copy the following code and paste it in the file you’ve created.
<div class="qv-product-images" style="opacity: 0"></div>
<div class="qv-content">
 <div class="holder">
   <h3 class="qv-product-title"></h3>
   <h4 class="qv-product-type"></h4>
   <h5 class="qv-product-price"></h5>
   <h5 class="qv-product-original-price"></h5>
   <hr />
   <div class="qv-add-to-cart">
     <div class="qv-product-options"></div>
     <div class="quantity">
       <span>Quantity</span>
       <input type="number" class="qv-quantity" value="1" min="1">
     </div>
     <input type="submit" class="qv-add-button" value="Add to Cart">
     <div class="qv-add-to-cart-response"></div>
   </div>
   <div class="qv-product-description"></div>
 </div>
 <a class="view-product" href=""><span>View Full Product Details</span></a>
</div>
- Tap on
Saveto finish.
Edit theme.liquid file
From the Layouts directory, open your theme.liquid file and paste the following code right before the closing tag.
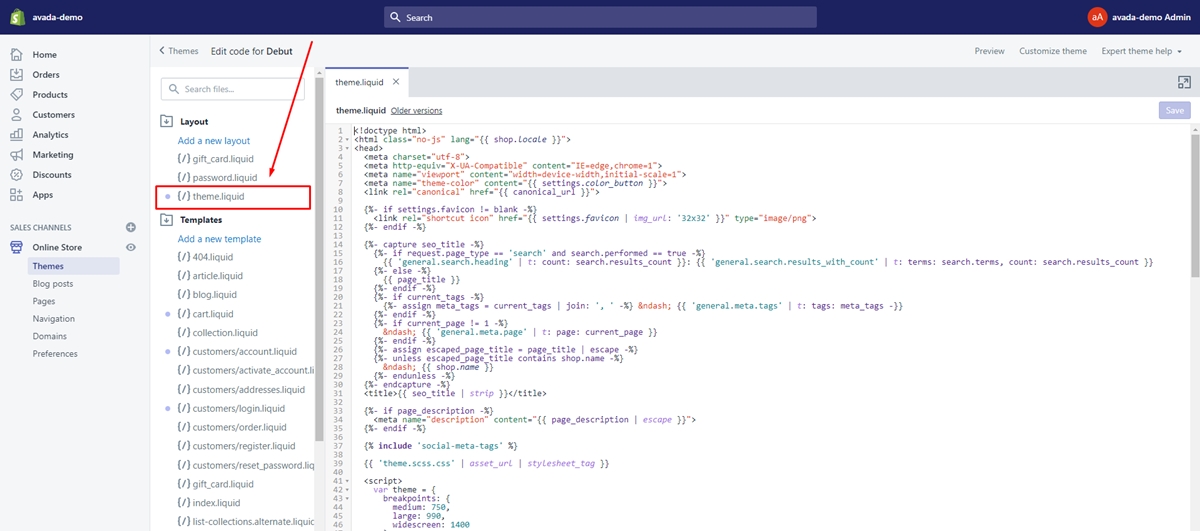
{{ '//cdnjs.cloudflare.com/ajax/libs/fancybox/2.1.5/jquery.fancybox.min.css' | stylesheet_tag }}
{{ '//cdn.jsdelivr.net/npm/[email protected]/slick/slick.css' | stylesheet_tag }}
{{ 'quickview.scss.css' | asset_url | stylesheet_tag }}
{{ '//cdn.jsdelivr.net/npm/[email protected]/slick/slick.min.js' | script_tag }}
{{ 'quickview.js' | asset_url | script_tag }}
<script>
 {% capture content %}{% include 'quickview' %}{% endcapture %}
 var content = {{ content | json }};
</script>
Add “Quick view” button
In this section, you can add Quickview button by adding the following code into product loop.
<div class="quick-view-button"><a class="quick-view" data-handle="{{ product.handle }}" href="javascript:void(0);">Quick View</a></div>
You should depend on the theme you are using to adjust accordingly. If it’s difficult, you can move to the next section to find a powerful supporter which is a suitable app.
Add “Quick view” feature with apps
Technology and technology business trends are growing. As a shop owner, you will definitely need a lot of work to make sure your e-commerce store runs smoothly and grows better. Therefore, these applications will be a great tool to help you feel more relieved. With the Quickview feature - one of the important and beneficial features mentioned above, try to experience a great application. It will help you to be able to add this feature to your store effortlessly and effectively.
Let visit our post: 7 Best Quick view Apps for Shopify with key widgets and reasonable prices (including free ones) , you will definitely be able to make a great choice and feel satisfied.
Final words
In conclusion, we found Quickview to be a necessary feature and could be considered indispensable in the future of a growing e-commerce business. Therefore, this article has included effective ways including using code and using the application so you can add a Quickview To Shopify Store. Hopefully, you can take advantage of this awesome feature in the best way.


