
How to insert a checkbox to your cart page in sectioned themes in Shopify
Drive 20-40% of your revenue with Avada
As an e-commerce business runner, you must have heard about the I agree with the terms and conditions checkbox so what is that type of box exactly?
Legal agreements such as Privacy Policy agreement, Terms & Conditions agreement, and End-User License Agreement (EULA) are considered very essential for every website, mobile app, or even desktop app. They are important because they can define the terms, policies, and various acceptable uses of your app or website. Nonetheless, these agreements cannot be put into practice until people agree with the available terms and conditions. That is to say, they could be futile unless you do get your customers to agree to be bound by the terms legally. That is the reason why clickwrap was created. In details, it is a method that asks your users to agree with your terms or legal conditions by taking some form of action such as clicking the “I agree” checkbox.
However, please keep reading our instructional writing on How to insert a checkbox to your cart page in sectioned themes to know more deeply about this topic.
How to insert a checkbox to your cart page in sectioned themes
Insert a checkbox to your cart page in sectioned themes
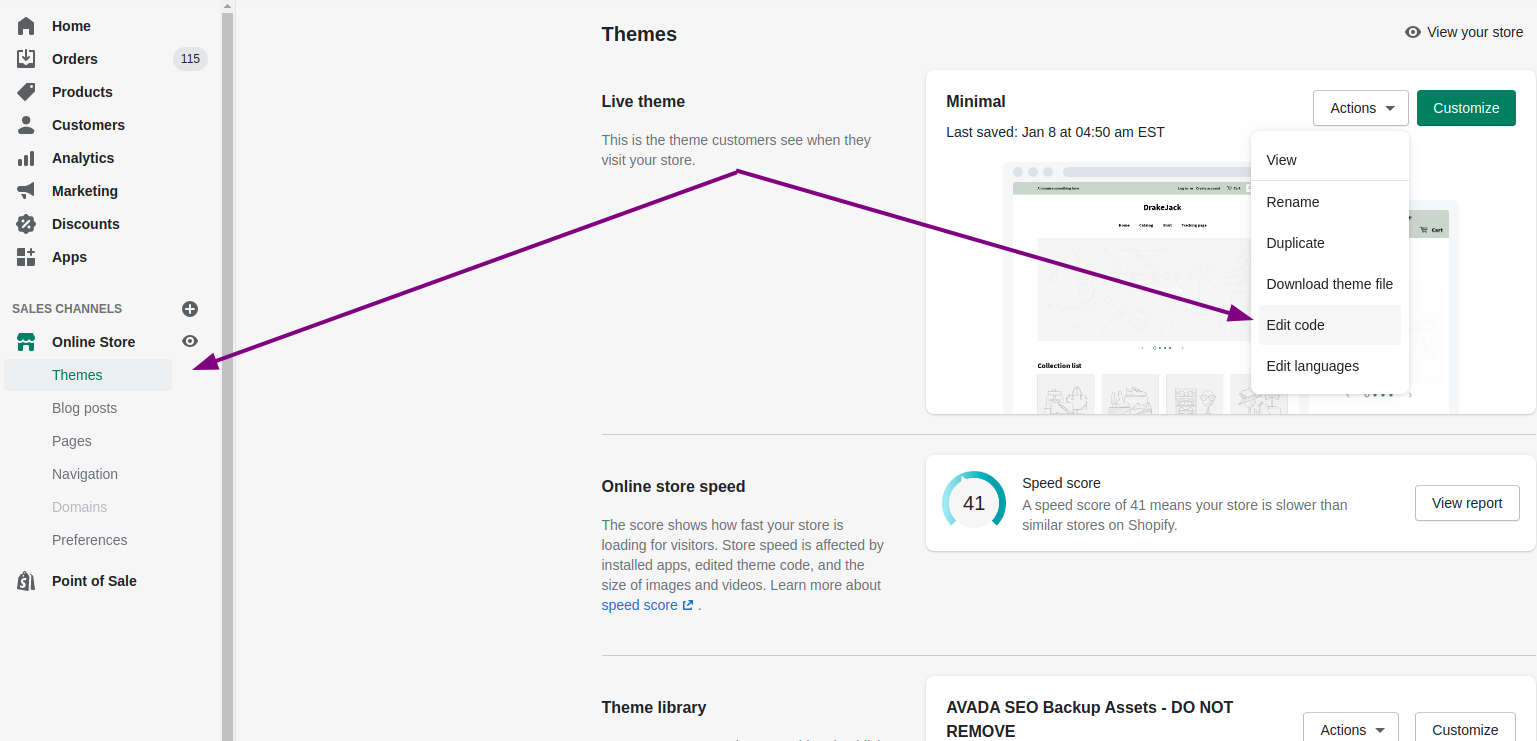
Step 1:
Go to Online Store > Themes from your Shopify admin panel. Or search for the theme that you want yo adjust and go to Actions > Edit code.
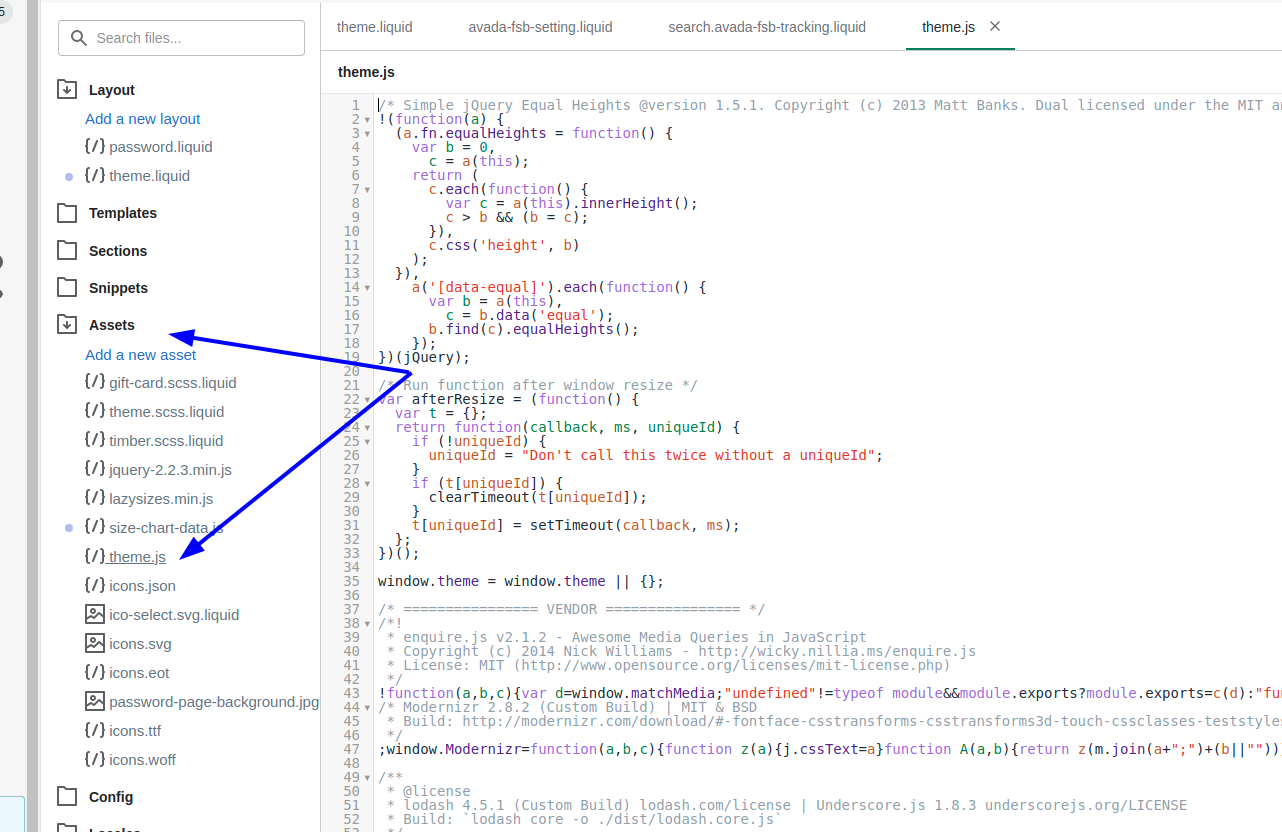
Step 2:
Click theme.js or theme.js.liquid in the Assets.
Step 3: Please paste the code given below at the bottom of the file:
  $(document).ready(function() {
    $('body').on('click', '[name="checkout"], [name="goto_pp"], [name="goto_gc"]', function() {
      if ($('#agree').is(':checked')) {
        $(this).submit();
      }
      else {
        alert("You must agree with the terms and conditions of sales to check out.");
        return false;
      }
    });
  });
Step 4:
Choose Save.
Step 5:
Tap cart-template.liquid in the Sections directory. In case there is no cart-template.liquid file available in the Sections directory, click cart-template.liquid or carrt.liquid in the Templates directory.
Step 6:
Search for the HTML code for your checkout button. Search for a <button> or an <input> element with the name attribute set to checkout. The code could look just like this:
<button type="submit" name="checkout" class="btn">{{ 'cart.general.checkout' | t }}</button>
And paste the code given below on a new line that is above the checkout button:
<p style="float: none; text-align: right; clear: both; margin: 10px 0;">
  <input style="float:none; vertical-align: middle;" type="checkbox" id="agree" />
  <label style="display:inline; float:none" for="agree">
    I agree with the <a href="/pages/terms-and-conditions">terms and conditions</a>.
  </label>
</p>
Step 7:
Replace /pages/terms-and-conditions with your terms and conditions page’ URL within the code you have just pasted.
- Step 8: Tap Save.
Boundless
Under the circumstance that you use Boundless, you may also need to insert the checkbox code into your theme.liquid file in the Layout directory.
Step 1:
In your theme.liquid file, search for this line of code:
<button type="submit" class="btn btn--full cart__checkout" name="checkout">
Step 2:
Paste the code given below on a new line before the above line of code:
<p style="float: none; text-align: right; clear: both; margin: 10px 0;">
  <input style="float:none; vertical-align: middle;" type="checkbox" id="agree" />
  <label style="display:inline; float:none" for="agree">
    I agree with the <a href="/pages/terms-and-conditions">terms and conditions</a>.
  </label>
</p>
Step 3:
Replace /pages/terms-and-conditions with your terms and conditions page’ URL within the code you have just pasted.
Step 4:
Tap Save.
Brooklyn
Step 1:
Search for the line of code given below in your ajax-cart-template.liquid file:
<button type="submit" class="btn--secondary btn--full cart__checkout" name="checkout">
Step 2:
Please paste the code given below on a new line before the above line of code:
<p style="float: none; text-align: right; clear: both; margin: 10px 0;">
  <input style="float:none; vertical-align: middle;" type="checkbox" id="agree" />
  <label style="display:inline; float:none" for="agree">
    I agree with the <a href="/pages/terms-and-conditions">terms and conditions</a>.
  </label>
</p>
Step 3:
Replace /pages/terms-and-conditions with your terms and conditions page’ URL within the code you have just pasted.
-
Step 4:Tap Save. The aim of the next step for Brooklyn is to comment out a line of code in your theme’s JavaScript file.
-
Step 5: Click
theme.js.liquidin the Assets directory. Search for this line of code:
theme.checkoutIndicator();
And replace it with:
// theme.checkoutIndicator();
Step 6:
Tap Save.
Conclusion
Giving your customers permission to confirm their consent to your business’ terms & conditions would be a good way to please your users. Let’s check it out!


