
How to include swatch.liquid in product.liquid in Shopify
Drive 20-40% of your revenue with Avada
We have looked at so many concepts that relate to the way Liquid work in Shopify themes. In this detailed instruction, we would like to go more into details about a specific template, which is called product.liquid.
There is a fact that customers tend to prefer colorful (or multi-colored) buttons displayed on the product pages. As an online store administrator, you are able to receive a swatch treatment, that is to say, your drop-down menu of color will be completely deleted from the product page. Then, as a result, many colorful buttons will replace the old menu. On top of that, you can get a button treatment, which means that a series of labeled gray buttons will be shown instead of your option drop-down, which will be removed from the page. To get started, let’s begin with including swatch.liquid in product.liquid!
However, please keep reading our instructional writing on How to include swatch.liquid in product.liquid to know more deeply about this topic.
How to include swatch.liquid in product.liquid
- About the product.liquid template
- How to find the product.liquid file
- How to include swatch.liquid in product.liquid
About the product.liquid template
In case you are a newbie to Shopify themes, to get started, we would like to get you through some information about product.liquid template.
product.liquid is the template that whenever a customer (or visitor) views a product detail page, it will be rendered by default. For instance, we are going to use the product.liquid template from the starter theme called “Motor Accessories”. It should look like this in the entirety:
<h2>{{ product.title }}</h2>
{{ product.description }}
<form action="/cart/add" method="post" enctype="multipart/form-data">
<select name="id">
{% for variant in product.variants %}
{% if variant.available == true %}
<option value="{{variant.id}}"> {{ variant.title }} for {{ variant.price | money_with_currency }}</option>
{% else %}
<option disabled="disabled"> {{ variant.title }} - sold out!</option>
{% endif %}
{% endfor %}
</select>
<input type="submit" name="add" id="add" value="Add to Cart" class="button">
</form>
There would be very little HTML in the template as you can see in the example above. The fact is that this is completely not a coincidence because it’s intended as a starting block for your theme. Under the circumstance that you install a theme from a Shopify theme store, you may see that the product.liquid template will be more involved but it might not include as much Liquid code as expected.
Let’s check what is really going in details. We are using Liquid output to get the description and title of the product displayed.
<h2>{{ product.title }}</h2>
{{ product.description }}
How to find the product.liquid file
Please follow these steps mentioned below to look for the product.liquid file:
Step 1:
Open your Shopify Admin panel.
Step 2:
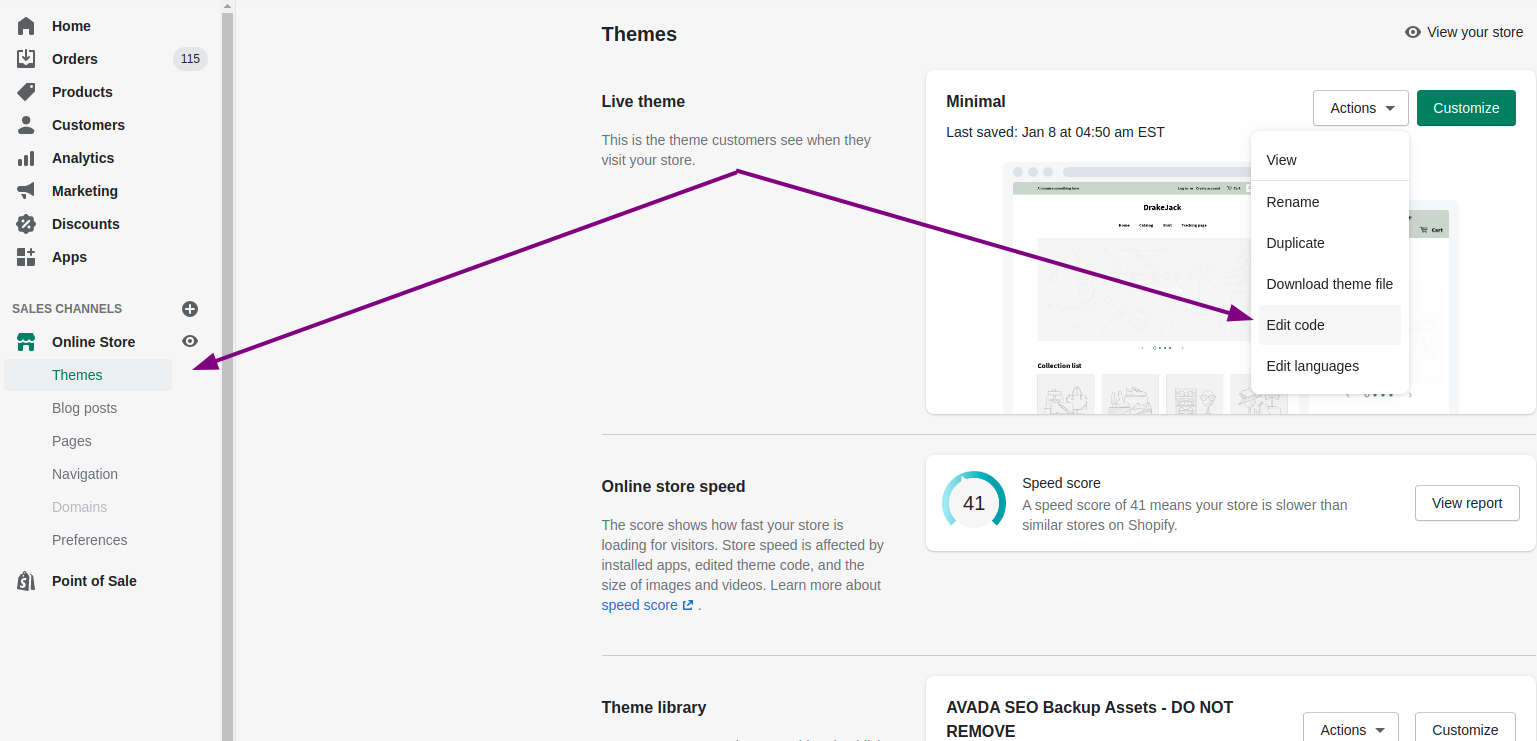
Click on Online Store in the Sales channels section.
Step 3:
In the left-hand menu, tap Themes.
Step 4:
Tap Actions on the established theme to open the settings drop-down menu.
Step 5:
Tap the Edit code button.
Step 6:
Open the Templates folder
Step 7:
Tap product.liquid
How to include swatch.liquid in product.liquid
Step 1:
Locate and tap product.liquid on the Edit CSS/HTML page, right under the heading called Templates on the left side, to get your product template opened in the online code editor
Step 2:
Include your swatch.liquid snippet in the place that you want to add a swatch. Include it with the product option’s theme that you are in need to convert into a swatch. For instance, if your item does have a Color option, use the code given below:
{% if product.available and product.variants.size > 1 %}
 {% include 'swatch' with 'Color' %}
{% endif %}
In case you want to apply the button treatment to a Size option, let’s use the code below:
{% if product.available and product.variants.size > 1 %}
 {% include 'swatch' with 'Size' %}
{% endif %}
In case you want to use the swatch treatment or the button on all your options of product, let’s use the code below:
{% if product.available and product.variants.size > 1 %}
  {% for option in product.options %}
    {% include 'swatch' with option %}
  {% endfor %}
{% endif %}
Conclusion
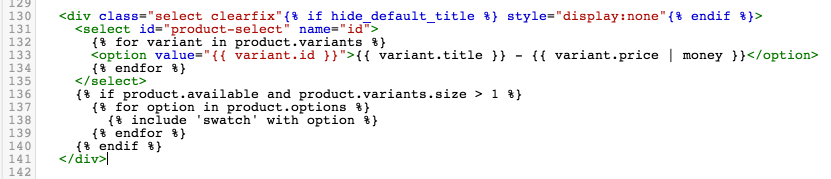
Please kindly notice that the swatch treatment will be applied to any product option that contains the word color or colour in an automatic way with this last snippet meanwhile the button treatment will be used on all other options. Just in case you are not certain which code snippet you should use, then please use the last one. In case you are uncertain the place to locate your snippet, please look for a select element with name ‘id’ and insert your snippet below that it like this:
If you still have any questions, please leave it in the comment box!


